manuals.online logo
Brands
  1. Home
  2. •
  3. Brands
  4. •
  5. Finelite
  6. •
  7. Lantern
  8. •
  9. Finelite HP-6 Recessed Flush Diffuser Tech Zone 6"... User manual

Finelite HP-6 Recessed Flush Diffuser Tech Zone 6"... User manual

Protected by one or more US Patents: 8915613; D702,391; D702,390; D700,732; D727,554 S; D727,550 S, D727,551 S
HP-6 Recessed Flush Diffuser 1" Tegular T-Bar
Starter/Independent Installation Instructions
© 2017 FINELITE, INC. ALL RIGHTS RESERVED. Form 98376 V2. 04/17
Note: All power connections to be installed to local/national codes
by a Certified Electrician. 1
Finelite, Inc. • 30500 Whipple Road • Union City, CA 94587-1530 • (510) 441-1100 • Fax: (510) 441-1510 • www.finelite.com
Step 1 Step 2
Remove diffuser and set aside to prevent it from getting dirty or dam-
aged. NOTE: If part of a longer run, diffuser will be reinstalled back
into original luminaire section as lengths vary.
Configure T-Bar to luminaire size and leave an opening for luminaire as noted above.
Make sure T-Bars are aligned at 90 degrees. Place luminaire on T-Bar.
0 - 10V
Dimming
Scan QR code for
helpful video(s)
Diffuser
Starter
Step 3
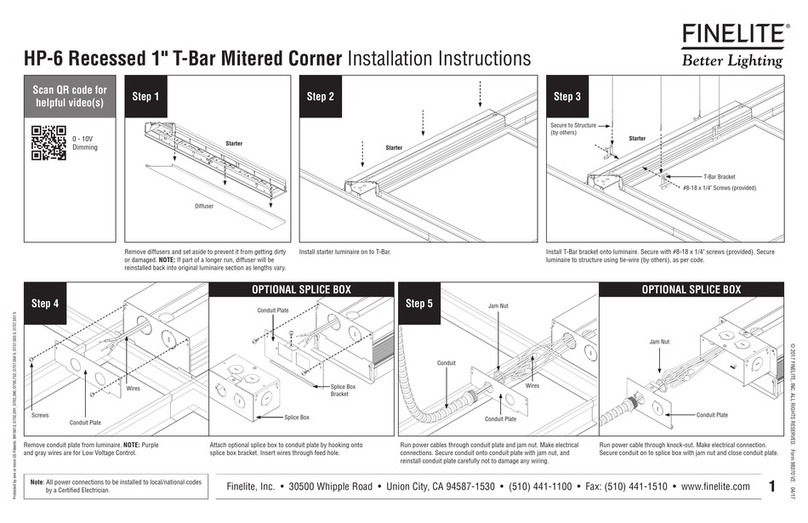
Install T-Bar bracket onto luminaire. Secure with #8-18 x 1/4" screws (provided).
Secure luminaire to structure using tie-wire (by others), as per code.
T-Bar Bracket
Secure to
Structure
(by others)
#8-18 x 1/4" Self Drilling
Screws (Provided)
Step 4
Remove conduit plate from luminaire. NOTE: Purple and gray wires
are for Low Voltage Control.
Attach optional splice box to conduit plate by hooking onto splice box
bracket. Insert wires through feed hole.
Splice Box
Conduit Plate
Splice Box
Bracket
Wires
Conduit Plate
Screws
Step 5
Run power cables through conduit plate and jam nut. Make electrical
connections. Secure conduit onto conduit plate with jam nut, and
reinstall conduit plate carefully not to damage any wiring.
Conduit
Conduit Plate
Jam Nut
Wires
Jam Nut
Conduit Plate
Run power cable through knock-out. Make electrical connection.
Secure conduit on to splice box with jam nut and close conduit plate.
OPTIONAL SPLICE BOX OPTIONAL SPLICE BOX
4"
6-3/8"
1" Tegular
Center-to-Center
T-Bar Spacing
Protected by one or more US Patents: 8915613; D702,391; D702,390; D700,732; D727,554 S; D727,550 S, D727,551 S
HP-6 Recessed Flush Diffuser 1" Tegular T-Bar
Starter/Independent Installation Instructions
© 2017 FINELITE, INC. ALL RIGHTS RESERVED. Form 98376 V2. 04/17
Note: All power connections to be installed to local/national codes
by a Certified Electrician. 2
Finelite, Inc. • 30500 Whipple Road • Union City, CA 94587-1530 • (510) 441-1100 • Fax: (510) 441-1510 • www.finelite.com
Step 6 Step 7
Secure luminaire to T-Bar with #6-20 x 1/2" self drilling sheet metal
screw (provided).
Reinstall diffuser and turn power on. NOTE: If part of a longer run, diffuser
will be reinstalled back into original luminaire section as lengths vary.
Diffuser
Conduit
Secure to Structure
(by others)
#6-20 x 1/2"
Self Drilling Screws
(provided)
Protected by one or more US Patents: 8915613; D702,391; D702,390; D700,732; D727,554 S; D727,550 S, D727,551 S
HP-6 Recessed Flush Diffuser 1" Tegular T-Bar
Joiner/Ender Installation Instructions
Note: All power connections to be installed to local/national codes
by a Certified Electrician. Finelite, Inc. • 30500 Whipple Road • Union City, CA 94587-1530 • (510) 441-1100 • Fax: (510) 441-1510 • www.finelite.com 1
© 2017 FINELITE, INC. ALL RIGHTS RESERVED. Form 98377 V2. 04/17
Step 1 Step 2
Step 3
Remove diffuser and set aside to prevent it from getting dirty or damaged. NOTE: If part of a longer run, diffuser will be reinstalled back
into original luminaire section as lengths vary.
Install T-Bar bracket onto luminaire. Secure with #8-18 x 1/4" screws (provided). Secure luminaire to structure using tie-wire (by others),
as per code.
Remove backplate clips to release the backplates. We recommend using a flat head screwdriver to remove them.
CAUTION: Do not lose these pieces.
0 - 10V
Dimming
Scan QR code for
helpful video(s)
Joiner/Ender
Install joiner/ender onto ceiling next to starter. Align the starter and joiner/ender luminaires and
slide them together.
Step 4
Backplate Clips
Joiner/Ender
Starter
Diffuser
Starter
Joiner/Ender
T-Bar Bracket
Joiner/Ender
Secure to
Structure
(by others)
Secure to Structure
(by others)
#8-18 x 1/4" Self Drilling
Screws (4) (Provided)
4"
6-3/8"
1" Tegular
Center-to-Center
T-Bar Spacing
Protected by one or more US Patents: 8915613; D702,391; D702,390; D700,732; D727,554 S; D727,550 S, D727,551 S
HP-6 Recessed Flush Diffuser 1" Tegular T-Bar
Joiner/Ender Installation Instructions
Note: All power connections to be installed to local/national codes
by a Certified Electrician. Finelite, Inc. • 30500 Whipple Road • Union City, CA 94587-1530 • (510) 441-1100 • Fax: (510) 441-1510 • www.finelite.com 2
© 2017 FINELITE, INC. ALL RIGHTS RESERVED. Form 98377 V2. 04/17
Step 7
Step 5
Starter
Plug-Together Wiring
Joiner/Ender
Step 6
Joint Sleeves
#10-32 x 5/8" Screws (2)
(provided) Yoke Brackets (2)
(provided)
IMPORTANT STEP
Pivot Point
Connect plug-together wiring connections.
Slowly swing down backplate. CAUTION: Do not twist the backplate when swinging down – it will come
out of the support extrusion. Note that the screws shown are the pivot points, and the backplate can be slid
a few inches either way for ease of access to the driver space.
IMPORTANT STEP: Secure joint with two yoke brackets (provided) using two #10-32 x 5/8" screws
(provided). When installed correctly these brackets will pull luminaires together to make a tight joint.
CAUTION: Do not over-tighten.
Step 8
Secure luminaire to T-Bar with #6-20 x 1/2" self drilling sheet metal screw (provided).
T-Bar Bracket
#6-20 x 1/2" Self Drilling
Screws (provided)
Secure to Structure
(by others)
Step 9
Replace backplates by holding them in their original position and pushing the clips back in. Make sure wire connections are
not pinched. (If a 1ft. backplate assembly is near joint, reconnect feed harness to LED board.) Replace diffuser and turn power
on to luminaire. NOTE: If part of a longer run, diffuser will be reinstalled back into original luminaire section as lengths vary.
Starter
Joiner
Joiner/Ender
Backplate Clips
Diffusers

Other manuals for HP-6 Recessed Flush Diffuser Tech Zone 6"...

4

Other Finelite Lantern manuals

Finelite HP-2 User manual

Finelite

Finelite HP-2 User manual
Finelite HP-6 Recessed Flush Diffuser Tech Zone 6"... User manual
Finelite

Finelite HP-6 Recessed Flush Diffuser Tech Zone 6"... User manual

Finelite HP-2 User manual

Finelite

Finelite HP-2 User manual

Finelite E2-ID Installation instructions

Finelite

Finelite E2-ID Installation instructions

Finelite HP-6 Recessed Flush Diffuser Tech Zone 6"... User manual

Finelite

Finelite HP-6 Recessed Flush Diffuser Tech Zone 6"... User manual

Finelite HP-6 Recessed Flush Diffuser Tech Zone 6"... User manual

Finelite

Finelite HP-6 Recessed Flush Diffuser Tech Zone 6"... User manual

Finelite HP-4 Recessed User manual

Finelite

Finelite HP-4 Recessed User manual

Finelite HP-2 User manual

Finelite

Finelite HP-2 User manual

Finelite 10WM series User manual

Finelite

Finelite 10WM series User manual
Finelite HP-2 User manual

Finelite

Finelite HP-2 User manual
Popular Lantern manuals by other brands

Cree CPY Series installation instructions

Cree

Cree CPY Series installation instructions

Gama Sonic DL-713LS instruction manual

Gama Sonic

Gama Sonic DL-713LS instruction manual

esotec Stone 40 Using instructions

esotec

esotec Stone 40 Using instructions

Sunny SN Series user manual

Sunny

Sunny SN Series user manual

Winner 499902718 quick start guide

Winner

Winner 499902718 quick start guide

Lenmar SOLV17 owner's manual

Lenmar

Lenmar SOLV17 owner's manual

One Stop Gardens 92793 Assembly & operating instructions

One Stop Gardens

One Stop Gardens 92793 Assembly & operating instructions

Perel EDL4 user manual

Perel

Perel EDL4 user manual

Anslut 422-351 operating instructions

Anslut

Anslut 422-351 operating instructions

LUCCI MFL by Masson 240802 installation instructions

LUCCI

LUCCI MFL by Masson 240802 installation instructions

superbrightleds HPLA2 Series user manual

superbrightleds

superbrightleds HPLA2 Series user manual

Fiberli CG5 installation guide

Fiberli

Fiberli CG5 installation guide

Larson Electronics RUL-10 instruction manual

Larson Electronics

Larson Electronics RUL-10 instruction manual

Eaton CROUSE-HINDS EE 11 PL Series operating instructions

Eaton

Eaton CROUSE-HINDS EE 11 PL Series operating instructions

Acuity 247 Series installation instructions

Acuity

Acuity 247 Series installation instructions

ML Accessories RW5WW Installation & maintenance manual

ML Accessories

ML Accessories RW5WW Installation & maintenance manual

BEGA 24 210 Instructions for use

BEGA

BEGA 24 210 Instructions for use

Sealey LED3607G quick start guide

Sealey

Sealey LED3607G quick start guide

manuals.online logo
manuals.online logoBrands
  • About & Mission
  • Contact us
  • Privacy Policy
  • Terms and Conditions

Copyright 2025 Manuals.Online. All Rights Reserved.