2345
FEATURES . . . . . . . . . . . . .3
WHERETO LOCATE . . . . . . . . 3
INSTALLATION . . . . . . . . . . 4
WIRELESS INTERLINK
(WHT-630 ONLY). . . . . . . . . .4
Note:This user guide is also available in large text and other formats.
Please call 0800 141 2561 for further information.
CONTENTS
IMPORTANT: This user guide contains important information regarding the operation of
your FireAngel heat alarm.
Ensure you read this user guide fully before installing and operating this alarm. If you are
installing this heat alarm for use by others, you must leave this guide (or a copy of it) with
the end user.
IFTHERE IS ANY QUESTION AS TOTHE CAUSE OF THE ALARM, ALWAYS ASSUMETHAT
THIS IS AN ACTUAL FIRE AND FOLLOWYOUR FIRE EMERGENCY PLANS.
ALARMTEST . . . . . . . . . . . 6
MAINTENANCE . . . . . . . . . . 6
TROUBLESHOOTING . . . . . . . 6
DISPOSAL . . . . . . . . . . . . . 7
WARRANTY . . . . . . . . . . . . 7
IMPORTANT INFORMATION!
FEATURES
• Fixed point heat alarm, Class A1 with
alarm point temperature 56°C - 64°C.
• Thermistor heat sensing element for
accuracy, reliability and stability.
• Thermistek technology activates the
alarm sooner if it predicts a signicant
rate of rise in temperature.
• 10 year, sealed for life battery.
• Operating red LED ashes once,
approximately every 45 seconds.
• Fault indication - amber LED ashes to
indicate a low battery condition or alarm
fault. SeeTroubleshooting.
• CentralTest/Silence ( ) button.Tests
circuitry, battery and sounder.
• Loud 85 decibel piezo sounder.
• Automatically resets when alarm
condition has passed.
• Easy installation. Fixings supplied.
• Silencer. In the event of a known false
alarm your alarm can be temporarily
silenced by briey pressing the central
test button.Your alarm will automatically
return to full sensitivity within 10
minutes.
• WHT-630 includes Wi-Safe®2 technology,
allowing you to wirelessly interlink up
to 50 heat alarms, smoke alarms and
accessories , which contain Wi-Safe 2
technology.These may be either battery
or mains powered.
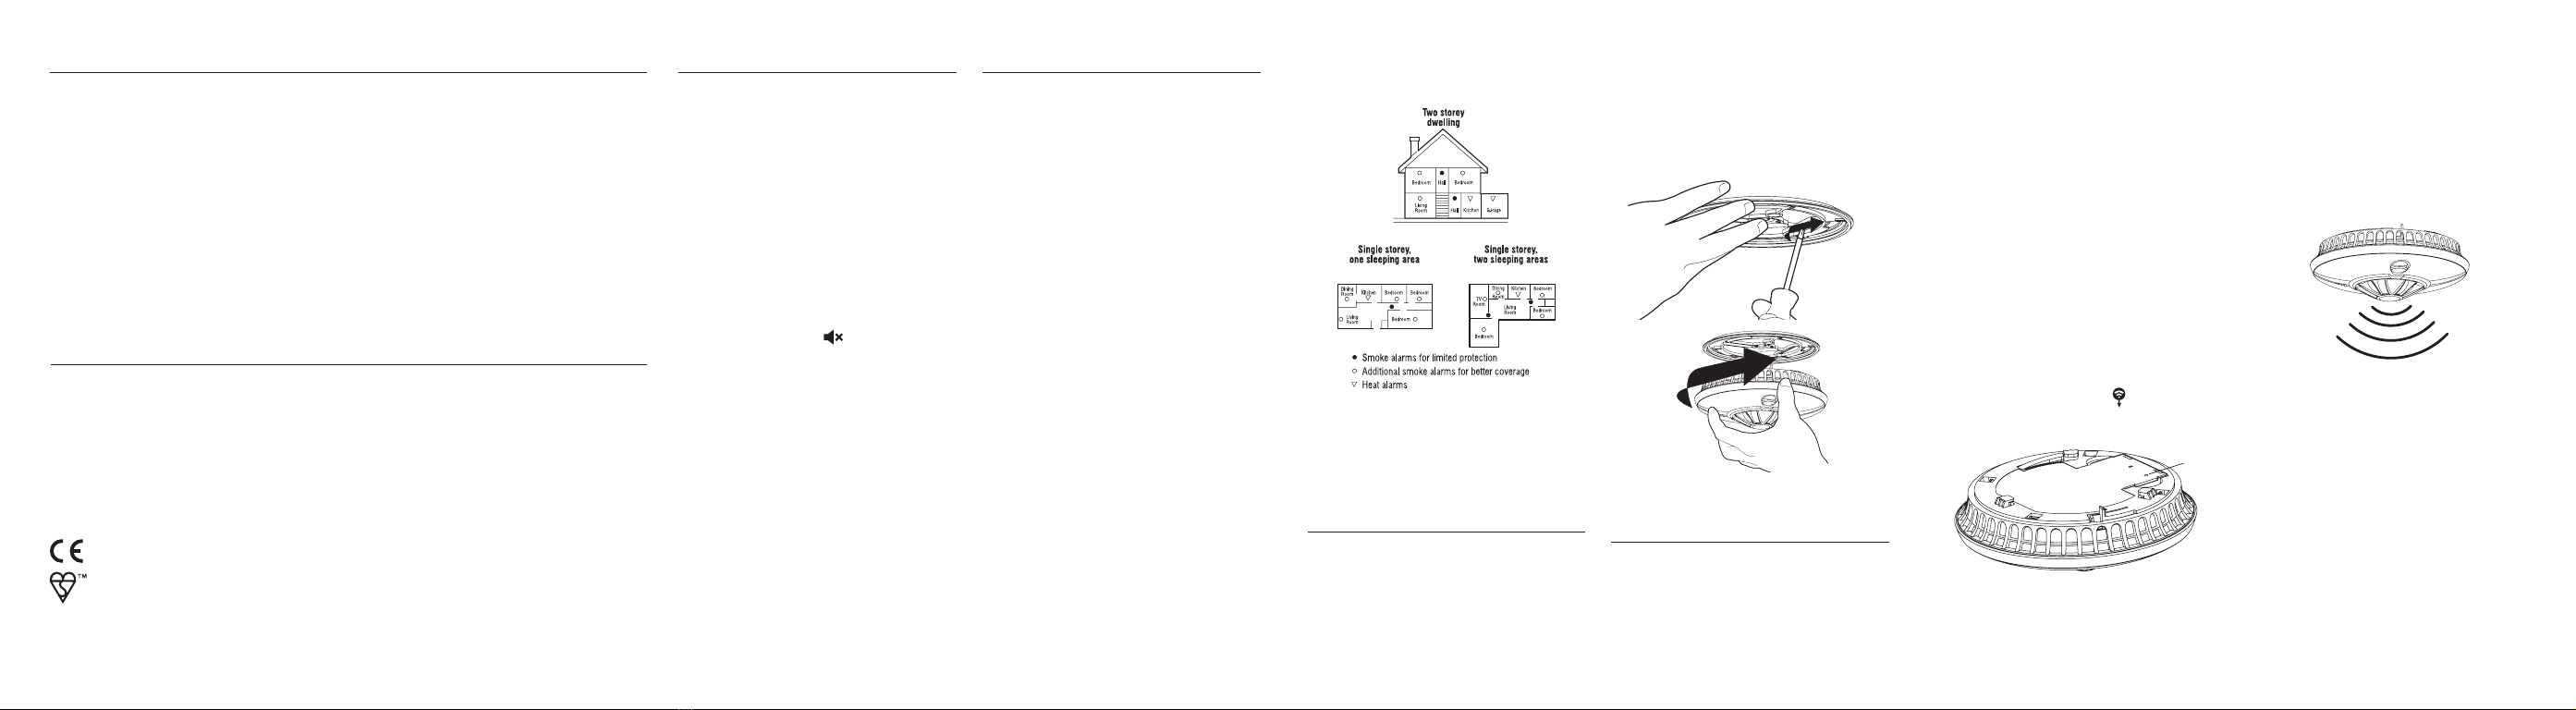
WHERE TO LOCATE
For the best protection heat alarms should
always be installed as part of a complete
re protection system that also includes
smoke alarms. Heat alarms are best suited
to areas where dust, fumes and moisture
can cause nuisance alarms in smoke
alarms, such as:
• Boiler rooms
• Kitchens
• Laundry rooms
• Lofts
• Garages
Heat alarms should not be installed in
escape routes instead of smoke alarms.
They should only be used in the above
applications and where possible be
interlinked to smoke alarms. (Smoke
alarms should be installed in circulation
areas forming part of the escape routes
and in every room in the house.)
When heat alarms are installed in a room,
they should be placed on the ceiling, ideally
in the centre of the room. They should be
at a distance no greater than 5.3m from the
farthest wall, no greater than 5.3m from a
door to any room in which a re might
start and no greater than 5.3m from the
next heat alarm.
NOTE: HEAT ALARMS SHOULD NOT BE
WALL MOUNTED.
Install sufcient alarms to compensate for
closed doors and obstacles, which may
interfere with the path of heat to an alarm
and may prevent occupants from hearing
an alarm.
IMPORTANT: These heat alarms are
intended primarily for use in single
occupancy private dwellings. For use
in other applications the manufacturers
advice should be sought.
INSTALLATION
IMPORTANT: Please read ‘WHERE TO
LOCATE’ before installing the alarm.
Fit the mounting plate to the ceiling using
the screws provided.
To t the alarm to the mounting plate
included in this pack, position the alarm
on the plate, then turn clockwise until the
alarm is locked into position. Make sure
that the alarm is twisted fully. The power
pack will now activate. The red LED on
the front of the alarm should ash once,
approximately every 45 seconds to show
that it is active.
WIRELESS INTERLINK
(WHT-630 only)
The WHT-630 heat alarm contains an
inbuilt RF module, which enables you
to wirelessly interlink up to 50 Wi-Safe 2
products to create a network.Therefore the
WHT-630 alarms need to be ‘learned-in’ or
interlinked in order to communicate with
each other , or other alarms with Wi-Safe
2 technology.
Once a network has been established, if
one alarm activates, all other interlinked
alarms will also sound. Please note that
WHT-630s can only be interlinked with
other WHT-630s and products within the
Wi-Safe 2 range.
The process below describes ‘learning-in’
two alarms into a network, ‘Alarm 1’ and
‘Alarm 2’:
1. Install ‘Alarm 1’ as described previously.
2. Install the mounting plate for ‘Alarm 2’
in one of the recommended locations.
Do not t the second alarm onto its
mounting plate yet.
3. On ‘Alarm 2’, using a ballpoint pen or a
paperclip opened out, briey push and
release the learn button , located in a
circular hole in the back of the alarm.
Circular hole
Learn-in button
4. The red LED next to the learn button
will ash briey then light up for
approximately ve seconds to show it’s
ready to receive the ‘learn-in’ signal.
During these ve seconds you will
need to briey press the test button on
‘Alarm 1’ to wirelessly interlink the two
alarms.
5. ‘Alarm 1’ will give an audible sound
consisting of 2 cycles of 3 loud beeps.
The red LED on the wireless module of
‘Alarm 2’ will ash to indicate that it has
been ‘learned-in’ successfully.
6. PLEASE NOTE: If the test button is
not pressed quickly enough (before
the red LED on ‘Alarm 2’ has gone
out), the ‘learn-in’ process will fail.
If this happens, repeat the process
again, as described above.
7. Fit ‘Alarm 2’ onto its mounting plate
to complete the installation.
Additional alarms should be ‘learned-
in’ in the same way. When ‘learning-in’
additional alarms, any alarm already in
the network can be used as ‘Alarm 1’.
This means that you can ‘learn-in’ the
additional alarm, into any alarm already
W2 module contained within the WHT-630 product
independently tested to RF standard
ETSI EN 300 220-2 V2.3.2 (2010-02)
by TRaC Global Ltd
BS5446-2:2003
KM607094