Fixi 02RBZ User manual

MANUALE DI ISTRUZIONI
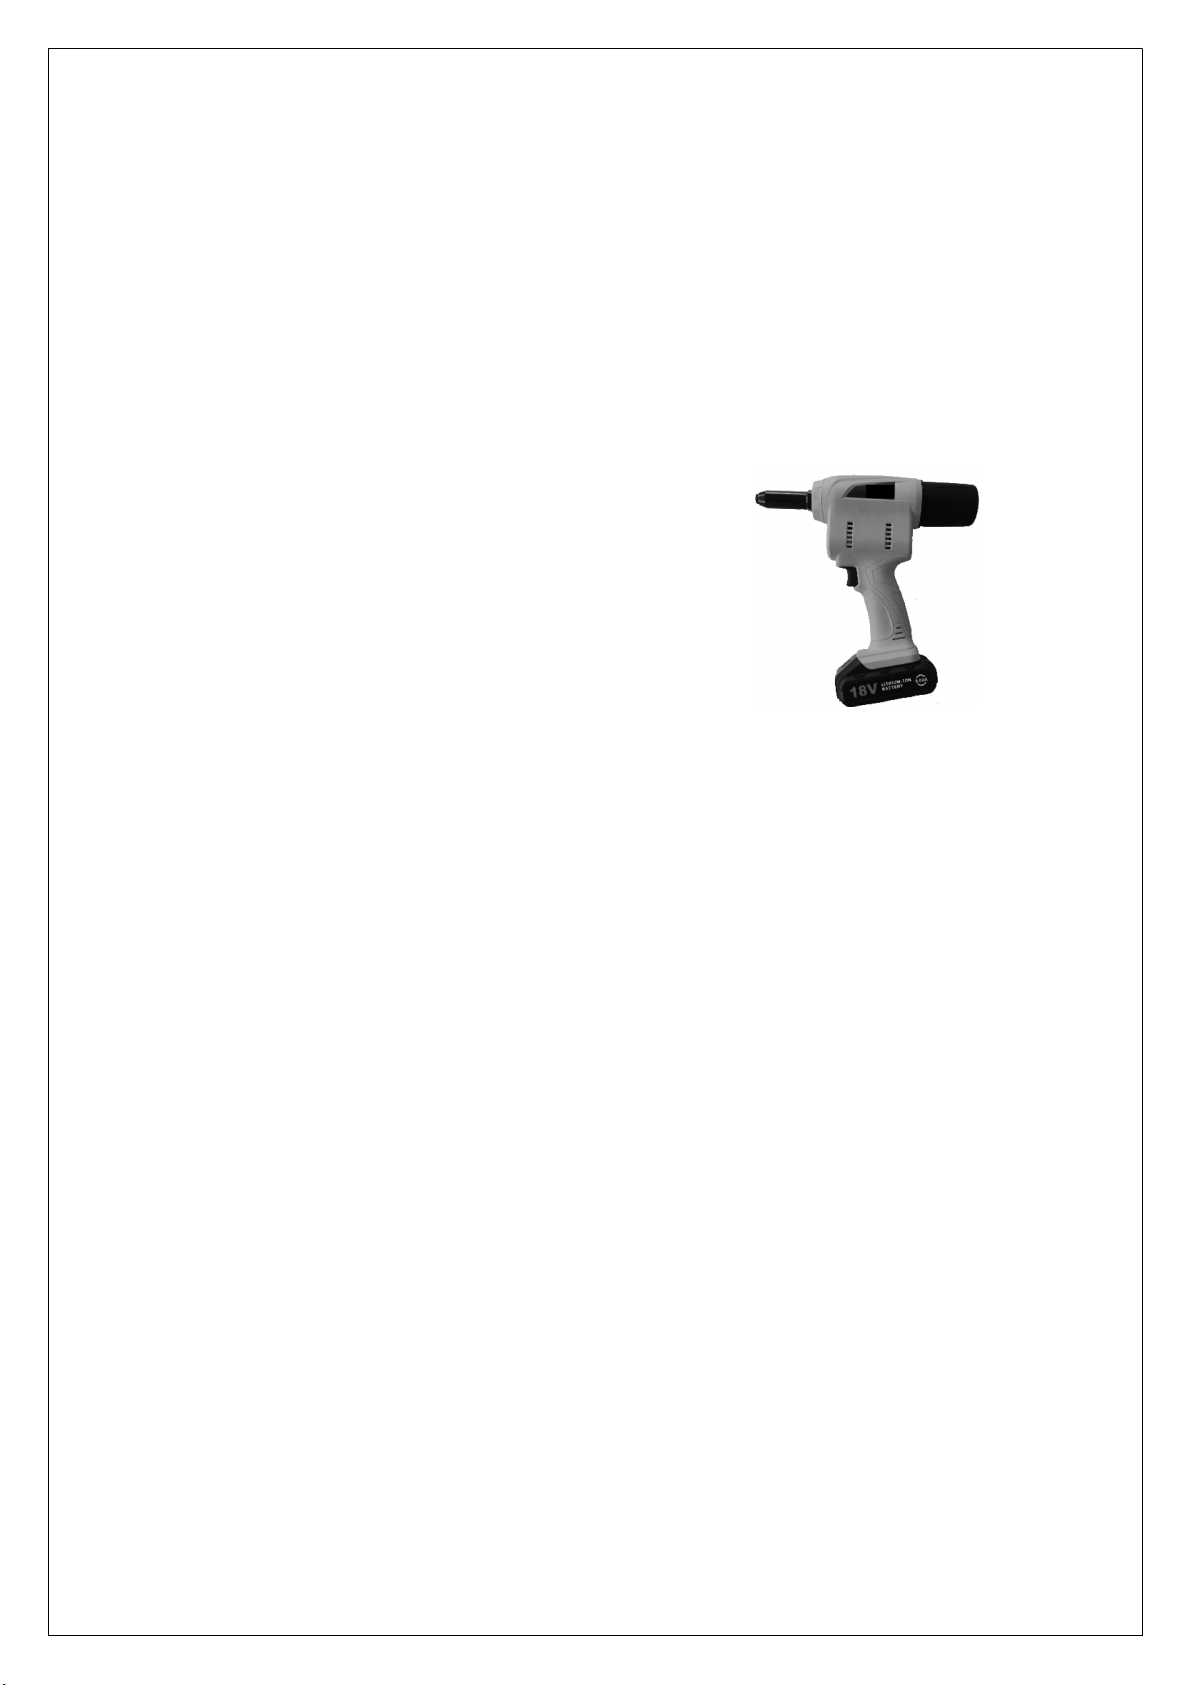
RIVETTATRICE
BATTERY POWERED RIVETER
PAG 3-9 ITALIANO
Leggere attentamente tutte le
Conservare questo manuale per future consultazioni
Read All Safety Rules and Instructions Carefully
Keep this manual for Future Reference
SEDE CENTRALE /
MANUALE DI ISTRUZIONI
USER MANUAL
RIVETTATRICE
A BATTERIA
BATTERY POWERED RIVETER
PAG. 1
Leggere attentamente tutte le
n
orme di sicurezza e le istruzioni
Conservare questo manuale per future consultazioni
.
Read All Safety Rules and Instructions Carefully
Keep this manual for Future Reference
SEDE CENTRALE /
HEADQUARTER:
Via Bellardi,
40/A
10146 Torino -
(Italy)
Tel. +39 011 70.72.398
Fax +39 011
70.72.521
www.fixi.it - [email protected]
02RBZ
PAG. 1
0-17 ENGLISH
orme di sicurezza e le istruzioni

2
Via Bellardi, 40/A - 10146 TORINO (ITALY)
Tel. +39 011.7072398 - Tel. +39 011.7070877
Fax +39 011.7072521
E-mail: [email protected]
Via Valgioie, 94 - 10146 TORINO (ITALY)
Tel. +39 011.0882009
Fax +39 011.0882012
E-mail: [email protected]
Via Delle Gallarane, 10/12 - 22046 MERONE (COMO) (ITALY)
Tel. +39 031.3333486
Fax +39 031.3339064
E-mail: [email protected]
Via Keplero, n. 4 G/H - Z.I. di TOGNANA - 35028 Piove di Sacco (PD) (ITALY)
Tel. +39 049.8079285
Fax +39 049.8087725
E-mail: [email protected]
Via Secci, n. 4 - 40132 BOLOGNA (ITALY)
Tel. +39 051.0353243
Fax +39 051.0353244
E-mail: [email protected]
Via Roma, n. 10 – 63078 Fr. Pagliare del Tronto Spinetoli (AP) (ITALY)
Tel. +39 0736.814110
Fax +39 0736.984002
E-mail: [email protected]
Via Arno, n. 50 - 63082 Castel di Lama (AP) (ITALY)
Tel. +39 0736.812922
Fax +39 0736.812922
E-mail: info@fixicentrosud.it

3
MISURE DI SICUREZZA
Si raccomanda di leggere attentamente le seguenti direttive di sicurezza prima di
utilizzare la rivettatrice o di eseguire operazioni di manutenzione.
-
Mai smontare la rivettatrice senza prima aver studiato attentamente e messo in atto
le istruzioni contenute in questo manuale.
-
Usare sempre la rivettatrice rispettando le norme di sicurezza contenute in questo
manuale. Rivolgere qualsiasi domanda riguardante l’utilizzo ottimale e sicuro della
rivettatrice alla nostra azienda (e-mail: [email protected], tel: +39 011.7072398)
-
Le istruzioni di sicurezza devono essere seguite da tutte le persone coinvolte
nell’utilizzo della rivettatrice.
-
La rivettatrice deve essere utilizzata solo per tirare rivetti a strappo.
-
La rivettatrice deve essere mantenuta in buono stato d’uso. Per controllarne il
corretto funzionamento, deve essere revisionata ad intervalli regolari
esclusivamente da personale specializzato. Non smontare la rivettatrice senza
previa lettura di questo manuale.
-
Non indirizzare la rivettatrice verso se stessi o altre persone.
Sicurezza del posto di lavoro
a) Conservare lo spazio di lavoro in condizioni di pulizia e illuminazione ottimali.
b) Non utilizzare questa rivettatrice in un ambiente a rischio di esplosioni e/o che
contenga liquidi, gas o polveri infiammabili.
c) Tenere lontani i bambini e altre persone mentre si usa questa rivettatrice.
Sicurezza della batteria
Non esporre a pioggia o umidità le rivettatrici a batteria. Eventuali infiltrazioni d’acqua
comporterebbero il rischio di scosse elettriche per l’operatore.
Sicurezza delle persone
a) Non usare questa rivettatrice se si è particolarmente stanchi o sotto l’effetto di alcool,
droghe o farmaci. Una momentanea disattenzione durante l'utilizzo può causare
lesioni gravi.
b) Indossare sempre indumenti e occhiali protettivi. Non indossare abiti ampi o gioielli.
Evitare di avvicinare capelli, vestiti e guanti alle parti mobili della rivettatrice.
c) Rimuovere gli strumenti di regolazione e i cacciaviti prima di accendere la rivettatrice
a batteria. Uno strumento o un cacciavite inserito in una parte rotante della
rivetttatrice può causare lesioni.
d) Assumere una posizione stabile e in equilibrio durante l’utilizzo della rivettatrice. In
questo modo è possibile controllarla meglio.
e) Accertarsi, prima dell’utilizzo della rivettatrice, che il dispositivo di raccolta dei
mandrini sia collegato e utilizzato correttamente.
Funzionamento e movimentazione
-
Non sovraccaricare la rivettatrice. Usare la rivettatrice solo per gli scopi indicati in

4
questo manuale, solo a queste condizioni si può lavorare in maniera ottimale e in
sicurezza.
-
Se l’interruttore di accensione risultasse difettoso non utilizzare la rivettatrice. Una
rivettatrice che non può essere accesa e/o spenta è pericolosa e deve essere
riparata.
-
Rimuovere sempre la batteria nei seguenti casi: prima di regolare la rivettatrice; prima
di sostituire dei pezzi; per trasportare la rivettatrice. Questa precauzione di sicurezza
ne impedisce l'avvio involontario.
-
Conservare le rivettatrici fuori dalla portata dei bambini.
-
Prestare attenzione alla manutenzione delle rivettatrici.
Controllare se le parti mobili funzionano perfettamente e non si inceppano. Verificare
la presenza di parti rotte o danneggiate che potrebbero influenzare il funzionamento
della rivettatrice. Riparare le parti danneggiate prima di utilizzare la rivettatrice. Molti
incidenti con le rivettatrici derivano da una scorretta manutenzione.
Uso e gestione degli strumenti a batteria
-
Utilizzare solo batterie originali e ricaricarle solo con dispositivi approvati dal
produttore per evitare rischi di incendio e lesioni.
-
Quando la batteria non viene utilizzata, tenerla lontana da graffette, monete, chiavi,
chiodi, viti e altri piccoli oggetti metallici che potrebbero causare un cortocircuito, e
quindi ustioni o incendi.
-
Nel caso di fuoriuscita di liquidi dalla batteria evitare il contatto. In caso di contatto
accidentale sciacquare la zona con acqua. Se il liquido della batteria viene a contatto
con gli occhi, chiamare un medico. Il liquido delle batterie può causare ustioni e
irritazione della pelle.
Manutenzione
Solo il personale qualificato è autorizzato a effettuare operazioni di manutenzione sulla
rivettatrice a batteria. Utilizzare solo ricambi originali.
Consigli di sicurezza per macchine rivettatrici a batteria
-
Tenere con entrambe le mani saldamente la rivettatrice a batteria durante il
lavoro e mantenere una posizione stabile.
-
Se la rivettatrice si inceppa spegnerla e togliere subito la batteria.
-
Fissare il pezzo che deve essere rivettato. Il pezzo può essere tenuto in maniera
più salda utilizzando un dispositivo di bloccaggio o una morsa da banco.
-
Assicurarsi che l'interruttore sia in posizione "Off" prima di inserire una batteria.
Tenere le dita lontano dall'interruttore di alimentazione durante il trasporto.
Inserire la batteria quando la rivettatrice è accesa potrebbe causare incidenti.
-
Non aprire la batteria, per evitare il rischio di cortocircuito. Tenere la batteria
lontana da fonti di calore (ad es. radiazione solare permanente) e dal fuoco per
evitare esplosioni.
-
Se la batteria è danneggiata o utilizzata in modo inappropriato, potrebbero
fuoriuscire dei vapori. In questo caso prendere aria e chiedere l’intervento di un
medico in caso di disturbi. I vapori possono irritare le vie respiratorie.
5
-
Se la batteria è difettosa, potrebbe fuoriuscire del liquido e ricoprire gli oggetti
adiacenti. Controllare le parti interessate, pulirle o sostituirle, se necessario.
-
Utilizzare la batteria adatta al modello di rivettatrice indicato nel manuale, per
prevenirne un pericoloso sovraccarico.
ATTENZIONE: le operazioni di manutenzione e riparazione devono essere svolte
esclusivamente da personale specializzato.
CARATTERISTICHE DELLA RIVETTATRICE A BATTERIA
La rivettatrice può lavorare con rivetti a strappo di tutti i materiali con diametro compreso fra
2,4-5 mm.
Peso: 1,5 Kg (senza batteria)
-
Corsa: 22 mm.
-
Motore a 18V DC
-
Forza di installazione: 10.000 N
-
Conforme al regolamento UE n. 2006/42/EG
Caratteristiche della batteria
-
Tensione nominale: 18.0 V
-
Capacità: Li-Ion 2,0 Ah (4 celle)
-
Peso: 2.0 Ah: 0,38 Kg
Dati su rumorosità e vibrazioni
-
Emissione di rumore: LPA = 78,8 dB
-
Incertezza: K = 3 dB
-
Il livello di rumore durante il funzionamento può superare 80 dB (A)
-
Utilizzare protezioni acustiche!
-
Vibrazioni: <2,5 m / s2
Dispositivo di ricarica
-
Tensione di ingresso: 100 - 240 V / 50 - 60 Hz
-
Tensione di uscita: 18,0 V
-
Corrente di uscita: max. 1,5 A
-
Tempo di ricarica: 2,0 Ah: <80 minuti
-
Peso: 0,37 kg
Peso totale (inclusa batteria 1x2,0 Ah, dispositivo di ricarica e imballaggio): 3,5 kg. Sono
disponibili adattatori di alimentazione internazionali (CE / ECM / UL / ETL / CB / SAA).

6
FUNZIONAMENTO
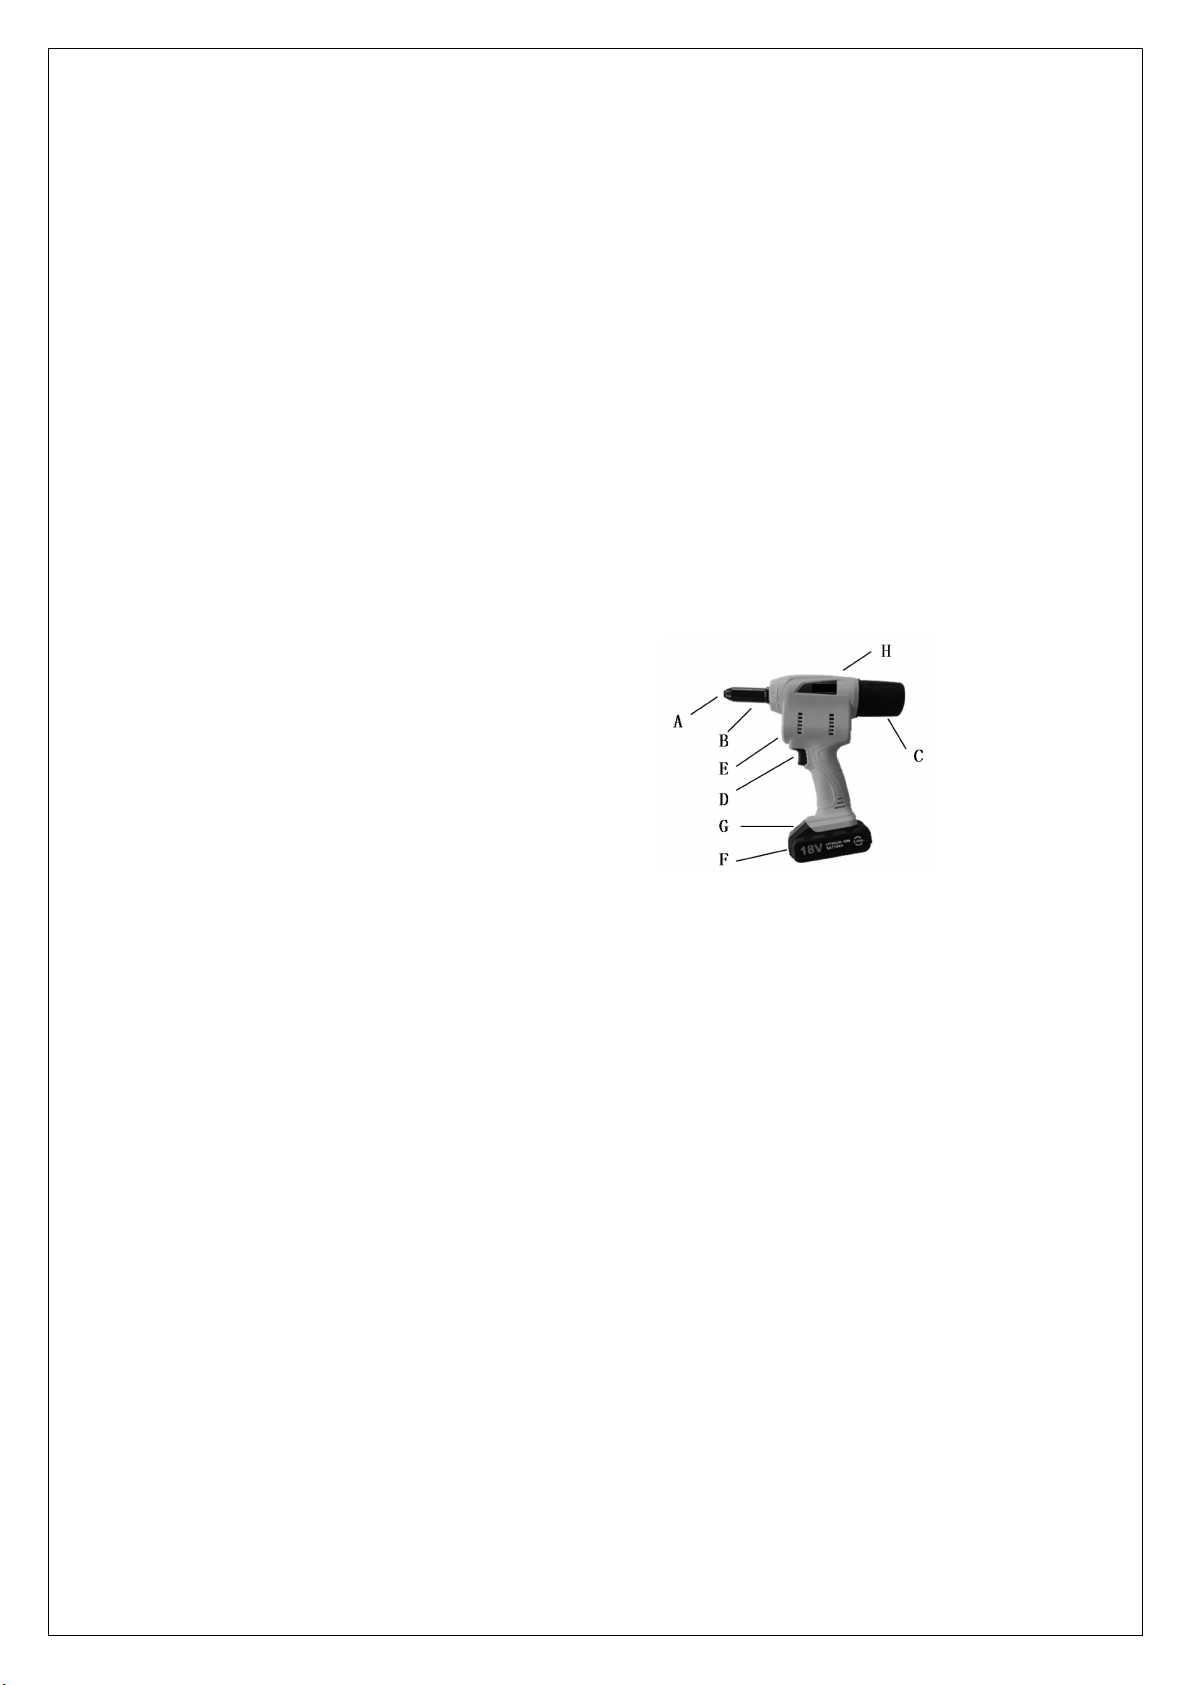
Componenti
La numerazione dei componenti nell’immagine si riferisce alle parti esterne più rilevanti
della rivettatrice.
A) Ugello
B) Involucro dell’ugello
C) Raccoglitore di mandrini
D) Pulsante
E) Illuminazione dell'area di rivettatura
F) Batteria
G) Interruttore di blocco della batteria
H) Led rosso
Carica della batteria
NB: la batteria è parzialmente carica alla consegna.
Per garantire la massima potenza della batteria, caricarla completamente con il
caricabatterie prima del primo utilizzo. Prestare attenzione all'indicatore di carica sul
dispositivo di ricarica. La batteria al litio può essere ricaricata in qualsiasi momento senza
influire sulla sua durata. L'interruzione del processo di ricarica non danneggia la batteria. La
batteria è dotata di un sistema di monitoraggio della temperatura che consente di caricarla
tra 0° e 45 ° C.
Rimozione della batteria
La batteria (F) è dotata di un meccanismo di blocco (G). Finché la batteria rimane all'interno
della rivettatrice rimane nella posizione corretta grazie ad una molla. Per rimuovere la
batteria (F), premere il pulsante di sblocco (G) e rimuovere la batteria dalla rivettatrice. Non
usare la forza.
Inserimento della batteria
Inserire la batteria al litio originale. L'uso di altre batterie può causare lesioni e rischi di
incendio.
Spingere la batteria (F) dal basso nel supporto della rivettatrice, tenendo premuto il
pulsante di blocco (G). Spingere completamente la batteria nel supporto fino a bloccarla
saldamente.
Cambiare l’ugello
Su ogni ugello (A) è marcato il diametro del rivetto da utilizzare. Tenere premuto
l'interruttore di alimentazione (D). Il meccanismo di bloccaggio si sposterà nella posizione
posteriore. Durante questa fase NON rilasciare l’interruttore.
Utilizzare la chiave inglese SW 12, inclusa nella confezione, per montare l’ugello
necessario. Una volta avvitato l’ugello idoneo rilasciare l'interruttore di alimentazione.
Rivettatura
Inserire il rivetto nell’ugello (A) e l'altra estremità del rivetto nel pezzo da rivettare. Premere
l'interruttore di alimentazione (D) fino ad applicare il rivetto, quindi rilasciare l'interruttore di
alimentazione. Inclinare la rivettatrice all'indietro in modo che il mandrino del rivetto rimosso
cada nel dispositivo di raccolta del mandrino (C). Se il rivetto non si stacca in un'unica
operazione, ripetere la procedura.
Eventuali problematiche
Se vengono utilizzati rivetti troppo duri o se la batteria è scarica o sovraccarica, la
rivettatrice smette di funzionare e il LED rosso (H) si accende. Attendere fino a quando il
LED rosso (H) si spegne e premere l'interruttore di alimentazione (D) per un breve periodo.
Se la batteria è scarica, la rivettatrice viene spenta da un circuito di protezione e la

7
rivettatrice non si muove più.
Se si preme di nuovo l'interruttore di alimentazione dopo che la rivettatrice è stata spenta
automaticamente si potrebbe danneggiare la batteria.
Gestione ottimale della batteria
Tenere la batteria lontana da umidità e acqua. Conservare la batteria a temperature
comprese tra 0 ° e 45 ° C. Non lasciare la batteria nell'auto, ad es. in estate. Se la batteria
dopo una ricarica funziona per poco tempo è esaurita e deve essere sostituita.
Si prega di considerare le istruzioni per lo smaltimento indicate dal proprio Paese e
agire in maniera ecoresponsabile.
Manutenzione e assistenza
Togliere la batteria dalla rivettatrice durante il trasporto e lo stoccaggio.
Mantenere la rivettatrice e le fessure di ventilazione pulite per garantire un funzionamento
corretto e sicuro.
Se la rivettatrice a batteria dovesse comunque guastarsi nonostante le meticolose
procedure di controllo della produzione e della qualità, le riparazioni dovranno essere
eseguite da un centro di assistenza autorizzato.
Si prega di indicare il numero di serie indicato sulla targhetta della rivettatrice ogni volta che
ci si rivolge al servizio clienti o si ordinano dei pezzi di ricambio.
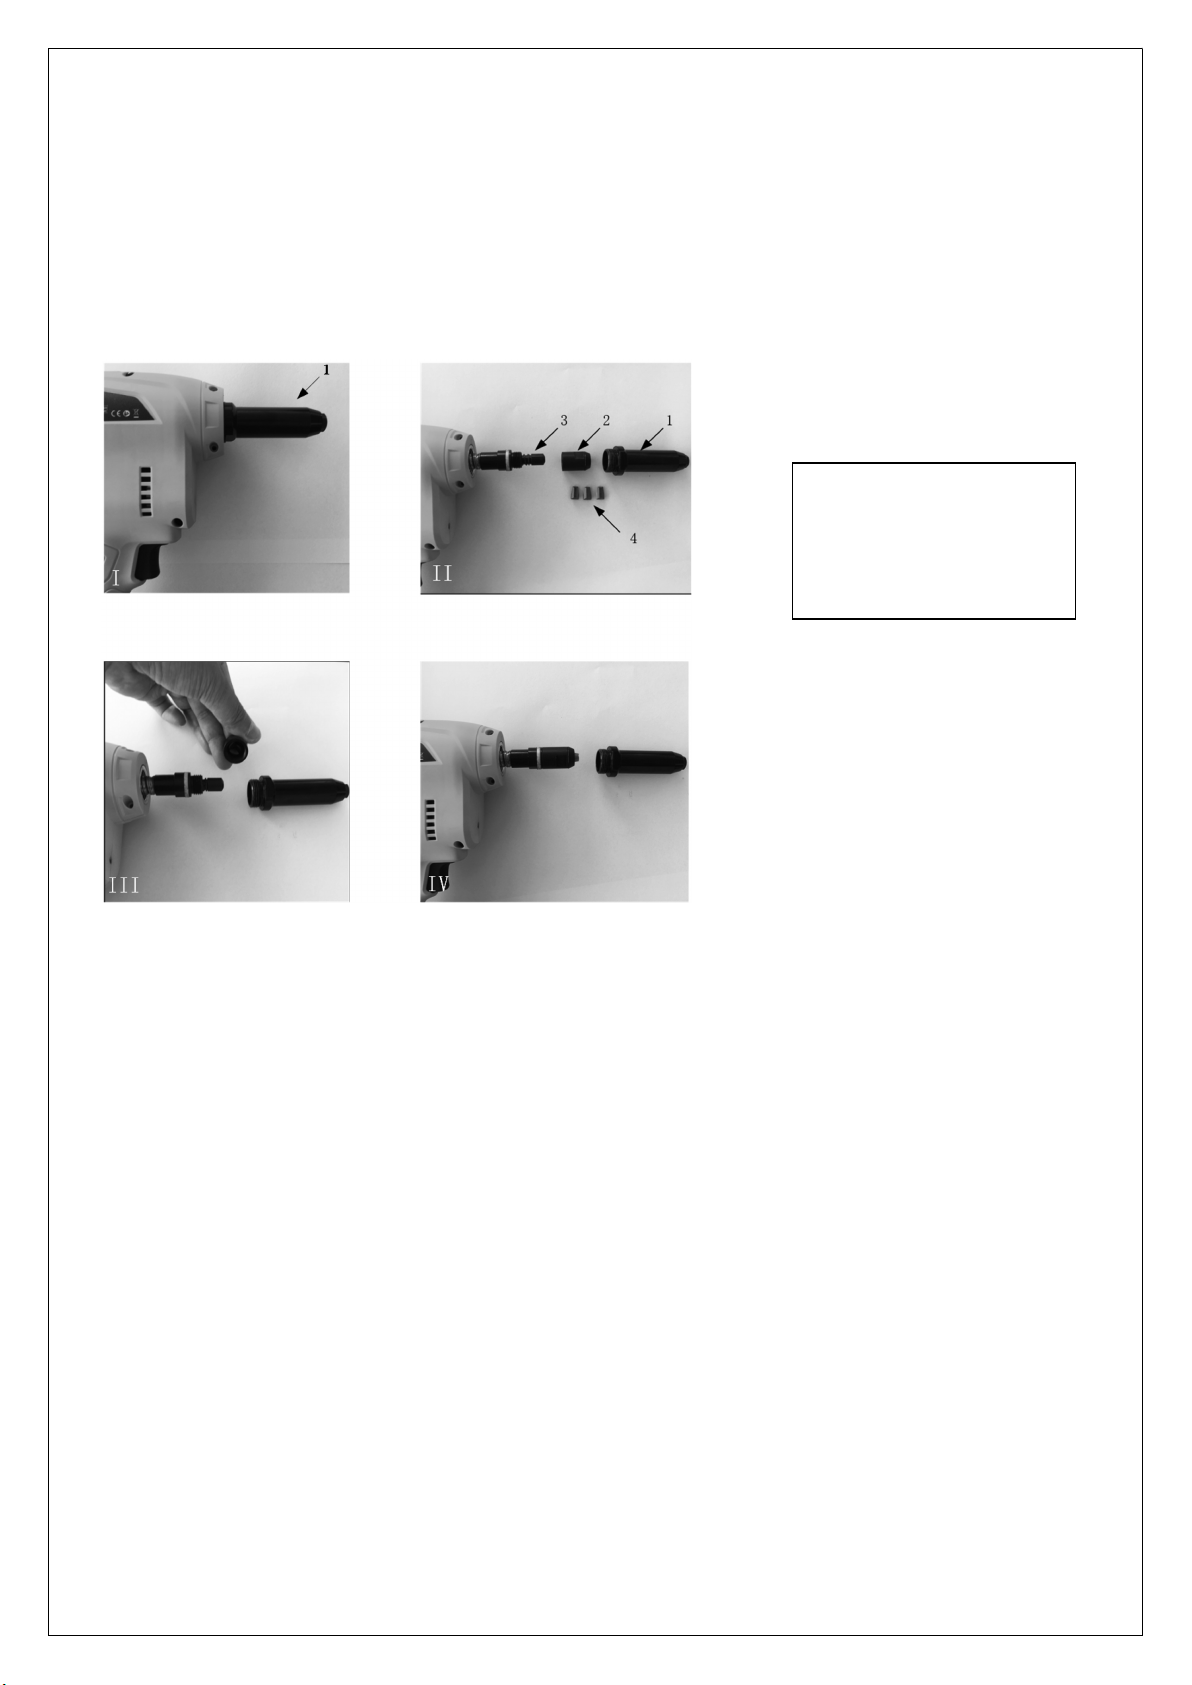
Sostituzione dei morsetti
I morsetti sono parti soggette ad usura. Se non si riesce a rivettare in un singolo ciclo di
lavoro si devono cambiare le ganasce di serraggio:
III. Svitare la testa (1) della rivettatrice (3). Estrarre dalla testa (1) il porta morsetti (2) e i
morsetti (4). Sostituire i morsetti nel caso in cui siano consumati. Inserire i morsetti nuovi
nel portamorsetti. Inserire il porta morsetti nella testa.
IV. Avvitare la testa (1) sulla rivettatrice.
(1) Testa
(2) Porta morsetti
(3) Rivettatrice
(4) Morsetti (3 pezzi)

8
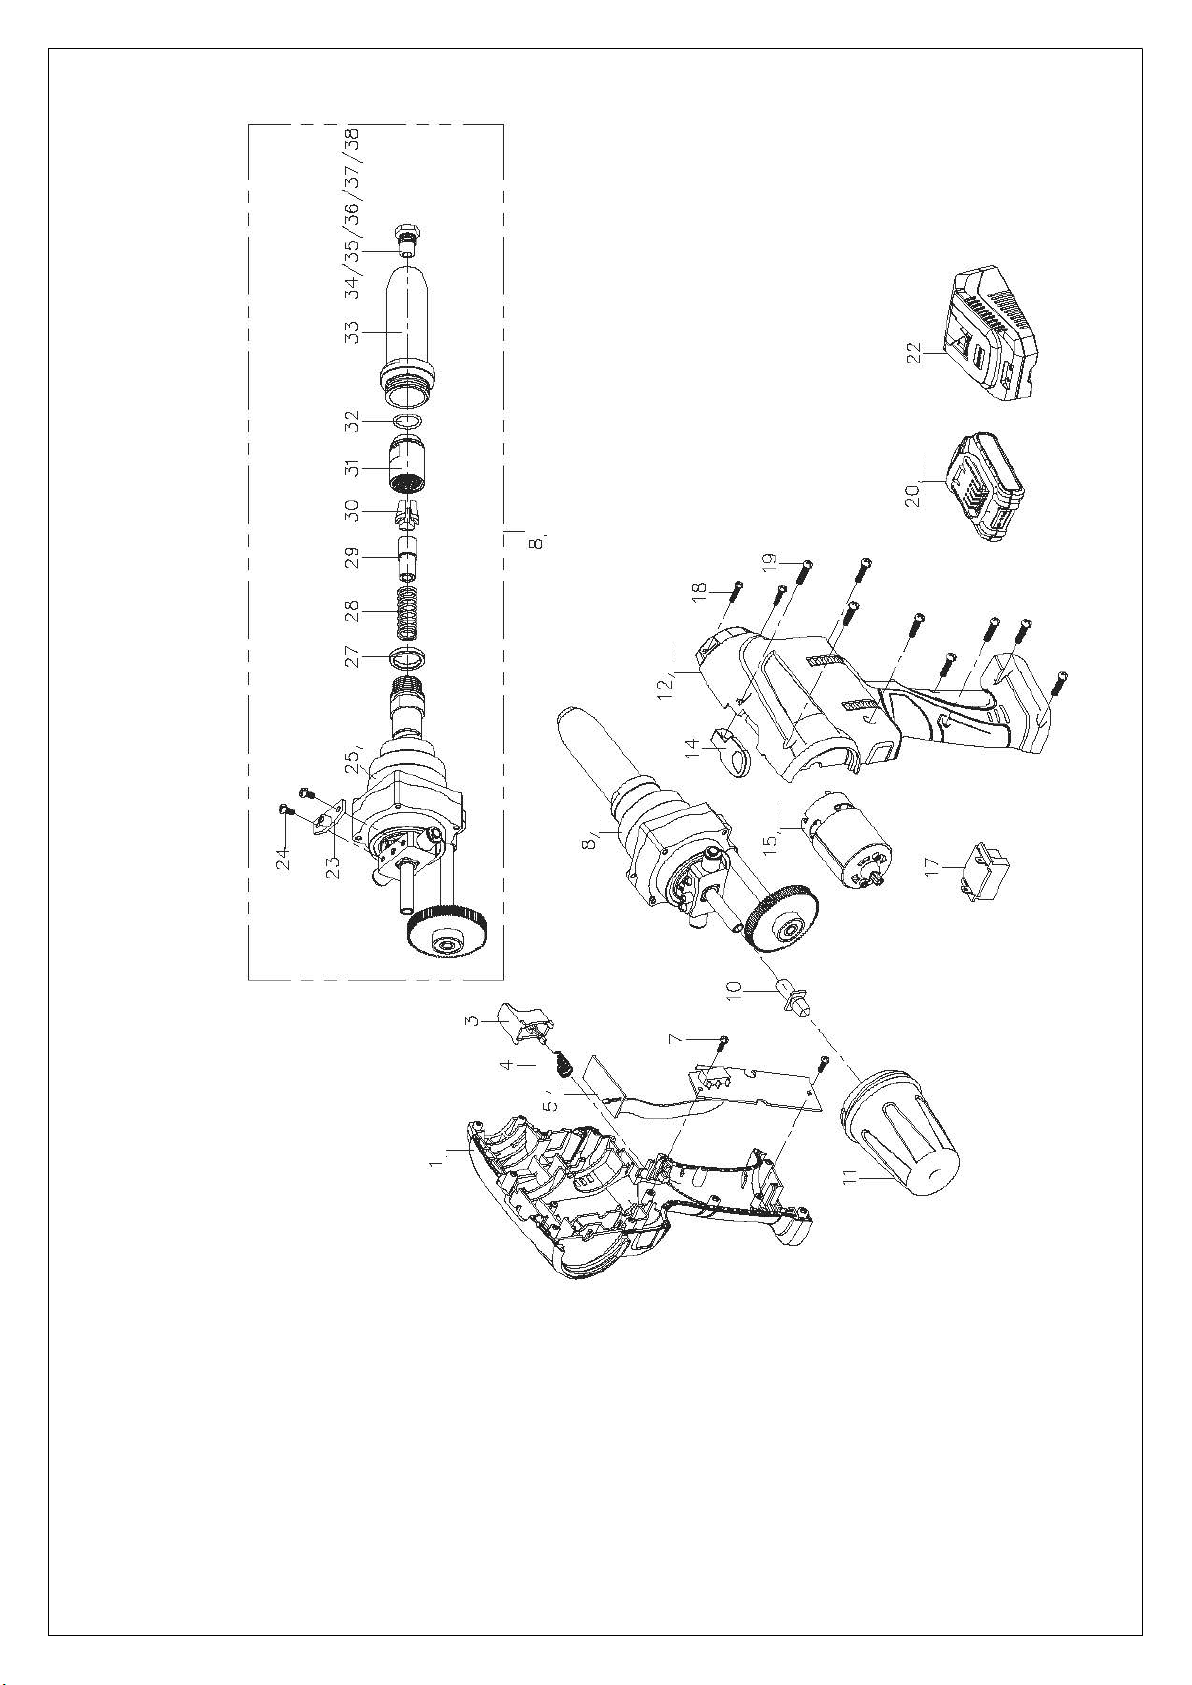
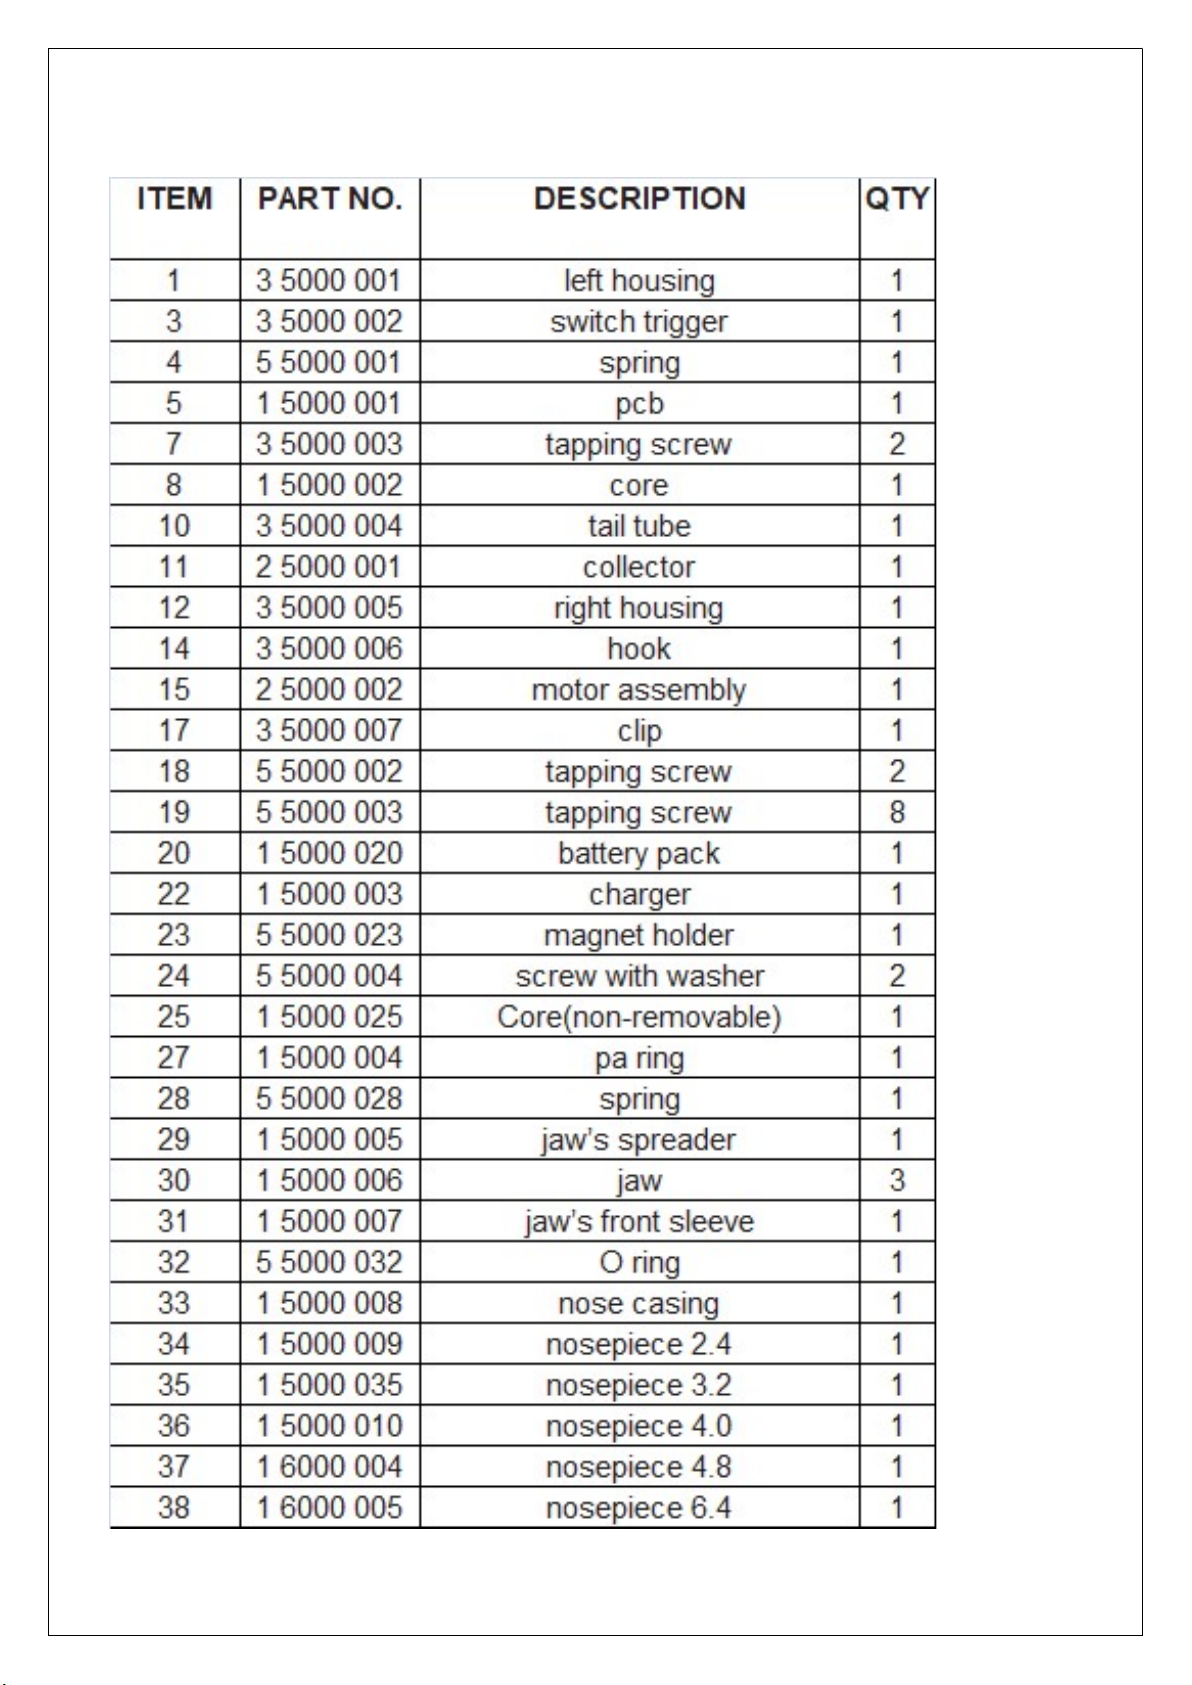
PARTI DI RICAMBIO
9

10
SAFETY INSTRUCTIONS
It is strongly recommended to carefully read and pay close attention to the following safety
directions before using the tool or performing maintenance.
-
Never dismantle the tool without first having thoroughly studied the instructions given
in this User Manual and applying them.
-
Always use the tool in accordance with the specified safety instructions. Direct any
queries regarding optimal and safe operation or use of the tool to our company (e-
mail: [email protected], tel. +39 011.7072398)
-
The safety instructions must be followed by any person handling or operating the
tool.
-
The tool must be used for setting Breakstem Rivets only.
-
The tool must be kept in a safe working condition at all times and inspected at
regular intervals to check the correct function by skilled personnel only. Do not
dismantle this tool without reading the user manual and maintenance instructions.
-
Never aim the tool at any person or operator during use.
Workspace safety
a. Keep your work space in a clean condition and provide sufficient lighting.
b. Do not operate this machine in an environment with risk of explosions which
contains flammable liquids, gases or dust.
c. Keep away children and other persons while operating this machine.
Battery safety
Do not expose battery operated riveting machines to rain or humidity. Water entering a
battery operated riveting machine increases the risk of electric shock.
People safety
a. Stay alert, be careful with your actions and use this machine in a reasonable
way. Do not use this machine if you are tired or under the influence of alcohol,
drugs or medication. A momentary inattentiveness while using this machine can
lead to serious injuries.
b. Wear protective clothing and always wear protective goggles.
Remove adjusting tools and screwdrivers before switching on the battery
riveting machine. A tool or screwdriver placed into a rotating part of the device
can lead to injuries.
c. Avoid unnatural body positions. Ensure you are standing firmly and always
preserve your balance. This way you can better control the battery riveting
machine, should an unexpected situation occur.
d. Wear appropriate clothes. Do not wear large clothes or jewelry. Avoid putting
your hair, clothes and gloves close to the moving parts of the device. Wide

11
clothing, long hair and jewelry can be caught up in the moving parts.
e. If the mandrel collection devices can be mounted, make sure that they are
connected and used correctly.
Operation and handling of this riveting machine
a. Do not overload the machine. Use the machine that is suitable for your work. The
suitable riveting machine allows you to work better and safer in the specified range of
performance.
b. Do not use a riveting machine that has a defective power switch. A riveting
machine which cannot be turned on and off any more is dangerous and has to be
repaired.
c. Remove the battery before making adjustments to the device, changing
accessories or putting the device away. This safety precaution prevents the
inadvertent start of this machine.
d. Store unused riveting machines out of the reach of children.
e. Pay attention to the maintenance of this riveting machine. Check if the moving
parts are functioning flawlessly and do not jam. Check for broken and damaged parts
that could influence the operation of this riveting machine. Repair the damaged parts
before using the device. Many accidents with the riveting machines stem from
maintenance failures.
Use and handling of the battery tools
-
Only recharge the batteries in charging devices approved by the
manufacturer. There is a risk of fire when using a charging device designed for a
specific battery type when is used with other batteries.
-
In the machines, only use batteries that have been designed for this type of
use. Using other battery types may lead to fire and injuries.
-
When not using the battery, keep it away from paper clips, coins, keys, nails,
screws and other small metallic object which may cause the contacts to
connect. If the battery contacts short - circuit, it may lead to burns or fire.
-
Fluid may emerge from the battery if it is used incorrectly. Avoid contact with that
fluid. In case of accidental contact with the body, rinse the area with water. If the
battery fluid comes in contact with the eyes, additionally call for medical help.
Emerging battery fluid can lead to burns and irritation of the skin.
Service
Only let qualified personnel repair your battery riveting machine and use only original
spare parts for that. This ensures the continuous safety of the battery riveting machine.

12
Security advices for battery riveting machines
-
Hold the battery riveting machine firmly with both hands when working and keep
standing steadily. The battery riveting machine can be operated safer when using
both hands.
-
Immediately turn off the battery riveting machine if the riveting tool jams.
-
Be prepared for a high reacting torque which causes strong recoil. The tool jams when
the battery riveting machine is overloaded.
-
Hold the battery riveting machine tightly. Secure the work-piece that is to be riveted. A
work-piece is held more securely by a clamping device or a bench vise than by hand.
-
Make sure that the power switch is turned to the "Off" position before inserting a
battery. Holding your fingers close to the power switch when carrying this machine or
inserting a battery while it is “On” may lead to accidents.
-
Do not open the battery, as this leads to the risk of a short-circuit. Keep the battery
away from heat (e.g. permanent sun radiation) and from fire due to risk of explosion.
-
If the battery is damaged or used in an inappropriate manner, vapors may emerge
from it. Get some fresh air and call for medical help in case of complaints. The
vapors can lead to irritation of the respiratory tracts.
-
If the battery is defective, fluid may emerge from it and coat adjacent objects. Check the
parts affected, clean them or replace them, if necessary.
-
Use the battery only with this battery riveting machine. This is the only way to prevent
dangerous overload of the battery.
Technical specifications Battery - powered riveting machine
For setting blind rivets with diameters from 2.4 to 6.4 mm, in all materials.
● Weight: 02RBZ: 1.5 kg (without battery)
● Stroke: 02RBZ: 22 mm
● Drive: 18.0 V DC Motor
● Installation force: 02RBZ: 10,000 N
● CE according to EU regulation No. 2006/42/EG
Quick - replacement of the rechargeable battery
● Nominal voltage: 18.0 V
● Capacity: Li-Ion 2.0 Ah (4 cells)
● Weight: 2.0 Ah: 0.38 kg
Data on noise and vibrations
● Noise emission: LPA= 78,8dB
● Uncertainty: K = 3 dB
● The noise level during operation can exceed 80 dB(A)
● Use ear protectors!
● Vibrations: <2.5 m/s2
13
Charging device
● Input voltage: 100 - 240 V / 50 - 60 Hz
● Output voltage: 18.0 V
● Output current: max. 1.5 A
● Recharging time:2.0 Ah: <80 minutes
● Weight: 0.37 kg
Total weight (including 1x2.0 Ah battery, charging device and packaging): 3.5 kg
Configurations with power plugs for worldwide use are available
(CE/ECM/UL/ETL/CB/SAA)
OPERATIONAL DESCRIPTION
Depicted components
The numbering of the components in the picture refers to the main exterior parts of
the battery riveting machine.
A) Nosepiece
B) Nose casing
C) Mandrel collector
D) Trigger
E) Riveting area illumination
F) Battery
G) Battery locking switch
H) Operational indicator
Charging the battery
Note: The battery is partially charged on delivery.
To guarantee full power of the battery, charge it completely in the charger before first use.
Pay attention to the charge indicator on the charging device. The Li - Ion battery can be
recharged at any time without affecting its fatigue life. Interrupting the charging process
doesn't damage the battery.
The battery is equipped with a temperature monitoring system which only allows for
charging between 0°C and 45°C.
Please consider the instructions for disposal.
Removing the battery
The battery (F) is equipped with a locking mechanism (G). As long as the battery remains
inside the machine it is held in position by a spring. To remove the battery (F), press the
unlocking button (G) and pull the battery from the riveting device. Don't use force.
Putting the device into operation
Insert the battery. Only use original Li-Ion batteries with the voltage depicted on the label of
your battery riveting machine.
The use of other batteries may lead to injuries and risk of fire.

14
Push the battery (F) from under into the stand of the riveting machine, holding the locking
button (G) pressed. Push the battery into the stand completely until it is securely locked.
Changing nose pieces
The nose piece (A) is marked with numbers corresponding to the rivet diameters - section.
Hold the power switch (D) pressed, that will lead to the clamping mechanism moving into
the rear position. Use the included wrench SW 12 to switch to the required nose piece and
release the power switch.
Riveting
Insert the rivet into the nose piece (A) and the other end of the rivet into the work - pieces
to be riveted. Press the power switch until the rivet is removed, then release the power
switch. Tilt the riveting device backwards so that the removed rivet pin falls into the
mandrel collection device (C). If the rivet doesn't come off in a single working stroke,
repeat the procedure.
Failure
If rivets which exceed the indicated power of the device are used or if the battery is low or
overcharged, the device will stop operating and the red LED (H) will light up. Wait until the
red LED (H) turns off and press the power switch (D) for a short time. The device will revert
to the original position. If the battery is low, the device is powered down by a protective
circuit and the working tool will not move any more. Do not press the power switch again
after the riveting machine has been powered down automatically, this may lead to battery
damage.
Advise on optimal handling of the battery
Keep the battery away from wetness and water. Only store the battery at temperatures
from 0° to 45°C. Do not leave the battery in the car, e.g. in summer. If the battery is
working for significantly shorter periods of time after a recharge, it is used up and needs to
be replaced. Please consider the instructions for disposal.
Maintenance and service
Take the battery out of the battery riveting machine for transportation and storage. Risk of
injury occurs if you inadvertently press the power switch. Keep the electric riveting machine
and the ventilation slots clean to ensure good and safe operation.
If the battery riveting machine should fail despite the meticulous manufacturing and quality
control procedures, the repairs should be done by an authorized service center for the
battery riveting devices.
Please quote the serial number indicated on the label of the battery riveting machine
whenever turning to customer service or ordering spare parts.
Batteries:
Li-Ion: do not dispose of batteries in household waste, do not throw them into fire or water.
Batteries should be collected and recycled or disposed of in an environment - friendly way.
Only valid for European Union countries: According to European regulation 91/157/EWG,
15
defective and used up batteries need to be recycled. Batteries that are not functional can
be handed over at your store or directly disposed of in an environment - friendly way.
Changing the clamping jaw.
The clamping jaws are wearing parts. If you are unable to rivet in a single working stroke
you should change the clamping jaws:
III. Unscrew the rivet tool (3) nose casing (1). Remove the nose casing (1), the jaw
holder (2) and the jaws (4). Replace the jaws when they are worn out. Insert the new
jaws in the jaw holder. Insert the jaw holder in the nose casing.
IV. Screw the nose casing back on the rivet tool (3)
(1) Nose casing
(2) Jaw holder
(3) Rivet tool
(4) Clamping jaws (3
parts)
16
PARTS LISTS

17
Other manuals for 02RBZ
1
Table of contents
Languages:
Other Fixi Rivet Tools manuals


