Flex ROA 128 5151 User manual

User Guide
ROA 128 5151
PIM Evaluation Board
1/28701-ROA 128 5151Rev A May 2018
© Flex
PIM Evaluation Board
ROA 128 5151
User Guide

User Guide
2
ROA 128 5151
PIM Evaluation Board
1/28701-ROA 128 5151Rev A May 2018
© Flex
Contents
1
Introduction............................................................................................3
1.1 Prerequisites............................................................................................3
2
Evaluation Board ROA 1285151 ...........................................................4
2.1 Board Description ....................................................................................4
2.2 Power Supply...........................................................................................7
2.3 Management Power.................................................................................7
3
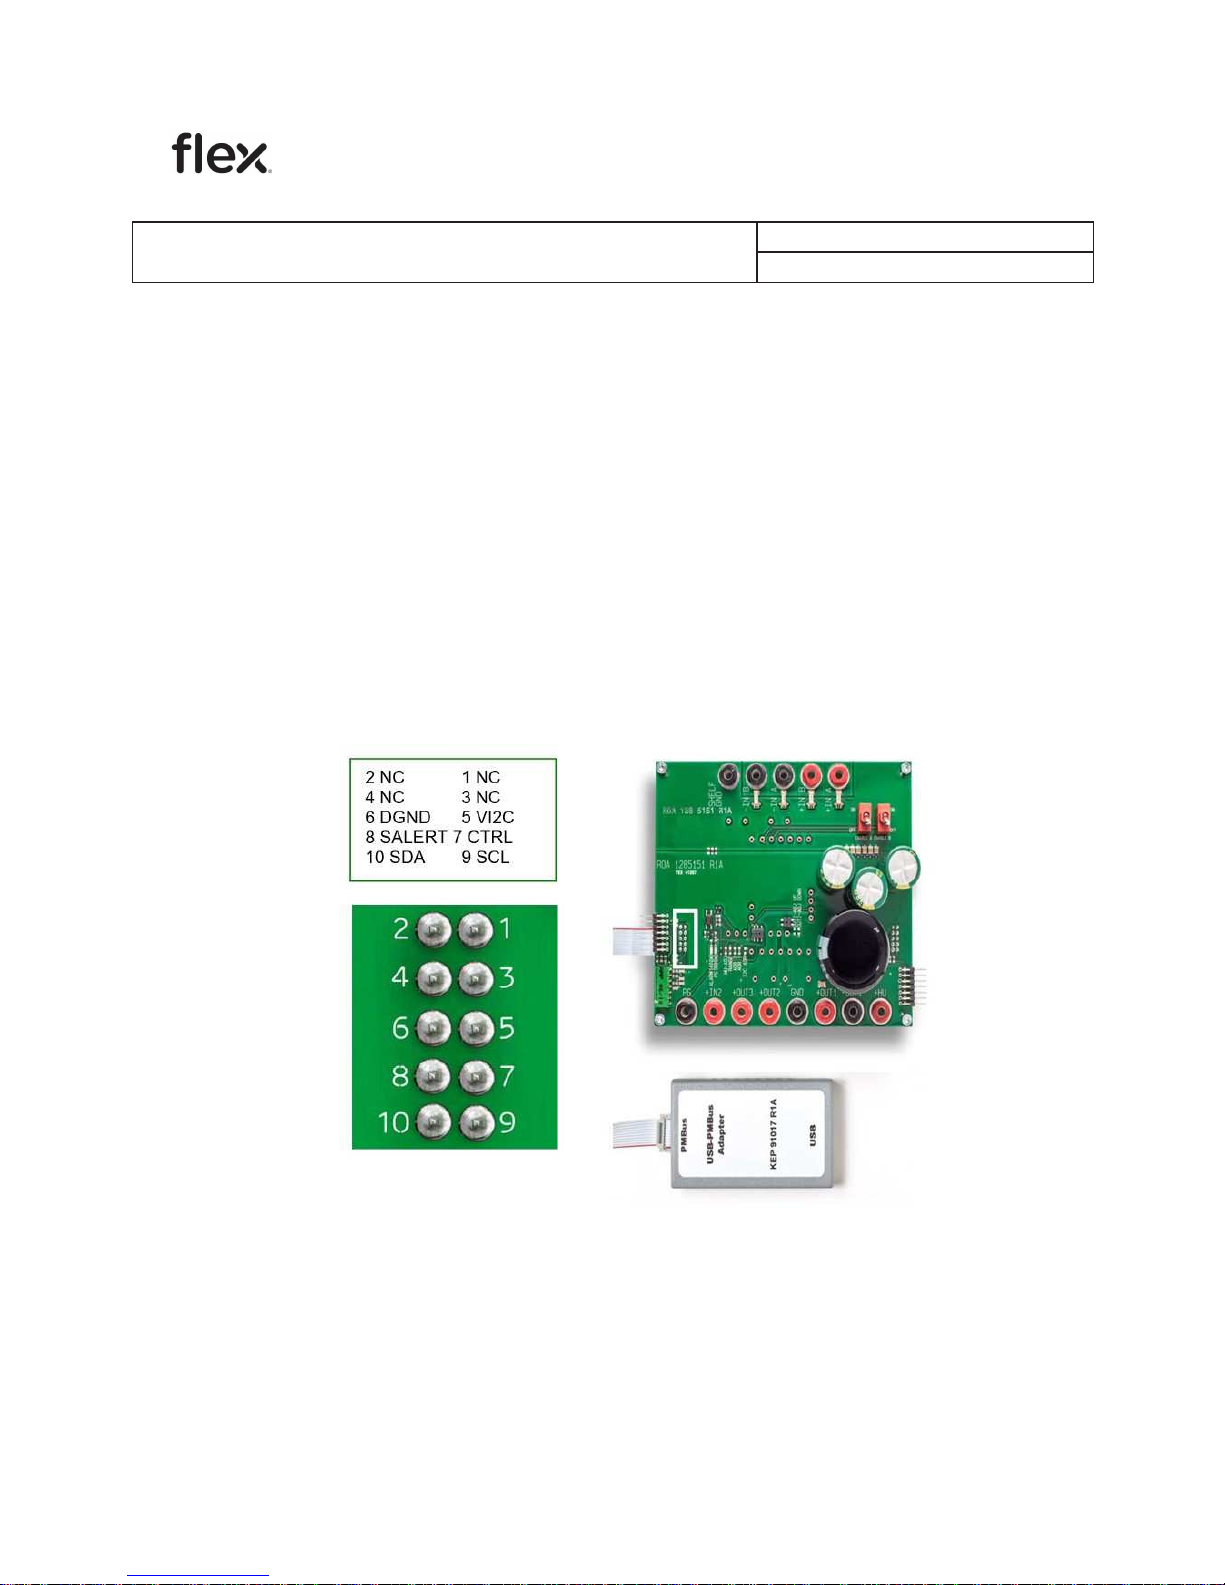
PMBus/USBAdaptors............................................................................8
3.1 Connection of Flex Power KEP 910 17PMBus-to-USB adaptor...............8
4
Power-up and Power-down Instructions..............................................9
4.1 Power-up instruction................................................................................9
4.2 Power-down instruction..........................................................................10
5
Address and Voltage Pin-strap Resistors........................................... 11
5.1 Address pin-strapresistors.....................................................................11
5.2 Holdup voltage adjust resistor................................................................12
5.3 Input voltage range pin-strap resistor.....................................................13
5.4 Output 2 voltage adjust resistors............................................................14
6
Fuses....................................................................................................15
7
Isolation................................................................................................15

User Guide
3
ROA 128 5151
PIM Evaluation Board
1/28701-ROA 128 5151Rev A May 2018
© Flex
1
Introduction
This User Guide provides a brief introduction and instruction on how to use PIM
Evaluation board ROA 128 5151. This board provides the possibility to evaluate
operation of PIM 4328 or PIM 4820. The ROA 128 5151 board is a part of the 3E
Design Kit.
1.1
Prerequisites
In order to operate the ROA 128 5151 board the following is needed:
•
Power supply 36-75 V.
•
PIM 4328 or PIM 4820.
•
PMBus-to-USB adaptor Flex Power KEP 910 17.
•
The 3E GUI Gold Edition software package and a compatibleWindows
PC. Users must be familiar with the Windows® operatingsystem.

User Guide
4
ROA 128 5151
PIM Evaluation Board
1/28701-ROA 128 5151Rev A May 2018
© Flex
2
Evaluation Board ROA 128 5151
2.1
Board Description
Figure 1. ROA 128 5151 (top side).
1a Input voltage connector A.
1b Input voltage connectorB.
1c Input voltage connector A GND.
1d Input voltage connector B GND.
1e Output voltageconnector.
1f Output voltage connector GND.
2 Shelf GND.
3a Input Management Power.
3b Input Management Power GND.

User Guide
5
ROA 128 5151
PIM Evaluation Board
1/28701-ROA 128 5151Rev A May 2018
© Flex
3c Output Management Power 2.
3d Output Management Power 3.
4
Power Good.
5
Hold Up Voltage.
6
Male/female board-to-board connectors. Connectors are used to connect
the board to other 3E evaluation boards. All interconnected boards are
sharing the same PMBus and Sync signals. Only one PMBus-to-USB
adaptor is needed. The following signals are connected to the board to
board connectors: SYNC, SALERT, SCL, SDA, CTRL, VI2C,DGND.
7
Enable switch A and B.
8a Connector for the Flex Power KEP 910 17 PMBus-to-USB adaptor.
It is found on reverse side of the board.
9a Position for PIM 4820.
9b Position for PIM 4328.
10
PIM I/O Connector. The following signals are connected to the PIMI/O
connector: SALERT, SCL, SDA, CTRL, VI2C DGND, +OUT2 for all
products and +OUT3 for PIM 4328.

User Guide
6
ROA 128 5151
PIM Evaluation Board
1/28701-ROA 128 5151Rev A May 2018
© Flex
11
The PIM Evaluation board is equipped with a 3x470µF capacitance.
Along with the Board, as a side-part, a 3300µF capacitor is included in
the kit. It is up to the user to un-mount and/or mount the capacitance
actually needed. For information about hold-up capacitance
recommendations, please see the technical specification for the PIM
product.
When connecting the 3300µF capacitor attach “-“connector of the
capacitor (see a, Figure 2) to the “-“ connection of the board (see b,
Figure 2). Soldering is required.
Figure 2. Connection of the Hold Up capacitor.
a
b

User Guide
7
ROA 128 5151
PIM Evaluation Board
1/28701-ROA 128 5151Rev A May 2018
© Flex
2.2
Power Supply
Power the board by connecting 36-75 V DC power to the “+IN A” and –IN A”
and/or “+IN B” and “-IN B” connectors (see 1a-1d, Figure 1). Enable switches A
and B should be in OFF position (see 7, Figure 1).
2.3
Management Power
With an external power supply PIM 4820’s management power (see 3c in Figure
1) can handle larger loads, for more information see the technical specification for
the PIM product.
The external power supply shall be connected between +IN2 and GND (see 3a-
3b, Figure 1). it shall be at least 1.5 V above the +OUT2 voltage (see 3c, Figure
1) and max 14.4 V.

User Guide
8
ROA 128 5151
PIM Evaluation Board
1/28701-ROA 128 5151Rev A May 2018
© Flex
3
PMBus/USB Adaptors
The Flex Power KEP 910 17 PMBus-to-USB adaptor is used to connect the
PIM board to a PC.
3.1
Connection of Flex Power KEP 910 17PMBus-to-
USB adaptor
Connect the Flex Power KEP 910 17 PMBus-to-USB adaptor as shown in Figure
3. Connector is found on reverse side of the ROA 128 5151 board (see 8a,
Figure 1).
Figure 3. Connection of the Flex Power KEP 910 17 PMBus-to-USB adaptor.

User Guide
9
ROA 128 5151
PIM Evaluation Board
1/28701-ROA 128 5151Rev A May 2018
© Flex
4
Power-up and Power-down Instructions
4.1
Power-up instruction
PIM 4328:
•
Mount the PIM products in the position (see 9b, Figure 1).
•
Make sure the enable switches are in OFF position (see 7, Figure1).
•
Connect and turn On the 36-75 V supply.
•
Turn either enable switch A or B in ON position.
•
Connect the PMBus Adapter/Cable to the board.
•
Start the 3E GUI Gold Edition software.
PIM 4820:
•
Mount the PIM products in the position (see 9a, Figure 1).
•
Connect and turn On the 36-75 V supply.
•
Connect the PMBus Adapter/Cable to the board.
•
Start the 3E GUI Gold Edition software.

User Guide
10
ROA 128 5151
PIM Evaluation Board
1/28701-ROA 128 5151Rev A May 2018
© Flex
4.2
Power-down instruction
PIM 4328:
The products can be removed or replaced only after the enable switches has
been set in OFF position and the supply voltage has been turned off.
PIM 4820:
The products can be removed or replaced only after the supply voltage has been
turned off.

User Guide
11
ROA 128 5151
PIM Evaluation Board
1/28701-ROA 128 5151Rev A May 2018
© Flex
5
Address and Voltage Pin-strap Resistors
This section describes the locations of the address and voltage pin-strap resistors
and the resistors for hold up and +OUT2 voltage adjustments. For exact resistor
values see the technical specification for the PIM product.
5.1
Address pin-strapresistors
Figure 5 shows the positions of the address pin-strap resistors for the different
PIM products. R2 and R3 are positions of the address pin-strap resistors for
PIM 4820. R29 is the position of the address pin-strap resistors for
PIM 4328.
Figure 5. Positions of the address pin-strap resistors.
a

User Guide
12
ROA 128 5151
PIM Evaluation Board
1/28701-ROA 128 5151Rev A May 2018
© Flex
5.2
Holdup voltage adjust resistor
Figure 6 shows the position of the hold up voltage adjust resistor which is
common for all PIM products (see R4, Figure 6). For exact resistor values see the
technical specification for the PIM product.
Figure 6. Position of the hold up voltage adjust resistor.

User Guide
13
ROA 128 5151
PIM Evaluation Board
1/28701-ROA 128 5151Rev A May 2018
© Flex
5.3
Input voltage range pin-strap resistor
Figure 7 shows the position of the input voltage range pin-strap resistor for PIM
4820 products (see R1, Figure 7). For exact resistor values see the technical
specification for the PIM product.
Figure 7 Position of the input voltage range pin-strap resistor.

User Guide
14
ROA 128 5151
PIM Evaluation Board
1/28701-ROA 128 5151Rev A May 2018
© Flex
5.4
Output 2 voltage adjust resistors
Figure 8 shows the positions of the Output 2 voltage adjust resistors for PIM 4820
products (see R6-R7, Figure 8). For exact resistor values see the technical
specification for the PIM product.
Figure 8. Positions of the Output 2 voltage adjust resistors.

User Guide
15
ROA 128 5151
PIM Evaluation Board
1/28701-ROA 128 5151Rev A May 2018
© Flex
6
Fuses
The DC input to the board is protected by fuses. Figure 9 shows the positions (a-
d) of the fuses. In each position there are two 12 A fuses mounted in parallel.
Figure 9. The positions of the fuses.
7
Isolation
The board is equipped with 0 Ohm resistors tying SHELF_GND and GND/DGND
together. If 2250 V isolation is desired the resistors R33-R35 have to be removed.
Figure 10 shows the positions of the resistors R33-R35
Figure 10. Positions of the resistors R33-R35 tying SHELF_GND and GND/DGND
together.
Table of contents
Other Flex Motherboard manuals
Popular Motherboard manuals by other brands

ASROCK
ASROCK PRO Series user manual

Renesas
Renesas ISL68134-31P-EV1Z Quick start user guide

Texas Instruments
Texas Instruments LM5161PWPBKEVM user guide

MSI
MSI MPG B550 GAMING CARBON WIFI quick start

ASROCK
ASROCK 4CORE1600-GLAN - V1.0 user manual

Analog Devices
Analog Devices EVAL-ADAU1701MINIZ quick start guide