flexicare PROVU VS User manual
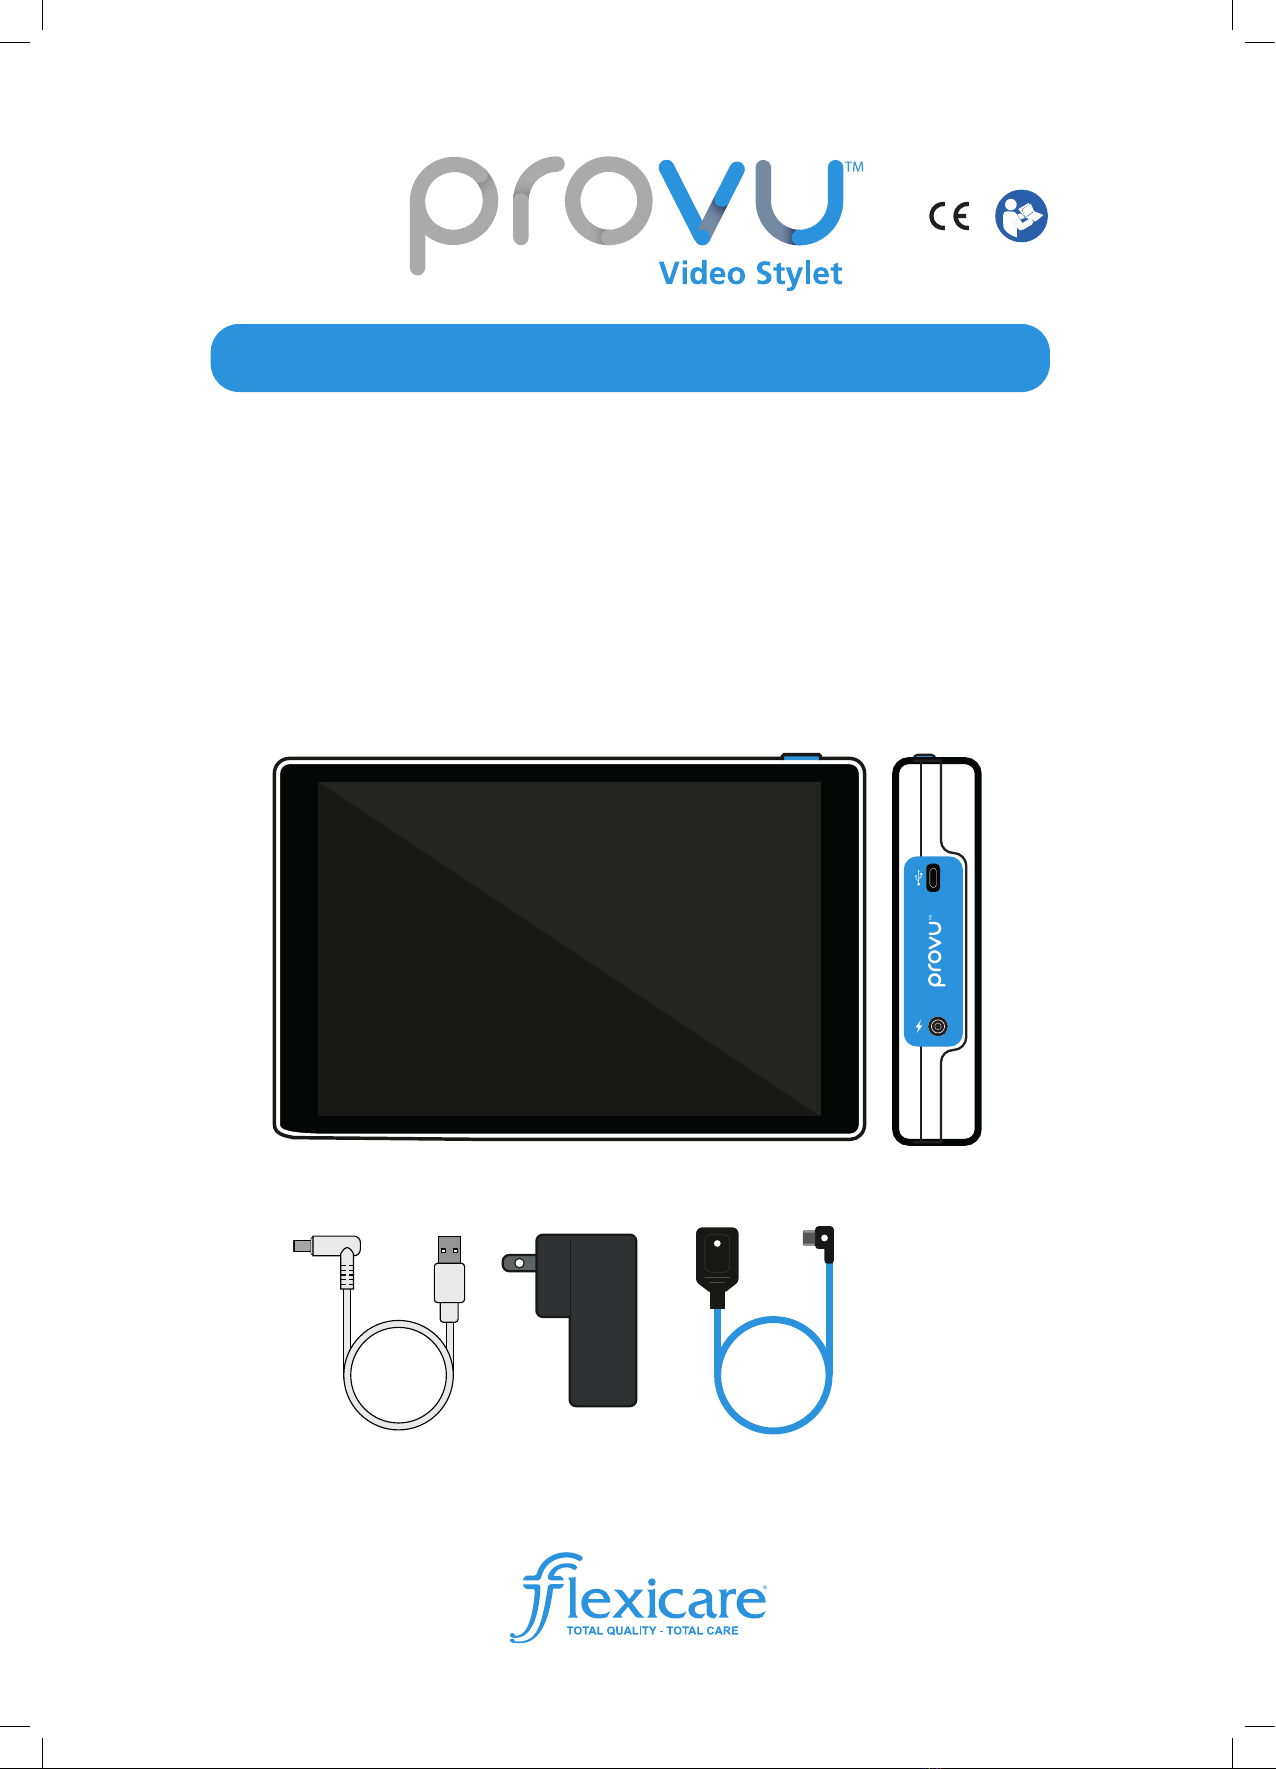
PROVU VIDEO STYLET 8” DISPLAY
CS
NL
FR
DE
IT
RO
ES
SV
TR
DISPLEJ PROVU VIDEO STYLET 8”
PROVU VIDEO STYLET 8” DISPLAY
MONITEUR POUR STYLET VIDÉO PROVU 20 CM (8 POUCES)
PROVU VIDEO STYLET 8-ZOLL-DISPLAY
DISPLAY PROVU VIDEO STYLET 8”
MONITOR DE 8 PULGADAS PARA VIDEOESTILETE PROVU
PROVU VIDEOMANDRÄNG 8” DISPLAY

Intended Use
The ProVu Video Stylet (VS) 8” Display is a digital display intended to show live images from the
ProVu Video Stylet (ProVu VS) only, via the micro USB cable, as an aid to intubation of adults in
hospital environments.
Product Description
The ProVu VS 8” Display is a non-sterile, reusable digital display intended to display live images
from the ProVu VS. When connected to the ProVu VS, a live video is transmitted from the device,
which can be used to further aid intubation of the patient.
The Display can be charged with the provided ProVu charging cable, in between uses or while in
use. When fully charged, the ProVu VS 8” Display will provide up to 7 hours of continuous use. The
product can also be charged through the micro USB port if the provided DC charger is unavailable.
the failure of the device.
DISPLAY
RESOLUTION (PIXELS)
ORIENTATION Landscape
DISPLAY TYPE
START UP TIME Immediate
SOFTWARE VERSION Refer to device screen while charging
CONNECTIONS
USB CONNECTION Micro USB
POWER CONNECTION DC Power
STORAGE AND TRANSPORTATION
TEMPERATURE
RELATIVE HUMIDITY ≤85%, non-condensing
ATMOSPHERIC PRESSURE 700 to 1060 hPa
OPERATING CONDITIONS
TEMPERATURE
RELATIVE HUMIDITY ≤85%, non-condensing
ATMOSPHERIC PRESSURE 700 to 1060 hPa
DISPLAY ELECTRICAL POWER RATING
POWER INPUT Input: 5.0V 1.5A
BATTERY TYPE 3.7V, 5000 mAh, Lithium-ion
TYPICAL BATTERY RUN TIME ≈ hours (of continuous use)
TYPICAL BATTERY CHARGE TIME ≈ hours (from zero charge)
WALL PLUG ELECTRICAL POWER RATING
INPUT 100-240V AC 0.5A 50-60Hz
OUTPUT Max 5.2V DC 3.0A
DIMENSIONS
WIDTH X HEIGHT X THICKNESS 205mm x 130mm x 25mm
WEIGHT 396g
PLUG
PLUG TYPE 110-120V with NEMA 5-15P 3 Pin Plug
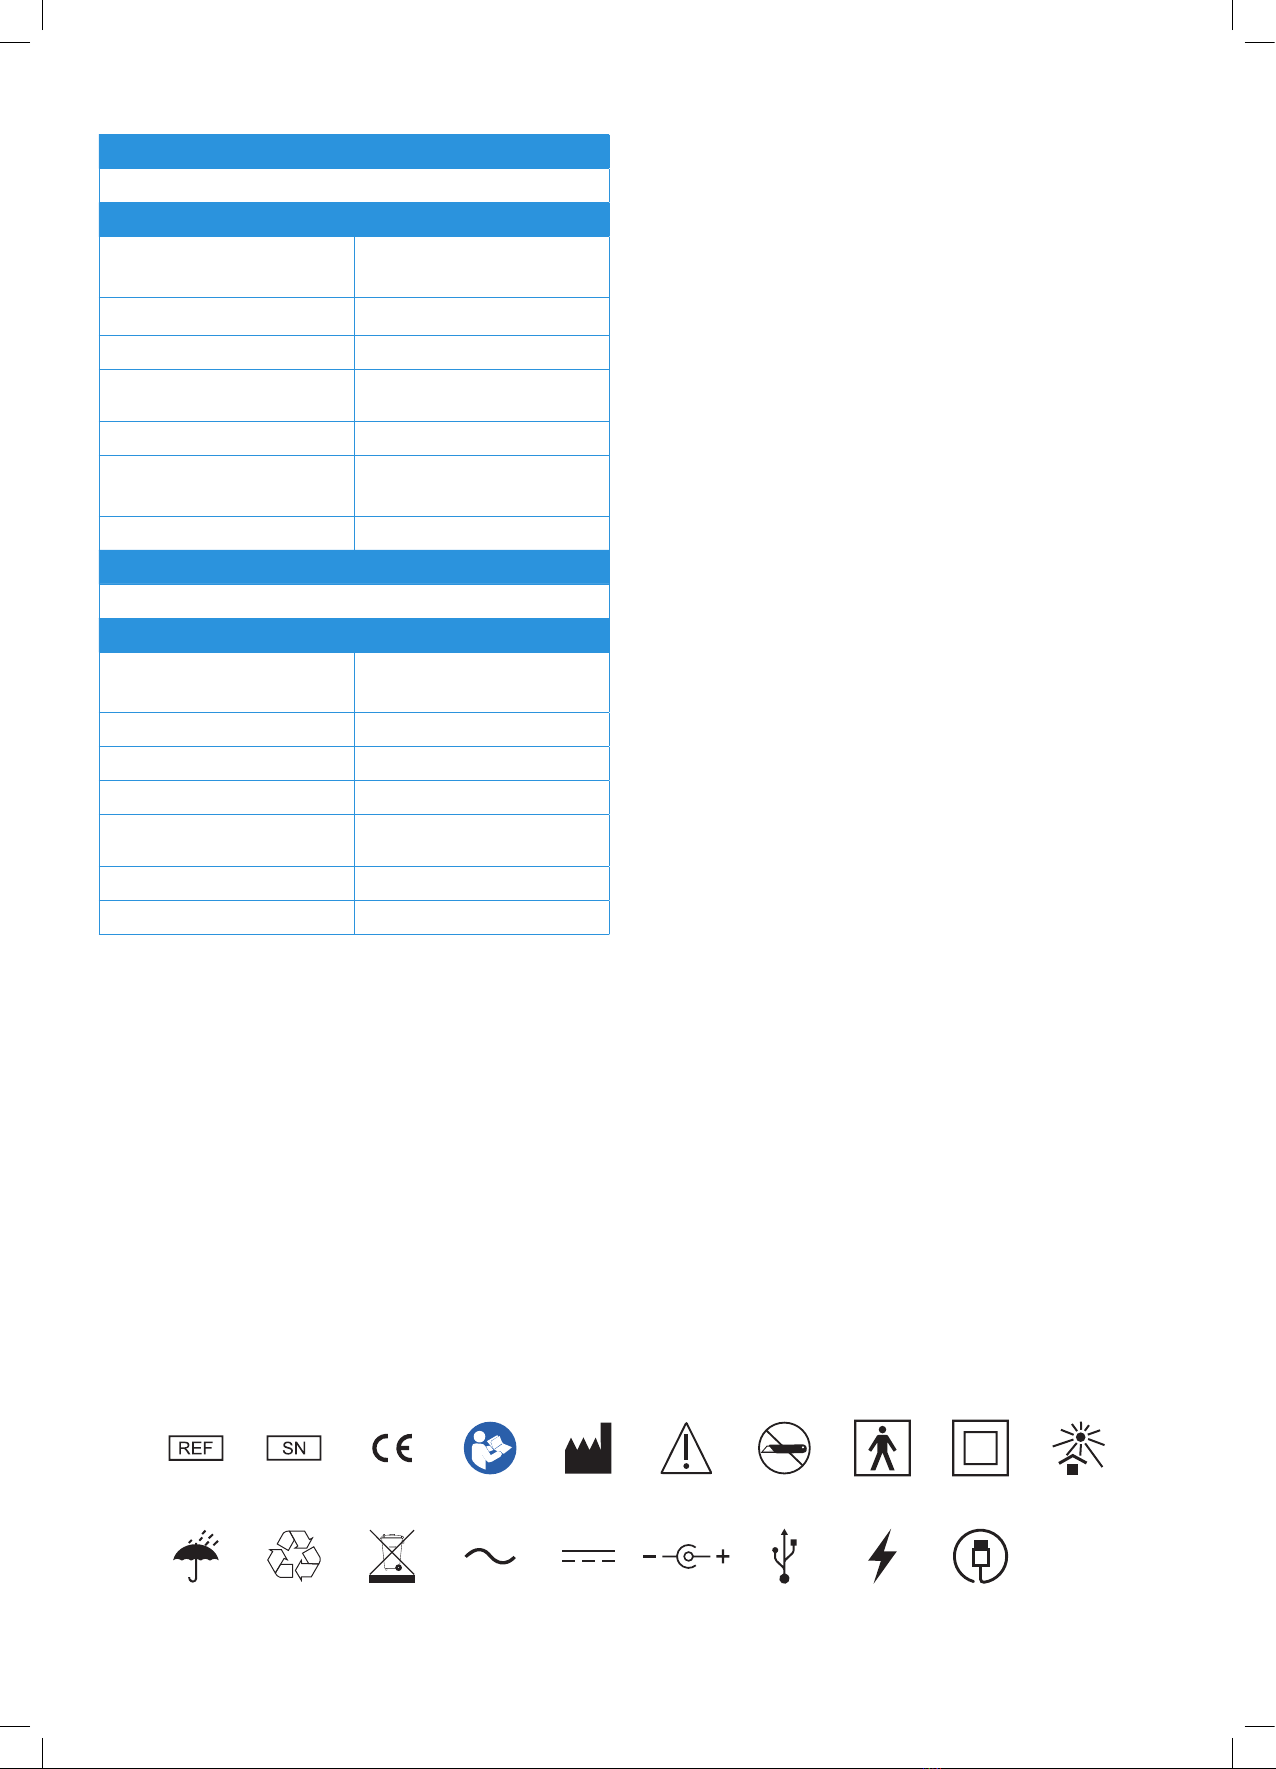
Technical Specications
Precautions
-Ensure there is adequate room for easy operation.
-Inspect the ProVu VS 8” Display and all accessories for damage prior to each use.
-Charge the Display fully before use. For shipping requirements, ProVu VS 8” Displays are shipped
with zero charge.
-Before charging, ensure that all components are completely dry, including the micro USB port.
-If using the Display Pole Stand, slide the Display securely onto the connector of the articulating
arm, ensuring it is fully seated.
-If using the ProVu Display Table Stand, slide the Display securely onto the connector, ensuring
it is fully seated.
-
Warnings & Cautions
-ProVu VS 8” Display and Accessories should only be used by trained personnel.
-
interference sources.
-Do not sterilise the device.
-The use of devices and other accessories which are not approved by Flexicare may result in sub-
optimal performance and place the patient at risk.
-
Display.
-The ProVu VS 8” Display should only be used with the ProVu VS and ProVu accessories.
-Always disconnect the ProVu VS 8” Display from the charging cable before cleaning.
-Ensure the voltage recommendations of the Display are compatible with power supplies.
-Do not clean the Display or Display accessories using any abrasive agents or mineral acids.
-Do not use sterilants with caustic ingredients, such as surgical scrub solutions, peroxide
solutions, bleaches, or povidone-iodine solutions.
-Do not disassemble device.
-
level before use.
-Do not modify the device.
-Device is not servicable.
-The battery is not removable. Do not open or remove battery. Warranty void if opened.
Any serious incident that occurs in relation to the device should be reported to the manufacturer
Setting Up the ProVu VS Stands
Refer to instructions supplied with the ProVu VS Pole Stand (IP0000-030) or ProVu Display Table
Stand (IP0000-021).
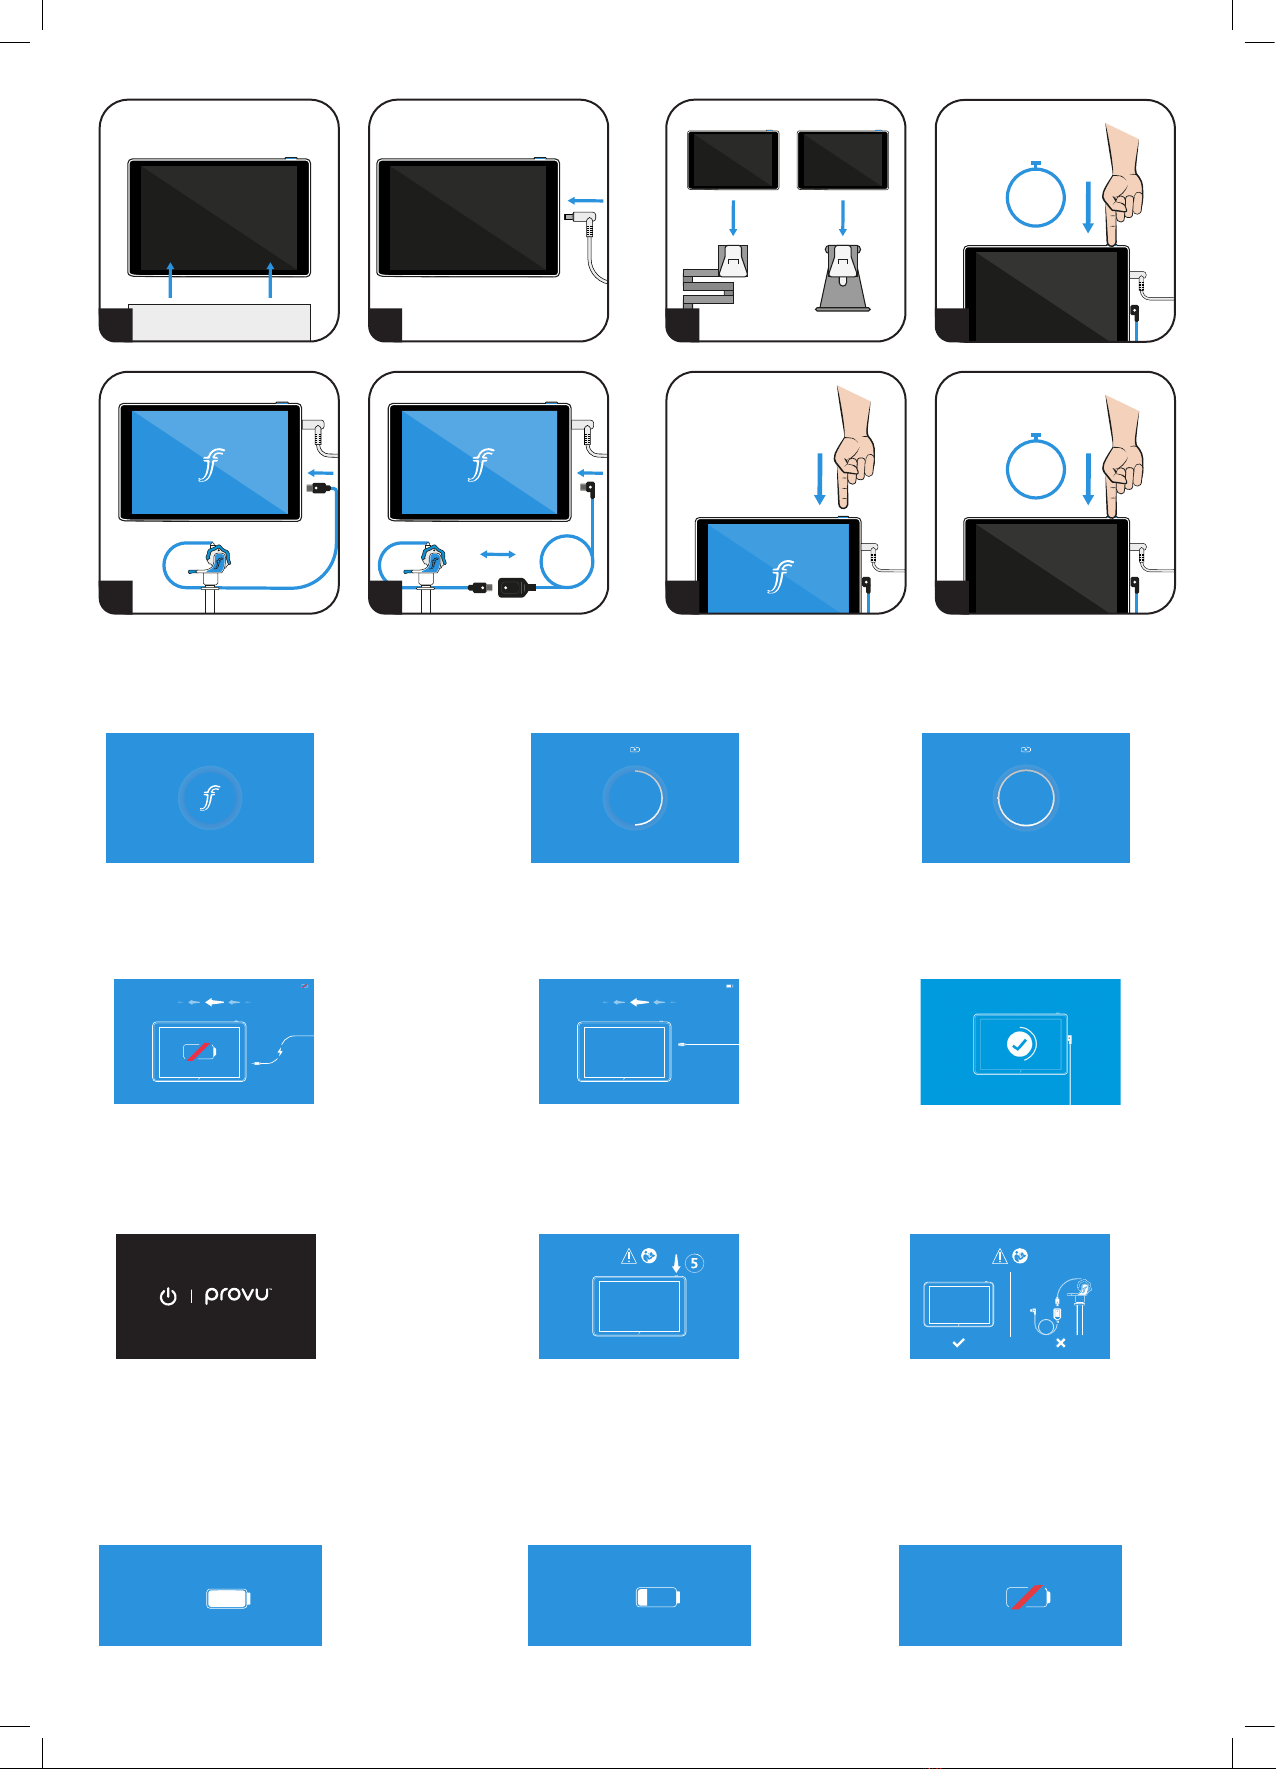
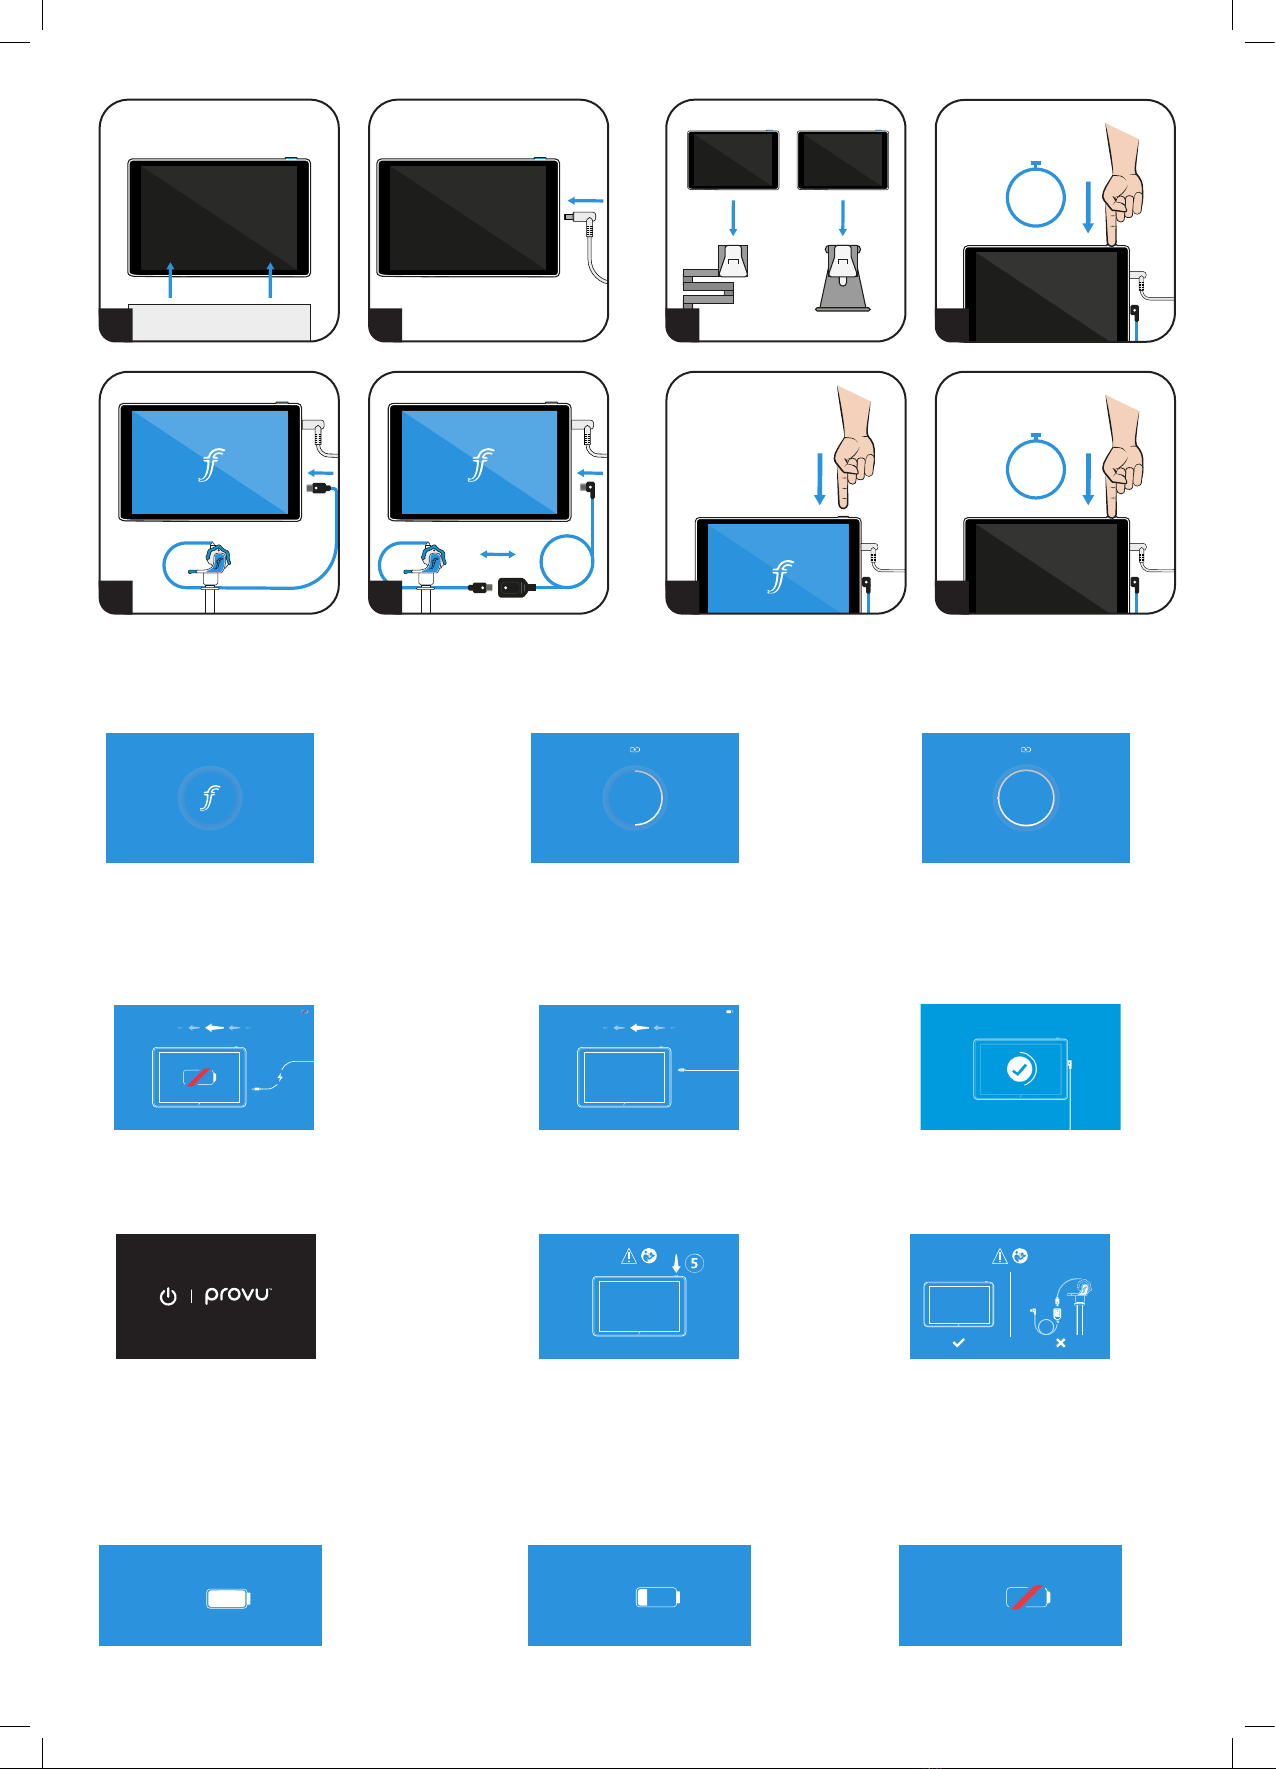
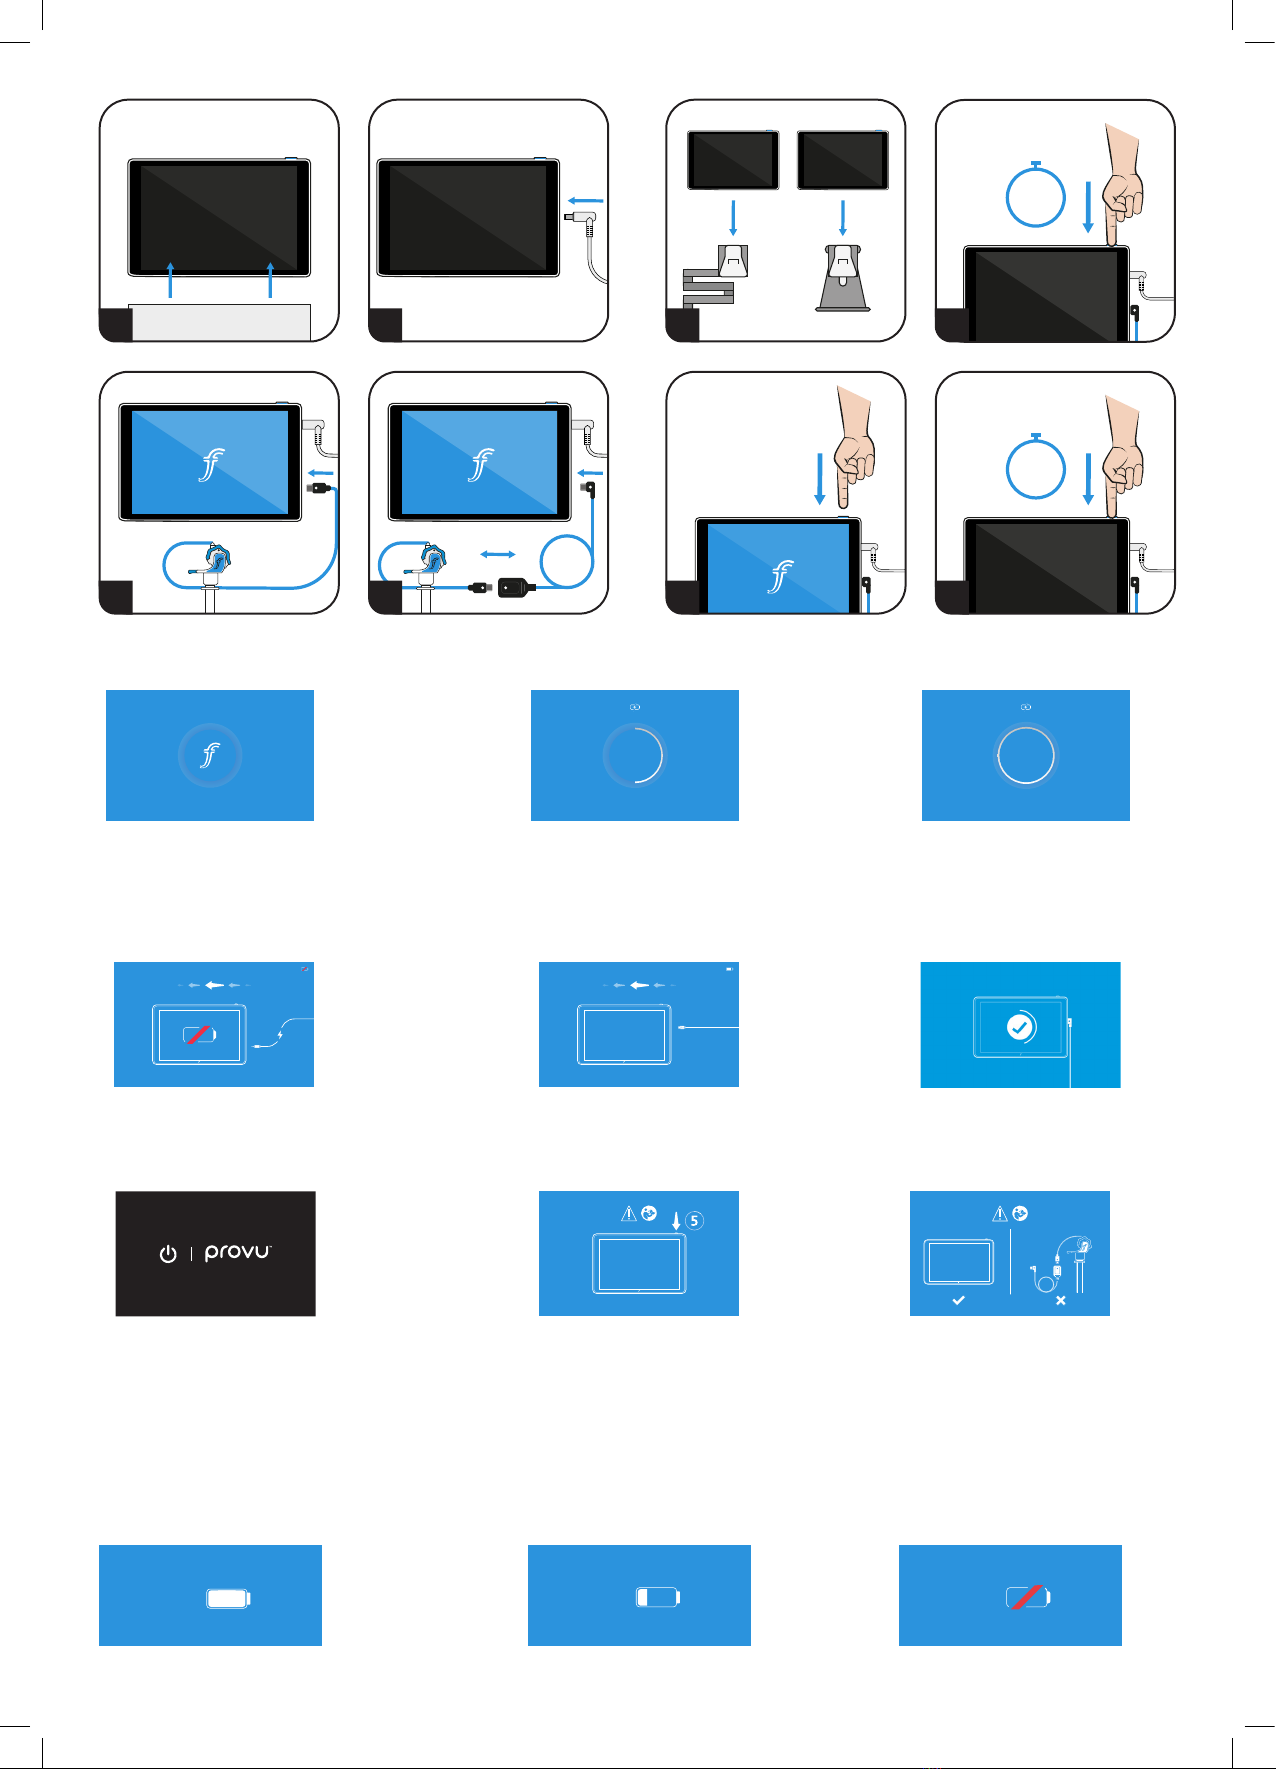
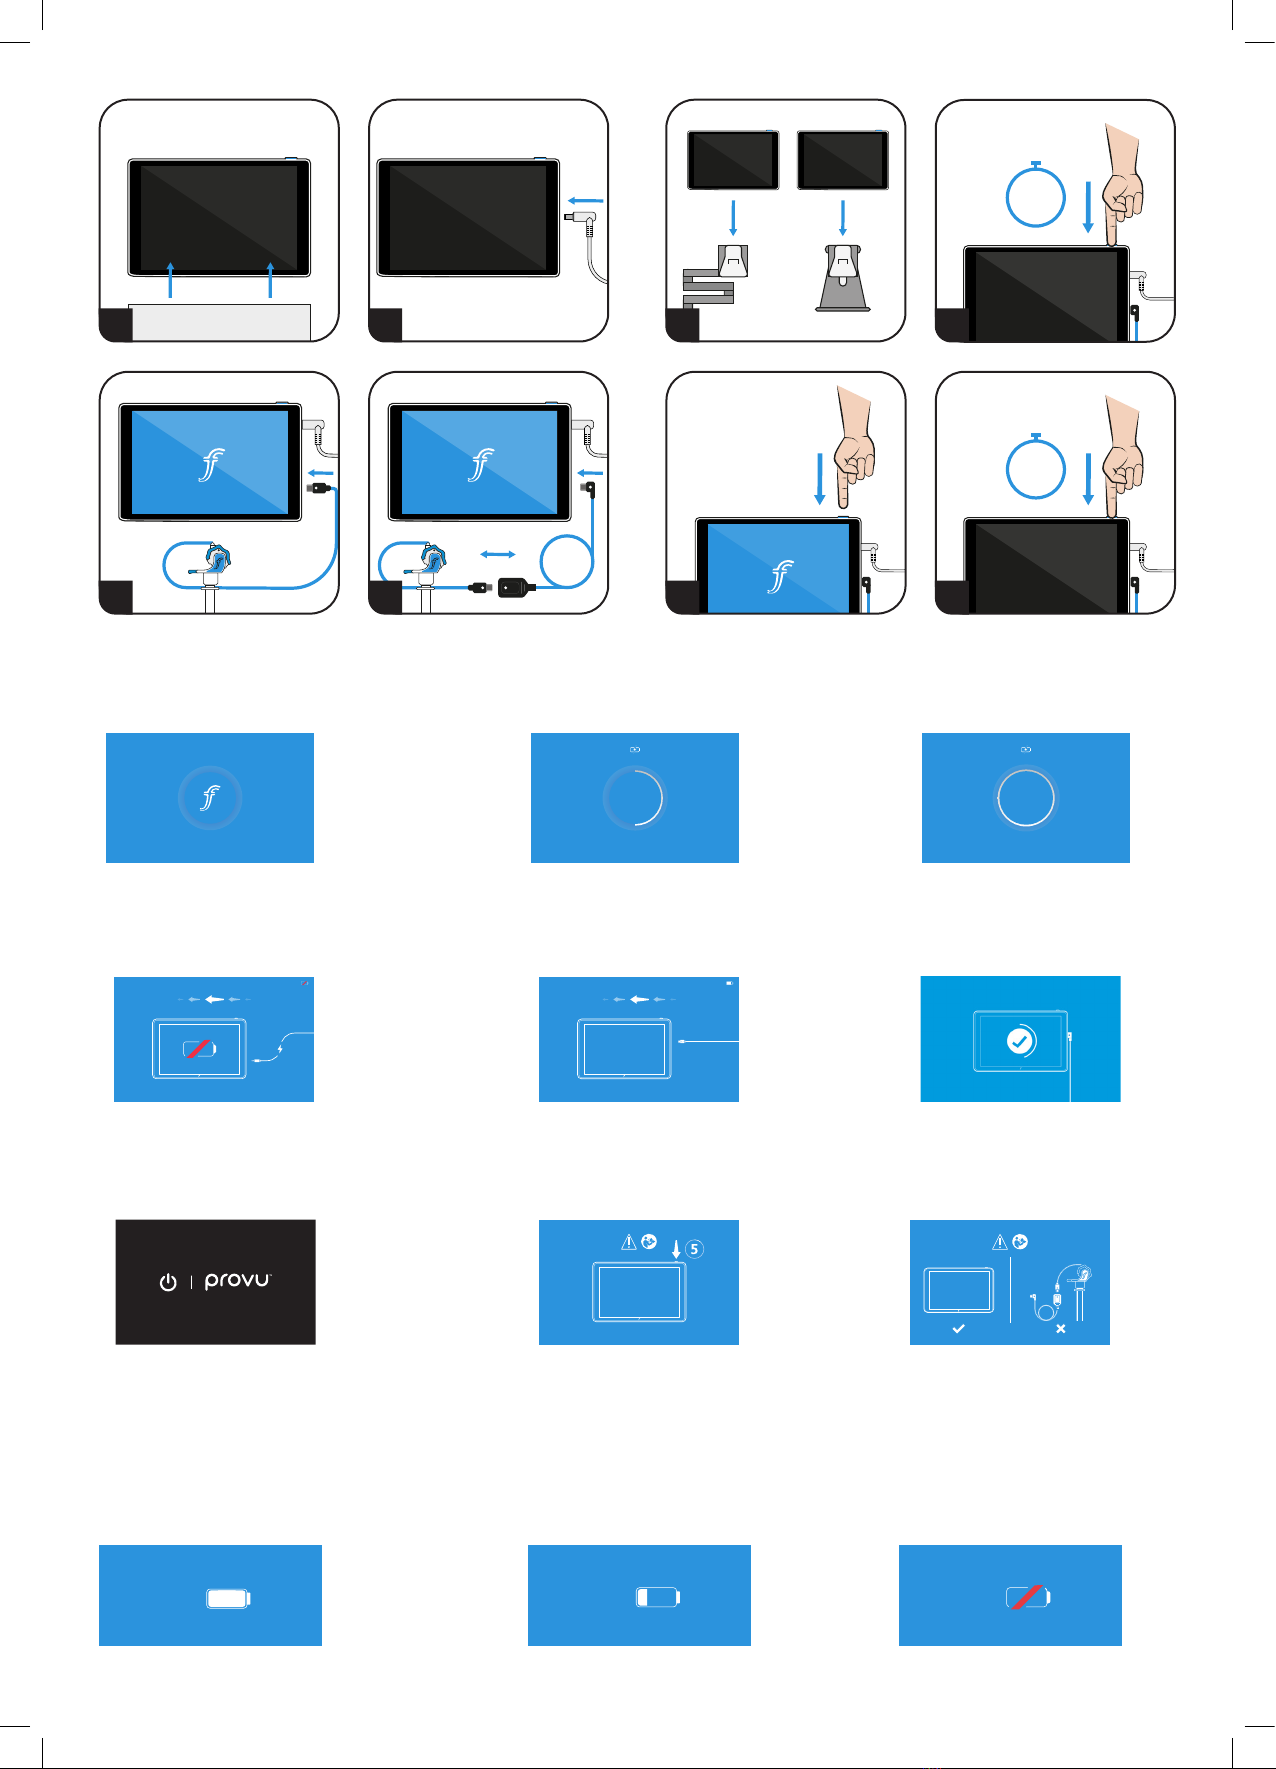
Charging
1. Connect the ProVu VS 8” Display to the DC charging cable, connected either to the plug
socket on the Display Pole Stand or directly to an outlet.
2. When connected and turned on, an indication of charge is shown on the screen. If this screen
does not display, check the security of the connections.
3. When fully charged, the Display will provide up to 7 hours of continuous use.
4. For optimal performance, keep the Display connected to the charger while in use. If this is
not suitable, re-charge between uses or when prompted on screen.
Using with ProVu VS
For more detailed instructions on the use of ProVu VS, refer to ProVu VS instructions (IP0000-042)
supplied with the ProVu VS.
1. Secure the ProVu VS 8” Display either on the ProVu VS Pole Stand or the Display Table Stand,
according to user preference.
2. Press and hold the Power Button for 3 seconds.
-If charge capacity is more than 5%, a blue screen with a connection prompt image
should appear.
-If charge capacity is 5% or less, a blue screen with the battery icon with strike out will
appear. Please connect to charger; the Display can be charged while simultaneously in
use with a ProVu VS.
3. Connect the ProVu VS to the ProVu VS 8” Display using the micro USB connector and observe
the Display screen to verify that a live image is being received from the ProVu VS.
4.
done correctly, line up the dots on the cables as shown in image #4.
5. To put the ProVu VS 8” Display into standby mode, press the Power Button once quickly and
the screen will turn black. To wake up from standby mode, press the Power Button once
quickly and the screen image will resume.
6.
the screen will turn black.
EN PROVU VIDEO STYLET 8” DISPLAY

3 secs
3 secs
1BA 2
3 4 5 6
Charged
ProVu VS 8” Display is fully charged.
Connected to ProVu VS
ProVu VS 8” Display is connected and
camera image is loading.
Display is Charging
ProVu VS 8” Display battery is charging.
Percentage charge is indicated in the circle.
Connect to ProVu VS
Connect ProVu VS 8” Display to view
camera image.
Error 2
Camera error or crash.
Software Version
Software version is displayed in the
bottom of the display when connected
to power.
Charge Display
charge via USB or charging dock.
Turn O
If Power Button is held for 3 seconds or
more, this screen will show while the
display shuts down.
Error 1
Software error or crash.
Reset ProVu VS 8” Display unit by holding
Power Button for 5 seconds or more.
100% 20% 19%
ProVu VS Software
The ProVu VS 8” Display has several on-screen prompts to assist use.
ProVu VS Battery Indicator
v0.0.1.1 v0.0.1.1
50
%
v0.0.1.1
100
%
5%
75%

Troubleshooting
Symbols Glossary
Catalog Number Serial Number Product Conforms with
Directive 93/42/EEC
Refer to Instruction
Manual/Booklet Manufacturer Caution Do Not Use Blade
to Open Type BF Applied Part Class II Equipment Keep Away
From Sunlight
Keep Dry Recycle Separate Collection Alternating Current Direct Current DC Jack Polarity
Center-Positive USB/Micro USB DC Power Port USB/Amplier
Cable Box
PROBLEM
No live image is seen
POSSIBLE EXPLANATION ACTION NEEDED
ProVu VS 8” Display needs to be charged
Charge display via the DC Charger or micro
USB cable. Note that the display can be charged
while in use.
ProVu VS 8” Display may be in sleep mode Press the Power Button once to wake.
ProVu VS 8” Display is damaged Replace the ProVu VS 8” Display with a new device.
Press and hold the Power Button for 3 seconds.
new device.
Incorrect connection to ProVu VS 8” Display
Remove and reconnect the ProVu VS 8” Display
to the device via the micro USB port as shown in
the instructions for use section.
ProVu VS may be damaged Replace with a new ProVu VS device.
PROBLEM
Low image quality
POSSIBLE EXPLANATION ACTION NEEDED
Incorrect connection to ProVu VS 8” Display
Remove and reconnect the ProVu VS 8” Display
to the device via the micro USB port as shown in
the instructions for use section.
new cable.
Dirty screen Wipe with an IPA cloth.
Damp screen Wipe with a dry cloth.
Camera lens may have secretions on it
or replace ProVu VS.
Illumination failure Replace with a new ProVu VS.
Incorrectly inserted cable Ensure all connections are secure.
After Use
1. Disconnect the ProVu VS 8” Display from the power supply.
2.
used.
3.
advised by your local healthcare provider.
4.
instructions.
Cleaning
1. Wear gloves throughout the cleaning procedure.
2. Clean the ProVu VS 8” Display and reusable accessories after each use, using a germicidal
wipe, e.g. 70% isopropyl alcohol wipe.
3. Inspect the ProVu VS 8” Display and accessories for contamination. If any is present repeat
steps 1 & 2.
4. Once the ProVu VS 8” Display and accessories are free from contaminates, dry with a clean,
dry cloth.
5. Check device for damage. If device does not function, refer to troubleshooting steps.
Warranty Statement
the product and will be free from defects in materials and workmanship that occur within one (1)
year from the date of purchase.
This warranty does not cover damage caused by:
-Handling during shipping.
-Use or maintenance contrary to labelling and instructions, including but not limited to incorrect
disassembly, reprocessing and reassembly.
-Alteration or repair by anyone not authorised by Flexicare Medical Limited.
Abuse, Misuse or Accidental Damage
If a product covered by this warranty is determined to be defective materials, components, or
workmanship, and the warrant claim is made within the warranty period described above, Flexicare
Medical Limited will, at its discretion, repair or replace the defective product free of charge.
Written authorisation must be obtained from Flexicare Medical Limited to return the product prior
to sending it with postage paid to Flexicare Medical Limited’s designated agent.
This warranty is in lieu of all other warranties, expressed or implied, including but not limited to,
Limited’s obligation under this warranty is limited to repair or replacement of products containing
a defect.
Flexicare Medical Limited is not responsible for any indirect or consequential damages resulting
from a product defect covered by the warranty.
This warranty shall be governed by and construed in accordance with Flexicare Medical Limited’s
Terms and Conditions.
List of Accessories
-Cables & Mounting Accessories
-Charging Cable
-
-ProVu VS Pole Stand
-ProVu Display Table Stand

Určené použití
Popis produktu
DISPLEJ
ROZLIŠENÍ (PIXELY)
ORIENTACE
TYP DISPLEJE
DOBA POTŘEBNÁ K ZAHÁJENÍ
VERZE SOFTWARU
PŘIPOJENÍ
USB PŘIPOJENÍ Micro USB
PŘÍPOJKA NAPÁJENÍ
SKLADOVÁNÍ A PŘEPRAVA
TEPLOTA
RELATIVNÍ VLHKOST ≤
ATMOSFERICKÝ TLAK 700 1060 hPa
PROVOZNÍ PODMÍNKY
TEPLOTA
RELATIVNÍ VLHKOST ≤
ATMOSFERICKÝ TLAK 700 1060 hPa
ZOBRAZENÍ JMENOVITÉHO ELEKTRICKÉHO VÝKONU
ELEKTRICKÝ PŘÍKON
TYP BATERIE
OBVYKLÁ DOBA VÝDRŽE BATERIE ≈
OBVYKLÁ DOBA NAPÁJENÍ BATERIE ≈
JMENOVITÝ ELEKTRICKÝ VÝKON ZÁSUVKY
PŘÍKON: 100-240 V AC 0,5 A 50-60 Hz
VÝKON Max 5,2 V DC 3,0 A
ROZMĚRY
ŠÍŘKA X VÝŠKA X TLOUŠŤKA 205 mm x 130 mm x 25 mm
HMOTNOST 396 g
ZÁSTRČKA
TYP ZÁSTRČKY
Technické parametry Předběžná opatření:
-
-
-
-
-
-
Výstrahy a opatření
-
-
-
-
-
-
-
-
-
-
-
-
-
-
-
neplatnou.
Nastavení stojanů Pro Vu
ProVu (IP0000-021).
NAPÁJENÍ
1.
2.
3.
4.
5.
Použití s ProVu VS
1.
2.
-
-
s ProVu VS.
3.
4.
5.
6.
CS DISPLEJ PROVU VIDEO STYLET 8”
3 secs
3 secs
1BA 2
3 4 5 6
Nabito
Připojeno k ProVu VS
Displej se nabíjí
Připojte k ProVu VS
displej ProVu VS 8”.
Chyba 2
Verze softwaru
Nabít displej
Vypnutí
displeje tato obrazovka.
Chyba 1
jednotku ProVu VS 8”.
100% 20% 19%
Software ProVu VS
Indikátor baterie ProVu VS
v0.0.1.1 v0.0.1.1
50
%
v0.0.1.1
100
%
5%
75%
Řešení problémů
Přehled symbolů
Katalogové číslo Sériové číslo Produkt je v souladu se
Směrnicí 93/42/EHS
Podívejte se do návodu
k použití/příručky Výrobce Varování Kotevření nepoužívejte
čepel Aplikovaná část typ BF Zařízení třídy II Uchovávejte mimo
sluneční světlo
Uchovávejte v suchu Recyklujte Tříděný sběr Střídavý proud Stejnosměrný proud
Konektor typu Jack
s polaritou center
positive
USB/Micro USB DC Power Port USB/Krabice kabelu
zesilovače
PROBLÉM
MOŽNÉ VYSVĚTLENÍ CO DĚLAT
3 sekund.
PROBLÉM
MOŽNÉ VYSVĚTLENÍ CO DĚLAT
Po použití
1.
2.
3.
4.
Čištění
1.
2.
3.
4.
5.
Prohlášení o záruce
Tato záruka se netýká poškození, způsobených:
-
-
-
Limited.
Zneužití, nesprávné použití nebo náhodné poškození
Medical Limited.
Medical Limited.
Seznam příslušenství
-
-
-
-
-

Doelmatig gebruik
De ProVu Video Stylet (VS) 8” display is een digitaal display, bedoeld om alleen via de micro-usb-
kabel live beelden van de ProVu Video Stylet (ProVu VS) weer te geven, als hulpmiddel bij intubatie
van volwassenen in ziekenhuisomgevingen.
Productbeschrijving
Het ProVu VS 8” display is een niet-steriel, herbruikbaar digitaal display dat bedoeld is om live
beelden van de ProVu VS weer te geven. Aangesloten op de ProVu VS wordt een livevideo van het
apparaat verzonden, die kan worden gebruikt om de patiënt verder te helpen bij de intubatie.
Het display kan worden opgeladen met de meegeleverde ProVu-oplaadkabel, tussendoor of tijdens
het gebruik. Wanneer het ProVu VS 8” display volledig is opgeladen, kan het tot 7 uur continu
worden gebruikt. Als de meegeleverde DC-oplader niet beschikbaar is kan het apparaat ook
worden opgeladen via de micro-usb-poort.
uitval van het apparaat.
DISPLAY
RESOLUTIE (PIXELS)
ORIËNTATIE Liggend
TYPE DISPLAY
OPSTARTTIJD Direct
SOFTWAREVERSIE Raadpleeg het scherm van het apparaat tijdens het
opladen
AANSLUITINGEN
USB-AANSLUITING Micro-usb
STROOMAANSLUITING DC-voeding
OPSLAG EN VERVOER
TEMPERATUUR
RELATIEVE VOCHTIGHEID ≤85%, niet-condenserend
ATMOSPHERISCHE DRUK 700 tot 1060 hPa
GEBRUIKSCONDITIES
TEMPERATUUR
RELATIEVE VOCHTIGHEID ≤85%, niet-condenserend
ATMOSPHERISCHE DRUK 700 tot 1060 hPa
WEERGAVE ELEKTRISCHE STROOM
STROOMINVOER Invoer: 5.0V 1.5A
ACCU TYPE 3.7V, 5000 mAh, lithium-ion
WERKINGSDUUR ACCU ≈
OPLAADDUUR ACCU ≈
WANDCONTACT ELEKTRISCHE STROOM
INVOER 100-240V AC 0,5A 50-60Hz
UITGANG Max 5.2V DC 3.0A
AFMETINGEN
BREEDTE X HOOGTE X DIKTE 205mm x 130mm x 25mm
GEWICHT 396g
PLUG
TYPE PLUG 110-120V met NEMA 5-15P 3-pins plug
Technische data Voorzorgsmaatregelen
-Zorg ervoor dat er voldoende ruimte is voor een eenvoudige bediening.
-Controleer voor elk gebruik het ProVu VS 8” display en alle accessoires op schade.
-Laad het display voor gebruik volledig op. Vanwege vervoersvereisten worden ProVu VS 8”
displays niet-opgeladen verzonden.
-Controleer voor het opladen of alle componenten volledig droog zijn, inclusief de micro-usb-
poort. Als u de displayconsole gebruikt, schuif de display dan stevig op de connector van de
scharnierarm en zorg ervoor dat deze goed vastzit.
-Als u de displaytafelconsole gebruikt, schuif het display dan stevig op de connector van de
scharnierarm en zorg ervoor dat deze goed vastzit.
-Plaats de displaytafelconsole altijd op een stabiele, vlakke ondergrond.
Waarschuwingen en voorzorgsmaatregelen
-ProVu VS 8” display en accessoires mogen alleen worden gebruikt door geschoold personeel.
-
hoge interferentiebronnen.
-Steriliseer het apparaat niet.
-Het gebruik van hulpmiddelen en andere accessoires die niet door Flexicare zijn goedgekeurd,
kan leiden tot suboptimale prestaties en kan de patiënt in gevaar brengen.
-DeProVuVS 8”display isontworpenom tepassen op dedisplayconsole ofdedisplaytafelconsole.
8” display.
-ProVu VS 8” display en accessoires mogen alleen worden gebruikt door geschoold personeel.
-
-Zorg ervoor dat de spanningsaanbevelingen van het display compatibel zijn met de voeding.
-Reinig het display of de accessoires niet met schurende middelen of minerale zuren.
-Gebruik geen sterilisatiemiddelen met bijtende ingrediënten, zoals chirurgische
scruboplossingen, peroxide-oplossingen, bleekmiddelen of povidone-jodiumoplossingen.
-Demonteer het apparaat niet.
-Ontoereikende accuniveaus kunnen leiden tot een plotselinge uitval zonder waarschuwing.
Controleer voor gebruik of het batterijniveau voldoende is.
-
-Het apparaat is niet bruikbaar.
-De accu is niet verwijderbaar. Open of verwijder de accu niet. De garantie vervalt als deze wordt
geopend.
Elk ernstig incident dat zich in verband met het apparaat voordoet, moet aan de fabrikant en de
Het instellen van de ProVu VS-staanders
Raadpleeg de instructies die bij de ProVu VS-console (IP0000-030) of ProVu displaytafelconsole
(IP0000-021) worden geleverd.
Opladen
1. Sluit het ProVu VS 8” display aan op de DC-oplaadkabel en sluit deze aan op de
stekkeraansluiting van de displayconsole of rechtstreeks op een stopcontact.
2. Bij het aansluiten en inschakelen wordt een indicatie van het oplaadniveau op het scherm
getoond. Wordt dit scherm niet weergegeven, controleer dan de beveiliging van de
aansluitingen.
3. Wanneer het display volledig is opgeladen, kan het tot 7 uur lang continu worden gebruikt.
4. Voor optimale prestaties houdt u het display aangesloten op de oplader tijdens het gebruik.
5. Als dit niet genoeg is, laad dan opnieuw op tussen toepassingen door of wanneer dit op het
scherm wordt gevraagd.
Met gebruik van ProVu VS
Raadpleeg voor meer gedetailleerde instructies over het gebruik van ProVu VS de ProVu VS-
instructies (IP0000-042), die met de ProVu VS worden meegeleverd.
1. Maak het ProVu VS 8” display vast op de ProVu VS-console of op de displaytafelconsole,
afhankelijk van de voorkeur van de gebruiker.
2. Houd de power-knop 3 seconden ingedrukt.
-Als de oplaadcapaciteit meer dan 5% is, moet er een blauw scherm met een
verbindingsprompt verschijnen.
-Als de oplaadcapaciteit 5% of minder is, verschijnt er een blauw scherm met het
batterijpictogram met doorstreping. Gelieve aan te sluiten op de oplader; het display
kan worden opgeladen terwijl het tegelijkertijd in gebruik is met een ProVu VS.
3. Sluit de ProVu VS aan op het ProVu VS 8” display met behulp van de micro-usb-aansluiting
en kijk op het beeldscherm om te controleren of er een live-beeld wordt ontvangen van de
ProVu VS.
4. Als u de herbruikbare versterkerkabel gebruikt, sluit dan de elleboog van de versterkerkabel
aan op het display en steek de ProVu VS-camerakabel in de connector van de
versterkerkerkabel. Om er zeker van te zijn dat dit correct gebeurt, moet u de stippen op de
kabels uitlijnen zoals op afbeelding #4.
5.
knop en het scherm wordt zwart. Druk om het display uit de stand-by-modus te ontwaken
6. Druk om het ProVu VS 8” display uit te zetten 3 seconden lang op de power-knop en het
scherm wordt zwart.
NL PROVU VIDEO STYLET 8” DISPLAY
3 secs
3 secs
1BA 2
3 4 5 6
Opgeladen
ProVu VS 8” display is volledig opgeladen
Aansluiten op ProVu VS
ProVu VS 8” display is aangesloten en het
camerabeeld wordt geladen.
Het display is bezig met
opladen
ProVu VS 8” display accu is bezig met
opladen Oplaadniveau is weergegeven in
de cirkel.
Aansluiten op ProVu VS
Sluit ProVu VS 8” display aan om het
camerabeeld te bekijken.
Error 2
Camerafout of -crash.
versterkerkerkabel.
Softwareversie
De softwareversie wordt onderin het
scherm weergegeven wanneer deze is
aangesloten op de stroomvoorziening.
Opladen display
Display heeft onvoldoende oplaadniveau.
Opladen via usb of het oplaaddock.
Uitschakelen
Als u de power-knop 3 seconden of
langer ingedrukt houdt, wordt dit scherm
weergegeven terwijl het display wordt
uitgeschakeld.
Error 1
Softwarefout of -crash.
Reset ProVu VS 8” display-unit door
de power-knop 5 seconden of langer
ingedrukt te houden.
100% 20% 19%
ProVu VS-software
Het ProVu VS 8” display kent verschillende instructies op het scherm om u te helpen bij het gebruik.
ProVu VS accu-indicator
Tijdens het gebruik verschijnt de accu-indicator op het scherm om het resterende oplaadniveau aan te geven. Het pictogram gaat aan en uit als het oplaadniveau minder dan 20% is.
v0.0.1.1 v0.0.1.1
50
%
v0.0.1.1
100
%
5%
75%
Probleemoplossing
Symbolen begrippenlijst
Catalogusnummer Serienummer
Het product is in
overeenstemming met
Richtlijn 93/42/EEC
Raadpleeg de
handleiding met
instructies
Vervaardigd door Opgelet Gebruik het blad niet
om te openen Type BF toegepast deel Klasse II-apparatuur Houd het appraat uit de
buurt van zonlicht
Houd het droog Recyclen Afzonderlijke
inzameling Wisselstroom Gelijkstroom DC plug polariteit
centrum-positief Usb/micro-usb DC-voedingspoort Usb/versterkerkabelbox
PROBLEEM
Er is geen live-beeld te zien
MOGELIJKE VERKLARING ACTIE NODIG
ProVu VS 8” display moet worden opgeladen
Laad op via de DC-oplader of de micro-usb-kabel.
Het display kan worden opgeladen terwijl het
tegelijkertijd in gebruik.
ProVu VS 8” display is mogelijk in slaapmodus
ontwaken.
ProVu VS 8” display is beschadigd Vervang ProVu VS 8” display door een nieuw
apparaat.
ProVu VS 8” display is mogelijk uitgeschakeld Houd de power-knop 3 seconden ingedrukt.
ProVu VS-versterkerkerkabel is beschadigd Vervang ProVu VS-versterkerkerkabel door een
nieuwe.
of versterkerkerkabel
Verwijder het ProVu VS 8" display en sluit
het opnieuw aan op het apparaat via de
micro-usb-poort, zoals aangegeven in de
gebruiksaanwijzing.
ProVu VS kan beschadigd zijn Vervang door een nieuw ProVu VS-apparaat.
PROBLEEM
Lage beeldkwaliteit
MOGELIJKE VERKLARING ACTIE NODIG
of versterkerkerkabel
Verwijder het ProVu VS 8" display en sluit
het opnieuw aan op het apparaat via de
micro-usb-poort, zoals aangegeven in de
gebruiksaanwijzing.
ProVu VS-versterkerkerkabel is beschadigd Vervang ProVu VS-versterkerkerkabel door een
nieuwe.
Vuil scherm Reinig met een IPA-doekje.
Vochtig scherm Veeg af met een droge doek.
De lens van de camera kan afscheidingen
hebben
Maak de cameralens schoon met een schone
microvezeldoek of vervang ProVu VS.
Verlichtingsfout Vervang door een nieuw ProVu VS-apparaat.
Verkeerd geplaatste kabel Zorg ervoor dat alle aansluitingen vastzitten.
Na gebruik
1.
2.
3. Verwijder na gebruik het product en alle componenten weg in overeenstemming met het
4. Reinig en droog het ProVu VS 8” display en de versterkerkerkabel (indien gebruikt) conform
de reinigingsinstructies.
Reiniging
1. Draag handschoenen tijdens de gehele reinigingsprocedure.
2. Maak het ProVu VS 8” display en herbruikbare accessoires na elk gebruik schoon met een
kiemdodend doekje, bijvoorbeeld een 70% isopropylalcoholdoekje.
3. Controleer het ProVu VS 8” display en alle accessoires op besmetting. Indien aanwezig,
herhaal dan stap 1 & 2.
4. Zodra het ProVu VS 8” display en de accessoires vrij zijn van verontreinigingen, droog ze dan
af met een schone, droge doek.
5. Controleer het apparaat op schade. Als het apparaat niet werkt, raadpleeg dan de stappen
voor probleemoplossing.
Garantieverklaring
Flexicare Medical Limited garandeert dat het gekochte product voldoet aan de gelabelde
na de aankoopdatum voordoen.
Deze garantie dekt geen schade veroorzaakt door:
-Behandeling tijdens de verzending.
-Gebruik of onderhoud in strijd met de etikettering en instructies, met inbegrip van, maar niet
beperkt tot, onjuiste demontage, bewerking en montage.
-Wijziging of reparatie door iemand die niet geautoriseerd is door Flexicare Medical Limited.
Misbruik, verkeerd gebruik of onopzettelijke schade
Als wordt vastgesteld dat een product dat onder deze garantie valt, defecte materialen, onderdelen
bevat of ondeugdelijk vakmanschap vertoont en de garantieclaim wordt ingediend binnen de
hierboven beschreven garantieperiode, dan zal Flexicare Medical Limited het defecte product naar
eigen goeddunken kosteloos repareren of vervangen.
Schriftelijke toestemming moet worden verkregen van Flexicare Medical Limited om het product
te retourneren voordat het gefrankeerd wordt verzonden naar de aangewezen agent van Flexicare
Medical Limited.
Deze garantie vervangt alle andere garanties, expliciet of impliciet, met inbegrip van, maar niet
beperkt tot, de impliciete garanties van commercie en geschiktheid voor een bepaald doel. De
verplichting van Flexicare Medical Limited onder deze garantie is beperkt tot het repareren of
vervangen van producten die een defect vertonen.
Flexicare Medical Limited is niet verantwoordelijk voor enige indirecte of gevolgschade als gevolg
van een defect product, dat onder de garantie valt.
Deze garantie wordt bepaald door en geïnterpreteerd in overeenstemming met de Algemene
Voorwaarden van Flexicare Medical Limited.
Lijst met accessoires
-
-Oplaadkabel
-2m versterkerkabel
-ProVu VS-console
-ProVu displaytafelconsole

Utilisation prévue
l’intubation des adultes en milieu hospitalier.
Description du produit
du patient.
port micro USB, si l’alimentation secteur est indisponible.
Précautions
-
-
MONITEUR
RÉSOLUTION (PIXELS)
ORIENTATION Paysage
TYPE DE MONITEUR
TEMPS DE DÉMARRAGE
VERSION DU LOGICIEL
CONNEXIONS
CONNEXION USB Micro USB
CONNEXION ÉLECTRIQUE Alimentation secteur
STOCKAGE ET TRANSPORT
TEMPÉRATURE
HUMIDITÉ RELATIVE ≤85 %, sans condensation
PRESSION ATMOSPHÉRIQUE
CONDITIONS DE FONCTIONNEMENT
TEMPÉRATURE
HUMIDITÉ RELATIVE ≤85 %, sans condensation
PRESSION ATMOSPHÉRIQUE
AFFICHAGE DE LA PUISSANCE ÉLECTRIQUE
ENTRÉE ALIMENTATION
TYPE DE BATTERIE 3,7 V, 5 000 mA, lithium ion
AUTONOMIE DE LA BATTERIE ≈
CHARGEMENT DE LA BATTERIE ≈
PUISSANCE ÉLECTRIQUE DE L’ALIMENTATION SECTEUR
ENTRÉE 100-240 V AC 0,5 A 50-60Hz
SORTIE Max. 5,2 V DC 3,0 A
DIMENSIONS
LARGEUR X HAUTEUR X ÉPAISSEUR 205 mm x 130 mm x 25 mm
POIDS 396 g
PRISE
TYPE DE PRISE
Caractéristiques techniques -
-Avant de charger l’appareil, assurez-vous que tous les composants sont parfaitement secs,
notamment le port micro USB. Si vous utilisez le support de moniteur sur pied, faites glisser le
-Si vous utilisez le support de moniteur sur table ProVu, faites glisser le moniteur correctement
-Posez toujours le support de moniteur sur table sur une surface plate et stable.
Avertissements et mises en garde
-
-
-
-
performances non optimales et mettre le patient en danger.
-
-
-
nettoyer.
-
-Ne nettoyez pas le moniteur ou les accessoires du moniteur avec des produits abrasifs ou des
-
chirurgical, les solutions de peroxyde, les agents de blanchiment ou les solutions de povidone-
iode.
-
-
-
-
-La batterie n’est pas amovible. N’ouvrez pas le dispositif et ne retirez pas la pile. La garantie est
Mise en place des supports SV ProVu
Reportez-vous aux instructions fournies avec le support de moniteur sur pied SV ProVu (IP0000-
030) ou le support de moniteur sur table ProVu (IP0000-021).
Chargement
1.
2.
3.
heures d’utilisation continue.
4.
son utilisation.
5.
Utilisation avec le SV ProVu
Pour de plus amples informations sur l’utilisation du SV ProVu, veuillez vous reporter aux
instructions du SV ProVu (IP0000-042) fournies avec le SV ProVu.
1. 1. Ajustez correctement le moniteur SV ProVu 20 cm soit sur le support de moniteur sur
l’utilisateur.
2.
-
-
3.
4.
comme l’indique l’illustration no 4.
5. 5. Pour mettre le moniteur SV ProVu 20 cm en mode veille, appuyez une fois brièvement
6.
FR MONITEUR POUR STYLET VIDÉO PROVU 20 CM (8 POUCES)
3 secs
3 secs
1BA 2
3 4 5 6
Chargement complet
Le moniteur SV ProVu 20 cm est
Connexion établie avec le SV ProVu
Statut du chargement
La batterie du moniteur SV ProVu 20 cm est
en cours de chargement. Le pourcentage
cercle.
Connexion au SV ProVu
Branchez le moniteur SV ProVu 20 cm pour
Erreur 2
Version du logiciel
Chargement nécessaire
Veuillez recharger le dispositif via le port
USB ou la station de recharge.
Mise à l’arrêt
Erreur 1
au moins 5 secondes.
100% 20% 19%
Logiciel SV ProVu
Statut de la batterie du SV ProVu
v0.0.1.1 v0.0.1.1
50
%
v0.0.1.1
100
%
5%
75%

Guide de dépannage
Glossaire des symboles
Référence du modèle Numéro de série Produit conforme à la
directive 93/42/CEE
Suivre les instructions
d’utilisation Fabricant Avertissement Ne pas utiliser de lames
pour ouvrir
Pièce appliquée de
type BF Équipement de classe II Tenir à l’abri de la
lumière directe
Conserver au sec Recyclable Collecte séparée Courant alternatif Courant continu
Connecteur
d’alimentation Polarité
centre positif
USB/Micro USB Port alimentation
secteur
Connecteur câble USB/
amplicateur
PROBLÈME
Aucune image n’est visible en direct
EXPLICATIONS POSSIBLES ACTIONS NÉCESSAIRES
Rechargez le moniteur sur l’alimentation secteur
veille
Remplacez le moniteur SV ProVu 20 cm par un
nouveau dispositif.
un nouveau dispositif.
Mauvaise connexion au moniteur SV ProVu 20
ProVu 20 cm au dispositif avec le port micro
d’emploi.
Remplacez le dispositif avec un nouveau SV
ProVu.
PROBLÈME
EXPLICATIONS POSSIBLES ACTIONS NÉCESSAIRES
Mauvaise connexion au moniteur SV ProVu 20
ProVu 20 cm au dispositif avec le port micro
d’emploi.
Écran sale
Écran humide
SV ProVu.
Remplacez le dispositif par un nouveau SV
ProVu.
Après utilisation
1.
2.
3.
4.
reportant aux instructions de nettoyage.
Nettoyage
5.
6.
7.
8. 4. Lorsque le moniteur SV ProVu 20 cm et les accessoires sont exempts de toute
9.
Garantie
-une manipulation pendant le transport maritime ;
-
-
Limited.
Abus, mauvais usage ou dommages accidentels
Cette garantie remplace toutes les autres garanties, explicites ou implicites, y compris, mais sans
Limited.
Liste des accessoires
-
-
-
-Support sur pied SV ProVu
-Support de moniteur sur table ProVu

Verwendungszweck
Das ProVu Video Stylet (ProVu VS) 8-Zoll-Display ist ein digitales Display, mit dem Live-Bilder vom
Produktbeschreibung
Das ProVu VS 8-Zoll-Display ist eine nicht sterile, wiederverwendbare Digitalanzeige zur Anzeige
von Livebildern vom ProVu VS. Bei Anschluss an den ProVu VS wird vom Gerät ein Live-Video
übertragen, das zur weiteren Unterstützung der Intubation des Patienten verwendet werden kann.
Das Display kann zwischen den Einsätzen oder während des Gebrauchs mit dem mitgelieferten
Dauerbetriebslänge von bis zu 7 Stunden. Das Produkt kann auch über den Micro-USB-Anschluss
aufgeladen werden, wenn das mitgelieferte DC-Ladegerät nicht verfügbar ist.
Ausfall des Geräts.
BILDSCHIRM
AUFLÖSUNG (PIXEL)
ORIENTIERUNG Querformat
DISPLAY-ART
ANLAUFZEIT Sofort
SOFTWAREVERSION Siehe Gerätebildschirm während des Ladevorgangs
VERBINDUNGEN
USB-VERBINDUNG Micro-USB
STROMANSCHLUSS DC-Stromversorgung
LAGERUNG UND TRANSPORT
TEMPERATUR
RELATIVE LUFTFEUCHTIGKEIT ≤85 %, nicht kondensierend
ATMOSPHÄRISCHER DRUCK 700 bis 1060 hPa
BETRIEBSBEDINGUNGEN
TEMPERATUR
RELATIVE LUFTFEUCHTIGKEIT ≤85 %, nicht kondensierend
ATMOSPHÄRISCHER DRUCK 700 bis 1060 hPa
ELEKTRISCHE LEISTUNGSBEWERTUNG DES DISPLAYS
NETZSTROMEINGANG Eingang: 5,0 V 1,5 A
AKKUTYP 3,7 V, 5000 mAh, Lithium-Ionen
TYPISCHE AKKU-LAUFZEIT ≈
TYPISCHE LADEZEIT DES AKKUS ≈
ELEKTRISCHE STROMBEWERTUNG DES WANDSTECKERS
EINGANG 100-240V AC 0,5 A 50-60Hz
AUSGANG Max. 5,2 V DC 3,0 A
ABMESSUNGEN
BREITE X HÖHE X DICKE 205 mm x 130 mm x 25 mm
GEWICHT 396 g
STECKER
STECKERART 110-120V mit NEMA 5-15P 3-poligem Stecker
Technische Daten Vorsichtsmaßnahmen
-Stellen Sie sicher, dass ausreichend Platz für eine einfache Bedienung vorhanden ist.
-Das ProVu VS 8-Zoll-Display und das gesamte Zubehör vor jedem Gebrauch auf Beschädigungen
überprüfen.
-
8-Zoll-Displays kostenlos geliefert.
-
Anschlusses, vollständig trocken sind.Bei Verwendung des Display Pole Stand das Display sicher
auf den Anschluss des Gelenkarms schieben und sicherstellen, dass es vollständig aufsitzt.
-Bei Verwendung des ProVu Display Table Stand das Display sicher auf den Anschluss schieben
und sicherstellen, dass es vollständig aufsitzt.
-Den Display Table Stand immer auf eine stabile, ebene Fläche stellen.
Warnungen
-Das ProVu VS 8-Zoll-Display und Zubehör dürfen nur von geschultem Personal verwendet
werden.
-
anderen hohen Störquellen verwenden.
-Das Gerät nicht sterilisieren.
-Die Verwendung von Geräten und anderem Zubehör, die nicht von Flexicare zugelassen sind,
kann zu einer suboptimalen Leistung führen und den Patienten gefährden.
-Das ProVu VS 8-Zoll-Display passt entweder auf den Display Pole Stand oder den Display Table
ProVu VS 8-Zoll-Displays führen.
-Das ProVu VS 8-Zoll-Display sollte nur mit dem ProVu VSund ProVu-Zubehör verwendet werden.
-Das ProVu VS 8-Zoll-Display vor dem Reinigen stets vom Ladekabel trennen.
-Sicherstellen, dass die elektrischen Spannungsempfehlungen des Displays mit den Netzteilen
kompatibel sind.
-Das Display oder das Displayzubehör nicht mit Schleifmitteln oder Mineralsäuren reinigen.
-
Peroxidlösungen, Bleichmittel oder Povidon-Jod-Lösungen verwenden.
-Das Gerät nicht demontieren.
-Ein unzureichender Akkuladestand kann ohne Vorwarnung zu einem plötzlichen Ausfall führen.
Vor dem Gebrauch den ausreichenden Akkuladestand überprüfen.
-
-Gerät kann nicht gewartet werden.
-
die Garantie.
Jeder schwerwiegende Vorfall im Zusammenhang mit dem Gerät sollte dem Hersteller und der
Einrichten der ProVu VS-Ständer
Die mit dem ProVu VS Pole Stand (IP0000-030) oder dem ProVu Display Table Stand (IP0000-021)
gelieferten Anweisungen beachten.
Auaden
1. Das ProVu VS 8-Zoll-Display mit dem DC-Ladekabel, das entweder an die Steckdose am
Display Pole Stand oder direkt an eine Steckdose angeschlossen ist, verbinden.
2.
fehlender Anzeige dieses Bildschirms die Sicherheit der Verbindungen überprüfen.
3.
4. Zum Erzielen einer optimalen Leistung das Display während des Betriebs an das Ladegerät
angeschlossen halten.
5.
Verwendung mit ProVu VS
Ausführlichere Anweisungen zur Verwendung von ProVu VS sind in der mit dem ProVu VS
1. Das ProVu VS 8-Zoll-Display je nach Benutzerwunsch entweder am ProVu VS Pole Stand oder
am Display Table Stand sichern.
2. Die Einschalttaste für 3 Sekunden gedrückt halten.
-Wenn die Ladekapazität mehr als 5 % beträgt, sollte ein blauer Bildschirm mit einem Bild
-Wenn die Ladekapazität 5 % oder weniger beträgt, wird ein blauer Bildschirm mit dem
kann bei gleichzeitiger Verwendung mit einem ProVu VS aufgeladen werden.
3.
und Sie auf dem Bildschirm beobachten, ob ein Livebild vom ProVu VS empfangen wird.
4. Bei Verwendung des wiederverwendbaren Verstärkerkabels den Winkel des
Anschluss des Verstärkerkabels stecken. Zur Sicherstellung der korrekten Durchführung die
5. Um das ProVu VS 8-Zoll-Display in den Standby-Modus zu versetzen, einmal schnell
die Einschalttaste drücken. Der Bildschirm wird schwarz. Um aus dem Standby-Modus
aufzuwachen, einmal schnell die Einschalttaste drücken, und das Bildschirmbild wird wieder
angezeigt.
6. Zum Ausschalten des ProVu VS 8-Zoll-Display die Einschalttaste 3 Sekunden lang gedrückt
halten, und der Bildschirm wird schwarz.
DE PROVU VIDEO STYLET 8-ZOLL-DISPLAY
3 secs
3 secs
1BA 2
3 4 5 6
Aufgeladen
Das ProVu VS 8-Zoll-Display ist voll
aufgeladen.
Verbunden mit ProVu VS
Das ProVu VS 8-Zoll-Display ist
geladen.
Display wird aufgeladen
Der ProVu VS 8-Zoll-Display-Akku wird
aufgeladen. Der prozentuale Ladestand
An ProVu VS anschließen
Fehler 2
ersetzen.
Softwareversion
Die Softwareversion wird im unteren
Bereich des Displays angezeigt, wenn es
an die Stromversorgung angeschlossen ist.
Ladeanzeige
Das Display verfügt über nicht genügend
Akkuleistung. Bitte über USB oder
Abschalten
Wenn die Einschalttaste 3 Sekunden oder
länger gedrückt gehalten wird, wird dieser
Bildschirm angezeigt, während das Display
heruntergefahren wird.
Fehler 1
Softwarefehler oder Absturz.
Zum Zurücksetzen der ProVu VS 8-Zoll-Display-Einheit
die Einschalttaste mindestens 5 Sekunden lang gedrückt
halten.
100% 20% 19%
ProVu VS Software
Das ProVu VS 8-Zoll-Display verfügt über mehrere Bildschirmanweisungen, die die Verwendung erleichtern.
ProVu VS Akku-Anzeige
Während des Gebrauchs erscheint die Akkuanzeige auf dem Bildschirm, um die verbleibende Akkuleistung anzuzeigen. Das Symbol wird abwechselnd blinken, wenn die Akkuladung weniger
als 20 % beträgt.
v0.0.1.1 v0.0.1.1
50
%
v0.0.1.1
100
%
5%
75%

Fehlersuche
GLOSSAR DER SYMBOLE
Katalognummer Katalognummer
Das Produkt entspricht
der Richtlinie 93/42/
EWG.
Siehe Anleitung Hergestellt von Warnung Zum Önen keine
Klinge verwenden Anwendungsteil Typ BF Gerät der Klasse II Von Sonnenlicht
fernhalten
Trocken lagern Recycling Getrennte Sammlung Wechselstrom Gleichstrom DC-Buchse, mittig
positive Polarität USB/Micro USB Gleichstromanschluss USB /
Verstärkerkabelbox
PROBLEM
Es wird kein Livebild angezeigt
MÖGLICHE ERKLÄRUNG ERFORDERLICHE MASSNAHMEN
Das ProVu VS 8-Zoll-Display muss aufgeladen
werden
Das Display über das DC-Ladegerät oder das
das Display während des Betriebs aufgeladen
werden kann.
möglicherweise im Ruhemodus.
Zur Aktivierung die Einschalttaste einmal
drücken.
Das ProVu VS 8-Zoll-Display ist beschädigt. Das ProVu VS 8-Zoll-Display durch ein neues Gerät
ersetzen.
Das ProVu VS 8-Zoll-Display ist möglicherweise
ausgeschaltet.
Die Einschalttaste für 3 Sekunden gedrückt
halten.
Das ProVu VS-Verstärkerkabel ist beschädigt. Das ProVu VS-Verstärkerkabel durch ein neues
Gerät ersetzen.
Falsche Verbindung zum ProVu VS 8-Zoll-Display
Das ProVu VS 8-Zoll-Display entfernen und
Gebrauchsanweisung wieder an das Gerät
ProVu VS ist möglicherweise beschädigt. Durch ein neues ProVu VS-Gerät ersetzen.
PROBLEM
Niedrige Bildqualität
MÖGLICHE ERKLÄRUNG ERFORDERLICHE MASSNAHMEN
Falsche Verbindung zum ProVu VS 8-Zoll-Display
Das ProVu VS 8-Zoll-Display entfernen und
Gebrauchsanweisung wieder an das Gerät
Das ProVu VS-Verstärkerkabel ist beschädigt. Das ProVu VS-Verstärkerkabel durch ein neues
Schmutziger Bildschirm Mit einem IPA-Tuch abwischen.
Feuchter Bildschirm Mit trockenem Tuch abwischen.
möglicherweise Sekrete.
Mikrofasertuch reinigen oder ProVu VS
ersetzen.
Beleuchtungsfehler Durch ein neues ProVu VS-Gerät ersetzen.
Stellen Sie vor Beginn der Behandlung sicher,
dass alle Verbindungen gesichert sind.
Verwendungszweck
1. Das ProVu VS 8-Zoll-Display von der Stromversorgung trennen.
2. ProVu VS vom ProVu VS 8-Zoll-Display oder vom Verstärkerkabel, falls verwendet, trennen.
3.
Ihres örtlichen Gesundheitsdienstleisters entsorgen.
4.
Reinigungsanweisungen reinigen und trocknen.
Reinigung
1. Während des gesamten Reinigungsvorgangs sind Handschuhe zu tragen.
2. Das ProVu VS 8-Zoll-Display und das wiederverwendbare Zubehör nach jedem Gebrauch mit
einem keimtötenden Tuch, z. B. einem 70 % Isopropylalkohol-Tuch, reinigen.
3. Das ProVu VS 8-Zoll-Display und das Zubehör auf Verunreinigungen überprüfen. Falls
vorhanden, die Schritte 1 und 2 wiederholen.
4. Sobald das ProVu VS 8-Zoll-Display und das Zubehör frei von Verunreinigungen sind, mit
einem sauberen, trockenen Tuch abtrocknen.
5. Das Gerät auf Beschädigungen kontrollieren. Bei Nichtfunktionieren des Gerätes die Schritte
zur Fehlerbehebung konsultieren.
Garantieerklärung
Flexicare Medical Limited garantiert, dass das gekaufte Produkt den gekennzeichneten
Die Garantie deckt keine Schäden ab, die wie folgt verursacht wurden:
-Handhabung während des Versands.
-
nicht beschränkt auf fehlerhafte Demontage, Wiederaufbereitung und -zusammenbau.
-Änderung oder Reparatur durch Personen, die nicht von Flexicare Medical Limited autorisiert
wurden.
Missbrauch, unsachgemäße Verwendung oder versehentliche Beschädigung
Sofern festgestellt wird, dass es sich bei einem Produkt, für das diese Garantie gilt, um fehlerhafte
oben beschriebenen Garantiezeit geltend gemacht wird, repariert oder ersetzt Flexicare Medical
Limited das fehlerhafte Produkt nach eigenem Ermessen kostenfrei.
Um das Produkt zurückzusenden, muss eine schriftliche Genehmigung von Flexicare Medical
Limited eingeholt werden, bevor es frankiert an den von Flexicare Medical Limited benannten
Vertreter gesendet wird.
Diese Garantie ersetzt alle anderen ausdrücklichen oder stillschweigenden Garantien,
dieser Garantie beschränkt sich auf die Reparatur oder den Austausch von Produkten, die einen
Defekt enthalten.
Flexicare Medical Limited haftet nicht für indirekte Schäden oder Folgeschäden, die auf einen von
der Garantie abgedeckten Produktfehler zurückzuführen sind.
Diese Garantie unterliegt den Allgemeinen Geschäftsbedingungen von Flexicare Medical Limited
und wird in Übereinstimmung mit diesen ausgelegt.
Vernebler und Zubehör
-
-Ladekabel
-2m-Verstärkerkabel
-ProVu VS Pole Stand
-ProVu Display Table Stand

Uso previsto
Il Display ProVu Video Stylet (VS) 8” è un display digitale progettato per mostrare immagini dal
vivo provenienti esclusivamente da ProVu Video Stylet (ProVu VS), tramite il cavo micro USB, come
ausilio per l’intubazione degli adulti negli ambienti ospedalieri.
Descrizione del prodotto
Il Display ProVu VS 8” è un display digitale riutilizzabile non sterile progettato per la visualizzazione
di immagini dal vivo da ProVu VS. Quando è collegato al ProVu VS, dal dispositivo viene trasmesso
un video dal vivo che può essere utilizzato per facilitare ulteriormente l’intubazione del paziente.
Il Display può essere caricato con il cavo di alimentazione ProVu in dotazione tra un utilizzo e l’altro
continuo. Il prodotto può anche essere caricato tramite la porta micro USB se il caricabatterie c.c.
In dotazione non è disponibile.
malfunzionamento del dispositivo.
DISPLAY
RISOLUZIONE (PIXEL)
ORIENTAMENTO Orizzontale
TIPO DI DISPLAY
TEMPO DI AVVIO Immediato
VERSIONE SOFTWARE Fare riferimento allo schermo del dispositivo durante
la carica
COLLEGAMENTI
CONNESSIONE USB Micro USB
COLLEGAMENTO DI ALIMENTAZIONE Alimentazione a c.c.
IMMAGAZZINAMENTO E TRASPORTO
TEMPERATURA
UMIDITÀ RELATIVA ≤85%, senza condensa
PRESSIONE ATMOSFERICA da 700 a 1060 hPa
CONDIZIONI DI FUNZIONAMENTO
TEMPERATURA
UMIDITÀ RELATIVA ≤85%, senza condensa
PRESSIONE ATMOSFERICA da 700 a 1060 hPa
VALORE NOMINALE DI ALIMENTAZIONE ELETTRICA DISPLAY
INGRESSO DELL’ALIMENTAZIONE Ingresso: 5,0 V 1,5 A
TIPO DI BATTERIA 3,7 V, 5000 mAh, a ioni di litio
AUTONOMIA DELLA BATTERIA TIPICA ≈
TEMPO DI CARICA DELLA BATTERIA
TIPICO ≈
VALORE NOMINALE DI ALIMENTAZIONE ELETTRICA SPINA A PARETE
INGRESSO 100-240 V c.a. 0,5 A 50-60 Hz
USCITA Max 5,2 V c.c 3,0 A
DIMENSIONI
LARGHEZZA X ALTEZZA X SPESSORE 205mm x 130mm x 25mm
PESO 396 g
SPINA
TIPO DI SPINA 110-120 V con spina a pin NEMA 5-15P 3
Speciche Tecniche Precauzioni
-
-Ispezionare il display ProVu VS 8” e tutti gli accessori per individuare eventuali danni prima di
ogni utilizzo.
-Caricare completamente il display prima dell’uso. Per quanto riguarda i requisiti di spedizione, i
Display ProVu VS 8” sono spediti a costo zero.
-Prima di caricare il dispositivo, assicurarsi che tutti i componenti siano completamente asciutti,
inclusa la porta micro USB. Se si utilizza il supporto per asta del display, far scorrere il display in
modo sicuro sul connettore del braccio articolato, assicurandosi che sia completamente inserito.
-Se si utilizza il supporto da tavolo per display ProVu, far scorrere il display in modo sicuro sul
connettore, accertandosi che sia completamente inserito.
-
Avvertenze e Precauzioni
-
-Non utilizzare in ambienti di risonanza magnetica (RMN, RM) o in presenza di altre fonti di
interferenze elevate.
-Non risterilizzare il dispositivo.
-L’uso di dispositivi e altri accessori non approvati da Flexicare può comportare prestazioni non
ottimali e mettere a rischio il paziente.
-Il Display ProVu VS 8” è progettato per adattarsi al supporto per asta del display o al supporto
del Display ProVu VS 8”.
-Il Display ProVu VS 8” deve essere utilizzato solo con gli accessori ProVu VS e ProVu.
-Scollegare sempre il Display ProVu VS 8” dal cavo di alimentazione prima di pulirlo.
-Assicurarsi che i requisiti di tensione del display siano compatibili con le fonti di alimentazione.
-Non pulire il display o gli accessori del display utilizzando agenti abrasivi o acidi minerali.
-Non utilizzare sterilizzanti con ingredienti caustici, come soluzioni di lavaggio chirurgico,
soluzioni di perossido, candeggine o soluzioni di iodopovidone.
-Non smontare il dispositivo.
-Livelli di caricamento della batteria inadeguati possono causare guasti improvvisi senza
-
-Il dispositivo non è riparabile.
-La batteria non è rimovibile. Non aprire o rimuovere la batteria. La garanzia è nulla in caso di
apertura.
Impostare i supporti ProVu VS
Fare riferimento alle istruzioni fornite con il supporto per asta ProVu VS (IP0000-030) o con il
supporto per tavolo ProVu (IP0000-021).
Caricamento
1. 1. Collegare il Display ProVu VS 8” al cavo di alimentazione c.c., collegato alla presa elettrica
sul supporto per asta del display o direttamente a una presa.
2. 2. Quando il dispositivo è collegato e acceso, sullo schermo è visualizzato un indicatore di
carica. Se questa schermata non viene visualizzata, controllare che i collegamenti siano ben
3.
4. 4. Per ottenere prestazioni ottimali, mantenere collegato il Display al caricabatterie durante
l’uso.
5. Se questo non è possibile, ricaricare tra un utilizzo e l’altro o quando richiesto a schermo.
Utilizzo con ProVu VS
Per istruzioni più dettagliate su come utilizzare ProVu VS, fare riferimento alle istruzioni ProVu VS
(IP0000-042) fornite con il ProVu VS.
1. Fissare il Display ProVu VS 8” al supporto per asta ProVu VS o al supporto per tavolo del
Display, in base alle preferenze dell’utente.
2. Premere e tenere premuto il pulsante di accensione per 3 secondi.
-
di collegamento.
-
batteria barrata. Collegare al caricabatterie; il Display può essere ricaricato anche
mentre è in suo con un ProVu VS.
3. Collegare il ProVu VS al Display ProVu VS 8” utilizzando il connettore micro USB e osservare
4.
5.
schermo.
6. Per spegnere il Display ProVu VS 8”, premere e tenere premuto il pulsante di accensione per
IT DISPLAY PROVU VIDEO STYLET 8”

3 secs
3 secs
1BA 2
3 4 5 6
Carico
Il Display ProVu VS 8” è completamente
carico.
Collegato a ProVu VS
Il Display ProVu VS 8” è collegato e l’immagine
della telecamera è in caricamento.
Display in carica
La batteria del Display ProVu VS 8” è in
carica. La percentuale di carica è indicata
nel cerchio.
Collegare a ProVu VS
Collegare al Display ProVu VS 8” per
visualizzare l’immagine della telecamera.
Errore 2
Crash o errore telecamera.
Versione software
La versione software viene visualizzata
nella parte inferiore del display quando il
dispositivo è collegato all’alimentazione.
Caricare il Display
Ricaricare tramite USB o base di ricarica.
Spegnimento
Se viene premuto il pulsante di accensione
schermata mentre il display si spegne.
Errore 1
Crash o errore software.
pulsante di accensione per 5 secondi o più.
100% 20% 19%
Software ProVu VS
Il Display ProVu VS 8” dispone di vari prompt a schermo per assistere l’utente.
Indicatore batteria ProVu VS
20%.
v0.0.1.1 v0.0.1.1
50
%
v0.0.1.1
100
%
5%
75%

Risoluzione dei problemi
Glossario dei simboli
Numero di catalogo Numero di serie Prodotto conforme alla
Direttiva 93/42/CEE
Fare riferimento al
libretto/manuale di
istruzioni
Produttore Attenzione Non utilizzare oggetti
alati per aprire
Parte applicata di
tipo BF
Apparecchiatura di
Classe II
Proteggere dalla luce
del sole
Conservare al riparo
dall’umidità Riciclo Raccolta dierenziata Corrente alternata Corrente continua Polarità jack c.c.
positiva centrale USB/Micro USB Porta di
alimentazione c.c.
Scatola cavo
amplicatore/USB
PROBLEMA
Nessuna immagine dal vivo visualizzata
POSSIBILE SPIEGAZIONE AZIONE RICHIESTA
Il Display ProVu VS 8” deve essere ricaricato
Ricaricare il display tramite il caricabatterie c.c. o
il cavo micro USB. Notare che il display può essere
ricaricato durante l’uso.
Il Display ProVu VS 8” potrebbe essere in
Premere il pulsante di accensione una volta sola
per riattivarlo.
Il Display ProVu VS 8” è danneggiato Sostituire il Display ProVu VS 8” con un nuovo
dispositivo.
Il Display ProVu VS 8” potrebbe essere spento Premere e tenere premuto il pulsante di
accensione per 3 secondi.
danneggiato
un nuovo dispositivo.
Collegamento non corretto al Display ProVu VS
Rimuovere e ricollegare il Display ProVu VS 8”
al dispositivo tramite la porta micro USB come
mostrato nella sezione delle istruzioni per l'uso.
Il ProVu VS può essere danneggiato Sostituirlo con un nuovo dispositivo ProVu VS.
PROBLEMA
POSSIBILE SPIEGAZIONE AZIONE RICHIESTA
Collegamento non corretto al Display ProVu VS
Rimuovere e ricollegare il Display ProVu VS 8”
al dispositivo tramite la porta micro USB come
mostrato nella sezione delle istruzioni per l'uso.
danneggiato
un nuovo cavo.
Schermo sporco Asciugare con un panno IPA (alcol isopropilico).
Schermo umido Asciugare con un panno asciutto.
Possono esserci secrezioni sull’obiettivo della
telecamera
Pulire l’obiettivo della telecamera con un
il ProVu VS.
Guasto illuminazione Sostituire con un nuovo ProVu VS.
Cavo inserito in maniera errata
Dopo l’utilizzo
1. Scollegare il Display ProVu VS 8” dall’alimentazione.
2.
3.
come suggerito dall’operatore sanitario locale.
4.
riferimento alle istruzioni di pulizia.
Pulizia
1. Indossare i guanti durante tutta la procedura di pulizia.
2. Pulire il Display ProVu VS 8” e gli accessori riutilizzabili dopo ciascun utilizzo utilizzando un
detergente germicida, ad es. una salviettina imbevuta di alcool isopropilico al 70%.
3. Ispezionare il Display ProVu VS 8” e gli accessori per individuare eventuali tracce di
contaminazione. In caso siano presenti, ripetere le operazioni descritte ai punti 1 e 2.
4. Una volta che il Display ProVu VS 8” e gli accessori sono liberi da contaminanti, asciugare
completamente con un panno asciutto.
5. Controllare che il dispositivo non sia danneggiato. Se il dispositivo non funziona, vedere i
passaggi per la risoluzione dei problemi
Dichiarazione di garanzia
anno dalla data di acquisto.
La presente garanzia non copre i danni causati da:
-Manipolazione durante la spedizione
-Uso o manutenzione contrari all’etichettatura e alle istruzioni, compreso, in via non limitativa,
smontaggio, ricondizionamento e riassemblaggio errati.
-
Abuso, uso improprio o danni accidentali
Se un prodotto coperto dalla presente garanzia risulta presentare materiali, componenti o
lavorazione difettosi e la richiesta di garanzia è presentata entro il periodo di garanzia sopra
gratuitamente.
È necessario ottenere l’autorizzazione scritta di Flexicare Medical Limited per la restituzione del
prodotto prima di inviarlo con spedizione pagata all’agente designato di Flexicare Medical Limited.
La presente garanzia vale in luogo di tutte le altre garanzie esplicite o implicite incluse, tra le altre,
Medical Limited ai sensi della presente garanzia è limitato alla riparazione o alla sostituzione di
prodotti contenenti un difetto.
Flexicare Medical Limited non è responsabile per eventuali danni indiretti o conseguenti derivanti
da un difetto del prodotto coperto dalla garanzia.
Medical Limited.
Elenco degli accessori
-Cavi e accessori di montaggio
-Cavo di alimentazione
-
-Supporto asta ProVu VS
-Supporto tavolo Display ProVu

Scopul utilizării
de la ProVu Video Stylet (ProVu VS), prin intermediul cablului micro USB, pentru a ajuta la intubarea
Descrierea produsului
defectarea dispozitivului.
AFIȘAJ
REZOLUȚIE (PIXELI)
ORIENTARE Peisaj
TIP AFIȘAJ
TIMP DE PORNIRE Imediat
VERSIUNE DE SOFTWARE
CONEXIUNI
CONEXIUNE USB Micro USB
CONEXIUNE DE ALIMENTARE Alimentare cu c.c.
DEPOZITARE ȘI TRANSPORT
TEMPERATURĂ
UMIDITATE RELATIVĂ ≤
PRESIUNE ATMOSFERICĂ
CONDIȚII DE OPERARE
TEMPERATURĂ
UMIDITATE RELATIVĂ ≤
PRESIUNE ATMOSFERICĂ
PUTERE ELECTRICĂ NOMINALĂ AFIȘAJ
INTRARE ALIMENTARE Intrare: 5,0 V 1,5 A
TIPUL BATERIEI 3,7 V, 5000 mAh, litiu-ion
DURATĂ DE FUNCȚIONARE TIPICĂ
BATERIE ≈
DURATĂ DE ÎNCĂRCARE TIPICĂ BATERIE ≈
PUTERE ELECTRICĂ NOMINALĂ ȘTECĂR DE PERETE
INTRARE 100-240 V c.a. 0,5 A 50-60 Hz
IEȘIRE Max. 5,2 V c.c. 3,0 A
DIMENSIUNI
LĂȚIME X ÎNĂLȚIME X GROSIME 205 mm x 130 mm x 25 mm
GREUTATE 396 g
ȘTECĂR
TIP ȘTECĂR
Specicații tehnice
Precauții
-
-
-
-
-
-
Atenționări și precauții
-
-
-
-
-
-
-
-
alimentare.
-
-
-
-
-
-
-
Congurarea suporturilor ProVu VS
Încărcare
1.
2.
3.
4.
5.
Utilizarea împreună cu ProVu VS
1.
2.
-
-
3.
4.
imaginea nr. 4.
5.
6.
RO AFIȘAJ PROVU VIDEO STYLET 8”
Table of contents
Languages:
Other flexicare Medical Equipment manuals


Popular Medical Equipment manuals by other brands


Solmitech
Solmitech Refit Cam SHC-CM1S Quick user guide

Sutter
Sutter Bison Series manual

Whitehall
Whitehall cleatPRO T-12-M-CC-EG22 Operation and care manual

Rondish
Rondish Nexus WCP-11C User instructions

decomedical
decomedical VAPODEC DEC 54 operating instructions

bort medical
bort medical ActiveColor Sport Wrist band with thumb... manual


