Fluke VT02 User manual

October 2012, Rev.1, 7/13
© 2012-2013 Fluke Corporation. All rights reserved.
Specifications are subject to change without notice.
All product names are trademarks of their respective companies.
VT02, VT04
Visual IR Thermometer
Users Manual

1
Introduction
The VT Series (the Product) are Visual IR Thermometers that combine surface
temperature measurement with real-time thermal and visual images. The
thermal image removes the time necessary for component-by-component
measurement associated with a traditional spot thermometer (radiometer). The
Product is ideal for electrical, HVAC, and facility maintenance applications.
The recommended use model is:
1. Scan a broad area with the blended thermal and visual image to
quickly identify temperature anomalies that need more inspection.
2. Use the wide field-of-view to move closer to the target for a
temperature measurement with more detail.
3. Capture both thermal and visual images with a single trigger pull.
4. Create a report with Fluke SmartView®software.
The Product is easy to use. Turn on and within seconds it provides an image
with no training needed. Several features increase the accuracy and usability of
the Product:
•Adjustable emissivity and reflected background compensation
improves measurement accuracy on semi-reflective surfaces
•Hot and cold spot temperature markers that guide the user to the
hottest and coldest regions in the thermal image
•Selectable color palettes
•Visual/Thermal image alignment
The VT04 includes these additional features:
•Hi/Lo Temperature Alarms
•Time-Lapse Image Capture
•Auto-Monitor

VT02, VT04
Users Manual
2
How to Contact Fluke
To contact Fluke, use one of these telephone numbers:
•USA: 1-800-760-4523
•Canada: 1-800-36-FLUKE (1-800-363-5853)
•Europe: +31 402-675-200
•Japan: +81-3-6714-3114
•Singapore: +65-6799-5566
•Anywhere in the world: +1-425-446-5500
Or, visit Fluke's website at www.fluke.com.
To register your Product, visit http://register.fluke.com.
To view, print, or download the latest manual supplement, visit
http://us.fluke.com/usen/support/manuals.
Safety Information
A Warning identifies hazardous conditions and procedures that are dangerous
to the user. A Caution identifies conditions and procedures that can cause
damage to the Product or the equipment under test.
Warning
To prevent possible electrical shock, fire, or personal injury:
•Read all safety information before you use the Product.
•Carefully read all instructions.
•Use the Product only as specified, or the protection
supplied by the Product can be compromised.
•Replace or recharge the batteries when the low battery
indicator shows to prevent incorrect measurements.
•Do not use the Product around explosive gas, vapor, or
in damp or wet environments.
•Do not use the Product if it operates incorrectly.
•Do not use the Product if it is damaged.
•See emissivity information for actual temperatures.
Reflective objects result in lower than actual temperature
measurements. These objects pose a burn hazard.

Visual IR Thermometer
Safety Information
3
•Remove the batteries if the Product is not used for an
extended period of time, or if stored in temperatures
above 50 °C. If the batteries are not removed, battery
leakage can damage the Product.
•Follow all battery care and charging instructions in this
manual.
•Use only specified replacement parts.
•Use only the Fluke supplied power adapter to charge the
VT04 battery.
Table 1 is a list of symbols used on the Product or in this manual.
Table 1. Symbols
Symbol Description
Important information. See manual.
Hazardous voltage. Risk of electrical shock.
Conforms to relevant Australian standards.
Conforms to requirements of European Union and European
Free Trade Association.
Conforms to relevant South Korean EMC standards.
This camera contains a Lithium-ion battery. Do not mix with the
solid waste stream. Spent batteries should be disposed of by a
qualified recycler or hazardous materials handler per local
regulations. Go to Fluke's website for recycling information.
This product complies with the WEEE Directive (2002/96/EC)
marking requirements. The affixed label indicates that you must
not discard this electrical/electronic product in domestic
household waste. Product Category: With reference to the
equipment types in the WEEE Directive Annex I, this product is
classed as category 9 “Monitoring and Control Instrumentation”
product. Do not dispose of this product as unsorted municipal
waste. Go to Fluke's website for recycling information.

VT02, VT04
Users Manual
4
Before You Start
Table 2 is a list of all items included with the Product.
Table 2. Packing List
Description Part Number
Model
VT02 VT04
VT02 Visual IR Thermometer 4253599 •
VT04 Visual IR Thermometer 4366444 •
AA Alkaline Batteries (QTY. 4) 1560231 •
Rechargeable Battery 4365971 •
Micro SD Memory Card and conversion
adapter to standard SD Memory Card[1]
4269849 ••
Transport/Storage Case 4272528 ••
Micro USB Charger/Power Supply 4366918 •
VT Series Quick Reference Card[2] 4257700 ••
CD-ROM with Users Manual 4253607 ••
SmartView®Software on CD-ROM 2814474 ••
[1] Fluke recommends the micro SD memory card that is supplied with the Product.
Fluke does not warrant the use or reliability of aftermarket SD memory cards of
different brands or capacities.
[2] Printed in English, Spanish, French, German, and Simplified Chinese. See the CD-
ROM for additional languages. To request a printed Quick Reference Card in a
language not supplied with your product, email Fluke at TPubs@fluke.com. Specify
the product name and language preference in the subject line.

Visual IR Thermometer
Power On and Off
5
Power On and Off
To turn on the Product, push and hold for 2 seconds. A start-up screen
shows on the display and an indicator bar shows the status, see Figure 1. The
indication bar increases on power up and decreases on power down. After the
start-up screen, the Product is ready to use. To turn off the Product, push and
hold for 2 seconds.
The Auto Off feature turns off the Product after 10 minutes of inactivity.
VT02 VT04
hak03.eps
Figure 1. Start-Up Screen and Status Indicator
For the first time use, or when the batteries are removed for more than a few
hours, the Date and Time menu opens. See page 18 for more information about
how to set the date and time.
Note
All visual IR thermometers need sufficient warm-up time for the most
accurate temperature measurements. This time can often vary by
model and by environmental conditions. Although most visual IR
thermometers are fully warmed up in 3 to 5 minutes, it is always best
to wait a minimum of 10 minutes if the most accurate temperature
measurement is very important to your application. When you move a
visual IR thermometer between environments with large differences in
ambient temperature, more adjustment time can be required.

VT02, VT04
Users Manual
6
Rechargeable Battery
The VT04 has a rechargeable Li-ion battery.
Note
New batteries are not fully charged. Two to ten normal
charging/discharging cycles may be required before the battery
charges to its maximum capacity.
Before using the VT04 for the first time, charge the battery:
1. Plug the ac power supply into an ac wall outlet.
2. Connect the micro-USB connector to the VT04. See Figure 2.
While the battery is charging, shows on the display and the
status LED is red. When charged, shows on the display and the
status LED is green. The typical charge time from 100 % discharged
to 100 % charge is 5 to 6 hours.
Note
Make sure the Product is near room temperature before you connect
it to the charger. See the charging temperature specification. Do not
charge in hot or cold places. Charging in extreme temperatures
reduces the battery pack’s ability to hold a charge.
hak18.eps
Figure 2. Rechargeable Battery

Visual IR Thermometer
Features and Controls
7
Features and Controls
Table 3 is a list of the Product features with the location of each control.
Table 3. Features
3
VT04 VT02
VT04
6
2
4
5
1
9
10
12
13
11
7
8
hak04.e
p
s
Item Description
LCD Display
Power On/Off and Menu
Micro SD Memory Card Slot
Lanyard
Tripod Mount
Select/Enter
Infrared Lens
Rotating Lens Cover (VT02)
Visual Camera
Trigger for Image Capture
Battery Cover
Micro USB Connector (Input 2.5 W, 0.5 A at 5 V)
Battery Charge Status LED

VT02, VT04
Users Manual
8
Button Operation
Two functions are accessed directly from the buttons: Blending/Capture and
Save. The arrow buttons are used for menu navigation.
Image Blending
Image blending makes it easier to understand infrared images through the use
of an aligned visible image and infrared image. The Product captures a visible
image with each infrared image to exactly show the target area and more
effectively share it with others.
To use the blending function:
1. Push until shows in the bottom left-hand corner of the screen.
2. Use /to adjust the blending from 0 % to 100 %.
The blend options are shown in Figure 3.
0 % 25 % 50 % 100 %75 %
hak01.eps
Figure 3. Blend Options

Visual IR Thermometer
Button Operation
9
Visual Image Alignment Control
The image blending overlay and the visual camera are positioned above each
other in the VT Series. This vertical parallax will change with distance to your
object. To correct the parallax for a near or far distance you have a visual
image alignment control. See Figure 4.
To toggle the control between a near object or far object:
1. Push NEAR () for a measurement distance from 15 cm to 23 cm
(6 in to 9 in).
2. Push FAR () or a measurement distance further than 23 cm/9 in.
The Near or Far icon shows in the upper left corner of the display.
FLUKECORPORATION
EVERETT,WAUSA
USPAT:
www.patentlabel.com/uke
IMAGINGIR
THERMOMETER
VT02
FLUKECORPORATION
EVERETT,WAUSA
USPAT:
www.patentlabel.com/uke
IMAGINGIR
THERMOMETER
VT02
> 9 in / 23 cm
≤ 9 in / 23 cm
hak19.eps
Figure 4. Visual Image Alignment

VT02, VT04
Users Manual
10
Capture and Save
The Product saves up to 10,000 images/GB on the Micro SD memory card.
To capture the image and save it to memory:
1. Push until shows in the bottom right-hand corner of the
screen.
2. Point the Product at the object or area of interest.
3. Pull the trigger to capture the image.
The image remains frozen for about 4 seconds. Next, a dialog box
prompts you to save or discard the image.
4. Push to save or to discard the image.
The display has an icon that shows the current status of the micro SD memory
card, see Figure 5.
1 2 34
hak02.eps
Figure 5. Micro SD Memory Card Warning Icons
No Micro SD Memory Card in slot
Micro SD Memory Card card error
Micro SD Memory Card empty
Micro SD Memory Card full
Note
A routine file back-up procedure is recommended for the Micro SD
Memory Card to store these files in a safe location.

Visual IR Thermometer
Menu Functions
11
Menu Functions
To open the display menu, push . The menu has options for memory,
emissivity, background temperature, spot temperature markers, date, and time.
Basic Navigation
The basic functions of the Product are accessible with the six buttons and color
display. Only five options show on the display at one time. The /buttons
scroll through the display menu. The middle option is always highlighted in
yellow. See Figure 6.
5:12
˚C
20˚C
0
Yellow Highlight
Open Display Menu Select/Enter
Up/Down to
Change Values
Battery Charge Level
hak07.eps
Figure 6. Menu Navigation and Battery Icon
Push to select the menu option and edit the value. The /buttons
change the value of the menu selection. After adjustments are made, push
to accept a new value and exit the edit mode. See Figure 7.

VT02, VT04
Users Manual
12
D/C to highlight
to select (color inverts)
F
D/C change values
Faccept new value
hak08.eps
Figure 7. Parameter Adjustment
Table 4 is a list of the menu icons and their descriptions.
Table 4. Menu Icons
Icon Description
View Stored images
Emissivity
Color Palette
Background Temperature
Temperature Markers
Temperature Units
Clock
Hi/Lo Temperature Alarm (VT04)
Auto-Monitor (VT04)
Time-Lapse Image Capture (VT04)

Visual IR Thermometer
Menu Functions
13
Review Memory
The Memory mode lets you view the stored images. You can also delete
images in this menu.
1. Push to open the Memory mode.
2. Push /to scroll through and review the stored images.
3. Push to delete image.
Emissivity
The emissivity is adjustable in 0.01 steps from 0.10 to 01.00. The default value
is set at 0.95.
The correct emissivity values are important for you to make the most accurate
temperature measurements. Emissivity of a surface can have a large effect on
the apparent temperatures that the Product observes. Understanding the
emissivity of the inspection surface can, but not always, allow you to obtain
more accurate temperature measurements.
Go to http://www.fluke.com/Fluke-Thermal-Imaging-and-Thermal-Imagers for
more information on emissivity and how to get the most accurate temperature
measurements.

VT02, VT04
Users Manual
14
Temperature Measurement
All objects radiate infrared energy. The quantity of energy radiated is based on
the actual surface temperature and the surface emissivity of the object. The
Product senses the infrared energy from the surface of the object and uses this
data to calculate an estimated temperature value. Many common objects and
materials such as painted metal, wood, water, skin, and cloth are very good at
radiating energy and it is easy to get relatively accurate measurements. For
surfaces that are good at radiating energy (high emissivity), the emissivity
factor is ≥90 % (0.90). This simplification does not work on shiny surfaces or
unpainted metals as they have an emissivity of <60 % (0.60). These materials
are not good at radiating energy and are classified as low emissivity. To more
accurately measure materials with a low emissivity, an emissivity correction is
necessary. Adjustment to the emissivity value will usually allow the Product to
calculate a more accurate estimate of the actual temperature.
Note
Surfaces with an emissivity <0.60 make reliable and consistent
determination of actual temperatures problematic. The lower the
emissivity, the more potential error is associated with the temperature
measurement calculations of the Product, even when emissivity and
reflected background adjustments are attempted and performed
properly.
Warning
To prevent personal injury, see emissivity information for actual
temperatures. Reflective objects result in lower than actual
temperature measurements. These objects pose a burn hazard.

Visual IR Thermometer
Menu Functions
15
Table 5 shows the distance to area ratio (D:S) for measurement accuracy.
Table 5. Temperature Measurement Accuracy
AB C
AB C
D
S
For best temperature accuracy,
strive for a full field of view.
hak09.eps
Model D:S A B C
VT02 6:1
38 mm @ 230 mm 60mm @ 360 mm 100 mm @ 600 mm
1.5 in @ 9 in 2.4 in @ 14.5 in 4 in @ 24 in
VT04 9:1
26 mm @ 230 mm 40 mm @ 360 mm 67 mm @ 600 mm
1 in @ 9 in 1.6 in @ 14.5 in 2.7 in @ 24 in

VT02, VT04
Users Manual
16
Figure 8 shows how the D:S ratio compares on-screen for both models. The
higher the ratio, the smaller the target area needs to be for an accurate
measurement. Figure 9 illustrates the detection ability.
VT02 D:S = 6:1 VT04 D:S = 9:1
hak21.eps
Figure 8. On-Screen Comparison of D:S Ratio
A
B
Can detect a 1" spot in your field of view that
is at least 5 °C different from the surrounding area.
A
B
VT02
25 mm @ 762 mm
1 in @ 30 in
VT04
25 mm @ 1090 mm
1 in @ 43 in
hak14.eps
Figure 9. Detection Ability

Visual IR Thermometer
Menu Functions
17
Color Palette
The Palette menu changes the false-color presentation of the infrared images
that are on the display or captured. A variety of palettes are available. Some
palettes are more suitable for specific applications and are set as required.
Grayscale Palettes offer an equal, linear presentation of colors that allow for
best presentation of detail.
The High Contrast palette offers a weighted presentation of colors. This palette
is best in situations with high thermal contrast for increased color contrast
between the high temperatures and low temperatures.
The Ironbow and Rainbow palettes offer a mixture of the High Contrast and
Grayscale palettes.
Palette VT02 VT04
Grayscale (White hot) ••
Grayscale (Black hot) ••
High Contrast ••
Ironbow ••
Rainbow ••
Hot Metal •
Reflected Background Temperature
The background temperature can be set between -10 °C and +100 °C.
Compensation for reflected background temperature is set in the Background
tab. Very hot objects or very cold objects can affect the apparent temperature
and measurement accuracy of the target or object of interest, especially when
surface emissivity is low. Adjustment of the reflected background temperature
can make the temperature measurement better in many situations. For more
information, see Emissivity on page 13.
Spot Temperature Markers
The spot temperature markers turn on and off. When turned on, the marker is
an indication of a hot or cold spot in the scene that may require additional
evaluation. When turned off, the user is able to concentrate on the single
measurement pixel.

VT02, VT04
Users Manual
18
Temperature Units
The Product displays temperatures in °C or °F.
Date and Time
In the Clock menu the user can set the time and the date.
Push to select the Clock.
hak12.jpg
1. Push again to select the date type. Move through the menu
selections with the /buttons.
Selections are:
•DD/MM/YYYY
•MM/DD/YYYY
2. Move down to the date.
3. Use /to select each date item. Use /to change the value.
4. Push to set the value.
5. Move down to 12/24 hour clock. Push to edit the option.
6. Use the /to move through the selections.
7. Push to set the selection as:
•12 hr
•24 hr
8. Move down to time.
9. Push to edit the option.
10. Use /to move through individual time items.
11. Use /to change the value.
12. Push to set the value.
13. Push to exit the Clock menu and go to the live image.

Visual IR Thermometer
Menu Functions
19
Hi/Lo Temperature Alarm (VT04)
High temperature and low temperature alarms are available on the VT04. The
temperature threshold is set for either the high or low alarm. When an alarm is
set, you can quickly scan the scene and find objects that are above or below the
threshold. An alarm condition is clearly shown on the screen as a flashing
red/black band (Hi) or blue/black band (Lo). See Figure 10. In accordance with
the D:S ratio (see Table 5), the object size should be large enough to cover the
area defined by the 4 corner markers.
High Alarm Low Alarm Measurement Area
hak15.eps
Figure 10. VT04 Hi/Lo Temperature Alarm
Note
The Auto Off feature is disabled in the Alarm mode.
To turn on the alarm:
To turn off the alarm:
To set an alarm:
(-10 °C to +250 °C)
Other manuals for VT02
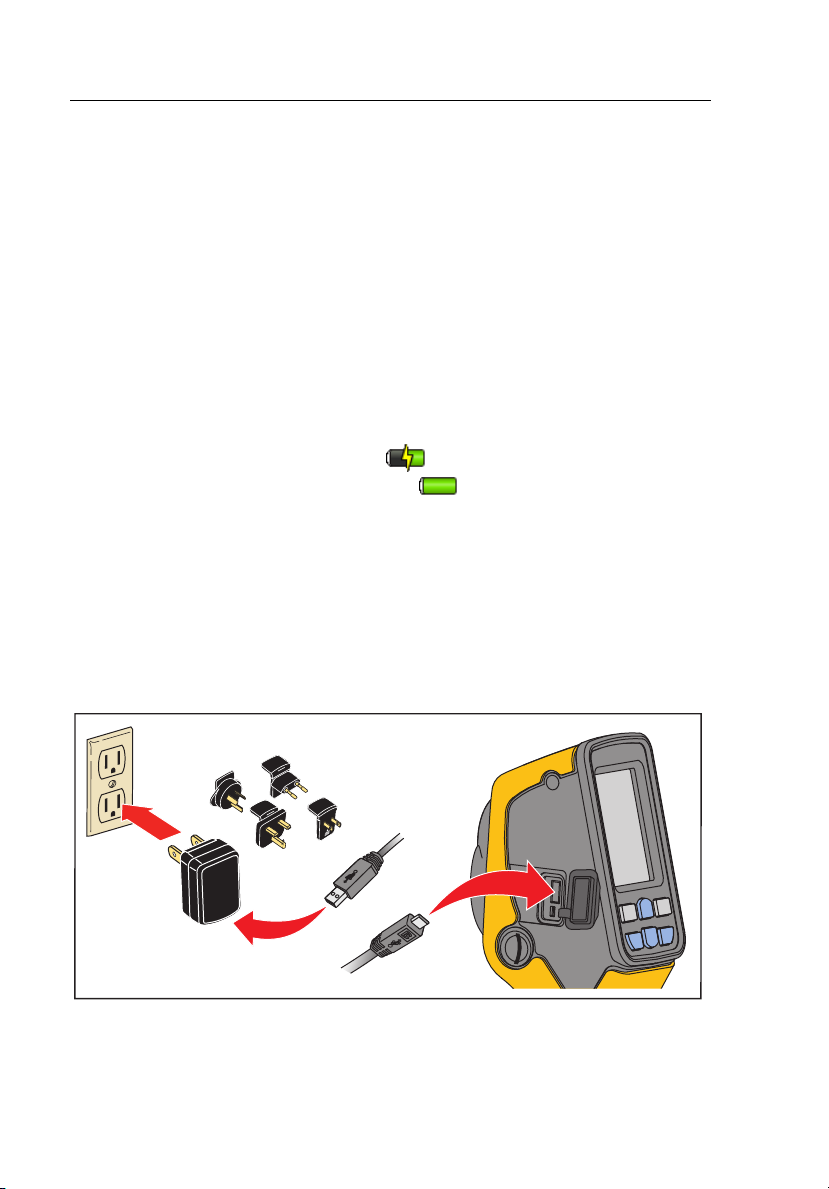
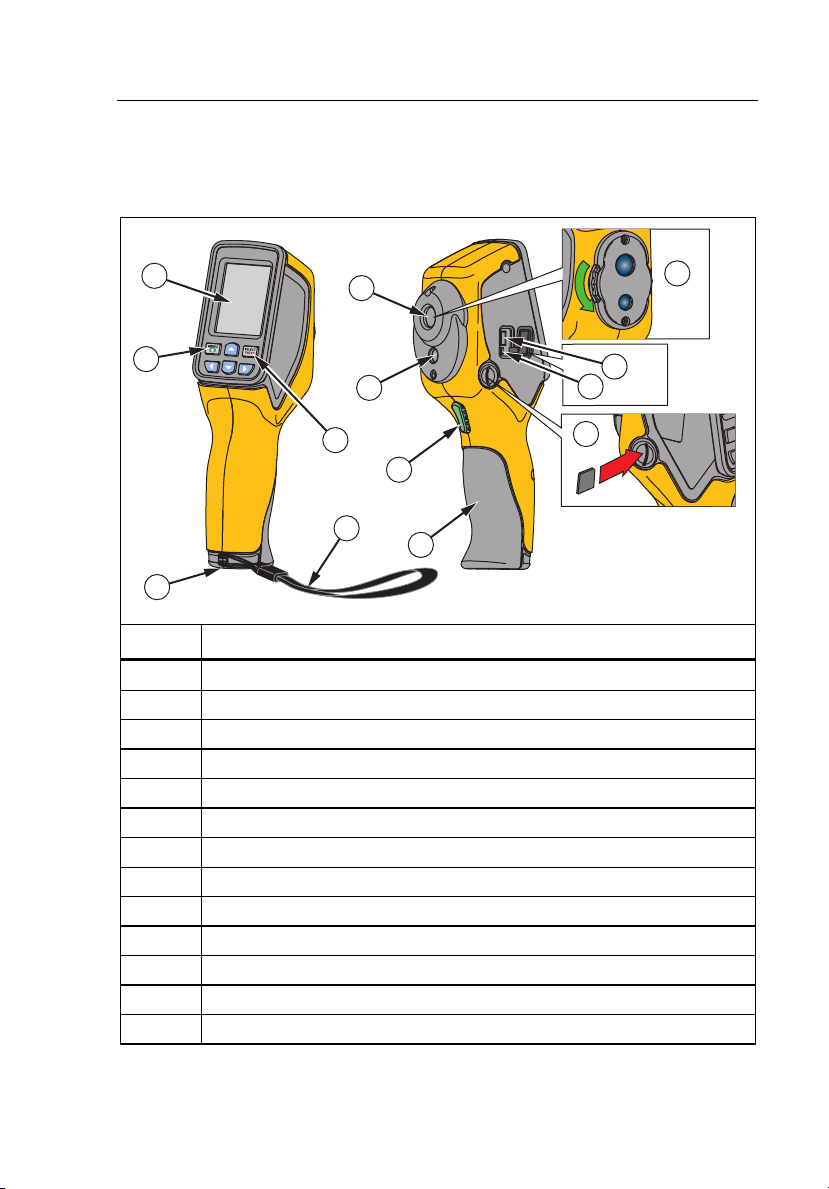
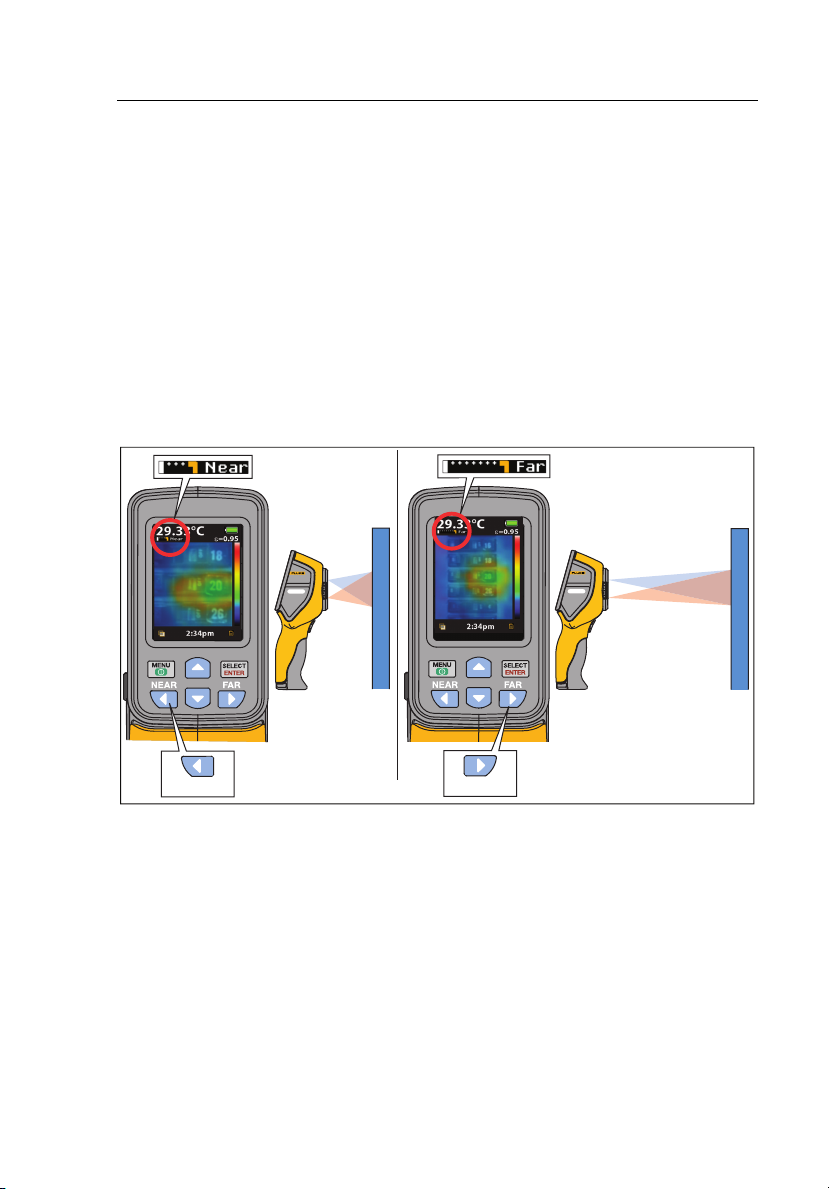
5
Table of contents
Other Fluke Thermometer manuals

Fluke
Fluke Series II User manual

Fluke
Fluke 67 MAX User manual

Fluke
Fluke 1504 User manual

Fluke
Fluke VT06 Original instructions

Fluke
Fluke 5616 User manual

Fluke
Fluke CNX t3000 User manual

Fluke
Fluke 572-2 Instruction manual

Fluke
Fluke 65 User manual

Fluke
Fluke 568 EX Installation instructions

Fluke
Fluke VT04 User manual

Fluke
Fluke 572-2 Parts list manual

Fluke
Fluke 568 EX User manual

Fluke
Fluke Hart Scientific 1522 User manual

Fluke
Fluke 572 User manual

Fluke
Fluke CNX t3000 Use and care manual

Fluke
Fluke Hart Scientific 1523 Quick start guide

Fluke
Fluke 5626/5628 User manual

Fluke
Fluke 51 II Series User manual

Fluke
Fluke 1529 Quick start guide

Fluke
Fluke 1594A Quick start guide