Flytec 6030 User manual

Flytec 6030GPS
Revision Date:08•12•14
Through firmware v3.38a

© Flytec USA, 2007 – 2014Printed on 100% post-consumer recycled paper
2

© Flytec USA, 2007 – 2014Printed on 100% post-consumer recycled paper
3
© Flytec USA 2007 - 2014. All rights reserved.
No part of this manual may be reproduced, stored in a retrieval system, or transmitted in any form or by any
means, electronic, mechanical, photocopying, recording, or otherwise without permission in writing from Flytec
USA. This manual is protected under US and International Copyright Laws.
Warning! Read before you proceed! Warning!
Warning! Read before you proceed! Warning
This instrument is not a safety device and should not be used as an indicator of safe
flying parameters. This instrument should only be used for information purposes.
Aviation can be a hazardous and possibly fatal activity. As a pilot, you are entirely
responsible for your own safety and the safety of others around you. Pilots should abide
by applicable aviation authority regulations and use best judgment for safe flying at all
times, irrespective of instrument readings. Flytec is not responsible for loss or injury
caused by the use of this instrument. You assume all risks associated with flying and
the use of this instrument. Individuals who ignore this warning do so at their own risk
and may suffer serious personal injury, property damage, or death.
If you are unwilling to assume all of the risks associated with the use of this instrument,
do not use the instrument. Return it immediately, unused with all of its’ included items,
within 30 days of the date of purchase, for a full refund. Please note that instruments
showing signs of wear or those that have been damaged or modified in any way cannot
be accepted for return.

© Flytec USA, 2007 – 2014Printed on 100% post-consumer recycled paper
4
Table of Contents
WARNING! READ BEFORE YOU PROCEED! WARNING! ...............................................................................................................3!
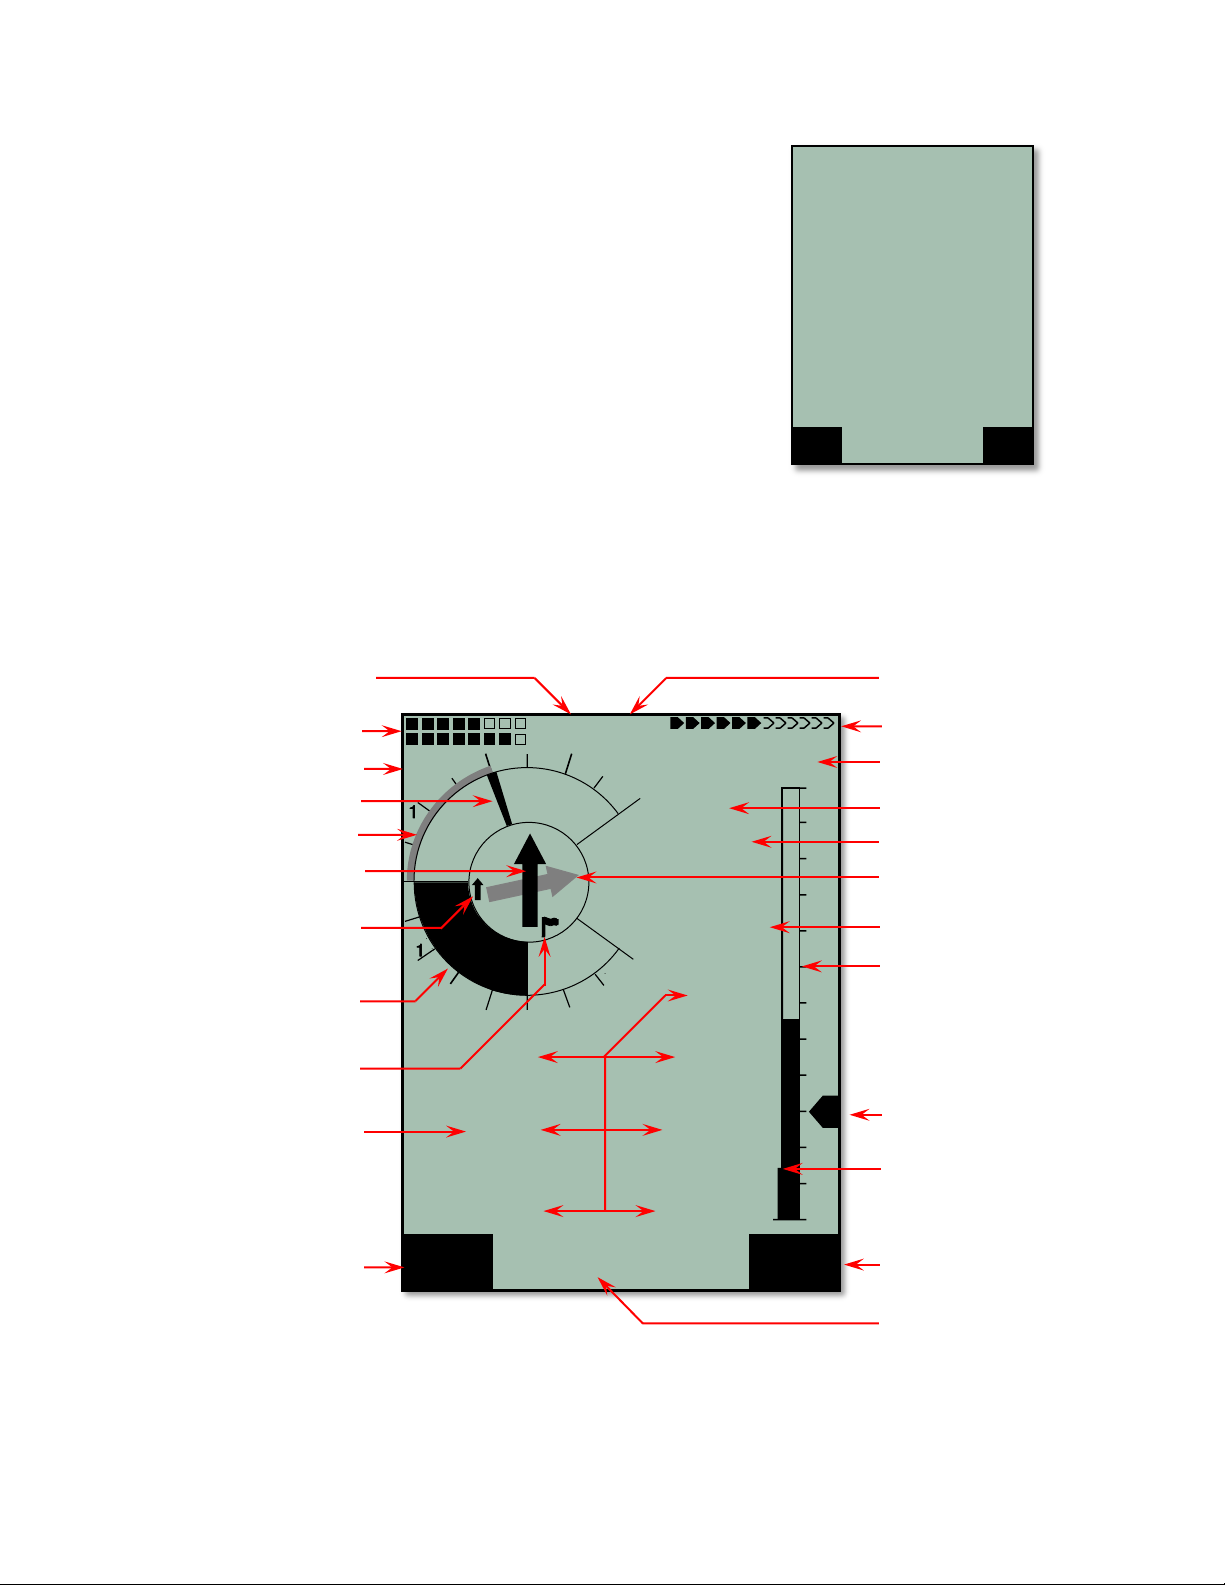
1!INSTRUMENT LAYOUT..................................................................................................................................................................6!
2!OVERVIEW......................................................................................................................................................................................7!
2.1!Turning the 6030 On/Off........................................................................................................................7!
2.2!Main Display Page ................................................................................................................................8!
2.3!Keypad ..................................................................................................................................................9!
2.3.1!Function Keys F1 and F2.......................................................................................................9!
2.3.2!Entering Text .........................................................................................................................9!
2.4!Units for Numerical Values....................................................................................................................9!
2.5!Real-Time Map Page ..........................................................................................................................10!
2.6!Batteries and Charging........................................................................................................................11!
2.7!User-Fields ..........................................................................................................................................11!
2.8!Main Setup Menu ................................................................................................................................12!
3!FLIGHT FUNCTIONS ....................................................................................................................................................................13!
3.1!Variometer...........................................................................................................................................13!
3.1.1!Analog vario.........................................................................................................................13!
3.1.2!Digital Vario and Netto Vario ...............................................................................................13!
3.1.3!Average Thermal Climb Indicator ........................................................................................14!
3.2!Altimeters and Air Pressure.................................................................................................................14!
3.3!Setting Altimeter 1 ...............................................................................................................................14!
3.4!Speed ..................................................................................................................................................15!
3.4.1!Airspeed...............................................................................................................................15!
3.4.2!Stall Alarm ...........................................................................................................................16!
3.4.3!Ground Speed .....................................................................................................................16!
3.4.4!Wind Direction and Speed ...................................................................................................16!
3.4.5!Total Energy Compensation (TEC)......................................................................................16!
3.5!Speed-to-Fly........................................................................................................................................17!
3.5.1!Best Glide Speed.................................................................................................................17!
3.5.2!McCready Indicator..............................................................................................................17!
3.5.3!Polars...................................................................................................................................18!
3.6!Audio ...................................................................................................................................................18!
3.7!Temperature........................................................................................................................................20!
3.8!Time and Date.....................................................................................................................................20!
3.9!Flight Time...........................................................................................................................................20!
3.10!Distance Measurements....................................................................................................................20!
3.10.1!Distance to Waypoint...........................................................................................................20!
3.10.2!Distance to Last Thermal.....................................................................................................20!
3.10.3!Distance to Goal ..................................................................................................................20!
3.10.4!Distance to Restricted Airspace...........................................................................................20!
3.10.5!Distance to Take-Off............................................................................................................21!
3.10.6!Distance to Cylinder / Distance to Start Cylinder.................................................................21!
3.11!Glide Ratio (L/D Ratio) ......................................................................................................................21!
3.12!Altitudes Above Targets ....................................................................................................................21!
3.12.1!Altitude above Best Glide Line (A BG WP)..........................................................................21!
3.12.2!Altitude above Waypoint (Alt a WP).....................................................................................21!
3.12.3!Altitude above Goal (A BG Goal).........................................................................................21!
4!NAVIGATION.................................................................................................................................................................................22!
4.1!Assessment of Reception Quality .......................................................................................................22!
4.2!Compass and Flight Direction .............................................................................................................22!
4.3!Real-Time Map Page ..........................................................................................................................22!
4.4!Relocating Thermals ...........................................................................................................................23!
4.5!Waypoints and Coordinates ................................................................................................................23!
4.5.1!Current Coordinate Display .................................................................................................23!
4.5.2!Saving the Current Position .................................................................................................24!
4.5.3!Waypoints ............................................................................................................................24!
5!NAVIGATING WAYPOINTS AND ROUTES.................................................................................................................................25!
5.1!Goto Function......................................................................................................................................25!
5.2!Track, Bearing and Cross Track Error.................................................................................................25!
5.2.1!Goto a Waypoint ..................................................................................................................26!
5.2.2!Correct Bearing in a Cross Wind .........................................................................................26!

© Flytec USA, 2007 – 2014Printed on 100% post-consumer recycled paper
5
5.2.3!Wind Component ................................................................................................................ 26!
5.3!Route Function ................................................................................................................................... 27!
5.3.1!Direction arrow to second turnpoint .................................................................................... 27!
5.3.2!Enter/Edit Route.................................................................................................................. 27!
5.3.3!Direction arrow to second turnpoint .................................................................................... 28!
5.4!Competition Route .............................................................................................................................. 28!
5.4.1!Setting up a Competition Route .......................................................................................... 28!
5.4.1.1!Flying a Competition Route ........................................................................................ 30!
5.4.2!Optimized Competition Route ............................................................................................. 30!
5.4.2.1!Flying an Optimized Competition Route..................................................................... 31!
5.4.3!The Start ............................................................................................................................. 32!
5.4.3.1!Exit Start..................................................................................................................... 33!
5.4.3.2!Entry Start .................................................................................................................. 34!
5.4.4!Final Glide ........................................................................................................................... 34!
5.4.4.1!Final climb .................................................................................................................. 35!
5.4.4.2!Gliding to Goal............................................................................................................ 35!
6!FLIGHT MEMORY AND FLIGHT ANALYSIS .............................................................................................................................. 37!
6.1!Flight Memory ..................................................................................................................................... 37!
6.1.1!Graphic Display of Flights - Map page ................................................................................ 39!
6.2!Flight Verification for Competition, OLC and World Records.............................................................. 39!
7!RESTRICTED AIRSPACE (CTRS)............................................................................................................................................... 40!
7.1!Airspace Alerts and Info...................................................................................................................... 41!
7.1.1!Recalling Detailed Airspace Information ............................................................................. 42!
7.1.2!Deselect or select individual airspace................................................................................. 43!
7.2!Airspace on an SD card...................................................................................................................... 43!
7.2.1!Using Airspace loaded on the SD card ............................................................................... 44!
7.2.2!Create .faf file from OpenAir file and load to SD card......................................................... 44!
7.3!Entering Flight Airspace Manually ...................................................................................................... 46!
8!CONNECTION TO A COMPUTER ............................................................................................................................................... 48!
8.1!Downloading Flights ........................................................................................................................... 48!
8.2!Instrument Settings............................................................................................................................. 48!
8.3!Upload/Download Waypoints and Routes .......................................................................................... 48!
8.4!Uploading Airspace with FlyChart....................................................................................................... 49!
8.4.1!Creating an Airspace File with FlyChart.............................................................................. 52!
8.5!Transferring New Firmware to the 6030 ............................................................................................. 52!
8.6!Optional Software ............................................................................................................................... 53!
8.7!Viewing the Contents of an IGC File................................................................................................... 53!
9!MAIN DEVICE SETTINGS MENU ................................................................................................................................................ 55!
9.1!Flight Memory ..................................................................................................................................... 56!
9.2!Waypoints ........................................................................................................................................... 56!
9.3!Routes ................................................................................................................................................ 56!
9.4!Airspaces (CTRs) ............................................................................................................................... 56!
9.5!Pilot settings ......................................................................................... Error! Bookmark not defined.!
9.6!Clear/Initialize Memory ....................................................................................................................... 58!
9.7!Simulation Mode ................................................................................................................................. 58!
9.8!Device settings ..................................................................................... Error! Bookmark not defined.!
9.9!SD Card .............................................................................................................................................. 59!
10!MAINTENANCE, WARRANTY AND SERVICE ........................................................................................................................... 61!
10.1!Resetting and Reinitializing .............................................................................................................. 61!
10.2!Water Damage.................................................................................................................................. 61!
10.3!Warranty ........................................................................................................................................... 61!
11!SPECIFICATIONS AND APPROVALS ........................................................................................................................................ 62!
12!APPENDIX .................................................................................................................................................................................... 63!
12.1!Stall Alarm ........................................................................................................................................ 63!
12.2!Netto Vario........................................................................................................................................ 63!
12.3!True or Indicated Air speed .............................................................................................................. 63!
12.4!Polars and Best Glide Speed............................................................................................................ 64!
12.5!McCready Theory – Optimized Speed to Fly.................................................................................... 65!
12.6!Enter & Exit Competition Start Examples ......................................................................................... 67!

© Flytec USA, 2007 – 2014Printed on 100% post-consumer recycled paper
6
1 Instrument Layout
1
Speaker
14
Volume
2
GPS status
15
Charging status LEDs
3
Digital air speed
16
Power on/off
4
Altimeter 1 (MSL)
17
F1 Key
5
Charger cable jack (under flap)
18
F1 function identifier
6
Best Glide speed indicator
19
User-field
7
SD card slot (under flap)
20
Compass rose
8
USB Port (under flap)
21
Analog variometer
9
Analog air speed indicator
22
External air speed jack (under flap)
10
Stall speed indicator
23
Thermal Average indicator
11
F2 function identifier
24
Active McCready indicator
12
F2 Key
25
Battery status bank 1 and 2
13
OK (accept)/Menu key
26
Pitot tube
26
1
2
3
4
5
6
7
8
9
10
11
12
13
14
15
16
17
18
19
20
21
22
23
24
25

© Flytec USA, 2007 – 2014Printed on 100% post-consumer recycled paper
7
2 Overview
While it is possible to turn on the 6030 and immediately go flying, we recommend that you study these operating
instructions and make yourself familiar with the various functions. We have kept the operating instructions as
brief as possible. Users who would like to freshen up on the basics, or those who want to learn more about the
individual functions and their uses, we have included in-depth explanations in the Appendix. These appendices
are referred to in the basic instructions. Please first review the diagrams of the 6030 display and keypad and
their descriptions so that after scanning the index briefly you will have an basic understanding of the 6030’s
functions.
The firmware of the 6030 is stored in “flash” memory. Upgrading your unit’s firmware to the most recent version
can be done with the help of a PC, and does not necessitate sending the unit to us for service. The cable
required to connect the unit to your PC is included. To update your 6030, all you need to do is download the
update from our web site and transfer it to your 6030 using the supplied installation software.
The 6030 has a Simulation mode that helps you better understand the numerous functions of the instrument,
and to practice using the 6030 by simulating an actual flight. With this feature you can simulate almost any
situation encountered during flight. You can change several flight parameters such as: altitude, climb rate, air
speed, ground speed, wind speed, and flight direction. You can also observe the effects of these on best glide
speed, the McCready indicator, arrival altitude at destination, distance from the destination, etc. All
accompanying sounds are simulated, as well.
2.1 Turning the 6030 On/Off
To switch the 6030 on, short-press the On/Off key. The instrument will beep
once, and the display will show a list of possible languages. Select the desired
language with the !" keys and press the OK key to continue. The selected
language will now be in effect and will become the default; in subsequent start-
ups you will only need to press the OK key to confirm start-up. If after pressing
the OK key, the 6030 powers down without advancing to the next screen, it is
most likely an indication that the batteries are critically low. In this case the
6030 should be charged or the rechargeable batteries should be temporarily
replaced with alkaline cells before attempting to start the instrument.
Repeatedly attempting to power-up the instrument with weak batteries can
cause corruption of the EEPROM and/or loss of factory settings. Please see
Section 2.6.
After you press the OK key, the display will show the Start-Up screen for 15
seconds with the following information shown:
•Instrument Manufacturer
•Instrument model and serial number
•Pilots Name (if set)
•Glider type (if set)
•Glider ID – Call sign/Pilot license/etc. (if set)
•Firmware version and date
•Time and date
•Battery status for Banks 1 and 2
When the battery test is complete the 6030 will enter run-mode and the display
will appear as shown in section 2.2.
FLYTEC AG
6 0 3 0
Sn 8070
Owner
not set
Glider type:
not set
Glider Id:
not set
Version 3.33 07.08.08
Date Time (UTC)
31.08.08 20:13
Battery check for 3 s. .
Battery Bank 1: 88%
Battery Bank 1: 88%
Init EEPROM
English ↑
Deutsch
Francais
Espagñol
Italiano
↓
OK

© Flytec USA, 2007 – 2014Printed on 100% post-consumer recycled paper
8
To switch the 6030 off, press and hold the On/Off key for 3 seconds. To
prevent unintentional switch-off, the display will show “really switch off??
Press OK to confirm.” Confirm by pressing the OK key. If the instrument has
not registered a flight, the display will show the Shutdown screen. The
remaining battery status will be shown, as well as the comment “Wait 10
seconds before next power on.” Important: failure to observe this
instruction can cause malfunction.
Alternatively, if a flight recording has occurred, the display will show the Flight
Analysis Page where the particulars of the recorded flight are shown. A short
press of the OK key or the On/Off key will complete the shutdown process.
The 6030 has an automatic shut-off function that will power down the unit
after 30 minutes without GPS reception or 30 minutes after it determines a
flight has concluded.
2.2 Main Display Page
Each time the 6030 is turned on, the display defaults to the main display page. The upper portion of the display
provides altitude, vertical speed (vario), air speed (ground speed if pitot sensor is turned off), directional
information, as well as battery and GPS status. The lower half of the main display has seven data fields that
show relevant flight data. The information shown in each of these fields can be selected from a list by the user.
Consequently, they are referred to as user-fields. The 6030 has three independent pages of user-fields that
can be scrolled through with the !key. The assignment of user-fields is discussed in Section 2.7
The Information Field is the region between the two function key identifiers in the lower portion of the normal
operation pages that can show up to two lines of situation dependent text. For example, when you first turn on
the instrument the Information Field will show “Mod Alt1
!"
”to prompt you to set altimeter with the !" keys
before you fly. The Information Field is used when the 6030 needs to convey text information when the
instrument is in normal run-mod
========================
FLIGHT -ANALYSIS
========================
Date: 17.20.07 UTC
Start: 13:02:02 UTC
Stop: 15:55:32 UTC
Flight time: 2:53:30
Scanrate: 10 s
Max A1: 2823 ft
Max A2: 1154 ft
A3: 4273 ft
Max Vario (10s): 420 fpm
Min Vario (10s): -270 fpm
Max Vario (10s): 580 fpm
Min Vario (10s): -640 fpm
Max speed: 52 mph
Recal
Sign.
cal
Show
Map
km/h
3
3
4
4
2
2
Gnd Spd
.
Int
-2.5
2067
65
m
57
90
80
60
P1
Wind Spd
12
Alta BG
374
Dist Cyl
16.3
40
N
E
S
W
70
50
30
Track
30
Dist WP
112
Dist WP
16.7
Alt1
GPS
Mod Alt 1 "#
- - -
m/s
Alt 1
1023
MC
Page no. of
user-fields
GPS status
Digital airspeed
Digital vario type
Digital vario
Altimeter 1 (MSL)
Analog speed scale
Best glide speed
indicator
Information Field
F2 function identifier
Stall speed
Direction to
2nd Turnpoint
F1 function identifier
User-fields
Direction to WP pointer
McCready indicator
Units for vario
Battery status bank 1 & 2
Analog vario
Thermal Average indicator
McCready sound on/off
Direction to last thermal
Wind direction

© Flytec USA, 2007 – 2014Printed on 100% post-consumer recycled paper
9
2.3 Keypad
White lettering on the keypad indicates actions/functions executed with a short-press of that key. Yellow
lettering indicates actions/functions executed with a long press (3 seconds) of the key and are associated with
making a selection or adjusting a setting.
2.3.1 Function Keys F1 and F2
The 6030 has two Function Keys (F1 and F2), and their functions are context-dependent. For example, when
operating in Route mode, F1 means “previous waypoint” and F2 “next waypoint.” However, when creating a
route, F1 stands for “Insert WP” and F2 “Delete WP.” In each case the meaning of the keys appears in the dark
shaded fields just above the respective keys.
2.3.2 Entering Text
While it is considerably easier to enter alphanumeric data such as pilot name, glider type or waypoint name
using FlyChart (as discussed in section 8.3, this can also be accomplished with the 6030 keypad even though
it does not have letter/number keys. To serve as an example, the following is the process for entering the pilot’s
name into the 6030:
Long-press the Menu key, scroll down to Pilot settings with the "key and press OK, then scroll down to Pilot
name with the "key and press OK. Note that there is a blinking cursor in the Pilot Name field (“not set” is there
as a place holder). Use the !and "keys to scroll through the available upper case letters and symbols, or
short-press the F1 key to cause the !and "keys to scroll through lower case letters and numbers. Press OK
to accept the selection and advance to the next character. Continue this process through all the characters of
your name. The cursor can be moved with the #and$keys, and characters can be deleted with a short press
of the F2 key. Important: the characters $ * ! \ ^ ~ are not available since they are reserved for use in the .igc
file.
2.4 Units for Numerical Values
The numerical values shown on the 6030 display can be set to display in either U.S. Standard units or metric
units. Altitude values can be in feet or meters; vertical speed (rate of ascent/descent) in ft/min or m/sec;
distance in miles or kilometers; speed in mph, km/h or knots; and temperature in ºF or ºC. Each measurement
type can be individually set. For example, altitude can be shown in meters, vertical speed in ft/min and speed in
knots. To set the measurement units, highlight the Units sub-menu in Menu>Device settings and press OK; the
cursor will start blinking on the first unit to be set. Select the desired unit by choosing 0 for metric or 1 for US
standard units (2 is used to select knots for speed) with the !" keys, and then press OK to accept the setting
and advance to the next field. Proceed in the same way with all five measurement unit selections.
Adjust up
Execute F2
Adjust altimeter 2
Information key
Adjust head/tail wind
Adjust volume
Bring up WP list
Toggle Main and Map
pages in run-mode or
escape in menu
Switch on/off
Sink alarm on/off
Bring up Route list
McCready sound on/off
Mark new Waypoint
Accept entry
Bring up main menu
Scroll user-field
pages before flight
or move cursor in
menu
Scroll user-field
position before flight
or move cursor in
menu
Adjust down
Execute F1 function
Adjust altimeter 1
before flight or insert
tracklog marker in flight

© Flytec USA, 2007 – 2014Printed on 100% post-consumer recycled paper
10
2.5 Real-Time Map Page
A short press of the Page/ESC key will bring up the Real-Time Map page where your track, waypoints, the
active route, and any restricted airspace you have defined will be visible. If a Competition Route is active,
start/turnpoint/goal cylinders will be shown as well. There are three user-fields just below the map (default is
Digital vario, altitude and air speed). There is also an analog vario scale along the left edge of the map. Your
current position will appear on the track as a direction arrow.
When viewing a stored flight, the #!"$keys can be used to pan the map in each respective direction.
However, this function is not enabled during flight.
Note: Tracks are drawn backwards from the current position. It will take a few moments to draw the map/track,
depending on the number of track points in the flight track (“Wait” and “Ready” will correspondingly appear in
the Information Field). If a zoom or pan key is pressed while the map is being drawn, the original draw will be
suspended and will start over again with new pan/zoom selection. This allows you to quickly view the desired
section of the map.
Short press
Action on Map Page
F1
Zoom out
The map scale is incrementally increased until the complete track is shown.
F2
Zoom in
The map scale is incrementally decreased to show greater detail.
OK
Jumps back to complete flight view.
%
Calls up information related to the three closest airspace avoidances.
Page
Returns to the Main Page.
►
During flight, all waypoints not used in the active route are hidden/revealed.
All other keys cause the displayed track to be redrawn
Vario
5.7
Zoom
Out
Grant
Quest
Grant
wa
Griffin
Leesburg
11.9
18
2
2
4
6
6
4
+
-
Zoom
In
Altitude
3452
Speed
43
Function of F2 key
Track
User-field
Function of F1 key
User-field
Waypoint
Airspace boundary
Analog variometer
Information Field
User-field
Route
Scale

© Flytec USA, 2007 – 2014Printed on 100% post-consumer recycled paper
11
2.6 Batteries and Charging
The 6030 operates on two banks of two AA batteries and comes equipped
with four 2100 mAh NiMH batteries installed, for a total run time of
approximately 30 hours. The instrument always starts on Bank 1 and will
automatically switch to Bank 2 when Bank 1 is exhausted. However, if you
attempt to start-up the 6030 when battery Bank 1 is too weak for proper
operation, the 6030 will be unable to auto-switch to battery bank 2 and will
automatically shut down. If this occurs, do not attempt to turn it on again until
the batteries have been charged or replaced with fresh batteries. Important:
failure to observe this precaution can result in malfunction.
When the 6030 is turned on, it performs a battery test during the start-up
sequence and shows the approximate charge level of the two battery banks
on the start-up screen. When the 6030 is on, the battery status of each bank
is shown in the upper left corner of the display on the Main Pages (Bank 1
on the top line and Bank 2 on the bottom line). When the 6030 is shut down,
the display will show the battery status of both banks on the shutdown
screen. It is recommended that the rechargeable batteries in Bank 1 be
swapped with Bank 2 once a year so that they age equally.
The 6030 has a built-in dual charging system that will simultaneously and
independently charge Banks 1 and 2. When either the wall adapter or the
vehicle charging cable is plugged in (under the right side port cover) the
charging status LEDs on the bottom of the instrument will illuminate. The
LEDs may blink for a few minutes when the charging cable is first plugged in
while the charger assesses the condition of both battery banks. Each LED
will turn off when its respective battery bank has been fully charged (4-6
hours if the batteries were nearly fully depleted). When the LEDs turn off, the
batteries will continue to trickle charge and can be left this way to top-off the
batteries. However, for safety reasons, it is recommended that the charger
cable be disconnected after a few hours of trickle charging. Note: If the
charging is terminated before the LEDs turn off, the battery status will
falsely show that the batteries are full. The ambient temperature should
be between 50°and 86°F (10°–30°C) during charging. It may happen in
warm ambient temperatures that the charging process will be discontinued – indicated by flashing LED(s) –
because the batteries have gotten too hot. In this case the charging cable should be removed and replaced after
the batteries have been allowed to cool down. Important: The 6030 should not be switched on during
charging, as this will interfere with proper charging of the batteries.
If you forget to charge the batteries and discover at the takeoff site that they are too weak to use, or if you are in
a situation where recharging is not feasible, you can replace the rechargeable batteries with alkaline batteries. It
is not necessary – but it is recommended – that Bank 2 have batteries installed. However, Bank 1 must have
batteries installed. If alkaline batteries are used, the battery type should be changed to alkaline in Menu>Device
settings>Battery type. It is important that the correct battery type be set, to prevent the 6030 from inadvertently
switching off when it attempts to auto-switch from Bank 1 to 2.
Please recycle spent batteries.!
2.7 User-Fields
On the Main Display Page, the 6030 can display either five or seven user-fields that can be selected from the
list below. There are three pages of user-fields that can be scrolled with a short press of the$key. The page
number (i.e., P1, P2 or P3) of the sub-page is shown left of the GPS status indicator. On the Map Page there
are three User-fields. To assign a user-field, press the #key to scroll to the desired user-field position. The
name of the corresponding user-field will be highlighted in black above the selected field and will appear in the
Information Field. To change the user-field shown in the selected position, use the !" keys to scroll through
the list of possible values. If the user-field is not changed within 10 seconds, the highlighting will cancel and the
original data field will remain. During flight you may page among the three pages of user-fields using the $
arrow key; however assignment of the user-fields is blocked. The Selection of 5 or 7 user-fields for each of the
three user pages is set in Menu>Device settings>Userfields. Set each page to “Yes” for 7 user-fields per page
or “No” for 5 user-fields per page. When five user-fields per page is selected, the four user-fields in the lower
portion of the display are considerably larger than when seven per page is selected.

© Flytec USA, 2007 – 2014Printed on 100% post-consumer recycled paper
12
User-Field
Description
Reference
Alt 1
MSL altitude
3.2
Alt 1 (ft)
Altimeter 1 shown in feet (used if main altimeter is in meters)
3.2
Alt 2
Reference height (if desired can be set to 0 at launch)
3.2
Alt 3
Total height gained during the flight
3.2
Alt GPS
Altitude From internal GPS module*
3.2
FL (ft)
Flight level
3.2
QNH (hPa)
Air pressure in hecto-Pascals (millibars)
3.2
QNH (inHg)
Air pressure in inHg
3.2
Alt a WP
Arrival height above the next waypoint/goal*
3.12.2
Alt Allowed
Shows the floor of overhead airspace (if present)
7
Vario
Vertical speed
3.1.2
A BG WP
Altitude above the best glide path to the next waypoint*
3.12.1
A BG Goal
Altitude above (or below) best glide to goal around the course
3.12.3
Alt Cone
Vertical distance up to CESS
5.4.4.1
Start Race
Minutes and seconds before/after the start of Competition Route
5.4.3
CylArrival
Minutes and seconds before/after the race start from current position
5.4.3
Spd StCyl
Groundspeed required to arrive at the start cylinder boundary for optimal start*
5.4.3
Flt time
Flight time since takeoff
3.9
Time
Time of day according to GPS with UTC offset applied
3.8
Temp
Internal temperature
3.7
Track
Flight direction (course)*
5.2
Bearing
Direction to chosen destination*
5.2
Dist WP
Distance to chosen destination (waypoint)*
3.10.1
Dist therm
Distance to last climb*
3.10.2
Dist goal
Distance to goal (end of route) around the balance of the route *
3.10.3
Dist CTR
Distance to restricted areas*
3.10.4
Dist Toff
Distance to takeoff*
3.10.5
Dist Cyl
Distance to cylinder*
3.10.6
Dist StCyl
Distance to start cylinder*
3.10.6
Dist opt WP
Distance to the optimized turnpoint cylinder intercept (optimized route active)*
5.4.2
XT Error
Cross track error (the perpendicular distance to the active leg of a route)*
5.2
Wind Comp
Wind component (ground speed minus true air speed) along the glider’s track*
5.2
Gnd spd
Speed over the ground (GS)*
3.4.3
Air spd
Air speed
3.4.1
Wind Spd
Wind speed*
3.4.4
L/D req.
L/D required to reach a WP*
3.11
L/D air
Actual L/D through air (= TAS/Sink)
3.11
L/D gnd
Actual L/D over ground (= Ground Speed/Sink)*
3.11
L/D goal
L/D required to reach goal around the remaining turnpoints to goal*
3.11
SMS p/t
Number of pending and transmitted positions (via SMS)
FLARM
No. of FLARM enabled aircraft in close proximity (optional hardware required)
[blank]
No data shown
* GPS reception required
2.8 Main Setup Menu
Press and hold the Menu key until the Main Setup Menu appears. In this menu you can customize the 6030 to
your preferences, view recorded flights, manage routes/waypoints, manage restricted airspace definitions,
manage the instrument memory, and access the 6030 Simulation mode. Use the !" keys to highlight the
desired selection, and press OK to open that sub-menu. Please see Section 9 Main Setup Menu for a
complete discussion of the Main Setup Menu.

© Flytec USA, 2007 – 2014Printed on 100% post-consumer recycled paper
13
3 Flight Functions
3.1 Variometer
3.1.1 Analog vario
The most important instrument function for any kind of glider
flying is the variometer. The 6030 displays vertical speed in
ft/min or m/sec and tells whether the pilot is climbing or
descending. By using the vario and its accompanying sounds,
the pilot can search for the most efficient climb or recognize
when he or she is in rapidly descending air.
The first scale range on the analog variometer display is +/-800
ft/min (shown as ±4 m/sec in the figure on the right). If the
vertical speed exceeds these limits, the scale automatically
switches to a second range from 800 to 1600 ft/min (shown as
±4 to 8 m/sec in the top figure next page).
The 6030 features a new state-of-the-art pressure sensor and
smart filter technology. This allows the variometer to
dramatically reduce false lift indication caused by turbulence
surrounding lift. This filtering can be controlled in Menu>Pilot
settings>Vario>Vario response delay. The setting range is 0
(dampened and subdued) to 4 (fast and reactive). A setting of
4 will yield a very fast and reactive vario that will respond
almost instantly with vertical ascent and will offer little
dampening of ascent and descent swings associated with
turbulence. This setting is recommended for very smooth light
conditions or for pilots who want to be able to “hear” the texture
of the air and do their own filtering. A setting of 0 will minimize
false indications of lift, however, the vario response will seem
dampened and sluggish. This setting is useful in strong and
turbulent conditions or for pilots that prefer not to be distracted
by a very active variometer. If you are unsure of your
preference, a setting of 2 or 3 is recommend (with a Vario lift
threshold of 4 ft/min or 2cm/s). The effects of this setting can
be seen and heard in the simulation mode, or in test flights, and
the vario response delay can then be adjusted up or down as
desired.
If you are flying too fast while thermaling, thus compromising
your climb rate, the 6030 will provide a visual indication on the
dial display. A radial line will appear above the indicated climb
rate (lower right figure). If this example is compared to the
figure on the bottom of the preceding page, you can see that a
52 km/h thermaling speed is too fast for the 2 m/sec thermal,
and the pilot’s climb rate is compromised by 0.2 m/sec. To
maximize the climb rate, the pilot should reduce air speed until
the radial line converges with the indicated climb rate on the
dial (unless, of course, the turbulence of the thermal dictates a
higher thermaling speed).
3.1.2 Digital Vario and Netto Vario
The digital vario appears to the right of the analog vario dial just above Altimeter 1, and has a resolution of 10
ft/min (0.1 m/sec). The digital variometer has a very wide measuring range of +/-14,000 ft/min (+/- 70 m/sec).
Therefore, it is capable of displaying extreme vertical speeds such as those found in skydiving and base-
jumping. If desired, the digital vario display can function as an averaged vario (also called an integrated vario)
by setting Digital vario mode to 0 in Menu>Pilot settings>Vario>Digital vario mode and then setting the desired
km/h
3
4
4
2
2
Wnd.
Int
2.0
2067
8
m
47
90
80
60
P1
70
3
N
S
W
E
km/h
3
7
8
4
2
6
Wnd.
Int
6.5
2067
8
m
47
P1
90
80
60
70
5
N
S
W
E
km/h
3
3
4
4
2
2
Wnd. Spd.
Int
1.8
2067
7
8
m
52
P1
1
1
90
80
60
70
N
S
W
E

© Flytec USA, 2007 – 2014Printed on 100% post-consumer recycled paper
14
average period between 1 and 30 seconds in the Average time field. This is very useful in determining the
actual strength of a rough thermal.
Alternatively, the digital vario can be set as a Netto (air-mass) vario, which shows the vertical motion of the
surrounding air, by setting Digital vario mode to 1. It is possible to set the digital vario to serve as an averaged
vario while climbing and as a netto vario (air mass vario) while gliding, by setting the Digital vario mode field to
2. For more information, see Section 12.2. In order to receive accurate netto vario information from the 6030,
you must first install an accurate polar for your flight configuration (i.e., your particular glider, wing loading,
harness, air speed sensor, etc.). Please see Section 12.4 for more information.
3.1.3 Average Thermal Climb Indicator
Soaring pilots know that thermal strength can vary considerably from day to day and throughout any given day.
The 6030 has an Average Thermal Climb indicator that shows the strength of a thermal averaged over a
predetermined period (up to 10 minutes). The Average Thermal Climb rate is shown in the shaded outer ring
(this ring is black when McCready sound is turned on) of the analog vario dial. In the example below the
averaged strength of the last thermal is 2 m/sec. You are gliding optimally when you control your air speed so
that the McCready indicator points to the value of the average thermal climb indicator. Also see Section 12.5,
McCready Theory. The period over which the thermal strength is averaged can be set between 1 and 20 in
Menu>Pilot settings>Vario>Thermal Averager, where the values represents units of 0.5 minutes. The default is
20, which is 10 minutes (20*0.5 min).
3.2 Altimeters and Air Pressure
The 6030 tracks and can display five different altitudes as well as the QNH in hPa and InHg, as shown in the
table below. The MSL altitude is shown in Altimeter 1 (Alt 1) and appears to the right of the analog variometer.
All of the other altitudes and the QNH can be displayed in the user-fields. See Section 2.7, User-Fields.
Alt 1
Altitude above sea level (QNH). Can be manually set with !", F1, F2 keys or auto-set
from GPS (see below).
Alt 2
Altitude with respect to a reference height. This can be adjusted at any time by calling up
“Mod A2
!"
”with a 3-second press of the F1 key and then setting the desire value using
the !" keys – or press the F2 key to set A2 to 0.
Alt 3
The total height gained during a flight. If several pilots complete the same flight task, then
the one who climbed the least overall would have flown most efficiently.
FL (ft)
Flight-Level is based on an air pressure of 29.92 inHg (1013 hPa) at mean sea level and
cannot be adjusted by the user.
Alt GPS
Altitude from the internal GPS module. May be useful in competition where there is a
ceiling and the scorekeeper will be checking compliance with scoring programs that use
GPS altitudes. In this case, the pilot should monitor Alt GPS to be sure a declared ceiling
is not broken.
QNH hPa
The barometric pressure at sea level in hecto-Pascals (millibars)
QNH inHg
The barometric pressure at sea level in inches of mercury
With the exception of GPS altitude, all of the altimeters in the 6030 measure altitude from atmospheric pressure.
When you turn on the 6030 it has no way of knowing to what extent the current barometric pressure is having on
the measured air pressure. For this reason, Alt 1 should be adjusted to display the actual height above sea level
prior to each flight.
3.3 Setting Altimeter 1
When the 6030 enters the run mode after switch-on, Alt 1 will be blinking to indicate that the altitude has not yet
been set and the Information Field will show “Mod Alt1
!"
”to prompt that the !" keys can be used to set Alt
1. If the user does not set Alt 1 with the !" keys the 6030 will auto-set Alt 1 to GPS altitude as soon as the
GPS gets a 3D fix. After Alt 1 is auto-set, it will continue to blink to show that the altitude was not manually set
by the user, however, it will stop blinking when the 6030 recognizes that a flight has begun. Alt 1 can be
manually set to a value that corresponds to the default QNH pressure of 29.92 inHg (1013.25 hPa) with a short
press of the F1 key. Alt 1 can be manually set to GPS altitude by pressing the F2 key (provided the internal

© Flytec USA, 2007 – 2014Printed on 100% post-consumer recycled paper
15
GPS has acquired). If other pages or functions have been accessed prior to setting the altitude, “Mod Alt1
!"
”
may not be present in the Information Field but can be called up with a long press of the Alt1 key.
When you adjust Alt 1, the sea level air pressure also changes and can be seen in the QNH hPa or QNH inHg
user-fields. To set the altitude of your current location based on the QNH pressure, follow the steps to set Alt 1 –
but rather than setting the Alt 1 value to a specific altitude, use the !" keys to set the QNH user-field to the
value reported by a weather radio or flight service. If Alt 1 is set to zero for any planned landing area, then the
height above this location will always be indicated after starting. The associated air pressure (QFE) will be the
actual air pressure in hPa at that altitude, which deviates from QNH, the pressure at sea level.
The user-field Alt GPS displays your altitude as determined by the internal GPS module, whereas, all of the
other altimeters in the 6030 use pressure altitude. Due to the different calculation methods for pressure
altitude and GPS altitude, Alt GPS will, more than likely, differ from Alt 1, even if you correctly set your reference
altitude prior to launch. On warm days pressure altitude will generally read lower than GPS altitude and can
differ a few hundred feet. It should be noted that the worldwide standard for aviation is pressure altitude.
Therefore, GPS altitude should not be used with respect to aviation regulations. Alt GPS may be useful in
competitions that set altitude limits with respect to GPS altitude.
As the pressure sensor in the 6030 ages, the pressure shown in the QNH user-field, when setting the altimeter,
may not coincide with the QNH provided by flight service, local weather station, etc. It is possible to correct this
by entering a pressure sensor correction value, however, this should only be attempted by experienced users.
If you find that the 6030 QNH does not agree with the QNH provided by reliable sources, contact Flytec for
assistance in entering a correction.
3.4 Speed
3.4.1 Airspeed
After vertical speed and altitude, air speed is the next most significant piece of flight information. Air speed
information increases safety and can be used to increase performance during racing and distance flights. The
best glide speed, the McCready speed to fly, and the netto vario can only function when the air speed is known.
The 6030 displays your air speed in the analog speed scale on the right side of the normal run-mode display,
and digitally at the top of the analog scale. You can choose to display air speed as true or indicated, and can
choose between two possible speed ranges for the analog speed display (12–37 mph) or (19–56 mph) in
Menu>Pilot settings>Speed>Speed mode.
The 6030 has two independent speed sensor options:
•A built-in pitot pressure sensor that measures indicated air speed (IAS) and is capable of showing
speeds of up to 180 mph (300 km/h) on the digital display and 12–56 mph on the analog speed scale. If
necessary, the pitot tube can be extended with a flexible tube to a turbulence-free spot on the glider or
removed (pulled out) for replacement. IMPORTANT: if the pitot tube is removed, the opening in the
fitting should NEVER be plugged airtight as this can over-pressurize and damage the internal
sensor.
•An optional vane wheel sensor (can be used with HG and PG versions of the 6030), which measures true
air speed (TAS) and is capable of showing speeds 1–94 mph (150 km/h) on the digital display and 12–56
mph on the analog speed scale. It is also well suited for determining the wind speed at takeoff. If this
sensor is plugged into a 6030, the pitot sensor will be disabled and the air speed from the vane sensor will
be displayed.
Regardless of which air speed sensor is used, the 6030 internally calculates both TAS and IAS. Should you be
unfamiliar with the difference between these two air speeds, please refer to Section 12.3, True or Indicated Air
speed in the Appendix.
The measured air speed from either speed sensor (pitot and vane wheel) can be corrected by applying a
correction factor in Menu>Pilot settings>Speed>Vane wheel correction or Menu>Pilot settings>Speed>Pitot
correction. The factory setting is 100% for both sensor options. When a value other than 100% is used, the
6030 will display that percentage of the measured value. It is also possible to set a constant offset onto the pitot
air speed value to compensate for the slower airflow underneath the wing; this is set in Menu>Pilot
settings>Speed>Pitot correction. This offset will be added or subtracted (depending on the sign) to the
measured air speed value. It is recommended that pitot correction be set to 100% if an offset value is to be

© Flytec USA, 2007 – 2014Printed on 100% post-consumer recycled paper
16
used. The pitot sensor can be turned off in Menu>Pilot settings>Speed>Pitot correction by setting use sensor to
off.
3.4.2 Stall Alarm
It is possible to enter the stall speed of your glider into the
6030, in which case, the altitude-adjusted stall speed will
appear on the left edge of the analog speed scale (shown in
figure left 36km/h). If the measured air speed falls below that
threshold an alarm will be given. Since the 6030 cannot directly
determine if a glider is about to stall, it is important to correctly
enter the glider’s stall speed (or preferably a speed just a little
bit faster). The stall alarm threshold can be entered in
Menu>Pilot settings>Speed>Stall speed. To prevent the stall
alarm from sounding during slow flight (thermaling), an altitude
threshold above which the stall alarm feature will be inactive
can also be set using this same menu. To disable the stall
alarm, set the stall speed value to 0. The trigger point for the
stall alarm is always linked to the indicated air speed. Therefore
the alarm will sound at a faster flying speed at higher altitudes
than at sea level. For information, refer to Section 12.1 Stall
Alarm.
3.4.3 Ground Speed
The GPS receiver determines its position once each second.
Ground speed is derived from the distance between these
positions and can be displayed in the user-field Gnd speed.
Only from the difference between air speed and ground speed
can one make conclusions about the wind’s influence. If the pitot sensor is turned off in Menu>Pilot
settings>Speed>Pitot correction and there is no vane wheel sensor plugged in, the 6030 automatically shows
the GPS-derived ground speed in the analog speed scale and in the digital speed field.
3.4.4 Wind Direction and Speed
The wind speed can be displayed in the user-field Wind Spd. Wind direction appears in the compass rose as a
small windsock. It is necessary to fly at least two complete 360s as steadily as possible before the 6030 can
register and display wind speed and direction. During the final landing approach, this symbol should always be
at the top of the compass rose (to the extent the landing field will allow).
3.4.5 Total Energy Compensation (TEC)
It is evident that a cyclist who coasts up a small hill without pedaling has gained the elevation from his own
momentum. Similarly, a hang glider can gain altitude by pushing out the control bar while flying at speeds above
minimum sink. It would be a mistake for that pilot to interpret this altitude gain as lift. Total Energy
Compensation (TEC) is an attempt to eliminate a climb indication (audible and visual) caused by trading air
speed for altitude. This is an indispensable feature for sailplanes because of their performance. However, if an
obvious gain in altitude can be achieved by speed reduction when hang gliding and paragliding, then the use of
TEC makes sense for them as well. The 6030 can suppress these vario swings caused by speed changes, and
will indicate climb or sink caused by the surrounding air, and not by the conversion of speed to altitude. When
you are flying according to McCready speed to fly, where speed adjustments are continuously necessary, the
TEC is also of great help. TEC also steadies the vario, and its related audio, when you are centering in a
turbulent thermal. The effect of the TEC can be adjusted in Menu>Pilot settings>Speed>TEC. The factory
compensation setting is 65%, and it is recommended that the compensation be kept between 60% and 80%. A
TEC setting of 100% has not proved useful because then even horizontal wind turbulences can influence the
TEC and make the vario a bit jumpy.
km/h
3
3
4
4
2
2
Gnd Spd.
Int
-2.5
2067
7
65
m
57
90
80
60
P1
Wind Spd
12
Bearing
32
Dist Cyl
16.3
40
70
50
30
Track
30
Alt 2
1002
Dist WP
16.7
Auto
Wind
HT man. "# 10
- - -
N
S
W
E
Stall speed

© Flytec USA, 2007 – 2014Printed on 100% post-consumer recycled paper
17
3.5 Speed-to-Fly
3.5.1 Best Glide Speed
On the right side of the analog speed scale there is a black arrow that indicates the air speed for best glide,
which is dependent on the polar of the glider, the wind strength and direction, and the sink rate of the
surrounding air. When racing (flying to cover the most distance in the least amount of time), a pilot will generally
fly faster than the best glide speed this indicator is recommending – unless every foot of height is essential
(survival mode). The true value of the best glide speed will increase with increased altitude; however, it does not
matter if you have chosen to display true or indicated air speed, since the 6030 compensates for this on the
various displays. For more information please see Appendix Sections 12.3, True or Indicated Air Speed,
and 12.4, Polars and Best Glide Speed.
3.5.2 McCready Indicator
To assist in controlling your glide speed for McCready-
optimized flight, the 6030 has a McCready indictor that shows
the speed ring setting being flown, based on your current
flight speed, the polar of the glider, the wind, and the vertical
speed of the air mass in which you are currently flying. On the
6030 the McCready pointer appears as a radial line in the
analog dial. To fly optimally, you should control glide speed so
that the McCready indicator points to your next expected climb
rate on the analog vario dial. In the example (above right), the
pilot is flying with a speed ring setting of 2 m/sec (400 ft/min).
To complete a competition task in the shortest time possible,
the pilot may consider keeping the McCready pointer as close
as possible to the average climb rates achieved in previous
thermals (indicated by the Average Thermal Climb indicator).
Please refer to Section 12.5, McCready Theory for further
explanation.
If you glide too slowly for the given conditions, the McCready
pointer will appear in the sink sector of the analog vario display.
In the example (below right), the pilot is flying 50 km/h, which is
too slow for the current conditions; therefore the McCready
pointer is seen in the sink sector of the dial display. If the
McCready sounds are on,the pilot will hear The Negative
McCready alarm (rapid low-frequency beep) telling the pilot
to speed up. The pilot should immediately speed up until the
negative McCready alarm stops and the McCready pointer at
least progresses to 0 (best glide).
Using the 6030’s McCready audio feature, you can control glide
speed acoustically. The default for McCready sound is turned off each time the 6030 is turned on. To activate
the McCready sound, press the McC &key once. When the McCready sound is turned on, “MC” will appear at
the top of display (between the battery status and the page number). The Average Thermal Climb indicator will
appear as a solid black outer ring (as opposed to shaded when the McCready sound is off). The frequency of
the McCready tone is proportional to the speed ring setting that you are flying (i.e., the higher the speed ring
setting, the higher the frequency of the McCready tone). If the tone lowers while you are gliding and attempting
to hold a fixed speed ring setting, then you need to speed up; conversely, if the tone increases then you should
slow down.
It is possible to set a dead band for the McCready sound (in Menu>Pilot settings>McCready>tonegap) so that
there will no McCready sound when flying at or near the desired speed ring setting. Each time the McCready
sound is turned on, the dead band will be centered on the speed ring setting you were flying when you pressed
the McC/&key. If a deadband has been set in the McCready settings, the deadband will appear shaded in the
Average Thermal Climb indicator (assuming the Average Thermal Climb indicator is filled in to the point where
you set the dead band). To move the dead band to a different speed ring setting, adjust your speed so that the
McCready indicator lines up with the new desired speed ring setting and then press the McC/&key twice (the
first press turns the sound off and the second press turns it back on with the new setting). The width of the dead
band in ft/min (m/sec) and time delay (in seconds) for the starting of the McCready sound after leaving a thermal
can be set in Menu>Pilot settings>McCready.
km/h
3
3
4
4
2
2
Gnd Spd.
Int
-2.0
2067
70
m
62
MC P1
N
S
W
E
90
80
60
70
km/h
3
3
4
“
4
2
2
Gnd Spd.
Int
-1.7
2067
62
m
54
MC P1
N
S
W
E
90
80
60
70

© Flytec USA, 2007 – 2014Printed on 100% post-consumer recycled paper
18
3.5.3 Polars
In order to receive accurate speed to fly, netto vario and glide ratio information from the 6030, you must enter an
accurate polar for your flight configuration (i.e., your particular glider, wing loading, harness, air speed sensor,
etc.). You can obtain the polar for your glider from your glider’s manufacturer and then, by trial and error, adjust
those values to match your actual performance. A more accurate method is to use the 6030 to record the data
to build your polar by flying data recording flights in smooth air. During the flight, each air speed between Vstall
and Vne should be maintained for several seconds. With the aid of FlyChart 4.52.21 or later, the data attained
can be used to generate your own actual polar curve.
Once the polar has been developed, only two polar curve points need to be entered into the 6030: the speed
(mph or km/h) and corresponding sink rate (ft/min or m/sec) for (1) minimum sink and (2) a speed in the upper
range of your glider (best maneuvering speed). These two air speed/sink rate pairs are entered manually into
the 6030 in Menu>Pilot settings>Polar data. You may notice that the polar values you enter are rounded- this is
normal and is no cause for concern. In addition to the two sink-rate/air-speed pairs, you must also enter the
average altitude at which you flew when conducting the testing, using the altitude field of the Polar data menu.
All of the documented polar curve points will be converted and saved as “Indicated,” and the polar curve will
now be valid for all altitudes.
The 6030 can store the polar data for two different gliders so that you do not need to re-enter the polar data
pairs when flying your second glider. To enter and use a second polar data set, change the use set field in
Menu>Pilot settings>Polar data to either 1 or 2.
3.6 Audio
The volume for the 6030 audio is adjusted with the &key. Short press the &key to scroll through the volume
settings. The sound levels are: 0% –25% –50% –75% –100% and are momentarily displayed in the
Information Field when a change in volume is made. All of the sounds described in this section can be heard in
Simulation mode.
Automatic Volume Control: The basic sound levels of 25%, 50%, and 75% will slowly increase automatically
when the air speed exceeds 25 mph (40 km/h), but never to greater than 100%.
Ascent Tone: The ascent tone starts when the climb rate
exceeds a predetermined threshold. The ascent tone
threshold is the lift value that must be exceeded to start the
ascent tone (beeping). If the vario units have been set to
ft/min, the default threshold is approximately 4 ft/min and can
be altered to between 0 and 39 ft/min. If the vario units have
been set to m/sec the default is .02 m/sec and can be set
between 0 and 0.2 m/sec. The value can be changed in
Menu>Pilot settings>Acoustic vario>Lift audio threshold. The
greater the threshold value, the greater the ascent rate
needed to initiate the ascent tone. As stronger lift is
encountered, the frequency (tone) and tempo of the ascent
tone will increase at a predetermined rate (see Modulation
and Pitch below).It is possible to set the start frequency of
the ascent tone between 600 and 1400 Hz in the ascentF field
in Menu>Pilot settings> Acoustic vario>Customize sound.
Nascent (Near) Thermal Tone: This is a beep tone similar to
the ascent audio that indicates lift that is not quite strong
enough to trigger the ascent tone but may deserve
investigation when finding a source of lift is critical. The
nascent thermal tone is only active in flight to prevent
unnecessary and distracting beeping while standing at launch
waiting to takeoff or after landing. The upper threshold of this
tone is the same as ascent tone threshold and the lower limit
can be set between 0 and -200ft/min in Menu>Pilot
settings>Acoustic vario>Near thermal tone. In this same menu
the cycle rate (beep/pause ratio) of the nascent thermal tone
can be set from 10% to 100%. At 10% the nascent thermal
tone will have a short beep and a long pause, at 50% the
Ascent
Descent
!
Descent alarm
(steady tone)
0 ft/min
Descent alarm threshold
Ascent tone threshold
Ascent tone (beeping)
Nascent thermal tone

© Flytec USA, 2007 – 2014Printed on 100% post-consumer recycled paper
19
beep/pause will be equal, and at 100% the tone will be steady. The nascent thermal tone can be disabled
Menu>Pilot settings> Acoustic vario>Near thermal tone.
Acoustic Integrator: Also known as dampening, this is used to dampen the irregular ascent/descent sounds
that would result when flying in turbulent air. The amount of dampening can be set to between 1 and 35 in the
damp field in Menu>Pilot settings>Acoustic vario>Customize sound. The lower the value, the more responsive
the frequency change in the ascent tone will be, as vertical speed values change. However, this will result in an
erratic beep frequency in rough air (piano effect). The higher the value, the smoother the ascent/descent
frequency changes will be with changes in vertical speed – however, the frequency change will be somewhat
delayed. The factory setting is 8, which is a good compromise.
Modulation: The rate at which the frequency of
the ascent tone increases as increased lift is
encountered is called modulation. The modulation
of the ascent tone can be adjusted to values from
2 to 9 in Menu>Pilot settings>Acoustic
vario>Customize sound. The higher the value, the
faster the frequency will increase as the lift values
increase. A modulation setting of 9 will yield more
audible change at lower climb rates, making it best
suited for use in mild lift. Conversely, a modulation
of 2 will spread the audible change over a greater
range of climb rates, and will be better suited for
flying in stronger conditions (see graph facing
page). The factory setting is 5.
Pitch: The ascent tone has a beep-pause ratio of
1:1 that cannot be changed; however, the tempo
(pitch) of the beeping becomes more rapid with
increasing lift. The rate at which the tempo
increases as increased lift is encountered can be
changed by altering the pitch value between 1 and 7 in Menu>Pilot settings> >Acoustic vario> Customize
sound. A pitch setting of 7 will yield maximum beep tempo at a climb rate of 1,000 ft/min (5 m/sec), while a
setting 1 will yield maximum beep tempo at 5,000 ft/min (25 m/sec).
Sink Alarm: The sink alarm is a continuous tone, triggered when the descent rate exceeds a predetermined
threshold. The sink tone decreases in frequency as the descent rate increases. The sink alarm can be toggled
on and off by briefly pressing the &" key. When the sink alarm is turned on, the 6030 will sound a sample tone
and the analog vario display will momentarily show the sink alarm threshold. The sink tone threshold can be set
between 10 and 2000 ft/min in Menu>Pilot settings>Acoustic vario>Sink tone threshold. The start frequency of
the sink tone can be set in the sinktoneF field in Menu>Pilot settings>Acoustic vario>Customize sound.
Stall Alarm: This is a tone of medium frequency with a very fast beep interval rate; it is always at full volume
(100%) and is not adjustable. The threshold speed and altitude for the stall alarm can be set in Menu>Pilot
settings>Speed>Stall speed. To turn off the stall alarm, set the threshold speed to 0. For more details read
Section 12.1, Stall Alarm, in the Appendix.
McCready Sound: When gliding with the McCready Sound activated, the 6030 will provide a beep that
corresponds to the McCready speed value (speed to fly). This sound is not adjustable and has been chosen
so that it should not be confused with the normal ascent beeping. It has a beep-pause ratio of 1:4. It is possible
to set a dead band for the McCready sound in the tonegap field of Menu>Pilot settings>McCready, so that there
will be no McCready sound when flying at or near the desired speed ring setting. Each time the McCready
sound is turned on, the deadband will be centered on the speed ring setting you were flying when you pressed
the McC &key. When the McCready sound is turned on, “MC” will appear at the top of display (between the
battery status and the page number). A time delay (in seconds) for the starting of the McCready sound after
leaving a thermal can be set to between 0 and 30 seconds in the delay field in Menu>Pilot settings>McCready.
For more detail, read Sections 3.5.2
Negative McCready Alarm: This is a deeper (lower frequency) beep with a rapid beep interval rate, which
indicates that you are flying slower than best glide speed and should fly faster immediately. This sound is not
adjustable.
150
0
200
0
250
0
300
0
350
0
Ascent tone in Hz
2 4 6 8 10 12 14 16
Climb rate in 100ft/min
ft/min
Modulation 2 = slow
change
Modulation 9 = fast
change
Modulation

© Flytec USA, 2007 – 2014Printed on 100% post-consumer recycled paper
20
3.7 Temperature
The 6030 uses a temperature sensor, not only for compensation of the pressure sensors but also for
automatically regulating the contrast of the display. The temperature can be displayed in the user-field Temp
and can be set to Fahrenheit or Celsius in Menu>Device settings>Units. It should be noted the sensor
measures the circuit board temperature. The inside temperature of the casing can be higher than the ambient
air temperature, especially when in direct sunlight.
3.8 Time and Date
The 6030 contains a real-time clock that is periodically set to your local time by the GPS signal and can be
displayed in the user-field Time. The time does not need to be set since it is automatically set by the GPS
receiver. The UTC time will be automatically set when the 6030 acquires GPS coverage for the first time (or
after the instrument has been re-initialized) and will be confirmed with a short beep. However, to set the unit to
local time, you must enter the difference from UTC. A positive value corresponds to time zones east of
Greenwich and negative values to those west. It is also possible to enter half-hour time zones by adding a 0.5h
shift to the set time zone. The UTC offset and date can be set under Menu>Device settings >UTC offset.
3.9 Flight Time
The takeoff time is automatically recorded and the flight time starts when the 6030 detects horizontal movement
or a change of altitude. This is referred to as Flight Acceptance. Flight acceptance will occur when either the
GPS speed exceeds 10km/h or there is 20m change in altitude (within 60 seconds). These default values can
be changed in Menu>Pilot settings> Recording>Recording mode.
The flight time can be displayed in the user-field Flt Time. The 6030 will also automatically recognize the end of
the flight when horizontal movement is less than 10km/h and the vario is less than 20 ft/min for 60 sec. In
Menu>Pilot settings>Recording>Recording Mode you can choose between automatic, semi automatic and full-
time recording. For more information on recording, see Section 6.1.
3.10 Distance Measurements
3.10.1 Distance to Waypoint
The horizontal distance to a waypoint can be displayed in the user-field Dist WP. This distance will appear,
either if the instrument has switched to the waypoint automatically as part of the Route function, or if the
destination has been chosen manually with the Goto function. For distances under 10 km the resolution is 10
meters; if the distance is greater than 10 km the resolution is 0.1 km. Please read Section 5.1, Goto Function.
The distance to a waypoint is always measured to the actual waypoint and not to the cylinder that may be
around the waypoint in the case of a Competition Route.
3.10.2 Distance to Last Thermal
This function can assist the pilot in relocating thermals that are lost when searching for better lift. The user-field
Dist Therm will show the distance to your last thermal with a climb rate over a predetermined limit. The
threshold for the last thermal can be set in Menu>Pilot settings>Vario>Last Thermal threshold. A small up-arrow
in the compass rose shows the direction to the last thermal. If this arrow is displayed at the top in the ring, then
you are flying towards the thermal; conversely, if the arrow is in the bottom of the compass rose, you are going
away from the thermal.
3.10.3 Distance to Goal
The remaining distance to goal, or to the end of a route around the balance of that route, can be displayed in the
user-field Dist goal. This value is used when calculating L/D to goal (see Section 4.6 below).
3.10.4 Distance to Restricted Airspace
It is possible to enter restricted airspace (referred to as CTRs) in the 6030. CTRs will appear on the real-time
map and can be polygons, circles or polygons with arc sections. The distance to the nearest CTR can be
displayed with the user-field Dist CTR. For information on entering restricted airspace please see Sections 7
and 8.4
Table of contents
Other Flytec GPS manuals

Flytec
Flytec 6015 User manual

Flytec
Flytec ELEMENT User manual

Flytec
Flytec 6040 User manual

Flytec
Flytec 5030 GPS User manual

Flytec
Flytec 5020 User manual

Flytec
Flytec 5020 How to use

Flytec
Flytec 6015 User manual

Flytec
Flytec 5030 GPS User manual

Flytec
Flytec 5020 User manual

Flytec
Flytec SensBox User manual