Fona XPan 3D Plus User manual
OPERATING INSTRUCTIONS
FONA XPan 3D Plus_
English

Operating Instructions
2
ITALIANO
Table of contents
FOREWORD............................................................................................................................................................4
1. WARNING AND SAFETY NOTES...................................................................................................................5
2. GENERAL DESCRIPTION...............................................................................................................................8
3. OPERATING CONTROLS AND DISPLAYS ...................................................................................................9
3.1. UNIT...........................................................................................................................................................9
3.2. REMOTE HAND-SWITCH.........................................................................................................................9
3.3. CONTROL PANEL ..................................................................................................................................10
3.4. OPERATING POSITIONS .......................................................................................................................11
3.4.1. PANORAMIC EXAMS .......................................................................................................................11
3.4.2. CAPHALOMETRIC EXAMS ..............................................................................................................11
4. POSITIONING TOOLS...................................................................................................................................12
5. APPLICATION SOFTWARE..........................................................................................................................13
5.1. ORISWIN DG SUITE ...............................................................................................................................13
6. EXPOSURE PROGRAMS..............................................................................................................................15
6.1. P1 PROGRAM (Adult standard panoramic image) .................................................................................15
6.2. P2 PROGRAM (Children panoramic image) ...........................................................................................15
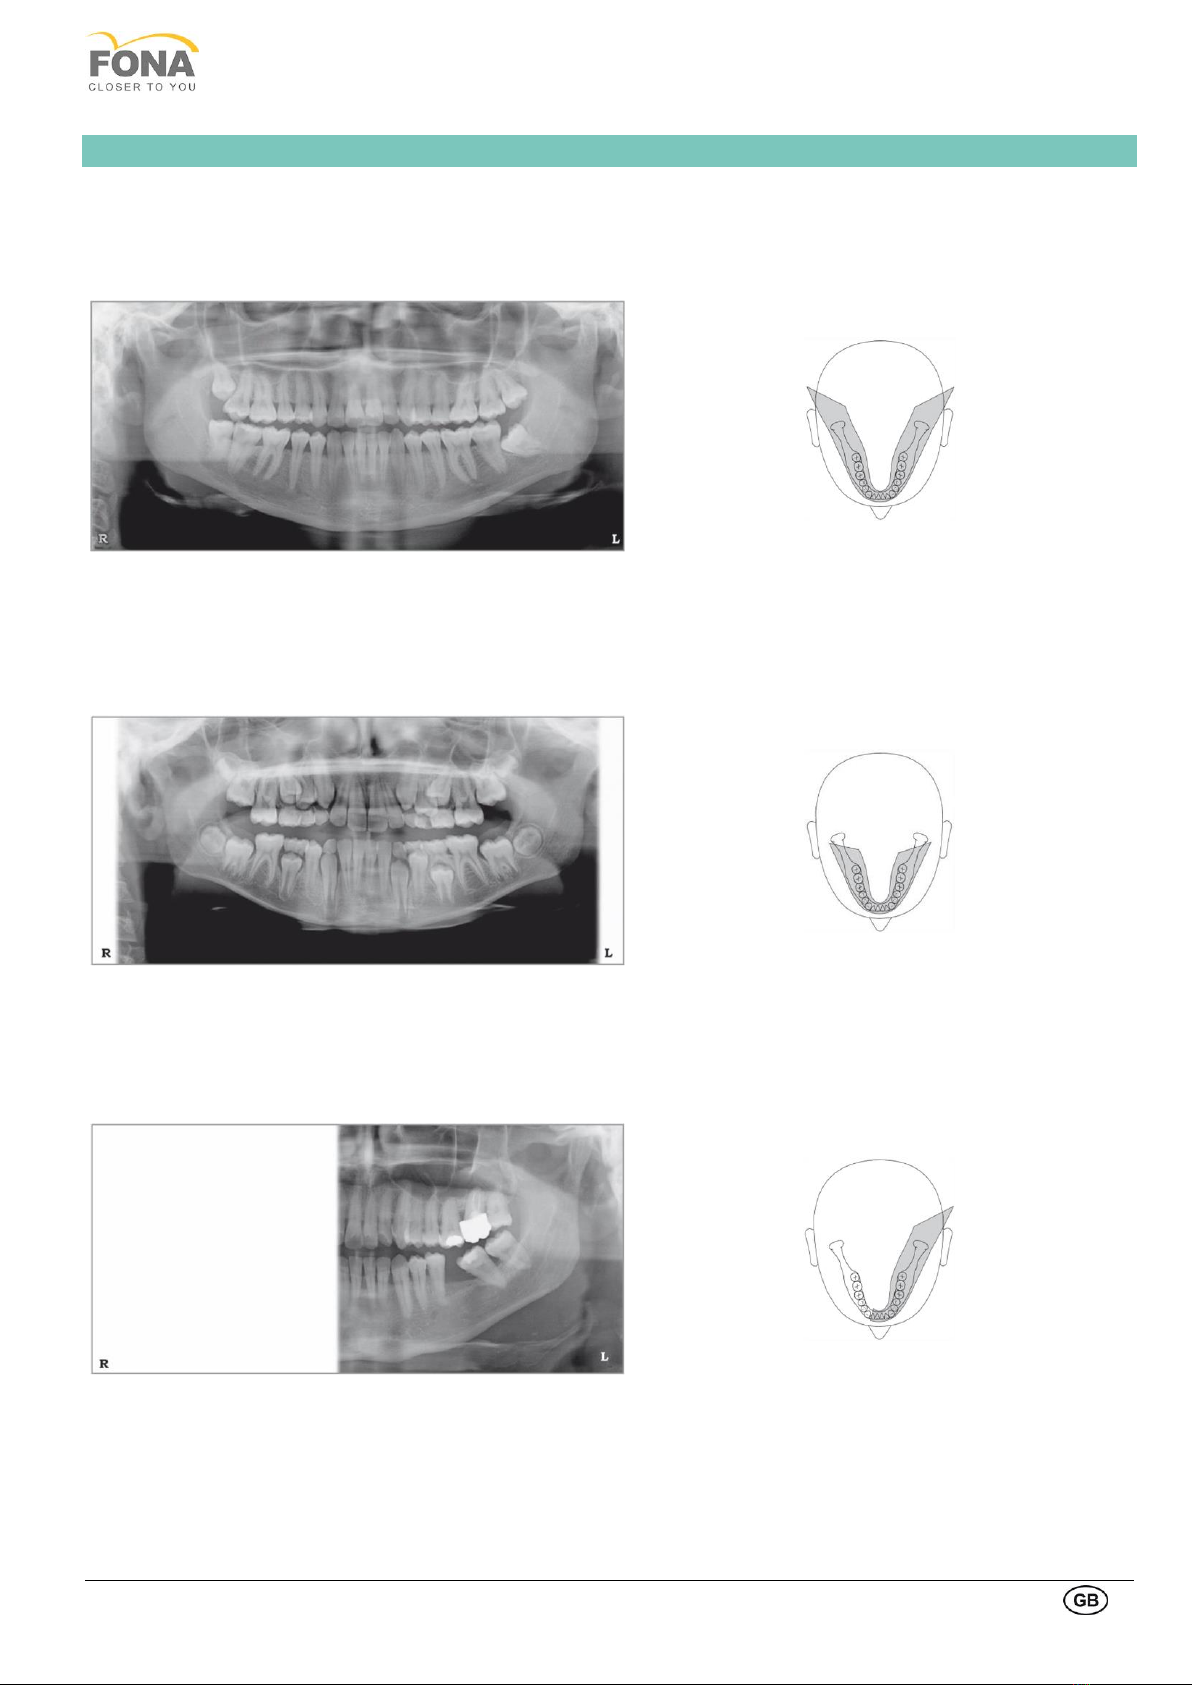
6.3. P3 PROGRAM (Left hemi-arch panoramic image) .................................................................................15
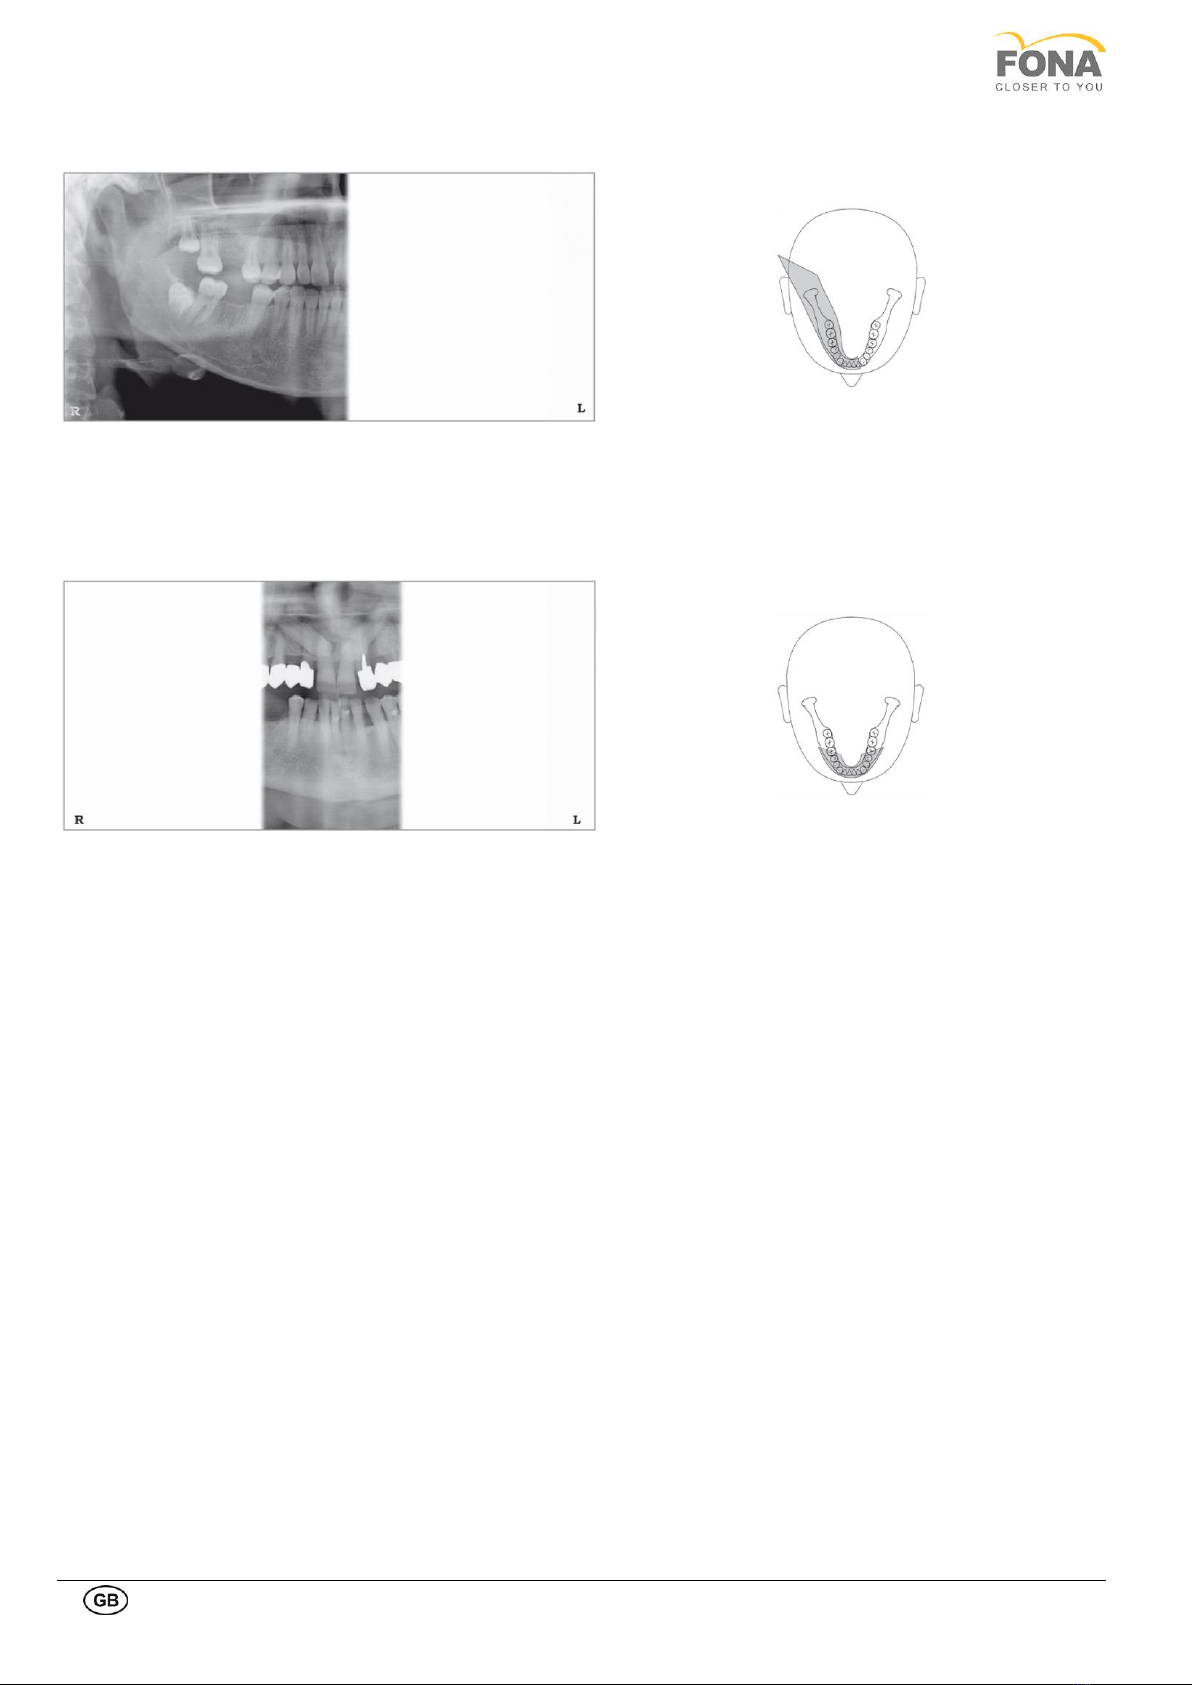
6.4. P4 PROGRAM (Right hemi-arch panoramic image) ...............................................................................16
6.5. P5 PROGRAM (Anterior teeth panoramic image) ...................................................................................16
6.6. P6 PROGRAM (Temporo-madibular join TMJ, closed/open mouth) ......................................................17
6.7. P7 PROGRAM (Maxillary sinuses) ..........................................................................................................17
6.8. P8 PROGRAM (Full mouth 3D volume) ..................................................................................................18
6.9. P9 PROGRAM (TMJ left 3D volume) ......................................................................................................18
6.10. P10 PROGRAM (TMJ right 3D volume) ..................................................................................................18
6.11. P11 PROGRAM (Latero-lateral cephalometric image)............................................................................19
6.12. P12 PROGRAM (Antero-posterior cephalometric image) .......................................................................19
6.13. P13 PROGRAM (Carpus image).............................................................................................................19
7. OPERATION –P1 to P10 PROGRAMS ........................................................................................................20
7.1. PREPARING EQUIPMENT FOR EXPOSURE .......................................................................................20
7.2. PREPARING PATIENT BEFORE POSITIONING...................................................................................22
7.3. POSITIONING THE PATIENT.................................................................................................................22
7.3.1. Panoramic and 3D Exams (from P1 to P8, except P6 and P7).........................................................22
7.3.2. TMJ Exam (P6) and Sinus Exam (P7) ..............................................................................................23
7.3.3. 3D TMJ exams (P9 left TMJ, P10 right TMJ) ....................................................................................23
7.4. POSITIONING THE PATIENT - Part 2....................................................................................................24
7.5. RELEASING THE EXPOSURE ...............................................................................................................26
7.6. AFTER THE EXPOSURE........................................................................................................................27
7.7. COOLING DOWN OF THE TUBEHEAD.................................................................................................27
8. OPERATION –CEPHALOMETRY (P11 to P13 PROGRAMS) ....................................................................28
8.1. PREPARING EQUIPMENT FOR EXPOSURE .......................................................................................28
8.2. PREPARING PATIENT FOR EXPOSURE..............................................................................................29
8.3. POSITIONING THE PATIENT.................................................................................................................30
8.3.1. Latero-lateral program (P11) .............................................................................................................30
8.3.2. Antero-posterior program (P12).........................................................................................................31
8.3.3. Carpus program (P13) .......................................................................................................................32
8.4. RELEASING THE EXPOSURE ...............................................................................................................33
8.5. AFTER THE EXPOSURE........................................................................................................................33
8.6. COOLING DOWN OF THE TUBEHEAD.................................................................................................33

FONA XPan 3D Plus
3
9. PROGRAMMING............................................................................................................................................34
9.1. PROGRAMMING PROCEDURE ............................................................................................................34
9.2. PROGRAM VALUES...............................................................................................................................35
10. CARE OF THE SURFACES ..........................................................................................................................36
11. MESSAGES ...................................................................................................................................................37
11.1. WARNING MESSAGES ..........................................................................................................................37
11.2. ERROR MESSAGES ..............................................................................................................................37
12. INSPECTION AND MAINTENANCE .............................................................................................................38
13. TECHNICAL DESCRIPTION .........................................................................................................................39
14. ELECTROMAGNETIC COMPATIBILITY ......................................................................................................42
14.1. ELECTROMAGNETIC EMISSION ..........................................................................................................42
14.2. ELECTROMAGNETIC IMMUNITY..........................................................................................................42
14.3. SYSTEMS THAT ARE NON LIFE SUPPORTING ..................................................................................43
14.4. RECOMMENDED SAFETY DISTANCES FOR SYSTEMS THAT ARE NOT LIFE SUPPORTING.......43

Operating Instructions
4
FOREWORD
Dear Customer,
Thank you for purchasing your new FONA XPan 3D Plus.
We provided you with a set of technical literature:
Operating Instructions,
Installation manual,
Service manual,
Maintenance manual
Warranty conditions
Keep this literature for easy and quick reference.
Read the Operating Instructions to become familiar with the unit before taking radiographs on the patient.
Please observe the radiation Protection Regulations and Warning and Safety Notes.

FONA XPan 3D Plus
5
1. WARNING AND SAFETY NOTES
Instructions
The accompanying documents among which the Operating Instructions
and the Installation Instructions supplied with the unit are integral parts of
the product.
The original language of the Operating Instructions is English.
The manual information are subject to changes without any notice.
The manufacturer is not responsible for direct, indirect or accidental
damage resulting from or relating to the provision or use of this
information.
This document may not be reproduced, adapted or translated, in part or
in full, without the prior written permission of the manufacturer.
Labeling of warning and safety
information
In order to prevent injury to persons and damage to the equipment you
must also read the warning and safety notes given in these Operating
Instructions.
Indication for use
The unit is intended to produce two dimensional images and three
dimensional volume reconstructions, including partial volumes and
selected projections of the dentomaxillofacial areas, for use in planning
and diagnostic support. Image acquisition modes include
panoramic/cephalometric X-ray and cone beam tomography x-ray.
Contraindications
There are no contraindications to the use of the equipment within the
indication for use other than those related to exposure of the patient to
ionizing radiation, which should be limited to the maximum.
Prescription for use
Caution: Federal law restricts this device to sale by or on the order of a
licensed healthcare practitioner.
Responsibilities of the User
The user has the following responsibilities:
Use the system following the instructions and recommendations
contained in this user manual.
Keep the machine in perfect working condition following the
maintenance instructions given by the manufacturer. Failure to
observe the instructions relieves the manufacturer or his agent from
any responsibility for injury, damage or non-conformities that may
derive there from.
Promptly notify the competent Health Authority and the manufacturer
in the event of an accident involving this medical device and/or
operations that may cause death or put the patient and/or the user at
risk. The type and serial numbers of the components involved,
indicated on the external labels, are to be communicated to the
manufacturer.
General safety information
As manufacturers of medical devices, we can assume responsibility for
safety-related performance of the equipment only if maintenance, repair
and modifications are carried out only by us or agencies we have
authorized for this purpose, and if components affecting safe operation of
the unit that may be needed are replaced with original parts.
We suggest that you request a certificate showing the nature and extent
of the work performed, from those who carry out such work, and specify
that the certificate show any changes in rated parameters or working
ranges, as well as the date, the name of the firm, and a signature.
For safety reasons only use original accessories indicated in this
Operating Instructions. It is the user's risk when using non-released
accessories.
Exposures of patients may only be taken if the unit functions fault-free.
Never leave the unit unattended.
System assembly at installation
The system is fully tested in manufacturing and can be operated once the
major modules are mechanically assembled at installation and then
connected to the power line.
Operating Instructions
6
Safety measures during switch-on
Following extreme temperature fluctuations, condensate formation may
occur; therefore please do not switch on the device until normal room
temperature has been reached (see chapter 7.1, Preparing for exposure).
Electromagnetic Compatibility
This unit may be operated in a residential/hospital area, provided it is
used under the responsibility of a trained medical operator, and following
the recommendations reported in chapter 13, Electromagnetic
Compatibility.
FONA XPan 3D Plus needs special precautions regarding EMC, and
needs to be installed and put into service according to the EMC
information provided in Chapter 13.
Portable and mobile Radio Frequency communications equipment can
affect medical electrical equipment like FONA XPan 3D Plus.
The use of accessories and cables other than those provided, with the
exception of accessories and cables sold by the FONA as replacement
parts for internal components, may result in increased emissions or
decreased immunity of the device.
FONA XPan 3D Plus should not be used adjacent to or stacked with
other equipment; if adjacent or stacked use is necessary, FONA XPan 3D
Plus. should be observed to verify normal operation in the configuration in
which it will be used.
Interference with medical devices
by radio telephones
To guarantee the operational safety of medical devices, it is
recommended that the operation of mobile radio telephones in the
medical practice or hospital is prohibited.
Malfunction of electronic units/
devices which are worn on the
patient's body
In order to prevent failure of electronic units and data storage devices,
e.g. radio-controlled watch and telephone card, etc., it is essential that
these be removed prior to X-ray exposure.
Laser light localizers used
This product incorporates Class 1 lasers as light localizers for the
positioning of the patient. They must not be used for other purposes. A
minimum distance of 100 mm must be maintained between the eye and
the laser. Avoid unnecessary exposure of the eyes and pay attention that
the beams are not intercepted by any optical device.
Electrical safety
Trained and qualified technicians only are authorized to remove covers
and have access to power circuits.
Power supply lines must comply with safety legislation and have ground
terminals for protective earth connection.
Explosion
This unit cannot be used in presence of flammable gases or vapours.
Radiation protection guidelines
X-ray equipment produces ionizing radiation that may be harmful if not
properly controlled. It is therefore recommended that the equipment be
operated by trained personnel only, in accordance with existing law.
Exposure to ionizing radiation is of particular concern in pediatric
patients. It is thus recommended to follow the specific pediatric protocol
available on the unit. Refer also to the Image Gently in Dentistry
Campaign materials (http://www.imagegently.org/Roles-What-can-I-
do/Parent/Dentist) for best practices in pediatric X-ray imaging.
Observe the applicable health physics regulations. The radiation
protection facilities should be used.
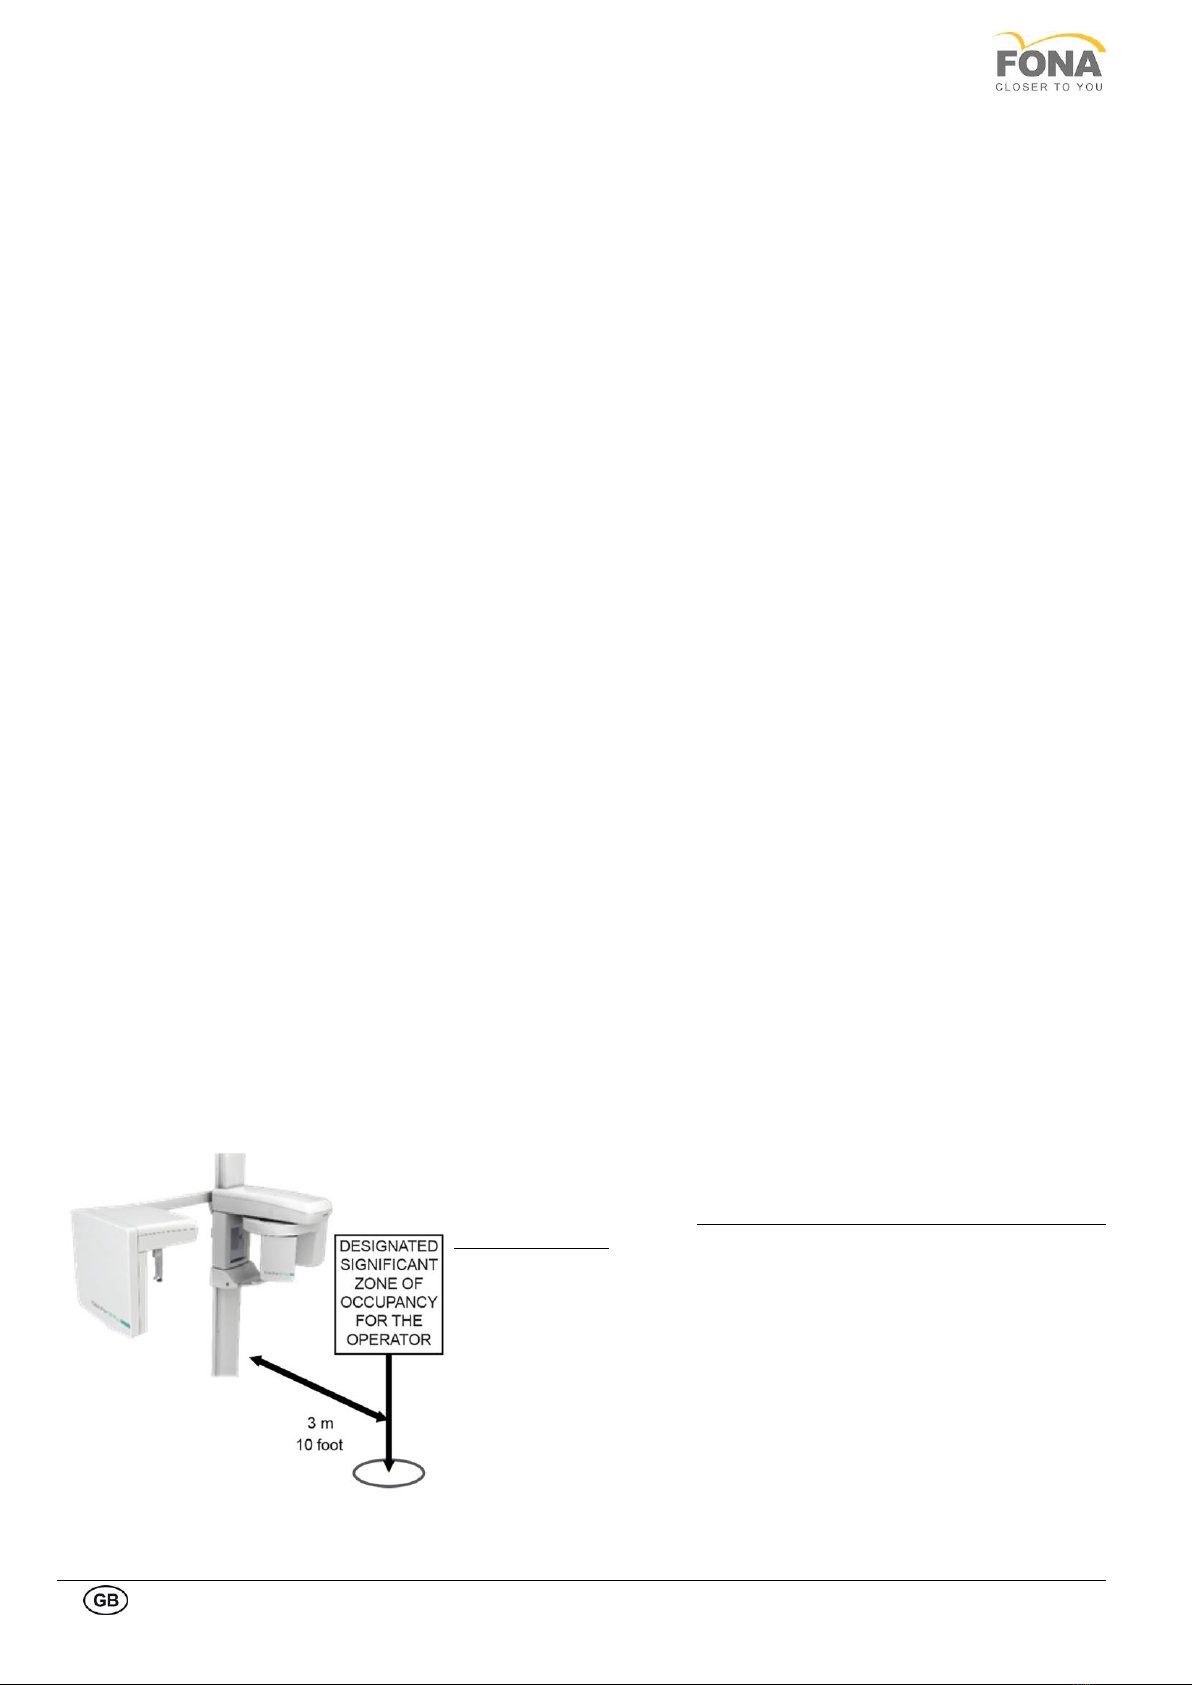
The operator should remain as far away from the X-ray tube as the cable
of the release button permits (in the designated significant zone of
occupancy for the operator).
With the exception of the patient, no other persons may remain in the
room while the exposure is being made. Under exceptional
circumstances a third person, however not belonging to the dental
practice, may then assist.
Maintain visual contact with the patient and the unit during the exposure
and in case of faulty operation, immediately discontinue the exposure by
releasing the X-ray button.

FONA XPan 3D Plus
7
Disassembly and reinstallation
For disassembly and reinstallation of the unit proceed as described in the
installation instructions for new installation to ensure perfect function of
the unit and its stability.
Disposal
It generally applies that any disposal of this product must comply with the
relevant national regulations. Please observe the regulations applicable
in your country.
Within the European Economic Community, Council Directive
2012/19/EU (WEEE) requires environmentally sound recycling/disposal
of electrical and electronic devices.
Your product is marked with the adjacent symbol. Disposal of your
product with domestic refuse is not compatible with the objectives of
environmentally sound recycling/ disposal. The black bar underneath the
garbage can symbol means that it was put into circulation after Aug. 13,
2005 (see EN 50419:2005).
Please note that this product is subject to Council Directive 2012/19/EU
(WEEE) and the applicable national law of your country and must be
recycled or disposed of in an environmentally sound manner.
The X-ray tube assembly of this product contains a tube with a potential
implosion hazard, a lead lining and mineral oil.
Please contact your dealer if final disposal of your product is required.

Operating Instructions
8
2. GENERAL DESCRIPTION
Thank you for choosing FONA XPan 3D Plus as your new CBCT 3D, Panoramic and Cephalometric solution!
Our patients, dentists and partners are inspiring us every day. With all our knowledge, passion and experience, we
provide complete modern dental solutions to improve global dentistry. We hope that FONA XPan 3D Plus will help you
to provide happy and healthy smiles to your patients, every day.
FONA XPan 3D Plus combines Cone Beam CT, Panoramic and One-Shot Cephalometric imaging functionality in one
compact device. It is the ultimate solution for everyone who wants to perform full range of radiographic exams with
only one system. Switching between sensors is done automatically, without need of manual handling, thus saving your
time and securing your investment. Select desired 2D or 3D exposure program, simply with a push of a button, on
device control panel or remotely from the computer. Your smooth workflow is guaranteed, since the unit is completed
by high-performance PC and powerful OrisWin DG Suite imaging software. Fast, easy to use and fully loaded - your
ultimate diagnostic solution, FONA XPan 3D Plus.
System with 2-sesors automatically and quickly adjusts its position to your 3D, 2D Pano or Ceph program selection.
This saves time and secures your investment. Innovative sensor technology acquires the cephalometric image in less
than 1 second, thus preventing patient movement and increasing image quality. Setting of exposure was never easier
- 3D, Pano or Ceph in just 2 clicks. Simply select the program, patient size and you are ready to go.
You can select from 7 panoramic programs including Sinus and TMJ. Child panoramic and partial arch scans are
available to allow patient dose reduction including Left-side, Right-side and Anterior dentition. 3D Cone Beam volume
of 8.5 x 8.5 is ready in just 30 seconds. Advanced 64bit technology allows you to begin diagnosis in as little as 30
seconds from start of the exposure. Mandibular canal and maxillary sinuses are clearly visible in a single exposure.
Quickly acquired and distortion-free One-Shot Ceph images are immediately ready to be traced and evaluated, with
detailed diagnostic information in both soft and hard tissue.
To make the system complete you can opt for FOPNA Implant Simulation Software. It allows precise preparation of
your implant placement and to select from more than 60 different implant brands.
To keep your system in top shape, consult regular maintenance checks with your distributor. This will ensure that your
FONA XPan 3D Plus will be updated, in good condition and performing according to highest standards. For more
support, register your system to receive information about latest updates and news at
www.fonadental.com/registerproduct

FONA XPan 3D Plus
9
3. OPERATING CONTROLS AND DISPLAYS
3.1. UNIT
3.2. REMOTE HAND-SWITCH
The hand switch can alternatively be mounted remotely in case the unit is located in an
X-ray room which has a door and enables visual contact with the patient.
An optional kit is available for remote mounting of the hand switch. Order code 93 190
00155.
1. X-Ray button
2. Patient positioning mirror
3. 3D-Panoramic Image Mirror
4. Bite block
5. Height adjustment buttons
6. Main switch
7. Knob for Frankfurt plane adjustment
8. Cephalometric image receptor
9. Cephalostat
10. Control panel
11. X-Ray Generator
12. Optional self standidg base

Operating Instructions
10
3.3. CONTROL PANEL
Unit ON with light on display
READY green light ON when system ready
ALARM red light ON upon alarm message
EXPOSURE key on Hand Switch
X-ray Radiation –Orange Light ON
PROGRAM Selection
INCREASE kV (left side) mA (right side)
DECREASE kV (left side) mA (right side)
PATIENT build: Small, Medium, Large, Extra-Large
LIGHT for alignment ON for 60 s
RETURN Arm Movement
TEST Mode without Radiation
BACK for backward movement and alarm reset
UP carriage movement
DOWN Carriage movement
Arrows for the positioning of the canine laser
FONA XPan 3D Plus
11
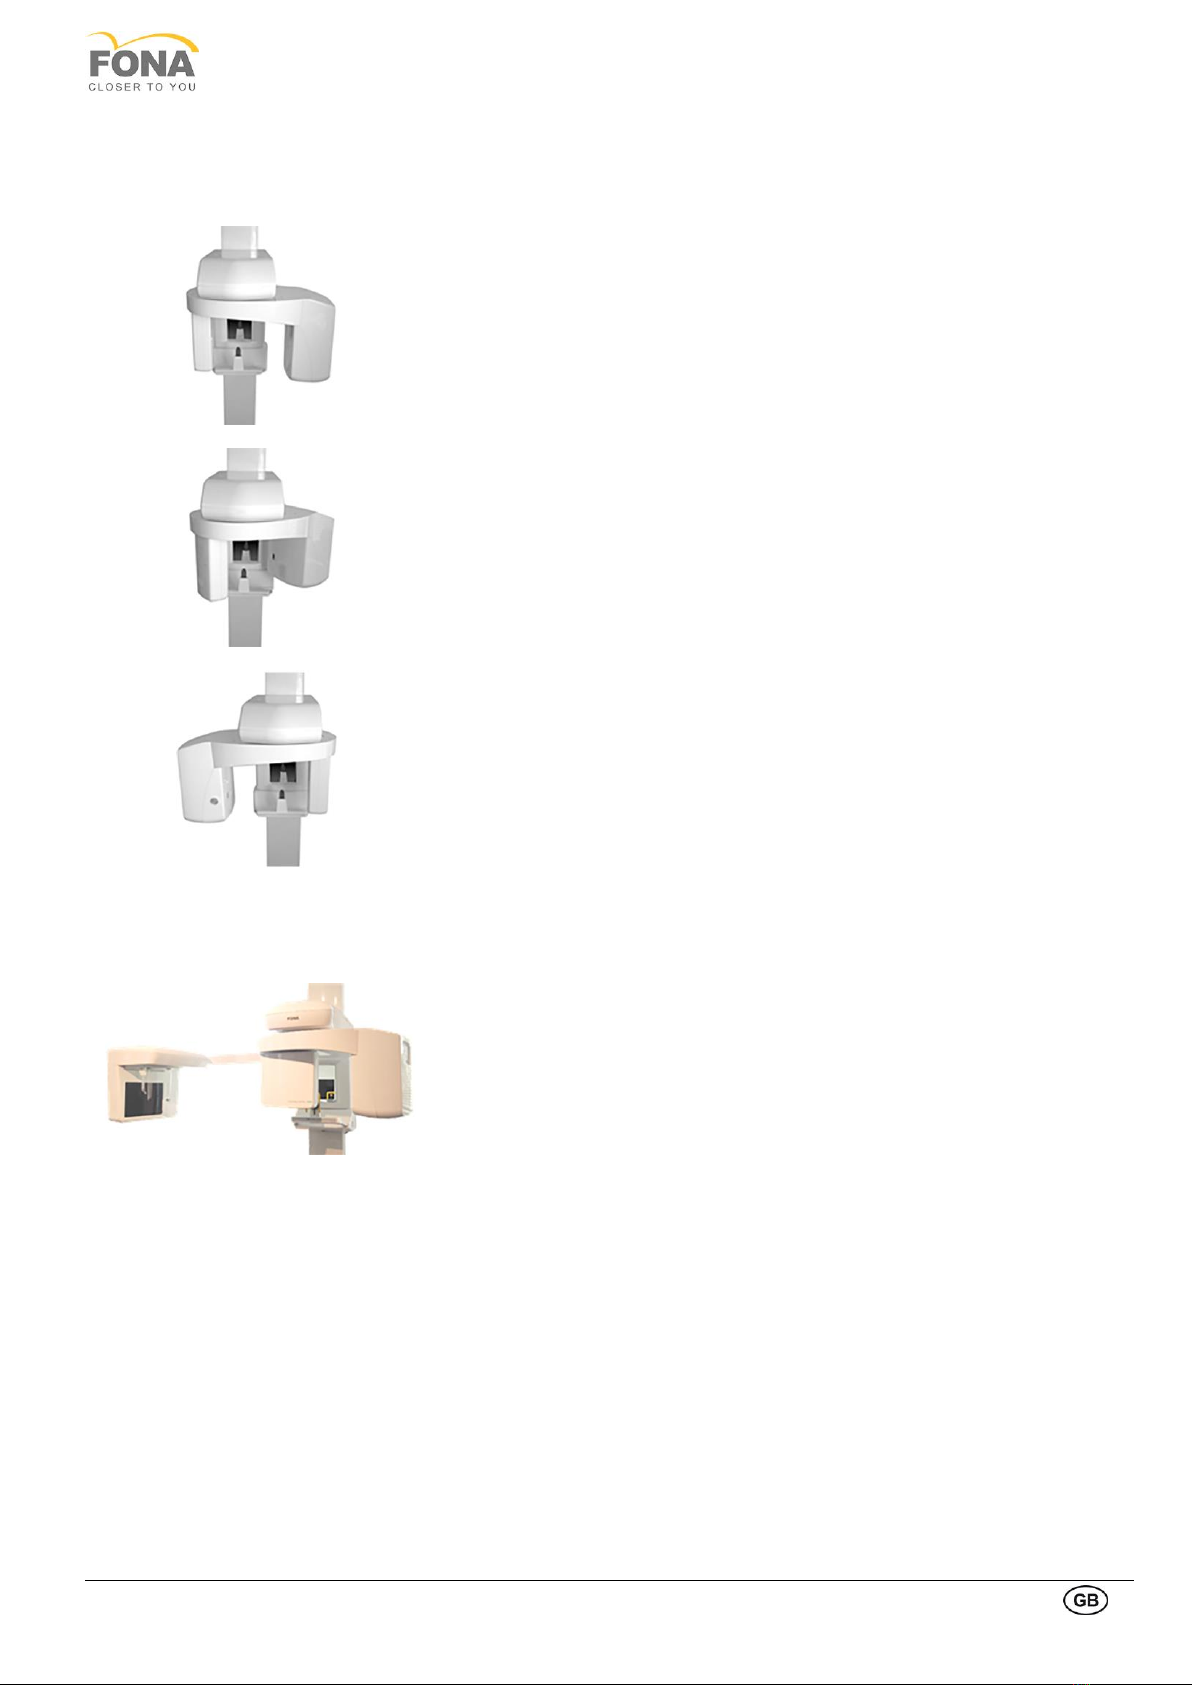
3.4. OPERATING POSITIONS
3.4.1. PANORAMIC EXAMS
PATIENT ENTRY position
Control panel and X-ray source on the right of the patient and the image
receiver on the left.
START position
System ready to start the exposure. When the unit reaches the START
position the green light of the READY indicator on the control panel is
turned ON
PATIENT EXIT position
Control panel and X-ray source on the left of the patient and the image
receiver on the right.
3.4.2. CAPHALOMETRIC EXAMS
CEPHALOMETRIC EXAMS positions
For Cephalometric exam there is only one position: the Panoramic/3D
sensor is in front of the mirror, the X-ray source in front of the
cephalometric sensor.

Operating Instructions
12
4. POSITIONING TOOLS
1Bite block with chin rest
5 Bite block for TMJ and sinus
exams
2 Chin rest with support for
edentulous
6 Nasal support for TMJ and
sinus exams
3 Bite block
7 Chin rest with support for
3D TMJ exams (left and
right) –Optional
4 Nasal support for
edentulous patients
8 Adjustable Nasion Support+
2 auricular rods
(Cephalometric exams)

FONA XPan 3D Plus
13
5. APPLICATION SOFTWARE
5.1. ORISWIN DG SUITE
The software OrisWin DG Suite is a complete and simple to use tool for the management of the dental cabinet and
enhancement of digital radiographic images.
The software allows to manage all data of the Dental cabinet in a very simple and intuitive way. Moreover, it allows to
acquire the images from a wide range of electronic devices: video radio X-Ray system, telecameras, digital extraoral
units, scanners, cameras, slides scanner, etc.
All the acquired images, independently from their origin, can be saved and elaborated. A series of measurement
functions exist (distance, angles, areas, etc.) for reliable treatment planning.
The software OrisWin DG Suite allows the acquisition of panoramic and cephalometric X-ray images and X-Ray
images for 3D reconstruction, managing also the associated patient data records.
The images acquired by OrisWin DG Suite can be saved in DICOM format.
For more information on the use of the application, refer to the OrisWin DG Suite user manual which is included in the
installation DVD.
The procedure for image acquisition is described below. The instructions for subsequent processing and storage of the
images are described in the OrisWin DG Suite User Manual
A. Starting
On the PC connected to FONA XPan 3D Plus with
OrisWin DG Suite installed:
Start OrisWin DG Suite and select the Patient module
with the relevant button
B. Selecting the patient
Select the patient from the list or insert a new patient.
Then start image management.
Operating Instructions
14
C. Selecting the X-ray system
Start an acquisition session by selecting the FONA
XPan 3D Plus button.
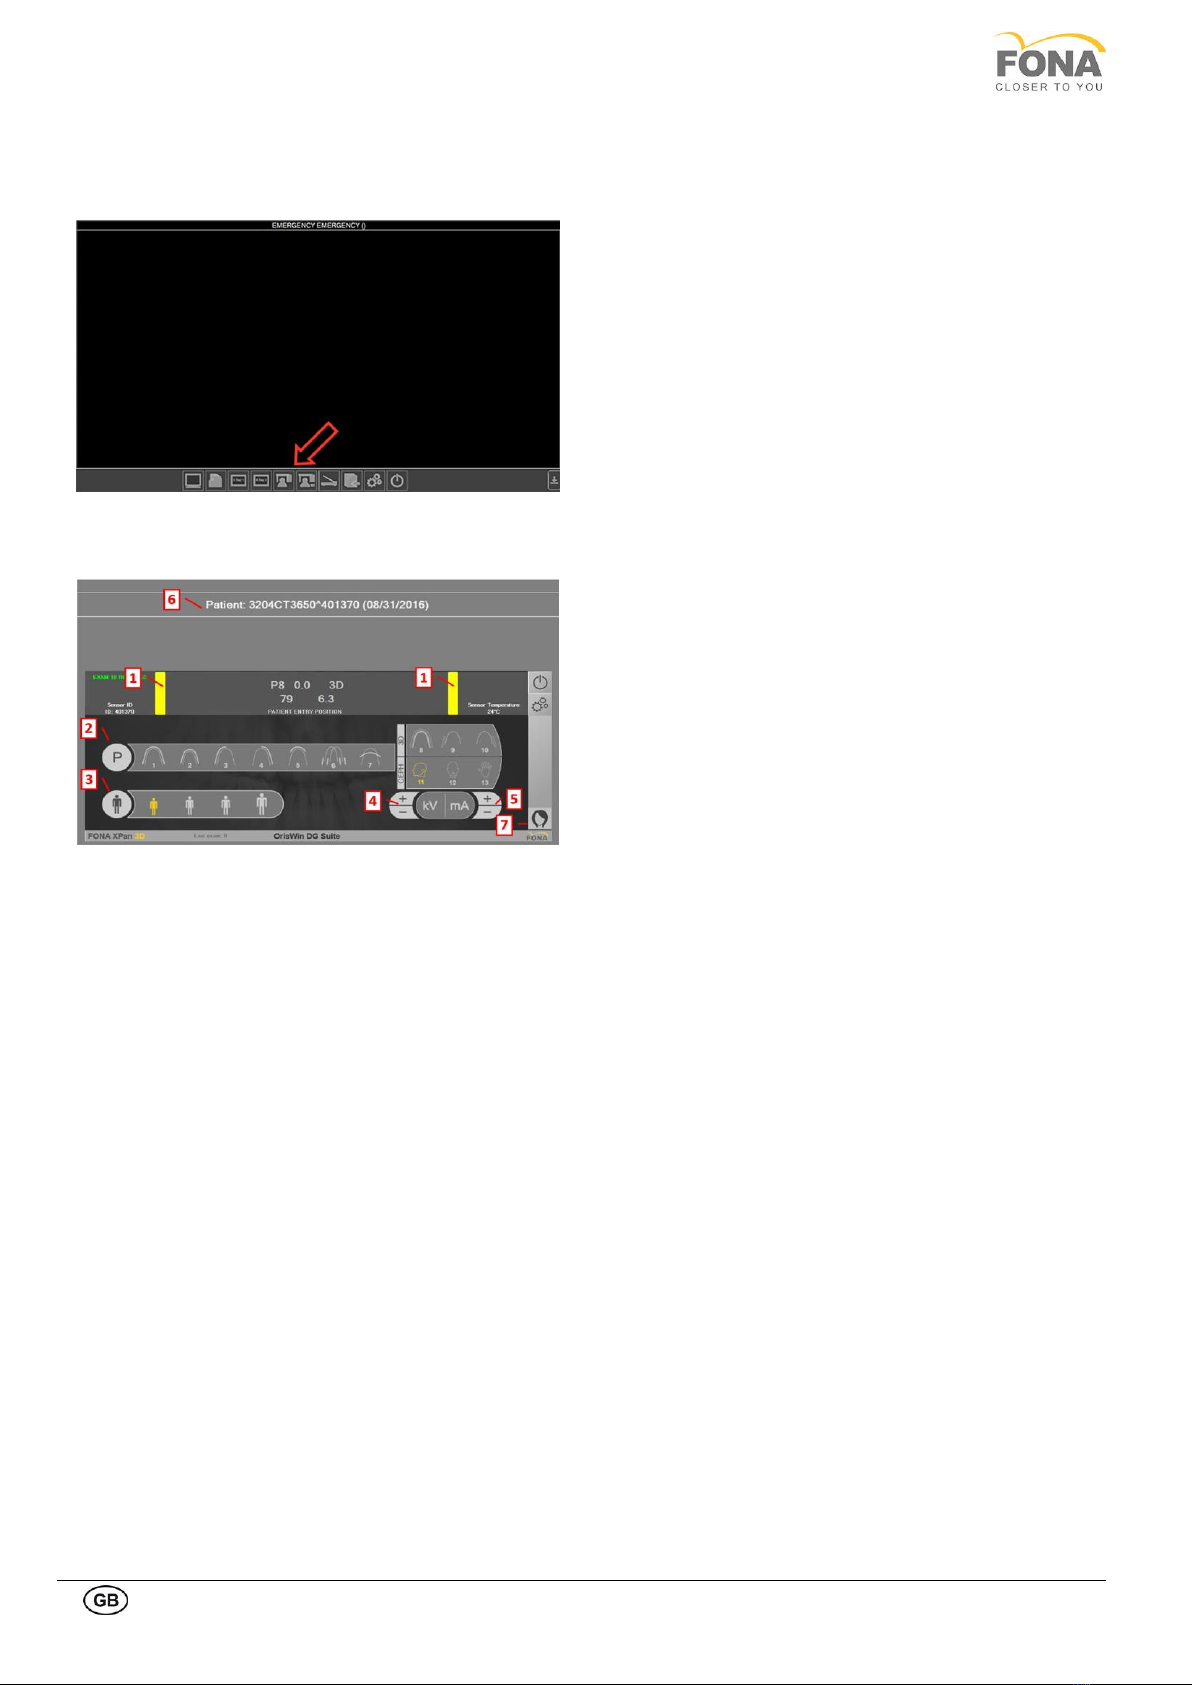
D. Software Acquisition Interface
The two vertical bars (1) on acquisition module can be:
oRed: system not connected to PC
oYellow: system proper connected to PC, but not
ready to acquire
oGreen: system ready to acquire
oBlue: system acquiring (X-Ray ON)
Click on “P” button (2) to select the program and on
“Size” button (3) to select proper patient size.
If needed, it is possible to change the kV (4) and mA (5)
values by clicking on the “+” and “-” buttons
Patient information (name and date of birth) is shown in
the upper part of the window (6)
By clicking on the button in the right bottom part of the
acquisition window (7) the file containing the step by
step positioning guide will be shown
FONA XPan 3D Plus
15
6. EXPOSURE PROGRAMS
The image at receptor’s plane is approximately 27% higher than real size: the vertical magnification on adult standard
profile is 1.27:1 approximately with constant vertical magnification on dental arch.
6.1. P1 PROGRAM (Adult standard panoramic image)
Program duration time approx.: 16 s
Program exposure time: 14.2 s
Positioning tool: 1, 2, 3, 4 (see §4. Positioning
tools)
6.2. P2 PROGRAM (Children panoramic image)
Program duration time approx.: 16 s
Program exposure time: 11.5 s
Positioning tool: 1, 2, 3, 4 (see §4. Positioning
tools)
6.3. P3 PROGRAM (Left hemi-arch panoramic image)
Program duration time approx.: 16 s
Program exposure time: 7.3 s
Positioning tool: 1, 2, 3, 4 (see §4. Positioning
tools)
Operating Instructions
16
6.4. P4 PROGRAM (Right hemi-arch panoramic image)
Program duration time approx.: 16 s
Program exposure time: 7.3 s
Positioning tool: 1, 2, 3, 4 (see §4. Positioning
tools)
6.5. P5 PROGRAM (Anterior teeth panoramic image)
Program duration time approx.: 16 s
Program exposure time: 4.8 s
Positioning tool: 1, 2, 3, 4 (see §4. Positioning
tools)

FONA XPan 3D Plus
17
6.6. P6 PROGRAM (Temporo-madibular join TMJ, closed/open mouth)
Two exposures are usually taken with closed and open mouth. (Please refer to “Positioning the patient” paragraph 7.3)
Patient is positioned with bite block under the nose.
Once taken the first set of two images, return the unit.
A second set of two exposures can be taken immediately.
TMJ closed mouth:
Program duration time approx.: 16 s
Program exposure time: 4.4 s (2 x 2.2 s)
Positioning tool: 5, 6 (see §4. Positioning tools)
TMJ open mouth:
Program duration time approx.: 16 s
Program exposure time: 4.4 s (2 x 2.2 s)
Positioning tool: 5, 6 (see §4. Positioning tools)
6.7. P7 PROGRAM (Maxillary sinuses)
Program duration time approx.: 16 s
Program exposure time: 12.9 s
Positioning tool: 5, 6 (see §4. Positioning tools)

Operating Instructions
18
6.8. P8 PROGRAM (Full mouth 3D volume)
Program duration time: approximately : 14 s
Program exposure time: 12.3 s
Positioning tool: 1, 2, 3, 4 (see §4. Positioning
tools)
6.9. P9 PROGRAM (TMJ left 3D volume)
Program exposure time: 12.3 s
Positioning tool: 7 (available on request)
6.10. P10 PROGRAM (TMJ right 3D volume)
Program exposure time: 12.3 s
Positioning tool: 7 (available on request)

FONA XPan 3D Plus
19
6.11. P11 PROGRAM (Latero-lateral cephalometric image)
Positioning tool: 8 (see §4. Positioning
tools)
Program duration time: 1.6 s (adjustable)
Program exposure time: 1.6 s (adjustable)
6.12. P12 PROGRAM (Antero-posterior cephalometric image)
Positioning tool: 8, without nasion (see §4.
Positioning tools)
Program duration time: 1.6 s (adjustable)
Program exposure time: 1.6 s (adjustable)
6.13. P13 PROGRAM (Carpus image)
Positioning tool: 8, without nasion and ear
plugs (see §4. Positioning tools)
Program duration time: 0.5 s (adjustable)
Program exposure time: 0.5 s (adjustable)
Operating Instructions
20
7. OPERATION –P1 to P10 PROGRAMS
7.1. PREPARING EQUIPMENT FOR EXPOSURE
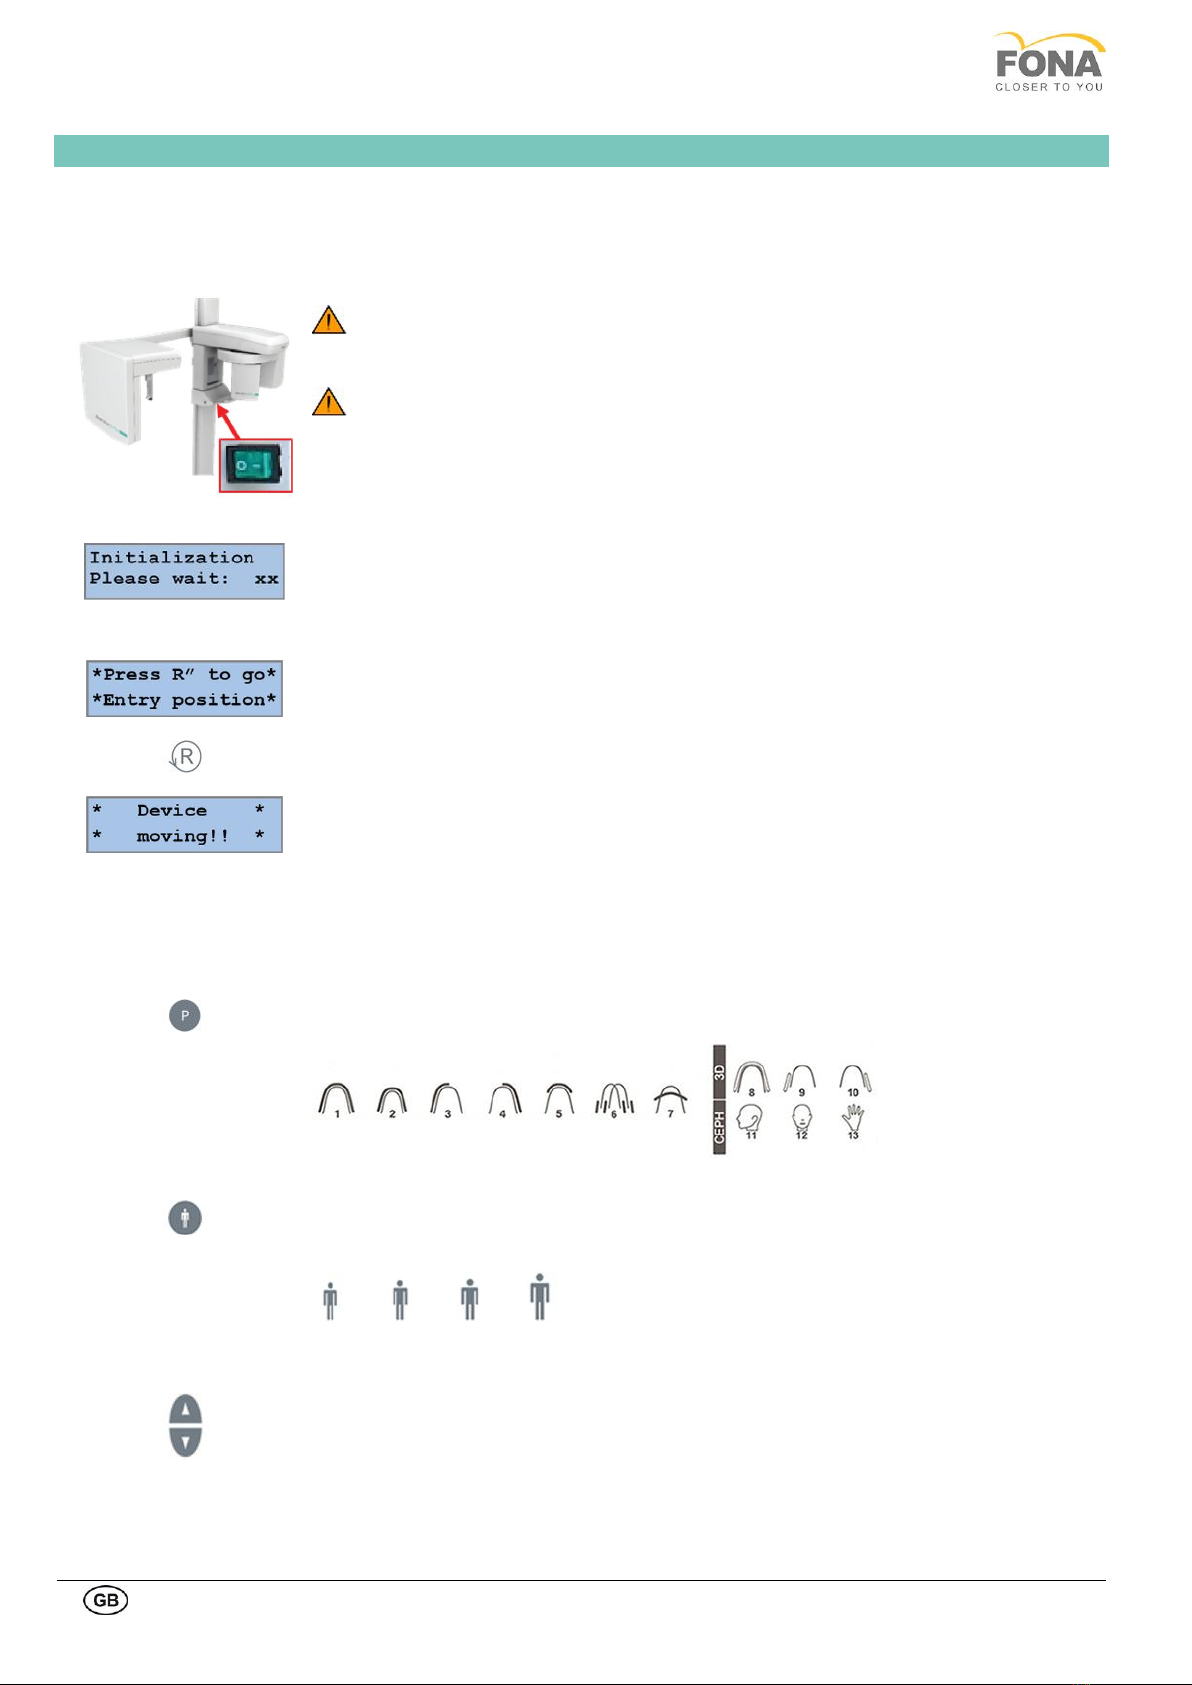
A. Switching ON the Unit
By pressing the mains switch in the lower part of the vertical carriage under the mirror,
the unit is supplied as indicated by the green light of the mains switch.
ATTENTION:
Following extreme temperature fluctuations, condensate formation may occur; therefore
please do not switch on the device until normal room temperature has been reached.
ATTENTION:
When switching on the unit there must NOT be a patient positioned in the unit.
If a fault occurs which requires switching the unit off and then back on again, the patient
must be taken out of the unit at the latest before switching it on again!
The display on the control panel turns on
System initialization is started
B. Reset Function
In order to use the equipment, it is necessary to press the Return button in order to
initialize the device, as indicated on side figure.
By pressing the RETURN Arm Movement key the rotation arm locates the reference
points and moves to the PATIENT ENTRY position.
When the unit is moving, the message “Device moving!!” appears on the display
C. Running Image Acquisition Software on the PC
Set the OrisWin DG Suite program following the indication of §5, Application Software).
D. Selection of Exam
Press the key for PROGRAM selection, to sequentially change the program from 1 to 13
and back again.
E. Selection of Patient Size
Press the key for PATIENT build selection, from left: Small (1), Medium (2), Large (3),
Extra Large (4). Indicatively, for P2 program, size 1, 2, 3, 4 to be used respectively for 10,
12, 14, 16 years old patient.
The pre-programmed technique factors (kV and mA) are automatically selected and
appear on the display
Manual correction of tube voltage and of tube current can be done using the INCREASE
or DECREASE keys at display sides.
The same correction can be done through Image Acquisition module on PC side.
Table of contents
Other Fona Medical Equipment manuals


Popular Medical Equipment manuals by other brands


Getinge
Getinge Arjohuntleigh Nimbus 3 Professional Instructions for use

Mettler Electronics
Mettler Electronics Sonicator 730 Maintenance manual

Pressalit Care
Pressalit Care R1100 Mounting instruction

Denas MS
Denas MS DENAS-T operating manual

bort medical
bort medical ActiveColor quick guide

AccuVein
AccuVein AV400 user manual


