Foppapedretti Misterchef User manual

SEGGIOLONE Istruzioni di montaggio, leggere attentamente e conservare per future referenze
Conforme alle norme EN 14988:2017 / EN 12790:2009
HIGH CHAIR Instruction manual, read carefully and keep for future reference
Conforms to standards EN 14988:2017 / EN 12790:2009
CHAISE HAUTE Manuel d’instructions, à lire attentivement et conserver pour référence ultérieure
Conforme aux normes EN 14988:2017 / EN 12790:2009
TRONA Manual de instrucciones, lea atentamente las instrucciones y consérvelas para futuras referencias.
Conforme a las normas EN 14988:2017 / EN 12790:2009
ΚΑΡΕΚΛΑ Φυλλάδιο οδηγιών χρήσης - διαβάστε προσεκτικά και φυλάξτε το για μελλοντικές αναφορές
Συμβατό με τα πρότυπα EN 14988:2017 / EN 12790:2009
СТУЛЬЧИК ДЛЯ КОРМЛЕНИЯ Инструкции по сборке
Соответствует стандарту EN 14988:2017 / EN 12790:2009
SJEDALICA ZA HRANJENJE Uputstva; pažljivo pročitajte i sačuvajte za buduće korištenje.
Prilagođava se standardima EN 14988:2017 / EN 12790:2009
IT
I
EN
FR
ES
EL
RU
HR
Misterchef
Valido solo per i peluches
Valid only for toys

2
IMPORTANTE! LEGGERE
ATTENTAMENTE E CONSERVARE
PER FUTURE REFERENZE
IMPORTANT! READ THE
INSTRUCTIONS CAREFULLY AND
KEEP FOR FUTURE REFERENCE
IMPORTANT! LIRE
ATTENTIVEMENT ET CONSERVER
SOIGNEUSEMENT A PORTEE DE
MAIN POUR UNE UTILISATION
ULTERIEURE
IMPORTANTE! LEER
ATENTAMENTE Y CONSERVAR
PARA FUTURAS REFERENCIAS
I T.
EN.
FR.
ES.

3
ΣΗΜΑΝΤΙΚΟ: ΚΡΑΤΗΣΤΕ ΤΙΣ ΟΔΗΓΙΕΣ
ΓΙΑ ΝΑ ΤΙΣ ΣΥΜΒΟΥΛΕΥΕΣΤΕ
ΣΤΟ ΜΕΛΛΟΝ - ПРОЧТИТЕ
ВНИМАТЕЛЬНО
ВАЖНАЯ ИНФОРМАЦИЯ!
ВНИМАТЕЛЬНО ПРОЧТИТЕ И
СОХРАНИТЕ ДЛЯ ДАЛЬНЕЙШЕГО
ПОЛЬЗОВАНИЯ
VAŽNO! PROČITAJTE PAŽLJIVO
UPUTSTVA I SAČUVAJTE ZA
BUDUĆE KORIŠTENJE
EL.
RU.
HR.

4
• ITALIANO • • ITALIANO •
COMPONENTI
D E
Vassoio
Telaio seduta completo:
seduta, imbottitura, riduttore*
e cinture di sicurezza
Telaio gambe
Arco portagiochi
Cestino
A
B
C
D
E
A CB
*
*

5
• ITALIANO • • ITALIANO •
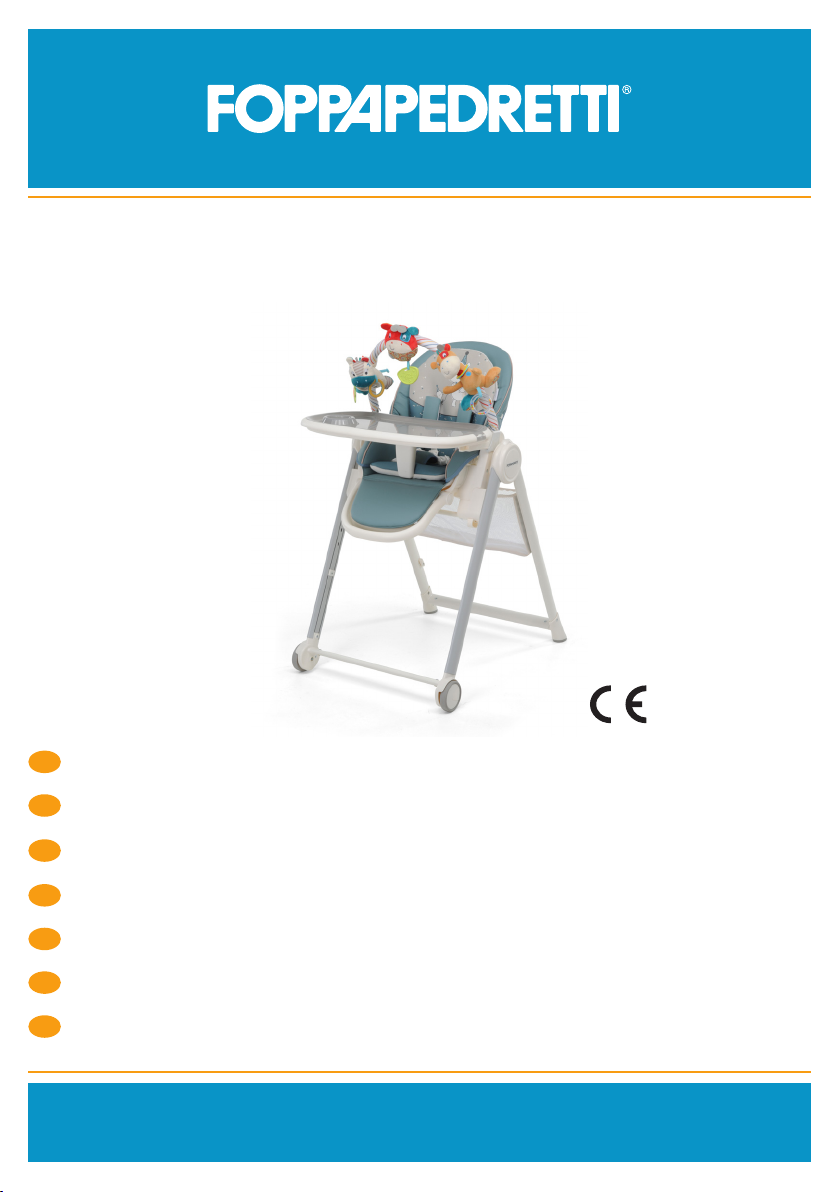
1. APERTURA DEL TELAIO
Premere il tasto “A” di apertura / chiusura sul telaio e allargare
le gambe no a sentire il click di avvenuto bloccaggio in
posizione aperta.
2.MONTAGGIO E RIMOZIONE DELLA SEDUTA
MONTAGGGIO: Posizionare la seduta sul telaio correttamente
orientata, seduta rivolta verso le ruote, come indicato in gura.
Allineare ed inserire i connettori in plastica della seduta nelle
proprie sedi sul telaio.
Premere no a quando non sentire click, questo vi indicherà il
corretto aggancio.
AVVERTENZA: Prima dell’utilizzo assicurarsi sempre che
entrambi i supporti della seduta siano correttamente agganciati
al telaio, sollevando la seduta verso l’alto non deve sganciarsi.
RIMOZIONE: premere, da ambo i lati, i pulsanti “F” e rimuovere
la seduta sollevandola.
IMPORTANTE: Non rimuovere mai la seduta con all’interno il
bambino.
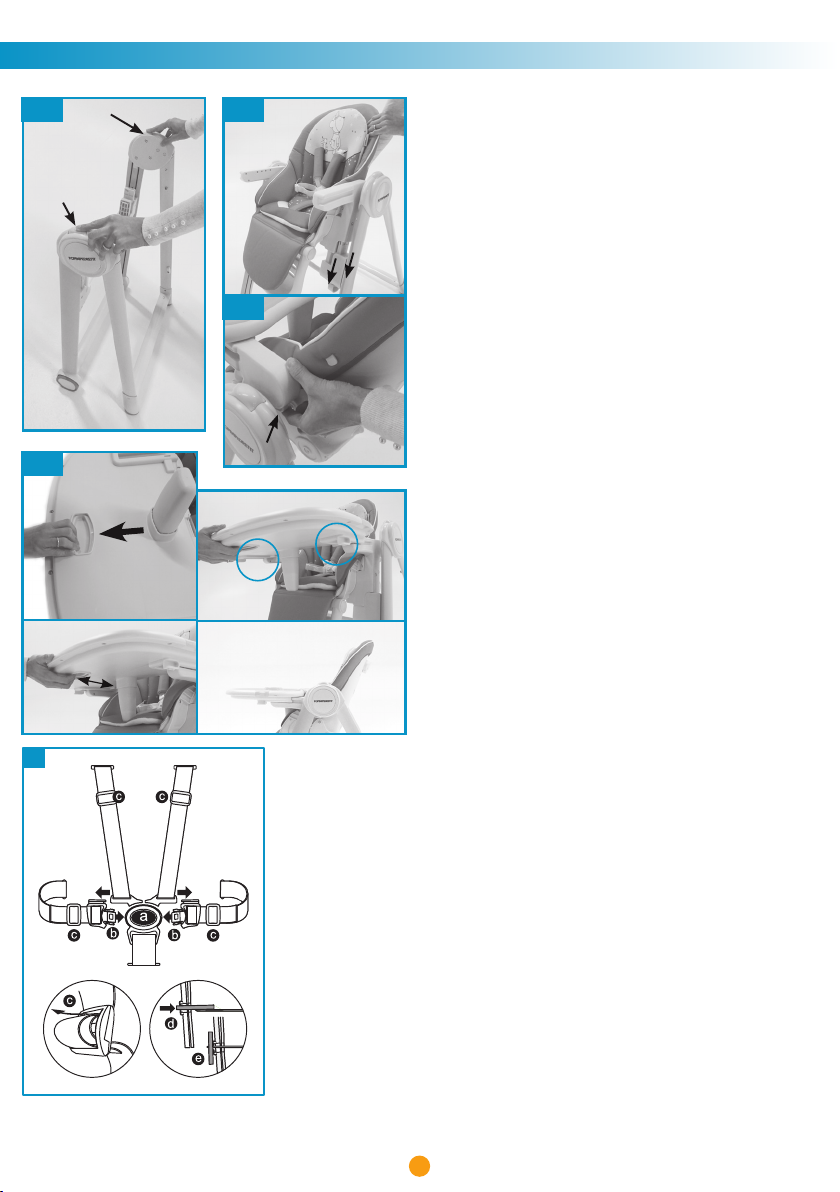
3. MONTAGGIO VASSOIO
Tenere premuto la leva, sul lato inferiore del vassoio (B) e
posizionare lo stesso sulla seduta, vericando che i braccioli
siano all’interno delle guide presenti nella parte inferiore del
vassoio stesso. Rilasciare la leva e spingere il vassoio verso
l’interno del seggiolone, no a bloccarlo in posizione. Un click
indicherà il corretto bloccaggio.
ATTENZIONE: vericare sempre prima dell’uso che il vassoio
sia ssato e bloccato correttamente sui braccioli.
IMPORTANTE: prima dell’utilizzo vericare che il vassoio sia
correttamente bloccato nella posizione scelta, tirando verso
l’esterno senza premere la leva, il vassoio deve restare in
posizione.
ATTENZIONE: Non permettere al bambino di mettere la mano
sul bracciolo quando si monta il vassoio.
4. CINTURE DI SICUREZZA
ATTENZIONE: l’uso delle cinture di sicurezza con sparti gambe è indispensabile per
garantire la sicurezza del bambino.
ATTENZIONE: Il solo vassoio agganciato alla seduta non garantisce un contenimento
sicuro del bambino. Utilizzare sempre le CINTURE di sicurezza!
Il Seggiolone è dotato di cinture di sicurezza a 5 punti.
• Sganciare la bbia: Premere il pulsante (a) ed estrarre i componenti (b)
• Agganciare la bbia: Inserire i componenti (b) nella bbia (a), un click indicherà il
corretto aggancio.
Regolare la cintura in base alla corporatura del bambino, utilizzando i regolatori (c).
Regolare la posizione delle bretelle, cinture pettorali, in base all’altezza del bambino.
Le Bretelle devono essere regolate nelle asole in prossimità alle spalle del bambino.
• Per regolare le bretelle o rimuove la cintura di sicurezza, ruotare l’anello in plastica
di bloccaggio della cintura di sicurezza “bretelle” e “cintura addominale” sul lato
posteriore dello schienale (d), e slare la cintura tirandola, dal lato interno della seduta,
attraverso le asole della scocca seduta e l’imbottitura.
• Per rimontare le bretelle, inlare l’anello in plastica ssato all’estremità della bretella
attraverso le asole sul tessuto e le corrispondenti asole della scocca. Ruotare l’anello
in posizione verticale, sul lato esterno dello schienale (e). Assicurarsi del corretto
montaggio e bloccaggio. Tirando le bretelle dal lato interno seduta, le cinture non
devono slarsi. Assicurarsi sempre che le bretelle siano posizionate nelle asole dello schienale poste alla stessa altezza.
IMPORTANTE: la cintura deve sempre e solo essere utilizzata con tutti i componenti agganciati.
IMPORTANTE: Regolare correttamente la cintura ad ogni utilizzo.
MONTAGGIO
1
3
2a
B
A
A
2b
F
12
11
4
B

6
• ITALIANO • • ITALIANO •
5. REGOLAZIONE INCLINAZIONE SCHIENALE
Lo schienale del seggiolone è reclinabile in 3 posizioni (P1), (P2) e (P3).
Per regolare l’inclinazione dello schienale premere il tasto “C” posto in alto sul retro,
sollevare o reclinare lo schienale no alla posizione desiderata e rilasciare la leva. Lo
schienale si bloccherà in una delle tre sedi e si sentirà il click di avvenuto aggancio.
L’operazione può essere effettuata anche con il bambino nel seggiolone.
IMPORTANTE: per bambini non in grado di stare seduti da soli (età inferiore ai 6 mesi)
utilizzare lo schienale nella sola posizione 3 (versione sdraietta).
6. REGOLAZIONE ALTEZZA DELLA SEDUTA DEL SEGGIOLONE
Il Seggiolone è regolabile in 5 posizioni in altezza.
• Per sollevare la seduta: tenere lo schienale per la parte alta e tirare lo stesso
verso l’alto no all’altezza desiderata.
• Per abbassare la seduta: premere contemporaneamente verso l’esterno
i pulsanti “D” nella parte inferiore e abbassare la seduta nella posizione
desiderata. Rilasciare i pulsanti. Un click indicherà il bloccaggio nella posizione.
Assicurarsi che la seduta sia correttamente bloccata nella nuova posizione.
ATTENZIONE: effettuare l’operazione di regolazione della seduta, senza il
bambino collocato nel seggiolone.
7.RIMOZIONE DEL VASSOIO INTERNO
Per rimuovere il vassoio interno tirare le clip sui lati e sollevarlo.
Il vassoio interno si ssa al vassoio principale mediante un
meccanismo a pressione. Per agganciare il vassoio interno,
posizionarlo sopra il vassoio principale e premere verso il basso,
le clip di ssaggio bloccheranno il vassoio interno al vassoio
principale.
ATTENZIONE: assicurarsi sempre che il vassoio interno sia
correttamente agganciato al vassoio principale, prima di ogni
utilizzo.
8.REGOLAZIONE DELLA PEDANA POGGIAGAMBE
La pedana può essere regolata in 3 posizioni.
Premere contemporaneamente i due pulsanti “E” di regolazione,
alzare o abbassare la pedana appoggia gambe.
Rilasciare i pulsanti e vericare il corretto bloccaggio della pedana
nella posizione desiderata.
Un click indicherà il corretto bloccaggio.
MONTAGGIO
6
7
8
D
E
E
5
C
P1 P2 P3

7
• ITALIANO • • ITALIANO •
MONTAGGIO
9. RIPORRE IL VASSOIO
Quando non utilizzato, il vassoio può essere agganciato posteriormente alla struttura
mediante i due appositi ganci.
Rimuovere il vassoio dalla seduta e posizionarlo come mostrato in gura.
Allineare ed inlare i perni di aggancio sul telaio gambe nelle guide di aggancio poste sul lato
inferiore del vassoio stesso.
Premere verso il basso per agganciare il vassoio al telaio.
Per rimuovere il vassoio dal telaio, sollevarlo verso l’alto.
10. MONTAGGIO DEL CESTINO PORTAOGGETTI
Agganciare il cestino ai 4 bottoni “clip” presenti sul telaio posteriore con l’apertura del
cestino rivolta verso l’alto.
11. MONTAGGIO E USO DELLA BARRA PORTAGIOCHI.
ATTENZIONE: LA BARRA PORTAGIOCHI ha un sostegno di
aggancio destro e sinistro, posizionare il sostegno sinistro orientato
correttamente per il lato sinistro del seggiolone, vedere gura 11a,
seguire la stessa operazione per il lato destro.
Agganciare la barra porta giochi su entrambi i braccioli, come indicato
in gura.
Un click indicherà il corretto aggancio e bloccaggio (g.11b).
La barra portagiochi ha tre posizioni di
regolazione (P1), (P2) e (P3).
9
10
P1 P2 P3
11a 11b
MAX
3 kg

8
• ITALIANO • • ITALIANO •
12. CHIUSURA
ATTENZIONE: effettuare queste operazioni facendo attenzione che il
bambino ed eventuali altri bambini siano a debita distanza. Assicurarsi
che in queste fasi le parti mobili del seggiolone non vengano a contatto
con il corpo del bambino.
ATTENZIONE: se montato, togliere il vassoio prima di iniziare le
operazioni di chiusura agganciandolo posteriormente alla struttura
mediante i due appositi ganci. Vedere step 9
Regolare lo schienale in posizione verticale e la pedana poggiagambe
in posizione verticale.
Per ridurre l’ingombro, consigliamo di regolare nella posizione più bassa
la seduta, vedere step 6.
CHIUSURA: Posizionarsi dietro al seggiolone. Premere i tasti “A”
posti sopra gli snodi e, contemporaneamente, avvicinare le gambe
del seggiolone (Fig.12) no a sentire il click che indica il bloccaggio in
posizione di chiusura.
RIMUOVERE L’IMBOTTITURA PER IL LAVAGGIO
Ruotare l’anello in plastica di bloccaggio della cintura
di sicurezza “bretelle” e “cintura addominale” sul lato
posteriore dello schienale (a), e slare la cintura tirandola,
dal lato interno della seduta, attraverso le asole della scocca
seduta e l’imbottitura.
Ruotare l’anello in plastica di bloccaggio della cintura
spartigambe sul lato inferiore della seduta e slare la cintura
tirandola, dal lato interno della seduta, attraverso le asole
della scocca seduta e l’imbottitura.
Sganciare il bottone automatico che ssa il tessuto
lateralmente al bracciolo (b).
Rimuovere il rivestimento dalla seduta (C).
MONTAGGIO DELL’IMBOTTITURA
Posizionare l’imbottitura sulla seduta.
Inlare l’anello in plastica ssato all’estremità della bretella attraverso le asole sul tessuto e le corrispondenti asole della scocca.
Ruotare l’anello in posizione verticale, sul lato esterno dello schienale. Vericarne il corretto bloccaggio.
Inlare l’anello in plastica ssato all’estremità della cintura addominale, attraverso le asole sul tessuto e le corrispondenti asole
della scocca.
Ruotare l’anello in posizione verticale, sul lato esterno dello schienale (d). Vericarne il corretto bloccaggio .
Inlare l’anello in plastica ssato all’estremità della cinghia spartigambe, attraverso l’asola sul tessuto e la corrispondente asole
della scocca.
Ruotare l’anello in posizione orizzontale, sul lato inferiore della seduta. Vericarne il corretto bloccaggio.
12
A
A
114
13

9
• ITALIANO • • ITALIANO •
IMPORTANTE!
LEGGERE ATTENTAMENTE E CONSERVARE
PER FUTURE REFERENZE.
RISPETTARE SCRUPOLOSAMENTE LE SEGUENTI APPLICAZIONI D’USO PREVISTE PER IL PRODOTTO:
UTILIZZO COME SDRAIETTA: Per bambini non in grado di stare seduti da soli (dalla nascita fino a 6 mesi, peso massimo 9
kg) utilizzare sempre e solo lo schienale completamente reclinato, posizione P3.
Conforme alla norma EN 12790:2009.
UTILIZZO COME SEGGIOLONE: Per bambini in grado di stare seduti da soli, dai 6 mesi fino ad un’età di 3 anni o 15 kg di
peso. Conforme alla norma EN 14988:2017.
VERSIONE SEGGIOLONE: Il prodotto è destinato per bambini in grado di stare seduti da soli fino ad un’età di 3 anni o un
peso di 15 kg.
VERSIONE SDRAIETTA: Per bambini non in grado di stare seduti da soli (dalla nascita fino a 6 mesi, peso massimo 9 kg),
utilizzare lo schienale solo nella posizione più reclinata.
• Questo prodotto nella versione sdraietta, non é destinato a periodi di sonno prolungati.
• Questo prodotto nella versione sdraietta, non sostituisce il lettino. Se il bambino ha bisogno di dormire, metterlo in un
lettino adeguato.
ATTENZIONE
• “ATTENZIONE: Non lasciare mai il bambino incustodito”.
• “Utilizzare sempre il sistema di ritenuta”.
• “Pericolo di caduta: non lasciare che il bambino si arrampichi sul prodotto”.
• “Non utilizzare il prodotto a meno che tutti i componenti non siano correttamente agganciati e regolati “.
• “Prestare attenzione al rischio generato da fiamme libere e altre fonti di forte calore nelle vicinanze del prodotto”
• “Prestare attenzione al rischio di ribaltamento del prodotto nel caso in cui il bambino si spinga con i piedi contro il tavolo
o qualsiasi altra struttura “.
• L’uso della cintura di sicurezza con spartigambe “imbracatura” correttamente fissata alla seduta, della barriera e
dell’imbottitura è indispensabile per garantire la sicurezza del bambino. Utilizzare sempre le cinture di sicurezza.
• Il prodotto è destinato per bambini in grado di stare seduti da soli fino ad un’eta’ di 3 anni
o un peso di 15 kg.
• AVVERTENZA: Il montaggio deve essere effettuato esclusivamente da un adulto.
• Accertarsi del corretto montaggio prima del suo impiego.
• AVVERTENZA: Non utilizzare il seggiolone se una parte è rotta, strappata o mancante.
• AVVERTENZA: Il seggiolone non deve essere utilizzato se uno degli elementi non è stato montato o agganciato
in modo corretto e adeguato.
• Non utilizzare componenti, parti di ricambio o accessori non forniti o approvati dal costruttore.
• AVVERTENZA: Utilizzare il seggiolone solamente quando il vostro bambino è in grado di stare seduto diritto e da
solo, età superiore ai 6 mesi.
• AVVERTENZA: Il seggiolone è adatto a bambini con un peso max. di 15 kg
• AVVERTENZA: Non lasciare mai il bambino incustodito nel seggiolone.
• AVVERTENZA: Usate sempre le cinture di sicurezza, per evitate che il bambino possa ferirsi in modo grave cadendo
o scivolando dal prodotto.
• AVVERTENZA: Controllate regolarmente che le cinture siano correttamente agganciate, non danneggiate o
sfilacciate.
• AVVERTENZA: Assicurarsi che il bambino abbia sempre le cinture ben fissate e regolate a giusta misura.
• IMPORTANTE: La cintura “imbracatura” deve sempre e solo essere utilizzata con tutti i componenti agganciati.
• AVVERTENZA: Il solo vassoio agganciato alla seduta non garantisce un contenimento sicuro del bambino.
AVVERTENZE

10
• ITALIANO • • ITALIANO •
Utilizzare sempre le CINTURE di sicurezza!
• AVVERTENZA: Non sollevare MAI il seggiolone o regolare l’altezza della seduta con il bambino collocato all’interno.
• AVVERTENZA: Non mettere il seggiolone vicino a finestre o muri, dove corde, tende o altro potrebbero essere
utilizzate dal bambino per arrampicarsi o essere causa di soffocamento o strangolamento.
• AVVERTENZA: La vicinanza di fuoco o altre fonti di forte calore come stufe elettriche, a gas, può rappresentare
un pericolo.
• Non posizionare il prodotto in prossimità di scale.
• Non posizionare su una superficie rialzata, esempio: su un tavolo, un piano di lavoro.
• Utilizzare il prodotto solo su superfici piane.
• Non utilizzare come seggiolone sui mezzi di trasporto.
• Non spostare o trasportare il prodotto con all’interno il bambino.
• ATTENZIONE: nelle operazioni di apertura e chiusura assicurarsi che il bambino sia a debita distanza. Nelle
operazioni di regolazione (inclinazione dello schienale, posizionamento del vassoio) assicurarsi che le parti mobili
del Seggiolone non vengano a contatto con il corpo del bambino.
• Non permettete al vostro bambino di salire, senza aiuto, nel seggiolone, di giocare con il seggiolone o penzolarsi
dallo stesso. Questo prodotto non è un giocattolo.
• L’utilizzo di questo prodotto è previsto per un solo bambino.
• Controllare periodicamente il perfetto bloccaggio di tutti i componenti.
• Rimuovere e smaltire l’imballaggio in modo sicuro. I sacchetti possono essere pericolosi, rischio soffocamento, se
manipolati da bambini.
• Assicurarsi che tutti gli utilizzatori, siano a conoscenza del corretto funzionamento del prodotto.
• Assicurarsi che tutti i dispositivi di bloccaggio funzionano correttamente e controllare regolarmente che i dispositivi
di sicurezza siano correttamente agganciati e bloccati.
• Controllare regolarmente tutte le parti soggette a usura o strappo.
• Non usare spray lubrificanti, non usare sostanze aggressive.
• Per la pulizia del seggiolone utilizzare una spugna, acqua calda e sapone o detergente neutro e asciugare
accuratamente.
• Macchie difficili possono essere rimosse con detergente neutro.
• Non utilizzare mai sostanze abrasive, a base di ammoniaca, candeggina o detergenti a base di alcool.
AVVERTENZE
MANUTENZIONE E PULIZIA

11
• ITALIANO • • ITALIANO •
GARANZIA CONVENZIONALE
Il contenuto sottoindicato va in vigore dal 01.01.2005
e sostituisce a qualsiasi titolo e completamente
qualsiasi messaggio anteriore riferito alla garanzia
prestata da Foppa Pedretti S.p.A.
GARANZIA CONVENZIONALE
Foppa Pedretti S.p.A. con sede inGrumello del
Monte (Italia) Via Volta 11, garantisce direttamente al
Consumatore che questo Prodotto, nuovo di fabbrica, è
privo di difetti nei materiali, nella progettazione e nella
fabbricazione ed conforme alle caratteristiche dalla
stessa dichiarate.
La presente garanzia convenzionale è valida in tutti i
Paesi Stati membri dell’Unione Europea e non esclude
né limita i diritti del Consumatore ai sensi di norme
imperative di legge nei confronti del Venditore del
Prodotto.
Per usufruire della presente garanzia convenzionale il
Consumatore dovrà riportare il Prodotto difettoso
al Venditore, presentandogli la prova d’acquisto
del Prodotto dalla quale risultino in modo leggibile
l’indirizzo del Venditore, la data d’acquisto del Prodotto
col timbro e rma del Venditore e l’indicazione del
Prodotto stesso o, in alternativa, lo scontrino scale,
non modicato, dal quale risultino in modo chiaro le
medesime informazioni.
La garanzia convenzionale ha validità per Dodici (12)
mesi dalla data di acquisto del Prodotto. Durante
questo periodo Foppa Pedretti S.p.A. riparerà o
sostituirà, a sua discrezione, il Prodotto difettoso.
La garanzia convenzionale è concessa all’acquirente
nale del Prodotto (Consumatore) e non esclude né
limita i diritti imperativi del medesimo Consumatore,
quali previsti dalla legge e/o i diritti che il Consumatore
può vantare contro il Venditore/Rivenditore del
Prodotto.
ESCLUSIONI DELLA GARANZIA CONVENZIONALE.
La garanzia convenzionale è esclusa per i danni derivati
al Prodotto dalle seguenti cause: uso non conforme
alle disposizioni contenute nel foglio d’istruzioni
all’uso ed al montaggio, urti e cadute, esposizione del
Prodotto ad umidità o condizioni termiche o ambientali
estreme od a cambiamenti repentini di tali condizioni,
corrosione, ossidazione, modiche o riparazioni non
autorizzate del Prodotto, riparazioni con uso di parti
di ricambio non autorizzate, uso improprio, cattiva
mancata manutenzione, manutenzione impropria
rispetto a quanto indicato nel foglio d’istruzioni all’uso
e al montaggio, montaggio non corretto, incidenti,
azioni di cibi o bevande, azione di prodotti chimici,
cause di forza maggiore.
In ogni caso Foppa Pedretti S.p.A. declina ogni
responsabilità per danni a persone o a cose, diversi
dal Prodotto, quando tali danni siano causati da
negligenza alle disposizioni / raccomandazioni /
avvertenze contenute nel manuale o, in alternativa,
nel “Foglio d’istruzioni all’uso e al Montaggio”
che accompagna ogni Prodotto destinato al
proprietario/utilizzatore. (come a titolo meramente
esemplicativo, nel caso del Prodotto Lettino:
“Sorvegliate costantemente il bambino. Controllate
che lenzuola e coperte non coprano la testa del
bambino…”).
Foppa Pedretti S.p.A. declina, inoltre, ogni
responsabilità per danni a persone o a cose
quando la rottura dei suoi prodotti è causata dal
deterioramento dei componenti del Prodotto,
soggetti ad usura. Sono considerati componenti
del Prodotto soggetti a usura tutti i componenti in
materiale plastico.

12
• ENGLISH • • ENGLISH •
COMPONENTS
Tray
Seat frame, set: seat, padding, reducer *
and safety straps
Leg frame
Toy arch
Basket
A
B
C
D
E
D E
A CB
*
*

13
• ENGLISH • • ENGLISH •
1. OPENING THE FRAME
Press the open / close button on the frame and expand the legs
until you hear a click to indicate that they are locked in an open
position.
2. ASSEMBLING AND REMOVING THE SEAT
ASSEMBLY: Place the seat on the frame the right way around,
facing the wheels, as shown in the gure.
Align and insert the plastic connectors of the seat into their slots
on the frame.
Press until a click is heard indicating that it has been fastened
correctly.
WARNING: Before use, always check that both the seat
supports are fastened correctly to the chassis. When the seat is
lifted upwards, it must not detach from the chassis.
REMOVING: press button “F” on both sides and remove the
seat by lifting it.
IMPORTANT: Never remove the seat with the child inside.
3. ASSEMBLING THE TRAY
Hold down the lever on the underneath of the tray (7) and place
the tray on the seat, checking that the armrests are inside the
guides located on the bottom of the tray itself. Release the lever
and push the tray towards the inside of the HIGH CHAIR, until it
locks in place. A click will indicate that it has locked in position
correctly.
CAUTION: Always check before use that the tray is attached
and locked correctly on the armrests.
IMPORTANT: Check before use that the tray is correctly locked
in the chosen position by pulling it outwards without pressing
the lever; the tray should stay in place.
CAUTION: Do not allow the child to place his hand on the
armrest when mounting the tray.
4. SAFETY HARNESS
CAUTION: Using a safety harness with leg separator is essential
to ensure your child’s safety.
CAUTION: The tray alone being attached to the seat does not guarantee that your
child is secured. Always use the safety harness!
The HIGH CHAIR is equipped with a 5-point safety harness.
• Unclipping the buckle: Press the button (a) and pull out the components (b).
• Clip the buckle: Insert the components (b) into the buckle (a); you will hear a click
when they are attached correctly.
Adjust the harness depending on the size of the child, using the adjusters (c).
Adjust the position of the straps, or chest belts, depending on the height of the child.
The straps must be adjusted in the slots close to the child’s shoulders.
• To adjust the straps or to remove the safety harness, rotate the plastic locking ring
of the safety harness “straps” and “lap belt” on the rear side of the backrest (d), and
remove the harness by pulling it from the inner side of the seat, through the slots in the
seat shell and padding.
• To ret the straps,insert the plastic ring, xed to the end of the strap, through the slots
in the fabric and the corresponding slots in the seat shell.
Rotate the ring into a vertical position, on the outer side of the backrest (e).
Make sure that it is correctly mounted and locked. When pulling the straps from the
inner side of the seat, the belts should not disengage.
Always make sure that the straps are positioned in the backrest slots located at the
same height.
IMPORTANT: The harness must only be used with all the components attached.
IMPORTANT: Adjust the harness correctly each time the HIGH CHAIR is used.
ASSEMBLY
1
3
2a
B
A
A
2b
F
12
11
4
B

14
• ENGLISH • • ENGLISH •
5. ADJUSTING THE BACKREST
The high chair backrest can be reclined in 3 positions (P1), (P2) and (P3).
To adjust the tilt of the backrest, press the button (C) located at the top on the back, lift
up or recline the backrest to the desired position and release the lever. The backrest
will lock in one of the three positions and you will hear a click when it is engaged.
This process can also be carried out with the child in the high chair.
IMPORTANT: for children unable to sit up unaided (under 6 months of age), use the
backrest in position 3 only (bouncer version).
6. ADJUSTING THE HEIGHT OF THE HIGH CHAIR SEAT
The HIGH CHAIR can be positioned at 5 different heights.
• To lift up the seat: Hold the backrest at the top and pull it upwards until you
reach the desired height.
• To lower the seat: push the “D” buttons at the bottom outwards at the same
time and lower the seat to the desired position. Release the buttons. A click will
indicate that it has locked in position.
Make sure that the seat is locked properly in the new position.
CAUTION: Make sure you adjust the seat without the child placed in the HIGH
CHAIR.
7. REMOVING THE INNER TRAY
To remove the inner tray (8) pull the clips on the sides and lift it up.
The inner tray is xed to the main tray using a pressure mechanism.
To attach the inner tray, place it on top of the main tray and press
downwards; the securing clips will lock the inner tray to the main
tray.
CAUTION: Always make sure that the inner tray is correctly
clipped to the main tray, before each use.
8. ADJUSTING THE LEG REST
The leg rest can be adjusted to 3 positions.
Press the two “E” adjustment buttons at the same time and raise
or lower the leg rest support.
Release the buttons and check that the leg rest has locked
correctly in the desired position.
A click will indicate that it has locked correctly.
ASSEMBLY
6
7
8
D
E
E
5
C
P1 P2 P3

15
• ENGLISH • • ENGLISH •
ASSEMBLY
9. STORING THE TRAY
When not in use, the tray can be attached to the rear of the frame using the two hooks.
Remove the tray from the seat and position it as shown in the gure. Align and insert the
attachment pins on the leg frame into the attachment guides located on the underneath of
the tray itself.
Press downwards to attach the tray to the frame.
To remove the tray from the frame, lift it upwards.
10. ASSEMBLING THE STORAGE BASKET
Attach the basket to the 4 clip buttons on the back frame, with the basket opening facing
upwards.
11. ASSEMBLING AND USING THE TOY BAR
ATTENTION: The TOY BAR has a right and left hook support; place
the left support correctly oriented with the left-hand side of the
highchair – see gure 11a, and follow the same process for the right-
hand side.
Attach the toy bar onto both armrests, as shown in the gure. A click
will indicate that it has attached and locked correctly (Fig. 11b).
The toy bar has three adjustment
positions (P1), (P2) and (P3).
9
10
P1 P2 P3
11a 11b
MAX
3 kg

16
• ENGLISH • • ENGLISH •
12. CLOSING THE HIGH CHAIR
CAUTION: Make sure that the child, and any other children, are at a safe
distance away when carrying out these steps. Make sure that the moving
parts of the HIGH CHAIR do not come into contact with the child’s body
during these steps.
CAUTION: If in use, remove the tray before closing by attaching it to the
back of the frame using the two hooks. See step 9.
Adjust the backrest and the leg rest to a vertical position.
To reduce its dimensions, we recommend that you adjust the seat to the
lowest position; see step 6.
CLOSING: Stand behind the highchair. Press the “A” buttons located
above the hinges and, at the same time, bring together the highchair
legs (Fig. 12) until you hear the click indicating that they are locked in
the closed position.
REMOVING THE PADDING FOR WASHING
Rotate the plastic locking ring of the safety harness “straps”
and “lap belt” on the rear side of the backrest (a), and
remove the harness by pulling it from the inner side of the
seat, through the slots in the seat shell and padding.
Rotate the plastic locking ring of the leg separator on the
underneath of the seat and remove the belt by pulling it from
the inner side of the seat, through the slots in the seat shell
and padding.
Unclip the press stud that secures the fabric at the sides to
the armrest (b).
Remove the lining from the seat (C).
ASSEMBLING THE PADDING
Place the padding on the seat.
Insert the plastic ring, xed to the end of the strap, through the slots in the fabric and the corresponding slots in the seat shell.
Rotate the ring into a vertical position, on the outer side of the backrest. Check that it has locked correctly.
Insert the plastic ring, xed to the end of the lap belt, through the slots in the fabric and the corresponding slots in the seat
shell.
Rotate the ring into a vertical position, on the outer side of the backrest. Check that it has locked correctly.
Insert the plastic ring, xed to the end of the leg separator belt, through the slots in the fabric and the corresponding slots in
the seat shell.
Rotate the ring into a horizontal position, on the underneath of the backrest. Check that it has locked correctly.
12
A
A
ASSEMBLY
114
13

17
• ENGLISH • • ENGLISH •
IMPORTANT!
READ CAREFULLY AND KEEP FOR FUTURE
REFERENCE.
CAREFULLY OBSERVE THE FOLLOWING CONFIGURATIONS FOR USE PROVIDED FOR THE PRODUCT:
FOR USE AS A BOUNCER: For children unable to sit up unaided (from birth up to 6 months, maximum weight 9 kg) always
use the fully reclined backrest only, position P3.
Conforms to standard EN 12790:2009.
FOR USE AS A HIGHCHAIR: For children able to sit up unaided, from 6 months up to 3 years of age or 15 kg. Conforms to
standard EN 14988:2017.
HIGHCHAIR VERSION: The product is intended for children who are able to sit up unaided up to 3 years of age or weighing
up to 15 kg.
BOUNCER VERSION: For children unable to sit up unaided (from birth up to 6 months, maximum weight 9 kg) always use
the backrest in the most reclined position only.
• When used in the bouncer version, this product is not intended for prolonged periods of sleep.
• When used in the bouncer version, this product does not replace the cot. If your child needs to sleep, place them in an
appropriate cot.
WARNING
• “WARNING: Never leave the child unattended”.
• “Always use the restraint system”.
• “Falling hazard: Prevent your child from climbing on the product”.
• “Do not use the product unless all components are correctly fitted and adjusted”.
• “Be aware of the risk of open fire and other sources of strong heat in the vicinity of the product”
• “Be aware of the risk of tilting when your child can push its feet against a table or any other structure”.
• In order to guarantee the safety of your child when using this product, it is necessary to use the safety harness with
crotch strap correctly fitted to the seat, the restraint barrier and the padded seat reducer. Always use the safety
harness.
• This product is intended for children able to sit up unaided and up to 3 years or a maximum
weight of 15 kg.
• WARNING: This HIGH CHAIR must only be assembled by an adult.
• Ensure that it is correctly assembled before use.
• WARNING: Do not use this HIGH CHAIR if any part is broken, torn or missing.
• WARNING: This HIGH CHAIR must not be used if one of the elements has not been assembled or attached
correctly and adequately.
• Do not use components, spare parts or accessories that have not been supplied or approved by the manufacturer.
• WARNING: Only use the HIGH CHAIR when your child is able to sit upright unaided and is aged over 6 months.
• WARNING: The HIGH CHAIR is suitable for children with a maximum weight of 15 kg.
• WARNING: Never leave your child unattended in the HIGH CHAIR.
• WARNING: Always use the safety harness to prevent the child being seriously injured by falling or sliding out of
the product.
• WARNING: Check regularly that the harness is correctly attached and not damaged or frayed.
• WARNING: Make sure that the child always has the harness properly secured and adjusted to the right size.
• IMPORTANT: The harness must only be used with all the components attached.
• CAUTION: The tray alone being attached to the seat does not guarantee that your child is secured. Always use
the safety harness!
• WARNING: NEVER lift the HIGH CHAIR or adjust the height of the seat with your child placed inside.
WARNINGS

18
• ENGLISH • • ENGLISH •
• CAUTION: Do not place the HIGH CHAIR near to windows or walls, or where there are cords, curtains or similar,
which may be used by the child to climb or cause suffocation or strangulation.
• WARNING: Proximity to fire or other sources of strong heat, such as electric or gas heaters, can be dangerous.
• Do not place the product near to stairs.
• Do not place it on a raised surface, e.g. on a table or a worktop.
• Use the product only on flat surfaces.
• Do not use as a car seat or travel seat.
• Do not move or carry the product with your child inside it.
• CAUTION: Make sure that your child is at a safe distance when opening or closing. When adjusting the HIGH
CHAIR (tilting the backrest or positioning the tray) make sure that the moving parts of the HIGH CHAIR do not come
into contact with your child’s body.
• Do not allow your child to climb into the HIGH CHAIR unaided or to play in it or dangle out of it. This product is
not a toy.
• This product is intended for use by a single child.
• Check periodically that all the components are locked correctly.
• Remove and dispose of the packaging safely. Plastic bags can be dangerous, with a risk of suffocation, if handled
by children.
• Make sure that all users are aware of how to work the product correctly.
• Make sure that all the locking devices are functioning properly and check regularly that the safety devices are
correctly engaged and locked.
• Check all parts subject to wear or tear regularly.
• Do not use spray lubricants, do not use aggressive substances.
• To clean the HIGH CHAIR, use a sponge, hot water and a mild soap or detergent, and dry thoroughly.
• Stubborn stains may be removed with a mild detergent. Never use abrasive substances, products containing
ammonia or bleach, or alcohol-based detergents.
• To clean the lining, follow the instructions on the washing label.
WARNINGS
MAINTENANCE and CLEANING

19
• ENGLISH • • ENGLISH •
FORMAL GUARANTEE
The contents of this document as stated below will
come into effect as from 01.01.2005 and replace,
on every account and in full, any previous message
referring to the guarantee provided by Foppa
Pedretti S.p.A.
FORMAL GUARANTEE
Foppa Pedretti S.p.A. the head ofce of which is
located at n. 11 Via Volta, Grumello del Monte (Italy),
guarantees directly to the Consumer that this brand
new product is free of faults with regard to the materials,
design and manufacture and that it complies with the
characteristics as declared by the manufacturer.
This formal guarantee is valid in all Member Countries
of the European Union and it neither excludes nor limits
the Consumer’s rights in accordance with mandatory
measures provided for by the law with regard to the
Retailer of the Product.
To take advantage of this formal guarantee, the
Consumer must return the faulty product to the
Retailer, presenting to the same the proof of purchase
of the Product which must clearly show the Retailer’s
address, the date of purchase of the Product with the
Retailer’s stamp and signature and an indication of the
Product itself or, alternatively, the receipt which must
not have been altered and which must clearly show the
same information as that referred to above.
The formal guarantee is valid for twelve (12) months
from the date of purchase of the Product. During this
period, Foppa Pedretti S.p.A. will repair or replace
the faulty product, at its own discretion. The formal
guarantee is granted to the end buyer of the Product
(Consumer) and it neither excludes nor limits the
mandatory rights of the Consumer as provided for by
the law and/ or the rights that the Consumer may have
with regard to the Dealer/Retailer of the Product.
EXCLUSIONS TO THE FORMAL GUARANTEE.
The formal guarantee is excluded in the case of damage
caused to the Product for the following reasons: if the
product is used in a way that does not comply with
the information contained in the use and assembly
instruction sheet, if the product is knocked or dropped,
if the Product is exposed to humidity or extreme heat
or environmental conditions, or to sudden changes
in the same, corrosion, oxidization, unauthorized
alterations or repairs to the Product, repairs using
unauthorised spare parts, improper use, improper
maintenance or failure to carry out the same, improper
maintenance compared to the information given on the
use and assembly instruction sheet, incorrect assembly,
accidents, damage caused by food or drink, damage
caused by chemical products, cases of force majeure.
In any case, Foppa Pedretti S.p.A. declines all
responsibility for damage caused to persons or
to property, other than the Product, when such
damage is caused by a failure to comply with the
instructions/advice/warnings cont a ined in the
manua l or, alternatively, in the use and assembly
instruction sheet provided with each Product for the
owner/user. (Purely as an example, in the case of a cot
: “Check your baby constantly.
Make sure that the sheets and blankets do not cover
the baby’s head…”).
Furthermore, Foppa Pedretti S.p.A. declines
all responsibility for damage to persons and to
property when the breakage of its products is
due to a deterioration in the components of the
Product that are subject to wear. All the components
of the Product made of plastic are considered to be
components subject to wear.

• FRANÇAIS • • FRANÇAIS •
20
LISTE DES COMPOSANTS
Plateau
Châssis de l’assise, complet : revêtement de
l’assise, rembourrage, réducteur* et sangles
de sécurité
Châssis des pieds
Arche de jeux
Panier
A
B
C
D
E
D E
A CB
*
*
Table of contents
Languages:
Other Foppapedretti High Chair manuals