asalvo TRONA CHEF User manual

TRONA
CHEF
www.asalvo.com www.clubasalvo.com
GUÍA DEL USUARIO

MANUAL DE INSTRUCCIONES
ES
ENCANTADORA SILLA DEBIDO A QUE POSEE:
1. Una bandeja de mano ajustable con 3 posiciones convenientes para las diferentes fases de
crecimiento del Bebé
2. 2 bandejas móviles y lavables con apoyador de taza.
3. 3 posiciones de asiento reclinables para el relax y el descanso del Bebé.
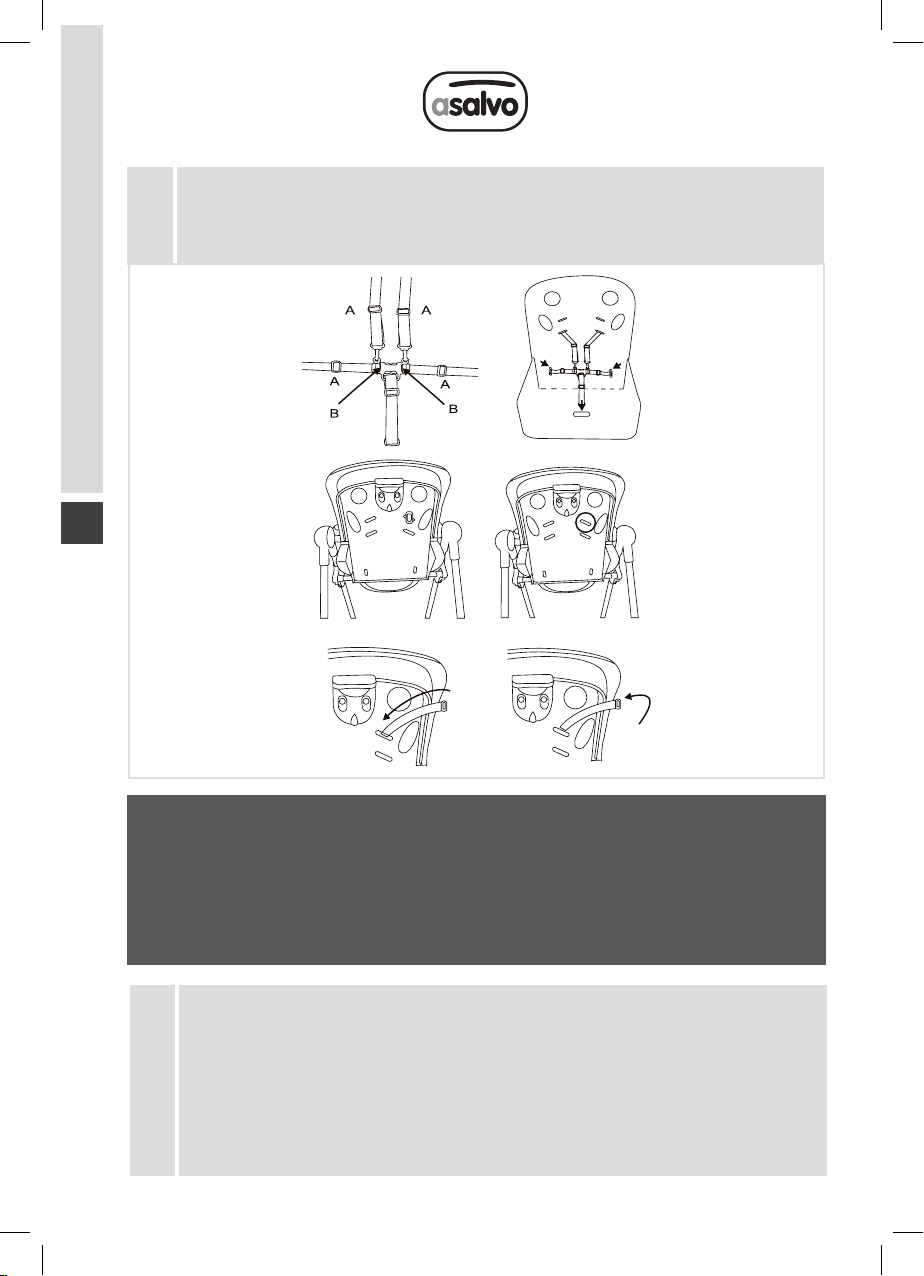
4. 5 puntos de arnés de seguridad para garantizar la seguridad del Bebé.
5. 6 posiciones de altura ajustables para la unidad de asiento, facilitando dar de comer al Bebé.
6. Mantenimiento de pie después del plegado de la trona.
7. Cubierta de asiento móvil para un lavado más fácil.
8. Reposapiés ajustable.
9. Conveniente para seis meses.
10. Conforme a la normativa
Gracias por elegir un producto Asalvo.
La trona está cuidadosamente diseñada para la seguridad del Bebé y está equipada con
una bandeja grande y con un asiento lavable con arnés de cinco puntos. La trona también
se compacta para el almacenaje.
Conveniente para niños que son capaces de sentarse por ellos mismos (aproximadamente
de 6-9 meses a 36 meses).
Para asegurarse, y un empleo sin problemas, por favor tómese un pequeño momento para
leer las importantes notas sobre seguridad que se detallan a continuación y las siguientes
instrucciones.
IMPORTANTE: CONSÉRVELO PARA FUTURAS REFERENCIAS
ADVERTENCIA — No dejar nunca al niño desatendido
ADVERTENCIA — Cuando esté en el andador, el niño podrá
alcanzar más objetos y desplazarse rápidamente
ADVERTENCIA
• No deje al niño sin vigilancia.
• Asegúrese de que el arnés se ha colocado correctamente.
• No utilice la trona a menos que todos sus componentes
esténcorrectamente fijados y ajustados.
• No coloque la trona cerca del fuego u otras fuentes de calor
como calefactores eléctricos o estufas de gas.
• Lea detenidamente este manual de instrucciones. No hacerlo
pondrá en peligro la seguridad del bebé.

MANUAL DE INSTRUCCIONES
ES
• Asegúrese que todos los dispositivos de bloqueo funcionan correctamente y comprue-
be regularmente los bloqueos y accesorios para su seguridad.
• Compruebe regularmente todas las partes susceptibles de desgaste.
• No use espray lubricantes, simplemente límpiela después de usarla.
INTRODUCCIÓN
El ajuste de altura multiposición de la trona es apto para su uso tanto en la posición de
bandeja de alimentación como en la de apoya vasos y su asiento reclinable permite al
bebé relajarse.
Puede mantiene de pie cuando está plegada según como le convenga.
La bandeja lavable puede ser rápidamente ajustada o quitada.
La cubierta de lujo acolchada puede ser fácilmente extraíble para su lavado.
Espero que se divierta usando nuestra trona.
1. LISTA DE PARTES
Por favor conserve todos los paquetes hasta asegurarse de que no hay ninguna parte
extraviada. Después de ensamblarlo, coloque todas las piezas cuidadosamente.
1. Unidad de asiento
2. Bandeja de servicio de dos partes
3. Pies delanteros y traseros
4. Patas derechas e izquierdas
5. Arandelas y tornillos x2
6. Funda del asiento
CUIDADO Y MANTENIMIENTO
ADVERTENCIA
• No use la trona hasta que el niño pueda mantenerse sentado
sin ayuda. La edad tope de uso es de 36 meses.
• No use la trona si alguna de sus piezas falta o esta rota.

MANUAL DE INSTRUCCIONES
ES
MONTAJE
Coja la pata derecha o izquierda
(4), presione y mantenga al botón
rojo (a) y extienda la pata mientras
suelta el botón rojo.
Después coja la otra pata y repita
el mismo procedimiento.
Coja las piernas teniendo en cuen-
ta la orientación de la estructura
insertando las patas en lo alto del
2

MANUAL DE INSTRUCCIONES
ES
MONTAJE DE LA SILLA PARA BEBÉ
asiento ajustando los soportes.
Para levantar el asiento a la altura
de las patas, simplemente presio-
ne los botones rojos del soporte
del asiento y levante. Existen seis
posiciones para regular la altura.
Saque las ruedas de la bolsa, e in-
sértelas en los huecos de las patas
traseras.
FIJACIÓN DE LOS PIES
Voltee la trona bocabajo. Por favor
tenga en cuenta que cada una de
las cuatro piernas tiene un resorte
de la clavija cargado. Alinee una
de las patas de modo que el pe-
queño hueco de arriba de las pa-
tas se alinee con la clavija. Presio-
ne rmemente ambas patas hasta
el nal hasta que cada uno de los
dos resortes de la clavija haga clic
en su lugar dentro del pequeño
hueco en la pata. Repita el mismo
proceso en la otra pata. Tenga en
cuenta que la pata trasera está
indicada mediante una pegatina
circular roja localizada en la pata
de plástico blanca. Coja una de las
arandelas e insértela en el tornillo
corto; después insértela en el ori-
cio interior de la parte de atrás de
la rueda delantera izquierda y repi-
ta el mismo proceso en la pierna
derecha.
3

MANUAL DE INSTRUCCIONES
ES
MONTAJE DE LA SILLA PARA BEBÉ
FIJACIÓN DE LA FUNDA DEL ASIENTO
Deslice el bolsillo de la parte de atrás de la funda del asiento sobre la parte
curvada del chasis. Asegure los lados del asiento envolviéndolos alrededor del
chasis y los clips de sujeción de plástico (a) a cada lado del asiento.
MONTAJE DE LA BANDEJA
Posicione la bandeja frente a los brazos, ocupando el nivel frontal localizado
en la parte de debajo de la bandeja, mientras desliza la bandeja por la ranura
en la posición necesaria.
La bandeja tiene res posiciones solamente, como está indicado en los repo-
sabrazos, alineando la bandeja con la posición deseada y liberando los niveles
a la posición de bloqueo. En el caso de que la bandeja no se bloquee automá-
ticamente en los reposabrazos, mueve la bandeja ligeramente hasta que oiga
un doble clic que señale que la bandeja está bloqueada de forma segura.
PRECAUCIÓN: Nunca deje la bandeja jada en una posición en la cual los sig-
nos de peligro sean visibles. La parte superior de la bandeja puede ser retirada
tirando de las cadenas (c) y (d).
Para colocarla de nuevo, posicione la parte superior de la bandeja sobre la
bandeja inferior y presione hacia abajo para asegurarse.
La bandeja quizás pueda ser almacenada en las patas traseras de la trona.
Alinee los agujeros en la parte trasera de la bandeja con las pequeñas clavijas
de las patas traseras.
4
5

MANUAL DE INSTRUCCIONES
ES
MONTAJE DE LA SILLA PARA BEBÉ
ARNÉS
El arnés de seguridad de cinco puntos está previsto para frenar a su bebé y
debe ser llevado siempre.
Los ajustadores de deslizamiento están equipados and deben ser cuidado-
samente ajustados de manera que el arnés sujete a su bebé de manera con-
fortable.
Para abrocharse el arnés, presione la placa de enganche contra la enganche.
Para liberarlo, presione la placa de enganche (A) y retírelo del enganche.
Pase la correa por el nal por los hombros, la cintura y la entrepierna a través
de las ranuras verticales en la parte inferior del respaldo, girando los extremos
y girando hacia atrás para asegurarse.
La cubierta del asiento debe venir ya puesta en la trona, sin embargo puede
ser necesario retirar esos componentes para propósitos de limpieza.
6

MANUAL DE INSTRUCCIONES
ES
MONTAJE DE LA SILLA PARA BEBÉ
Para retirar el asiento, desabroche el arnés y retírelo por las correas de los
hombros y la entrepierna a través de las ranuras insertadas en el asiento y
retírelo simplemente.
IMPORTANTE: NOTA DE SEGURIDAD
La cubierta del asiento debe ser lavada solamente con una
esponja. Si siente la necesidad de retirar la cubierta del
asiento, para mayor facilidad de lavado, por favor asegúrese
de que sigue cuidadosamente las instrucciones explicadas
en la parte 7 en cómo recolocar el arnés de seguridad.
MONTAJE DE LA SILLA PARA BEBÉ
AJUSTE DE LA ALTURA Y RECLINACIÓN DEL ASIENTO
Nota: No ajuste la altura del asiento mientras el niño esté sentado en la silla.
Para ajustar la altura del asiento, presione ambos bloqueos de ajuste de altura
(A) y simultáneamente suba o baje el asiento, liberando ambos bloqueos a la
altura requerida.
7

MANUAL DE INSTRUCCIONES
ES
Para ajustar el ángulo del asiento, levante el nivel de plástico (b) (situado en la
parte de atrás del asiento) y posiciónelo como desee, liberando el mecanismo
para asegurar en su lugar.
IMPORTANTE
Si el ajuste de altura se va deteriorando después de un periodo de uso y como
parte de una rutina de mantenimiento cotidiano, NO USE sprays lubricantes,
simplemente límpielo después de cada uso.
MONTAJE DE LA SILLA PARA BEBÉ
PLEGADO DE LA SILLA
Para un plegado más compacto
sitúe la bandeja en la parte trase-
ra de la trona.
Para plegar presione en ambos
bloqueos de ajuste de altura (a) y
simultáneamente baje el asiento
de la trona a la posición 6, pre-
sionando ambos enganches en
las patas laterales y deslice las
patas traseras hacia delante.
Compruebe que la trona está co-
rrectamente plegada en su posi-
ción de bloqueo antes de dejarla
sostenerse por sí misma.
8

Síguenos
www.clubasalvo.com
Gracias
POR ADQUIRIR UN
PRODUCTO ASALVO.
Por favor, vísita nuestro blog del
“Club Asalvo” y hazte socio para
poder disfrutar de promociones,
regalos y noticias exclusivas.
Importado por Estar Asalvo S.L.
CIF B91234286
C/3, PI Fridex · 41500 · Alcalá de Guadaíra · Sevilla · Tfno. 902 360 516
Fax: 955 631 205 · email: [email protected]
www.asalvo.com www.clubasalvo.com
LAVADO
• La trona puede ser lavada mediante una esponja con agua tibia y
jabón y un detergente suave. Un desinfectante suave también podría
ser usado su así lo desea.
• Las manchas difíciles o delicadas deben ser quitadas mediante
una crema limpiadora no abrasiva. Nunca limpie con productos
abrasivos, basados en amoniaco, lejía o limpiadores
MANUAL DE INSTRUCCIONES
ES
MONTAJE DE LA SILLA PARA BEBÉ
AJUSTE DEL REPOSAPIÉS
Presione los botones (b) en am-
bos lados para ajustar el reposa-
piés.
9
TRONA
CHEF

TRONA
CHEF
www.asalvo.com www.clubasalvo.com
USER GUIDE

INSTRUCTION
EN
LOVELY HIGHCHAIR BECAUSE IT HAS A:
1. One hand adjustable tray with 3 positions that suitable for different stage of baby’s growth.
2. 2 removable, washable trays with cup holder
3. 3 position seat recline for baby relax and snoozing.
4. 5 points safety harness make sure baby’s safety
5. 6 position height adjustable for seat unit, so easy to feed your baby.
6. Free standing after folding the highchair.
7. Removable seat cover for easy cleaning.
8. Adjustable footrest
9. Suitable for six months.
10. Passed EN14988 standard
Thank you for choosing an Asalvo product.
This highchair is carefully designed for baby’s safety and features a large tray with cup
holder and a wipe clean seat with ve point harness.
The highchair also folds compactly for storage. Suitable for children who are able to sit up
unaided (approximately 6-9 months up to 36 months.
To ensure safe, trouble free use, please take a little time to read the important safety notes
below and the following instructions.
IMPORTANTE: CONSÉRVELO PARA FUTURAS REFERENCIAS
WARNING
• WARNING: Do not use if any part is broken, torn or missing.
• WARNING: Do not use the highchair until the child can sit up unaided
• WARNING: Do not use the highchair unless all components are correctly
tted and adjusted.
• WARNING: Do not leave your child unattended, even for the shortest time.
• WARNING: To prevent serious injury or death from falls or sliding out,
ensure the harness is correctly tted and that the child is secure in the
restraint.
• WARNING: Avoid placing the chair near naked heat sources such as
electric bar res, gas res, etc. or where a child could gain access to any
other kind of hazard.
• Ensure all users are familiar with the products operation. It should always
open and fold easy. If it does not, do not force the mechanism- stop and
read the instructions.

INSTRUCTION
EN
• Ensure all locking devices work correctly & regularly check the locks & ttings for security.
• Regularly check all parts for wear & tear.
• DO NOT use spray lubricants, simply wipe clean after use.
INTRODUCTION
The multi-position height adjustment of the highchair means that it is suitable for use
from breakfast bar to coffee table and its recline seat allows baby to relax. It is free stan-
ding when folded for your convenience. The large wipe clean tray can be quickly adjusted
or removed. The luxurious padded cover is easily removable for cleaning. We hope that
you enjoy using the highchair.
1. PARTS LIST
Please retain all packaging until you are certain no parts are missing. After assembly,
please dispose of all packaging carefully.
1. Seat Unit
2. Two part serving tray
3. Front and Rear feet
4. Left and Right legs
5. Stop washer and screw x 2
6. Seat cover
CARE & MAINTENANCE
• Only use on a flat stable surface.
• Ensure your highchair is fully erected before placing your seat inside.
• Ensure children are clear of all moving parts before making any adjustments.
• Do not move the highchair with your child inside.
• Do not allow your child to climb unassisted into, play with or hang onto
your highchair. This is not a toy.
• All additional hazards such as electrical flex should be kept out of reach of
the child in the highchair.
• Complies with EN 14988:2006

INSTRUCTION
EN
ASSEMBLY
Take either the left or right leg (4),
press and hold the red button (a)
and extend the leg then release the
red button.
Take the other leg and follow the
above procedure.
Take the legs and noting the orien-
tation in the diagram insert the
legs into the top of the seat unit
2

INSTRUCTION
EN
MONTAJE DE LA SILLA PARA BEBÉ
adjusting brackets.
To lift the seat unit to the top of
the legs simply press and hold the
red buttons on the seat unit ad-
justment brackets and lift. There
are six positions to adjust height.
Take out the wheels from the bag,
and insert them into the holes of
the rear feet.
FIXING THE FEET
Turn the highchair upside down.
Please note that each of the four
legs has a sprung loaded pin.
Line up one of the feet so that the
small hole in the top of the foot li-
nes up with the pin.
Push rmly on the foot at either
end until each of the two sprung
pins click into place within the
small hole in the foot. Repeat for
other foot.
Note the rear foot is indicated by a
red circular sticker located on the
white plastic foot.
Take one stop washer and insert
the short screw, then insert it into
the bottom hole at the rear of the
front left leg and repeat the pro-
cess on the right leg.
3

INSTRUCTION
EN
MONTAJE DE LA SILLA PARA BEBÉ
FITTING THE SEAT COVER
Slide the pocket of the seat cover back over the curved back frame. Secure the
seat sides by wrapping them around the frame and fastening plastic clips (a)
at each side of the seat.
FITTING THE TRAY
Position the tray to front of the arms, full the front lever (a) found on the un-
derside of the tray, whilst sliding the tray along with the slot (b) to the position
required.
The tray has three positions only as indicated on the arm rests, line the tray
with the desired position, release the levers to lock position. In the case the
tray is not automatically locked onto the armrests, move the tray slightly until
a double click is heard signaling the tray is securely locked.
WARNING: Never leave the tray tted in a position in which the warning signs
are visible.
The top tray can be removed by pulling at the ridge ( c) and (d).
To replace again, position the top tray over the bottom tray and push down
to secure. The tray maybe stored on the back legs of the highchair. Align the
holes in the rear of the tray with the small pegs on the back legs.
4
5

INSTRUCTION
EN
MONTAJE DE LA SILLA PARA BEBÉ
HARNESS
A ve-point safety harness is provided to restrain your child and should always
be worn. Sliding adjusters are tted and should be carefully adjusted so the
harness ts your child comfortably.
To fasten the harness push the prongs into the buckle. To release, push the
prongs (A) and remove from the buckle. Pass the end of the shoulder, waist
and crotch straps through the vertical slots in the lower backrest, rotate the
ends, and pull back to secure.
The seat cover should come already positioned on the highchair, however it
may be necessary to remove the seat insert undo the harness and thread the
shoulder and crotch straps through the seat insert slots and simply remove.
6

INSTRUCTION
EN
IMPORTANT: SAFETY NOTE
The seat cover may be sponge cleaned only. If you feel the
need to remove the seat cover, for ease of cleaning, please
ensure that you are carefully follow the instructions outlined
in part 7 of how to correctly re-thread the safety harness
MONTAJE DE LA SILLA PARA BEBÉ
ADJUSTING THE SEAT HEIGHT AND RECLINE
Note: Do not adjust the height of the seat whilst the child is seated in the chair.
To adjust the height of the seat push in both of the height adjusting locks (A)
and simultaneously raise or lower the seat, releasing both of the locks at the
required height.
7

EN
To adjust the angle of the seat, lift the plastic lever (b) (found on the back of the
seat unit) and position as required height.
IMPORTANT
If the height adjustment becomes difcult after a period of use and as part of
the regular maintenance routine, DO NOT use spray lubricants, simply wipe
clean after use.
MONTAJE DE LA SILLA PARA BEBÉ
FOLDING THE HIGHCHAIR
For a more compact fold t the
tray to the back of the highchair.
To fold push in both of the height
adjusting locks (a) and simul-
taneously lower the seat of the
highchair to position 6, press in
both of the release catches (b)
on the side legs and slide the rear
legs forward.
Check the highchair is correctly
folded in its locked position befo-
re leaving to stand free.
8
INSTRUCTION

INSTRUCTION
EN
Follow us
www.clubasalvo.com
FOR PURCHASING
A ASALVO.
Please visit our blog “Club Asalvo”
and become a member to enjoy
promotions, gifts and
exclusive news.
Thank
you
9
Imported by Estar Asalvo S.L.
CIF B91234286
C/3, PI Fridex · 41500 · Alcalá de Guadaíra · Sevilla · Tfno. 902 360 516
Fax: 955 631 205 · email: [email protected]
www.asalvo.com www.clubasalvo.com
INSTRUCTION
EN
PRESS THE (B) BUTTONS ON
BOTH SIDES TO ADJUST THE
FOOTPLATE.
WASHING
ADJUSTING FOOTREST
• The highchair can be washed using a sponge with soap and warm
water and mild detergent. a mild disinfectant could also be used
their so wish.
• Difficult or sensitive spots must be removed by a non-abrasive
cleanser. never clean with abrasive, ammonia based, bleach or
cleaners
Table of contents
Languages:
Other asalvo High Chair manuals
Popular High Chair manuals by other brands

BEBE CONFORT
BEBE CONFORT CHAISE WOODLINE Instructions for use & warranty

CUGGL
CUGGL LITTLE SHEEP DELUXE 819/5584 manual

Primi Sogni
Primi Sogni Bunny Instructions for use

VERTBAUDET
VERTBAUDET 70342-0054 Instructions for use

Chicco
Chicco POLLY MAGIC HIGHCHAIR owner's manual

Graco
Graco Table2Table Premier Fold user manual