Force AeroCollect User manual

User Manual

1 Introduction
This user manual describes how to correctly use the AeroCollect®equip-
ment. AeroCollect®is an air sampling device, designed to capture and retain
bacteria and viruses from veterinary environments in a custom designed
disposable sample chamber.
After sampling, the sample chamber containing the collected sample is
shipped to the laboratories for analysis. Here the content of the sample
chambers are analysed for the presence of selected bacteria and virus-
es. AeroCollect®can be used in all sectors of the agricultural industry. For
detailed information about how samples are correctly collected in different
sectors, refer to the sector specific guidelines in the corresponding quick
guide.
1.1 Applications
AeroCollect®is a handheld air sampling device, designed to be operated in
dusty environments. However, whenever the device is not being used, it
should be stored in the accompanying protective suitcase.
2 Before you start
First check that all of the parts are in the case (see section 2.1). If some-
thing is missing, immediately contact AeroCollect. See section 9 for contact
information. It is important that you read and understand this manual before
samples are collected with the AeroCollect®equipment.
2.1 Case contents
The protective suitcase contains the AeroCollect®equipment. Note that the
protective foam are designed to handle disinfection with both ethanol and
other disinfectant solutions.
2.2 Overview of equipment
Figure 2 shows the device viewed from the back and from the front. The
device’s individual parts’ functions and purpose are explained in the section
below.
3 Use of AeroCollect®
This section explains how to collect air samples using the AeroCollect®
equipment. Note that to avoid incorrectly collected samples the device can
only be activated if the sample chamber has been correctly inserted.

2.1 Case contents
2.2 Overview of equipment
Rear
Front
On Off
Model Nr.: 000
Serie Nr.: 0000
FORCE Technology
Venlighedsvej 4
2970 Hørsholm
WEEE CE mark
Batteries 2 x AA
Air out
Sampling
(Green LED)
Wait/Error
(Red LED)

3.1 Preparation of the sample chamber
The sample chambers are supplied in 5 ml protective tubes (see step 1 of
the chamber insertion procedure below), which can easily be disinfected on
the outside. To avoid contamination of the sample chambers, the protective
tubes should not be opened before the user is in the location where the
sample is to be collected. Be aware that the sample chambers are designed
for single use as a disposable collection chamber.
A step by step guide for how to correctly insert the sample chamber in the
device is given below:
1. Open the protective tube and take out the sample
chamber.
The sample chambers are supplied in a protective
tube, which can easily be disinfected on the
outside.
2. Insert the sample chamber perpendicular to the
top of the AeroCollect®, as shown in the picture.
The arrows on the rear of the sample chamber
indicate which side shall face up and which way
the chamber shall be pushed in.
3. Push the sample chamber all the way in. During
this process it will move into position and be held
by a spring. This ensures there is the necessary
connection to the electrodes and the pump.
4. AeroCollect® can collect a sample once the
sample chamber is correctly inserted.

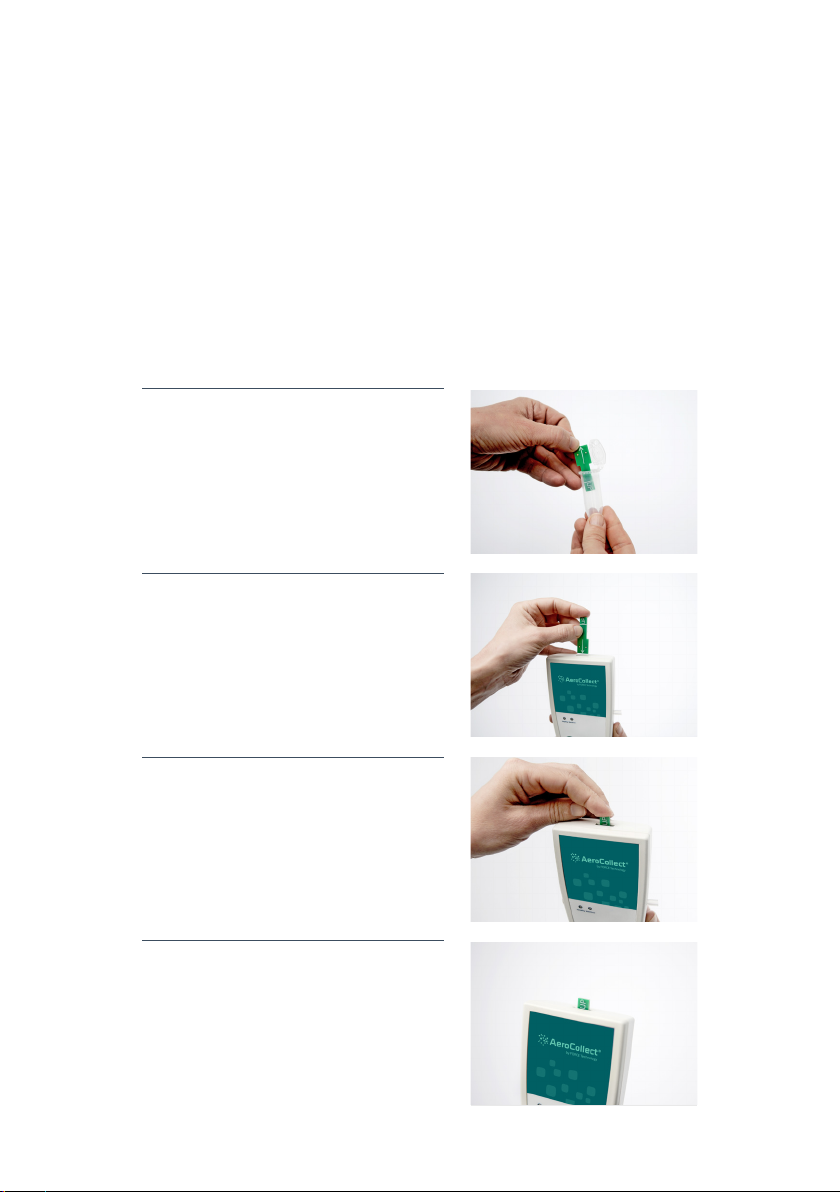
3.2 Sampling procedure
After the sample chamber has been correctly inserted into the AeroCollect®,
the device is ready to collect a sample. To activate the sampling procedure
press the green button on the device (shown in step 5).
5. To activate the sampling procedure, press
the green button on the device (as shown in
the figure). If the pump fails to start it may be
because the chamber is incorrectly inserted (for
more information about possible causes of faults,
see section 5).
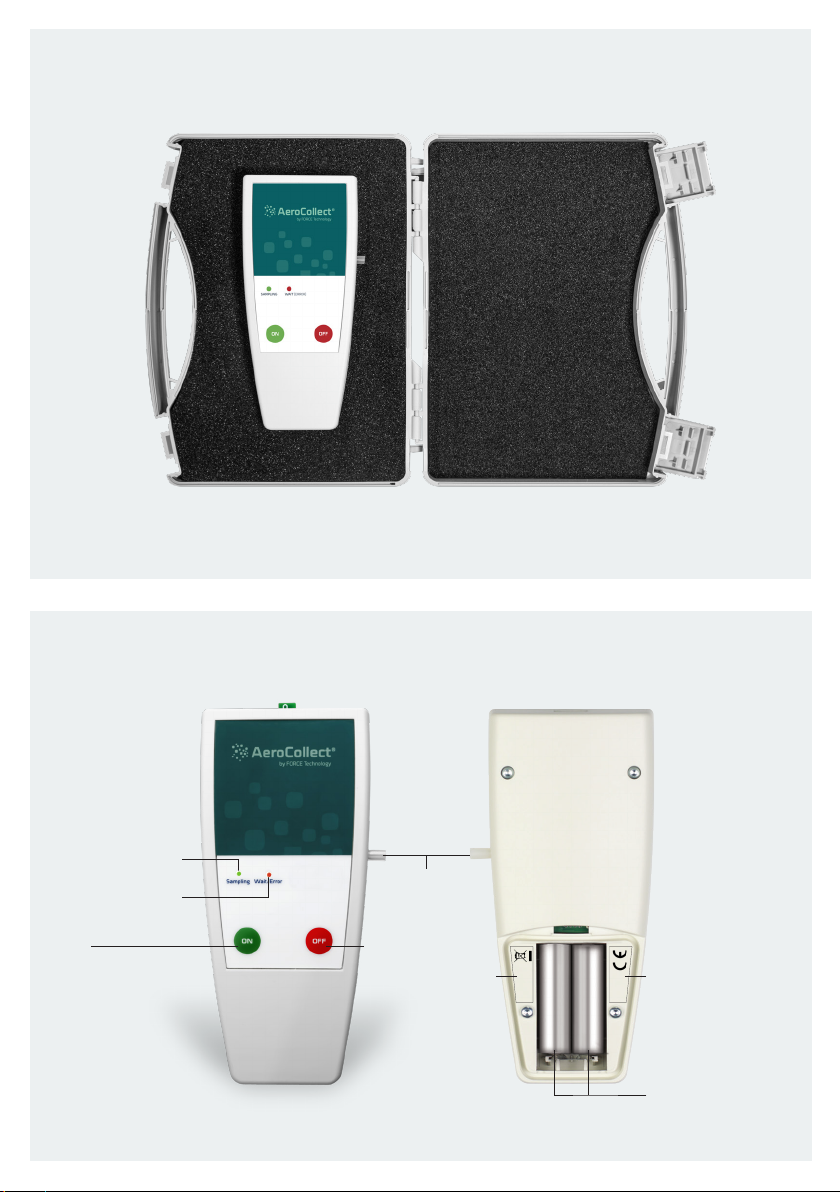
6. When AeroCollect® is activated, it will first ramp
up to 400 V, which will capture and retain bacteria
and viruses. The red LED (with the label wait/
error) will be lit in the meantime. The process
should take less than 1 second.
7. At 400 V, the pump will start and the sampling
procedure will be initiated, which will be indicated
by the green LED being lit, while the red LED
switches off. The green LED should be lit during
the entire sampling procedure to indicate that
the sampling procedure is working as intended. If
during the sampling procedure the noise of pump
changes, check to see whether the chamber is
blocked. See section 4.4 for details.
8. After the sampling is finished, stop the sampling
procedure by pushing the red button and the
green LED will switch off.
9. Remove the sample chamber by lightly lifting the
tip and pulling. Put the sample chamber back in
the associated protective tube. Note that you
must never try and remove the sample chamber
before the sampling procedures has stopped.

3.3 Section specific sampling
Depending on the sector that the AeroCollect®is to be used in, the sample
collection procedure may differ. In the corresponding quick guide the sector
specific sampling procedure is described in detail.
4 Maintenance, disinfections, storage and disposal
4.1 Maintenance
It is recommended that you wipe off any visible dirt or dust on the
AeroCollect®using a cloth. In cases where the farm is to be sanitised, follow
the procedure for the disinfection of the AeroCollect®device described
below. If the LED indicators stop working, the AeroCollect®must be
immediately sent in for servicing. Refer to the contact information at the end
of this manual.
4.2 Replacement of batteries
AeroCollect®is powered by two AA batteries. The batteries are easy to
replace. Simply open the cover on the back of the device. Make sure that
you insert new batteries correctly, in accordance with the polarity label
in the bottom of the battery holder. Always dispose of used batteries in
accordance with the WEEE Directive.
4.3 Storage
When AeroCollect®is not in use, it should be stored in the protective suit-
case, which will protect the device from unnecessary moisture, dust and
knocks.
10. Place the sample chamber back into the
protective tube and label the closed container.
The samples should be shipped for analysis as
fast as possible. The chambers can be shipped
using traditional carriers and ambient conditions.

The sample chambers must not be removed from the protective tubes
outside of the section in which the sample is to be collected. This will
reduce the risk of potential contamination of the sample chambers, which
could result in false positive results.
4.4 Test of the pneumatic connection to the sample cham
To test the pump system and the O ring, which ensures the pneumatic
connection to the sample chamber is intact, it is important to regularly carry
out the following procedure:
1. Insert a sample chamber inside the AeroCollect® device.
2. Start the sampling procedure and wait until the pump starts – indicated when the green LED
is lit.
3. The suction inlet in the sample chamber is blocked for short intervals. If the O ring is still
intact, the sound from the pump will change when the suction inlet is blocked.
Note that the same procedure can be used to check if the sample chamber
is blocked. If the chamber is blocked the sound of the pump will not change
either.
4.5 Disinfection of AeroCollect®
Both the AeroCollect®device and its associated case have been designed
so that they can be effectively disinfected when necessary. However, we
recommend that the device is not transported between farms and not used
in several locations. Should this be necessary, the following disinfection
procedure must be followed carefully to avoid the spread of potential
disease between farms. Note that it is important to disinfect both the
AeroCollect®and the case.
1. Remove any visible dust from the device and from the case.
2. Wipe the AeroCollect®device and case using a Vircon Solution.
3. Wipe the AeroCollect®device and case using a 70 % ethanol solution.
4. Place the AeroCollect®device in the case and close securely.
When sanitising an infected farm, the above procedure should be followed
to disinfect the AeroCollect®device and case in connection with the
sanitising procedure.

4.6 Disposal
The authorities require that electrical and electronic equipment is collected
and parts from such equipment are recycled. Electrical and electronic
equipment that has the WEEE symbol must be taken to the local recycling
centre or returned to the supplier.
5 Troubleshooting
If the device does not begin the sampling procedure (and the green LED
therefore remains unlit) within a few seconds, carry out the following:
First, check that the sample chamber is correctly inserted. To avoid false negative readings,
sampling with the AeroCollect® device cannot begin if the sample chamber is incorrectly
inserted. Therefore, first try to extract the sample chamber and reinsert it.
The battery power may be too low and unable to power the pump. If the batteries are
drained of power and therefore cannot power the pump, the pump will not start and the
green LED will remain unlit and the red LED will remain lit.
If the problem continues, please contact AeroCollect for the purpose of having the device
repaired as quickly as possible.
6 Safety
The AeroCollect®device may only be used as intended, i.e. for collecting air
samples in veterinary environments. To ensure that the AeroCollect®device
is used correctly, the following requirements must be met:
Always use the correct type of battery (AA).
Always use only the specially designed sample chambers for the AeroCollect®.
Always insert the sample chamber in the AeroCollect® device as described above.
The device must never under any circumstances be exposed to liquids of any kind other
than disinfectant when wiping the device as described earlier in this manual.

7 Warranty
The limited warranty that applies to AeroCollect®will be null and void if the
following is not complied with:
The device and sampling chambers must not be exposed to violent knocks or impacts
The AeroCollect®device and sampling chambers must not under any circumstances be
immersed in water or any other liquid and must be stored in the accompanying case so as to
be protected from moisture during those periods when not in use.
Cleaning and disinfection must be carried out in accordance with the associated section in
this manual.
The AeroCollect®device must not be dismantled.
When shipping the device, it must be sent in the accompanying case.
If the AeroCollect®device stops working, regardless of the reason, immediately
contact AeroCollect for the purpose of determining the cause of the malfunction.
See below for contact details.
8 Technical specifications
8.1 Battery
AeroCollect®is powered by two AA batteries. These may be single use or
rechargeable batteries and they must be disposed of in accordance with the
manufacture’s instructions
8.2 Expected battery lifetime
The AeroCollect®device is capable of collecting samples for a minimum of
two concecutive hours using two fully-charged batteries.
8.3 Operating environment
8.3.1 Recommended temperatures for AeroCollect®:
Storage temperature range: -20ºC to +40ºC
Transport temperature range: -40ºC to +60ºC
Normal use temperature range: -20ºC to +40ºC

8.3.2 Recommended air humidity for AeroCollect®:
Air humidity with transport, storage and use:
30% to 75% relative air humidity (non-condensing)
Recommended air pressure for AeroCollect®:
Air pressure with transport, normal use and storage: 700–1060 hPa
8.3.3 Recommended temperature for sample chamber:
Transport and storage temperature range: -80ºC to +90ºC
Transport of collected samples temperature range: -80ºC to +30ºC
Normal use temperature range: -20ºC to +40ºC
8.3.4 Recommended air humidity for sample chamber:
Transport and storage air humidity range:
35% to 75% relative air humidity (non-condensing)
8.3.5 Recommended air pressure for sample chamber:
Air pressure with transport, normal use and storage: 700–1060 hPa
If the storage, transport and use recommended temperature and relative air
humidity ranges are not followed, this can result in the deterioration of the
device’s capturing capability.

9 Contact information
For more information about the use of AeroCollect®, contact:
FORCE Technology
AeroCollect
Venlighedsvej 4
2970 Hørsholm
Denmark
Tel.: +45 43 25 14 00
aerocollect@force.dk

5098.3 – EN
FORCE Technology
AeroCollect
Venlighedsvej 4
2970 Hørsholm
Denmark
Tel.: +45 43 25 14 00
aerocollect@force.dk
aerocollect.dk
Table of contents
Other Force Safety Equipment manuals
Popular Safety Equipment manuals by other brands

Petzl
Petzl AVAO BOD manual

Safety Xpress
Safety Xpress FDBOL800PAD PRODUCT INFORMATION & INSTALLATION GUIDE

Micro Detectors
Micro Detectors SB400 Installation and operation manual

Singing rock
Singing rock STATIC A 10,5 Instructions for use

FALL SAFE
FALL SAFE Inspector FS519 instruction manual

Guardian Fall Protection
Guardian Fall Protection 00691 instruction manual