Formula MOD User manual

1
MANUALE ISTRUZIONI - OPERATING MANUAL - MANUEL D’INSTRUCTIONS -
BETRIEBSANLEITUNG - MANUAL DE INSTRUCCIONES

2
TORX® è un marchio registrato di CAMCAR / TEXTRON INC. Tutti i marchi appartengono ai
rispettivi proprietati.
TORX® is a registered trademark of CAMCAR / TEXTRON INC. All trademarks are the property
of their respective owners.
TORX® est une marque déposée de CAMCAR / TEXTRON INC. Toutes les marques appartien-
nent aux propriétaires respectifs.
TORX® ist ein registriertes Warenzeichen der CAMCAR / TEXTRON INC. Alle Warenzeichen
gehören den respektiven Eigentümern an.
TORX® es una marca registrada de CAMCAR / TEXTRON INC. Todas las marcas pertenecen a
los respectivos propietarios.

3
WARNING! BEFORE INSTALLING AND USING THIS NEW FORMULA S.a.S PRODUCT IT
IS CRITICAL TO YOUR SAFETY THAT YOU READ AND STRICTLY ADHERE TO THE IN-
STRUCTIONS
IN THIS MANUAL. FAILURE TO DO SO COULD CAUSE SERIOUS INJURY
AND/OR AFFECT YOUR LEGAL RIGHTS.
KEEP THIS MANUAL IN A SAFE PLACE FOR FUTURE REFERENCE AS IT CONTAINS
INFORMATION CRITICAL TO YOUR SAFETY.
WARNING! DO NOT INSTALL OR DISASSEMBLE THIS FORMULA S.a.S PRODUCT ON
YOUR OWN!
Always seek the help of a professional mechanic. If you decide to ignore this import-
ant safety warning, keep in mind that you are doing so EXCLUSIVELY at your own risk
and strictly follow all Formula installation and disassembly instructions.
Note: AS WITH ANY MANUAL, THIS MAY BE PERIODICALLY UPDATED. CONTACT
YOUR FORMULA S.a.S DEALER, OR CHECK OUR WEB SITE, (www.rideformula.com)
TO RECEIVE ALL SUCH UPDATES.
This manual contains information for the safe use, proper mounting and maintenance
of MOD shock sets. Following the rules contained in this manual will ensure the safest
use, best performance
and longest life of your MOD shock and will avoid the most common product use/
maintenance inconveniences and problems.
Carefully follow the SAFETY GUIDELINES to assure appropriate use and service of
Mod shock guidelines
MOD SHOCK SAFETY GUIDELINES
• MOD shocks sets produced by FORMULA S.a.S are designed exclusively for use on
two wheels bicycles. Any other use is to be considered hazardous. FORMULA S.a.S
shall not be held liable for any consequences from improper usage.
• The lifespan of MOD shock depends on many factors, such as rider size and weight,
spring and frame used and normal wear and tear on the bicycles.
• Check the condition of the spring regularly and replace it when necessary.
• Impact, falls, excessive, improper or harsh use of the bicycle may compromise the
structural integrity of the shocks, significantly reducing their lifespan. Short life-
wheel components need to be replaced more often.
• Have the shock regularly inspected by a qualified mechanic for any cracks, deforma-
tion, signs of fatigue or wear.
• If inspection reveals any deformation, cracks, signs of impact or stress, no matter
how slight, immediately replace (not repair) the component. Excessively worn com-
ponents also require immediate replacement.
• The frequency at which inspection is required depends on many factors. Ask a FOR-
MULA S.a.S dealer to recommend an inspection and service schedule that is right
for you.
• Use of the product by individuals who weigh more than 120kg/265Ibs is not recom-
mended. If you weigh more than 120kg/265Ibs be especially careful and have the
bike inspected more frequently.
• Parts which have been bent or damaged in an accident or as the result of impact,
must be immediately replaced with genuine FORMULA S.a.S replacement parts.
• Check with a qualified mechanic to ensure that the selected MOD shock is suitable
for the required type of use and to establish an inspection and service schedule that
is right for you.
• Tools supplied by other manufacturers for wheels similar to MOD shock may not be
TRANSLATION OF THE ORIGINAL INSTRUCTION MANUAL

4
compatible with MOD shock. Likewise, tools provided by FORMULA S.a.S may not be
compatible with components/wheels supplied by other manufacturers. Check with a
qualified mechanic or 5 tool manufacturer to ensure compatibility before using tools
supplied by one manufacturer on components/wheels supplied by another manu-
facturer.
• Failure to verify compatibility of the tools may cause the component to work incor-
rectly or break, resulting in an accident, personal injury or death.
• The user of MOD shock expressly recognizes that there are risks inherent in bicycle
riding, including but not limited to failure of a bike component, resulting in an acci-
dent, personal injury or death.
• By purchasing and using these MOD shock, the user expressly, voluntarily and know-
ingly accepts and/or assumes these risks, including but not limited to the risk of
passive negligence on the part of FORMULA S.a.S, i.e. for hidden, latent or obvious
defects and exempts FORMULA S.a.S from liability to the fullest extent permitted by
law against any resulting damage.
• Ensure there are no damaged or loose hardware.
• Always make sure that the shock is marked “MOD”.
• Make sure the shock is true before use.
• Carefully read the FORMULA MOD shocks instructions before use.
• Carefully follow the scheduled maintenance program as indicated in the relative para-
graph.
• Always use genuine FORMULA S.a.S replacement parts.
ENVIRONMENTAL NOTES
In order to protect the environment, please follow these simple instructions to cor-
rectly dispose of FORMULA S.a.S products:
1) The packaging does not require special disposal because it is not dangerous in any
way; we suggest recycling paper and plastic.
2) It is also recommended to recycle the metal parts after use. For both points men-
tioned above, it is recommended to dispose of the waste following national regula-
tions through the appropriate specialized waste disposal companies.
CHECK BEFORE EVERY RIDE:
In order to guarantee your health and maximum enjoyment, check before every ride
that FORMULA MOD shock absorber is ready.
• Make sure the shock absorber is clean: using water and neutral soap, clean the out-
side of the suspension by hand. Subsequently, after a splash of water, act with a dry
and soft cloth to remove the residues;
ATTENTION: do not use solvents or degreasers. They can damage external sur-
faces. Do not use high pressure water sprayers directly on the shock absorber
joints, in particular near the hydraulic seals which could be seriously damaged and
compromise the functioning of the suspension.
• Inspect the outside of the shock absorber. Check if there are no breakages and / or
damages. If present, contact the FORMULA dealer immediately for inspection or re-
pair. Do not use the shock absorber in this case.
• Make sure that the frame coupling screws are tightened to the correct tightening
torque as recommended by the frame manufacturer. The hardware does not play
with the coupling screws. If yes, immediately replace them, see manual at
paragraph “b”.
• Also make sure that the coil spring is properly preloaded as recommended by para-
graph “e”.

5
ENVIRONMENTAL NOTES
In order to protect the environment, please follow these simple instructions to
correctly dispose of FORMULA S.a.S products:
1) The packaging does not require special disposal because it is not dangerous in any
way; we suggest recycling paper and plastic.
2) It is also recommended to recycle the metal parts after use.
For both points mentioned above, it is recommended to dispose of the waste following
national regulations through the appropriate specialized waste disposal companies.
INDEX:
1.1 Formula hardware installation;
1.2 Installing shocks on a MTB frame;
1.3 SAG and Adjustments;
1.4 Hydraulic regulation:
1.4.1 Rebound;
1.4.2 Compression;
1.4.3 Lockout;
1.5 CTS (compression tuning system) replacement;
1.6 Spring replacement;
1.7 Maintenance intervals
1.8 Formula spacer for reduction stroke
1.9 Problems - Causes - Remedies
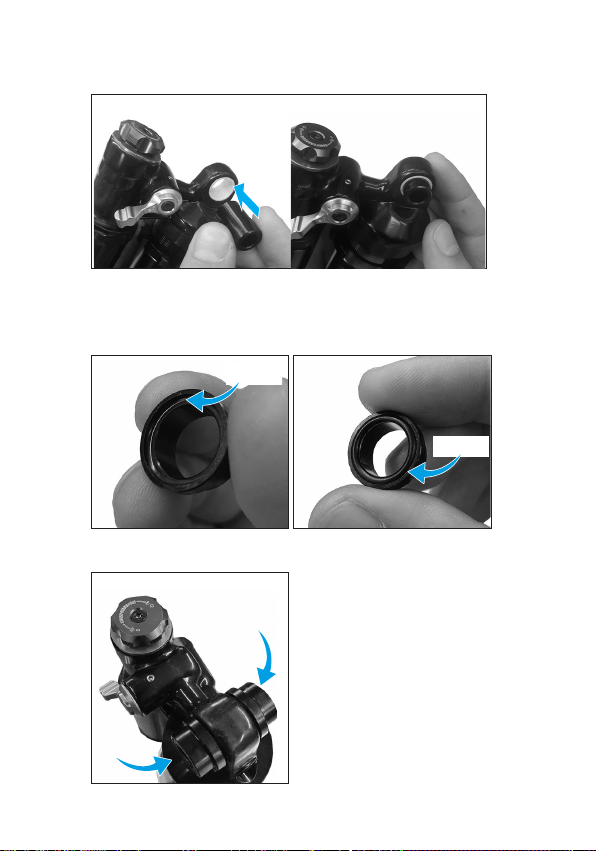
1.1 Formula hardware installation:
Formula hardware kit may differ depending on the customer’s request regarding its
frame. The bushings (DU) are already installed on the rear shock absorber.
For STANDARD attack shocks, the kit includes (figure A):
a) n.2 assembly pins;
b) n.4 spacers;
c) n.4 Orings;
For TRUNNION shocks:
a) n.1 mounting pin;
b) n.2 spacers;
c) n.2 Orings.
ATTENTION: The screws for the TRUNNION connection are supplied by the
frame manufacturer. FORMULA assumes no responsibility for damage or mal-
functions due to the condition of these screws.
Fig. A
6
INSTALLATION PROCEDURE (do the same also for the opposite part of the shock):
1) Insert the pin into the eye of the shock (figure B);
2) Insert Orings in the seats of the spacers: apply Formula grease on the OR seat (figure
C), then insert and check the homogeneous adhesion to the surface of the groove.
Then apply Formula grease on the OR too (figure D);
3) Inserting spacers on mounted pin (figure E);
End procedure
Fig. B
Fig. C Fig. D
Fig. E
GREASE
GREASE

7
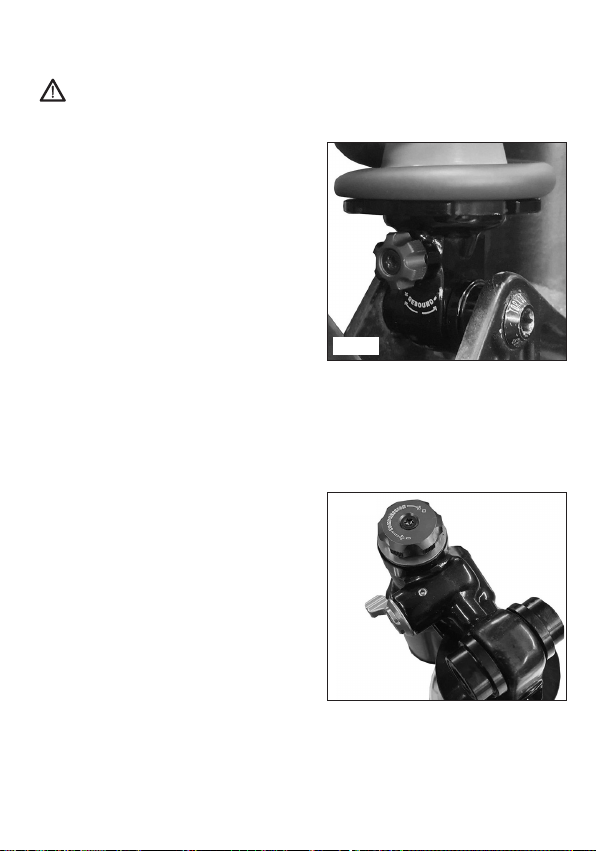
1.2 Installing shock on a MTB frame:
ATTENTION: Suspension setting should be different between different bi-
cycle manufacturer. All maintenance operations must be carried out solely by
personnel authorized by FORMULA S.a.S.
FORMULA assumes no responsibility for breakages and damage to people and / or
things due to this non-compatibility. The result of such non-compliance can lead
to DEATH. Contact the FORMULA Dealer and don’t use the shock.
WARNING: FORMULA recommend DO
NOT INSTALL THE SHOCK on frame
with the eyelets as showed in figure on
the left. The axes of the eyelets MUST
BE perpendicular to the same plane as
showed in figure on the right.
FORMULA assumes no responsibility for
breakages and damage to people and / or
things due to non-compliance. This is valid
until further notice.

8
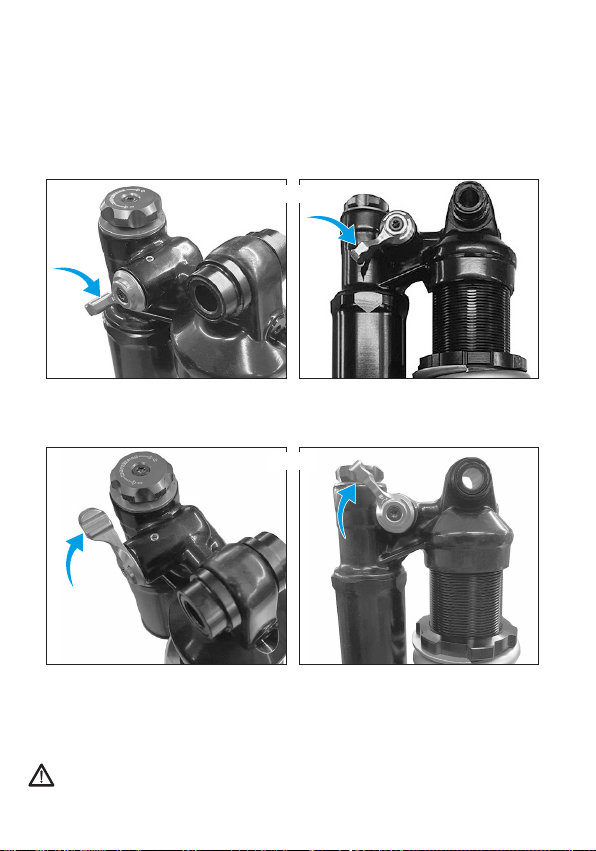
If MOD shock is not already supplied on the bicycle, it’s necessary check the frame
compatibility:
1) Remove the spring from the shock as written in paragraph “e”;
2) Install the Formula hardware on the shock as written in paragraph “b” according to
the specific measures of the frame;
3) Insert MOD shock into the frame and tighten the screws of it (figure F).
4) Slowly Compress and extend the rear part of the frame making the whole stroke.
Inspect if there is interference with the frame (figure G);
5) Remove the shock from the frame;
6) Install the spring with the correct preload as showed in paragraph “e” and install
MOD shock.
End procedure
Fig. F Fig. G

9
1.3 SAG and adjustments:
Detecting the SAG can be useful to have an initial idea of the response of the shock
absorber (complete with spring) with respect to our weight and the cycling discipline
that you want to practice.
Here is the measurement procedure:
a) Measure the distance between the two
eyelets of the shock absorber (eye-to-eye,
in mm) of the rear shock absorber moun-
ted on the bike (figure H).
b) Wearing your own complete
equipment for MTB output
and with the help of a per-
son, position yourself on
the bike in a normal riding
position and measure the
distance between the two
eyelets which will necessar-
ily be decreased (figure I).
c) Taking these two measurements, calculate the SAG;
Example: MOD shock, Length x Stroke: 230x65 mm. 1° measure: 230 mm;
2° measure: 210,5 mm;
Difference between the measures: 19,5 mm.
Use this formula: SAG(%)=
(230 - 210,5)
(Shock stroke) x 100
Fig. H
Fig. I

10
The result is 30% of SAG. Here below is a reference table for measurement:
STROKE 15%SAG 20%SAG 25%SAG 30%SAG 35%SAG 40%SAG
55 mm 8,25 mm 11 mm 13,75 mm 16,5 mm 19,25 mm 22 mm
65 mm 9,75 mm 13 mm 16,25 mm 19,5 mm 22,75 mm 26 mm
75 mm 11,25 mm 15 mm 18,75 mm 22,5 mm 26,75 mm 30 mm
FORMULA recommends 30% of SAG for the Enduro / Gravity discipline. For the trunnion
attack, it will have a different length but the calculation formula remains the same.
ADJUSTMENTS:
If the SAG is not the desired one, here’s how we can operate (figure J):
• To increase the value of SAG, need
to decrease the preload: rotate
with the RIGHT hand the preload
nut COUNTERCLOCKWISE (blue ar-
row), taking care not to drop below
the minimum preload value (2 mm).
If this does not allow the desired
value to be obtained, a lower stiff-
ness spring (lbs/in) must be used.
• To decrease it instead, rotate the
threaded ring CLOCKWISE (orange
arrow) making sure not to exceed
with the preload in addition to the
maximum allowable (5 mm). Here
too, if we fail to obtain the target
value, it will be necessary to change
the spring with a higher stiffness.
For the coil replacement consult paragraph “e”.
Fig. J
11
1.4 HYDRAULIC REGULATION:
ATTENTION:
Shock setup may vary between different bicycle manufacturers.
1.4.1 REBOUND:
The extension adjustment is provided on
the head of the shock absorber, acting on
the appropriate RED color register (figure K).
This adjustment concerns the second phase
of the shock cycle, which occurs following a
compression.
The extension range is intrinsically connec-
ted to the stiffness (lbs/in) of the coil spring
used: a spring with a higher stiffness value
corresponds to a higher elastic response
than it and consequently a higher hydraulic
force in extension will be required for the
shock absorber. To increase this force, turn
the RED knob CLOCKWISE.
Higher the stiffness value of the spring, the faster the rebound will be for the same
click. Going for example from 400 lbs/in to 450 lbs/in to obtain the same rebound we
will have to turn the knob clockwise one or two clicks. Vice versa for a spring of lower
stiffness.
FORMULA recommends with initial configuration, to close the whole register clockwise
and to unscrew anticlockwise by 6 clicks.
1.4.2 COMPRESSION:
The compression adjustment is provided
on the shock absorber body, acting on the
appropriate on the CTS with BLUE register
(figure L).
The compression phase is the first that oc-
curs following, for example, an impact with
the ground.
The compression range here too can be
influenced by the spring. Turn the knob
CLOCKWISE to increase the hydraulic force
that the shock absorber performs when it is
compressed; this allows for higher hydraulic
support in the rear of the bicycle.
Conversely, by opening the register, for example, you will have less support.
FORMULA recommends as an initial configuration, to close the whole register in a
CLOCKWISE direction and to unscrew in an anticlockwise direction by 9 clicks.
If you are not satisfied with the range available, FORMULA offers the possibility of in-
tervening on compression thanks to CTS (Compression Tuning System) technology. For
more information, visit the FORMULA website.
Fig. K
Fig. L
12
1.4.3 LOCKOUT:
The lockout adjustment allows for greater support from the shock absorber to de-
crease energy dissipation during the pedaling phase and consequently increase effi-
ciency. It is positioned on the shock body, acting on the GOLD-colored lever.
There is the possibility of having 2 positions:
• OPEN position is obtained by turning anticlockwise: we recommend using this config-
uration during the descent or technical climbs (figure M).
• CLOSED position is obtained by turning clockwise: we recommend using this config-
uration while pedaling.
The hydraulic system designed for the MOD rear shock absorber also includes the
THRESHOLD (or lockout force) function: it acts when the lockout is active; exceeding
a pressure value designated inside the shock absorber, a passage opens allowing the
reduction of this avoiding breakage of the suspension.
ATTENTION: If anomalies are found on the adjustments (eg. Knob does not turn)
contact a FORMULA dealer who will inspect it and / or carry out maintenance.
Fig. M
Fig. N
13
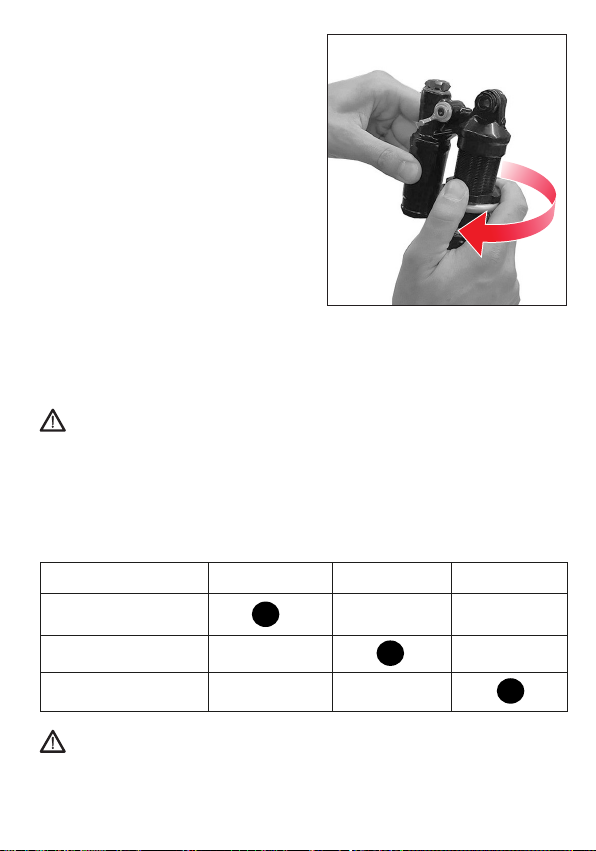
1.5 CTS (COMPRESSION TUNING SYSTEM) REPLACEMENT:
ATTENTION: FORMULA is not responsible for
any damage to parts of the shock absorber
due to this operation and/or to people. Contact a
specialized mechanic. Strictly follow this proced-
ure. Failure to comply can cause suspension mal-
functions and cause DAMAGE AND DEATH.
ATTENTION: Use the ONLY FORMULA suspension
pump for this operation.
Follow the entire procedure shows on the For-
mula website or Formula’s Youtube channel.
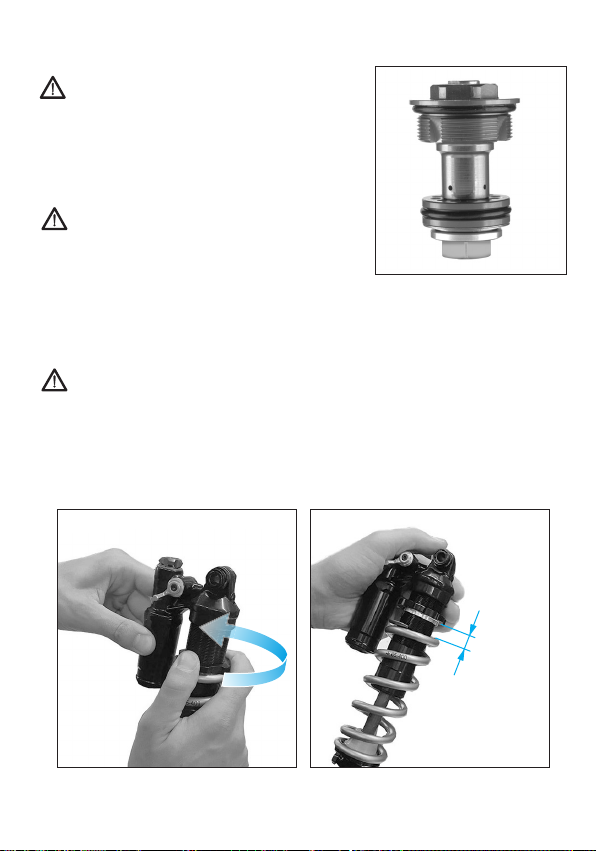
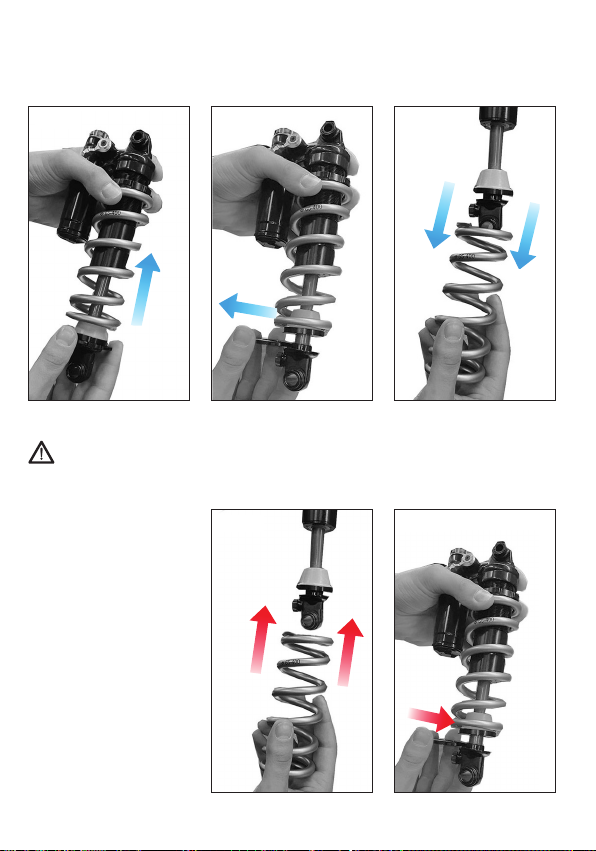
1.6 SPRING REPLACEMENT:
ATTENTION: FORMULA declines all responsibility for the use of a different spring to
the FORMULA one, suitably designed and tested with our products.
The procedure for replacing the coil spring on the rear shock absorber is as fol-
lows:
1) Remove the shock from the frame;
2) Unscrew the spring preload ring nut COUNTERCLOCKWISE (figure O) until the spring
is free to move (figure P);
Fig. O Fig. P
14
3) Push up and keep the spring (figure Q) while removing the spring locking ring nut
(figure R) by sliding it off the rod and remove the spring from the shock absorber. If
the hardware is too wide, it need to remove it before the spring;
ATTENTION: during this operation do not scratch the stem. This could compro-
mise the suspension and damage it.
4) Insert the spring to be
installed (figure T) and
keep it up and reinsert
the locking ring (figure
U);
Fig. Q Fig. R Fig. S
Fig. T Fig. U
15
5) Screw the threaded ring in a CLOCKWISE
direction (figure V), following the FOR-
MULA directive: preload min. Permissible
2 mm, preload max. Allowable 5 mm.
Each turn is 1,25 mm preload.
For control the preload measure the dis-
tance between the body and the thread
ring before and after applying the preload
(the difference must be in the range writ-
ten above);
6) If necessary, put the cup containing the
end stroke bumper in correct position.
End procedure
1.7 Maintenance interval:
To guarantee and maintain the characteristics and behavior of the rear shock absorber
during normal conditions of use, FORMULA recommends following a product mainte-
nance interval.
ATTENTION: to use the rear shock absorber in extreme conditions frequent-
ly, maintenance operations must be repeated more frequently. Furthermore,
using spare parts, high pressure washing methods, solvents and lubricants that
are NOT RECOMMENDED BY FORMULA also drastically reduces the maintenance
interval and also the suspension life. FORMULA therefore RECOMMENDS ONLY
ORIGINAL spare parts and FORMULA lubricating products. FORMULA recommends
contacting a mechanic specialized in the FORMULA technical service, in agreement
with FORMULA with all the specifications for maintenance.
Here are the service intervals below, to ensure a minimum of maintenance:
CAUTION: FORMULA strongly recommend for extreme condition of usage, as
Bikepark, DH and Freeride and in worst environmental conditions as extremely
dry, dusty or wet muddy, to perform maintenance earlier than the intervals listed
above. For more information on the types of interventions to be performed, consult
the FORMULA website.
Fig. V
Procedure Every ride Every 30 hrs/ Every 200 hrs/
3 months 1 year
External cleaning with
water and neutral soap
and visual inspection
SAG, spring preload and
damper setting controls
full shock service

16
1.8 Formula spacer for reduction stroke:
Formula MOD is provided with 55 mm or 65 mm standard strokes. For frames who
require different one, Formula offers stroke reduction spacers in the following dimen-
sions: 2.5 mm, 5 mm and 7.5 mm.
Formula reduction stroke spacer can be easily installed and removed without aid of
tools.
WARNING: FORMULA strongly recommend to not use this spacer when it’s not
required. Please follow the instruction below for the correct installation, do not
fit the spacer in other position.
The installation procedure is:
• Remove the spring preload;
• Remove the spring ring and the spring;
• Push up the washer with the bumper close to the cylinder;
• Insert the spacer along the stem by hand under the washer in the correct way as
showed in figure, this allows to connect these components each other;
• Install the spring;
• Insert the spring ring under the spacer with the flat surface facing the spring;

17
• Pull down the group with bumper, washer and spacer against the spring ring;
• Pull down the spring against the spring ring and apply the correct spring preload;
End procedure
1.9 PROBLEMS - CAUSES – REMEDIES:
This paragraph reports some problems that may occur when using the shock, their
possible causes and remedy.
ATTENTION: The operations listed below and accompanied by this symbol must
be performed exclusively by Authorized Service Centers.
Following a jump, the
rear hurls me forward
Rebound too excessive Turn CLOCKWISE the re-
bound adjuster by 1 or 2
clicks
The spring is free to ro-
tate axially around the
shock
Preload below the mini-
mum allowed
Turn CLOCKWISE the thre-
aded ring
The shock absorber has
little sensitivity and is
very supported on the
back, the bike is too un-
balanced on the front
Spring too preloaded or
compression too high
Turn the threaded ring
counterclockwise. Or turn
the CTS compression regi-
ster counterclockwise by 1
or 2 clicks

18
I can’t get the sag I wa-
nted
Spring too smooth or too
hard
Change spring
Play on the compression
adjuster
The screw has come loose Tighten the screw with a
TORX T10 play on the re-
bound adjuster
Play on the rebound
adjuster
The screw has come loose Tighten the screw with a
TORX T10 play on the re-
bound adjuster
Play on the lockout lever The screw has come loose Tighten the screw with a
TORX T10 play on the re-
bound adjuster
Lockout locks less or no
longer works
Pressure loss inside the
suspension
Do not use the shock ab-
sorber. Contact a specia-
lized FORMULA center for
inspection and mainte-
nance
CTS does not satisfy my
desired range of settin-
gs
Make sure to perform a
descending test and check
Change the CTS, see the
website: www.ridefor-
mula.com. FORMULA
recommends contacting a
specialized center for this
operation.
Oil leak Leakage from the seals Do not use the shock
absorber. Contact a
specialized FORMULA
center for inspection and
maintenance
Ribbed rod Debris or contacts have
carved the anodized sur-
face
Do not use the shock
absorber. Contact a
specialized FORMULA
center for inspection and
maintenance
The shock seems too
soft or deflated, causing
me to make too many
stops
Check and reset the pres-
sure of 95 psi in the tank
with the exclusive help of
the FORMULA suspension
pump.
If the problem persists do
not use the shock absor-
ber. Contact a specialized
FORMULA center for
inspection and mainten

19
READ CAREFULLY!
FORMULA S.a.S provides the original purchaser of its Shock with a limited warranty
that the Shock is free of defects in material and/or workmanship for a period of two
years from date of purchase.
WHAT PROTECTION DO I RECEIVE FROM THE WARRANTY?
FORMULA S.a.S will, at its discretion, repair or replace the defective product under
warranty
WARRANTY CONDITIONS AND LIMITATIONS
1. FORMULA S.a.S guarantees its new products to be free from defects in materials or
workmanship for 24 months from the date of purchase. You must establish proof
of purchase with an original sales document (sales receipt or invoice) showing the
date and place of retail purchase of the product in order to obtain warranty service.
FORMULA S.a.S gives no guarantee of whatever nature for non-new products.
2. The validity of this warranty is subject to the following:
(a)-The claim must be notified within eight (8) days of discovery of the potential
defect;
(b)-Every claim must be submitted to the FORMULA S.a.S Dealer from which the
product was purchased, with the understanding, however, that the discretion
as to the acceptability of the claim is exclusively FORMULA’s; Warranty claims
for products purchased directly from Formula shall be processed by FORMULA
S.a.S.
(c)-Only a FORMULA S.a.S Dealer can ship the allegedly defective product to the
manufac-turer, with the accompanying documentation.
Failure to comply with these procedures will invalidate the claim; in which case
the product will be made available to the owner for thirty (30) days and then des-
troyed.
3. This warranty does not cover damages resulting from:
a. Incorrect transport and installation. Incorrect installation refers to failure
to follow the safety guidelines and instructions outlined in these instruc-
tions manual and or on the web-site www.rideformula.com.
b. Unintended ad inappropriate use of the product. Unintended ad inappropri-
ate use refers to use of the product for purposes different from those for
which it was specifically designed and manufactured having regard to rea-
sonably foreseeable use. Unintended purposes include, but are not limited
to, cross country UCI sanctioned downhill races.

20
c. Use of materials or spare parts that do not carry the Formula trademark
for LINEA wheels. FORMULA S.a.S shall not guarantee conformity, safety,
service life and performance of Formula LINEA wheels if materials and spare
parts that do not carry the Formula trademark and/or are non-compatible
and/or are not suitable and/or are not expressly authorized are used.
d.Lack of appropriate or reasonable maintenance or storage, washing with
harsh materials, use of corrosive agents, prolonged exposure to solvents.
e. Products on which the serial number and/or production code have been
altered, damaged and/or removed.
f. Modifications made by persons not duly authorized by Formula without be-
ing approved by Formula.
g. Normal wear and tear or deterioration due to the use of the product.
4. Retailers, wholesalers, importers or anyone else apart from FORMULA S.a.S may
not modify this warranty in any way.
5. This warranty does not affect the statutory rights of the consumer or any rights
the purchaser may have against the dealer pursuant to the sales contract.
6. The laws of Italy govern all matters arising out of or relating to this warranty. Any
disputes or legal actions by purchaser arising out of or relating to this warranty
shall be brought exclusively before the court of Prato, Italy.
Table of contents
Other Formula Bicycle Accessories manuals

Formula
Formula THIRTYFIVE QR15 User manual

Formula
Formula Linea User manual

Formula
Formula R1 Racing User manual

Formula
Formula 4 Racing User manual

Formula
Formula 151239 Series User manual

Formula
Formula MD1 Manual

Formula
Formula NERO R User manual

Formula
Formula TECH SUSPENSION TJ2 User manual

Formula
Formula FD40292-20 User manual
Popular Bicycle Accessories manuals by other brands


Bowers & Wilkins
Bowers & Wilkins BIKE.GUARD CURV manual

Ergon
Ergon BA3 User instructions

Rose electronics
Rose electronics XTREME GRAND TOUR CROMO owner's manual

Sigma
Sigma ROX 11.1 EVO Short manual

Wuxi LingDe Microelectronics
Wuxi LingDe Microelectronics LD902GL instruction manual

ERGOTEC
ERGOTEC UP & DOWN 3 Assembly and safety instructions


