Formula Linea User manual
1
MANUALE ISTRUZIONI - OPERATING MANUAL - MANUEL D’INSTRUCTIONS -
BETRIEBSANLEITUNG - MANUAL DE INSTRUCCIONES

2

3
WARNING! BEFORE INSTALLING AND USING THIS NEW FORMULA S.a.S PRODUCT
IT IS CRITICAL TO YOUR SAFETY THAT YOU READ AND STRICTLY ADHERE TO THE
INSTRUCTIONS IN THIS MANUAL. FAILURE TO DO SO COULD CAUSE SERIOUS IN-
JURY AND/OR AFFECT YOUR LEGAL RIGHTS.
KEEP THIS MANUAL IN A SAFE PLACE FOR FUTURE REFERENCE AS IT CONTAINS
INFORMATION CRITICAL TO YOUR SAFETY.
WARNING! DO NOT INSTALL OR DISASSEMBLE THIS FORMULA S.a.S PRODUCT ON
YOUR OWN!
Always seek the help of a professional mechanic. If you decide to ignore this im-
portant safety warning, keep in mind that you are doing so EXCLUSIVELY at your
own risk and strictly follow all Formula installation and disassembly instructions.
Note: AS WITH ANY MANUAL, THIS MAY BE PERIODICALLY UPDATED. CONTACT
YOUR FORMULA S.a.S DEALER, OR CHECK OUR WEB SITE, (www.rideformula.com)
TO RECEIVE ALL SUCH UPDATES.
This manual contains information for the safe use, proper mounting and mainte-
nance of LINEA wheel sets. Following the rules contained in this manual will ensure
the safest use, best performance and longest life of your LINEA wheels and will avoid
the most common product use/maintenance inconveniences and problems.
Carefully follow the SAFETY GUIDELINES to assure appropriate use and service of
LINEA wheel sets.
In this handbook you will find the following safety symbols:
CAUTION: Directs your attention toward unsafe practices which could result in
damage to the bicycle, equipment and/or minor injury.
WARNING: Directs your attention toward unsafe practices a foreseeable con-
sequence of which would be damage to the bicycle, equipment and/or serious
injury or death.
It is impossible to anticipate every situation that may occur while riding a bicycle. This
manual makes no representation about the safe use of the bicycle under all condi-
tions. There are risks associated with the use of any bicycle which cannot be predict-
ed or avoided. By choosing to ride a bicycle, you assume the responsibility for that
risk. Read and understand your bicycle owner’s manual before using your bicycle.
GENERAL SAFETY GUIDELINES
•Never put your hands near or inside rotating parts. Protective five-finger gloves that
do not reduce sensitivity or your ability to grip should be used during repair.
•Check you adopt the correct measures to handle all components and equipment
that could cause damage to persons or property.
•Before starting any product installation/mounting operations, carefully check for
potentially dangerous conditions at the work site. If dark, ensure sufficient light is
available.
TRANSLATION OF THE ORIGINAL INSTRUCTION MANUAL

4
•All maintenance operations must be carried out solely by personnel authorized by FOR-
MULA S.a.S.
• Ensure that the thru axle is tightened correctly. Bounce the bike on the ground from
aheight of about 10cm/4” to ensure that there are no loose parts. Riding with an im-
properly adjusted wheel quick release can allow the wheel to wobble or fall off the
bicycle causing injury or death.
•Ensure that the tires are in good condition and check the inflation pressure before
each ride.
•Wet weather impairs tire grip, traction and braking, making it much more difficult to
control the bike. More attention must be paid while riding in wet conditions in order to
avoid accidents. Bear in mind that braking power/tire grip can change suddenly as the
road surface gradually dries.
•Always wear a properly fitted and fastened helmet while riding. Make sure the hel-
met is approved in the country of use.
•Learn and comply with the local rules of the road and cycling regulations. Always
ride carefully and responsibly.
•Wear close-fitting clothes that make you easy to see (fluorescent or bright colors).
•If you ride at night, use adequate lights and reflectors that are clean and fitted se-
curely. Be constantly alert that in darkness, you may not be visible to other road
users and alert to possible obstacles in the road.
LINEA WHEELSET SAFETY GUIDELINES
•LINEA wheel sets produced by FORMULA S.a.S are designed exclusively for use on
two wheel bicycles.. Any other use is to be considered hazardous. FORMULA S.a.S
shall not be held liable for any consequences from improper usage.
•The lifespan of LINEA wheel sets depends on many factors, such as rider size and
weight, tires used and normal wear and tear on the bicycle and/or wheels.
•The rim wears with use and is subject to metal fatigue. Check the condition of the
rim regularly and replace the rim when necessary. A worn rim or one showing signs
of fatigue may break suddenly.
•Impact, falls, excessive, improper or harsh use of the bicycle may compromise the
structural integrity of the wheels, significantly reducing their lifespan. Short life-
wheel components need to be replaced more often.
•Have the wheels regularly inspected by a qualified mechanic for any cracks, defor-
mation, signs of fatigue or wear. Use of penetrating fluid or other visual enhancers
to locate cracks on parts is recommended.
•If inspection reveals any deformation, cracks, signs of impact or stress, no matter
how slight, immediately replace (not repair) the component. Excessively worn com-
ponents also require im-mediate replacement.
•The frequency at which inspection is required depends on many factors. Ask a FOR-
MULA S.a.S dealer to recommend an inspection and service schedule that is right
for you.
•Use of the product by individuals who weigh more than 120kg/265Ibs is not recom-
mended. If you weigh more than 120kg/265Ibs be especially careful and have the
bike inspected more frequently.
•Parts which have been bent or damaged in an accident or as the result of impact,
must be immediately replaced with genuine FORMULA S.a.S replacement parts.
•Rim/tire compatibility; LINEA wheel sets are precisely sized. If fitting the tire onto a

5
LINEA rim is too easy, the tire may be too big. Use only high-quality tires which are
the correct size and require reasonable force in order to be put on. A tire that is too
big may suddenly deflate causing serious accidents, personal injury or death.
•Check with a qualified mechanic to ensure that the selected LINEA wheel is suitable
for the required type of use and to establish an inspection and service schedule that
is right for you.
•Tools supplied by other manufacturers for wheels similar to LINEA wheels may
not be compatible with LINEA wheels. Likewise, tools provided by FORMULA S.a.S
may not be compatible with components/wheels supplied by other manufacturers.
Check with a qualified mechanic or tool manufacturer to ensure compatibility before
using tools supplied by one manufacturer on components/wheels supplied by an-
other manufacturer.
•Failure to verify compatibility of the tools may cause the component to work incor-
rectly or break, resulting in an accident, personal injury or death.
•The user of LINEA wheels expressly recognizes that there are risks inherent in bi-
cycle riding, including but not limited to failure of a bike component, resulting in an
accident, personal injury or death.
•By purchasing and using these LINEA wheels, the user expressly, voluntarily and
knowingly accepts and/or assumes these risks, including but not limited to the risk
of passive negligence on the part of FORMULA S.a.S, i.e. for hidden, latent or obvious
defects and exempts FORMULA S.a.S from liability to the fullest extent permitted by
law against any resulting damage.
•Ensure there are no damaged or loose spokes.
•Always make sure that the front and rear wheels are marked “LINEA”.
•Make sure the wheels are true before use. Spin the wheel to ensure that it does not
wobble up and down or from side to side. Never use wheels that are not true or that
have broken or damaged spokes.
•Carefully read the FORMULA LINEA wheel instructions before use.
•Carefully follow the scheduled maintenance program as indicated in the relative
paragraph.
•Always use genuine FORMULA S.a.S replacement parts.
•Always use a spoke protection disc on the rear wheel. Check that it is in the correct
position on a regular basis.
BREAK-IN
Once your new hub is placed in service, some settling may occur. Check adjustment
by attaching wheel into dropouts. Ride for 5-10 minutes, check for play or binding,
and readjust if necessary. Recheck after the first 1-5 hours of riding. Check cog lock
ring on rear hubs after the first 20 hours of use, and tighten if necessary. Continue
monitoring for the first 60 hours of use.
During the first 60 hours of use, above average amounts of drag may be noticed. This
is normal as the seals break in, and will soon diminish. If this causes chain sag while
back-pedaling, increase the B-tension (cage tension) on the rear derailleur.
The bearing grease is intentionally overpacked and excess grease may seep from the
bearing seals during the break-in period.
Needle bearings on rear hub (cog side) may results not completely buttery smooth;
this causes a little extra friction on the axle’s spin: this is normal, due to the nature of
needle bearing; all will be regularly back to work after 60 hours of use.
6
ENVIRONMENTAL NOTES
In order to protect the environment, please follow these simple instructions to cor-
rectly dispose of FORMULA S.a.S products:
1)The packaging does not require special disposal because it is not dangerous in any
way; we suggest recycling paper and plastic.
2) It is also recommended to recycle the metal parts after use.
For both points mentioned above, it is recommended to dispose of the waste fol-
lowing national regulations through the appropriate specialized waste disposal com-
panies.
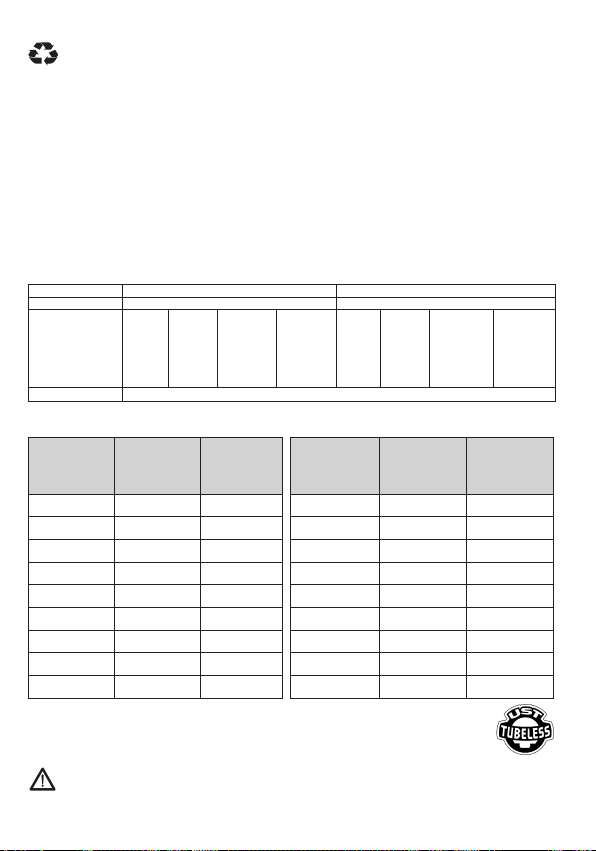
1 TECHNICAL SPECIFICATIONS
Table 1 Tire Operating Pressure
Size (in)
Max. pres-
sure
(bar)
Max. pres-
sure
(psi)
Size (in) Max. pressure
(bar)
Max. pressure
(psi)
1,95 4,0 59 2,45 3,3 48
2,00 3,9 58 2,5 3,2 46
2,10 3,8 55 2,55 3,1 45
2,13 3,8 55 2,6 3,1 45
2,20 3,6 52 2,65 3,0 43
2,25 3,6 52 2,7 3,0 43
2,30 3,5 51 2,75 2,9 42
2,35 3,4 49 2,8 2,9 42
2,40 3,3 48
NOTE: The wheel you have purchased has been designed for use with
STANDARD or TUBELESS tires.
WARNING:
If TUBELESS tires are used, verify they are genuine by making sure that are
marked with the TUBELESS logo and from a reputable seller.
Rim size 27.5”(in)29” (in)
Axle dimensions
Front 100/110 mm –Rear 142/148 /150 mm Front 100/110 mm –Rear 142/148 /150 mm
Spokes length
Linea2 (28 holes)
Linea3 (28 holes)
Linea4 (32 holes)
LineaG (32 holes)
LineaG (32 holes)
FRONT SX
-
284
278
278
278
FRONT DX
-
286
280
280
280
REAR SX
-
286
280
282
282
(axle 150mm)
REAR DX
-
284
278
280
280
(axle 150mm)
FRONT SX
308
302
-
298
298
FRONT DX
308
304
-
300
300
REAR SX
308
304
-
300
300
(axle 150mm)
REAR DX
308
302
-
298
298
(axle 150mm)
Inflation pressure

7
2 TIRES
In order to safely use FORMULA LINEA wheels, the tire must be tight on the rim.
FORMULA S.a.S has tested the rims with STANDARD and TUBELESS tires. In any
case, FORMULA S.a.S does not design or produce tires and therefore shall not be
held responsible for performance, quality or malfunctions of the tire.
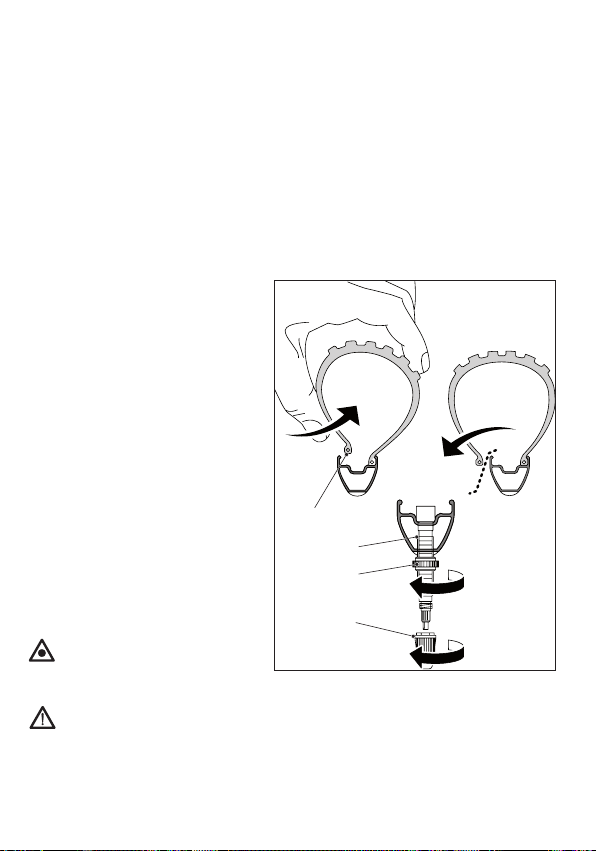
2.1 Mounting STANDARD tires
-Mount the protective tape (1) on
the rim, placing it with the hole (2)
matching the valve hole in the rim.
-Insert a stop (3) in the valve hole
and finish placing the protective
tape (1) on the rim ensuring the
hole in the tape is aligned with the
valve hole in the rim.
-Get the STANDARD tire that is suitable for your needs.
-Insert the first tire bead (4) in the rim groove.
NOTE:The inner tube should be fitted with a Presta valve (ø 6.5 mm).
444
1
2
3

8
WARNING: Never drill the rim for a larger valve hole or try to redrill the rim.
The rim will be irreparably damaged and may even collapse as a result.
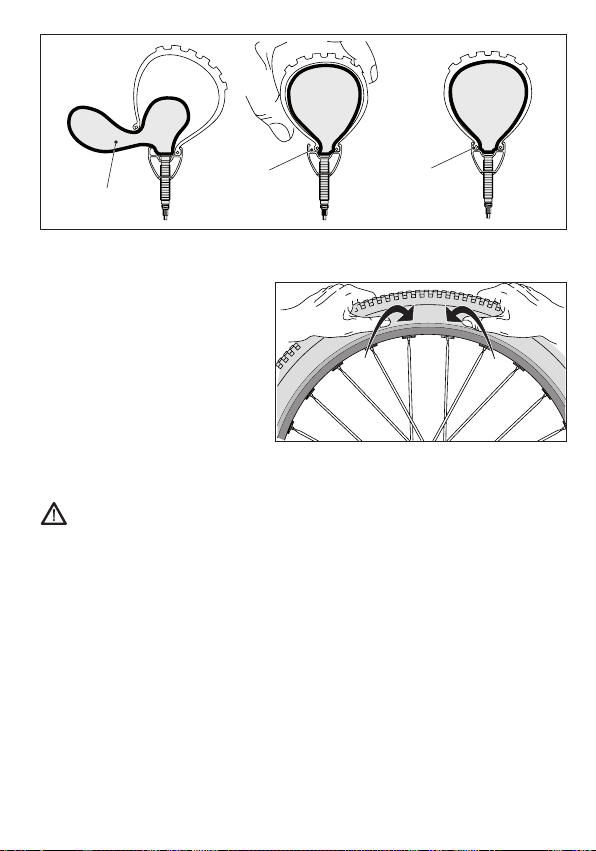
-Place the partially inflated inner tube (5) completely inside the tire. The Presta valve
should be inserted in the hole in the rim. Place the tube in the center of the tire
casing.
-
Insert the other tire bead (6), forcing it in the rim groove. Start from the point opposite
the valve and continue along the entire circumference of the rim. Use tire levers if
necessary. Be careful not to pinch the inner tube (5).
WARNING: Do not use screw
drivers or other sharp tools
that may scratch or damage
the edge of the rim or punc-
ture the inner tube.
- Inflate the inner tube (5) until the
two tire beads (4-6) are secured in
the correct position.
WARNING: Even when using an inner tube, it is EXTREMELY important to
seat the two tire beads to prevent the tire from coming off the rim.
5
664
5

9
All FORMUlA rims are tubeless campatible. You can use either a tubeless FLAP
or TAPE
Clean by rubbing cloth and isopropyl alcohol.
Insert the valve stem into the flap.
Install the flap; slide
with a screwdrice
under the flap all
around the rim in
order to properly
extend the flap into
the seat.

10
Install the tire
Add the sealant
Spin the wheel and size
turn, in order to fill all the
cavities Add the sealant
Spin the wheel and size
turn, in order to fill all the
cavities

11
2.2 Mounting TUBELESS tires
-Install the wheel, preferably on a
frame or truing stand to center the
wheels. Clean the inside of the rim
with a cloth dampened with alcohol
in order to degrease the channel in-
side the rim.
CAUTION: Use only alcohol to
clean the rim, other products
may damage the rim.
-Start installing the tape (1) for the
TUBELESS kit, starting the tape
halfway between 2 nipple holes (2).
-Keeping the tape tight (1) turn the
wheel while installing the tape. (3)
Make sure the tape stays in the
middle of the rim channel. The tape
should make two complete rota-
tions around the rim so that each
part of the rim is covered by two
layers of tape. Check the tape to
make sure it is fastened to the rim
at all points.
-Cut the tape (1).
-Make sure the tape is in the middle
of the rim channel and not protrud-
ing (2).
-Use a sharp punch slightly smaller
in diameter than the valve to make a
hole (4) in the tape where the valve
hole is found in the rim.
-Remove the valve cap (9) and valve
nut (6).
-Insert the valve (5) bringing it
against the rim channel. Tighten the
valve nut (6) from the opposite side
as shown in the figure. The valve nut
should only be tightened by hand.
2 3
1
2
4
5
6
5
6
95
6
12
WARNING: Whenever possi-
ble, install or remove the tires
only by hand. If this is not possi-
ble, use only tire levers specifical-
ly designed for bicycle wheels.
Any other lever may damage the
tire or rim, resulting in sudden or
future loss of pressure in the tire
which may result in the loss of
control of the bicycle and injury or
death.
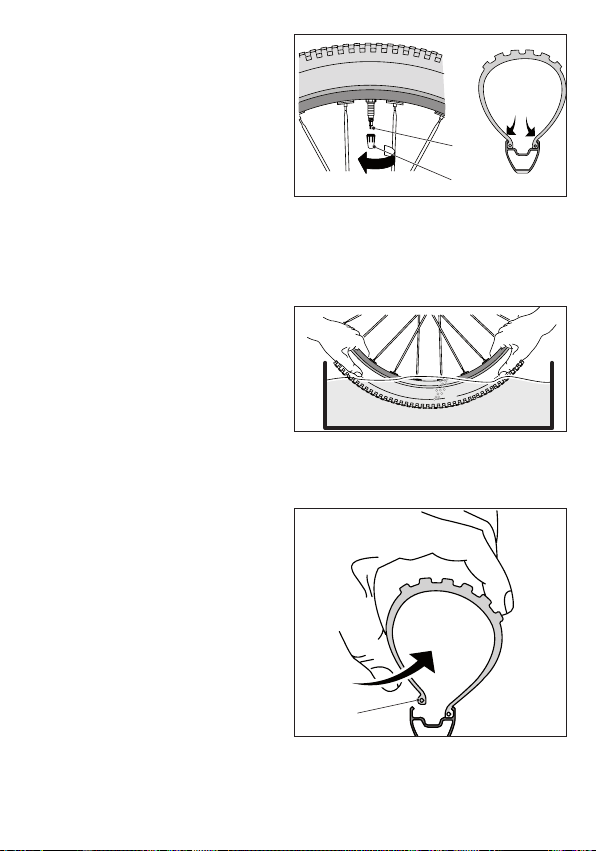
-Fit the first of the two beads (7) of
the tire into the rim groove start-
ing from the point opposite the
valve (Fig. A).
-Pour the recommended amount
of TUBELESS tire sealant into the
tire. Refer to the instructions pro-
vided by the tire sealant manufac-
turer or consult your mechanic for
the proper amount of your fluid of
choice.
-Fit the second bead (8) of the tire
into the rim groove starting from
the point opposite the valve and
continue around the whole cir-
cumference of the rim.
CAUTION: To prevent damaging the tire, it is necessary to complete the bead
installation near the valve.
-Check that the tire is correctly po-
sitioned on both sides of the valve
(Fig. B).
-Make sure the tire is correctly po-
sitioned by gently moving it back
and forth on the rim.
-Open the valve (10).
-Inflate the tire until the two beads
go into the correct position. While
this is being done, it may be possi-
ble to hear a popping noise as the
tire settles.
-Make sure the tire is centered and the bead is settled around the entire circumfer-
ence of the wheel.
-Completely deflate and verify that the tire beads stay in place and do not drop to-
wards the rim groove.
7
7
7
8
10
Fig. A
Fig. B
13
-Inflate until the desired pressure is
reached.
-Never exceed the maximum pressure
recommended by the tire manufac-
turer and the maximum pressure for
the rim indicated in the table in this
manual.
-Tighten the valve (10) back on and put
the valve cap (9) back into place.
2.2.1 Checking tightness of TUBELESS tires
-Verify the tire and rim are in good condition.
-Inflate the tire to a pressure of 3 bar. Place the wheel and tire in a bucket of water,
as shown in the figure.
-Replace the tire, if it is leaking and will
not seal.
-If the leak is found in the valve zone,
remove the valve, apply grease on
the rubber part of the valve in contact
with the rim and put back in place.
-If the leak continues, replace the
valve.
NOTE:If, after all the checks mentioned above have been completed and the TUBE-
LESS system is still not satisfactory, contact your nearest FORMULA S.a.S dealer.
2.3 Removing the tires
-Remove the valve cap (9), unscrew the
valve (10) and deflate the tire.
-Starting from the side opposite the
valve, press one side of the tire with
your hands until the bead (11) is re-
leased from its seat. Let it drop into
the rim groove and continue around
the entire wheel circumference.
10
9
11
14
-Starting from the valve, pull the tire until it comes off the rim and continue around
the entire wheel circumference removing the tire.
CAUTION: Completely remove one side of the tire before going on to the oth-
er side.
-Carry out the same operation on the other side of the tire.
-Remove the tire.
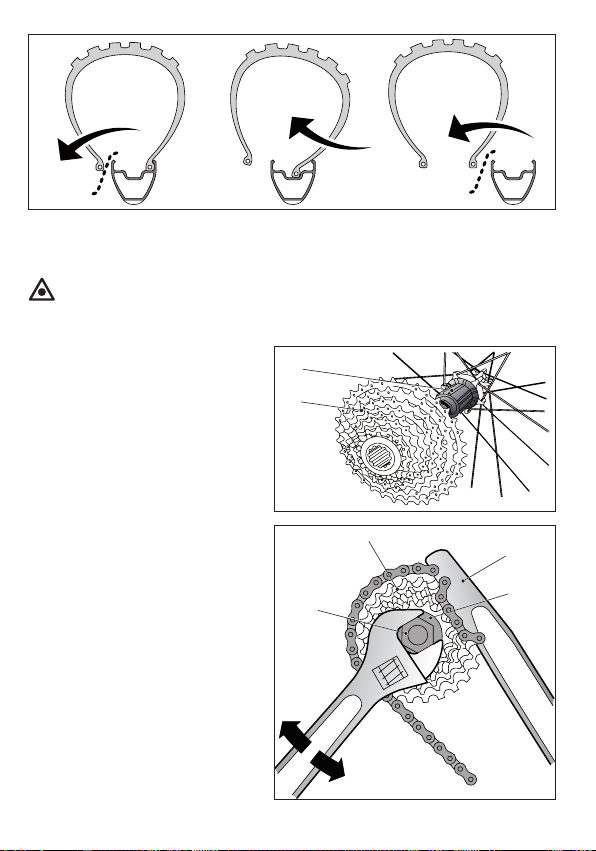
3 MOUNTING AND REMOVING
THE CASSETTE
3.1Mounting HG 9/10/11/12
SHIMANO INC. – PG 9/10/11/12
SRAM CORP
-Fit the cassette (12) onto the free-
hub body (13) following the cassette
manufacturer’s instructions for
proper alignment.
-Use tool (14) (TL – LR15 from
Shimano Inc. or FR5 from Park Tool
Co.) to tighten the lock ring (15) sup-
plied with the cassette on the free-
hub body to the correct torque spec-
ified by the cassette manufacturer.
3.2 Removing HG 9/10/11/12
SHIMANO INC. – PG 9/10/11/12
SRAM CORP
-Remove lock ring (15) using tool (14)
(TL-LR15 from Shimano Inc. or FR-5
from Park Tool Co.) and a chain whip
(16).
-Remove the cassette from the free-
hub body.
16
15
12
14
13
12

15
4 BRAKES
FORMULA LINEA wheels are available in the follow-
ing versions:
-for disc brakes with ISO 6-bolt system.
-for disc brake with Shimano Center Lock
WARNING: Do not use rim brakes on a wheel
designed for disc brakes and vice versa: fail-
ure to heed this warning may cause acci-
dents, serious personal injury or death.
-For brake operating instructions: consult the manual provided by your brake man-
ufacturer.
5 MAINTENANCE
5.1 Periodic wheel maintenance
CAUTION: It is strongly recommended that you contact a qualified mechanic
for all your service needs including mounting, removal and replacement of
the hubs, rims and spokes. Ask the mechanic to recommend an inspection
and service schedule that is right for you based on the riding style, mileage
and environment (example: rain, salted roads, muddy roads, bike rider’s
weight, etc…).
WARNING: Spoke nipples should only be adjusted with a special nipple
wrench. Using other tools may damage the nipples and/or cause them to
break resulting in accidents, serious personal injury or death.
WARNING: For qualified mechanics, contact your local FORMULA S.a.S deal-
er or FORMULA S.a.S service center for instructions regarding mounting,
servicing and replacing the hubs, rims and spokes.
5.2 Cleaning the wheels
Use only water and neutral soap or products specifically formulated to clean bicy-
cles. If you are not sure if a cleaning product is suitable, contact the FORMULA S.a.S
service center.
Dry with a soft cloth.
WARNING: Do not use rough sponges or metal pads.
CAUTION: Salt, mud and sand may seriously damage the bicycle and its com-
ponents. Thoroughly rinse, clean and dry your bicycle after using it in these
conditions. If a high-pressure washer is used to wash the bike, NEVER aim
the water jet directly at the hubs. Pressurized water, even water sprayed
from a garden hose, may penetrate the seals and get inside the hubs, irrep-
arably damaging the bearings.
16
5.3 Routine maintenance
If punctured:
When a tire is punctured, air leakage may be slow and not immediate allowing you, in
some cases, to keep on riding back home.
With standard tire with inner tube:
Replace it with a new one following the directions given in paragraph 2.1.
With TUBELESS tire:
Remember that a TUBELESS tire can be repaired by putting on a patch, anti-puncture
spray or a new inner tube.
5.3.1 Putting in an inner tube
-Completely deflate the tire.
-Starting from the side opposite the
valve, press one side of the tire with
your hands until the bead (18) is re-
leased from its seat. Let it drop into
the rim groove.
-Continue around the entire wheel
circumference.
-Starting from the valve, pull the tire
until it comes off the rim. Use tire le-
vers if needed.
-Continue around the entire wheel
circumference.
-Remove the valve cap (21).
-Unscrew the valve nut (19) of the
TUBELESS valve (20) and remove.
CAUTION: The inner tube must
be fitted with a Presta valve
(°6.5 mm)
WARNING: Never drill the rim for a larger valve hole or drill other holes in the
rim.
The rim will be irreparably damaged and may even collapse as a result.
18
21
20
19
17
-Put the partly inflated Presta valve tube (21) in the tire.
-Insert the bead (18) of the tire into
the rim groove starting from the
point opposite the valve. Continue
around the entire rim circumfer-
ence being careful not to pinch the
inner tube.
-Inflate the inner tube until the two
tire beads go into the correct po-
sition.
WARNING: Even when using an inner tube, it is EXTREMELY important for
safety purposes to seat the two tire beads to prevent the tire from coming
off the rim.
5.4 Transport and storage
When the wheel is transported separately from the bike or when it is not used for an
extended period, put it in a wheel bag to protect it from impact, dust and dirt.
21
18 18

18
READ CAREFULLY!
FORMULA S.a.S provides the original purchaser of its wheels with a limited warranty
that the wheels are free of defects in material and/or workmanship for a period of
two years from date of purchase.
WHAT PROTECTION DO I RECEIVE FROM THE WARRANTY?
FORMULA S.a.S will, at its discretion, repair or replace the defective product under
warranty.
WARRANTY CONDITIONS AND LIMITATIONS
1. FORMULA S.a.S guarantees its new products to be free from defects in materials
or workmanship for 24 months from the date of purchase. You must establish
proof of purchase with an original sales document (sales receipt or invoice) show-
ing the date and place of retail purchase of the product in order to obtain warranty
service. FORMULA S.a.S gives no guarantee of whatever nature for non-new prod-
ucts.
2. The validity of this warranty is subject to the following:
(a)-The claim must be notified within eight (8) days of discovery of the potential
defect;
(b)-Every claim must be submitted to the FORMULA S.a.S Dealer from which the
product was purchased, with the understanding, however, that the discretion
as to the acceptability of the claim is exclusively FORMULA’s; Warranty claims
for products purchased directly from Formula shall be processed by FORMULA
S.a.S.
(c)-Only a FORMULA S.a.S Dealer can ship the allegedly defective product to the
manufac-turer, with the accompanying documentation.
Failure to comply with these procedures will invalidate the claim; in which case
the product will be made available to the owner for thirty (30) days and then de-
stroyed.
3. This warranty does not cover damages resulting from:
a. Incorrect transport and installation. Incorrect installation refers to failure
to follow the safety guidelines and instructions outlined in these instruc-
tions manual and or on the web-site www.rideformula.com.
b. Unintended ad inappropriate use of the product. Unintended ad inappropri-
ate use refers to use of the product for purposes different from those for
which it was specifically designed and manufactured having regard to rea-
sonably foreseeable use. Unintended purposes include, but are not limited
to, cross country UCI sanctioned downhill races.

19
c. Use of materials or spare parts that do not carry the Formula trademark for
LINEA wheels. FORMULA S.a.S shall not guarantee conformity, safety, ser-
vice life and performance of Formula LINEA wheels if materials and spare
parts that do not carry the Formula trademark and/or are non-compatible
and/or are not suitable and/or are not expressly authorized are used.
d. Lack of appropriate or reasonable maintenance or storage, washing with
harsh materials, use of corrosive agents, prolonged exposure to solvents.
e. Products on which the serial number and/or production code have been
altered, damaged and/or removed.
f. Modifications made by persons not duly authorized by Formula without
being approved by Formula.
g. Normal wear and tear or deterioration due to the use of the product.
4. Retailers, wholesalers, importers or anyone else apart from FORMULA S.a.S may
not modify this warranty in any way.
5. This warranty does not affect the statutory rights of the consumer or any rights
the purchaser may have against the dealer pursuant to the sales contract.
6. The laws of Italy govern all matters arising out of or relating to this warranty. Any
disputes or legal actions by purchaser arising out of or relating to this warranty
shall be brought exclusively before the court of Prato, Italy.

20
Information may be enhanced for improvement without prior notice. All rights reserved.
Le informazioni possono essere modificate senza preavviso. Tutti i diritti riservati.
www.rideformula.com
FORMULA S.a.s. di “Formula Group S.r.l.” & C.
Via Erbosa, 63 - 59100 Prato (Italia)
Tel. +39 0574 603 609
Fax +39 0574 611 046
Reg. Imprese Prato / C.F. / P.IVA 02081070977
PEC: [email protected]
Cap. Soc. 500.000,00 € i.v.
Table of contents
Other Formula Bicycle Accessories manuals

Formula
Formula FD40292-20 User manual

Formula
Formula THIRTYFIVE QR15 User manual

Formula
Formula 151239 Series User manual

Formula
Formula MD1 Manual

Formula
Formula R1 Racing User manual

Formula
Formula 4 Racing User manual

Formula
Formula MOD User manual

Formula
Formula NERO R User manual

Formula
Formula TECH SUSPENSION TJ2 User manual


