Fortin EVO-ONE RF441W User manual
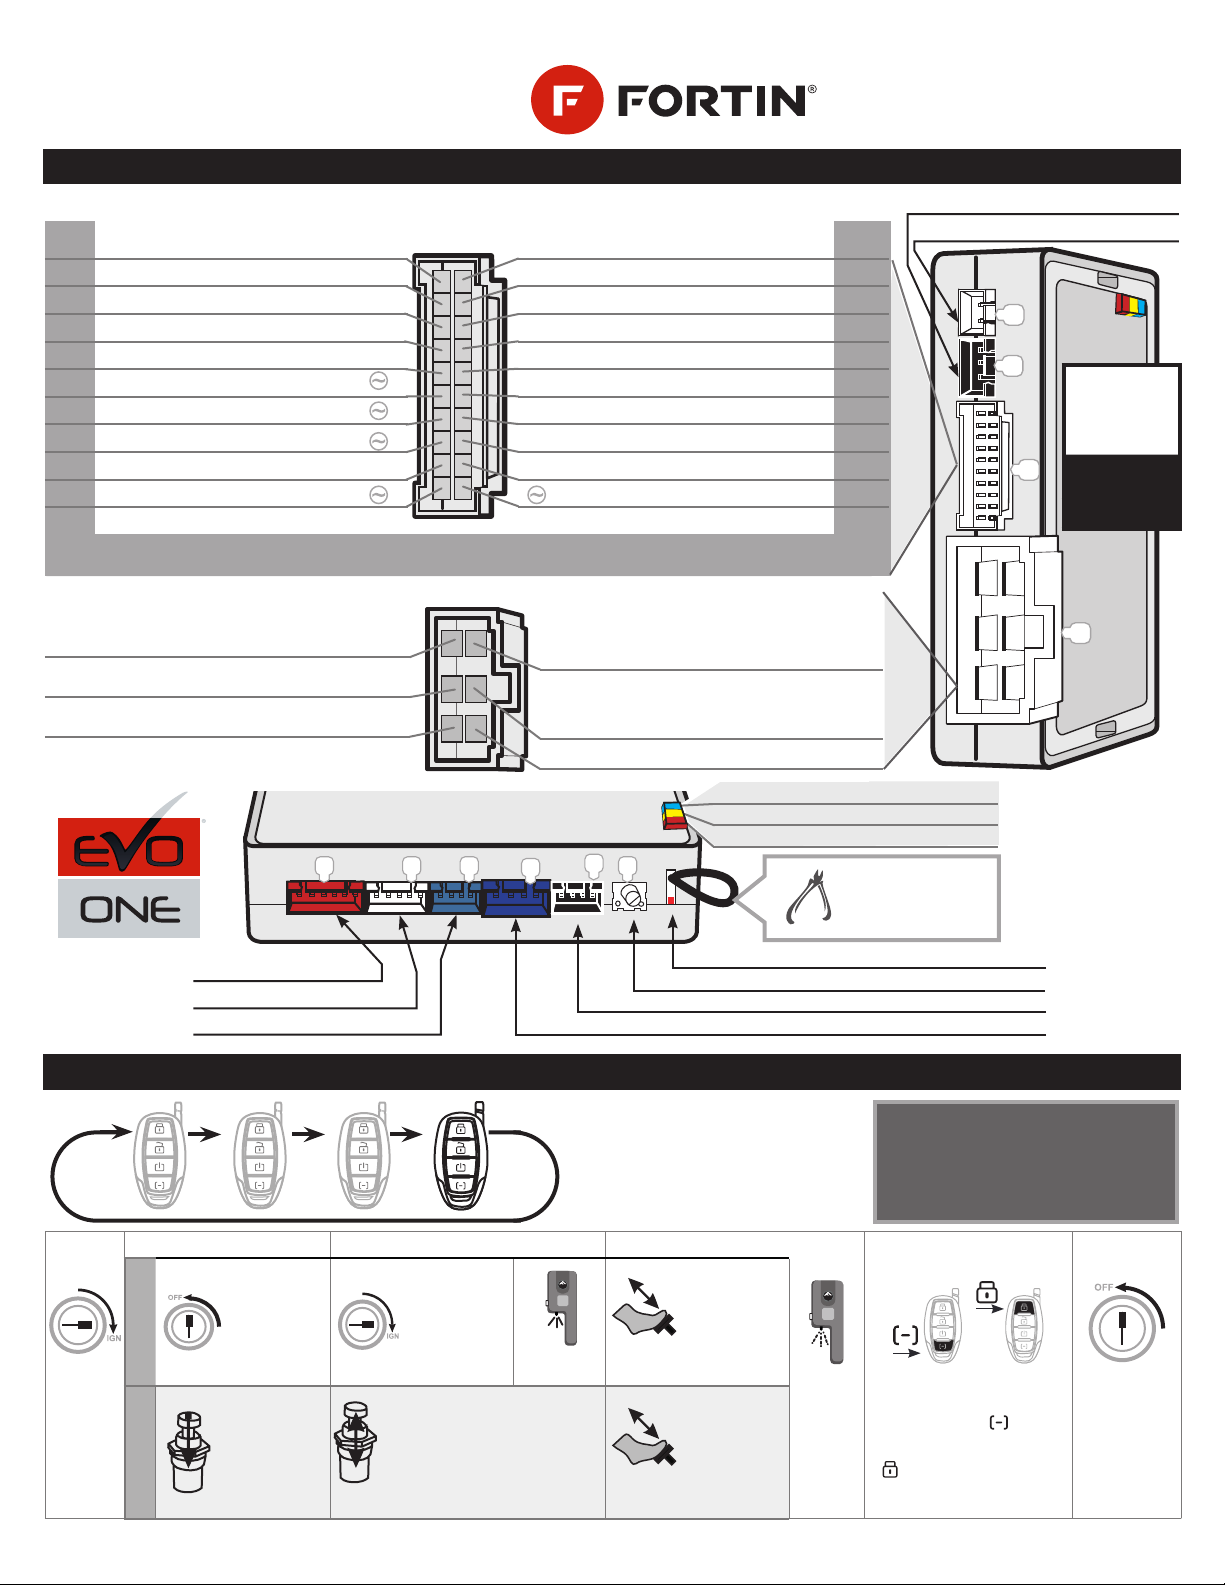
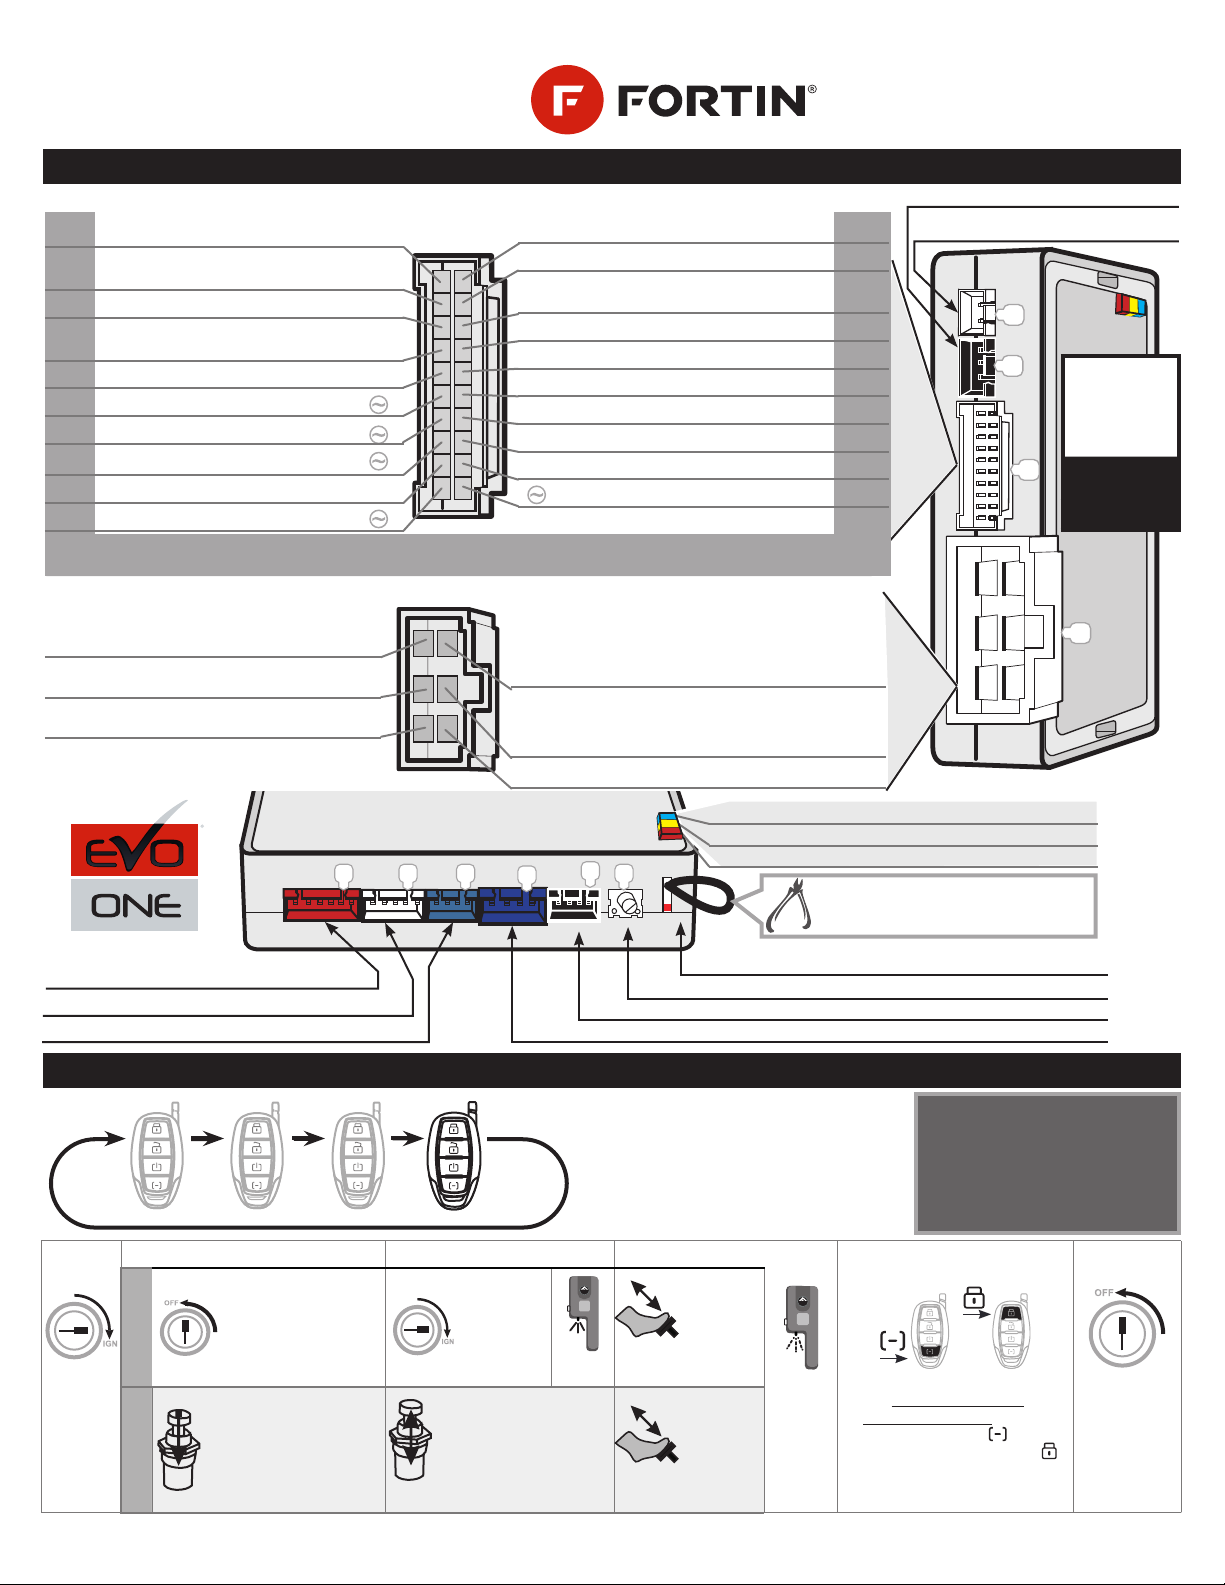
ALL-IN-ONE DATA INTERFACE
REMOTE STARTER / ALARM
QUICK
INSTALLATION GUIDE
DCBHIJ
(6-PIN) BYPASS RELAY
(5-PIN) CAN-BUS (4-PIN) RS-232 DATA-LINK & FLASH-LINK UPDATER PORT
BYPASS PROGRAMMING BUTTON
REMOTE STARTER PROGRAMMING LED
CUT LOOP FOR
AUTOMATIC
TRANSMISSION
MODE.
Red White Blue Blue Black
LED Blue CAN ACTIVITY
LED Yellow IGNITION ON
LED Red BYPASS DATA
E6
A
F
G
E
(+) Foot Brake Black In
750mA (-) Parking lights Pink Out
750mA (-) Trunk Release / AUX Yellow/Black Out
(-) Hand Brake Brown/White In
(-) Hood/Door Pink/Black In
Bypass cong. Purple/Yellow
Bypass cong. Green/White
Bypass cong. Green/Red
Bypass cong. White/Black Out
Bypass cong. Lt.Blue
Ground Black In
(+) Ignition Pink Out
(+) Starter Yellow Out
Out White
(+) ParkLight/IGN2
/ACC/START
Programmable Output
(FUNCTION 2 & 31)
Out Orange
(+) ACC / IGN2
Programmable Output
(FUNCTION 2 & 31)
In Red (+) 12V
In Yellow (+) Bypass Ignition
Out Purple (-) Lock 750mA
Out Purple/White (-) Unlock 750mA
Out Green (-) Ignition 750mA
Out White (-) Start 750mA
Out Orange (-) Disarm 750mA
Out Orange/Black (-) Horn/Siren 2 Amp
Out Dk.Blue (-) GWR / Programmable 750mA
In Red/Blue Bypass cong.
Lt.Blue/Black Bypass cong.
750 mA MAXIMUM OUTPUT. Do not exceed the maximum current or permanent damage to the module
will occur that will not be covered under warranty.
(6-PIN) POWER CONNECTOR
(20-PIN) SECONDARY CONNECTOR
COPYRIGHT © 2014-2017, FORTIN AUTO RADIO INC ALL RIGHTS RESERVED MADE IN CANADA REV.:20170323
A1
E1
(3-PIN) Shock Sensor
(2-PIN) Valet/Programming Button
A20
WIRING / CONNECTION GUIDE
PROGRAMMING REMOTE TRANSMITTER(S)
Black
White
White
White
(4-PIN) ANTENNA(4-PIN) DATA-LINK ANTENNA
REMOTE
STARTER
FIRMWARE
VERSION
1. [21]
ET PLUS
The system can learn up to a maxi-
mum of 4 transmitters.
Any transmitters can be stored in
more than 1 memory slot.
When a 5th transmitter is learned
the 1st remote is erased (FIFO).
STEP 1 STEP 2 STEP 3 STEP 4 STEP 5 STEP 6
WITH IGNITION SWITCH
Turn the Ignition
OFF. Turn the
Ignition ON.
F
M
H
2
-
W
The LED will
turn ON
x4
Press and
release the
brake pedal
four times.
F
M
H
2
-
W
Turn the
Ignition
ON.
WITH VALET SWITCH
Press and hold
the valet switch
until the park-
ing lights turn
ON, the horn/
siren will chirp. x5
Press and release the valet switch
ve time.
The parking lights will ash and the
horn/siren will chirp each time to
conrm. x1
Press and re-
lease the brake
pedal once.
The LED
will ash
rapidly.
On each Transmitter press
and release the button
then press and release the
button. The LED will stop
ashing conrming programming.
Turn the Ignition
OFF to exit
programming.
1 32 4
EVO-ONEEVO-ONE
download the specific vehicle installation
guide, user guide or the latest quick
installation guide at:
www.fortin.ca
RF441W
GUIDE # 33011

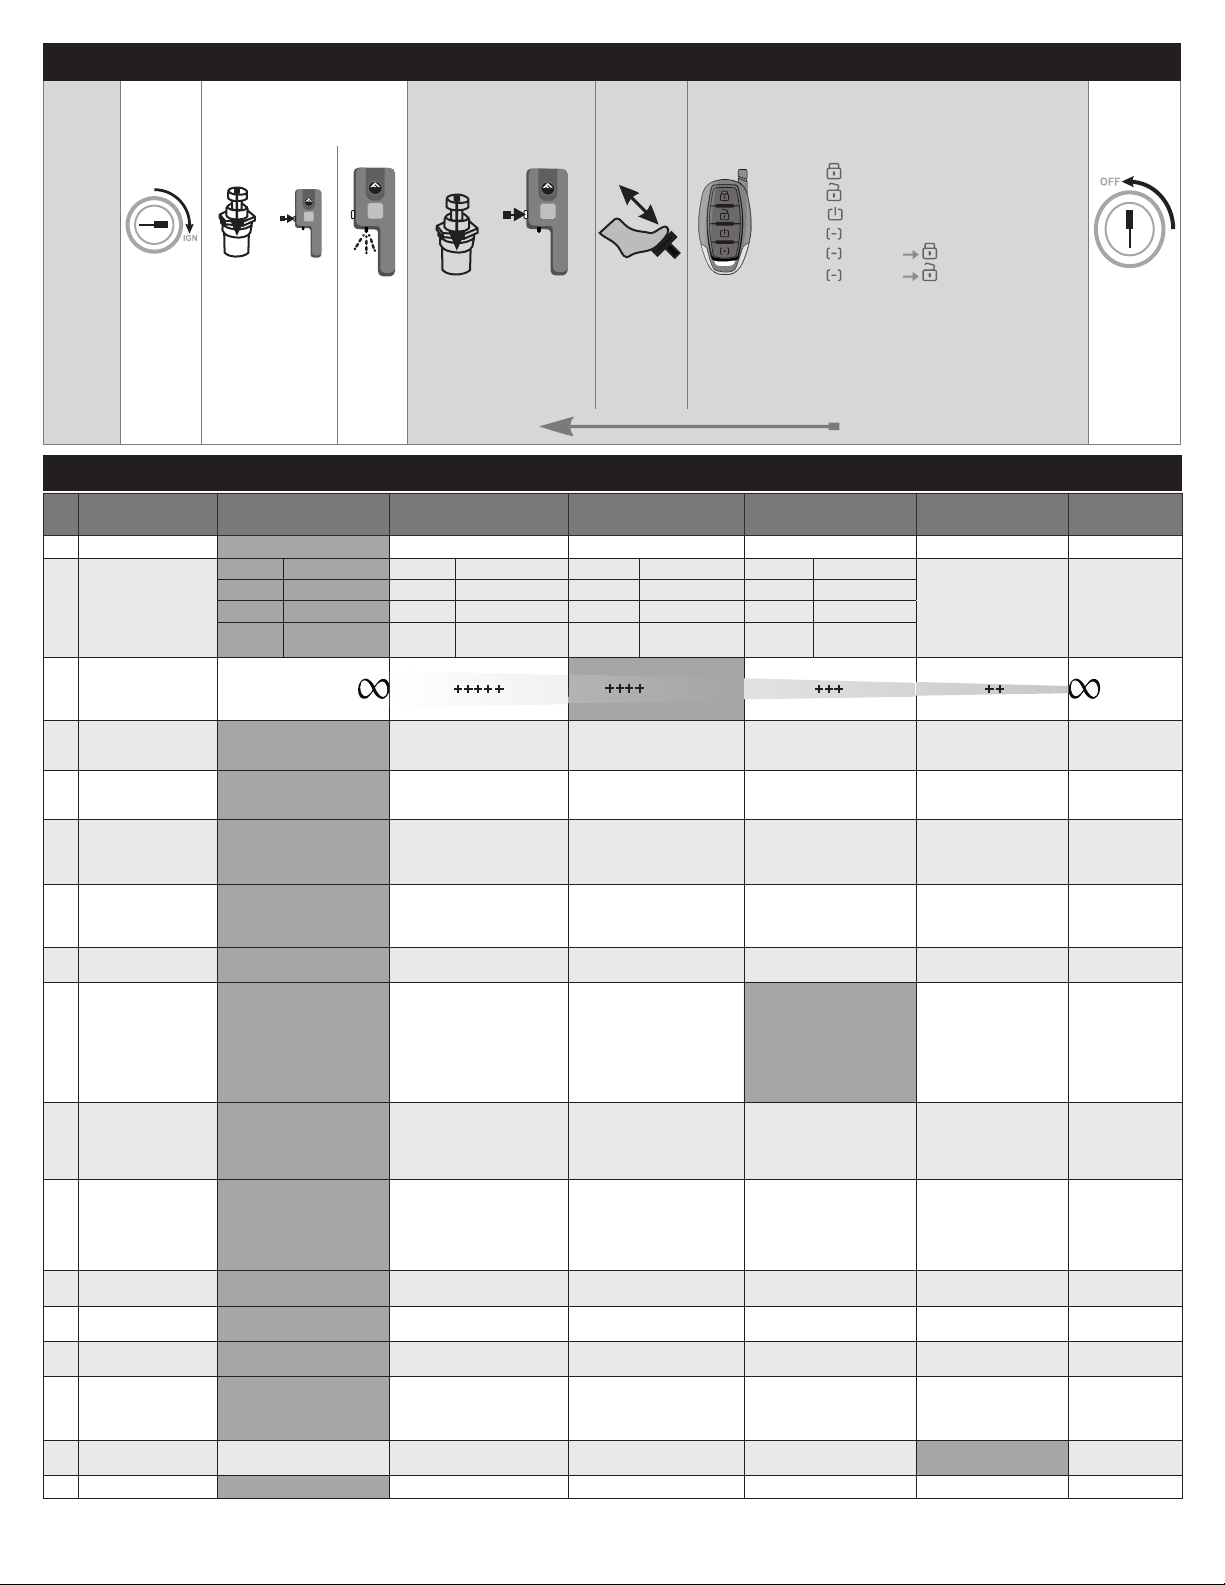
FUNCTION
FUNCTION MODE 1 MODE 2 MODE 3 MODE 4 MODE 5 MODE 6
1 — — — — — — —
2
Programmable Output
(+) Ign/Acc/Start
(FUNCTION 31
MODE 4)
White
(+)Ignition2 White (+)Accessory2 White (+)Start2 White (+)Start
— —
Orange (+)Accessory Orange (+)Accessory Orange (+)Accessory Orange (+)Ignition2
Pink (+)Ignition Pink (+)Ignition Pink (+)Ignition Pink (+)Ignition
Yellow (+)Start Yellow (+)Start Yellow (+)Start Yellow (+)Start2
3 Tachless sensivity Increase
crank time (By default) Decrease
crank
time
4Remote car starter
runtime Gas: 15 minutes
Diesel: 30 minutes Gas: 7 minutes
Diesel: 14 minutes Gas: 3 minutes
Diesel: 6 minutes — — —
5Add Remote on FMH
antenna series Add Remote — — — — —
6 Doorlock option No Unlock before remote-start &
Lock after remote-start. Lock after remote-start. Unlock and relock after
shut-down. Relock 10 sec.after
shut-down. Disarm before
shut down.
7Ignition Doorlock
option No Lock after foot-brake &
unlock after key is turned
OFF.
Unlock after key is turned
OFF. Doorlock Output at
Ignition only. — —
8 Unlock Pulse Time Single 0.25 sec Double 0.25 sec Single 4.0 sec Single 2.5 sec Single 1.5 sec Single 0.75 sec
9Active or Passive
Alarm & Starter Kill.
Active
Press LOCK to activate
the Alarm and starter-kill.
Passive (Lock disabled)
Arm alarm activate
starter-kill 30(MODE
4), 60(MODE5), or
120(MODE6) sec. after the
door is closed.
Passive (Lock enabled)
Arm alarm, activate
starter-kill and lock doors
30(MODE 4), 60(MODE5),
or 120(MODE6) sec. after
the door is closed.
Passive arm
30 seconds (by default
if MODE 2 ot 3 is
activated.
Passive arm
60 seconds. (if
MODE 2 ot 3 is
activated.
Passive arm
120 seconds.
(if MODE 2 ot 3
is activated.
10
Starter Kill Output.
Required function 32
mode 4. - Dk.Blue
(A8) = starter-kill.
Starter-kill &anti-grind Anti-grind only Relay normally open — — —
11 Sound Conrmation
& LED antenna
Antidémarreur
1st LOCK/UNLOCK silent
2nd LOCK/UNLOCK
sound
---------------------------
Antenna LED active.
LOCK/UNLOCK
sound always. Antenna LED disabled. Antenna LED disabled
with ignition.
Conrmation sound
at LOCK only Panic mode
disabled
12 Output horn/siren
conguration Horn(-) only. Siren(+) Output (E1) white Siren(+) Output (E1) white
and Horn(-) Siren(-) only (A7) — —
13 Conrmation Pulse Long Short — — — —
14 Alarm ON/OFF
Starter ON/OFF Alarm OFF
Remote-starter ON Alarm ON
Remote-starter ON. Alarm ON
Remote-starter OFF — — —
15 Smart Arming
Smart Doorlock
Smart Lock pulse Disable
(Unlock signal) Automatically
LOCK and rearm alarm if
door(s) are not opened after
30 seconds.
Automatic Lock when
starter kill arms. Lock pulse only when its
Unlock — —
16 Cold Start Timer 3 hours at -5oc/Runtime 1.5 hours at -5oc/Runtime 3 hours at -5oc/5 minutes 1.5 hours at -5oc/5
minutes Cold time OFF —
17 — — — — — — —
18 Diesel Mode Disable Enable (20 seconds)
Delay between Ignition
power up and Starter (crank).
Enable (10 seconds)
Delay between Ignition
power up and Starter
(crank).
Enable
No delay between
Ignition power up and
Starter (crank).
— —
19 Turbo timer Disable Run 2 minutes. Run 4 minutes. — — —
20
Engine supervision:
-Tachless -
-analog tach-
-Tach Data-Link-
Tachless on crank
and supervision Tach
Data-Link.
Tachless only.
( vehicles with automatic
transmission only) —
Start (crank) 8 seconds
on Tachless.
( vehicles with
automatic transmission
only)
Start (Crank) 8 sec
+ Supervision by
Data-LInk Tach
Tach Data-Link
only
STEP 1STEP 2STEP 3STEP 4STEP 5STEP 6
Disarm
the
system
(The
antenna
led must
not be
ashing,
see enter/
exit valet
mode
p.4).
OR
F
M
H
2
-
W
OR
FMH
2-W
X1
MODE 1 - LOCK
MODE 2 - UNLOCK
MODE 3 - START (3 SECONDS)
MODE 4 - FUNCTION (3 SECONDS)
MODE 5 - FUNCTION LOCK
MODE 6 - FUNCTION UNLOCK
Turn the
Ignition
ON.
Press and
hold the valet
switch or the
antenna but-
ton until the
Parking lights
turn ON, the
horn/siren will
chirp.
The
LED will
a s h
rapidly.
Press and release the valet
switch or the antenna but-
ton X time for the desired
function. The Parking
lights will ash and the
horn/siren will chirp each
time to conrm.
Press and
release the
brake-ped-
al once.
Turn the Igni-
tion OFF to
exit program-
ming.
The Parking
lights will
ash 4
times.
Press the BUTTON on a programmed remote to select the mode (X).
The Parking lights will ash 1-6 times to conrm.
Return to step 3 to programmed the next option
FMH
2-W
FUNCTION PROGRAMMING

FUNCTION MODE 1 MODE 2 MODE 3 MODE 4 MODE 5 MODE 6
21 Start Attempts 2 1 3 — — —
22 — — — — — — —
23 Master RESET
RESET all programming
options by default.
(Retains already
programmed remote.)
— — — — —
24 — — — — — — —
25 Yellow/Black (A13) :
Aux1 --> LOCK 0.5 seconds &
disarm alarm 0.5 seconds 10 sec latch or
until a button is pressed. 20 sec latch or
until a button is pressed.
30 sec latch or
until a button is
pressed.
Latch until
shutdown
26 Hybrid mode Gas / Diesel vehicle Hybrid vehicle — — — —
27 — — — — — — —
28 — — — — — — —
29 Alarm Duration 30 seconds 60 seconds 120 seconds — — —
30 Valet code Ignition ON
Valet button x3 times.
Ignition ON
Valet button x3 times
and x1 times 3 seconds.
Ignition ON
Valet button x4 times
and x1 times 3 seconds.
Ignition ON
Valet button x5 times
and x1 times 3 seconds.
Ignition ON
Valet button x6
times and x1 times
3 seconds.
Ignition ON
Valet button x7
times and x1
times 3 sec.
31 Special application
Programmable output
(+)
No special application
Priority on function 2
Special application - Function 2 (all option)
not available. White (+) Parking
Light White (+)
Parking
Light
White:
(+) Parking
Lights
Orange (+)
Accessory Orange Ign.2 Orange:
(+) Parking
lights
White wire (E1) : Enable
at ground out, disable with
vehicle ignition OFF.
White wire (E1) : Trunk
Output Pink (+) Ignition Pink Ign.1 Pink:
(+) Ignition
Yellow (+) Start Yellow (+) Start Yellow:
(+) Start
32 Ground Out Dk.Blue (Ground out):
Shut-down 1 second after
remote start run time.
Dk.Blue (Ground out):
Shut-down 3 seconds after
remote start run time.
Dk.Blue
(Ground Out):
Shutdown After
D.k Blue
(Ground Out):
Starter-Kill
D.k Blue
(Ground Out):
Arm / Rearm
Controlled by
CAN learning
33 Manual transmission
function Manual transmission
completed by door closed. Automatically activated by
hand-brake and Foot Brake
Manual sequence
completed by locking the
doors
Cancel ready mode when
trunk open. — —
34 Trunk output Pulse 0.5 seconds Pulse 2.5 seconds Unlock before trunk pulse
0.5sec Trunk Output at ignition
only — —
35 Door unlock Special
application No special application Activate vehicle ignition at
unlock. Activate vehicle ignition
and accessory at unlock. — — —
36 Activation/
desactivation remote
Valet Mode —by remote :
FUNCTION --> LOCK +
UNLOCK or valet button By Valet button only — — —
37 Security Remote car
starter
Special application No special application
Security ON: Shutdown
Engine if the door is opened
before UNLOCK is pressed.
(Door trigger required).
— — — —
38 System control by
OEM Remote Disable Press 3x Lock to remote start Start/Stop on trigger shock
sensor Alarm control by OEM
Remote. Press Lock, Unlock
Lock to remote start —
39 Temperature option Disable Enable : AUX1 activated at
5oc when remote started (see
function 25) — — — —
LEGEND: FUNCTION BY DEFAULT
FUNCTION
RESETS ALL FUNCTIONS BACK TO DEFAULT AND ERASES ANY REMOTES THAT HAVE BEEN PROGRAMMED.
Disarm the
system (The
antenna led
must not be
ashing, see
enter/exit
valet mode
p.4).
STEP 1 STEP 2 STEP 3 STEP 4 STEP 5 STEP 6
Turn the
Ignition
ON.
OR Press and hold the
valet switch or the
antenna button until
the Parking lights
turn ON, the horn/
siren will chirp.
OR Press and
release the
valet switch
or the antenna
button
23 times.
X1 Press and
release
the brake-
pedal
once.
OR Press and hold
the valet switch
or the antenna
button for 5 sec-
onds. The Parking
lights will ash to
conrm.
Turn the Igni-
tion OFF to
exit program-
ming. The
Parking lights
will ash 4
times.
FMH
2-W
FMH
2-W
FMH
2-W
ALL-IN-ONE DATA INTERFACE
REMOTE STARTER / ALARM
QUICK
INSTALLATION GUIDE
Manual
transmission only
supported on
vehicles with door
trigger available
on the CAN
network.
READY MODE
TO DISABLE READY MODE
COLD START MODE
WARNING
REMOTE START / ALARM DIAGNOSTICS
Make sure that
all doors are
closed and the
transmission is
in the NEUTRAL
position.
While the
engine is
running.
Engage the
parking
brake.
Release the
brake pedal.
STANDARD
• Open any door(s)
• Open the hood
Note : If the Parking lights ash 3 times when Remote-Starting, Ready
Mode is not enabled.
• Disengage the parking brake
Remove the
key from the
ignition barrel.
The vehicle
will remain
running with the
Remote-Starter.
Exit the vehicle
and close all of the
doors.The Remote-
Starter will stop
running once all the
doors are closed.
REMOTE STARTER DIAGNOSTICS
Parking lights ashes (before starting) :
3x Ready Mode disabled
4x Valet Mode activated (The LED is on)
5x Hood open
Parking lights ashes (after starting) :
1x Normal stop (Brake, Park Brake)
3x Runtime expired or shut down by Transmitter
4x No tachometer signal
5x Hood open
6x Over crank threshold (8 seconds)
ALARM DIAGNOSTICS
Parking lights ashes (after disarm) :
3x Door open – zone 3
4x Shock sensor – zone 4
5x Hood open – zone 5
6x Trunk open – zone 6
7x Auxiliary IN– zone 7
Note. : x Indicates the number of times the parking lights will ash.
+
TO ENABLE
Press and release the FUNCTION button, within 12
seconds simultaneously press and and hold the LOCK and
START buttons for 1 second. The remote’s Green LED will
ash and beep once to conrm. The parking lights will
ash once.
TO DISABLE
• Press and release the FUNCTION button, within 12 seconds
simultaneously press and and hold the LOCK and START buttons for 1
second. The remote’s Green LED will ash and beep once to conrm. The
parking lights will ash twice.
• Put the Remote-Starter/alarm into Valet
• Remote-Start the vehicle
• Open the hood
• Press the brake pedal
• Turn the key to the ignition position.
• Disable Ready Mode (manual transmission).
Push the START button
(3 seconds).
The Parking lights will
ash once and then
remain on.
DISARM / ENTER / EXIT VALET MODE
STEP 1 STEP 2
to disarm
the system
F
M
H
2
-
W
System
armed :
DEL ash
Insert the
key and
turn it to
the ignition
(ON/RUN)
position.
OR
Within 10
seconds
press and
release
the Valet
switch
or the
antenna
button 3
times.
F
M
H
2
-
W
System dis-
armed :
LED is OFF
3x
3x
FMH
2-W
to enter and
exit valet
mode
F
M
H
2
-
W
System
disarmed :
LED is OFF
F
M
H
2
-
W
System dis-
armed and in
valet mode :
LED is ON.
EVO-ONEEVO-ONE
ONE
ONE
The manufacturer will accept no responsibility for any electrical damage resulting from improper installation of the product, including either
damage to the vehicle itself or to the remote-starter module. This module must be installed by a certied technician including all of the
supplied safety devices. Please note that this guide has been written for trained professional technicians, a certain level of skills and knowledge
is therefore assumed. Please review the Installation Guide carefully before beginning any work.
By default this system is setup for vehicles with a manual transmission. For vehicles with an automatic transmission the safety wire loop on the
main unit must be cut. Before proceeding to the installation, make sure that the vehicle does not attempt to start when the when the vehicle
is in the “drive” or “reverse” position. If an automatic transmission vehicle starts when the transmission is in gear, ensure that the safety wire
loop on the unit is not cut. Once the safety wire loop is cut, the system is considered an automatic transmission remote-starter indenitely.
Once a loop is cut all warranties, guaranties, and liability is immediately void if the unit is install on a manual transmission vehicle.Neither the
manufacturer or distributor of this module is responsible of damages of any kind indirectly or directly caused by this module, except for the
replacement of this module in case of manufacturing defects. This module must be install by qualied technician. This instruction guide may
change without notice. To download the installation guide, user guide, or the latest quick installation guide, visit: www.fortin.ca
Technical support:
TEL: 514-255-4357
1-877-336-7797
www.fortin.ca
RF441W
TOUT-EN-UN, INTERFACE DATA
ET DÉMARREUR À DISTANCE / ALARME
GUIDE D’INSTALLATION
RAPIDE
DCBHIJ
(6-PIN) RELAIS POUR CONTOURNEMENT
(5-PIN) CAN-BUS (4-PIN) PORT RS-232 DATA-LINK ET FLASH-LINK UPDATER
(4-PIN) ANTENNE(4-PIN) ANTENNE DATA-LINK
BOUTON DE PROGRAMMATION POUR CONTOURNEMENT
DEL DE PROGRAMMATION DU
DÉMARREUR À DISTANCE
COUPEZ LA BOUCLE POUR
LE MODE TRANSMISSION
AUTOMATIQUE.
Rouge Blanc Bleu Bleu Noir
DEL Bleu ACTIVITÉS DU CAN
DEL Jaune IGNITION ON
DEL Rouge CONTOURNEMENT DE CLÉ ACTIVÉE
FILAGE / GUIDE DE BRANCHEMENTS
PROGRAMMATION DES TÉLÉCOMMANDES
A
F
G
E
(6-PIN) CONNECTEUR DE PUISSANCE
(20-PIN) CONNECTEUR SECONDAIRE
A1
Détecteur d’impact (3-pin)
Valet/Bouton de programmation
(2pin)
A20
E1
E6
Copyright © 2014-2017 FORTIN AUTO RADIO INC TOUS DROITS RÉSERVÉS FABRIQUÉ AU CANADA REV.:20170323
(+) Frein (pied)
Signal Noir In
750mA (-) Feux de
stationnement Rose Out
750mA (-) Valise / AUX. Jaune/Noir Out
(-) Frein à main
Signal Brun/Blanc In
(-) Capot/Porte Rose/Noir In
Cong. contournement Mauve/Jaune
Cong. contournement Vert/Blanc
Cong. contournement Vert/Rouge
Cong. contournement Blanc/Noir Out
Cong. contournement Bleu Pâle
Ground Noir In
(+) Ignition Rose Out
(+) Démarreur Jaune Out
Out Blanc
(+) Lumières de stationnement
ou (+) Ignition2 ou (+) Accessoire
ou (+) Démarreur
Sortie programmable (FONCTION
2 et 31)
Out Orange
(+) Accessoire ou (+) Ignition2
Sortie programmable (FONCTION
2 et 31)
In Rouge (+) 12V
In Jaune (+) Ignition
contournement
Out Mauve (-)Verrouille 750mA
Out Mauve/Blanc (-)Deverouille 750mA
Out Vert (-) Ignition 750mA
Out Blanc (-) Démarreur 750mA
Out Orange (-) Désarme 750mA
Out Orange/Noir (-) Klaxon/Sirène 2 Amp
Out Bleu Foncé (-) GWR / Programmable 750mA
In Rouge/Bleu Cong. contournement
BleuPâle/Noir Cong. contournement
SORTIE MAXIMUM 750mA. Ne pas dépasser le courant maximum ou des dommages permanents,
non couverts par la garantie, seront causés au module.
Noir
Blanc
Blanc
Blanc
VERSION
LOGICIELLE
DU
DÉMARREUR
À DISTANCE
1. [21]
& MORE
Le système peut apprendre jusqu’à 4
télécommandes.
Une seule télécommande peut prendre les
4 emplacements (programmée 4 fois).
La 5e télécommande programmée
supprime la première.
ÉTAPE 1 ÉTAPE 2 ÉTAPE 3 ÉTAPE 4 ÉTAPE 5 ÉTAPE 6
AVEC IGNITION
Tournez
l’ignition à OFF
Tournez la
clef
à ignition.
F
M
H
2
-
W
La DEL
s’allume
x4
Ap-
puyez et
relâchez
quatre
fois la
pédale de
frein.
F
M
H
2
-
W
Tournez
la clef à
ignition.
AVEC VALET
Appuyez et tenez
enfoncé le bouton valet
jusqu’à ce que les feux
de positionnement
s’allument et que le
klaxon/sirène reten-
tisse, puis relâchez. x5
Appuyez et relâchez
le bouton valet 5 fois.
Les feux de posi-
tionnement clignoter-
ont et le klaxon/sirène
retentira chaque fois
que le bouton est
appuyé.
x1
Appuyez
et relâ-
chez une
fois la
pédale de
frein.
La DEL
clignote
rapide-
ment.
SUR CHACUNE DES
TÉLÉCOMMANDES : Appuyez
et relâchez le bouton ensuite
appuyez et relâchez le bouton
.La DEL arrête de clignoter
pour conrmer l’apprentissage.
Tournez
l’ignition à
OFF pour
sortir du
mode de
programma-
tion.
1 32 4
EVO-ONEEVO-ONE
téléchargez le guide d’installation
spécifique au véhicule, le guide de
l’utilisateur ou le plus récent guide
d’installation rapide au
www.fortin.ca
RF441W
GUIDE # 33011
FONCTIONS MODE 1 MODE 2 MODE 3 MODE 4 MODE 5 MODE 6
1 — — — — — — —
2
Sortie (+) ign/acc/
start programmable
(FONCTION 31
MODE 4)
Blanc (+) Ignition2 Blanc (+) Accessoire2 Blanc (+) Start2 Blanc (+) Démarreur
— —
Orange (+) Accessoire Orange (+) Accessoire Orange (+) Accessoire Orange (+) Ignition2
Rose (+) Ignition Rose (+) Ignition Rose (+) Ignition Rose (+) Ignition
Jaune (+) Démarreur Jaune (+) Démarreur Jaune (+) Démarreur Jaune (+) Démar-
reur2
3Sensibilité du Tach
virtuel
Augmentation du
temps de
démarrage
(Par défaut)
Diminu-
tion temps
démar-
rage
4Temps de fonc-
tionnement du
démarreur
Gaz: 15 minutes
Diesel: 30 minutes Gaz: 7 minutes
Diesel: 14 minutes Gaz: 3 minutes
Diesel: 6 minutes — — —
5Ajouter télécom-
mande sur aAntenne
serie FMH Ajouter télécommande — — — — —
6Contrôle verrouil-
lage/déverrouillage Non Déverrouille avant et Ver-
rouille après le démarrage
à distance
Verrouille après le
démarrage à distance Sortie Lock/Unlock à
Ignition seulement.
Re-verrouille 10sec.
après le temps de
fonctionnement du
démarreur.
Désarme avant
la fermeture du
moteur.
7Ignition contrôle
verrouillage/déver-
rouillage Non
Verrouille lorsque le frein
est appuyé et déverrouille
lorsque la clé est tournée
à OF F.
Déverrouille lorsque la clé
est tournée à OFF.
Pulsation de verrouillage
de portes seulement
lorsque l’ignition — —
8Temps de la sortie
du Déverrouillage Simple 0.25 seconde Double 0.25 seconde Simple 4.0 secondes Simple 2.5 secondes Simple 1.5 seconde Simple 0.75
secondes
9Alarme
coupe démarreur
actif ou passif
Actif
Appuyez sur VER-
ROUILLER pour activer
l’alarme ou le coupe
moteur.
Passif (verrouillage
désactivé.) Après avoir
éteint le moteur, 30(MODE
4), 60(MODE5), ou
120(MODE6) sec. après la
sortie du véhicule l’alarme
et le coupe moteur s’active
automatiquement.
Passif (verrouillage
activé.) Mettre en
marche l’allumage et
attendre 30(MODE
4), 60(MODE5), ou
120(MODE6) sec. avant
de démarrer le moteur.
Armement passif
30 secondes.
(par défaut si mode 2 ou
3 activé)
Armement passif
60 secondes. (si mode
2 ou 3 activé)
Armement
passif 120 sec-
ondes. (si mode
2 ou 3 activé)
10
Antidémarreur
Requière fonction
32 mode 4.
Blue foncé (A8) =
antidémarreur.
Antidémareur & anti-
grincement Antigrincement seulement Relais normallement
ouvert — — —
11
Son de Conrmation
et antenne DEL
1e LOCK/UNLOCK:
silencieu x
2ième LOCK/UNLOCK:
conrmation sonore
----------------------------
Antenne DEL active
Verrouillage/Déverrouillage
avec conrmation sonore DEL de l’antenne non
active DEL de l’antenne OFF
avec l’ignition
Son de conrmation
au verrouillage seule-
ment
Désactivation du
mode Panique.
12 Conguration Sortie
Klaxon/Sirène Klaxon(-) seulement Sirène(+) Sortie (E1) Blanc Sirène(+) Sortie (E1)
Blanc et Klaxon(-) Sirène(-) (A7) seulement — —
13 Pulse de Conrma-
tion Long Court — — — —
14 Alarme ON/OFF
démarreur ON/OFF Alarme OFF
Démarreur ON Alarme ON
démarreur ON Alarme ON
démarreur OFF — — —
15
Verrouillage / Rever-
rouillage intelligent
réarmement intel-
ligent
Désactivé
(Signal Unlock) Verrouille
et arme automatique si
les portes ne sont pas
ouvertes après 30 sec.
Verrouillage automatique
lorsque le coup-démarreur
s’arme.
Pulse de verrouillage
seulement lorsque
déverrouillé. — —
16 Démarrage péri-
odique 3 heures à -5oc /Durée
d’exécution (Option 4) 1.5 heures à -5oc/Durée
d’exécution (Option 4) 3 heures à -5oc/5 minutes 1.5 heures à -5oc/5
minutes Démarrage périodique
Off —
17 — — — — — — —
FONCTIONS
Désarmer
le système.
(La Del de
l'antenne
ne doit pas
clignoter.
voir
ENTRER/
SORTIE
MODE
VALET
p.4).
ÉTAPE
1ÉTAPE 2ÉTAPE 3ÉTAPE 4ÉTAPE 5ÉTAPE6
ou
FMH
2-W
F
M
H
2
-
W
ou
FMH
2-W
X1
MODE 1 - VERROUILLAGE
MODE 2 - DÉVERROUILLAGE
MODE 3 - DÉMARRAGE (3 SECONDES)
MODE 4 - FONCTION (3 SECONDES)
MODE 5 - FONCTION VERROUILLAGE
MODE 6 - FONCTION DÉVERROUILLAGE
Tournez
la clef
à ignition.
Appuyez et tenez en-
foncé le bouton valet ou
le bouton sur l’antenne
jusqu’à ce que les feux
de positionnement
s’allument et que le
klaxon/sirène reten-
tisse, puis relâchez.
La DEL
clignote
rapide-
ment.
Appuyez 1 à X fois sur le com-
mutateur valet ou le bouton sur
l’antenne pour sélectionner la
fonction désirée. Les feux de
stationnement et le klaxon/sirène
conrment à chaque pression du
commutateur.
Appuyez et
relâchez une
fois la pédale
de frein.
Appuyez sur les boutons de l’une des télécommandes pro-
grammées pour sélectionner le mode (x).
Les feux de stationnement conrment le mode en clignotant
de 1 à 6 fois.
Tournez
l’ignition à
OFF pour sortir
du mode de
program-
mation. Les
lumières de
stationnement
clignotent 4
Retournez à l’étape 3 pour la prochaine option.
PROGRAMMATION DES FONCTIONS

FONCTIONS MODE 1 MODE 2 MODE 3 MODE 4 MODE 5 MODE 6
18 Mode Diesel Désactivé
Mettre en marche
l’allumage et attendre 20
secondes avant de démar-
rer le moteur.
Mettre en marche
l’allumage et attendre 10
secondes avant de démar-
rer le moteur.
Mettre en marche
l’allumage et pas
d’attente avant de démar-
rer le moteur.
— —
19 Mode turbo Désactivé Tourne 2 minutes. Tourne 4 minutes. — — —
20
Supervision du
moteur:
-Sans tachymetre-
-Tachymetre ana-
logue-
-Tachymetre en
Data-Link-
Sans Tachymètre pour le
démarrage - supervision
tachymetre ensuite en
Data-Link.
Sans Tachymètre seule-
ment.
(véhicules à transmis-
sion automatique seule-
ment)
—
Démarrage (crank) 8 sec-
ondes en Tachless.(
véhicules à transmission
automatique seulement)
Démarre (crank) 8sec.
+ supervision par
Tach en
Data-Link
Tach en Data-
Link seulement
21 Tentative de démar-
rage 2 1 3 — — —
22 — — — — — — —
23 Réinitialisation
principale
Réinitialisation de toutes
les fonctions par défaut.
(Conserve les télécom-
mandes déjà enregis-
trées.)
— — — — —
24 — — — — — — —
25 Jaune/Noir (A13)
: Sortie Aux1 -->
VERROUILLE
0.5 seconde &
désarme l’alarme 0.5 seconde Maintiens 10 sec ou
jusqu’à ce qu’un bouton
soit appuyé
Maintiens 20 sec ou
jusqu’à ce qu’un bouton
soit appuyé
Maintiens 30 sec
ou jusqu’à ce qu’un
bouton soit appuyé
Lorsqu’activée
la commande
est maintenue le
reste du temps
de démarrage
26 Mode Hybride Véhicule gaz / diesel Véhicule hybride — — — —
27 — — — — — — —
28 — — — — — — —
29 Durée de l’alarme 30 secondes 60 secondes 120 secondes — — —
30 Valet codé
pour activer le valet Ignition On
3 fois bouton Valet.
Ignition On
3 fois bouton Valet
et 1 fois 3 secondes.
Ignition On
4 fois bouton Valet
et 1 fois 3 secondes.
Ignition On
5 fois bouton Valet
et 1 fois 3 secondes.
Ignition On
6 fois bouton Valet
et 1 fois 3 sec.
Ignition On
7 fois bouton
Valet et 1 fois
3 sec.
31 Sortie (+) program-
mable
Application spéciale
Pas d’application spéciale
Priorité à la fonction 2.
Application spéciale - Fonction 2 (toutes les options)
non disponible. Blanc (+) Feux
de sta-
tionnement Blanc (+) Feux
de sta-
tionnement
Blanc:
(+) Feux de
stationnement
Orange (+) Acces-
soire Orange (+) Ignition2 Orange:
(+) Feux de
stationnement
Fil Blanc (E1) : S’active en
même temps que la masse
d’activation
désactive avec ignition
OF F.
Fil Blanc (E1) : Sortie
Valise. Rose (+) Ignition Rose (+) Ignition1 Rose
(+) Ignition
Jaune (+) Démar-
reur Jaune (+) Démar-
reur Jaune
(+) Démarreur
32 Ground Out
Bleu Foncé (Masse
d’activation): S’éteint
1 sec. après le temps
de fonctionnement du
démarreur.
Bleu Foncé (Masse
d’activation): S’éteint 3
sec. après le temps de
fonctionnement du démar-
reur.
Bleu Foncé (Masse
d’activation): Sortie Après
arrêt.
Bleu Foncé (Masse
d’activation):
Coupe-moteur
Bleu Foncé (Masse
d’activation):
Arme / Réarme
Contrôle par
l'autoappren-
tissage CAN
33 Function transmis-
sion manuelle
Séquence manuelle
complètée à la fermeture
des portes.
Automatiquement activée
par le frein à main et le
frein pied (ON).
Séquence manuelle com-
plètée par le Verrouillage
des portes.
Annule le mode prêt à
démarrer à l'ouverture de
la valise. — —
34 Sortie Valise pulse 0.5 seconde. pulse 2.5 secondes. Déverrouillage avant Valise
(0.5 seconde) Sortie Valise à Ignition
seulement. — —
35 application Spéciale
pour déverrouillage
des portes.
Pas d’application spé-
ciale. Active l’ignition du véhi-
cule au déverrouillage.
Active l’ignition et
l’accessoire du véhicule
au déverrouillage. — — —
36 Activation / Désac-
tivation du mode
Valet —
Par bouton Valet ou
par télécommande:
Function-->VERROUILLE +
DÉVERROUILLE
Par Bouton Valet
seulement — — —
37 Application speciale
de sécurité pour dé-
marreur à distance
Pas d’application spé-
ciale.
Activé : le moteur s’éteint
si une porte est ouverte
avant d’avoir appuyé sur
DÉVERROUILLE.
— — — —
38 Contrôle du système
par la télécom-
mande d’origine Désactivé Appuyez x3 sur Verrouille
pour démarrer à distance.
Entrée démarrage
sur l'entrée détecteur
d'impact
Contrôle de l’alarme par
télécommande d’origine.
Appuyez sur Verrouille,
Déverrouille et Ver-
rouille pour démarrer à
distance.
—
39 Option de
température Désactivé AUX1 s’active à 5oc quand
démarrer à distance (voir
fonction 25) — — — —
LEGENDE: FONCTION PAR DÉFAUT
FONCTIONS
RÉINITIALISATION DES FONCTIONS PAR DÉFAUT ET DÉPROGRAMMATION DES TÉLÉCOMMANDES ENREGISTRÉES
Désarmer
le système.
(La Del de
l'antenne
ne doit pas
clignoter.
voir EN-
TRER/SOR-
TIE MODE
VALET p.4).
ÉTAPE 1 ÉTAPE 2 ÉTAPE 3 ÉTAPE 4 ÉTAPE 5 ÉTAPE 6
Tournez la clé à
ignition.
OU Appuyez et tenez en-
foncé le bouton valet ou
le bouton de l’antenne
jusqu’à ce que les feux
de positionnement
s’allument et que le
klaxon retentisse, puis
relâchez.
OU Appuyez 23 fois
sur le commutateur
valet ou le bouton de
l’antenne. Les feux
de stationnement
et le klaxon/sirène
conrment.
X1 Appuyez et
relâchez
une fois la
pédale de
frein.
OU Appuyez et tenez
enfoncé le bouton
valet ou le bouton de
l’antenne pendant 5
secondes. Les feux
de stationnement
conrment.
Tournez l’ignition à OFF pour
sortir du mode de program-
mation. Les lumières de sta-
tionnement clignotent 4 fois.
FMH
2-W
FMH
2-W
FMH
2-W

TOUT-EN-UN, INTERFACE DATA
ET DÉMARREUR À DISTANCE / ALARME
GUIDE D’INSTALLATION
RAPIDE
Les véhicules
à transmission
manuelle ne sont
pas compatiblent
si la détection
des portes en
CAN n’est pas
supportés.
MODE PRÊT À DÉMARRER
DÉSACTIVATION DU MODE PRÊT À DÉMARRER
MODE TEMPS FROID
AVERTISSEMENT
DIAGNOSTIQUES DÉMARREUR /ALARME
Assurez-vous
que toutes les
Portières sont
fermées et que le
levier de vitesse
est en position
NEUTRE.
Pendant que le
Moteur est en
marche, serrez
le frein de
stationnement.
Relâchez la
pédale de
frein.
STANDARD
- Ouvrir une ou des porte(s).
- Ouvrir le capot.
Note : Si les feux de stationnement clignotent 3 fois, le véhicule ne
démarrera pas, l’activation de mode Prêt à démarrer est désactivée.
- Désengagez le frein de stationnement.
Retirez la Clé
de contact :
le Moteur se
maintiendra en
fonction.
Sortir du
véhicule. Le
démarreur
à distance
s’éteindra une
fois toutes
les portières
fermées.
DIAGNOSTIC DU DÉMARREUR À DISTANCE
Diagnostique des feux de stationnement avant démarrage :
3x Mode Prêt à démarrer désactivé
4x Mode valet actif (Le témoin est allumé)
5x Capot ouvert
Diagnostique des feux stationnement après démarrage :
1x Arrêt normal
3x Arrêt après 15min ou par la télécommande
4x Pas de tachymètre
5x Capot ouvert
6x Temps de démarrage (crank) supérieur à 8sec
DIAGNOSTIC DE L’ALARME
Diagnostic de l’alarme (feu de stationnement et sirène/klaxon) :
3x Porte – zone 3
4x Détecteur de choc – zone 4
5x Capot – zone 5
6x Valise – zone 6
7x Auxiliaire IN – zone 7
N.B. : Le x signie un clignotement des Feux de stationnement.
+
POUR ACTIVER
Appuyez et relâchez sur le bouton FONCTION, vous avez
ensuite 12 secondes pour appuyez simultanément sur
les boutons VERROUILLAGE et DÉMARRAGE seconde
jusqu’à ce que les feux de stationnement clignotent 1
fois.
POUR DÉSACTIVER
•Appuyez et relâchez sur le bouton FONCTION, vous avez ensuite 12
secondes pour appuyez simultanément sur les boutons VERROUILLAGE
et DÉMARRAGE pendant 1 seconde jusqu’à ce que les feux de
stationnement clignotent 2 fois.
•Mettre le démarreur à distance/alarme en mode Valet.
•Ouvrir le capot.
•Faites démarrer le moteur par le biais de la télécommande.
•Actionner la pédale de frein.
•Tourner la clé de contact en position d’allumage. (Les feux de
stationnement clignoteront une fois.)
•Désengagement du Mode Prêt à démarrer (Transmission manuelle
seulement).
Appuyez sur le bouton
DEMARRAGE (3 secondes).
Les Feux de positionnement
clignoteront une fois rapidement
et resteront allumés.
DÉSARMER / ENTRER / SORTIR DU MODE VALET
ÉTAPE 1 ÉTAPE 2
Pour
désarmer
le
système
F
M
H
2
-
W
Système
armé :
Le témoin
clignote
Tournez
la clé
à ignition.
OU
En 10 sec.
ou moins,
appuyez
3 fois sur
la touche
valet ou le
bouton de
l’antenne
pendant
environ
1 sec. et
relâchez-la.
F
M
H
2
-
W
Système désarmé :
Le témoin est
éteint
3x
3x
FMH
2-W
Pour
entrer
et sortir
du mode
valet
F
M
H
2
-
W
Système
désarmé :
Le témoin est
éteint
F
M
H
2
-
W
Système désarmé
et en mode valet :
Le témoin
s’allumera et
demeurera allumé.
EVO-ONEEVO-ONE
Support Technique:
TEL: 514-255-4357
1-877-336-7797
WWW.FORTIN.CA
ONE
ONE
Avis Le fabricant n’acceptera aucune responsabilité quant à des dommages de nature électrique ou mécanique causés par une installation
inadéquate du produit, qu’il s’agisse de dommages au véhicule lui-même ou au système. Ce produit doit être installé par un technicien certié
utilisant tous les dispositifs de sécurité fournis. Veuillez noter que ce guide prend pour acquis que l’installation de ce démarreur à distance a été
faite par des techniciens qualiés.
Avertissement Par défaut le système est conguré pour les véhicules à transmission manuelle. Pour les véhicules équipés d’une transmission
automatique, la boucle de sécurité de l’unité doit être coupée. Avant de procéder à l’installation, assurez-vous que le véhicule ne démarre pas
lorsque le sélecteur de vitesses est en position «drive» ou en position de marche arrière. Si un véhicule à transmission automatique démarre
lorsque la transmission est embrayée, assurez-vous que la boucle sur l’unité n’est pas coupée. Une fois la boucle de sécurité de l’unité coupée,
le système est considéré comme un démarreur à distance pour transmission automatique indéniment. Lorsque la boucle est coupée, toutes
garanties ou responsabilités seront immédiatement annulées si l’unité est installée sur un véhicule à transmission manuelle.
Ni le manufacturier, ni le distributeur ne se considèrent responsables des dommages causés ou ayant pu être causés, indirectement ou
directement, par ce module, excepté le remplacement de ce module en cas de défectuosité de fabrication. Ce module doit être installé par un
technicien qualié. Ce guide d’instruction peut faire l’objet de changement sans préavis. Pour télécharger le guide d’installation, le guide de
l’utilisateur, ou le plus récent guide d’installation rapide, visitez: WWW.FORTIN.CA
RF441W
Table of contents
Languages:
Other Fortin Remote Starter manuals

Fortin
Fortin EVO-ALL-CHR4 Assembly instructions

Fortin
Fortin EVO-ALL User manual

Fortin
Fortin EVO-ALL User manual

Fortin
Fortin EVO-ONE FTX75 User manual

Fortin
Fortin FTX84-1W User manual

Fortin
Fortin EVO ALL User manual

Fortin
Fortin FTX900 User manual

Fortin
Fortin INT-SL User manual

Fortin
Fortin EVO-ONE RFK411 User manual

Fortin
Fortin EVO-ALL User manual

Fortin
Fortin E400 RF751W User manual

Fortin
Fortin EVO-ONE User manual

Fortin
Fortin EVO ONE User manual

Fortin
Fortin E400 RF441W User manual

Fortin
Fortin EVO ALL User manual

Fortin
Fortin EVO ONE User manual

Fortin
Fortin AX-ST User manual

Fortin
Fortin ORBIT F3400 User manual

Fortin
Fortin RM442 User manual

Fortin
Fortin EVO ALL User manual


