Foscam FI8910W User manual

Model: FI8910/FI8910W
IP Wired / Wireless Camera
NIGHT VISION & REMOTE PAN / TILT ROTATE/
TWO WAY AUDIO
User Manual
Color:Black Color:Silver

CONTENTS
1 WELCOME..................................................................................................................................................... 1
1.1 Features .................................................................................................................................................. 1
1.2 Packing List ............................................................................................................................................. 2
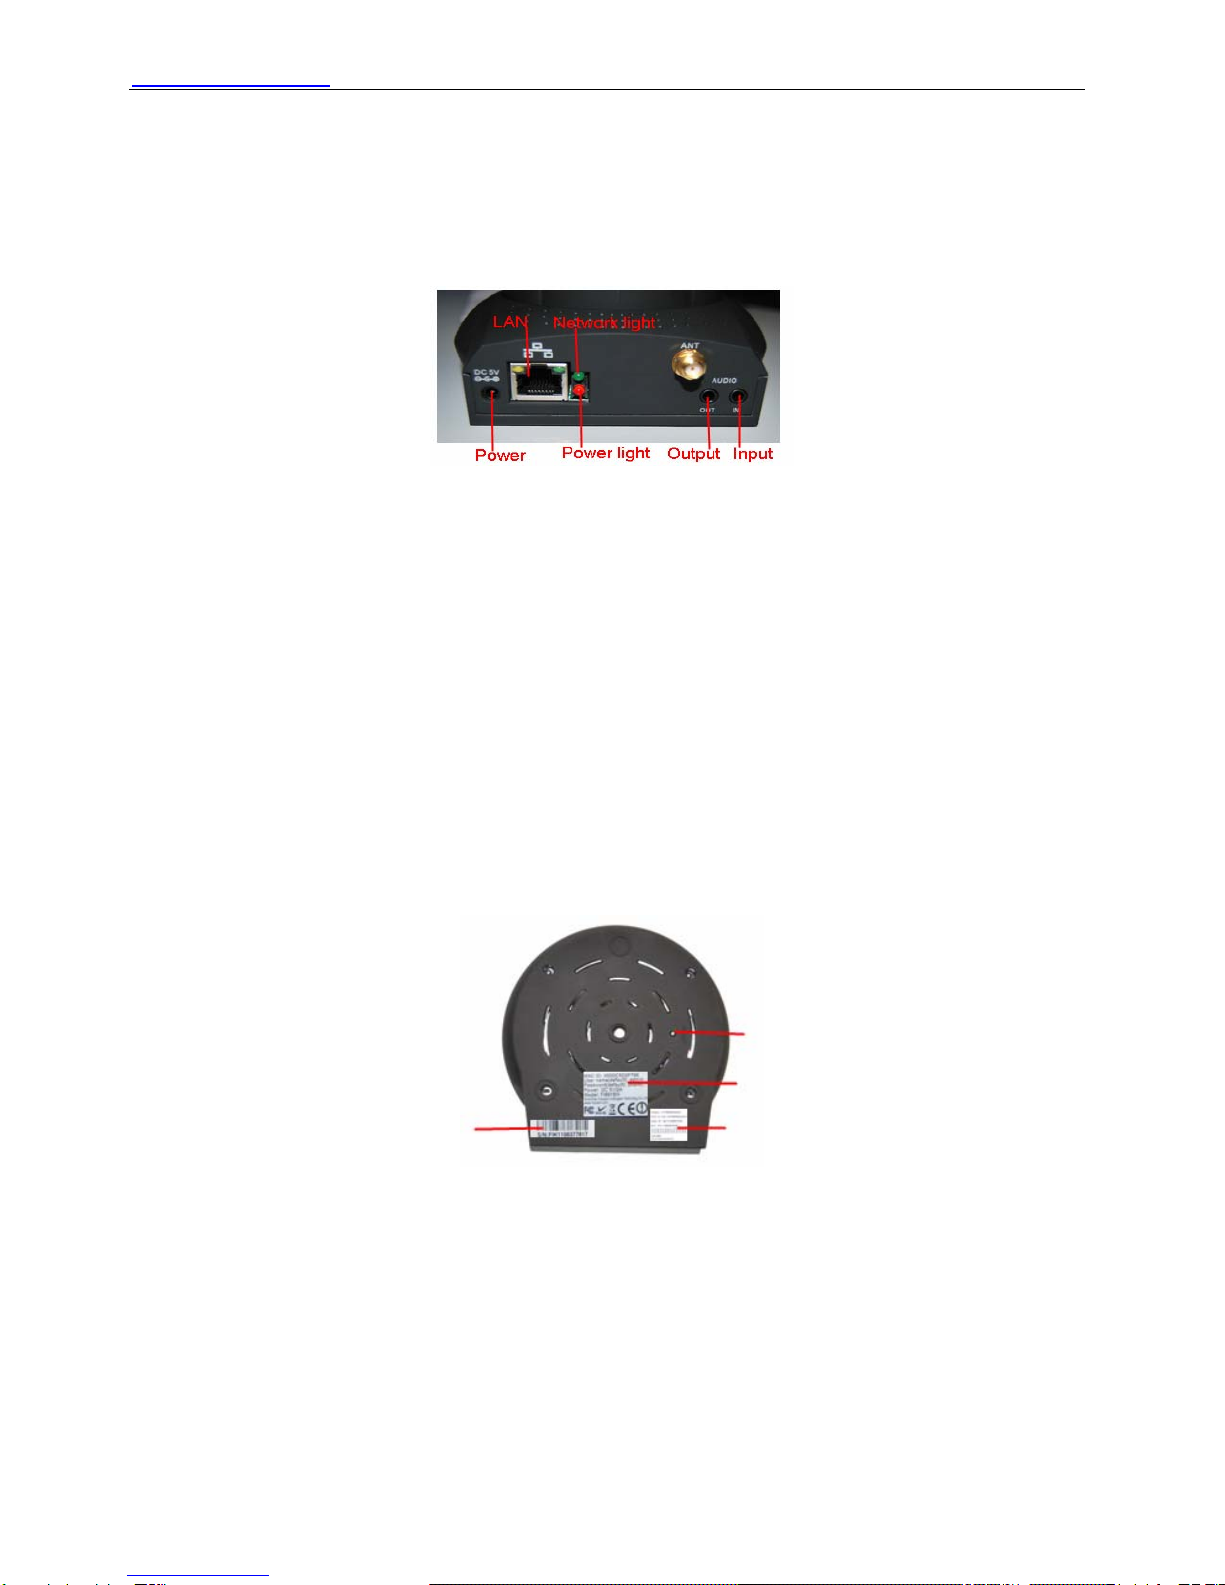
1.3 Product views .......................................................................................................................................... 2
1.4 Preparations before use .......................................................................................................................... 4
2 SOFTWARE OPERATION ............................................................................................................................. 6
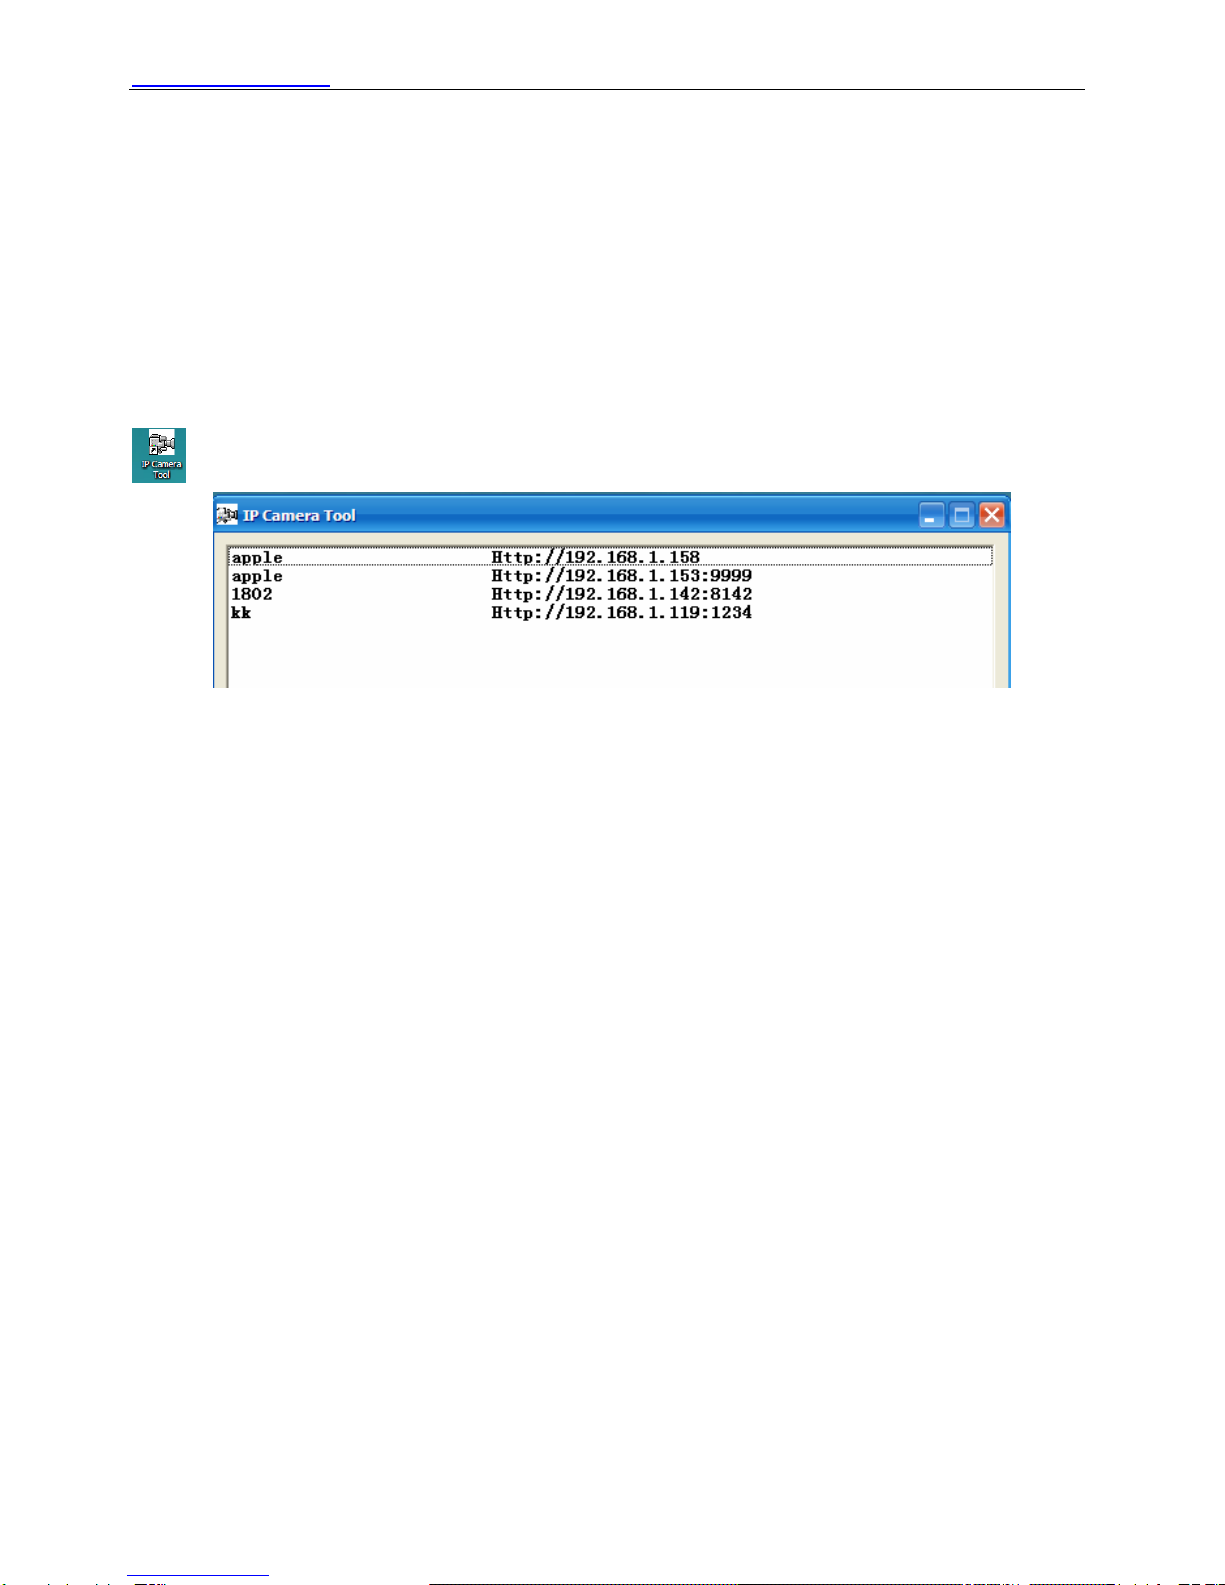
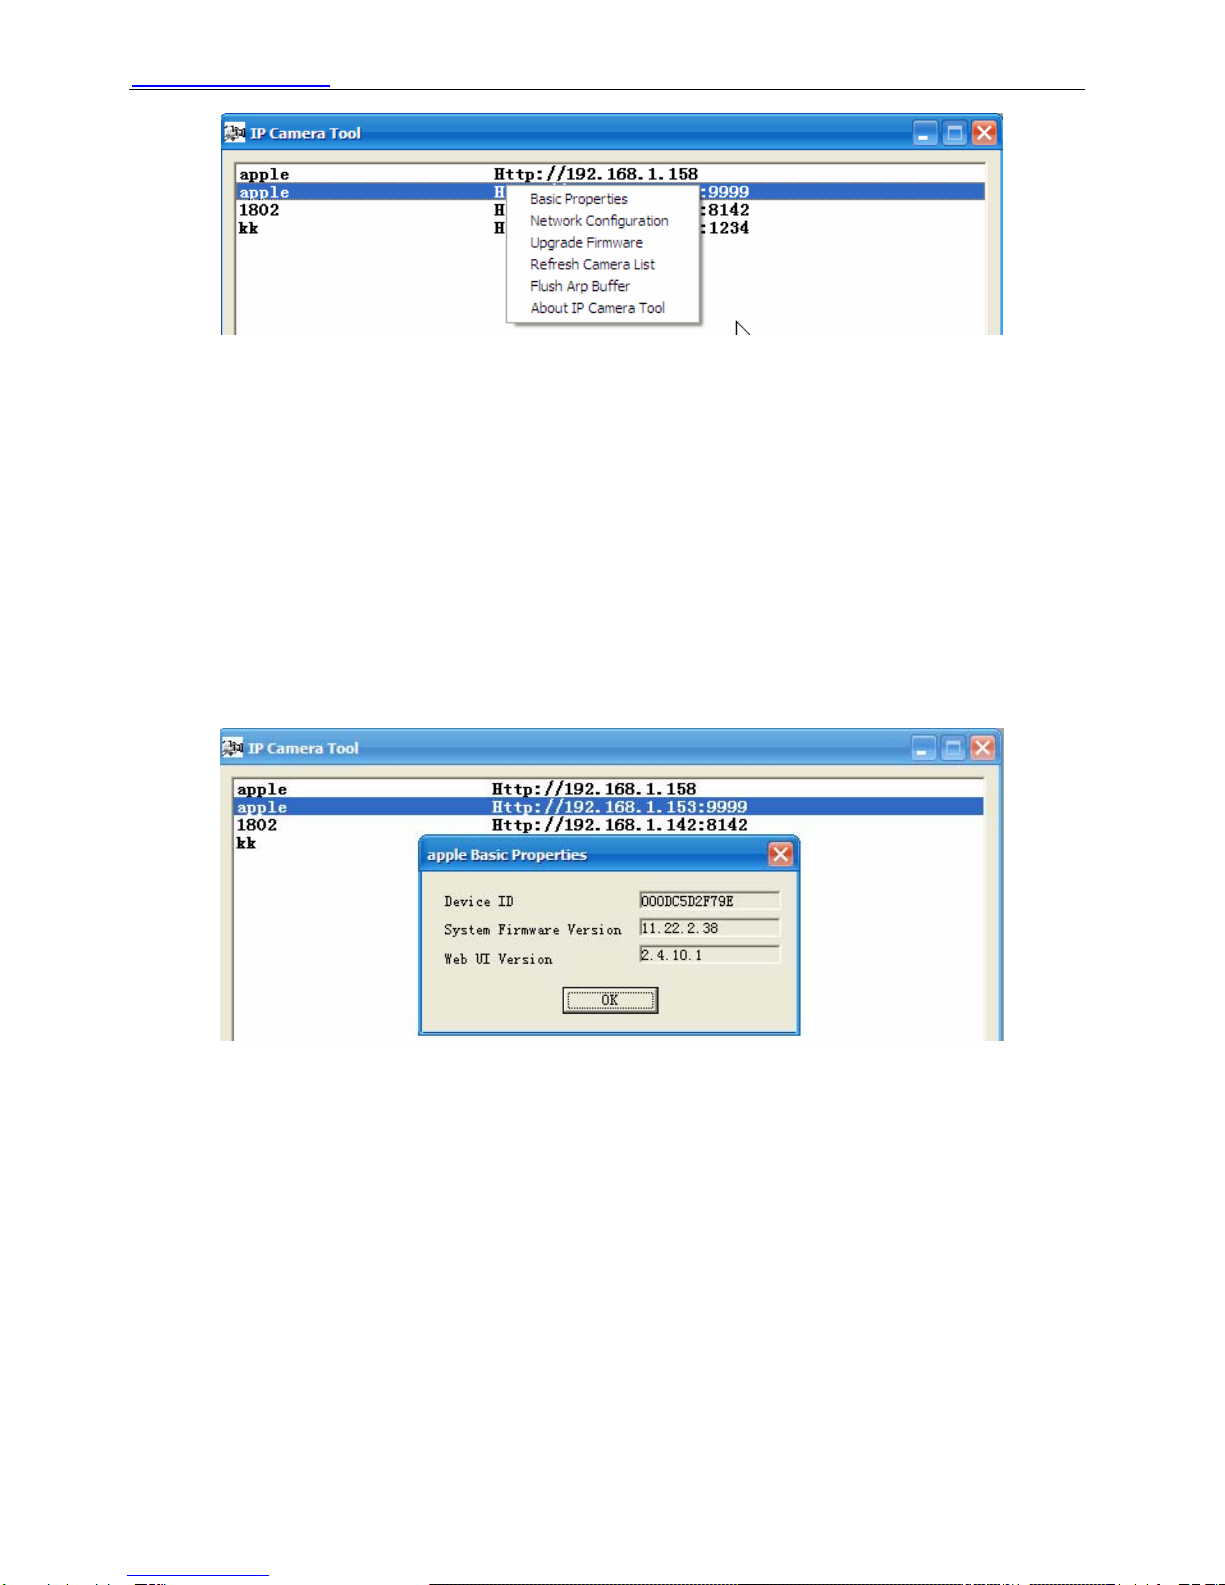
2.1 IP Camera Tool ........................................................................................................................................ 6
2.2 Camera Login .......................................................................................................................................... 9
2.3 Device Status......................................................................................................................................... 14
2.4 For Visitor .............................................................................................................................................. 15
2.5 For Operator .......................................................................................................................................... 16
2.6 For Administrator ................................................................................................................................... 19
3 How to configure settings in For Administrator ............................................................................................. 20
3.1 Alias Settings ......................................................................................................................................... 20
3.2 Date & Time Settings............................................................................................................................. 21
3.3 User Settings ......................................................................................................................................... 21
3.4 Multi-Device Settings ............................................................................................................................. 22
3.5 Basic Network Settings.......................................................................................................................... 26
3.6 Wireless LAN Settings ........................................................................................................................... 28
3.7 ADSL Settings........................................................................................................................................ 28
3.8 UPnP Settings ....................................................................................................................................... 29
3.9 DDNS Service Settings.......................................................................................................................... 29
3.10 Mail Service Settings ........................................................................................................................... 29
3.11 MSN Setting......................................................................................................................................... 30
3.12 FTP Service Settings ........................................................................................................................... 32
3.13 Alarm Service Settings......................................................................................................................... 34
3.14 PTZ Settings........................................................................................................................................ 38
3.15 Upgrade Device Firmware ................................................................................................................... 39
3.16 Backup & Restore Settings.................................................................................................................. 39
3.17 Restore Factory Settings ..................................................................................................................... 39
3.18 Reboot Device ..................................................................................................................................... 40

WWW.FOSCAM.COM FI8910/FI8910W User Manual
Shenzhen Foscam Intelligent Technology Co., Limited
Tel: 86 755 2674 5668 Fax: 86 755 2674 5168 1
3.19 Log....................................................................................................................................................... 40
3.20 Back..................................................................................................................................................... 40
4 APPENDIX ................................................................................................................................................... 41
4.1 Frequently Asked Questions.................................................................................................................. 41
4.2 Default Parameters................................................................................................................................ 44
4.3 Specifications......................................................................................................................................... 44
5 OBTAINING TECHNICAL SUPPORT.......................................................................................................... 45
1 WELCOME
IPCAM is an integrated wireless IP Camera solution. It combines a high quality digital video
Camera with network connectivity and a powerful web server on your desktop from anywhere on
your local network or over the internet.
The basic function of IPCAM is transmitting remote video on the IP network. The high quality
video image can be transmitted with 30fps speed on the LAN/WAN by using MJPEG hardware
compression technology.
The IPCAM is based on the TCP/IP standard. There is a WEB server inside which could support
Internet Explore. Therefore the management and maintenance of your device is simplified by
using the network to achieve the remote configuration, start-up and to upgrade the firmware.
You can use this IPCAM to monitor special places such as your home and your office. Also
controlling the IPCAM and managing image are simple by clicking the website through the
network.
1.1 Features
●Powerful high-speed video protocol processor
●High Definition Color CMOS Sensor
●300K Pixels
●IR night vision (Range: 8m)
●Pan 300 degree, tilt 120 degree
●Optimized MJPEG video compression for transmission
●Multi-level users’ management and passwords definition
●Embedded Web Server for users to visit by IE
●Wi-Fi compliant with wireless standards IEEE 802.11b/g
●Supports IR_CUT

WWW.FOSCAM.COM FI8910/FI8910W User Manual
●Supports Dynamic IP (DDNS) and UPnP LAN and Internet (ADSL, Cable Modem)
●Motion detection activates alarm
●Supports image snapshot
●Supports multiple network protocols: HTTP/TCP/IP/UDP/STMP/DDNS/SNTP/DHCP/FTP
●Supports WEP/WPA/WPA2 encryption
●Supports Daylight Saving Time
●Supports MSN
●Supports Gmail as sender on mail service settings
●Supports audio on Firefox, Google Chrome and Safari
1.2 Packing List
Untie the package and verify the items with the following list:
●IPCAM×1
●Wi-Fi Antenna×1 (only available for wireless model)
●DC Power Supply×1
●Quick Installation Guide×2(For MAC OS×1,For Windows OS×1,Foscam Video Installation)
●CD×1(Includes IPCAM user manual、IP camera tool)
●Network Cable×1
●Mounting bracket×1(option)
●Warranty Card×1
NOTE: Please Contact us immediately in case of any damaged or missing parts.
1.3 Product views
1.3.1 Front View
Figure 1.1
Infrared LED: 11 IR LEDs
LENS: CMOS sensor with fixed focus lens
WIFI Antenna: Wireless Antenna
Shenzhen Foscam Intelligent Technology Co., Limited
Tel: 86 755 2674 5668 Fax: 86 755 2674 5168 2

WWW.FOSCAM.COM FI8910/FI8910W User Manual
Microphone: Built-in microphone
Speaker: Built-in speaker
1.3.2 Back View
Figure 1.2
LAN: RJ-45/10-100 Base T
Power: DC 5V/2A Power supply
Network Light: The LED will blink when power and network cable are plugged in
Power Light: If the power adapter works well, the light will turn on
Audio Input: This jack is used to plug an external microphone
Audio Output: This jack is used to plug an external speaker
1.3.3 Bottom View
There are three stickers at the bottom of the camera; it is an important feature of original Foscam
cameras. If your camera does not have any of these three stickers, it may be a clone one.
Cloned Foscam cameras cannot use original firmware and not eligible obtain warranty or
technical services.
Reset button
MAC address of wired connection
S/N of FOSCAM MAC address of wireless connection
Figure 1.3
Reset button: Press and hold down the RESET BUTTON for 15 seconds. Releasing the reset
button, username and password will back to the factory default administrator username and
password. You must power on the camera before reset.
Shenzhen Foscam Intelligent Technology Co., Limited
Tel: 86 755 2674 5668 Fax: 86 755 2674 5168 3

WWW.FOSCAM.COM FI8910/FI8910W User Manual
1.4 Preparations before use
1.4.1 Software installation
(1) Put the CD in the CD drive of your computer. Open the CD; find the software per instructions;
(2) Double click IPCamSetup.exe and install the software per instruction.
Figure 1.4
(3) Click Next to complete the software installation.
Figure 1.5
Shenzhen Foscam Intelligent Technology Co., Limited
Tel: 86 755 2674 5668 Fax: 86 755 2674 5168 4

WWW.FOSCAM.COM FI8910/FI8910W User Manual
Figure 1.6
The computer restarts upon installation completion and an icon appears on the desktop
automatically.
NOTE: If you use Windows7 and could not find the icon on desktop after installing the IP camera
tool, please check if the path of the camera software is correct.
For example, if it was pointing to C:\Windows\System32\IPCamera.exe.
Then fix this by pointing the shortcut to the correct path C:\Windows\SysWOW64\IPCamera.exe.
The shortcut should work without any problems.
CAUTION: Before installing and using the product, please read the following precautions
carefully and make sure they are fully understood.
Use only the power adapter attached with the product. Using unauthorized power adapters may
cause damage to your IP Camera. IP Camera terminal shall be installed in an indoor
environment where the rain or snow could not pour it.
1.4.2 Hardware preparation
Follow the steps below to set up your camera hardware connections. Make sure to follow each
step carefully to ensure that the camera operates properly.
(1) Adjust the antenna at the back of the camera.
(2) Plug the network cable into the camera and then into your Cable/DSL router.
(3) Plug the power adapter into the camera and then into the power outlet.
CAUTION: Make sure to only use the power adapter supplied with IPCAM. Using a
non-approved power adapter may damage the camera.
(4) The camera takes approximately 30 seconds to start up before it displays an IP address on
the IP Camera Tool (details: 2.1)
(5) When the camera is powered and network cable plugged correctly, the small green light
Shenzhen Foscam Intelligent Technology Co., Limited
Tel: 86 755 2674 5668 Fax: 86 755 2674 5168 5

WWW.FOSCAM.COM FI8910/FI8910W User Manual
(network jack) will turn on and the small yellow light will flash. The network light will blink.
(about 1~2 times per second) and the power light will also turn on.
2 SOFTWARE OPERATION
2.1 IP Camera Tool
When the Device has been mounted properly, you can double click the icon “IP Camera Tool”
and a dialog box as Figure 2.1 will pop up.
Figure 2.1
The software searches for the IPcam automatically over the LAN.
There are 3 cases:
(1) If no Camera found in LAN. After about 1 minute of searching, the Result Field will show
“not found IP Server” and the program shuts off automatically.
(2) If IP Cameras have been found within LAN. All the IP Cameras will be listed and the total
number is displayed in the result field as shown in Figure 2.1.
(3) The IP Cameras installed within LAN do not share the same subnet with the monitoring PC.
A prompt is displayed with a “Subnet doesn’t match, dbclick to change!” message. Click the
left mouse button to choose the prompt and click the right mouse, choose Network
Configuration to set the IP address of the Camera to the same subnet as the LAN. (Figure 2.5)
You can choose obtain IP from DHCP server or set a static IP for the camera. (Figure 2.4)
NOTE: If you could not find the camera’s IP on the IP camera tool.
Please check if DHCP is enabled on your router, or disable MAC address filter.
Make sure that the firewall doesn’t block the camera.
Six Options
Choose the IP Camera list and right click; there are six options, Basic Properties, Network
Configuration, Upgrade Firmware, Refresh Camera List, Flush Arp Buffer and About IP Camera
Tool as shown Figure 2.2.
Shenzhen Foscam Intelligent Technology Co., Limited
Tel: 86 755 2674 5668 Fax: 86 755 2674 5168 6

WWW.FOSCAM.COM FI8910/FI8910W User Manual
Figure 2.2
zBasic Properties
There are some devices information in the Basic Properties, such as Device ID, System
Firmware Version, and Web UI Version. (Figure 2.3)
If there are several cameras on the list, you can choose basic properties to check the device ID
and recognize the IP address belong to which camera you set up, For example Device ID is
000DC5D203BB, the same MAC ID sticker is found at the bottom/back of the camera.
Each camera has its own MAC ID. Sometimes, if camera’s IP is not found on the IP Camera Tool.
The firewall may be blocking it, therefore you can add this MAC ID to your router and give it a
fixed IP or add the MAC ID as a trusted site. There are two MAC addresses, one is Wired MAC
and the other is WIFI MAC.
Figure 2.3
zNetwork Configuration
This page will allow you to configure the Network parameters.
Shenzhen Foscam Intelligent Technology Co., Limited
Tel: 86 755 2674 5668 Fax: 86 755 2674 5168 7

WWW.FOSCAM.COM FI8910/FI8910W User Manual
Figure 2.4
Obtain IP from DHCP server: If checked, the device will obtain IP from DHCP server. In other
words, the camera will have a dynamic IP. (Make sure the Router which the camera connects
has DHCP function and DHCP is enabled).
Figure 2.5
IP Address: Fill in the IP address assigned and make sure it is in the same subnet as your
computer or router. (I.e. the first three sections are the same)
Subnet Mask: The default subnet mask of the equipment in our LAN is: 255.255.255.0.You can
find the subnet mask in the basic information of your router or the locally-attached of your PC.
Gateway: Make sure it is in the same subnet with PC’s IP address. The gateway is your router’s
LAN IP.
DNS Server: IP address of your ISP network provider. You can find the DNS server in your
router or check the locally-attached address of your computer. Your PC contains your PC’s IP
address, gateway and DNS server. Normally, there are two DNS servers. Here you can also set
the DNS server the same with gateway.
Http Port: The default Lan port is 80.You can set another port number, such as port 8005, 85,
8100.etc.
User: Default administrator user name is admin.
Password: Default password is blank, no password.
Shenzhen Foscam Intelligent Technology Co., Limited
Tel: 86 755 2674 5668 Fax: 86 755 2674 5168 8

WWW.FOSCAM.COM FI8910/FI8910W User Manual
NOTE: If the prompt “Subnet doesn’t match, dbclick to change!” appears, please enable DHCP
and choose obtain IP from DHCP server or set camera’s IP address and gateway once again.
zUpgrade Firmware
Enter the correct User and Password to upgrade system Firmware and Web UI. If you upgrade
the camera, you must upgrade system firmware first and then upgrade web UI. Or it may
damage the camera.
Please download the firmware package under the correct type of your camera before upgrade.
Follow the upgrade documentation in the package carefully to upgrade. Read the readme.txt file
first before you upgrade.
CAUTION: Please don’t upgrade the firmware freely. Sometimes, your camera may be damaged
if configured wrong during the upgrade. If your camera works well with the current firmware, we
recommend not upgrading.
NOTE: If you download the firmware. Please check if bytes of the two .bin file are exactly the
same with the size in readme. If it fits, you can upgrade it. If not, please download the firmware
again until the bytes are exactly the same with the official size. Otherwise, your camera will crash
by the firmware which you selected.
Figure 2.6
zRefresh Camera List
Refresh camera list manually.
zFlush Arp Buffer
When wired and wireless of the camera both are fixed IP address. You may encounter an issue
with not being able to open the camera webpage. You may try to use flush Arp buffer.
zAbout IP Camera Tool
Display the version of the IP Camera Tool.
2.2 Camera Login
You can access the camera through the IP Camera Tool or IE, Firefox, Google Chrome,
Safari or other stand browser directly.
(1) Double click the IP address of the IP Camera listed (Figure 2.1).The browser you use will be
Shenzhen Foscam Intelligent Technology Co., Limited
Tel: 86 755 2674 5668 Fax: 86 755 2674 5168 9

WWW.FOSCAM.COM FI8910/FI8910W User Manual
opened automatically and display the camera login page. (Figure 2.8)
(2) You can also access the camera by IE browser directly by typing in the camera’s IP address.
For example:
Figure 2.7
The interface supports ten languages
Figure 2.8
The default user is admin, no password.
There are two modes to login. If you use IE browser, please choose activeX mode to login. If you
use Firefox or Google Chrome, please choose Server Push Mode to login. (Figure 2.9)
Shenzhen Foscam Intelligent Technology Co., Limited
Tel: 86 755 2674 5668 Fax: 86 755 2674 5168 10

WWW.FOSCAM.COM FI8910/FI8910W User Manual
Default user is admin
No password
If you use IE browser, choose
here to login
If you use Firefox, Google Chrome,
Safari, choose here to login
Figure 2.9
For IE browser
Fill in the user name and choose the first login button.
Figure 2.10
The first time you login the UI. You will receive an activeX prompt as in the picture above. (Figure
2.10) Right click on the active prompt and choose Run Add-on(Figure 2.11).
Shenzhen Foscam Intelligent Technology Co., Limited
Tel: 86 755 2674 5668 Fax: 86 755 2674 5168 11

WWW.FOSCAM.COM FI8910/FI8910W User Manual
Figure 2.11
Select Run on the next prompt (Figure 2.12) which will return to the login screen.
Figure 2.12
Fill in the user name and select login again. You will see a live video. (Figure 2.13)
Shenzhen Foscam Intelligent Technology Co., Limited
Tel: 86 755 2674 5668 Fax: 86 755 2674 5168 12

WWW.FOSCAM.COM FI8910/FI8910W User Manual
Figure 2.13
NOTE: If you could not view living video after running the activeX. Only a red cross in the
center of the video or just a black screen. Please change another port number to try. Don’t use
port 80.Use port 85, 8005 or 8100 to try.
Make sure all firewall or antivirus software on your computer does not block the active download
and installation. If you are unable to run the activeX control, try shutting down the firewall or
antivirus program.
For Firefox, Google Chrome, Safari or other standard browser
Fill in the user name and choose the second login button.
It may ask you for user name and password again before you login the UI.
After you enter the user name, you will see Device Status of the camera.
Figure 2.14
Click Live Video, you will see the camera’s live video.
Shenzhen Foscam Intelligent Technology Co., Limited
Tel: 86 755 2674 5668 Fax: 86 755 2674 5168 13

WWW.FOSCAM.COM FI8910/FI8910W User Manual
Figure 2.15
2.3 Device Status
For IE browser
If the camera is connected properly the light of the device status will show green.
If the light show yellow check if the activeX is enabled or change another port number and try
again.
Figure 2.16
If you want to view the device information, choose For Administrator and then click Device info
(Figure 2.17)
.
Shenzhen Foscam Intelligent Technology Co., Limited
Tel: 86 755 2674 5668 Fax: 86 755 2674 5168 14

WWW.FOSCAM.COM FI8910/FI8910W User Manual
Figure 2.17
For Firefox, Google Chrome and Safari
When you login the UI, you will see Device Status which is the same as Device Info in IE
browser. (Figure 2.14)
2.4 For Visitor
For IE browser
Figure 2.18
Multi-device window: The firmware inside the camera supports up to maximum of 9 cameras
Shenzhen Foscam Intelligent Technology Co., Limited
Tel: 86 755 2674 5668 Fax: 86 755 2674 5168 15

WWW.FOSCAM.COM FI8910/FI8910W User Manual
monitoring at the same time. You can add cameras in multi-device settings.
OSD: OSD is used to add timestamp on the video. There are five character colors to choose
from..
Add timestamp on record: Select this option if you want to add a timestamp on record
Alarm sound off: Select this option, you cannot hear alarm sound when motion has been
detected.
Audio buffer: Audio buffer with units set as number of seconds
: When you enable motion alarm, the camera will record automatically and store the
recording file to the folder you set. This icon is used to control the folder pop-up automatically or
not.
: Click the headphone icon and you will hear sound captured by the camera’s built-in
microphone. You may need to plug in earphones or enable the computer speakers to hear from
the camera’s microphone.
: Click the speaker icon and then talk through your computer’s microphone which will transmit
through the camera’s speaker.People will hear your talking through the camera’s built-in
speaker.
Record: Click the record icon. The camera will begin recording and store the .avi file to the folder
you set. (Figure 3.3) Click the record icon again to stop the recording.
For Firefox, Google Chrome and Safari
You will see the picture like Figure 2.14 when you login the camera as a visitor.
2.5 For Operator
For IE browser
Click For Operator, the following screen will appear (Figure 2.19)
Shenzhen Foscam Intelligent Technology Co., Limited
Tel: 86 755 2674 5668 Fax: 86 755 2674 5168 16

WWW.FOSCAM.COM FI8910/FI8910W User Manual
If you click here, the camera will horizontally & vertically rotate and
then sto
p
at the center
Turn off IR light
Turn on IR light
Pre-determined location
Figure 2.19
: Click this icon; camera will rotate up and down. Click to stop.
: Click this icon; camera will rotate left and right. Click to stop.
: Click this icon, all the IR lights will turn on. Click to turn off them.
Flip & Mirror: You can choose flip or mirror if you set up the camera to show a reverse image.
Mode: There are three modes. (50HZ, 60HZ and outdoor)
Brightness and Contrast are also used to adjust the quality of the video.
Preset: You can set a pre-defined location with this function. Once you have determined the
viewing location, click the button “set”. This location can be retrieved by selecting the number
assigned and clicking the “go” button.
For Firefox, Google Chrome and Safari
Click Live Video. There are several differences between IE and Firefox.
In Firefox, the snapshot button is under For Operator. Other functions under Live Video include:
refresh video, refresh parameters, audio and close audio. (Figure 2.20a)
Shenzhen Foscam Intelligent Technology Co., Limited
Tel: 86 755 2674 5668 Fax: 86 755 2674 5168 17

WWW.FOSCAM.COM FI8910/FI8910W User Manual
Figure 2.20a
audio: Connect speakers or earphone or other audio output device with PC. Click “audio” and
you will hear sound from the IPCAM built-in microphone.
Closeaudio: Click Close audio to turn off audio.
NOTE: You must have installed VLC before using this function. If you have not,download and
install the plugin from http://www.videolan.org (Figure 2.20b) and install it.
Figure 2.20b
During the installation, you must select Mozilla plugin as in Figure 2.20c.
Shenzhen Foscam Intelligent Technology Co., Limited
Tel: 86 755 2674 5668 Fax: 86 755 2674 5168 18
Other manuals for FI8910W
15
This manual suits for next models
1
Table of contents
Other Foscam Security Camera manuals

Foscam
Foscam FI9831P V2 User manual

Foscam
Foscam SD4 User manual

Foscam
Foscam FI9803P V2 User manual

Foscam
Foscam FN7104W-B4 User manual

Foscam
Foscam FI9902P User manual

Foscam
Foscam FI9900P User manual

Foscam
Foscam B4 User manual

Foscam
Foscam R2 User manual

Foscam
Foscam FI9902P User manual

Foscam
Foscam FI9816P User manual

Foscam
Foscam FI8919W User manual

Foscam
Foscam SD2 User manual

Foscam
Foscam G4EP User manual

Foscam
Foscam R3 User manual

Foscam
Foscam G2EP QJ2 FI9912EP User manual

Foscam
Foscam FI9961EP User manual

Foscam
Foscam FI8608 User manual

Foscam
Foscam FI9928P User manual

Foscam
Foscam V8EP User manual

Foscam
Foscam FI8918W User manual