Foscam FI9926P User manual
U
Us
se
er
r
M
Ma
an
nu
ua
al
l
Indoor FHD Pan/Tilt IP Camera
Model: FI9926P
V1.0

Table of Contents
Security Warning ......................................................................................................................................1
1 Overview ...............................................................................................................................................1
1.1 Key Features...............................................................................................................................1
1.2 Read Before Use.........................................................................................................................2
1.3 Package Contents .......................................................................................................................2
1.4 Physical Description ....................................................................................................................3
1.5 Hardware Installation...................................................................................................................4
2 Access the IP Camera ...........................................................................................................................5
2.1 Hardware Connection & Software Installation .............................................................................5
2.2 Access the Camera in LAN .........................................................................................................5
2.3 Access the Camera in WAN ........................................................................................................6
2.4 Using the VLC player ..................................................................................................................9
2.5 IP camera connection to the server...........................................................................................12
3 Surveillance Software GUI ..................................................................................................................13
3.1 login Window.............................................................................................................................13
3.2 Setup Wizard.............................................................................................................................14
3.3 Surveillance Window .................................................................................................................16
4 Advanced Camera Settings .................................................................................................................24
4.1 Setup Wizard.............................................................................................................................24
4.2 Status ........................................................................................................................................24
4.3 Basic Settings............................................................................................................................26
4.4 Network .....................................................................................................................................35
4.5 Video .........................................................................................................................................48
4.6 Detector.....................................................................................................................................51
4.7 Record.......................................................................................................................................55
4.8 PTZ ...........................................................................................................................................59
4.9 Firewall......................................................................................................................................63
4.10 System ....................................................................................................................................64
5 Playback..............................................................................................................................................68
6 Appendix..............................................................................................................................................70
6.1 Frequently Asked Questions .....................................................................................................70
6.2 Default Parameters ...................................................................................................................78
6.3 CE & FCC .................................................................................................................................78
6.4 Warranty....................................................................................................................................79
6.5 Statement ..................................................................................................................................81
7 Obtaining Technical Support................................................................................................................83

1
Security Warning
1. Please change the password of your camera regularly, using a combination of numbers, letters and
special characters.
2. We recommend that you regularly update your camera to the latest available software and firmware
versions to help ensure the best experience for your camera.
1 Overview
FOSCAM Indoor FHD IP camera is an integrated wireless IP Camera with a color CMOS sensor which
enable to view in High Definition resolution. It combines a high quality digital video camera, with a
powerful web server, to bring clear video to your desktop and mobile devices no matter where by your
local network or over the Internet.
These cameras support P2P function. Thanks to the P2P easy access technology, you don’t need to do
complicated Port Forwarding and DDNS settings, you just need to scan the QR code on the bottom of
the camera to connect it to smart phone, or input the UID on CMS software to realize remote access.
With flexible move of 340-degree horizontally and 120-degree vertically, FOSCAM IP Camera provides
users with more comprehensive controls over a monitored site. The camera supports H.264 video
compression technology, dramatically reduces file size and saves network bandwidth.
The camera is based on the TCP/IP standard. A built-in WEB server inside which could support Internet
Explorer simplifies the management and maintenance of your device is simplified by accessing the
website of your camera through network.
The camera is designed for indoor surveillance with wide applications such as at home, in retail store
and in office. Controlling the camera and managing images are simplified by using the provided web
interface across the network in either wired or wireless way.
FOSCAM provides Smart Phone App for Android and iPhone users, please search and install Foscam
App named Foscam on App Store and Google Play for iOS and Android devices, then you can view your
camera anywhere, anytime on your smart mobile devices.
1.1 Key Features
Standard H.264 video compression algorithm to satisfy the transmission of high definition video in
narrow bandwidth network
P2P feature for easy access
Megapixel HD video
Pan 340 degree, tilt 120 degree

2
Support IE/Firefox/Google/Safari browser
Support WEP,WPA-PSK and WPA2-PSK Encryption
Wireless connection is compliant with IEEE 802.11b/g/n WI-FI, up to 150Mbps
IR Range up to 8m(26ft)
Support image snapshot
Support dual-stream
Support SD Card storage up to 32GB
Support IR-Cut auto switch
Embedded free FOSCAM DDNS(dynamic domain name service) Service
Supporting the Third Party Domain Name Service
Support two-way audio
Support ONVIF protocols
Multi-level users management with password protection
Motion detection alert via email or upload image to FTP
Provide free Android and iPhone APP for viewing live video provide free Central Management
Software to manage and monitor multiple cameras
Support record schedule
1.2 Read Before Use
Please first verify that all contents received are complete according to the Package Contents listed below.
Before the IP Camera is installed, please carefully read and follow the instructions in the Quick Setup
Guide to avoid damage due to faulty assembly and installation. It also ensures the product is used
properly as intended.
1.3 Package Contents
●IP Camera × 1 ●DC Power Adapter × 1
●WI-FI Antenna × 1 ●Mounting bracket × 1
●Quick Setup Guide × 1 /
3
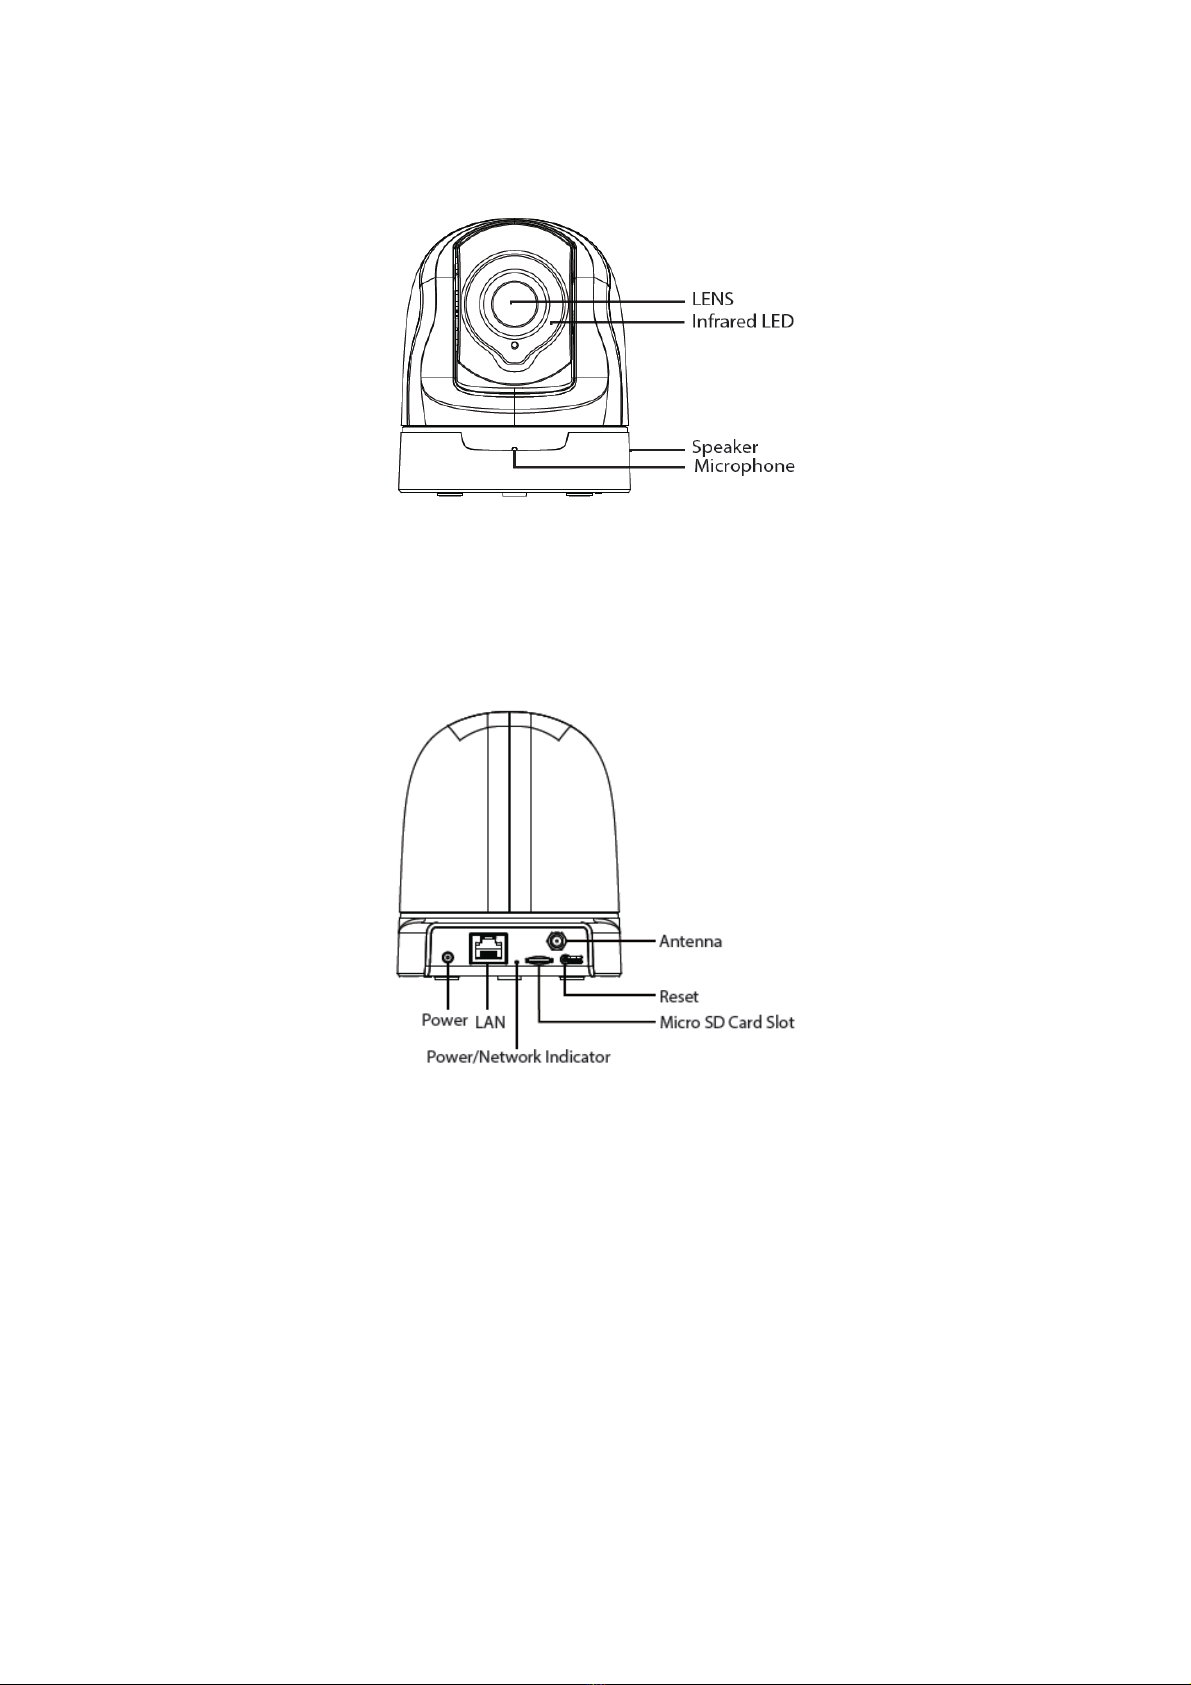
1.4 Physical Description
1.Speaker: Built-in speaker
2.LENS: Fixed focus lens
3.Infrared LED: Infrared LEDs for night vision
4.Microphone: Built-in microphone
LAN: 10/100 Mbps RJ-45 port for wired connection
Power: DC 5V/2A Power supply
SD card Slot: Supports up to 32GB SD card for storing the video
Antenna: Used to connect external wireless antenna
Reset Button: Push and hold for more than 5 seconds to set the camera to factory default.
Bottom View
There are some labels located of the camera; this is an important feature of original Foscam cameras. If
your camera does not have labels, it may be a clone. Cloned Foscam cameras can not use original
firmware and are not eligible for warranty or technical services.

4
Mounting Port: Port for mounting bracket
The flashing status of the Power light and Network light are shown in the following table.
Light Flashing Status Description
Power light off The power don't work properly.
on The power supply works fine.
Network light off No Wireless connection
Slow Flash once per second Wireless connection
Flashing every 0.4 seconds WPS is connecting
Flashing every 0.2 seconds EZLink takes effect
Constant for 3 seconds one time Reset to take effect
1.5 Hardware Installation
Step 1: Screw the mount on the wall with the two screws provided.
Step2: Loosen the thumb screws to adjust the mount to the desired position. Once the position is set,
tighten the screws securely.
5
2 Access the IP Camera
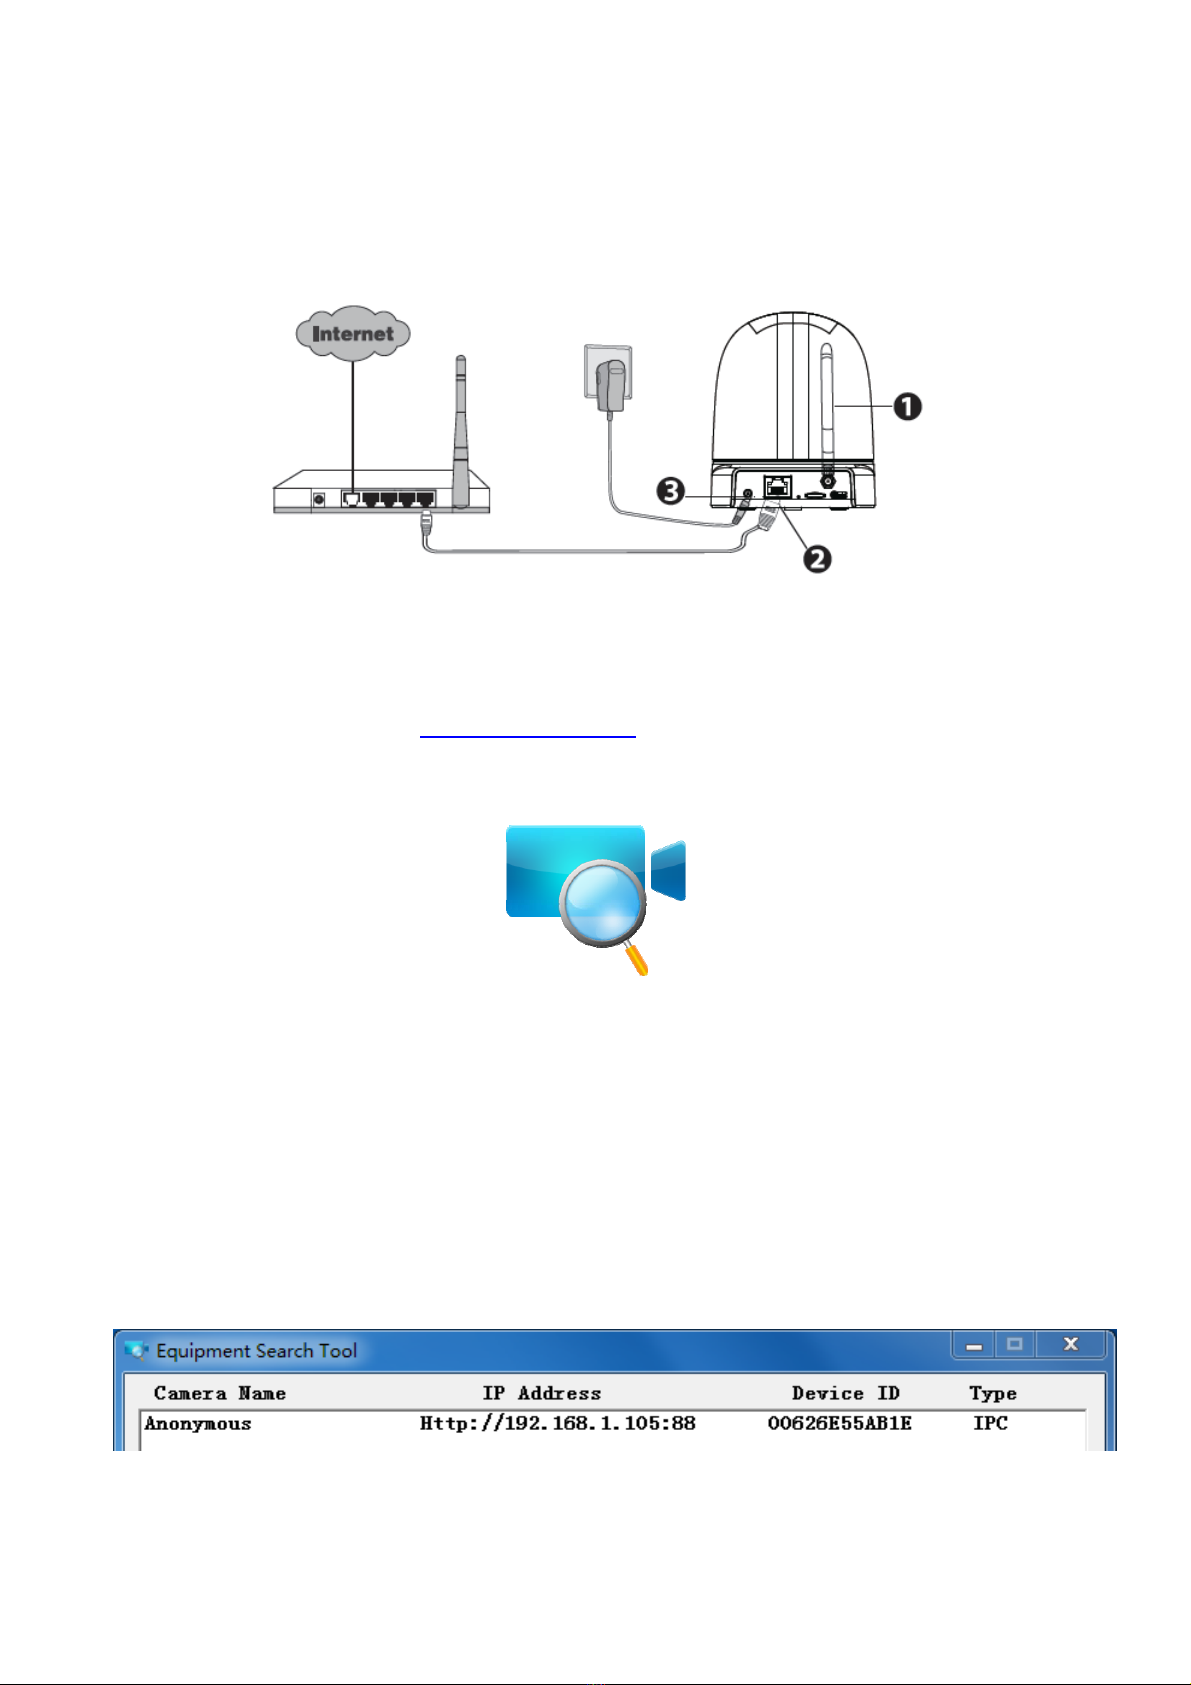
2.1 Hardware Connection & Software Installation
1. Mount the antenna and make it stand vertically.
2. Connect the camera to the LAN network (Router or Switch) via network cable.
3. Connect the power adapter to the camera.
4. Visit Foscam official website http://www.foscam.com , select “Support > Download Center >
Software Tools”, then you can find the “Equipment Search Tool”, download the tool to your computer, the
icon shows as below:
2.2 Access the Camera in LAN
The camera supports HTTP and HTTPS protocols, you can access the camera in two ways.
(1) http:// LAN IP + HTTP Port NO.
The default HTTP port NO. is 88. Double click the Equipment Search Tool icon to run, and it should find
the camera’s IP address automatically after you plug in the network cable.
Double click the IP address of the camera; the camera login page should be open in your default
browser.

6
(2) https:// LAN IP + HTTPS Port NO.
The default HTTPS port NO. is 443. You can use the URL to access the camera: https:// LAN IP +
HTTPS port NO.
Go to Settings - Network - Port panel, you can see and change the HTTP and HTTPS port NO.
NOTE:
When logging in for the first time, you will need to download and install the add-on.
2.3 Access the Camera in WAN
2.3.1 Static IP Addresses
Users with static IP addresses do not need to set DDNS service settings for remote access. After you
have finished connecting the camera using the LAN IP address and port forwarding, you can access the
camera directly from Internet using the WAN IP address and port number.
How to Obtain the WAN IP address from a public website ?
To obtain your WAN IP address, enter the following URL in your browser: http://www.whatismyip.com.
Your current WAN IP will be shown on the webpage.
7
2.3.2 Remote Access
If you want to access your camera by web browser outside of your LAN, you need to configure following
configurations.
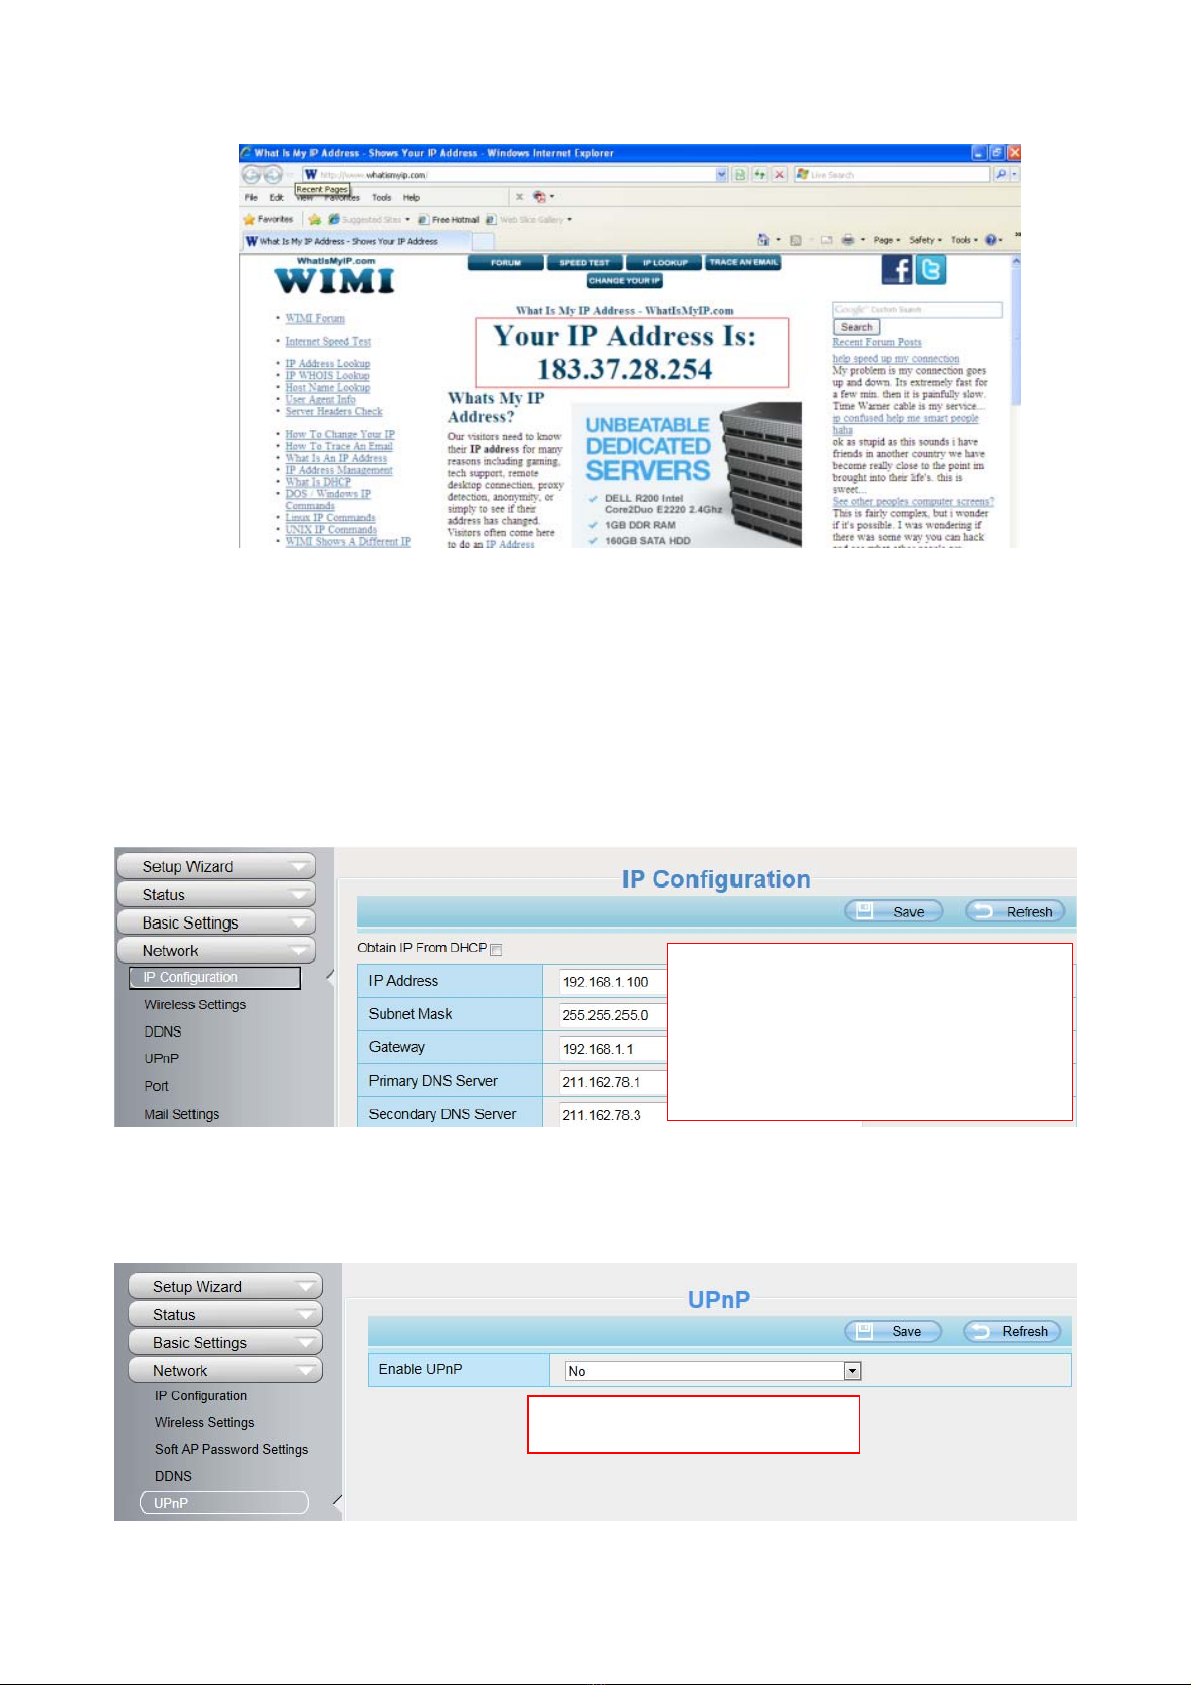
1. Choose “Settings” on the top of the camera web page, then go to the “Network > IP Configuration”
section on the left side of the screen, then uncheck the Obtain IP DHCP.
2. Enable UPnP and DDNS in the camera’s settings page. We recommend you to use the DDNS by
factory default.
IP Address: Set this in the same subnet
as your computer , or keep it as default.
Subnet Mask: Keep it as default.
Gateway and DNS Server: Set it to the
IP address of your router.
Select Yes and click Save.

8
3. You can see the port of your camera here. If you want to set Remote Access for several cameras on
the same network, you will need to change the HTTPS port for each camera.
4. If the UPnP of the router has been enable, you do not need to perform following steps. Otherwise,
you need to select one of the following methods to configure port forwarding on your router. For these
steps, we will be using the TP-LINK brand wireless router as an example.
If there is a UPnP function in your router:
Choose “Forwarding > UPnP”, make sure that the Current UPnP Status is Enabled.
If there is no UPnP function in your router:
You need to manually add port(HTTPS port) forwarding, refer to the following steps. You need go to the
“Forwarding > Virtual Servers” panel for setup.
Click Enable DDNS and click Save.
The content in the Manufacture’s DDNS
column is the domain name of your camera.
Table of contents
Other Foscam Security Camera manuals

Foscam
Foscam V4EC User manual

Foscam
Foscam FI9905B User manual

Foscam
Foscam V8EP User manual

Foscam
Foscam FI9902P User manual

Foscam
Foscam FI9818W V2 User manual

Foscam
Foscam R2 User manual

Foscam
Foscam FI9903P User manual

Foscam
Foscam FI9803 User manual

Foscam
Foscam FI8910W User manual

Foscam
Foscam R2 User manual

Foscam
Foscam FI9961EP User manual

Foscam
Foscam X2 User manual

Foscam
Foscam G4 User manual

Foscam
Foscam FI9902P User manual

Foscam
Foscam T5EP User manual

Foscam
Foscam T5EP User manual

Foscam
Foscam FI8910W User manual

Foscam
Foscam B4 User manual

Foscam
Foscam FI9900P User manual

Foscam
Foscam QJ4 G2EP G4EP FI9912EP User manual


