Fractal design ARC Mini R2 User manual

rev 1.0
ARC Mini R2 COMPUTERCASE

About Fractal Design – our concept
Without a doubt, computers are more than just technology - they have become an integral
part of our lives. Computers do more than make living easier, they often dene the function-
ality and design of our homes, our ofces and ourselves.
The products we choose represent how we want to describe the world around us and how
we want others to perceive us. Many of us are drawn to designs from Scandinavia, which
are organized, clean and functional while remaining stylish, sleek and elegant. We like these
designs because they harmonize with our surroundings and become nearly transparent.
Brands like Georg Jensen, Bang Olufsen, Skagen Watches and Ikea are just a few that
represent this Scandinavian style and efciency.
In the world of computer components, there is only one name you should know,
Fractal Design.
For more information and product specications, visit www.fractal-design.com
DACH: [email protected]
China: [email protected]
Support
1

Table of Contents:
Instructions for Arc Mini R2 computer case
2
ENGLISH ................................................................................................3
FRENCH.................................................................................................6
GERMAN ................................................................................................9
ITALIAN.................................................................................................12
CHINESE..............................................................................................15
JAPANESE ...........................................................................................18
KOREAN...............................................................................................21
POLISH.................................................................................................24
RUSSIAN..............................................................................................27
SPANISH ..............................................................................................30
SWEDISH .............................................................................................33
EXPLODED VIEW ................................................................................36

Introduction
Congratulations and thank you for purchasing a Fractal Design computer case.
Please thoroughly read the following information and instructions before using your new case.
Arc Mini R2
The Arc Mini R2 micro ATX case combines excellent cooling potential and build congurabil-
ity in a compact, minimalistic and elegant chassis design.
The Arc series of cases is dedicated to delivering optimized cooling solutions and the Arc
Mini R2 is no exception. The adaptable hard drive cage design brings forth options for mul-
tiple cooling setups. For a case of this size, it offers unmatched possibilities for water cooling
components with a choice to even t a 360mm thick radiator in the roof. The three Silent
Series R2 fans included in the case contribute to excellent cooling straight out of the box.
The Arc Mini R2 is compact but the size does not compromise exibility for component con-
guration and drive capacity. With room for up to six 3.5” drives plus an additional two 2.5”
drives hidden behind the motherboard plate, you can build a well-cooled PC with ample stor-
age space.
As in all our products, the Arc Mini R2 highlights ease of use alongside quality workmanship
and materials, which is something Fractal Design takes pride in. The case is built to last and
is lled with smart features such dust lters, integrated fan controller and plenty of space for
tidy cable routing. To top it all off, the Arc Mini R2 comes with a beautiful, slightly tinted win-
dow side panel which allows you to show off your build from the outside.
Fan controller
To install the built-in fan controller you have four con-
nectors, three of which you connect to your case fans
and one Molex connector which you plug into your
power supply unit. The speed of the fans can be regu-
lated in three steps, low speed (5V), medium speed
(7V) and high speed (12V).
Note: Some fans might not start in the low-speed position
and require a higher setting. Check the Starting Voltage of
non-Fractal Design fans for which setting should be used.
Cleaning the dust lters
The Arc Mini R2 comes with 3 separate dust lters:
• Front panel: Remove the front dust lter by pushing the upper part of the mesh; the
lter can be cleaned under running water or
by using a vacuum cleaner.
• Bottom lter: The lter located under the
power supply is removable by pulling it
straight out at the back of the case; it can be
cleaned under running water.
• Top panel: This lter is easiest to clean by
just using a vacuum cleaner, but can also be
taken off by removing the two thumbscrews at
the rear of the case.
3

Adaptable hard drive cages
All drive cages in the Arc Mini R2 can be removed in order to t bigger components or simply
to optimize airow throughout the case.
Removing or rotating the upper hard drive cage
In its original position, the upper HDD cage has been strategically placed to optimize a clean
build with excellent HDD cooling and cable management. In order to t graphics card(s) lon-
ger than 260mm you may need to remove the upper HDD cage. When the upper HDD cage
is rotated, it acts as a guide for the front fan and directs airow to the graphics card(s). To
remove or rotate the upper HDD cage, the two thumbscrews securing it must be removed.
Following rotation of the HDD cage, re-insert it in the desired position and secure the thumb-
screws in the new position or remove it completely.
Removing the lower hard drive cage
In order to t water cooling radiators to the front panel you will need to remove the lower
HDD cage to make space for it. The cage is removed by unscrewing 4 screws at the bottom
of the case.
Removing the optical drive bay
In order to install a 360mm radiator in the top panel you need to remove the optical drive bay
from the front of the case. This is secured by 8 screws, two on each side connecting to the
top panel and four in the front connected to the front metal panel. Simply unscrew the eight
screws and remove the optical drive bay from the case.
4

Water cooling options
The Arc Mini R2 offers multiple options when it comes to installing water cooling compo-
nents:
• Top panel: The fan positions in the top panel are positioned in such a way that install-
ing thick water cooling radiators will not interfere with components on your motherboard
such as memory or heatsinks. A 240mm radiator will t in the top but you can also t a
360mm radiator if you remove the optical drive bay from the front of the case. Instruc-
tions on how to remove the optical drive bay are outlined in the section Removing the
optical drive bay.
• Front panel: A 240mm radiator ts in this position as long as the total length is no
more than 272 mm and the bottom HDD cage is removed. If the radiator is longer than
272mm, if may still be installed however the optical bay will have to be removed. In-
structions on how to remove the optical drive bay are outlined in the section Removing
the optical drive bay.
• Rear panel: In this fan position you can t a 120mm radiator.
• Bottom panel: In this fan position you can t a 120mm radiator.
5

6
Motherboard plate SSD mounting options
For maximum use of the space behind the motherboard plate and the side panel, the Arc
Mini R2 computer case features an additional option for two solid state drives to be mounted
on the back of the motherboard
plate. Please note that you can also
mount SSD units in all of the regular
hard drive trays.
To fasten your drive, simply unscrew
the SSD bracket from the back of the
motherboard, attach your SSD drive
to the bracket with screws found in
the accessory box, then reattach the
bracket to the motherboard plate. It is
recommended to use straight cables
with straight SATA connectors; 90
degree cables are not supported.
Limited warranty and limitations of liability
Fractal Design Arc Mini R2 computer cases are guaranteed for twenty four (24) months from
the date of delivery to end-user, against defects in materials and/or workmanship. Within
this limited warranty period, products will either be repaired or replaced at Fractal Design’s
discretion. Warranty claims must be returned to the agent who sold the product, shipping
prepaid.
The warranty does not cover:
• Products which have been used for rental purposes, misused, handled carelessly or ap-
plied in such a way that is not in accordance with its stated intended use.
• Products damaged from an Act of Nature including, but not limited to, lightning, re,
ood and earthquake.
• Products whose serial number and/or the warranty sticker have been tampered with or
removed.
Product support
If you need to contact support please use following adresess:

6 7
Arc Mini R2
Le boîtier ATX Arc Mini R2 micro combine un excellent potentiel de refroidissement et une
exibilité de montage dans un châssis compact, minimaliste et élégant.
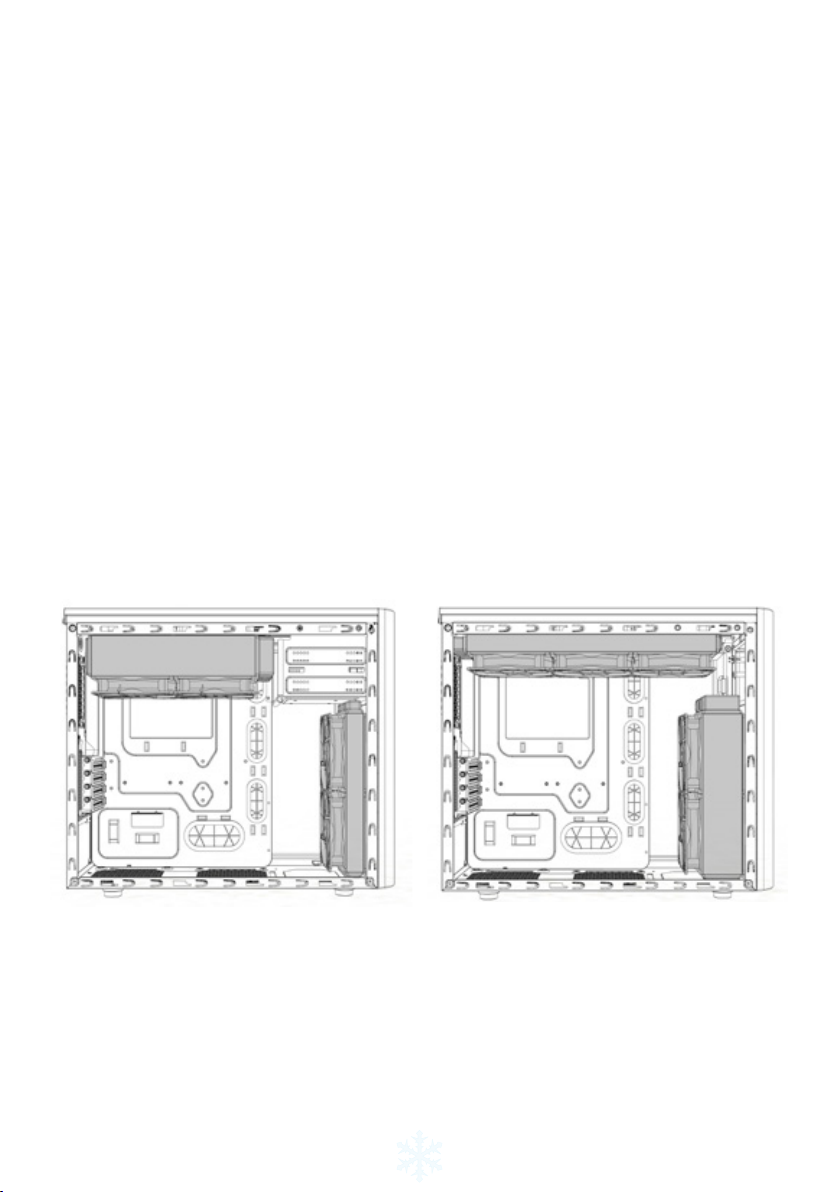
La série de boîtiers Arc est conçue pour proposer des solutions de refroidissement optimi-
sées et l’Arc Mini R2 ne fait pas exception. La cage adaptable pour disques durs offre des
options pour différentes congurations. Pour un boîtier de sa taille, il propose des possibili-
tés uniques avec des composants de refroidissement par eau et peut même s’accommoder
d’un radiateur épais de 360 mm sur le dessus. Les trois ventilateurs Silent Series R2 com-
pris dans le boîtier contribuent à un excellent refroidissement dès le départ.
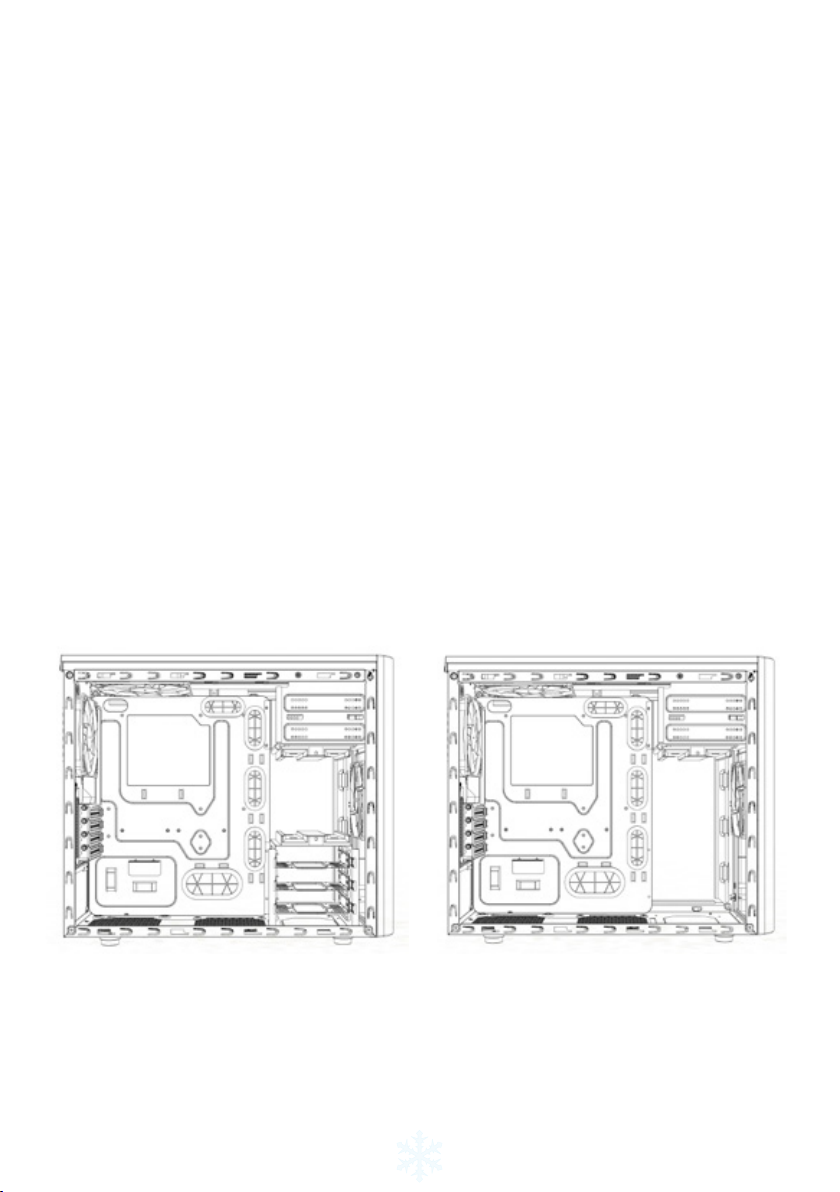
L’Arc Mini R2 est compact mais la taille ne compromet pas la exibilité pour la conguration
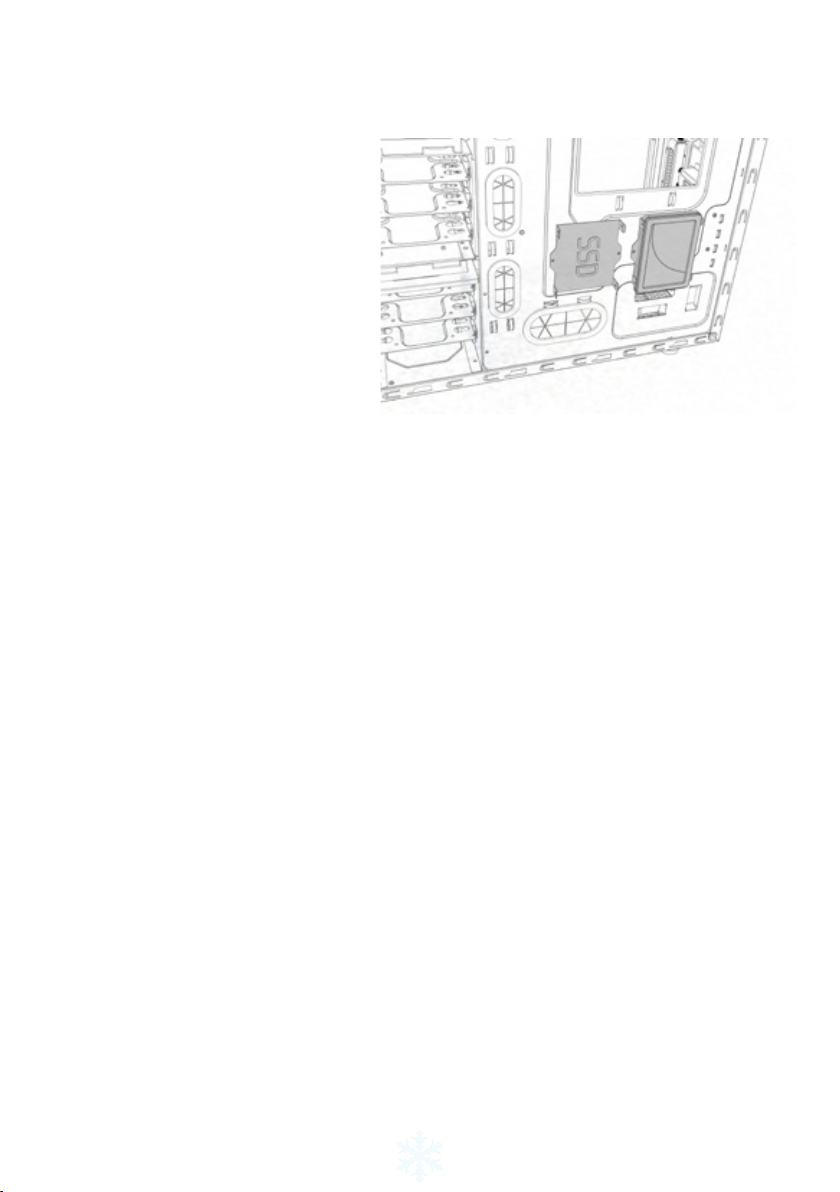
de composants et la capacité des disques. Avec de la place pour jusqu’à six disques de 3,5
“ plus deux emplacements de 2,5 “ cachés derrière la carte mère, vous pouvez construire un
PC bien refroidi avec beaucoup d’espace de stockage.
Comme pour tous nos produits, l’Arc Mini R2 met en avant la convivialité et la qualité des
matériaux et des nitions, ce dont Fractal Design est er. Le boîtier est conçu pour durer et
est rempli d’éléments utiles tels que des ltres contre la poussière, un contrôleur de ventila-
teur intégré et beaucoup de place pour un câblage propre. Pour couronner le tout, l’Arc Mini
R2 est proposé avec une panneau latéral vitré élégant, légèrement teinté qui vous permet
d’avoir un aperçu rapide de l’ensemble.
Contrôleur de ventilateur
Pour installer le contrôleur de ventilateur intégré, il y
a quatre connecteurs, trois d'entre eux allant sur les
ventilateurs de votre boîtier et un connecteur Molex
que vous devez brancher sur le bloc d'alimentation.
La vitesse des ventilateurs peut être réglée en trois
étapes, vitesse faible (5 V), vitesse moyenne (7 V) et
haute vitesse (12 V).
Remarque : Il se peut que certains ventilateurs ne démarrent pas
en position à vitesse faible et aient besoin d'être réglés à une vites-
se supérieure. Vériez la Tension au démarrage des ventilateurs autres que Fractal Design pour savoir quel réglage
utiliser.
Nettoyage des ltres à poussière
L'Arc Mini R2 est fourni avec 3 ltres à poussière séparés :
• Panneau frontal: Retirez le ltre à poussière
frontal en poussant la partie supérieure de la
maille, le ltre peut être nettoyé sous de l’eau
courante ou en utilisant un aspirateur.
• Filtre inférieur: Le ltre situé sous l‘alimen-
tation peut être retiré en tirant dessus et en le
faisant sortir de l‘arrière du boîtier. Il peut être
nettoyé sous de l‘eau courante.
• Panneau supérieur: Ce ltre est le plus
facile à nettoyer, en utilisant uniquement un
aspirateur. Mais il peut aussi être retiré en
enlevant les deux vis à l’arrière du boîtier.

8
Cages pour disque dur disponibles
Toutes les cages de disque de l’Arc Mini R2 peuvent être retirées an de s’accommoder de
plus gros composants ou simplement pour optimiser le ux d’air à travers le boîtier.
Retirer ou faire tourner la cage de disque dur supérieure
Dans sa position originale, la cage supérieure de disque dur a été placée stratégiquement
pour optimiser une version d’origine avec un très bon refroidissement de disque dur et une
gestion de câbles intelligente. An de pouvoir placer des cartes graphiques plus longues que
260 mm, vous devrez peut-être retirer la cage de disque dur supérieure. Quand la cage su-
périeure de disque dur est pivotée, elle agit comme guide pour le ventilateur frontal et dirige
le débit d’air sur la ou les cartes graphiques. Pour retirer ou faire pivoter la cage supérieure
de disque dur, les deux vis doivent être retirées. Après avoir fait pivoter la cage de disque
dur, insérez-la à nouveau dans la position souhaitée et serrez les vis dans la nouvelle posi-
tion, ou bien retirez-la complètement.
Retirer la cage de disque dur inférieure
An de placer des radiateurs de refroidissement sur le panneau frontal, vous devrez retirer
la cage de disque dur inférieure pour faire de la place. La cage se retire en dévissant les 4
vis en bas du boîtier.
Retirer la baie de disque optique
Pour installer un radiateur de 360 mm sur le panneau supérieur, vous devrez retirer la baie
de disque optique de l’avant du boîtier. Il est xé par 8 vis, deux sur chaque côté pour relier
le panneau supérieur et quatre sur l’avant reliés au panneau métallique à l’avant. Dévissez
simplement les huit vis et retirez la baie du lecteur optique du boîtier.

9
Options de refroidissement à l’eau
L’Arc Mini R2 offre divers options quand il s’agit d’installer les composants de refroidisse-
ment par eau :
• Panneau supérieur: Les ventilateurs sur le panneau supérieur sont disposés d’une
façon qui permet aux radiateurs de refroidissement par eau épais de ne pas gêner les
composants de votre carte mère, par exemple mémoire ou dissipateurs de chaleur. Un
radiateur de 240 mm peut se placer sur le dessus, mais vous pouvez aussi placer un
radiateur de 360 mm si vous retirez la baie de lecteur optique de l’avant du boîtier. Des
instructions sur le retrait de la voie du lecteur optique sont décrites dans la section Reti-
rer la baie du lecteur optique.
• Panneau frontal: Un radiateur de 240 mm peut se placer dans cette position tant que
la longueur totale ne dépasse pas 272 mm et que la cage de disque dur inférieure est
retirée. Si le radiateur fait plus de de 272 mm, il peut tout de même être installé, mais
vous devrez retirer la baie optique. Des instructions sur le retrait de la voie du lecteur
optique sont décrites dans la section Retirer la baie du lecteur optique.
• Panneau arrière: Vous pouvez placer un radiateur de 120 mm dans cette position.
• Panneau inférieur: Vous pouvez placer un radiateur de 120 mm dans cette position.

10
Cages de disques durs modulables
Pour une utilisation maximale de l’espace derrière la plaque de la carte mère et le panneau
latéral, le boîtier d’ordinateur Arc Mini R2 possède l’option supplémentaire de monter deux
disques durs au dos de la plaque où la carte mère est vissée. Veuillez noter que vous pou-
vez également monter des unités SSD dans toutes les baies de disques durs régulières.
Pour xer votre lecteur, dévissez sim-
plement les xations SSD de l’arrière de
la carte mère, xez votre lecteur SSD
sur le support avec les vis se trouvant
dans la boîte à accessoires, puis xez à
nouveau l’ensemble à la carte mère. Il
est conseillé d’utiliser des câbles droits
avec des connecteurs SATA droits, les
câbles à 90 degrés ne sont pas pris en
charge.
Garantie limitée et limites de responsabilité
Les boîtiers d’ordinateur Fractal Design Arc Mini R2 sont garantis pendant vingt quatre (24)
mois, à compter de la date de livraison à l’utilisateur nal, contre les défauts de matériaux
et/ou de fabrication. Dans cette période de garantie limitée, les produits seront soit réparés
ou remplacés, au choix de Fractal Design. Les réclamations de garantie doivent être faites
auprès de l’agent qui a vendu le produit, frais prépayés.
La garantie ne couvre pas ce qui suit :
• Les produits qui ont été loués, utilisés incorrectement, utilisés avec négligence ou uti-
lisés d’une manière qui n’est pas en conformité avec l’usage prévu indiqué.
• Les produits qui ont été endommagés par des causes naturelles, y compris mais sans
s’y limiter, la foudre, les incendies, les inondations et les tremblements de terre.
• Les produits dont le numéro de série et/ou l’étiquette de garantie a été enlevé ou modi-
é.
Support du produit
Pour le support du produit, veuillez utiliser les informations de contact suivantes :
Chine: [email protected]

11
Arc Mini R2
Das Micro-ATX-Gehäuse Arc Mini R2 kombiniert ausgezeichnetes Kühlpotenzial und Kon-
gurierbarkeit in einem kompakten, minimalistischen und eleganten Gehäusedesign.
Die Gehäuse der Arc-Serie zielen auf die Bereitstellung optimierter Kühllösungen ab; und
das Arc Mini R2 stellt keine Ausnahme dar. Das anpassungsfähige Design des Festplatten-
kägs fördert Optionen für mehrere Kühleinrichtungen. Für ein Gehäuse dieser Größe bietet
es beispiellose Möglichkeiten für Wasserkühlkomponenten mit der Option, sogar einen 360
mm dicken Kühlkörper am Dach anzubringen. Die drei im Gehäuse enthaltenen Silent Seri-
es R2-Lüfter leisten direkt einen ausgezeichneten Beitrag zur Kühlung.
Das Arc Mini R2 ist kompakt, während die Größe keine Einbußen in puncto Flexibilität bei
der Komponentenkonguration und Festplattenkapazität fordert. Mit Platz für bis zu sechs
3,5-Zoll-Festplatten und zusätzlichen zwei 2,5-Zoll-Festplatten hinter der Motherboard-Platte
können Sie einen gut gekühlten PC mit reichlich Speicherkapazität erschaffen.
Wie all unsere Produkte weist auch das Arc Mini R2 eine einfache Handhabung in Verbin-
dung mit qualitativer Verarbeitung und hochwertigen Materialien auf, worauf Fractal Design
zurecht stolz ist. Das Gehäuse wurde auf Beständigkeit ausgerichtet und verfügt über zahl-
reiche intelligente Merkmale, wie Staublter, integrierte Lüftersteuerung und Unmengen
Platz zur sauberen Kabelführung. Und nicht zuletzt weist das Arc Mini R2 eine wunderschö-
ne Seitenblende mit leicht getöntem Fenster auf, das Einblicke in Ihr System gewährt.
Lüftersteuerung
Zur Installation der integrierten Lüftersteuerung
haben Sie vier Anschlüsse; drei dieser Anschlüsse
verbinden Sie mit Ihren Gehäuselüftern, einen Mo-
lex-Anschluss verbinden Sie mit Ihrem Netzteil Die
Geschwindigkeit der Lüfter kann in drei Schritten
reguliert werden: Geringe Geschwindigkeit (5 V),
mittlere Geschwindigkeit (7 V) und hohe Geschwin-
digkeit (12 V).
Hinweis: Einige Lüfter starten möglicherweise bei Einstellung
auf die niedrige Geschwindigkeit nicht und erfordern eine höhere
Einstellung. Prüfen Sie daher zur Verwendung einer geeigneten Einstellung die Startspannung bei Lüftern, die nicht
von Fractal Design hergestellt wurden.
Staublter reinigen
Das Arc Mini R2 verfügt über 3 separate Staublter:
• Vordere Blende: Entfernen Sie den vorderen Staublter, indem Sie auf das obere Teil
des Gitters drücken; der Filter kann unter ießendem Wasser oder mit einem Staubsau-
ger gereinigt werden.
• Unterer Filter: Der Filter unter dem Netzteil
kann von hinten gerade aus dem Gehäuse
herausgezogen werden; reinigen Sie ihn bei
Bedarf unter ießendem Wasser.
• Obere Blende: Dieser Filter kann mit einem
Staubsauger besonders einfach gereinigt
werden; Sie können ihn jedoch auch durch
Entfernen der Rändelschrauben an der Gehäu-
serückseite entfernen.

12
Anpassbare Festplattenkäge
Alle Festplattenkäge im Arc Mini R2 können zur Installation größerer Komponenten bzw.
zur Optimierung der Luftzirkulation im Gehäuse entfernt werden.
Oberen Festplattenkäg entfernen oder drehen
In seiner Ausgangsposition wurde der obere Festplattenkäg strategisch zur Optimierung
eines sauberen Aufbaus mit ausgezeichneter Festplattenkühlung und Kabelführung platziert.
Zur Installation einer/mehrerer Grakkarte(n) mit einer Länge von mehr als 260 mm müssen
Sie möglicherweise den oberen Festplattenkäg entfernen. Wenn der obere Festplattenkäg
gedreht wird, agiert er als Führung für den vorderen Lüfter und leitet den Luftstrom in Rich-
tung Grakkarte(n). Zum Entfernen oder Drehen des oberen Festplattenkägs müssen die
beiden zugehörigen Rändelschrauben entfernt werden. Nehmen Sie den Festplattenkäg
anschließend vollständig heraus bzw. drehen Sie ihn in die gewünschte Position und befesti-
gen Sie ihn dort wieder mit den Rändelschrauben.
Unteren Festplattenkäg entfernen
Zur Anbringung von Wasserkühlkörpern an der Frontblende müssen Sie den unteren Fest-
plattenkäg entfernen, um Platz zu schaffen. Entfernen Sie den Käg, indem Sie die 4
Schrauben an der Unterseite des Kägs lösen.
Optischen Laufwerkseinschub entfernen
Zur Installation eines 360-mm-Kühlkörpers an der oberen Blende müssen Sie den opti-
schen Laufwerkseinschub im vorderen Bereich des Gehäuses entfernen. Dieser wird durch
8 Schrauben gehalten, zwei Schrauben pro Seite halten ihn an der oberen Blende, vier
Schrauben an der Vorderseite verbinden ihn mit der vorderen Metallblende. Lösen Sie ein-
fach die acht Schrauben, entfernen Sie den optischen Laufwerkseinschub aus dem Gehäu-
se.

13
Wasserkühloptionen
Das Arc Mini R2 bietet mehrere Optionen hinsichtlich der Installation von Wasserkühlkompo-
nenten:
• Obere Blende: Die Lüfterpositionen an der oberen Blende sind so ausgerichtet, dass
dicke Wasserkühlkörper Komponenten auf Ihrem Motherboard wie Speicher oder Kühl-
körpern nicht in die Quere kommen. Ein 240-mm-Kühlkörper passt problemlos; Sie
können jedoch auch einen 360-mm-Kühlkörper installieren, wenn Sie den optischen
Laufwerkseinschub im vorderen Bereich des Gehäuses entfernen. Anweisungen zum
Entfernen des optischen Laufwerkseinschubs nden Sie im Abschnitt Optischen Lauf-
werkseinschub entfernen.
• Vordere Blende: Ein 240-mm-Kühlkörper passt problemlos, sofern die Gesamtlänge
nicht mehr als 272 mm beträgt und der unteren Festplattenkäg entfernt ist. Falls der
Kühlkörper eine Länge von mehr als 272 mm misst, kann er dennoch installiert wer-
den, sofern Sie das optische Laufwerk entfernen. Anweisungen zum Entfernen des
optischen Laufwerkseinschubs nden Sie im Abschnitt Optischen Laufwerkseinschub
entfernen.
• Hintere Blende: In dieser Lüfterposition können Sie einen 120-mm-Kühlkörper installie-
ren.
• Untere Blende: In dieser Lüfterposition können Sie einen 120-mm-Kühlkörper installie-
ren.

14
Motherboard-Platte mit SSD-Montageoptionen
Zur maximalen Nutzung des Freiraums hinter der Motherboard-Platte und seitlichen Blende
verfügt das Arc Mini R2-Computergehäuse über eine zusätzliche Option, bei der zwei Solid
State Drives an der Rückseite der Motherboard-Platte montiert werden können. Bitte beach-
ten Sie, dass Sie SSDs auch in allen regulären Festplatteneinschüben montieren können.
Lösen Sie zum Befestigen Ihrer
Festplatte einfach die SSD-Halte-
rung an der Rückseite des Mother-
boards; bringen Sie Ihre SSD mit
den mitgelieferten Schrauben an
der Halterung an, befestigen Sie die
Halterung wieder an der Mother-
board-Platte. Sie sollten gerade Ka-
bel mit geraden SATA-Anschlüssen
verwenden; angewinkelte Kabel (90
Grad) werden nicht unterstützt.
Eingeschränkte Garantie und Garantieeinschränkungen
Bei Fractal Design Arc mini R2-Computergehäusen gewähren wir dem Endanwender eine
Garantie von zwei Jahren ab Lieferdatum, die sich auf Material- und Verarbeitungsfehler er-
streckt. Innerhalb der eingeschränkten Garantiezeit werden Produkte nach Fractal Designs
Ermessen repariert oder ausgetauscht. Garantieansprüche müssen beim jeweiligen Händler
geltend gemacht werden; Versandkosten übernimmt der Käufer.
Nicht von der Garantie abgedeckt werden:
• Produkte, die falsch oder fahrlässig behandelt, entgegen ihres bestimmungsgemäßen
Einsatzzweckes oder zum Verleih eingesetzt wurden.
• Produkte, die durch höhere Gewalt beschädigt wurden; dazu zählen unter anderem
Blitzschläge, Brände, Überschwemmungen und Erdbeben.
• Produkte, deren Seriennummer und/oder Garantieaufkleber manipuliert oder entfernt
worden.
Produktunterstützung
Zur Produktunterstützung nutzen Sie bitte die folgenden Kontaktmöglichkeiten:

Arc Mini R2
Arc Mini R2 micro ATX机箱采用紧凑、简约、优雅的机箱设计,兼具优异的散热性能和装机配置
性 能。
Arc系列机箱致力于提供最佳散热解决方案,Arc Mini R2也不例外。可调硬盘驱动器笼设计提供
多种散热装置选项。在此机箱尺寸情况下,它令人难以想象地提供水冷组件,甚至可以选择在顶
板上安装360mm厚散热器。机箱中配备三个静音系列R2风扇,具有优异的直接散热性能。
Arc Mini R2是一款紧凑型机箱,但其尺寸并不影响组件配置的灵活性和驱动器容量。它的内部
空间最多可容纳6个3.5”驱动器,母板背面还有2个隐藏式2.5”驱动器空间,让您轻松配置存储空
间充足且散热良好的PC。
在我们的全部产品中,Arc Mini R2的亮点是其易用性及其高质量的工艺和材料,这也是Fractal
Design引以为傲的因素。此款机箱持久耐用,并采用多种精巧设计,如防尘网、集成式风扇控制
器、留有充足的空间整理走线。更妙的是,Arc Mini R2配有精美的、稍带颜色的窗口侧面板,您
可 以 从 外 部 展 示 您 的 配 置。
风扇调速器
要安装内置风扇调速器,需要用到四个连接器,其中
三个连接到机箱风扇,剩下的一个Molex连接器插到
电源供应器上。风扇速度可调节,共有三档:
低速(5 V)、中速(7 V)和高速(12 V)。
注:低速时一些风扇可能无法启动,须将速度设置在较高档。
对于非Fractal Design 出产的
清洁防尘网
Arc Mini R2配有3个独立的防尘网:
• 前面板:推动网眼的上部,拆下前部防尘网;可在流水下清洗防尘网,也可使用吸尘器
进行清洁。
• 底部防尘网:可将位于电源底部的防尘网直接从机箱后侧拉出,拆下该防尘网;可在流
水下进行清洗。
• 顶部面板:该防尘网最容易清洁,只需使用吸尘器即可,但也可以拆下机箱后侧的两个
翼形螺丝,取下防尘网进行清洁。
15

16
可调驱动器笼
Arc Mini R2中的所有驱动器笼均可卸下,以安装更大的组件或者优化机箱内的空气流通。
卸下或转动上部硬盘驱动器笼
在其原始位置,上部硬盘驱动器笼已巧妙地放置在可保持整洁外观的位置,并具有极佳的硬
盘驱动器散热效果和走线位置。为了安装长度超过260mm的图形卡,可能需要卸下上部硬
盘驱动器笼。若转动上部硬盘驱动器笼,它会对前部风扇产生引导作用,并会引导气流流向
图形卡。为卸下或转动上部硬盘驱动器笼,必须卸下固定它的两个翼形螺丝。转动硬盘驱动
器笼之后,重新将其插入所需位置,并将翼形螺丝固定在新位置,或将其完全卸下。
卸下下部硬盘驱动器笼
为了在前面板上安装水冷散热器,需要卸下下部硬盘驱动器笼以腾出空间。拧下机箱底部的
4 个 螺 丝 后,即 可 卸 下 此 笼。
卸下光驱位
为了在顶部面板上安装360mm散热器,需要从机箱前部卸下光驱位。它有8个固定螺丝,每
个侧面分别有2个连接到顶部面板,前面有4个连接到前部金属面板。拧下8个螺丝后,即可从
机箱上卸下光驱位。
水冷选项
Arc Mini R2提供多种水冷组件安装选项:
• 顶部面板: 顶部面板上风扇的位置既能安装厚的水冷散热器,又不妨碍母板上的组件(
如内存或散热装置)。 顶部安装240mm散热器。如果从机箱前部卸下光驱位,还可以安
装360mm散热器。关于如何卸下光驱位的说明,在卸下光驱位中介绍。
• 前面板: 只要总长度不超过272 mm且卸下底部硬盘驱动器笼,此位置可以安装
240mm风扇。当散热器长度超过272mm时,仍可安装,但必须卸下光驱位。 关于如何
卸下光驱位的说明,在卸下光驱位中介绍。
• 后面板: 此风扇位置可以安装120mm散热器。
• 底部面板:此风扇位置可以安装120mm散热器。

16 17
母板SSD安装选项
为了最大程度地利用母板和侧面板后的空间,Arc Mini R2电脑机箱为要安装在母板后侧的
两个固态驱动器提供了额外选项。请注意,您也可以在所有常规硬盘驱动器托盘中安装SSD
单元。
要固定您的驱动器,只需将SSD托架从母板后侧拧下,用配件箱中的螺丝将SSD驱动器连接
至托架,然后重新将托架连接到母板上。建议使用配有SATA接头的直连线缆;不支持90度
线 缆。
有限质保及责任范围
Fractal Design Arc Mini R2 电脑主机保修期为终端用户交付之日起的二十四 (24)个月,针对
的是材料和/或工艺上的缺陷。在此保修期内,由Fractal Design决定是否对产品进行维修或
更 换。保 修 申 请必 须 提 交 到 销 售 产 品 的 代 理 商 处,运 费 预 付。保 修 范 围 不包 括:
• 产品已用于出租用途,使用不当,处理不当或未按照其既定的预
• 产品因自然灾害损坏,包括但不限于 电、火灾、洪水和地震。
• 产品的序列号和/或保修贴纸已被篡改或去除
德国/瑞士/奥地利: [email protected]

18
Arc Mini R2
Arc Mini R2 micro ATX ケースは、コンパクト、かつ簡素でエレガントなシャーシのデザインで、優
れた冷却ポテンシャルとビルド構成の可能性を兼ね備えています。
Arc series のケースは、最適化された冷却ソリューションの提供に特化しており、Arc Mini R2 も例
外ではありません。ハードドライブケージのデザインが適応可能であることから、多くの冷却設定
向けオプションが作られました。このデザインはこのサイズのケースに、水冷コンポーネントに厚さ
360mm のラジエータさえも上盤に適合させることができる無比の可能性を提供します。このケー
スに搭載された 3 つの Silent Series R2 ファンにより、購入した日からすぐに使える優れた冷却が
実現します。
Arc Mini R2 はコンパクトですが、このサイズでもコンポーネント構成とドライブ容量の柔軟性に
妥協をしていません。最大 6 つの 3.5 インチのドライブと、2 つの 2.5 インチの追加のドライブをマ
ザーボードプレートの裏側に入れる余裕を持つゆったりとした収納スペースで十分冷却された PC
を構築できます。
すべての当社製品と同様、Arc Mini R2 は、フラクタルデザイン社が得意とする高品質の仕上がり
および材料と同時にその使い易さを強調しています。ケースは、長持ちするように構築され、そし
て、ダストフィルタ、統合型ファンコントローラ、および整然としたケーブル配線用の十分なスペース
などのスマートな機能で満たされています。その上、Arc Mini R2 は、ケースの中味を外から見るこ
とができるよう、わずかに着色されたウィンドウサイドパネルが付属しています。
ファンコントロ ーラ
4 つのコネクタのある内蔵ファンコントローラを取り付け
る場合は、コネクタの 3 つをケースのファンに接続し、残
りのモレックスコネクタを電源装置に差し込みます。 ファ
ンの速度は、低速(5V)、中速(7V)、高速(12V)の3 つの
ステップで調節できます。
注: 一部に低速位置では稼働せず、より高い設定が必要なファンもあり
ます。 どの設定を使用すべきかについては、フラクタルデザイン社製以外
のファンの起動電圧を確認してください。
防塵フィルタの清掃
Arc Mini R2 には、3 つの防塵フィルタが別個付属しています:
• フロントパネル: メッシュの上部を押して、フロン
ト防塵フィルタを取り外します。フィルタは流水
または電気掃除機を使って掃除することができ
ます。
• 底面フィルタ: 電源装置の下にあるフィルタを、ケ
ースの背 面 からまっすぐ引っ張って取り外します。
流水で洗浄することができます。
• 上面パネル: このフィルタは、電気掃除機を使え
ば簡単に掃除できますが、ケース背面にある 2 本
のつまみねじを外して取り出すこともできます。

19
適応できるドライブケージ
Arc Mini R2 では、大きいコンポーネントを適合させる、またはケース全体のエアフローを単に最
適化したい場 合、 すべてのドライブケージを取り外すことができます。
上部ハードドライブケージを取り外す、または回転させる
元の位置では、上部 HDD ケージは、優れた HDD 冷却およびケーブル管理を備えたクリーンビル
ドを最適化するために戦略的に配置されています。260 mm より長いグラフィックカードを適合さ
せるには、上部 HDD ケージを取り外す必要があります。上部 HDD ケージを回転させると、それは
フロントファンのガイドとして機能し、エアフローをグラフィックスカードに導きます。上部 HDD ケ
ージの取り外し/回転を行うには、それを固定している 2 本のつまみねじを取り外す必要がありま
す。HDD ケージの回転に続いて、望ましい位置に再挿入しつまみねじで新しい位置に固定するか、
あるいは完全に取り外します。
下部ハードドライブケージを取り外す
水冷ラジエータをフロントパネルに適合させるには、下部 HDD ケージを取り外してスペースを作
る必要 があります。ケージの底 面にある 4 つのねじを抜いてケージを取り外します。
光学ドライブベイを取り外す
上面パネルに 360 mm のラジエータを一台設置するには、ケースのフロントから光学ドライブベ
イを取り外す必要があります。上面パネルにつながる各側面に 2 つ、フロントの金属パネルにつな
がるフロント部に 4 つ、合計 8 つのねじで固定します。8 つのねじを外し、ケースから光学ドライブ
ベイを取り外すだけです。
Table of contents
Languages:
Other Fractal design Computer Accessories manuals

Fractal design
Fractal design DEFINE S2 VISION User manual

Fractal design
Fractal design Define R4 User manual

Fractal design
Fractal design DEFINE Mini User manual

Fractal design
Fractal design DEFINE XL User manual

Fractal design
Fractal design Define R3 User manual

Fractal design
Fractal design Define R4 User manual

Fractal design
Fractal design DEFINE XL R2 User manual

Fractal design
Fractal design FOCUS User manual

Fractal design
Fractal design CORE 1500 User manual

Fractal design
Fractal design Define R4 Dimensions