manuals.online logo
Brands
  1. Home
  2. •
  3. Brands
  4. •
  5. FRAME IT ALL
  6. •
  7. Greenhouse Kit
  8. •
  9. FRAME IT ALL Cumberland 6x8 User manual

FRAME IT ALL Cumberland 6x8 User manual

800001146, 800001147, 800001148, 800001149
800002146, 800002147, 800002148, 800002149
800003146, 800003147, 800003148, 800003149
800004146, 800004147, 800004148, 800004149
RAISED GARDEN BED
6’ x 8’ Cumberland
Layout your Boards along the borderline and connect each
Board together by inserting the top of the stake through the
bracket loops with the stake pointing to the sky. This enables
you to freely position your border to get your desired location.
Customer Service: 1800-914-9835 |
[email protected]m
© Frame It All. All Rights Reserved.
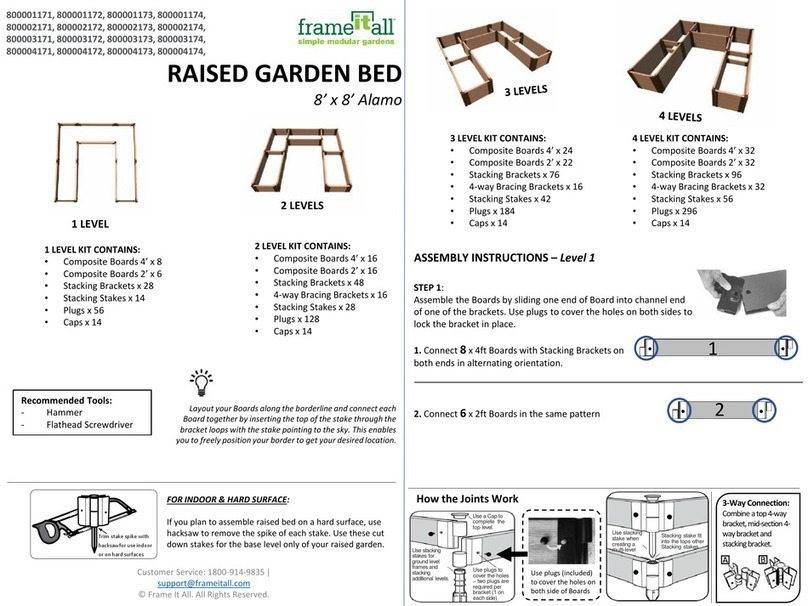
1 LEVEL KIT CONTAINS:
•Composite Boards 4’ x 6
•Composite Boards 2’ x 8
•Stacking Brackets x 28
•Stacking Stakes x 14
•Plugs x 56
•Finishing Caps x 14
ASSEMBLY INSTRUCTIONS –Level 1
STEP 1:
Assemble the Boards by sliding one end of Board into channel end
of one of the brackets. Use plugs to cover the holes on both sides to
lock the bracket in place.
1. Connect 6x 4ft Boards with Stacking Brackets on
both ends in alternating orientation.
2. Connect 8x 2ft Boards in the same pattern
FOR INDOOR & HARD SURFACE:
If you plan to assemble raised bed on a hard surface, use
hacksaw to remove the spike of each stake. Use these cut
down stakes for the base level only of your raised garden.
Trim stake spike with
hacksawfor use indoor
or on hard surfaces
How the Joints Work
Use plugs (included)
to cover the holes on
both side of Boards
Use plugs to
cover the holes
–two plugs are
required per
bracket (1 on
each side)
Use a Capto
complete the
top level.
Use stacking
stakes for
ground level
frames and
stacking
additional levels.
Use stacking
stake when
creating a
multi-level
Stacking stake fit
into the tops other
Stacking stakes
3-Way Connection:
Combine a top4-way
bracket,mid-section 4-
way bracketand
stackingbracket.
2 LEVELS
2 LEVEL KIT CONTAINS:
•Composite Boards 4’ x 12
•Composite Boards 2’ x 20
•Stacking Brackets x 48
•4-way Bracing Brackets x 16
•Stacking Stakes x 28
•Plugs x 128
•Finishing Caps x 14
4 LEVEL KIT CONTAINS:
•Composite Boards 4’ x 24
•Composite Boards 2’ x 40
•Stacking Brackets x 96
•4-way Bracing Brackets x 32
•Stacking Stakes x 56
•Plugs x 256
•Finishing Caps x 14
1
2
Recommended Tools:
- Hammer
- Flathead Screwdriver
3 LEVEL KIT CONTAINS:
•Composite Boards 4’ x 18
•Composite Boards 2’ x 28
•Stacking Brackets x 76
•4-way Bracing Brackets x 16
•Stacking Stakes x 42
•Plugs x 184
•Finishing Caps x 14
1 LEVEL
ASSEMBLY INSTRUCTIONS –Level 1 Continued
1
2
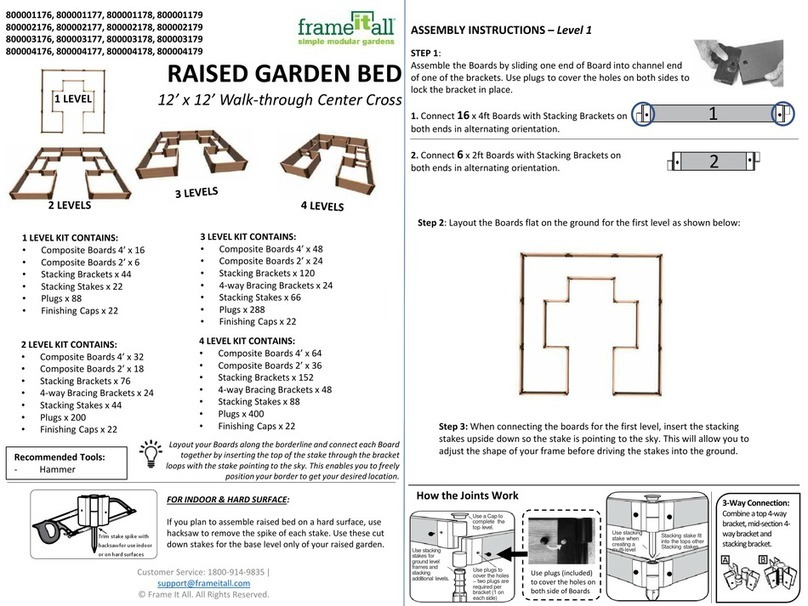
Step 2: Layout the Boards for the first level according to the number of the
board in Step 1.
IMPORTANT: If you connect any brackets incorrectly, they can be removed by
inserting a flathead screwdriver into the opening of the snap-lock plugs, pushing into
the nub and twisting upwards.
Step 3: When connecting the boards for the first level, insert the stacking
stakes upside down so the stake is pointing to the sky. This will allow you to
adjust the shape of your frame before driving the stakes into the ground.
Step 3a: With the first level stacking stakes still facing the sky, use bracketed
2ft boards to ensure that the cross Boards will fit by placing the board over
the stacking stakes on the cross-board positions shown below.
1
1
1
2
22
Step 4: Once you finish with the adjustments of your base level frame,
remove the Boards sitting on level 2 and hammer the stacking stakes on level
1 into the ground.
2
2
11
2 2
STEP 5:
Connect the brackets and boards for the second level in the following pattern:
1. Connect 4x 4ft Boards with Stacking Brackets on
both ends in alternating orientation.
2. Connect 3 x 2ft Boards with stacking brackets
on both sides, facing the same orientation.
3. Connect 2x 4ft Boards with a stacking bracket on
one end and a mid-section 4-way bracket on the
other end in alternating orientation.
4. Connect 2x 2ft Boards with a stacking bracket on
one end and a mid-section 4-way bracket on the
other end in alternating orientation.
5. Connect 1x ft Boards with Stacking Brackets on
both ends in alternating orientation.
6. Connect 2x 2ft Boards with mid-section 4-way brackets
on both ends in alternating orientation.
7. Connect 4x 2ft Boards with top 4-way brackets
on both ends, facing the same orientation.
ASSEMBLY INSTRUCTIONS –Level 2
1
2
3
4
5
6
7
44
377
66
77
11
2
2
1
2
3
1
5
Step 6: Layout the boards the second level of your design on the ground
around your base frame. Once they are all laid out, begin stacking and
connecting them starting at a corner and working your way out.
NOTE: Stacking stakes will be used for all additional levels and can insert into
the top of existing stakes.
Step 7: For a 3-level design, repeat steps 1 & 2. For the final 4th level,
repeat Step 5 & 6.
Step 8: Once your final level is installed, attack a finishing cap on top of
each joint and then you’re reading to fill with soil!
Happy Gardening!

This manual suits for next models

16

Other FRAME IT ALL Greenhouse Kit manuals

FRAME IT ALL Walk-through Center Cross 12x12 User manual

FRAME IT ALL

FRAME IT ALL Walk-through Center Cross 12x12 User manual

FRAME IT ALL Alamo 8x8 User manual

FRAME IT ALL

FRAME IT ALL Alamo 8x8 User manual

Popular Greenhouse Kit manuals by other brands

AeroGarden Mini 300291 quick start guide

AeroGarden

AeroGarden Mini 300291 quick start guide

ClearSpan Premium Solar Star instruction manual

ClearSpan

ClearSpan Premium Solar Star instruction manual

Halls Curved Greenhouse 46 Assembly instructions

Halls

Halls Curved Greenhouse 46 Assembly instructions

G-Tools G-kit Bonanza manual

G-Tools

G-Tools G-kit Bonanza manual

Mr Fothergill's Little Gardeners 14514 instructions

Mr Fothergill's

Mr Fothergill's Little Gardeners 14514 instructions

EXPOL ATLAS manual

EXPOL

EXPOL ATLAS manual

Holman GH2002 user guide

Holman

Holman GH2002 user guide

Vitavia Gaia Jumbo Assembly instructions

Vitavia

Vitavia Gaia Jumbo Assembly instructions

Walton 04GREEN0806SD-V2 quick start guide

Walton

Walton 04GREEN0806SD-V2 quick start guide

juwel BIO PROTECT 130/60 manual

juwel

juwel BIO PROTECT 130/60 manual

Halls Greenhouses Universal 128 SD manual

Halls Greenhouses

Halls Greenhouses Universal 128 SD manual

Rion Grand Gardener Assembly instructions

Rion

Rion Grand Gardener Assembly instructions

Juliana Veranda Assembly instruction

Juliana

Juliana Veranda Assembly instruction

Harbor Freight Tools 94515 Assembly instructions

Harbor Freight Tools

Harbor Freight Tools 94515 Assembly instructions

Gabriel Ash essential Series Assembly instructions

Gabriel Ash

Gabriel Ash essential Series Assembly instructions

Vitavia Calypso 3000 Assembly instructions

Vitavia

Vitavia Calypso 3000 Assembly instructions

Grandio GRANDIO ELITE 8x12 2015 user manual

Grandio

Grandio GRANDIO ELITE 8x12 2015 user manual

Dancover ARROW GH120025 manual

Dancover

Dancover ARROW GH120025 manual

manuals.online logo
manuals.online logoBrands
  • About & Mission
  • Contact us
  • Privacy Policy
  • Terms and Conditions

Copyright 2025 Manuals.Online. All Rights Reserved.