manuals.online logo
Brands
  1. Home
  2. •
  3. Brands
  4. •
  5. Franklin
  6. •
  7. Fitness Equipment
  8. •
  9. Franklin MLS X-RAMP PRO User manual

Franklin MLS X-RAMP PRO User manual

This manual suits for next models

1

Other Franklin Fitness Equipment manuals

Franklin 19083 User manual

Franklin

Franklin 19083 User manual

Franklin THREE STRIKES 14912 User manual

Franklin

Franklin THREE STRIKES 14912 User manual

Popular Fitness Equipment manuals by other brands

Weider Pro Pt 800 Bench null

Weider

Weider Pro Pt 800 Bench null

NSD PB-188P user manual

NSD

NSD PB-188P user manual

Performance HyperVibe User instructions

Performance

Performance HyperVibe User instructions

Scalamobil S27 Operator's manual

Scalamobil

Scalamobil S27 Operator's manual

Precor Experience Series Service manual

Precor

Precor Experience Series Service manual

FYTTER RedMIUM BENCH BE-T6R manual

FYTTER

FYTTER RedMIUM BENCH BE-T6R manual

Taurus TF-RK1312 Assembly and operating instructions

Taurus

Taurus TF-RK1312 Assembly and operating instructions

Nustep T5 Assembly instructions

Nustep

Nustep T5 Assembly instructions

Precor CW-507 Assembly guide

Precor

Precor CW-507 Assembly guide

Movement BICEPS Idea owner's manual

Movement

Movement BICEPS Idea owner's manual

Kegel8 V For Men user guide

Kegel8

Kegel8 V For Men user guide

BLK BOX 21-0122-0B Owner's manual & quick start guide

BLK BOX

BLK BOX 21-0122-0B Owner's manual & quick start guide

Stamina aeropilates premier 299 owner's manual

Stamina

Stamina aeropilates premier 299 owner's manual

SPORTSTECH PBX300 quick start guide

SPORTSTECH

SPORTSTECH PBX300 quick start guide

ParaBody Serious Steel 877102 Assembly guide

ParaBody

ParaBody Serious Steel 877102 Assembly guide

Weslo Gym 650 Gebruikershandleiding

Weslo

Weslo Gym 650 Gebruikershandleiding

Rebel ACTIVE RBA-1011 user manual

Rebel

Rebel ACTIVE RBA-1011 user manual

4iiii FLiiiight owner's manual

4iiii

4iiii FLiiiight owner's manual

manuals.online logo
manuals.online logoBrands
  • About & Mission
  • Contact us
  • Privacy Policy
  • Terms and Conditions

Copyright 2025 Manuals.Online. All Rights Reserved.

INSTRUCTION SHEET
MLS®X-RAMP PRO
2 IN 1 SOCCER TRAINER
6882
Parts List:
Pre-Assembled
64
53
21
1211
10
9
1 PC
7
1 PC
Pre-Assembled
Pre-Assembled
Pre-Assembled 1 PC
1 PC
1 PC
2 PCS
--Small parts.
Not for children under 3 yrs.
14 15
4 PCS 4 PCS
16
1 PC
13
28 PCS
Franklin Sports Inc.
Stoughton, MA 02072
Made in China
For replacements parts call
1-781-341-5178 or 1-800-225-8649
OR visit www.franklinsports.com
©2012 MLS, MLS, the MLS logo, Major League
Soccer and MLS team identifications are
trademarks and copyrights of Major League
Soccer, L.L.C. All rights reserved.
8
1 PC
Adult assembly required
&$87,21
:$51,1*
Assembly Instructions:
1) Remove all components from the package and confirm that you
have all of the parts listed.
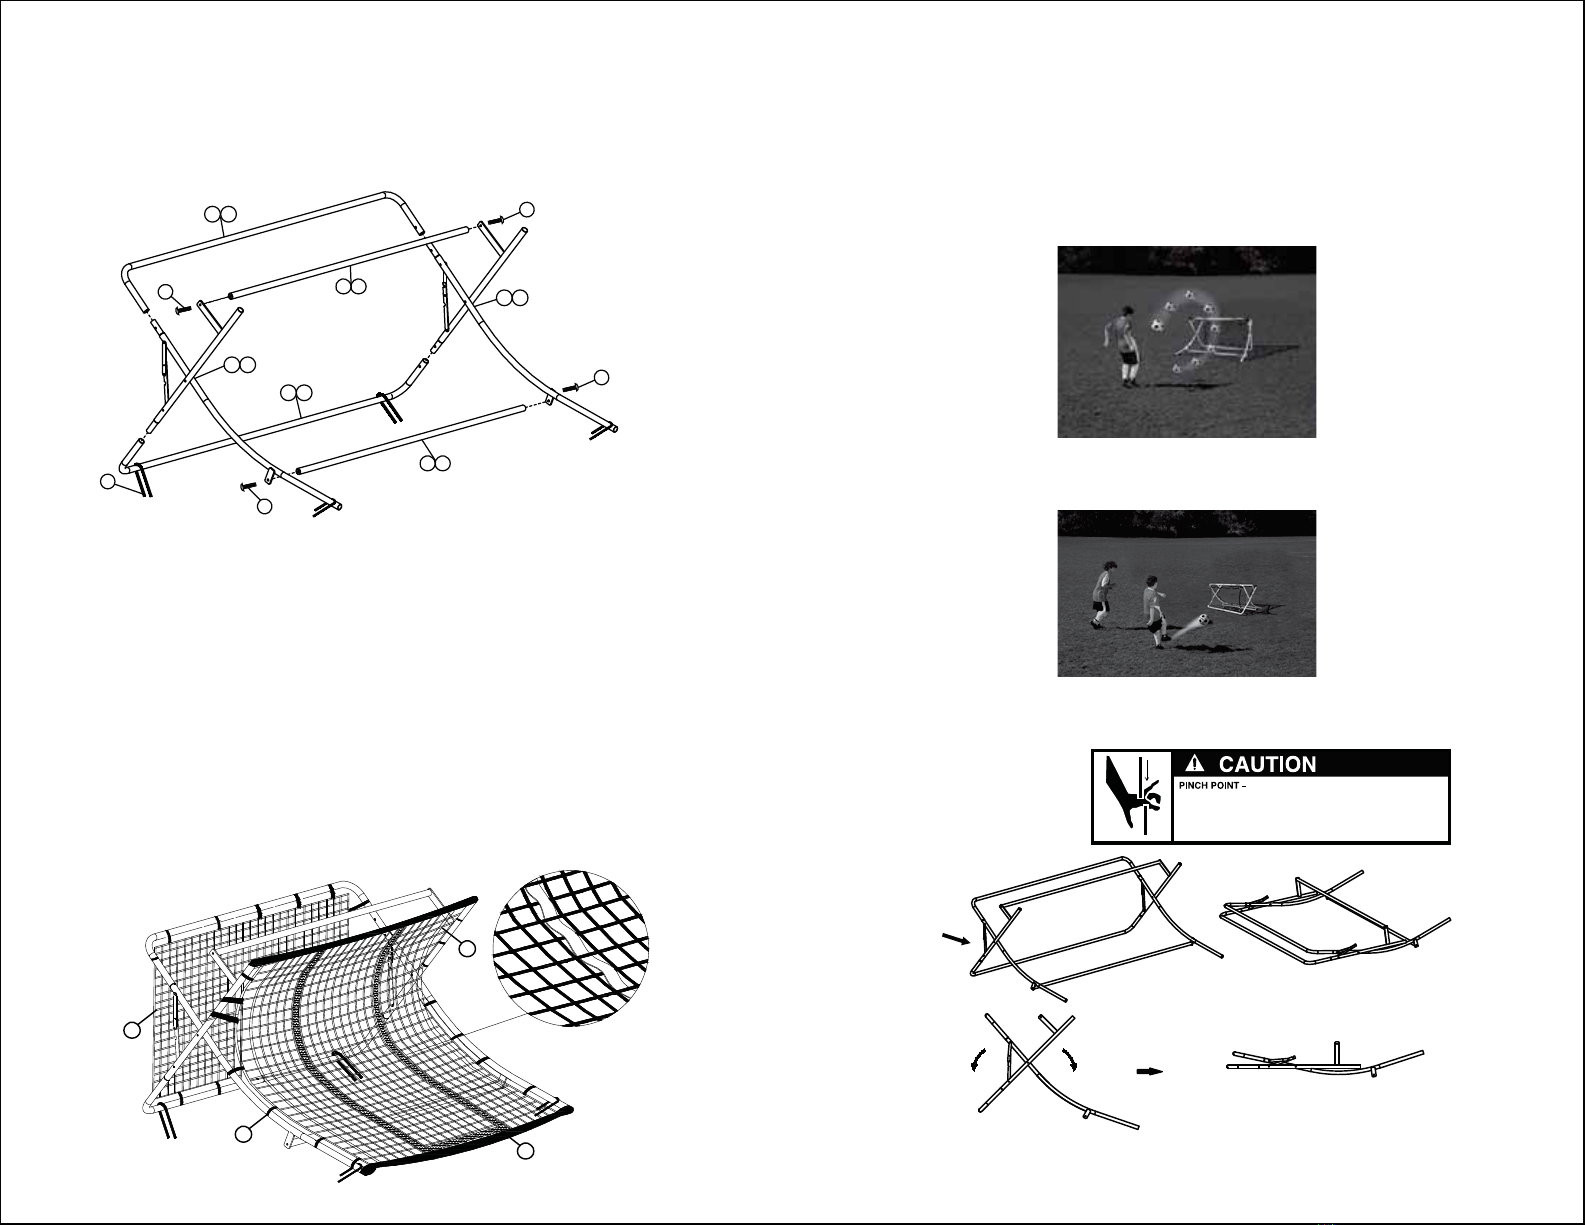
FRAME ASSEMBLY:
2) Assemble the frame according to the diagram below.
FUNCTION:
The MLS X-Ramp has two sides designed for training.
Side 1: Curved Ramp
This side is designed to help train passing, trapping and heading by
returning the ball in a controlled “looping” manner.
In order to achieve the looping effect, kick the ball toward the
center of the trainer. The ball MUST remain on the ground and
kicked with force. The curved design and the tension in the netting
allow the ball to loop back to the player.
STORAGE:
To fold the unit for storage and travel, slide down the plastic guard
on the locking hinges located on both sides of the frame. Unclip the
latch to release and fold.
See images below.
Locking
Hinge
Note: Netting was removed to illustrate folding feature. The netting can
remain on the product when folding for storage.
Side 2: Rebound Wall
This is designed to be used with one or multiple players. Kick the ball
into the wall to practice “Give and go” training, one touch passing
and trapping skills.
NET ASSEMBLY:
3) The larger netting (Part 7) attaches to the curved side of the frame. The
smaller netting (Part 8) attaches to the flat side of the frame.
4) For the curved side of the frame, slide the corners of the netting (Part 7)
onto the corners of the frame. Attach the bungee cords (Part 13) to the
grommets on the netting (Part 7) and then to the frame to secure. The net
should be very tight. Two people may be required to attach to the frame.
5) For the rebound side of the frame, attach the bungee cords (Part 13) to
the grommets on the netting (Part 8) and then to the frame.
6) Weave the red ribbon through the netting as shown below to create a
target strike zone area.
7) Use the ground stakes to secure and stabilize the item during play.
Place the ground stakes on each of the four bottom corners of the frame.
*Note: The ground stakes should attach to the frame only. Make sure that
the netting is not caught in the ground stake.
Keep hands and ngers clear
while pushing to fold soccer trainer. Failure to
observe this warning may result in loss of
ngers or other serious injury. Adult assembly
and supervision recommended.
15
15
14
15
15
3 5
4 6
1 2
910
11 12
11 12
7
8
13
16