Free The Tone AMBI SPACE User manual

AS-1R/AMBI SPACE
DIGITAL REVERB
Owner’s Manual
Ver 1.2
Safety Precautions
Precautions are identified by the two types of symbols below:
WarningCaution
Be sure to read these precautions and the user's manual before using this product.
Warning
Never try to disassemble, or modify the unit.
Stop using the unit if you notice smoke or a strange odor
coming from it and unplug the AC adapter from the outlet.
Never try to repair the unit or replace parts unless so
instructed by the user's manual. For other repair or parts
replacement contact your local dealer or Free The Tone.
Never unplug the AC adapter while your hands are wet.
Do not apply too much pressure or tension or place a heavy
object on the power cord. Doing so may damage the power
cord and create a danger of fire or electrical shock.
Turn off the unit and unplug the AC adapter from the outlet
and contact your local dealer or Free The Tone for repair in
the case of any of the following:
• The power cord is damaged.
• Foreign objects (coins, pins, etc.) or liquid enter the unit.
• The unit gets wet from rain or other liquid.
• The unit is out of order.
Be careful of heat radiation from the unit.
Never cover the AC adapter with cloth or other objects.
Built-up heat can deform the case or cause a fire hazard.
This symbol indicates that a risk of serious personal
injury or material damage may result if precautions are
ignored.
This symbol indicates that a risk of death or serious
personal injury may result if precautions are ignored.
Do not use or store the unit in environments where it will
be exposed to:
• Extreme temperatures (direct rays of the sun, heat
sources such as radiators or stoves.)
• High humidity or moisture.
• Excessive dust or sand.
• Excessive vibration or shock.
Whenever leaving the unit unattended for long periods,
be sure to unplug the AC adapter from the power source to
avoid creating a fire hazard.
Take care not to drop the unit, and do not subject it to
excessive pressure or weight.
Do not press the switches on the unit with a bare foot,
or unexpected injury may result.
Do not use solvents (such as benzine, paint thinner) on
the unit, since these may dull the finish or damage the
surface.
Caution
Support / Service
Contact the following for support and/or repair service.

Thank you for choosing a Free The Tone product. In order to take full advantage of the features and
performance it provides, please read this owner’s manual thoroughly, and keep it in a safe place for
future reference.
Table of Contents
Controls and Indicators 3
Front Panel 3
Rear Panel 4
Side Panel / Bottom Panel 5
Adjusting reverb (Manual mode) 6
Adjusting reverb sound 6
Reverb types 6
Trail Function 7
Recalling a preset(Preset mode)7
Switching between presets 1-4 7
Switching 1-128 presets via MIDI 8
Confirming the position of each knob stored in the preset 8
Changing/writing preset contents (Edit mode) 9
When the unit is put in Edit mode from Manual mode 9
When the unit is put in Edit mode from Preset mode 9
Configuring MIDI settings 10
Changing MIDI reception settings 10
Setting MIDI receiving channels 10
Correspondence between MIDI receiving channels and
PRESET LED indications 11
Receivable MIDI messages 12
Correspondence between presets and
MIDI program change numbers 12
Correspondence between parameters and
MIDI control change numbers 13
Initializing 13
Updating Firmware 13
Factory presets 14
Specifications 15
Safety Precautions 16
• Never connect or disconnect plugs to/from the input/output terminals on the unit when the external device that
drives speakers is powered. Doing so can cause noises and damage the speakers.
• Avoid applying excessive force to the footswitches, tact switches, and DIN connector on the unit.
• If the unit malfunctions or behaves erratically, cease operation at once and contact your local dealer or Free The
Tone directly.
Handling Precautions
Controls and indicators
Front panel
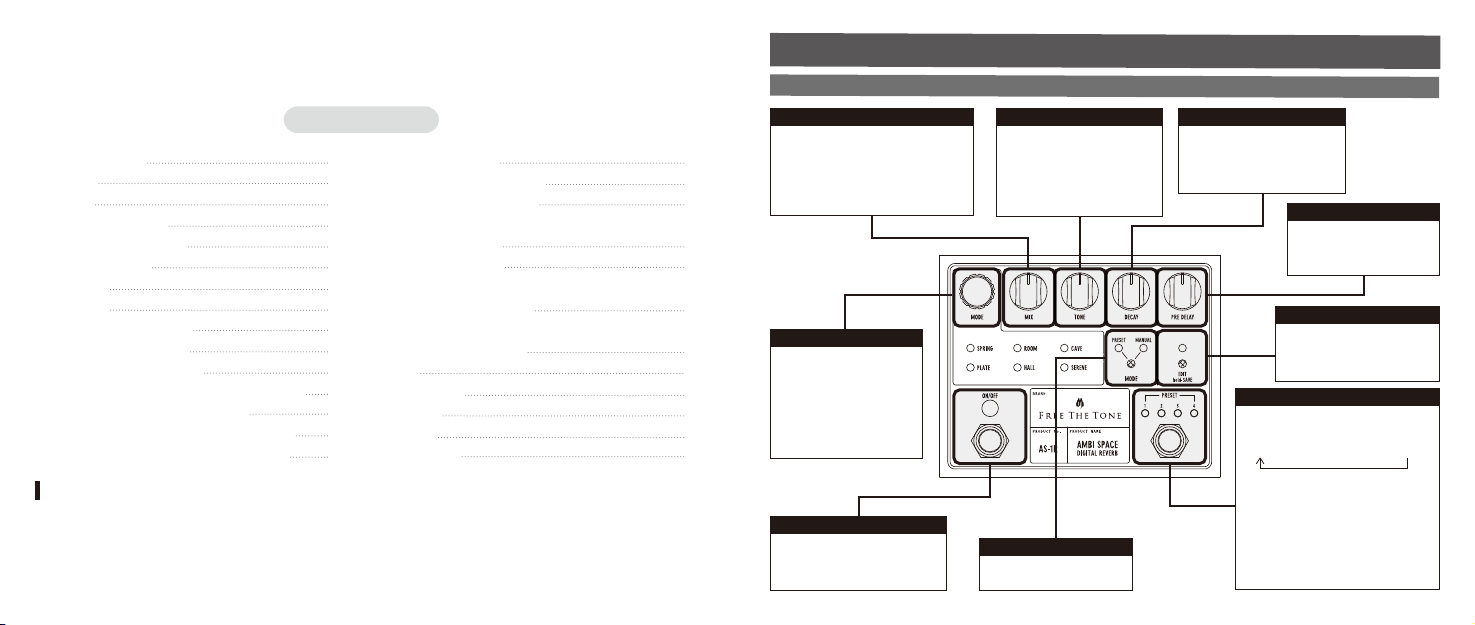
Press this switch to toggle the
reverb effect on/off. When ON,
the LED above the switch
illuminates.
Effect ON/OFF switch
In Preset mode:
Press this switch to select a preset from
Presets 1–4.
PRESET-1→PRESET-2→PRESET-3→PRESET-4
In Edit mode: (EDIT LED illuminates)
Press this switch to select the preset
number to which the current effects
sound settings are to be written. The
preset number LED for the writing
destination flashes.
In Manual mode:
Press this switch to select the preset to
be recalled when the AMBI SPACE is
put in Preset mode.
PRESET switch
Used to put the AMBI SPACE in
Edit mode.
From Manual mode →P. 9
From Edit mode →P. 9
EDIT switch
Toggles between Preset and
Manual modes.
MODE switch
Adjusts the delay time
before the reverb sound is
output. The adjustable range
is 0–250 ms.
PRE DELAY knob
Adjusts the decay time of the
reverb sound. Note that the
DECAY knob’s adjustable time
length differs according to the
selected reverb type.
DECAY knob
Adjusts the tone of the reverb
sound. Turning it clockwise
cuts the low frequencies and
turning it counterclockwise
cuts the high frequencies. Note
that this control does not work
on the original (dry) sound.
TONE knob
Mixes the reverb sound with the
original (dry) sound. When the knob is
turned fully counterclockwise, the
original (dry) sound is 100% and the
reverb sound is 0%. When turned fully
clockwise, the mix ratio becomes
about 50% to 50%.
MIX knob
This control is used to switch
reverb types when the AMBI
SPACE is in Manual or Edit
mode. Turning this encoder
changes reverb types.
Note that turning this control
in Preset mode does not
change reverb types.
MODE encoder
3

Terminal for connecting a
guitar, another instrument or
effects unit. Use the L
(MONO) terminal and R
terminal to connect a device
having stereo outputs.
Connect to the L (MONO)
terminal only when you are
using the AMBI SPACE in
monaural mode. Note that
the integrated HTS
circuit keeps the sound
texture the same
whether theeffect is
turned on or off.
Input (L (MONO)-IN-R) terminal
Input terminal for MIDI signals. This
terminal receives MIDI signals from an
external MIDI device.
MIDI IN terminal
This switch is used to select the input level
of the AMBI SPACE to match the output
level of the device to be connected to the
Input terminal. When connecting a device
with instrument level signals, set the switch
to the rear side (closer to the I/O jack). To
connect a device with line level signals, set
the switch to the front side.
Use a small flatblade screw driver to slide
the switch.
INPUT LEVEL SELECT switch
This switch is used to prohibit the original
(dry) sound from being output from the
Output terminal. When this switch is set to
the on position, the original (dry) sound will
not be output. To turn on the KILL DRY
switch, set it to the front side (closer to the
foot switch). Use a small flatblade screw
driver to slide the switch.
KILL DRY switch
This terminal is used to connect to an
external amplifier or mixer. To feed
monaural signals, connect to the L
(MONO) terminal.
Output (L (MONO)-OUT-R) terminal
For connecting an
AC adapter with 9V
DC center negative
polarity. Requires at
least 280mA of
available current.
Power DC 9V IN terminal
Rear panel Side panel
Bottom panel
5
4

Recalling a preset (Preset mode)
Switching between presets 1-4
Adjusting reverb sound
Reverb types
NOTE
In Preset mode turning each knob does not change reverb sounds. Only the reverb sound in the preset is output.
1. Press the MODE switch to illuminate the PRESET LED.
2. Press the PRESET switch to select the preset.
1. Press the ON/OFF switch to illuminate the LED above it.
2. Turn the MODE encoder to select the desired reverb type.
3. Turn the MIX knob to adjust the mixture level between the original and reverb sounds.
4. Turn the TONE knob to adjust the tone of the reverb sound.
5. Turn the DECAY knob to adjust the decay time of the reverb sound.
6. Turn the PRE DELAY knob to adjust the delay to start feeding the reverb sound.
Trail Function
Trail Function You can set whether the reverberation sound will remain or not when you turn off the effects.
Press and hold down the MODE switch for 1.5 seconds.
• The MANUAL LED (green) above the MODE switch flashes twice and the Trail function is turned on.
Reverberation sound will remain when you turn off the effects. (Default)
•The PRESET LED (red) above the MODE switch flashes twice and the Trail function is turned off.
Reverberation sound will not remain when you turn off the effects.
When the PRESET LED above the MODE switch illuminates, the AMBI SPACE is in Preset mode. In
Preset mode, the reverb sound stored in the preset selected by the PRESET switch is recalled.
Adjusting reverb (Manual mode)
The MANUAL LED above the MODE switch illuminates when the AMBI SPACE is operating in Manual mode.
In Manual mode, reverb sound is set by the position of each knob.
Use the MODE encoder to select one of the reverb types.
Simulates a spring reverb. Note that a real spring reverb does not have the PRE DELAY function but the
AMBI SPACE is deliberately designed to enable this function.
Simulate a steel plate reverb. Metallic sounds with extended highs can be obtained
Simulates reverberations in a room. Natural and warm reverberation sounds can be obtained.
Simulates reverberations in a hall. Spatial and clear reverberation sounds can be obtained.
Reverb that can be used for sound effects or volume swell. Magnificent and pure reverberation sounds as
if you are playing in a cave can be obtained.
Frequency bands of reverberation sounds will also change according to the complex reverberation pattern
design. You can get pleasing reverberation sounds as if they were resonating from another space.
SPRING
PLATE
ROOM
HALL
CAVE
SERENE
76
NOTE
It is not possible to set this function for each preset independently. This setting is applied globally to all of the
presets. When you are switching presets, if the Reverb type of the newly selected preset is the same as that of the
previous preset, then the Trail function is applied in the same way as when turning off the effect. If the Reverb type
of the newly selected preset differs from that of the previous preset, then the reverberation sound is muted and
then the preset is switched regardless of whether the Trail function is turned on or off.

Changing/writing preset contents (Edit mode)
Confirming the position of each knob stored in the preset NOTE
By pressing the EDIT switch again after turning the knobs to change parameters in Edit mode, your changes
are canceled and the AMBI SPACE returns to the status in which the original preset is recalled.
NOTE
By pressing the EDIT switch again after turning the knobs to change parameters in Edit mode, your changes
are canceled and the AMBI SPACE returns to the status in which the original preset is recalled.
When the unit is put in Edit mode from Manual mode
The current Manual mode setting is written to the preset.
1. Press the EDIT switch to enter into Edit mode.
2. Turn the knob of the parameter you want to change.
3. To select the preset for saving the settings, press the PRESET switch (preset 1–4) or send the MIDI program
change number corresponding to the desired preset number (preset 1–128) from the external MIDI device.
4. Press and hold the EDIT switch for 1.5 secs., the EDIT LED will flash and the writing operation will be executed.
After writing, the contents of that preset number are recalled and the AMBI SPACE enters Preset mode.
NOTE
Be sure to set the same MIDI program change number on the sending device’s MIDI channel and the AMBI SPACE
MIDI channel.
Setting up MIDI Receiving Channel P10.
Correspondence between MIDI receiving channels and PRESET LED indications P11.
Switching 1-128 presets via MIDI
1. Connect an external MIDI controller to the MIDI IN terminal on the AMBI SPACE rear panel.
2. Press the effect ON/OFF switch to illuminate the LED above it.
3. From the external MIDI controller, send the MIDI program change number corresponding to the preset to be
recalled.
NOTE
The PRESET 1 LED illuminates: The knob is moving in the counterclockwise direction comparing its current
position with the position stored in the preset.
The PRESET 4 LED illuminates: The knob is moving in the clockwise direction comparing its current position with
the position stored in the preset.
The PRESET 2 and PRESET 3 LEDs illuminate: The knob is at the same position as stored in the preset.
1. Recall the desired preset.
2. Press the EDIT switch. The PRESET LED for the selected preset flashes.
3. urn the desired knob clockwise or counterclockwise to confirm its stored position in the preset. The stored
knob position is indicated by the PRESET 1–4 LEDs as shown in the note below. When the unit is put in Edit mode from Preset mode
You can adjust only the desired parameters of the current preset sound and store them in the preset.
1. Press the EDIT switch to enter into Edit mode.
2. Turn the knob of the parameter you want to change.
3. To select the preset for saving the settings, press the PRESET switch (preset 1–4) or send the MIDI program change
number corresponding to the desired preset number (preset 1–128) from the external MIDI device.
4. Press and hold the EDIT switch for 1.5 secs., the EDIT LED will flash and the writing operation will be executed.
After writing, the contents of that preset number are recalled.
When the LED above the EDIT switch illuminates, the AMBI SPACE is in Edit mode. Edit mode is used to
change/write preset contents and pressing the EDIT switch puts the AMBI SPACE in this mode.
98

Correspondence between MIDI receiving channels and PRESET LED indications
○:LED on,×:LED off.
PRESET-1 LED PRESET-2 LED PRESET-3 LED PRESET-4 LED MIDI Channel to be set
× × × × MIDIChannel1
○ × × × MIDIChannel2
× ○ × × MIDIChannel3
○ ○ × × MIDIChannel4
× × ○ × MIDIChannel5
○ × ○ × MIDIChannel6
× ○ ○ × MIDIChannel7
○ ○ ○ × MIDIChannel8
× × × ○ MIDIChannel9
○ × × ○ MIDIChannel10
× ○ × ○ MIDIChannel11
○ ○ × ○ MIDIChannel12
× × ○ ○ MIDIChannel13
○ × ○ ○ MIDIChannel14
× ○ ○ ○ MIDIChannel15
○ ○ ○ ○ MIDIChannel16
NOTE
MIDI settings are automatically stored in the memory. No storing operation is required.
1110
Configuring MIDI settings
NOTE — Meaning of the ON/OFF LED statuses:
• ON/OFF LED illuminates: Omni mode is turned on. All of the MIDI channels will be accepted.
• ON/OFF LED is flashing: Omni mode is turned off. MIDI receiving channels can be set.
Setting MIDI receiving channels P10.
• ON/OFF LED is turned off: MIDI receiving function is disabled.
Changing MIDI reception settings
1. While holding down the PRESET switch, turn on the power to the AMBI SPACE. Keep the switch pressed
until both the PRESET and MANUAL LEDs illuminate.
2. When both the LEDs illuminate, release the PRESET switch.
3. Press the ON/OFF switch to toggle the MIDI reception settings.
4. Press the MODE switch to complete the setting.
The AMBI SPACE can switch presets and change each parameter by MIDI signals received from an
external controller.
Setting MIDI receiving channels
1. While holding down the PRESET switch, turn on the power to the AMBI SPACE. Keep the switch pressed
until both the PRESET and MANUAL LEDs illuminate.
2. When both the LEDs illuminate, release the PRESET switch.
3. Press the ON/OFF switch until the ON/OFF LED blinks.
4. Press the PRESET switch to select the receiving channel while referring to the table of Correspondence
between MIDI receiving channels and PRESET LED indications.
5. Press the MODE switch to complete the setting.

Correspondence between presets and MIDI program change numbers
Correspondence between parameters and MIDI control change numbers
Receivable MIDI messages
The AMBI SPACE can switch presets or change all of the parameters via MIDI signals sent from an external
device. MIDI signals assigned to controllable functions are listed below.
Note that when a preset is recalled on the AMBI SPACE via a MIDI program change number, the AMBI SPACE
will operate as follows according to its current mode:
• Preset mode: The specified preset is recalled.
• Manual mode: The specified preset is recalled and the AMBI SPACE enters Preset mode.
• Edit mode: The AMBI SPACE leaves Edit mode without writing, recalls the specified preset number, and
enters Preset mode.
When the AMBI SPACE receives a MIDI program change number 001-004, the corresponding LED 14 above the
PRESET switch illuminates and the PRESET display shows the corresponding preset number. If a MIDI program
change number 005 or later is received, then the LEDs 1-4 above the PRESET switch will not illuminate but the
PRESET display shows the corresponding preset number.
PRESET-1 001
PRESET-2 002
PRESET-3 003
PRESET-4 004
PRESET Number Program Change Number
PRE DELAY 92 0-127
DECAY 93 0-127
TONE 94 0-127
MIX 95 0-127
MODE 96 1-6
EFFECT ON/OFF 65 Off=0, On=127
Controls MIDI CC Numbers Value Range
1312
NOTE
This operation clears presets and returns all settings to the factory settings.
NOTE
Parameter adjustment via MIDI is effective in all of Manual, Preset, and Edit modes. Initializing
Updating Firmware
1. While holding down the MODE and PRESET switches, turn on the power to the AMBI SPACE.
2. Keep the two switches pressed until the PRESET 1–4 LEDs illuminate steadily. Release the switches when
the four LEDs are on.
3. All of the presets return to the factory shipment status and the AMBI SPACE is ready for usual operation.
Updating Firmware The firmware of the AMBI SPACE can updated. For the latest firmware or connection and
setup procedures, please confirm with the product or support page of the Free The Tone website.

1514
Specifications
• Number of presets: 128
• Input impedance: INST min. 1MΩ/ LINE min. 300 kΩ
• Output load impedance: min. 10 kΩ
• Maximum input level: INST +3 dBu / LINE +11 dBu
• Controls: PRE DELAY, DECAY, TONE, MIX, MODE, INST (-10 dB) / LINE (+4 dB) level select switch, KILL
DRY switch
• Terminals: 4 x 1/4" phone jack = L (mono) / R INPUT, L (mono) / R OUTPUT, 1 x DIN 5-pin connector (MIDI
IN), 1 x 9V DC input jack
• Power supply: 9V DC center negative polarity
• Current consumption: 280 mA
• Dimensions (W x D x H): 120 x 102.3 x 58.5 mm / 4.72 x 4.03 x 2.3 inches (incl. protuberances such as
footswitches, jacks)
• Weight: approx. 385 g / 0.85 lbs (excl. accessories)
• Accessories: Warranty card, Quick Start Guide, Safety Precautions, 4 x rubber feet
*Specifications and appearance subject to change without notice.
PRESET-1 SPRING MODE PRESET-2 PLATE MODE
PRESET-3 HALL MODE PRESET-4 SERENE MODE
Factory presets
This manual suits for next models
1
Table of contents
Other Free The Tone Recording Equipment manuals

Free The Tone
Free The Tone TRI AVATAR User manual

Free The Tone
Free The Tone PA-1QG User manual

Free The Tone
Free The Tone ARC-4 Use and care manual

Free The Tone
Free The Tone FF-1Y User manual

Free The Tone
Free The Tone Arc-53m User manual

Free The Tone
Free The Tone FT-1Y Flight Time User manual

Free The Tone
Free The Tone PA-1QG User manual

Free The Tone
Free The Tone PA-1QG User manual

Free The Tone
Free The Tone ARC-4 User manual

Free The Tone
Free The Tone FUTURE FACTORY User manual