Fujiiryoki CYBER-Relax SKS-1800 User manual

CYBER-Relax
SKS-1800
Medical EquipmentApproval in Japan: No. 27BZ0878
Device/Equipment 77, Vibrator, Home-use electric massaging equipment
USER MANUAL
Safety precautions..................................................... 2
Features..................................................................... 6
Name and functions of components.......................... 8
Assembly (Back-rest) ............................................. 11
Preparation before use ............................................ 12
Reclining and use of foot rest ................................. 14
Use of the AUTO COURSE ................................... 16
When terminating use on the way........................... 20
Movements during the AUTO COURSE................ 21
Use of selective functions....................................... 24
Movement adjustment of selective functions ......... 26
When changing the COURSE on the way.............. 29
When trouble is suspected ...................................... 31
Maintenance............................................................ 32
Storing..................................................................... 33
Care and inspection................................................. 34
Specifications.......................................................... 34
(Effect and Efficacy) Substitution of professional masseur
•Recovery from fatigue
•Promotion of blood circulation
•Removal of muscular fatigue
•Relief of muscular stiffness
•Alleviation of neuralgia or muscular pain
•Thank you for your purchasing of our massage chair CYBER-Relax AS-888.
•Read this manual carefully before use to learn about proper handling methods.
•After reading though, keep this manual at a safe place where you can consult whenever it is
necessary.
•Make sure you have received the warranty certificate.
Be sure to read this manual thoroughly in order to ensure
proper use. In particular, make certain to read the section
"IMPORTANT SAFETY INSTRUCTIONS"
Keep this manual in safe place so that it can be found easily.
Massage Chai
r

IMPORTANT SAFETY INSTRUCTIONS
1
Contents
Important Safety Instructions....................................2
Features.....................................................................6
Name and functions of components..........................9
Assembly (Back Rest).............................................13
Preparation before use.............................................14
Reclining and use of Foot Rest...............................18
Use of the AUTO COURSE....................................20
When terminating use on the way...........................25
Movements during the AUTO COURSE................26
Use of selective functions .......................................30
Movement adjustment of selective functions..........31
When changing the COURSE on the way ..............38
Use of the child safety lock function.......................40
When trouble is suspected.......................................41
Maintenance............................................................42
Storing.....................................................................43
Care and inspection.................................................44
Specifications..........................................................44
(Effect and Efficacy) Substitution of professional masseur
•Recovery from fatigue
•Promotion of blood circulation
•Removal of muscular fatigue
•Relief of muscular stiffness
•Alleviation of neuralgia or muscular pain
•Thank you for your purchasing of CYBER-Relax SKS-1800.
•Read this manual carefully beforehand to use the product properly.
•After reading though, keep this manual at a safe place where you can consult whenever it is
necessary.
•Make sure you have received your warranty certificate.

IMPORTANT SAFETY INSTRUCTIONS
2
When using an electrical appliance, basic precautions should always be followed, including the following:
Read all instructions before using this appliance.
DANGER To reduce the risk of electric shock:
1. Always unplug this appliance from electrical outlet immediately after using and before cleaning.
2. Improper connection of the equipment-grounding conductor can result in a risk of electric shock.
Check with a qualified electrician or serviceman if you are in doubt as to whether the product is properly
grounded. Do not modify the plug provided with the product - if it will not fit outlet, have a proper outlet
installed by a qualified electrician.
WARNING To reduce the risk of burns, fire, electric shock, or injury to persons:
1. An appliance should never be left unattended plugged in.
Unplug from outlet when not in use, and before off parts.
2. Do not operate under blanket or pillow.
Excessive heating can occur and cause fire, electric shock, or injury to persons.
3. Close supervision is necessary when this appliance is used by, on, or near children, invalids, or
disabled persons.
4. Use this appliance only for its intended use as described in this manual.
Do not use attachments not recommended by the manufacturer.
5 Never operate this appliance if it has a damaged cord or plug, if it is not working properly, if it has
been dropped or damaged, or dropped into water.
Return the appliance to a service center for examination and repair.
6. Do not carry this appliance by supply cord or use cord as a handle.
7. Keep the cord away from heated surfaces.
8. Never operate the appliance with the air openings blocked.
Keep the air openings free of lint, hair, and the like.
9. Never drop or insert any objects into any opening.
10. Do not use outdoors.
11. Do not operate where aerosol (spray) products are being used or where oxygen is being
administered.
12. To disconnect, turn all controls to the off position, then remove plug from outlet.

IMPORTANT SAFETY INSTRUCTIONS
3
WARNING
13. Grounding Instructions
This product must be grounded. If it should malfunction or breakdown, grounding provides a path of least
resistance for electric current to reduce the risk of electric shock. This product is equipped with a cord
having an equipment-grounding conductor and a grounding plug. The plug must be plugged into an
appropriate outlet that is properly installed and grounded in accordance with all local codes and
ordinances.
This product is for use on a nominal 120-volt circuit, and has a grounding plug that look like the plug
illustrated in sketch A. A temporary adapter that looks like the adapter illustrated B and C may be used to
connect the plug to a 2-pole receptacle as shown in sketch B if a properly grounded outlet is not available.
The temporary adapter should be used only until a properly grounded outlet (sketch A) can be installed by
a qualified electrician. The green colored rigid ear, lug, or the like extending from the adapter must be
connected to a permanent ground such as a properly grounded outlet box cover.
Whenever the adapter is used, it must be held in place by a metal screw.
GROUNDING METHODS
- Sketch A - - Sketch B - - Sketch C -
Save these instructions
Tab for
grounding screw
Metal
screw
Adapter
Grounded
outlet box
Grounding
pin
Grounded
outlet
14. Massager is intended for Household Use Only.
15. Be sure to check that there is not anybody (children in particular), pet or obstacle behind prior to
inclining the Back Rest.
Otherwise, it may result in a cause of injury or trouble.
16. Be sure to check that there is not anybody (children in particular), pet or obstacle behind prior to
lowering the Foot Rest.
Otherwise, it may result in a cause of injury.
17. Be careful not to operate the Back Rest with the cord wound on the main unit, or with the cord
hooked to the other obstacle.
Otherwise, the unreasonable force may be applied to the cord, probably resulting in a cause of fire or
electric shock.
18. Be careful not to put the hand into the clearance at the underside of Back Rest or to the clearance
between the Back Rest and Arm Rest.
Otherwise, it may result in a cause of injury.

IMPORTANT SAFETY INSTRUCTIONS
4
WARNING
19. Do not attempt to stand on the Arm Rest, Foot Rest or Back Rest.
Otherwise, the massager may fall down, resulting in injury.
20. Do not use the massager on the head, arm, knee or abdomen. As well as, do not put your hand or
leg between knead ball.
Otherwise, the user may feel sick or an injury may occur.
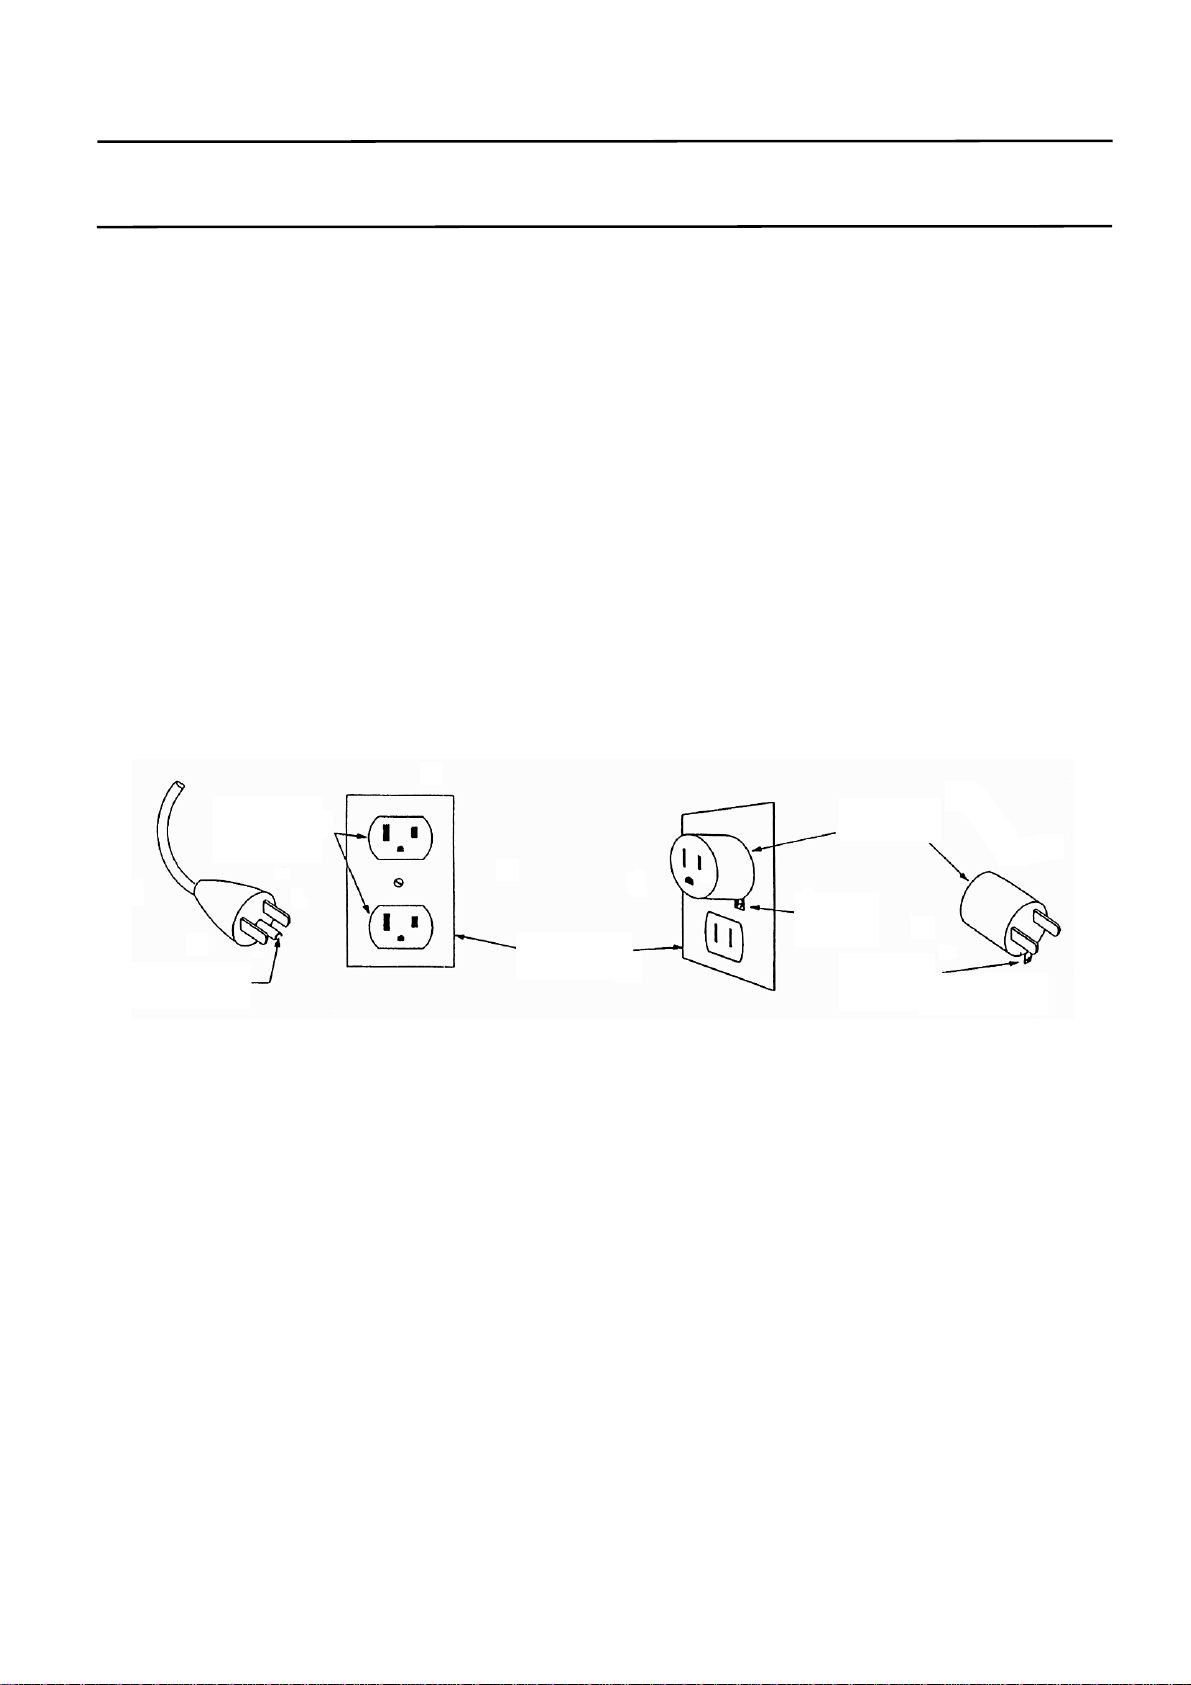
21. Do not attempt to plug/unplug the power plug with wet hands.
Otherwise, it may result in injury or electric shock.
22. When the cover cloth is broken (when the built-in mechanism is exposed), do not use such
massager, but send it for repair.
Otherwise, it may result in a cause of accident, or injury.
23. Never attempt to disassemble the massager. Do not allow any personnel other than repair engineer
to disassemble or repair the massager.
Otherwise, it may result in a cause of fire, electric shock or injury.
24. The following persons are requested to consult a doctor prior to use.
Otherwise, the user may feel sick or an injury may occur.
•Those who are under the medical treatment or particularly those who complain of indisposition
•Those who have malign tumors
•Those who suffer from heart trouble
•Those who are in menstrual period or pregnant
•Those who require complete rest
•Those whose backbone is abnormal or bent
•Those who desire to use the massager on a part of the body that is diseased or receiving medical
treatment
•Those who are feverish (38°C or over)
•Those who have weak bones (osteoporosis etc.)
25. If sickness or pain is felt during use, stop using the massager and consult a doctor immediately.
Otherwise, it may result in injury.
26. Attempt to use the massager up to 15 minutes for each use. Limit the use of massager at one point,
up to 5 minutes.
Otherwise, the use of massager at one point for a long time continuously may result in adverse effect.
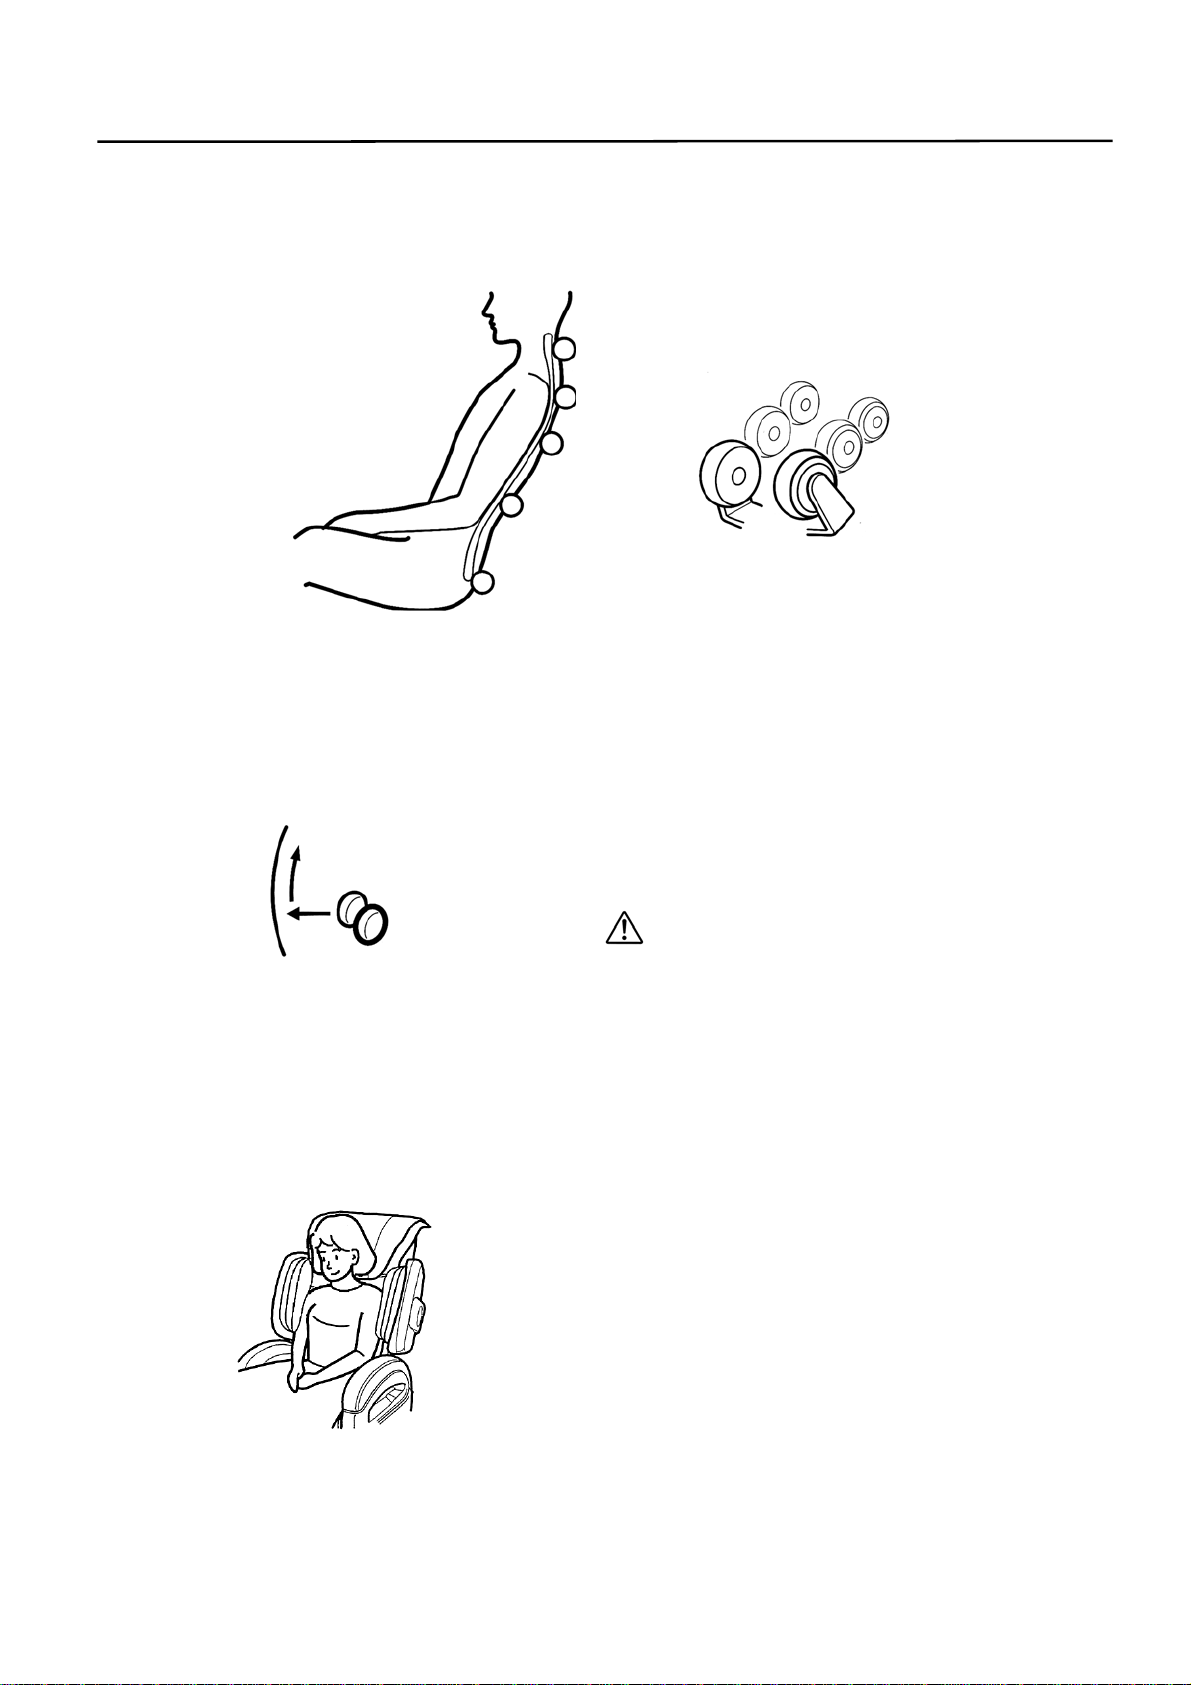
27. Check the knead ball position for the sake of safety before leaning on the massager slowly. Do not
twist the body, but lean on the massager straight, so that the backbone is located at center of
knead ball.
Otherwise, leaning on the massager abruptly may injure the backbone or result in injury.
28. Do not pull the cord, but the plug, when unplugging the massager.
Otherwise, the electric shock or short-circuit may occur, resulting in fire.
29. Do not use the massager with bare skin.
Otherwise, it may result in a cause of injury.
30. Do not move the massager with a person on it.
Otherwise, the massager may fall down.

IMPORTANT SAFETY INSTRUCTIONS
5
WARNING
31. After use, be sure to set the POWER switch to [OFF] position.
Otherwise, it may result in accident or injury due to child's mischief.
32. Do not attempt to pull the Back Pad forcibly or hang from the Back Pad.
Otherwise, the Back Pad may come off, probably resulting in injury or broken massager.
33. Do not attempt to damage, bend, pull, twist, or bundle the cord forcibly.
Otherwise, the cord may break, resulting fire or electric shock.
34. Do not use the massager on other than the designated voltage.
Otherwise, it may result in a cause of fire or electric shock.
35. Do not use the massager in the bathroom, or places where humidity is high.
Otherwise, it may result in electric shock or damage.
36. When the massager becomes inoperative, disconnect the power plug immediately for prevention of
accident, and ask the sales agent for inspection/repair information.
Otherwise, it may result in fire due to electric shock, leaking current, short circuit, etc.
37. Switch the power [OFF] instantly at the time of power failure, as well as pull the power plug out
from the socket.
Otherwise, it would become dangerous at the time of power comeback.
38. Be careful not to fall asleep during massage.
Otherwise, it may result in a cause of accident or injury.
39. Do not use the massager with other medical instruments (excluding foot type massager).
Otherwise, it may result in an accident or injury.
40. Place the massager main unit at a level floor surface.
Otherwise, if it is placed at an unstable place, it may fall down, probably resulting in a cause of injury.
41. The maximum permissible weight of the massager is 100 kilograms.
Do not use the massager with those who weigh more than 100 kilograms.
Otherwise, an accident may happen or damage to the machine may result.

Features
1. POINT NAVI sensor
(When using the AUTO COURSE only)
•Before starting the massage,
the Point Navi scans the
body shape and the posture.
Technique to scan the
massage line along the
body shape has realized
effective massaging.
2. “3D” mode
•“DEEP” and “GENTLE” features have been
added to the KNEAD, TAPPING and
WAVELET functions.
Massage of new sensation relieves stiffened
and tired muscles.
•Three-dimension massaging that adds up the
“Fore-aft” movements to the conventional
massaging functions has realized a stereoscopic
kneading feel emulating professional skills.
3. “STRETCH” mode
•Stretch function relieves strains from bottom
to top by applying rolling motions
simultaneously with the shiatsu treatment.
•Complex massaging that adds up the
KNEAD, TAPPING and WAVELET to the
stretch function relieves stiffness or fatigue
more effectively.
4. “FOOT STRETCH” mode
•“FOOT STRETCH” is a massaging mode
with new sensation, which allows moving up
or down the Foot Rest in addition to the air
massaging of legs.
CAUTION
In the “FOOT STRETCH” mode, the FOOT
REST will go down automatically while it is
inflated with air. You must confirm that there
is no obstructing object or child under the
FOOT REST before starting the mode.
5. AIR SHOULDER massage
•Air Shoulder massage relieves strains from
around shoulders with the air massage.
•Massaging strength is adjustable at 5 levels
from “GENTLE” to “STRONG”.
6

Features
6. Massaging with exquisite movements closely resembling human hands
•11 basic movements that integrate sensations of professional masseur which are more friendly to
human being
KNEAD UP KNEAD DOWN TAPPING WAVELET RUBBING
Relieves stiffened
muscle from bottom
to top.
Relieves stiffened
muscle from top to
bottom.
Comfortable
TAPPING promote
the blood
circulation.
Simultaneous
TAPPING and
KNEAD DOWN
produce excellent
feeling of comfort.
KNEAD DOWN
movement weaker
than the gentle
strength
DEEP KNEAD
UP DEEP KNEAD
DOWN STRETCH SHIATSU
KNEAD UP at a
level higher than the
strong
KNEAD DOWN at
a level higher than
the strong
Relieves stiffness
from bottom to up
with combined
massaging of
SHIATSU and
ROLLING.
Presses
concentrically at one
place.
ROLLING
WHOLE PART
Relieves stiffness
uniformly over the
entire back.
Relieves stiffness
concentrically at a
limited area.
7

Features
7. Fatigue relieving “AIR massage”
•Stimulation by air promote the blood
circulation over the entire body. Back
Shoulder
Waist
Bottom
Thigh
Bottom vibrator
Calf
2-level kneading,
effective to improve the
blood circulation
Sole
Air bags are provided for LEGS, THIGHS,
BOTTOM, WAIST, BACK and SHOULDER.
Entire body is massaged with pleasant
stimulus by air.
Seat heater
Built-in vibrator provides additional stimulus
rhythmically, which promotes the blood
circulation in a mood of relaxation.
•“COMBO FOOT REST” provides
massaging at the legs and other points
simultaneously excepting the SHOULDER.
•“PULSE” is a more effective mode that
provides massaging by repeating the supply
and exhaust of AIR several times after
supplying air at each point.
Ankle
•AIR massage consisting of 5 levels
Massaging strength can be set at any of 5
levels from “GENTLE” to “STRONG”.
8. Four AUTO COURSE can be selected depending on symptoms
Whole course ................. To relieve stiffness from the entire area of the back
Shoulder course ............. To relieve the neck and shoulder intensely
Waist course ..................To relieve the waist intensely
7 MIN course ................ Whole course is reduced to approx. 7 minutes.
* Additional 3 modes can be selected in the Whole , Shoulder and Waist modes depending on your need.
* There is no body shape detection during the 7 MIN course.
9. Intensity is adjustable at 5 levels for the AUTO COURSE.
8

Name and functions of components (Main unit)
Pillow
Air massage on the
shoulders.
Shoulder
Turn over to the back before
starting the massage.
Relax and lay the
back on.
Remote Controller
stand
Back Pad
In addition to the entire
back, the air massage is
applied also to the back
and the waist.
Back Rest
Seat
Air massage at the bottom
and thighs.
A heater and a vibrator are
built-in the seat. Arm Rest
Turn the switch to “OFF”
after use.
Power supply fuse
Power switch
Air massage is applied
to the legs.
Foot Rest
Seat pad
Power cord
Castor
Power cord plug Grounding terminal
[Accessory]
Shoulder unit Remote Controller stand Pillow Back pad
Left Right Cap (2 pieces)
Front Rear Rear Front
Mounting screw
(
4
p
ieces
)
Instruction
Manual
Mounting screw
(
2
p
ieces
)
Grounding
cable
Phillips screwdriver
9

Name and functions of components (Remote Controller)
10
Starts and stops the massaging, and
stores the knead balls.
“START/RESET” button
LCD display
Displays detail of setting or cautions.
(Page 12)
Stops the massaging movement.
It stops the selected course during the
AUTO COURSE.
“STOP” button
“ADJUST SHOULDER” button
This button allows adjusting finely the
shoulder position during the AUTO
COURSE and the shoulder position
setting for selected function.
It allows also moving the knead balls
when selecting a function.
Shoulder position can be adjusted finely
even on the way of the AUTO
COURSE.
“REPEAT” button
This button allows
r
epeating the
currently selected massage during the
AUTO COURSE.
“SHOULDER” button
Use this button to turn “ON/OFF” the
air shoulder massage or adjust its
strength at one of 5 steps.
Intensity of massaging can be
adjusted at 5 levels during the
AUTO COURSE.
“STRENGTH” button
Desired body section and type of
massage can be selected out of 11
options in the AUTO COURSE.
“AUTO COURSE” button
A
DJUST
SHOULDER
UP
START
RESET
STOP
DOWN
AUTO COURSE
SHOULDE
R
WHOLE
WAIST
STRENGTH
7 MIN
“FOOT STRETCH” button
This button allows interrupting the
currently selected massage and
shifting to next massage section.
“SKIP” button
“STRENGTH” button
Use this to adjust the intensity of
“AIR” at 5 steps during the AUTO
COURSE.
Allows turning “ON/OFF” the “FOOT
STRETCH”.
REPEAT
SKIP
“PULSE” button
This button allows turning “ON/OFF” the
air massage with the foot rest or selecting
the simultaneous massage on the calves
combined with another point.
“FOOT REST” button
Allows selecting the “PULSE” mode of
“AIR” massaging. “PULSE” mode
cannot be used simultaneously with the
“FOOT STRETCH”.
AIR
FOOT
STRETCH
SHOULDE
R
PULSE
STRENGTH
FOOTREST
VIBRATION
HEATE
R
UP UP
DOWN DOWN
FOOT REST
RECLINE
R
“HEATER” button
“UP”, “DOWN” buttons
Allows adjusting angles of the back
rest and the foot rest. Foot rest
movement is interlocked with that of
back rest.
* Movements of “AIR”,
“TAPPING” and “WAVELET” are
stopped when the back rest is
reclined.
This button turns “ON/OFF” the seat
heater.
The heater is turned OFF as the timer
counts up the predetermined time
(1 hour).
* Button lamp illuminates while the
heater is turned “ON”. It goes off i
f
the heater is turned “OFF”.
This button turns “O
N
/OFF” the
vibrator at the seat.
“VIBRATION” button
Allows adjusting the angle at the
FOOT REST only.
“UP”, “DOWN” buttons

Name and functions of components (Remote Controller)
<Under the Remote Controller lid> (Movements of selective functions)
Desired function can be selected from
10 kinds of massaging.
KNEAD UP
KNEAD
DOWN
TAPPING
WAVELET
RUBBING
DEEP KNEAD UP
DEEP KNEAD
DOWN
STRETCH
SHIATSU
ROLLING
“FUNCTION” selector button
Allows selecting the stretch or a
massaging function that
combines the “KNEAD UP”,
“TAPPING” or “WAVELET”
with the stretch movement.
“STRETCH” button
Allows selecting a massaging function
that combines the “KNEAD UP”,
“KNEAD DOWN”, “TAPPING” or
“WAVELET” with the strong or gentle
movement.
“WHOLE/PART” button
Allows setting the massaging area
while moving up or down along the
b
ack of body. When the “WHOLE”
is selected but the shoulder position
is not set, the “SHOULDER
ADJUSTMENT” is performed.
“3D” button
“SPEED” adjust button
Massaging speed can be adjusted at 3 levels.
* This adjustment is limited to the
KNEAD UP, KNEAD DOWN, TAPPING,
WAVELET, RUBBING, DEEP KNEAD
UP, DEEP KNEAD DOWN, STRETCH
KNEAD UP, STRETCH TAPPING and
STRETCH WAVELET only.
A
DJUST
SHOULDER
UP
START
RESET
STOP
DOWN
3D
FUNCTION STRETCH
SPEED WIDTH
WHOLE/PART
Allows adjusting the massaging
intensity at 7 levels.
“STRENGTH” adjust button
STRONG GENTLE
STRENGTH
AIR
FOOT
STRETCHSHOULDER PART
“FOOT STRETCH” button
Allows turning “ON/OFF” the
“FOOT STRETCH”.
COMB
O
FOOTREST
PULSE STRENGTH
“WIDTH” adjust button
“SHOULDER” button
This button allows turning “ON/OFF”
the air shoulder massage or adjusting its
intensity at one of 5 levels.
Width between knead balls can be
adjusted at 3 levels.
* This adjustment is limited to the
TAPPING, STRETCH, STRETCH
TAPPING, 3D TAPPING,
SHIATSU and ROLLING only.
Air “STRENGTH” button
Intensity of air massage can be
adjusted at 5 levels.
VIBRATION
HEATE
R
UP UP
DOWN DOWN
FOOT REST
RECLINE
R
Allows selecting the massaging par
t
out of 6 parts.
Air “PART” button
Allows selecting the “PULSE” mode of
“AIR”.
* This mode cannot be used
simultaneously with the “FOOT
STRETCH”.
“PULSE” button
“COMBO FOOT REST” button
Allows massaging legs simultaneously with
other points.
* This function cannot be selected
simultaneously with the “Foot Stretch”.
11

Name and functions of components
LCD display and information indicated on it
♦Display during the AUTO COURSE (See page 20 for method of use.)
♦Backlight
Massaging function on the move
Indication of intensity of AUTO
COURCE at 5 levels
Indication of selected additional
function
1. REJUVENATE
2. REFRESH
3. RELAX
Indication of name of AURO
COURCE on the move
Indication of remaining
massaging time in minute
Indication of intensity of AIR
SHOULDER massage at 5
levels
Indication of present position
of knead balls
MIN
♦Display when selected function is operating (See page 31 for method of use.)
Indication of AIR massaging
intensity at 5 levels
Indication of VIBRATION
massaging
Indication of massaging
intensity at 7 levels
Indication of selected
additional function forAIR
Indication of AIR massaging
intensity at 5 levels
Indication of VIBRATION
massaging
Indication of AIR massaging
of LEGs
■
SH 3
■
DR
Display of AIR SHOULDER
massage
A
IR 3
KNE
A
D
DOWN
Displays the massage being
performed at the next.
KNEAD
UP
1
WHOLE
BODY:
Displays the AIR massage
movement
A
IR 3
■
SH 3
■
DR
3-level display of knead ball
speed
Name of selected function
Indication of AIR massaging
of WAIST
Indication of AIR massaging
of BACK
Indication of present
position of knead balls
Indication of width between
knead balls at 3 levels
Indication of intensity of AIR
SHOULDER massage at 5 levels
Indication of remaining
massaging time in minute
Indication of massaging area
“WHOLE/PART/POINT”
Indication of AIR massaging
of THIGHS
Indication of AIR massaging
of BOTTOM
•Backlight glows if any switch button is pressed.
•Backlight extinguishes as approx. 2 minutes elapse in the stored condition.
•It extinguishes also when no switch is pressed for approx. 2 minutes after turning on the power
switch.
12

Assembly
Assembly (Back Rest) / Folding
Raise the Back Rest in the arrow direction and
confirm that the stopper (enlarged view in the
circle) is locked. (You will hear a click.)
Hold down the stopper located under the Back Rest
(enlarged view in the circle) in the arrow direction
and slowly bring down forward the Back Rest.
* Take care not allow it falling down suddenly.
* Back Rest cannot be folded where the shoulder
unit is mounted.
Fixed
Released
Stopper Stopper
Do not insert hands or fingers
between the Arm Rest and the Back
Rest when moving the Back Rest.
Do not touch any section other
than the section in the circle
when operating the stopper.
CAUTION
CAUTION
Installation of the Shoulder unit
1. Set the Back Rest at the upright
position when installing the Shoulder
unit.
2. Insert the protrusions and the air
joint of the Shoulder unit in the holes
provided on the Back Rest.
3. Fix securely with mounting screws at
two places.
4. Install the cap to finish up.
Shoulder unit
Holes Protrusions
Air joint
Protrusions
Mounting screw Backward
Phillips screwdriver * Install the cap in a
manner that the
protrusion on the cap
will face backward.
Cap
Install also the opposite side in the same
way. To remove the Shoulder unit, reverse
the order of installation.
Make sure to install the Shoulder unit
securely. Otherwise, it will cause air
leakage or injuries or mechanical trouble if
the unit has dropped off accidentally.
CAUTION
Request
13

Preparation before use
Use of Back Pad and Pillow
Attach the Back Pad using the fastener on the Back Rest. Attach the pillow using the magic tape on the
Back Rest.
1. Install the Back Pad. 2. Install the Pillow.
Magic Tape
Back Pad Fastener Pillow
Back Pad
•Turn down the Pillow backward before starting the massage.
•If you feel the massaging too hard, return the Pillow to the normal position.
•When you do not use the massaging, you can use it as a reclining chair with the Back Pad and the
Pillow attached at the specified positions.
Always confirm before use that the cloth cover over the Back Rest is not broken by lifting
the Back Pad. Confirm also other sections of the cloth are not broken.
(If any breakage is discovered regardless how tiny it is, stop the use immediately,
disconnect the power cord plug and consult your dealer for repair.)
Using the chair without mending the breakage could cause injury or electrical shock
WARNING
14

Preparation before use
Installation of the Remote Controller stand
[Completed view]
1. Remove the blinding
piece attached to the
left Arm Rest.
2. Install the Remote
Controller stand
securely with 2 pieces
of mounting screw.
Remote Controller stand
Blinding piece Mounting screw Phillips screwdriver
3. Reinstall the blinding
piece.
[Adjustment of the
Remote Controller holder]
Loosen the set screw.
Retighten the screw at a
desired position.
[Mounting and removal of
the Remote Controller]
Mounting
Insert from the
top to mount.
Removal
Hold the top
and pull up.
Set screw
Tightening
Blinding piece Loosening
To remove the Remote Controller stand,
reverse the order of installation.
Make sure to install the Remote Controller
stand securely. Otherwise, it will cause
injuries or mechanical trouble if the stand
has dropped off accidentally.
CAUTION
Request
15

Preparation before use
WARNING
Following persons must consult physician before using the product.
•
Who are suffering from malignant tumors
•
Who are suffering from acute sickness (with aches)
•
Who has a heart disease
•
Who uses a medical electronic device, which is embedded in the body, such as the pace-maker, or
others
•
Who has some abnormality or deformity of or on the backbone
•
Who is undergoing medical treatment or feels some physical abnormality
•
Who wishes to use the product at the section on the body, which was treated previously or is ill now
•
Who needs repose
•
Who has problems in their legs with blood circulation
•
Who is pregnant or in a period of monthly illness
•
Who is suffering from fragility and osteoporosis
•
Who has a high fever
•
Who suffers from dysesthesia
•
Who suffers from anemia
Use of the product could cause abnormal condition on the body.
Before reclining the Back Rest or elevating the Foot Rest, confirm there is nobody, pet or object at the
behind, under the Foot Rest, or others. It could cause accident, injury or damage on furniture.
When massaging around or periphery of neck, take care of the movement of knead balls and refrain from
massaging with excessive intensity. Accident or injury could result.
When reclining the Back Rest, be careful not to pinch hands, arms or feet between the Back Rest and the
seat/Arm Rest. It could cause injury.
Raise the Back Pad before use to check if the cloth cover on the Back Rest as well as other sections is not
broken. (If it is, you must stop the use immediately, disconnect the power cord plug and consult your dealer
for repair.) Using the product with the cloth cover broken could cause injury or electrical shock.
Confirm before using that you have removed a wrist watch or other accessories from your hands or arms.
It could cause accident or injury.
Refrain from allowing a child or person, who cannot express one’s will, to use the product alone. There is
risk of electrical shock or injury.
Do not use or store at a bathroom, or others, where the environment is highly humid. It could cause
electrical shock, fire, trouble or mold.
CAUTION
Time of use should not exceed 15 minutes, or 5 minutes when using at the same position on the body.
Using for extended period of time could damage muscles or nerves.
<Request> Refrain from using the product for more than 30 minutes a day.
If any abnormality is observed or felt on the body during using the product, stop it immediately and
consult a doctor.
Make sure to turn off the power switch after use.
There is risk of trouble as a result of abuse by children.
Insert the power cord plug securely to prevent dirt accumulating on the legs. It could cause electrical
shock, short circuit or fire.
Do not use the chair at the vicinity of source of fires such as stove, or others or while smoking. Refrain
also from using it on a heating device such as the hot carpet, or others. There is risk of fire.
Do not massage the elbow, knee, head or belly. It is also prohibited to insert hand or foot between the
knead balls. It could cause injury or disorder of physical condition.
Never place hands, head, or others under the Foot Rest or bottom of the chair. It could cause accident or
injury.
Do not use while wearing any hard hair ornament. You could get hurt.
16

Preparation before use
Place of installation
60 cm or more
Secure sufficient spaces around the chair. 60 cm or more
* Request: As the Back Rest is reclined, the Foot Rest is
turned up at the opposite end. Minimum 60 cm of
spaces must be secured both at the front and the
back of the chair.
* Request: Bottom of the chair may damage the tatami
mattress or floor. It is recommended to spread a
piece of mattress under the chair.
Changing the place of installation
Hold down on the top of the Back Rest using the castors as the fulcrum.
Front part of the chair will be lifted. Move the chair in this position.
CAUTION
•
Do not attempt to move the chair while a person or object sitting
on the seat. There is risk of upset.
•
Where the floor surface is not hard enough, the chair should not
be moved using the castors or by dragging directly on the floor. Castors
•
Do not hold the Seat or Foot Rest to move the chair.
•
Front part of the chair is rather heavy. Take sufficient care when
lifting the front part of the chair.
Grounding connection
Securely connect the grounding cable at the
chair. Unless the grounding cable is
installed, it could cause electrical
shocks when the earth leakage
occurs. Consult your dealer to
install the grounding cable.
When the grounding terminal is provided at
the wall receptacle
•Extend the grounding cable
from the grounding terminal
on the chair main unit to that
on the receptacle.
Gas pipe … There is risk of explosion or
ignition.
Telephone cable or lightning rod … It is
dangerous when struck by lightning.
Water pipe … Earth connection is not
established if plastic pipes are connected
on the way.
When the grounding terminal is not provided
at the wall receptacle
•Consult your dealer or electrical work
contractor for the installation of grounding
cable. (Class 3 connection. Service is provided
on the charge basis.)
CAUTION
Grounding cable
Do not connect the grounding cable
at the followings:
17

Reclining and use of Foot Rest
(Preparation)
•Insert the power cord plug in the receptacle and turn on the power switch on the chair.
Reclining the chair
1. While resting your back on the Back Rest, press the “DOWN” of the RECLINER switch.
If you keep holding down the
“DOWN” switch, the Back Rest
goes down while the FOOT
REST comes up.
Stimulation by the knead ball is
intensified as much as the Back
Rest is turned down.
Before reclining the Back Rest or elevating the Foot Rest,
confirm there is nobody, pet or object at the behind, under the
Foot Rest, or others. It could cause accident, injury or
damage on furniture.
Do not step on the Back Rest, Arm
Rest, Foot Rest or Shoulder.
Person stepping on or the chair
itself could upset the chair main
unit and cause accident or injury.
HEATER
DOWN
UP
FOOT REST
DOWN
UP
RECLINE
R
VIBRATION
WARNING
CAUTION
Upright condition
Reclined condition
2. When the Back Rest is turned down to a desired angle, remove the hand from the
RECLINER switch.
•Angle of the Foot Rest will also change along with the
reclining angle of the Back Rest.
HEATER
DOWN
UP
FOOT REST
DOWN
UP
RECLINE
R
VIBRA
TION
Request: When changing the reclining angle during massaging, gradually recline checking the
intensity of massaging.
18

Reclining and use of Foot Rest
3. To raise the Back Rest, press the “UP” button of the RECLINER switch.
If you keep holding down the
“UP” button, the Back Rest goes
up while the Foot Rest comes
down.
How to use the Foot Rest
1. Use the “UP” or “DOWN” button to adjust the angle of Foot Rest.
Before reclining the Back Rest or elevating the Foot
Rest, confirm there is nobody, pet or object at the
behind, under the Foot Rest, or others. It could cause
accident, injury or damage on furniture.
DOWN
UP
FOOT REST RECLINE
R
VIBRATION
WARNING
HEATER
UP
DOWN
HEATER
VIBRATION
UP
UP
DOWN DOWN
FOOT REST RECLINE
R
19
Table of contents
Other Fujiiryoki Massager manuals