manuals.online logo
Brands
  1. Home
  2. •
  3. Brands
  4. •
  5. Fujikura
  6. •
  7. Tools
  8. •
  9. Fujikura CT08 User manual

Fujikura CT08 User manual

KSP75-FP-011135(1)
INSTRUCTION MANUAL FOR HIGH PRECISION FIBER CLEAVER
CT08
Please read this instruction manual carefully before operating the equipment. Adhere
to all safety instructions and warnings contained in this manual.
1. Warnings and Cautions
WARNING: There is a possibility of death, serious injury, or
equipment damage resulting from improper use by
ignoring this documentation.
Safety glasses should always be worn during fiber preparation and splicing
operation.
Fiber fragments can be extremely dangerous if they come into contact with
your eyes or skin.
CAUTION: There is a possibility of personal injury or equipment
damage resulting from improper use by ignoring this
documentation.
Do not disassemble or modify the cleaver.
This cleaver is designed for cleaving the glass optical fibers used in
telecommunication. Do not attempt to cleave any other material.
Cleaver blade is extremely sharp. Do not touch as personal injury may result.
Take care not to place fingers in the blade during operation.
Never leave the cleaver exposed to water, for example, from rain or moisture.
2. Components of Cleaver
Name
Part Number
Qty
Remarks
Cleaver Main Body
CT08
1pc.
Fiber Plate
AD-50
1pc.
Fiber Scrap Box
FDB-04
1pc.
Carrying Case
CC-34
1pc.
Hexagonal Wrench
HEX-01
1pc.
Instruction Manual
M-CT08-EJ
1pc.
This documentation
Test report
-
1pc.
Accessories
Spare blade
CB-07
1pc.
Cleave blade for CT08
Arm set
ARM-CT08-01
1pc.
Arm set for CT08
Side Cover
SC-CT08-01
1pc.
Side Cover for CT08
3. Applicable Fiber
Applicable fiber
Single fiber, Silica optical fiber, SMF, MMF, NZDSF etc.
Cladding Dia. 0.125mm, Coating Dia:0.16 to 0.9mm
Cleave length
AD-50
5 to 20mm (Coating Dia.0.16 to 0.25mm)
10 to 20mm (Coating Dia. > 0.25mm)
11mm (Drop Cable, φ2, φ3mm code
Fiber holder
10mm
4. Appearance
5. Procedure
1. Release the Lock from the Lever(2).
2. Remove the Lid from the top of the Fiber Scrap Box(3). Then attach it to the
bottom of the Fiber Scrap Box.
3. Lift the Lever until it stops. The blade is automatically set at the start position and
is now ready to cleave the fiber.
NOTE: The Lever can lift up to 100 degrees. Do not lift it beyond 100 degrees.
4. Strip about 24 to 30mm of coating from the fiber to be cleaved, clean the fiber
with an alcohol wipe (and set it in the cleaver. When cleaving the fiber with
AD-50 adaptor, check and adjust the fiber length using the scale on the adaptor.
5. Close then gently push down on the Lever(1) until it stops. The blade
automatically moves and the fiber is cleaved.
Fig.4-1 Lever closed
Fig.4-2 Lever opened
Fig.5-1 Preparation
(4)Fiber Scrap
Box
(2)Lock
(3)Lid of Fiber Scrap
box
(1)Lever
(1)Lever
(2)Lock
(3)Lid of Fiber Scrap
box
KSP75-FP-011135(1)
6. Lift the Lever(1) until it stops and remove the fiber from the cleaver. Be careful
not to touch the fiber to anything, as this can contaminate the end-face of the fiber.
7. The fiber scrap is put into the Fiber Scrap Box after cleaving. Properly dispose it.
6. Maintenance
Properly clean the cleaver to ensure consistent cleaving quality. If the cleaver does
not cleave properly after cleaning, rotate the blade or change the blade height. Refer
to 6-3.
NOTE: Use the 1.5mm hex wrench, “HEX-01”, when changing the Blade
Position and Height. This is included with your cleaver.
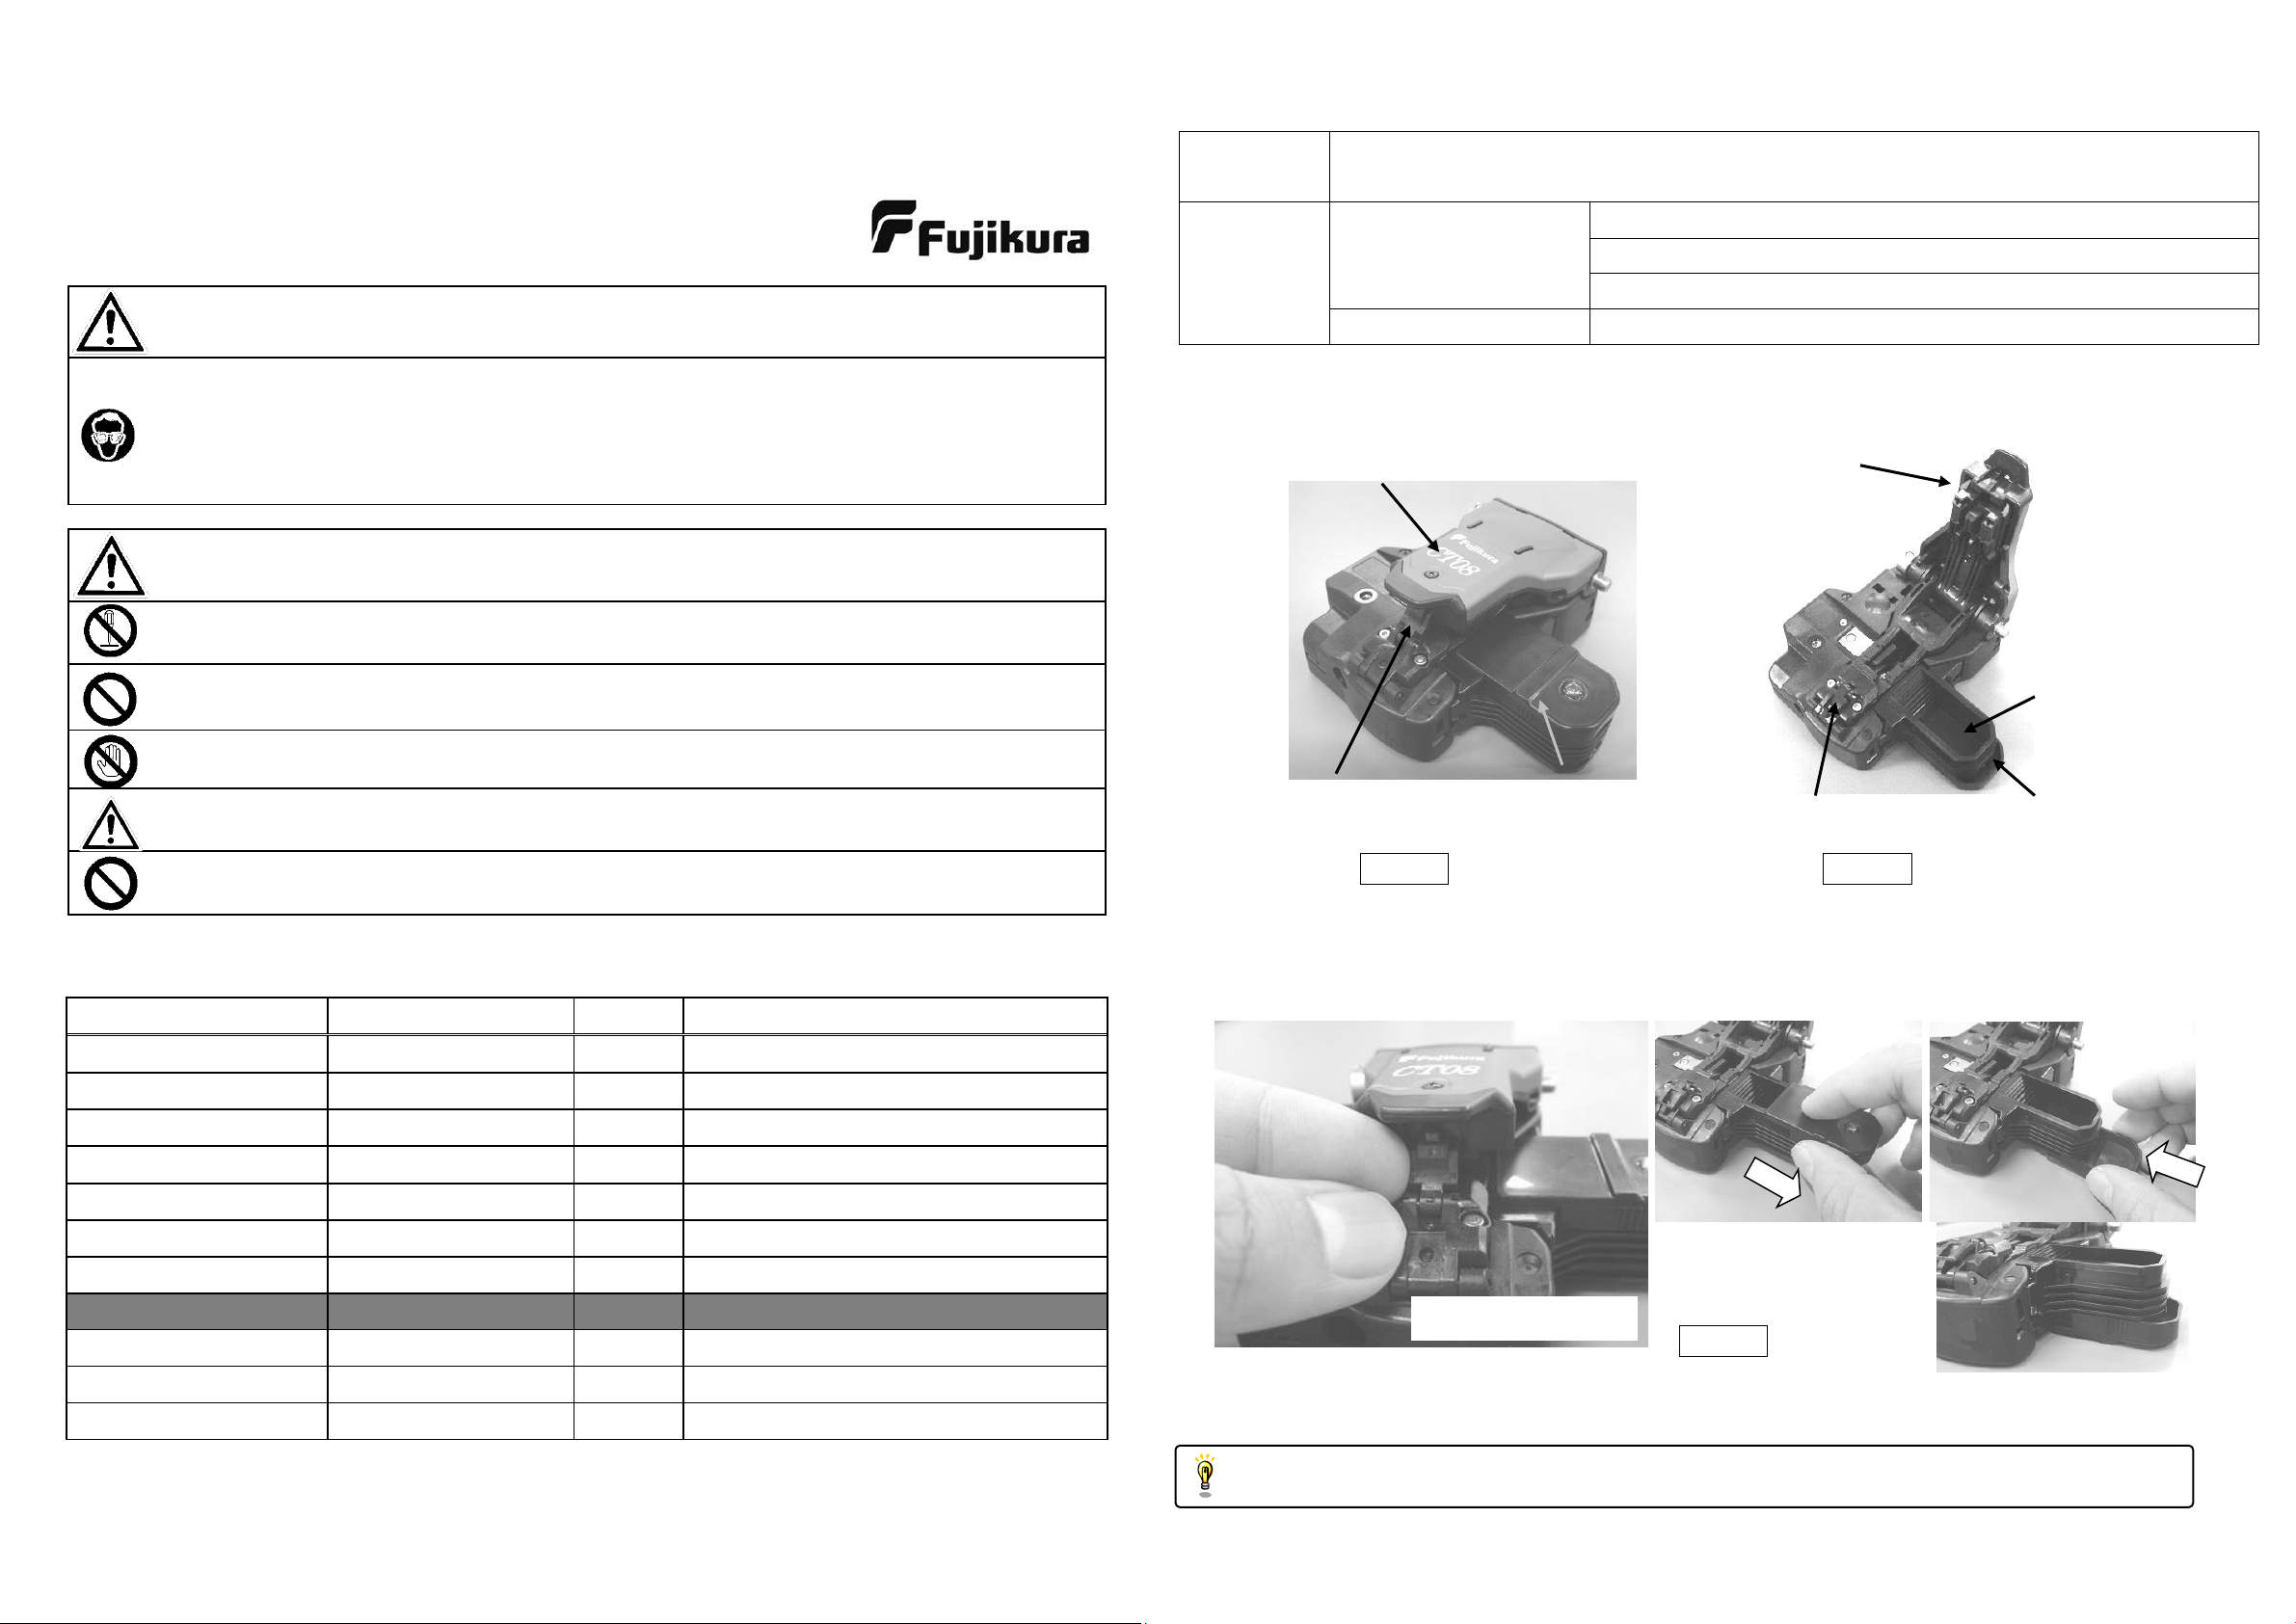
6-1. Cleaning
Clean all parts that the optical fiber touches with an alcohol moistened gauze or a
cotton swab.
If the cleaver is exposed to water, dry it with a dry gauze to prevent any rust.
NOTE: Do not to touch the blade during cleaning.
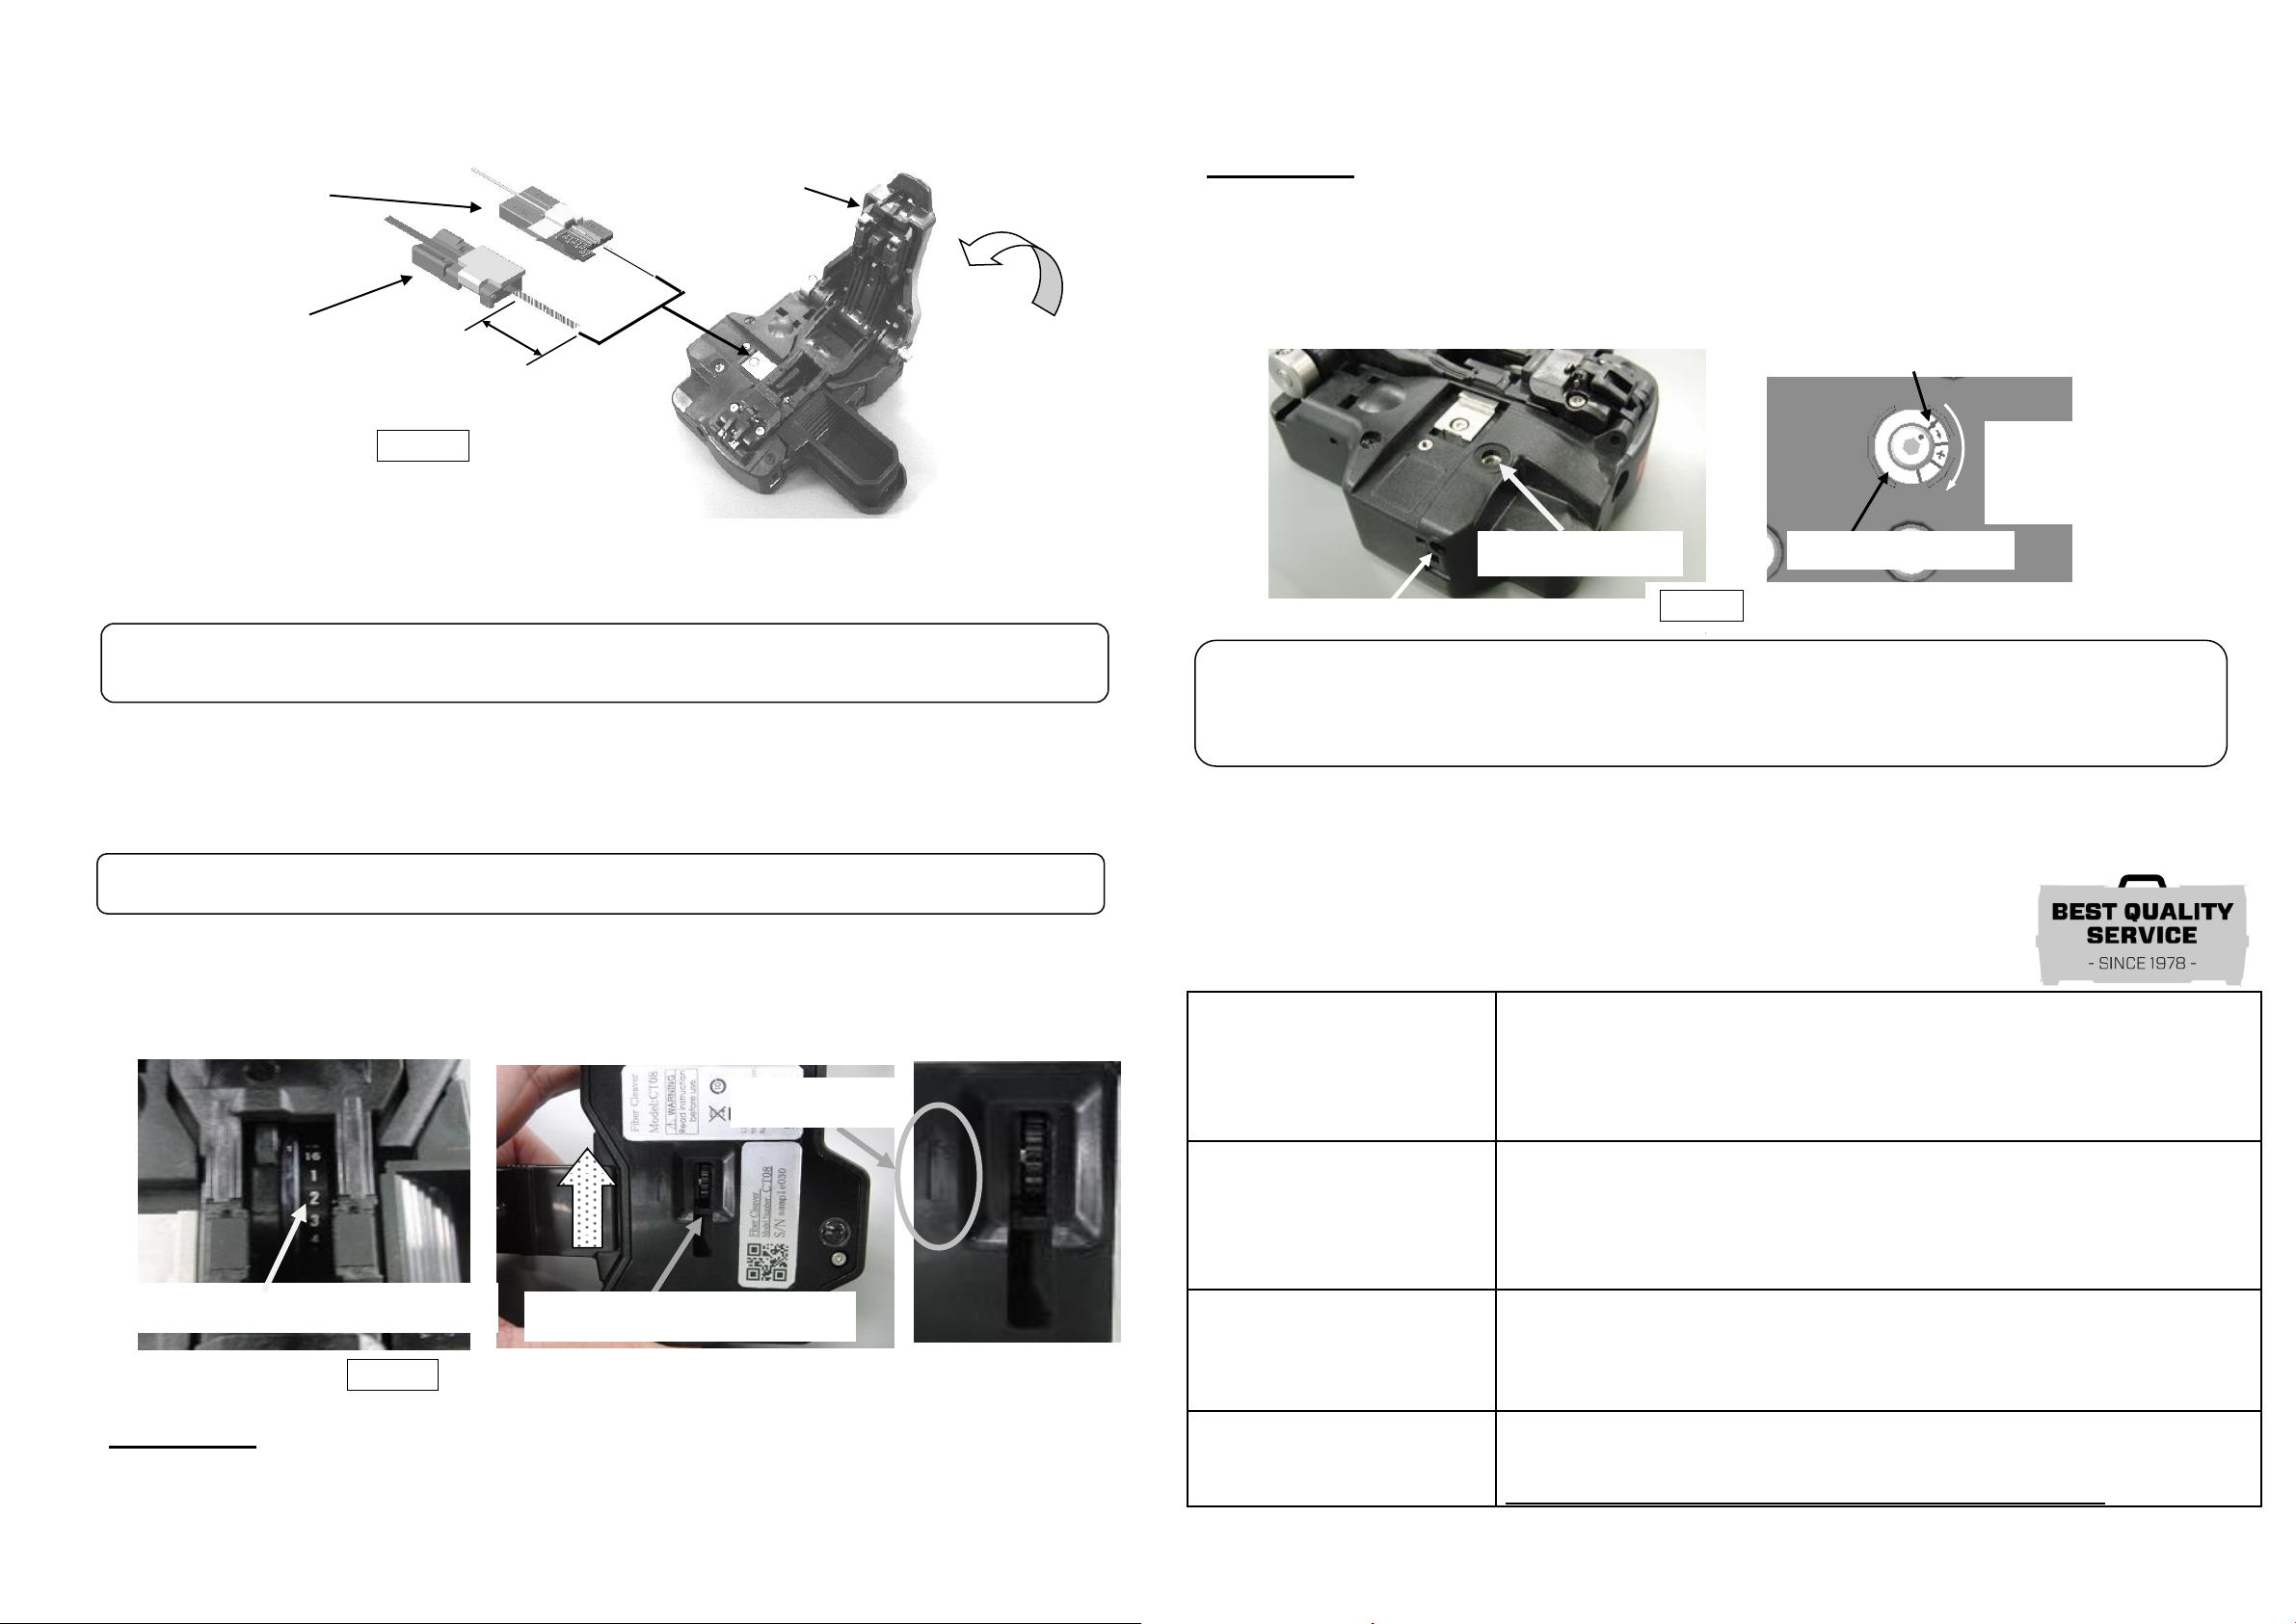
6-2. Change Blade Position
Check the bottom of the CT08. There is a Blade Rotating Dial(8) that changes the
blade position. The CT08 uses a circular blade that has 16 positions. Each position
can cleave 1,000 fibers. Rotate to the next number for a new blade position.
Procedure:
1. Check the Blade Positon Number(7) printed to the side of the blade.
2. Close the Lever(1) and then rotate the Blade Rotating Dial(8) in the direction of
the arrow until it clicks.
3. Check that the Blade Position(7) has advanced to next number.
6-3. Change Blade Height
The Blade height can be changed by rotating the Adjuster(10) located on the top of
the cleaver. It can be raised a total of 2 times.
Procedure:
1. Verify the position of the Blade Height Adjuster(10).
2. It is locked by the Adjuster Set Screw(11) to prevent turning. Fig.6-2.
3. Loosen the set screw with the HEX-01 and then rotate the Adjuster(10) one
mark. Do not rotate more than one mark at one time.
4. Tighten the Adjuster Set Screw(11). Overtightening may cause breakage.
NOTE: Replace the blade after raising it 2 times, and after all 16 positions
have been used.
The Cleave Blade and Arm set for CT08 is user serviceable. Contact
your Fujikura distributor for details.
7. Cleaver Disposal
The CT08 contains no toxic substances and no recyclable material. If the CT08
needs to be disposed, it should be discarded as noncombustible material.
8. Contact Address
Inquiries concerning products should be made to the
nearest sales agency or one of the following:
Fujikura Europe Ltd.
C51 Barwell Business Park Leatherhead Road,
Chessington, Surrey KT9 2NY,UK
Tel. +44-20-8240-2000 (Service: +44-20-8240-2020)
Fax. +44-20-8240-2010 (Service: +44-20-8240-2029)
URL http://www.fujikura.co.uk
AFL
260 Parkway East Duncan, SC 29334, U.S.A.
Tel. +1-800-235-3423 (Service: +1-800-866-3602)
Fax. +1-800-926-0007 (Service: +1-800-433-5452)
P.O.Box 3127 Spartanburg, SC 29304-3127
URL http://www.AFLtele.com
Fujikura Asia Ltd.
438A Alexandra Road, Block Alexandra Techno Park
#08-03, Singapore 119967
Tel. +65-6278-8955 Fax. +65-6273-7705
URL http://www.fujikura.com.sg
Fujikura Ltd.
1-5-1 Kiba, Koto-ku, Tokyo, 135-8512, Japan
Tel. +81-3-5606-1164 Fax. +81-3-5606-1534
URL: https://www.fusionsplicer.fujikura.com
Fig.6-1 Changing the Blade Position
(7) Blade Position Number
(8)Blade Rotating Dial
(9)Arrow
Adjuster initial position
Rotate clockwise
to raise blade
height
(10)Adjuster
(10)Adjuster
(11)Adjuster Set Screw
Fig6-2. Blade Height changing
(5)Fiber Plate
[AD-50]
(6)Fiber Holder
(1)Lever
Fig.5-2 Cleaving
KSP75-FP-011135(1)
CT08 光ファイバカッタ取扱説明書
このたびは単心光ファイバカッタをお買い上げいただきましてありがとうございます。
ご使用前に、必ず本取扱説明書をお読みください。
1.安全に関するご注意
警告 この警告を無視して誤った取り扱いをすると、
人が死亡または重傷を負う可能性があります。
光ファイバの接続作業の準備中あるいは接続作業中に、折れた光ファイバの破
片が誤って目に入る可能性があります。
安全のため、作業中は常に安全めがねを着用して下さい。
また、光ファイバの破片が目以外に付いた場合もケガをする危険があります
ので、光ファイバ屑の取り扱いには十分注意して下さい。
注意 この注意を無視して誤った取り扱いをすると、人が負傷する
危険および物的損傷のみの発生する危険があります。
本製品は、非常に精密な機械です。分解しないで下さい。
本製品は、光ファイバを切断することを目的としたものです。
決して光ファイバ以外の切断に使用しないで下さい。
切断刃には、触れないで下さい。ケガをする恐れがあります。
作業中に手を挟む恐れがありますので取り扱いには十分注意して
下さい。
雨水・結露など製品が濡れた状態での使用・保管はしないで下さい。
2.構成品
品名
型番
数量
備考
本体
CT08
1台
ファイバプレート
AD-50
1個
単心光ファイバ用アダプタ
屑回収箱
FDB-04
1個
キャリングケース
CC-34
1台
-
六角レンチ
HEX-01
1個
取扱説明書
M-CT50-EJ
1部
本紙
切断成績書
-
1部
-
アクセサリ
替刃
CB-07
1個
CT08 用
アームセット
ARM-CT08-01
1個
CT08 用
サイドカバー
SC-CT08-01
1個
CT08 用
3.適応光ファイバ心線
種類
単心、シングルモードおよびマルチモード 石英ガラス光ファイバ
クラッド径 0.125mm、被覆外径:0.16~0.9mm
切断長
AD-50 アダプタ
5~20mm ( 被覆外径 0.16~0.25mm )
10~20mm ( 被覆外径 0.25mm 超)
11mm ( ドロップケーブル、φ2、φ3コード)
ファイバホルダ
10mm
4.構造および各部名称
5.取扱手順
1. ストッパー(2)を手前に引っ張り、ストッパー(2)を外します。
2. 屑回収箱の蓋(3)を取り外し、無くさないよう屑回収箱(4)の下側にはめておきます。
3. 切断レバー(1)を後ろまで倒すと切断刃がセットされ切断可能状態になります。
切断レバー(1)は100°で止まります。限界以上に開けないでください。
図4-2 使用時
図4-1 収納状態
図5-1 事前準備
(2)ストッパー
(1)切断レバー
(2)ストッパー
(3)屑回収箱(蓋)
(4)屑回収箱
(2)ストッパー
(3)屑回収箱(蓋)
(1)切断レバー
KSP75-FP-011135(1)
4. 24~35mm 被覆を除去した光ファイバをセットします。
AD-50 を使用して単心ファイバを切断する場合はファイバプレート(5)の目盛り
で切断長を調節して下さい。テープ心線は各ファイバが重なっていないかチェック
し、真直ぐセットして下さい。(図5-2)
5. 切断レバー(1)を最後まで閉じると切断刃が動き光ファイバを切断します。
6. 切断レバー(1)を開き切断したファイバを取り出します。取り出す際に、切断した
光ファイバを当てないように注してください。
7. 切断された光ファイバの屑は、屑回収箱の中に溜まります。こまめに捨てて下さい。
6.メンテナンス
安定して高品質な切断面が得られるよう毎日の清掃、また定期的な点検をしてくだ
さい。切断刃は回転させてポジションの変更ができます。1ポジションで 1,000 本の
光ファイバが切断できます。また刃の高さを 2段階変えられます。
6-1.日常のお手入れ
アルコールを含ませたガーゼや綿棒で刃先や光ファイバが接する面のゴミや汚れを
取り除いてください。また本体が濡れている場合には、乾いた布などで水分を拭き取っ
てください。
6-2. 刃の回転(ポジションの変更)
1,000 本切断した後や切れにくくなった場合は刃ポジションを変えてください。
方法:本体裏面の中央に 刃回転ダイヤル(8)があります。切断レバー(1)を閉じた状態
で、このダイヤルを指で矢印方向へ回すと刃が 1ポジション動きます。
刃ポジションは本体を上側から見たときに、刃の横にある数字で確認できます。動か
しすぎた場合は戻すか、1周回してください。
6-3. 刃の高さ変更
刃の高さは最初の高さから 2段上げることができます。刃を 16 ポジション使いきっ
たあとに、刃の高さを変えることで再び光ファイバを切断することができます。
方法
1. 刃の高さをアジャスタ(10)で確認してください。
2. 添付の六角レンチを使いアジャスタ(10)を固定しているアジャスタ固定ネジ(11)
を緩めます。(図6-2)
3. 六角レンチを使いアジャスタ(10)を1目盛動かしてください。
4. アジャスタ固定ネジ(11)でアジャスタ(10)が動かないよう固定してください。
7.廃却方法(リサイクル)
光ファイバカッタは環境に有害な材質の部品を使用しておりません。
また、リサイクル可能な材質の部品も使用しておりません。不燃物扱いで廃却して下
さい。
8.お問合わせ先
修理・メンテナンス等で装置を返却する場合は、故障現象を
明記下さるようお願い致します。
技術的な
問い合せ先
〒135-8512 東京都江東区木場 1-5-1
(株)フジクラ 精密機器事業部 技術部
TEL:03-5606-1636 FAX:03-5606-1535
URL:https://www.fusionsplicer.fujikura.com/jp/
メンテナンス
窓口
〒861-0312 熊本県山鹿市鹿本町梶屋 748
フジクラプレシジョン株式会社 サービスセンター
TEL:0968-46-4012
(10)アジャスタ
アジャスタ初期位置
回転方向
図6-2 刃高さ変更
アジャスタ固定ネジ(11)を強く締めないで下さい。破損の原因となります。
刃は最初の高さから 2段上げることができます。2段上げた後 16 ポジション
使い切った場合は、刃の交換を行ってください。刃の交換方法は、替刃に添付
された資料でご確認いただけます。
図6-1 刃の回転
(7)刃ポジション番号
(8)刃回転ダイヤル
(9)矢印
(11)アジャスタ固定ネジ
(10)アジャスタ
図5-2 切断
(5)ファイバプレート
[AD-50]
(6)ファイバホルダ
(1)切断レバー
24~35mm

Other Fujikura Tools manuals

Fujikura QRG-04 User manual

Fujikura

Fujikura QRG-04 User manual

Fujikura 70S+ User manual

Fujikura

Fujikura 70S+ User manual

Fujikura CT110 User manual

Fujikura

Fujikura CT110 User manual

Popular Tools manuals by other brands

Alemite Rolla AP650 Service instructions

Alemite

Alemite Rolla AP650 Service instructions

Huskie Tools REC-B6510K Operation manuals

Huskie Tools

Huskie Tools REC-B6510K Operation manuals

USAG 1547 instruction manual

USAG

USAG 1547 instruction manual

Brevetti Montolit TOPROFILE manual

Brevetti Montolit

Brevetti Montolit TOPROFILE manual

Schill ST 260 Installation and operating instruction

Schill

Schill ST 260 Installation and operating instruction

ReelCraft UR82000 OLB operating instructions

ReelCraft

ReelCraft UR82000 OLB operating instructions

Sealey SM94/C instructions

Sealey

Sealey SM94/C instructions

Populo CDAL-2004 user manual

Populo

Populo CDAL-2004 user manual

Siemens WTT726-FE7300 operating manual

Siemens

Siemens WTT726-FE7300 operating manual

Air & Allied Sales TOKU DIGGER TCD-20 Operator instructions

Air & Allied Sales

Air & Allied Sales TOKU DIGGER TCD-20 Operator instructions

stayer HD3K operating instructions

stayer

stayer HD3K operating instructions

PaoFonG PF-313 manual

PaoFonG

PaoFonG PF-313 manual

HEIDENHAIN TS 641 Mounting instructions

HEIDENHAIN

HEIDENHAIN TS 641 Mounting instructions

Beta 1461/C29B Instructions for use

Beta

Beta 1461/C29B Instructions for use

Tyco Electronics 59239-4 instruction sheet

Tyco Electronics

Tyco Electronics 59239-4 instruction sheet

Deliverance MJH-A1 Operator's manual

Deliverance

Deliverance MJH-A1 Operator's manual

Flexco AMIGO-1000-RETURN-SIDE-KIT instructions

Flexco

Flexco AMIGO-1000-RETURN-SIDE-KIT instructions

RED LABEL RL4TTP owner's manual

RED LABEL

RED LABEL RL4TTP owner's manual

manuals.online logo
manuals.online logoBrands
  • About & Mission
  • Contact us
  • Privacy Policy
  • Terms and Conditions

Copyright 2025 Manuals.Online. All Rights Reserved.