Fullstar CHOPPER PRO User manual

20.Cut Resistant Glove
Mandoline base
Pusher
Chopper and spiralizer base
Pusher insert
Top rack*
Spiralizer blade holder
19.Spiralizer cleaning brush
* The top rack consists of the pusher and chopper base.
21.Blade lock button
21
CHOPPER PRO
Live Life to the Full
Full Instruction Video Here:
fullstar.org/videos

General information
Reading and storing the user manual
This user manual accompanies this CHOPPER PRO and contains
important information on setup and handling.
Before using the CHOPPER PRO, read the user manual carefully.
This particularly applies to the safety notes. Failure to do so may
result in personal injury or damage to the CHOPPER PRO.
Store the user manual for further use. Make sure to include this user manual
when passing the CHOPPER PRO on to third parties.
Safety
1
Improper handling of the Mandoline slicers may result in injury.
−Use extreme care when handling the cutting blades. The
blades are very sharp. Keep fingers clear of the blades at
all times.
USE THE FINGER GUARD
NO GLOVE
WEAR THE GLOVE
NO FINGER GUARD
NO GLOVE
NO FINGER GUARD
NO NO NONO NO NO
Please always wear the glove and use ther finger guard to slice.

2
Safety instructions
IMPORTANT SAFEGUARDS
Read and fully understand all instructions and warnings prior
to using the CHOPPER PRO. Your safety is most important.
Failure to comply with procedures and safeguards may result in
serious injury or property damage.
WARNING!
Risk of injury!
Improper handling of the CHOPPER PRO may result in injury.
− The CHOPPER PRO is for HOUSEHOLD use only.
−Do not use the CHOPPER PRO for other than its intended
use.
−Use extreme care when handling the cutting blades. The
blades are very sharp. Keep fingers clear of the blades at
all times.
−Keep children away from the food chopper.
−Do not leave the CHOPPER PRO unattended during use.
−Before using the CHOPPER PRO, check that all parts are
operating properly, and perform the intended functions.
Do not use the CHOPPER PRO if damage is found.
−Ensure that the CHOPPER PRO is stable during use. The
collecting container should be placed on a level and stable
work surface. The CHOPPER PRO should not move during
the cutting process.
−Never push food through the cutting blades with hands.
−Do not use the CHOPPER PRO while under the influence of
drugs or alcohol.
−Do not allow children to play with the packaging wrapper.

3
NOTICE!
Risk of damage!
Improper handling of the CHOPPER PRO may result in damage to
the CHOPPER PRO.
− Do not use the CHOPPER PRO for frozen food, meat, fish,
fruit or vegetable with pits, nuts or anything other than
food stuff. The CHOPPER PRO is not suitable to cut hard
items.
−
Never place the CHOPPER PRO on or near hot surfaces such
as ovens or heaters. Keep it away from open fire.
−Top rack dishwasher safe.
−
Never use the CHOPPER PRO inside a microwave or oven.
First use
Checking the CHOPPER PRO and package contents
1.
Take the CHOPPER PRO out of the packaging and check whether the
CHOPPER PRO or any of the individual parts are broken or damaged.
If this is the case, do not use the CHOPPER PRO.
Be very careful when opening the packaging to prevent damage to the
CHOPPER PRO.
2.
Check to make sure that all components and accessories have been
received (see Fig. A).
Basic cleaning
1. Remove the packaging material and all plastic wrapping.
2.
Clean all parts of the CHOPPER PRO before first use as described in the
chapter “Cleaning”.
Using the Chopper/Dicer
WARNING!
Risk of injury!
Improper handling of the chopper may result in injury.
−Use extreme care when handling the cutting blades.The
blades are very sharp. Keep fingers clear of the blades at
all times.
Before using the chopper:
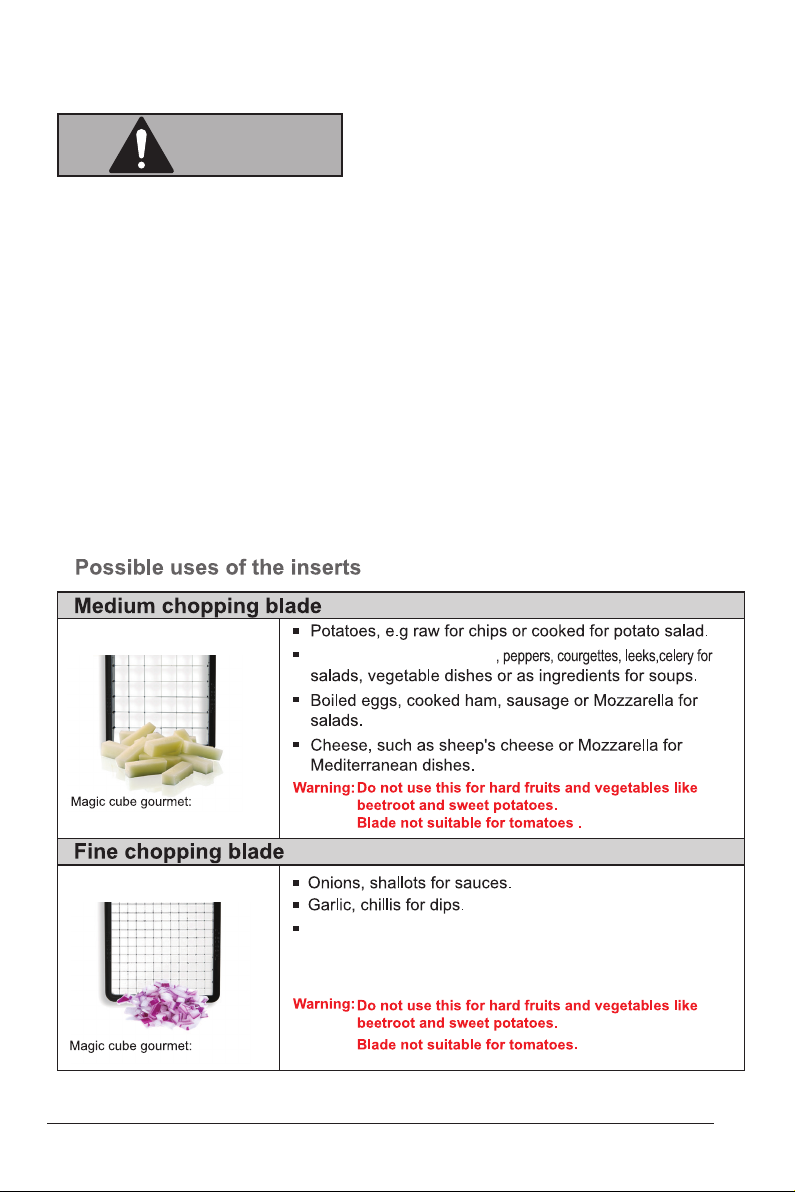
−Peel fruit or vegetable with thick skin (e.g. onion)
−Remove stems and trim ends
−Cut large fruit or vegetable into smaller pieces (must be
smaller than the cutting blade & the height of the food is
not greater than 4cm before cutting)
4
Carrots,zucchinis ,cucumbers
0.53x0.53 in
0.27x0.27 in
Zucchini,mushrooms,soft cheese,peppers and more.

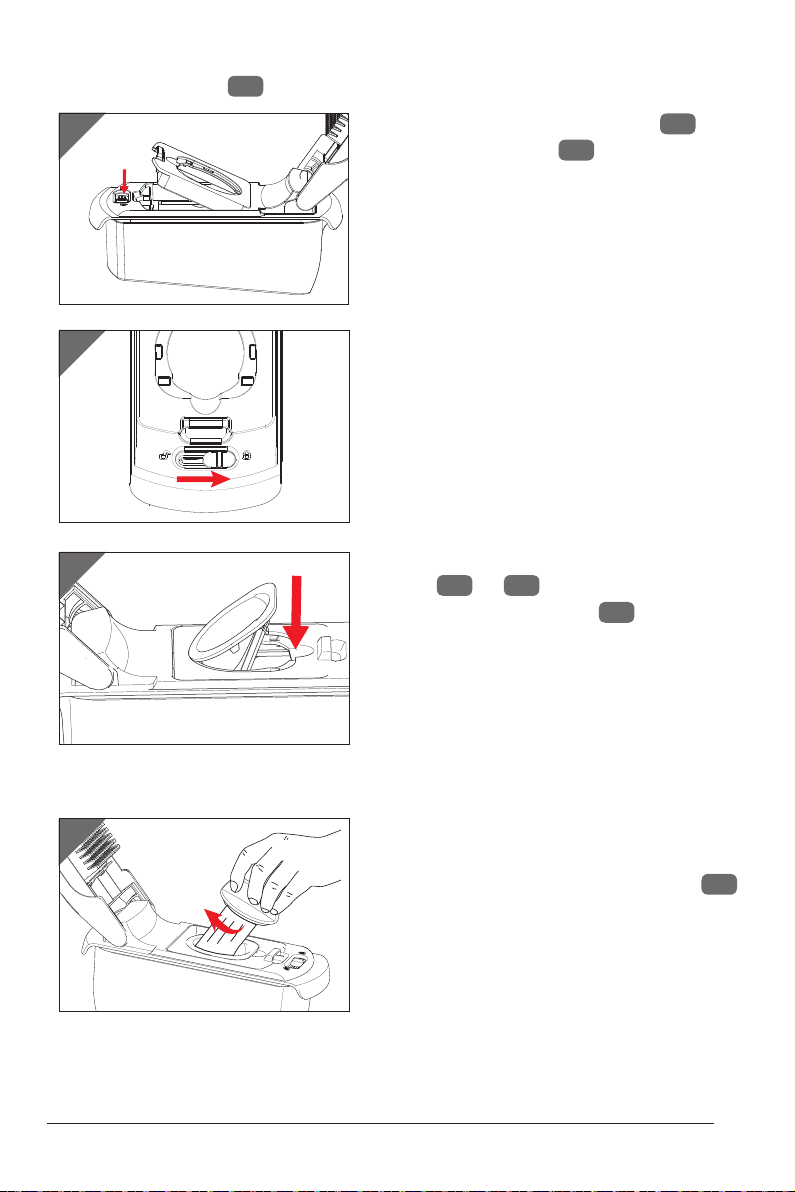
1. Place the top rack 9onto the collecting container 1.
2. Flip the pusher 3open.
3. Select a cutting blade 10 or 11 and insert it into the lower slot
(see Fig. C).
Ensure correct installation with the text “THIS SIDE UP” facing upward on the
cutting blade.
5
TWO CHOPPING BLADES INCLUDED
Fine chopping blade
for onions, zucchinis, chillis,
shallots, garlic, mushrooms.
soft cheese, bell peppers and more.
Medium chopping blade
for carrots,potatoes, zucchinis, onions,
shallots, peppers,chillis.
C
4.Lock the cutting blade(see Fig.C)
6.Close the pusher. The chopper is now assembled and ready for use.
It is recommended to always close the pusher when the chopper is not
in use.
5.To replace the cutting blade, unlock the cutting blade then remove the
installed cutting blade before placing the desired one onto the chopper base 4
B

5.
If necessary, flip the pusher open and use the cleaning scraper
6to remove
any food residuals on the pusher insert
8before using the food chopper
again (see Fig. E).
E
8
6
6
1. Flip the pusher 3open.
2. Place the fruit or vegetable you want to cut onto the cutting blade 10 or
11 with the flat or larger side facing down.
3. Close the pusher and press it downward onto the fruit or vegetable
(see Fig. D1).
D1
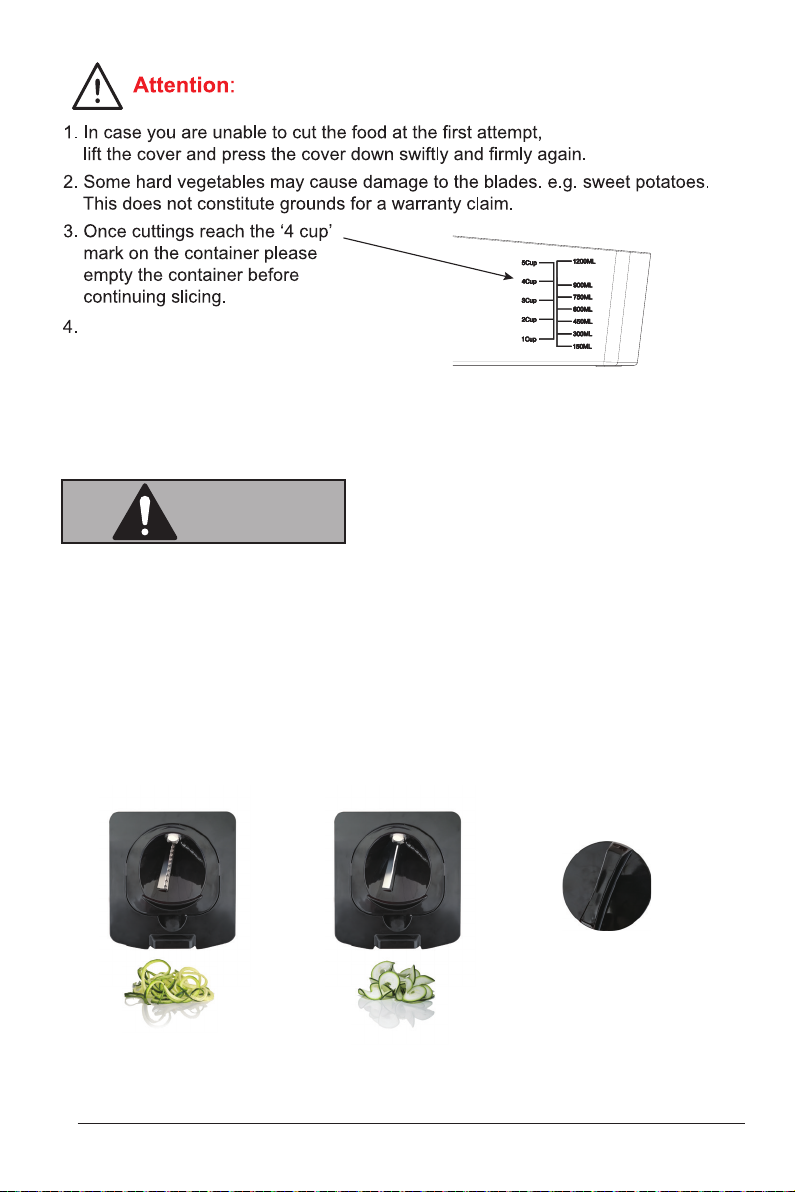
4. Remove the top rack 9to empty the cut fruit or vegetable from the collecting
container 1.
Cut an onion or large vegetable into a quarter or much smaller pieces when
using the fine chopping blade.
Press the pusher down swiftly and firmly with both hands like a hammer.
Fruits or vegetables to be cut are pressed downward through the cutting blade.
2
3
How to chop/dice:
D2
1Make sure that vegetable to be chopped stays entirely within the blade
area,otherwise it might be difficult to chop it (see Fig. D2).
Using the Spiralizer
WARNING!
Risk of injury!
Improper handling of the Spiralizer slicers may result in injury.
−Use extreme care when handling the cutting blades. The
blades are very sharp. Keep fingers clear of the blades at
all times.
Please always wear the glove to slice.
7
TWO SPIRALIZING BLADES INCLUDED
Spiralizing Julienne blade
for cucumbers,zucchinis,
carrots.
Ribbon blade
for cucumbers,
zucchinis,carrots.
Spiralizer spiked grip
skewer short pieces of
food or end pieces.
Clean all blades under running water
immediately after use in order to prolong
the life of blade and keep them sharp for
longer time.
8
2.Insert Spiralizer blade holder
into chopper base .
See Fig.F.
4.Select desired Spiralizer
blade insert into
Spiralizer blade holder.
See Fig.H.
5.Wash, and if necessary peel the food you are about to cut.
6.Remove stems and trim ends.
7.Place food into the insert.
1.Flip the pusher 3
17
15 16
4
17
18
open.
F
H
G
I
or
ATTENTION: Skewer short pieces of food
or end pieces on the Spiralizer spiked grip.
8.Twist the food with slight pressure to
slice it. See Fig.I.
9. Clean all blades under running water
immediately after use in order to
prolong the life of blade and keep
them sharp for longer time.
3. Switch to lock. See Fig.G

9
2.Select desired blade
insert into mandoline base .
See Fig.J.
Using the Mandoline
WARNING!
Risk of injury!
Improper handling of the Mandoline slicers may result in injury.
−Use extreme care when handling the cutting blades. The
blades are very sharp. Keep fingers clear of the blades at
all times.
Please always wear the glove to slice.
1.Place the mandoline base onto the collecting container. 12
12 13 14
2
Jor or
THREE MANDOLINE BLADES INCLUDED
Table of contents
Other Fullstar Food Processor manuals


