manuals.online logo
Brands
  1. Home
  2. •
  3. Brands
  4. •
  5. Furuno
  6. •
  7. Conference System
  8. •
  9. Furuno INMARSAT FLEET BROADBAND FELCOM 250 User guide

Furuno INMARSAT FLEET BROADBAND FELCOM 250 User guide

www.furuno.com
INMARSAT FLEET BROADBAND
MODEL FELCOM 250/FELCOM500
FX MODE SET UP
This manual is intended as an addition to the FELCOM250/FELCOM500 operator’s manual and
covers the set up procedure for FX mode. Refer to the operator’s manual for information regarding
the following items:
• How to turn the power on/off.
• How to operate the equipment and the equipment functions.
1. 1. Overview of the FX Service
The FX (Fleet Xpress) service is provided by the INMARSAT company and utilizes Ka band sat-
ellites to provide high speed connection. A GX terminal is required to use this service.
NOTE 1: The FX and FBB services cannot be used simultaneously.
NOTE 2: The FELCOM250/500 terminals allow use of the FBB service. They are not GX termi-
nals.
2. FELCOM250/FELCOM500’s Role in the FX Service Network
The FELOM250/FELCOM500 units function as a backup communication device when using the
FX service.
If the signal from the GX terminal is dropped during transmission, the line is automatically switched
from the GX terminal to the FELCOM250/FELCOM500. The automatic switching is conducted by
the Network Service Device (NSD), which controls the FELCOM250/FELCOM500, Packet
Switching (PS)* and disconnection.
*: Packet switching is dividing the data to be transferred into smaller pieces (packets) before
transmitting the data. For brevity, all references to packet switching hereafter are written as “PS”.
3. How to Connect the FELCOM Unit to the NSD
Connect the LAN cable from the NSD to the FELCOM unit LAN port to be assigned for the FX
service.
Shipboard
LAN NSD
GX Terminal Satellite
Satellite
FELCOM250/500
When using the FX service, if the GX
terminal becomes unusable
(disconnected, cannot transmit, etc.),
the NSD switches the line to the
FELCOM unit automatically.
2
4. How to Set Up for FX Mode
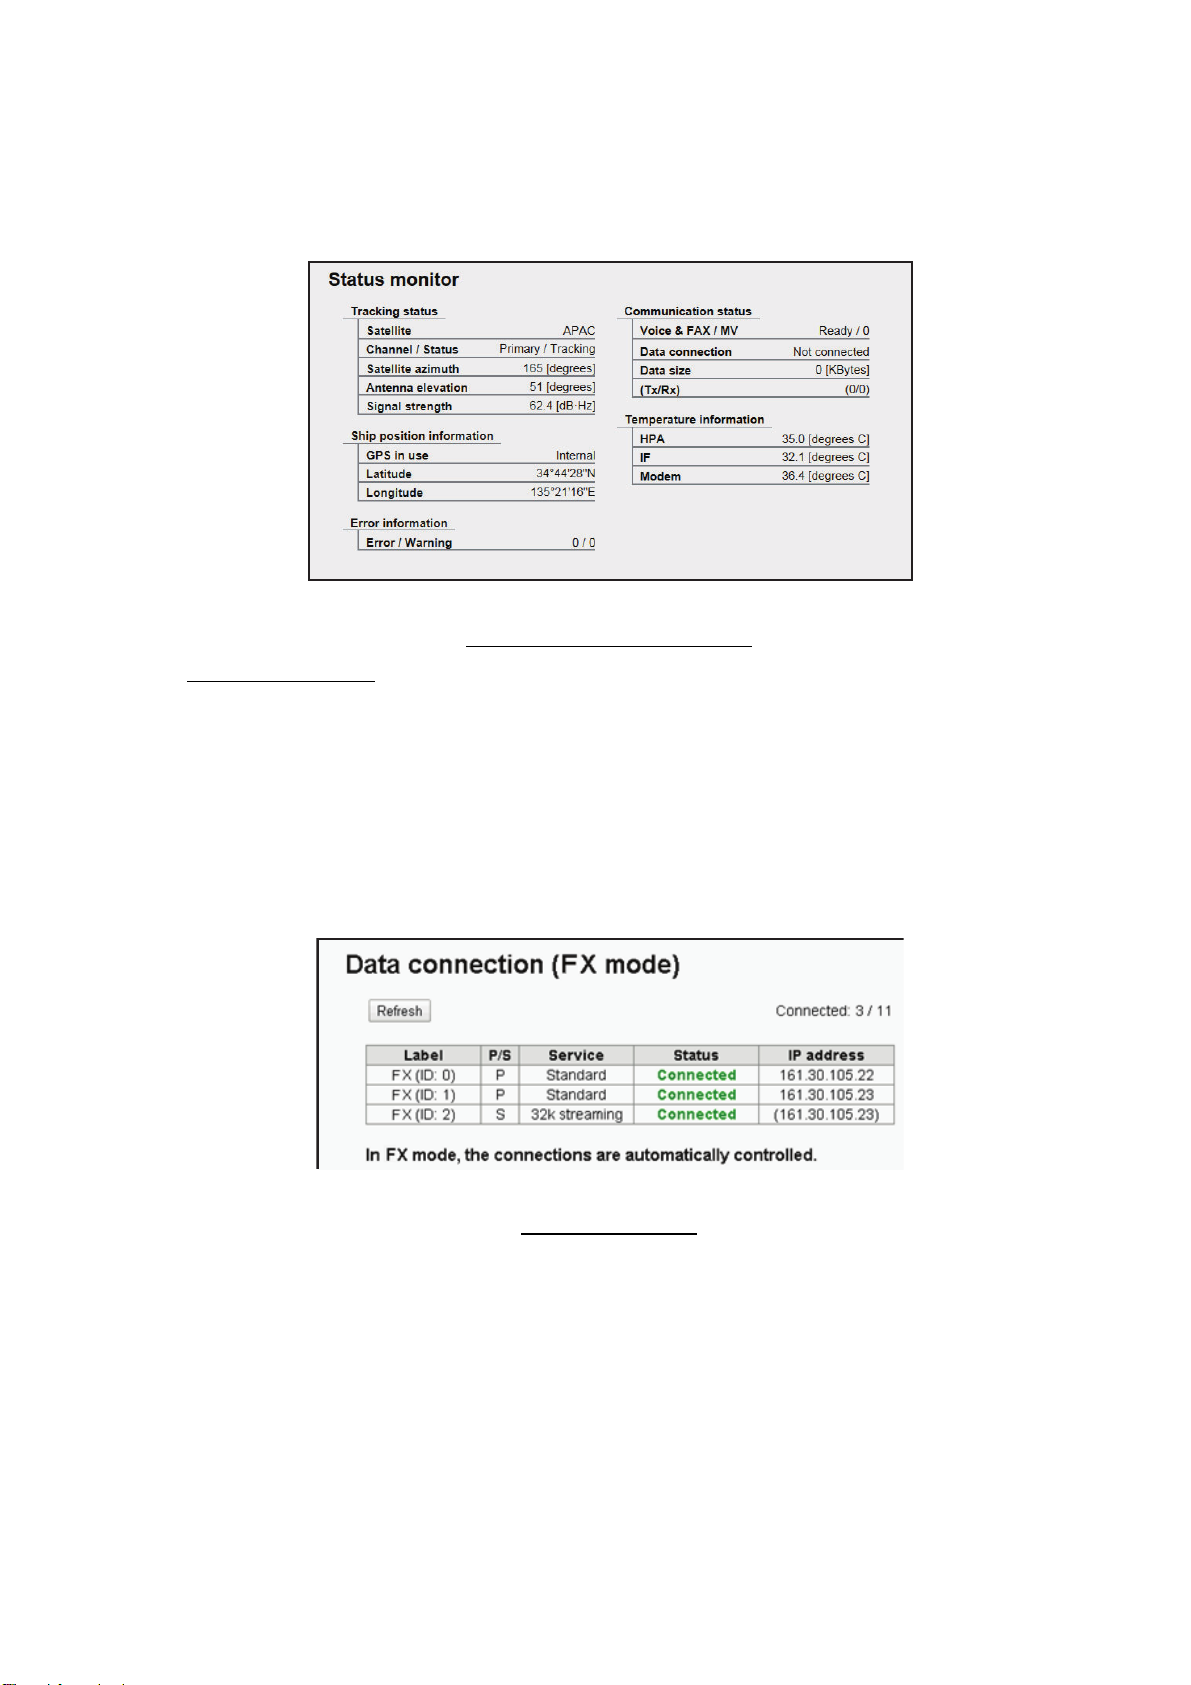
NOTE: When FX mode is active, the NSD controls packet switching. PS connection/disconnection
from devices such as handsets or PCs with Launchpad installed is not possible. When PS con-
nection is attempted the following error message is displayed on the handset’s screen.
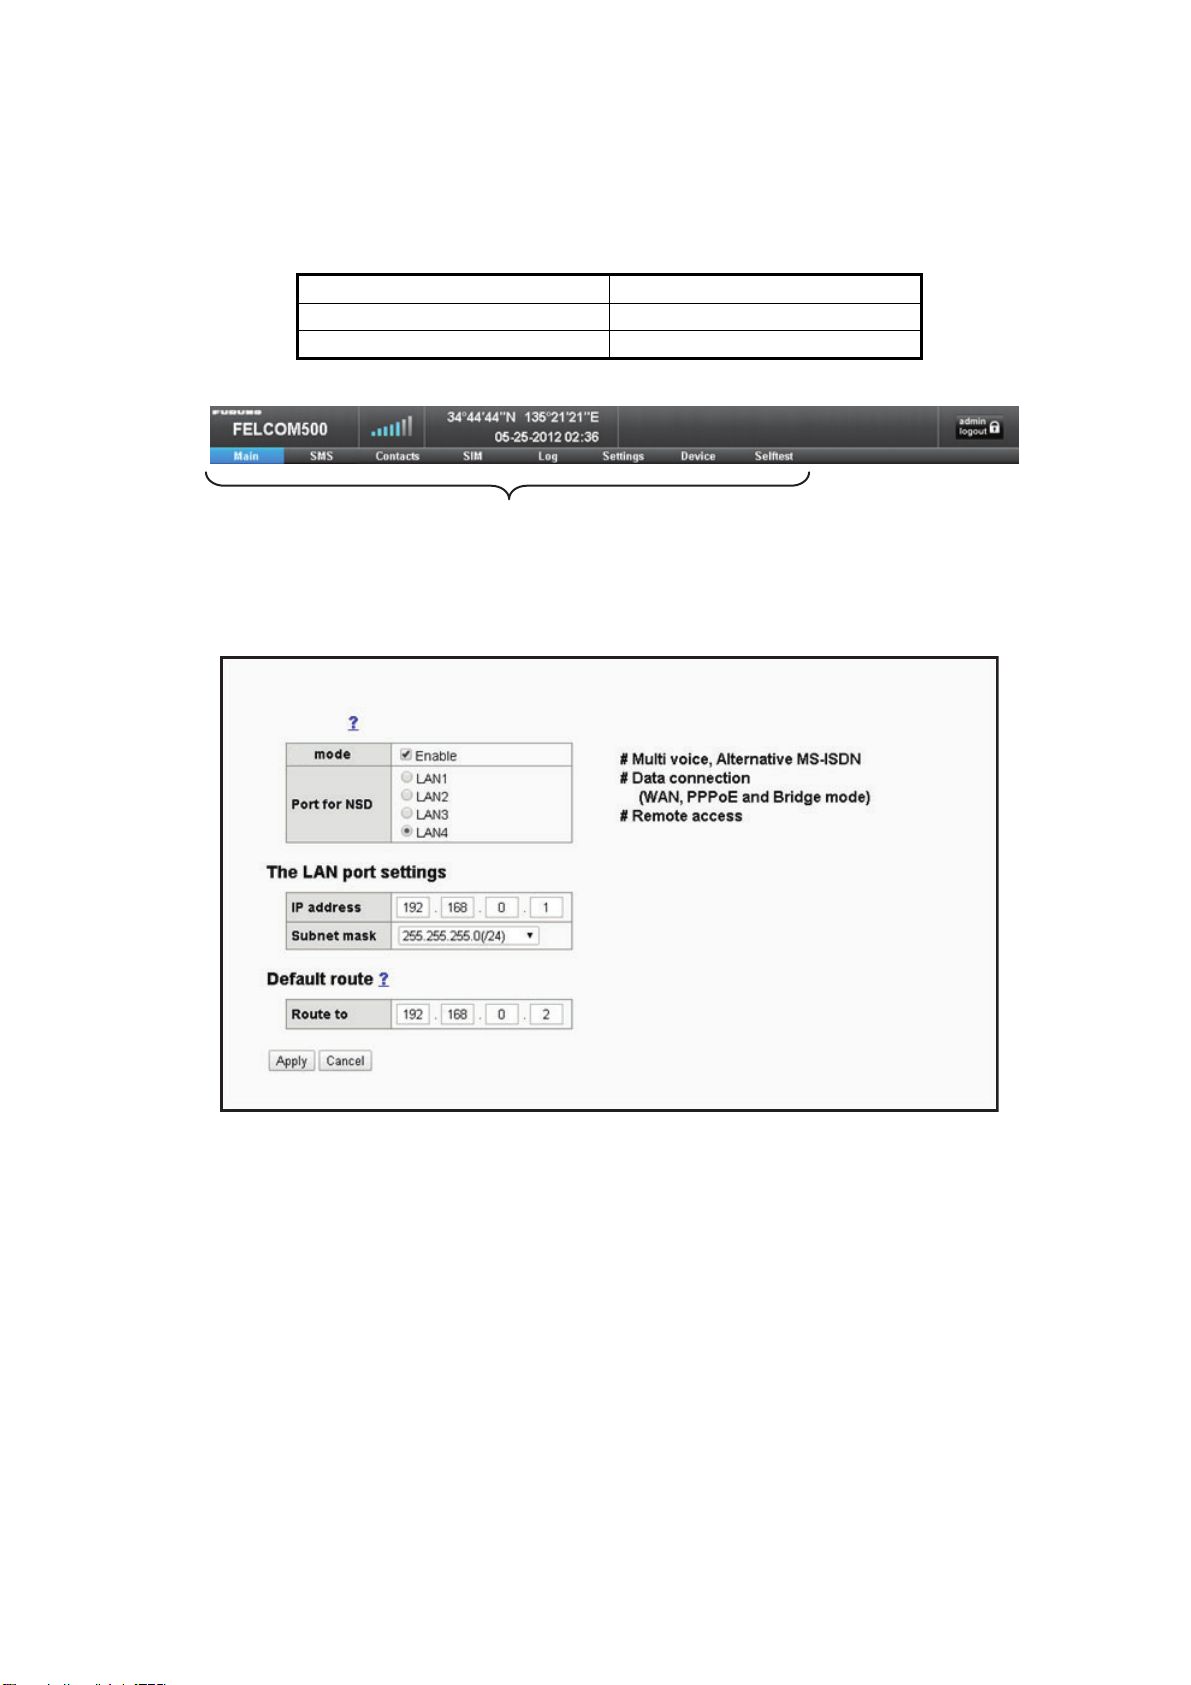
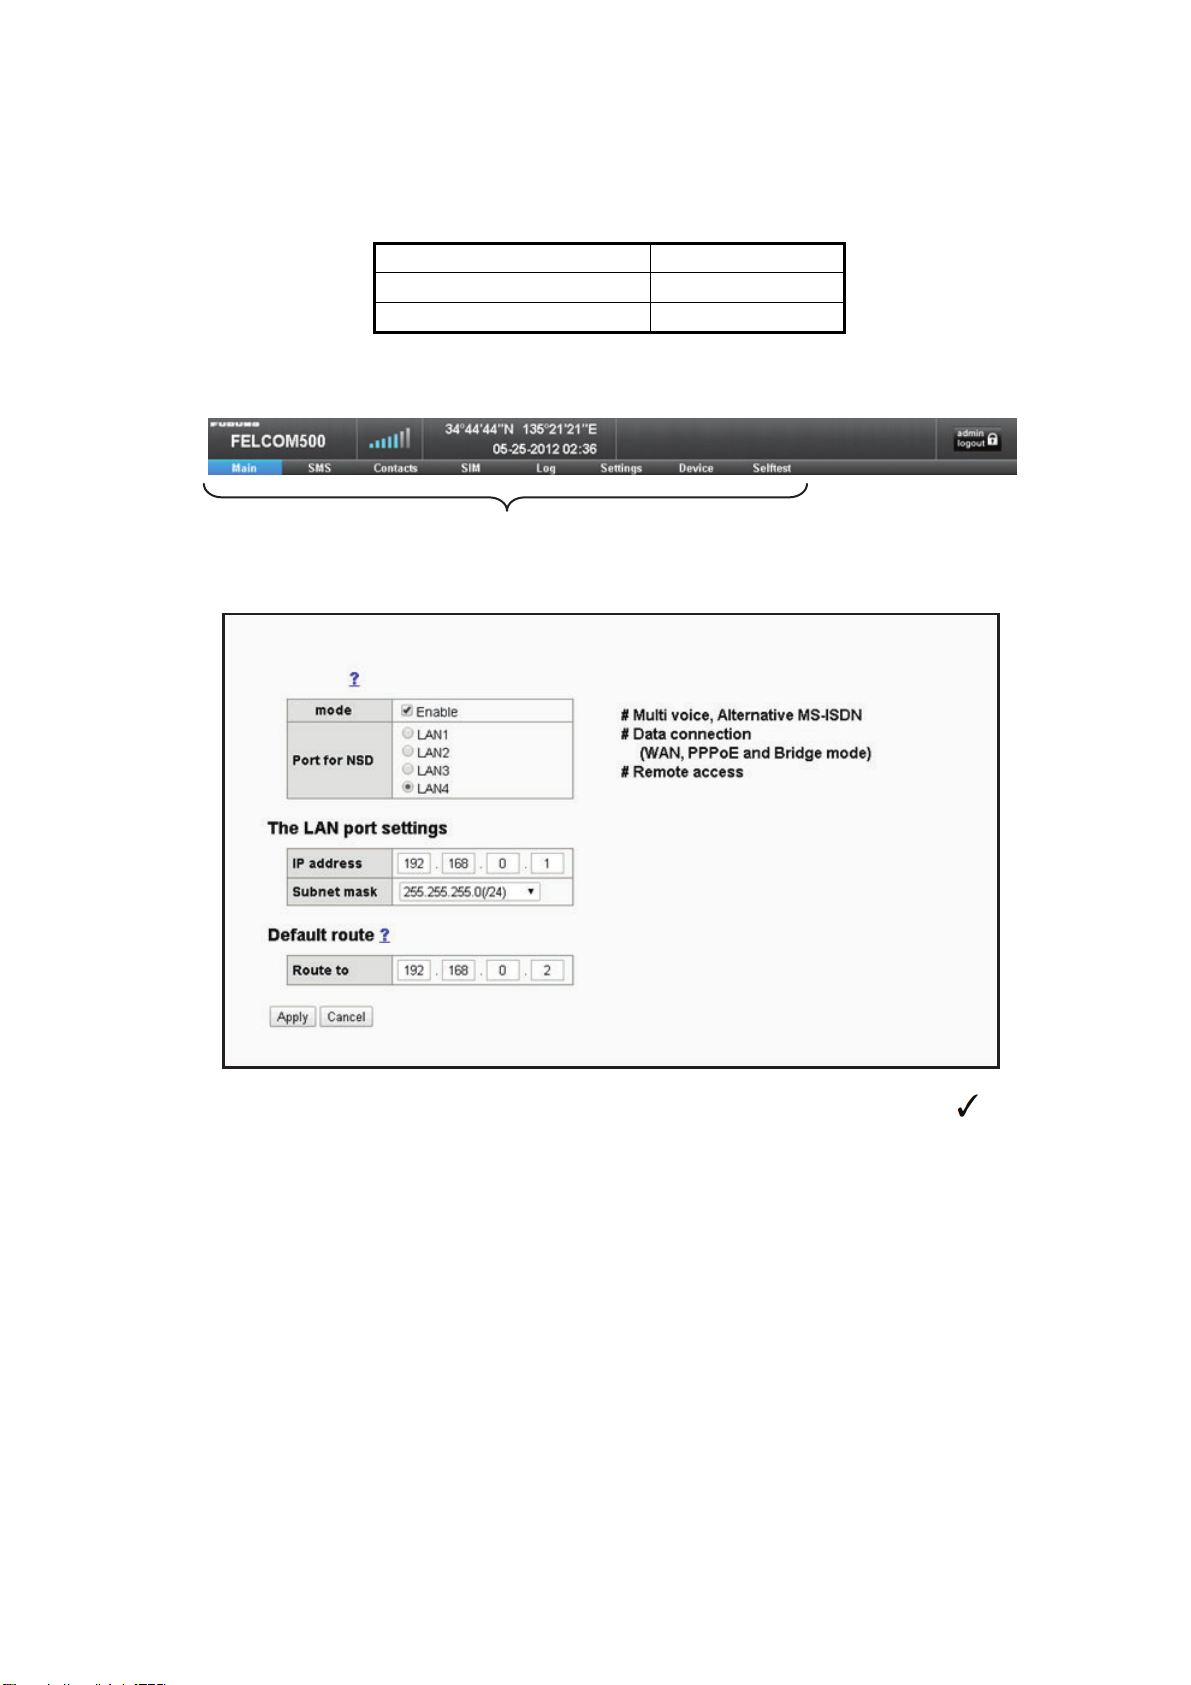
FX mode can be set up from the WEB menu, using the following procedure.
1. Select [Settings] on the menu bar, then left-click.
2. Select [Network Settings] then left-click.
3. Select [FX mode], then left-click.
4. To enable FX mode, left-click the [Enable] check box to display a check mark ( ).
To disable FX mode, left-click the box to remove the check mark.
5. Select the LAN port to which the NSD is to be connected, then left-click.
6. At the [IP address] line, set the IP address for the LAN port selected at step 5.
7. At the [Subnet mask] line, set the subnet mask for the LAN port selected at step 5.
8. At the [Route to] line, enter the IP address for the NSD LAN port which is connected to this
unit.
9. Select [Apply], then left click.
The message “The CmmUnt will restart automatically after this settings. Continue?” is dis-
played.
10. Select [OK], then left-click.
When the set up is complete, the message “Completed” is displayed.
11. Select [OK], then left-click.
The unit will now restart. When restart is completed, the main screen is automatically dis-
played.
Handset software version Error message
Ver09.01 Failed (FX mode)
Ver08.04 or older Failed
Menu bar
Network settings / FX mode
FX mode
During “FX mode” , the followings disabled
FX
3
12. Check the following items to be sure that the unit is connected correctly to FX mode.
a) From the menu bar, select [Main], then left-click.
b) Select [Status Monitor], then left-click. A screen similar to the one shown below appears.
Communication status
- Data Connection: “(FX)” is added to the end of the indication.
- Data size: Shows the data size for the connected PC’s group packets.
- Connection: This indication, normally shown directly below [Data size], is hidden.
c) From the menu bar, select [Main], then left-click.
d) Select [Data connection], then left-click. A screen similar to the one shown below appears.
- The screen title has “(FX mode)” added to the end.
- The label column of the table has “FX” added to each entry.
(FX)
4
5. Precautions When Using FX Mode
When using FX mode, the operational function restrictions shown in the table below apply.
Function LAN ports other than FX
mode port
FX mode LAN port
TEL Includes the following:
• Access code
• Call filter
• 1st/2nd ring
• Internal call routing
•Groupcall
• Automatic switching
• Incoming indicator
buzzer
Operational FX mode LAN port is
reserved for FX mode.
A handset may be connect-
ed, but will not function.
FAX Operational Not usable
UDI/RDI Operational Not usable
SMS Operational Operational from WEB
menu.
Not usable from handset.
PS WAN Not usable.
NSD controls PS.
All non-NSD packet switch-
ing is not available. WEB
menu for items listed to the
left are not available.
Not usable.
NSD controls PS.
All non-NSD packet switch-
ing is not available. WEB
menu for items listed to the
left are not available.
PPPoE
Bridge
Remote Access
Multi voice
Multi number
LAN DHCP Operational Not usable
Routing Operational Not usable
RIP Operational Not usable
VRRP Operational Not usable
Alive monitoring Not usable.
NSD controls PS.
Alive monitor does cannot
respond.
Not usable.
NSD controls PS.
Alive monitor does cannot
respond.
Syslog transfer Operational Not usable
Address book transfer Operational Not usable
WEB menu Operational.
PS settings cannot be
changed, all other settings
can be changed.
Operational.
WEB menu can be accessed
via the FX mode LAN port
OTHERS Self-test Operational Operational
4
5. FX モー ド 使用時の注意事項
FX モー ド 使用時に、 下表の機能が制限 さ れます。
FX モー ド 動作中の LAN ポー ト 別 機能制限一覧表
機能一覧 FX モード用以外の
LAN ポート
FX モード用 LAN ポート
TEL 下記を含む。
・ Access code
・ Call filter
・ 1st/2nd ring
・ Internal call routing
・ Group call
・ 着信指示器鳴動
・ 自動切断機能
○有効 ×FXモード用 LAN ポートにハン ド
セッ トを接続しても、本機能を
使用することができません。
FAX ○ 有効 × 使用で き ま せん。
UDI/RDI ○ 有効 × 使用で き ま せん。
SMS ○ 有効 △ WEB メニューからは使用できま
す。但し、ハンドセットからは
使用できません。
データ
通信
WAN × NSD 経由以外のデータ通信
接続を禁止するため、左
記データ通信を利用する
WEB メニューは表示され
ません。
×NSD 経由以外のデータ通信接続
を禁止するため、左記データ通
信を利用する WEB メニューは表
示されません。
PPPoE × ×
Bridge × ×
Remote access × ×
Multi voice × ×
Multi number × ×
LAN DHCP ○ 有効 × 無効
Routing ○ 有効 × 無効
RIP ○ 有効 × 無効
VRRP ○ 有効 × 無効
Alive monitoring × 無効:データ通信の制御
は NSD が行うため、応答
しません。
×無効:データ通信の制御は NSD
が行うため、応答しません。
Syslog transfer ○ 有効 × 無効
ア ド レ ス帳移行 ○ 有効 △ WEB メニューからは利用できま
す。但し、FX モー ド 用 LAN ポー
トに接続したハンドセットとの
アドレス帳移行はできません。
WEB メニュー ○データ通信の接続に関す
る設定は、変更できませ
ん。それ以外の設定につ
いては、変更できます。
○FXモード用ポートからも WEB
メニューへのアクセスができま
す。
その他 Self-test ○ 有効 ○ 有効
3
12. 本機が FX mode に設定で きた こ と を確認 し ます。
A) メニューバーの [Main] をクリックします。
B) [Status monitor] をクリックします。
次のようなステータスモニターが表示されます。
ステー タ スモニ タ ーの表示例
Communication status
・Data Connection:項目の末尾に「(FX)」が追加されます。
・Data size:使用中のパソコンが所属しているグループのパケット通信量を表示します。
・Connection:「Data size」の直下に表示されていた本項目が非表示になります。
C) メニューバーの [Main] をクリックします。
D) [Data connection] をクリックします。
次のようなデータ接続画面が表示されます。
接続画面の表示例
・タイトルの Data connection に「(FX mode)」が追記されます。
・Label の名称の先頭に「FX」が追記されます。
(FX)
2
4. FX モー ド の設定方法
注)FELCOM250/500 でFX モードが動作中は、NSD がデータ通信を制御するため、ハンドセット
やLaunchPad をインストールしたパソコンから、データ通信の接続または切断ができません。
また、ハンドセットからインターネットに接続しようとすると、以下のメッセージがハンド
セットの画面に表示されます。
次の要領で、 WEB メ ニ ュ ーか ら FX モー ド を設定し ます。
1. メ ニ ューバーの [Settings] を ク リ ッ ク し ます。
2. [Network settings] を ク リ ッ ク し ます。
3. [FX mode] を ク リ ッ ク し ます。
4. FX mode を有効にするには、 [Enabled] のチ ェ ッ クボ ッ ク スに 「✓」 を入れます。
FX mode を無効にするときは、チェックマークを外してください。
5. [Port for NSD] 欄に、 NSD と 接続する (FX モー ド と し て利用する) 本機の LAN ポー ト を選びます。
6. [IP address]欄に、FXモード用のLANポートに割り当てる、IPアドレスを入力します。
7. [Subnet mask] 欄に、 FX モー ド 用の LAN ポー ト に割 り 当て る、 サブネ ッ ト マス ク を入力 し ます。
8. [Default route] 欄に、 本機と接続 し ている NSD がも つ、 LAN ポー ト の IP ア ド レスを入力 し ます。
9. [Apply] ボ タ ン を ク リ ッ ク し ます。
“The CmmUnt will restart automatically after this settings. Continue” という確認メッセージが表示さ
れます。
10. [OK] ボ タ ン を ク リ ッ ク し ます。
設定が終了すると、”Completed.” というメッセージが表示されます。
11. [OK] ボ タ ン を ク リ ッ ク し ます。
通信制御ユニットの再起動が始まります。再起動後、自動的にメイン画面になります。
ハンドセットソフトウェア 文言
Ver09.01 Failed(FX mode)
Ver08.04 以前のバージョン Failed
䝯䝙䝳䞊䝞䞊
Network settings / FX mode
FX mode
During “FX mode” , the followings disabled
FX
www.furuno.com
Pub. No. C52-01602-A
(1704, TAHA) FELCOM250/500
00019274210
インマルサッ トフリートブロードバンド
型式 FELCOM250/FELCOM500
FX モー ド の設定方法
本書は、 FELCOM250/500 の取扱説明書を補足する も ので、 FX モー ド の設定方法について説明
し ます。 以下については、 取扱説明書を参照し て く だ さ い。
・ 電源を入れてから切る までの流れ
・ その他機能の設定方法
1. FX サービスの概要
FX (Fleet Xpress) サービ ス と は、 Inmarsat 社が提供する Ka バン ド 衛星を利用 し た、 高速衛星
通信サービ ス です。 FX サービ スの専用端末 (GX 端末) に よ っ て、 FX サービ ス を利用する こ
とができるよ うになります。
注)FELCOM250/500 は、FBB(フリートブロードバンド)サービスを利用するための端末であり、
GX 端末ではありません。
2. FX サービ スに関わる本機の役割
FELCOM250/500 は、 GX 端末のバ ッ ク ア ッ プの通信手段 と し て使用 し ます。
FX と FBB 各サービスのシステム構成イ メ ージ
FX サービ ス利用時、 GX 端末の回線が使用でき な く なった場合に、 回線が GX 端末から
FELCOM250/500 へ と 自動的に切 り 替わ り ます。 回線の自動切替えは、 Network Service Device
(NSD) と 呼ばれ る 装置が行い、 FELCOM250/500 は こ の装置か ら の制御を受けて、 デー タ通信
の接続、 ま たは切断を行い ます。
3. 本機と NSD との接続方法
NSD に接続 さ れた LAN ケーブル を、 本機の LAN ポー ト (FX モー ド と し て利用す る) に接続 し
ます。
㻺㻿㻰
㻲㻱㻸㻯㻻㻹㻞㻡㻜㻛㻡㻜㻜
㻳㼄 ➃ᮎ
㻲㼄 䝃䞊䝡䝇䛾฼⏝󰪍䚸 㻳㼄 ➃ᮎ䛾ᅇ⥺䛜
౑⏝䛷䛝䛺䛟䛺䛳䛯ሙྜ䛻䚸 㻺㻿㻰 䛻䜘䛳䛶ᅇ⥺䛜
⮬ືⓗ䛻 㻲㻱㻸㻯㻻㻹㻞㻡㻜㻛㻡㻜㻜 䜈䛸ษ䜚᭰䜟䜛䚹
⾨󰩮
⾨󰩮
⯪ෆ
㻸㻭㻺

This manual suits for next models

1

Other Furuno Conference System manuals

Furuno IB-782 User manual

Furuno

Furuno IB-782 User manual

Furuno LH-5000 User manual

Furuno

Furuno LH-5000 User manual

Popular Conference System manuals by other brands

Motorola MOSCAD-L Schematic diagrams

Motorola

Motorola MOSCAD-L Schematic diagrams

DIS CM 6080 F datasheet

DIS

DIS CM 6080 F datasheet

Sony IPELA PCS-XG55 Integration guide

Sony

Sony IPELA PCS-XG55 Integration guide

Yealink MeetingSpace VC880 user guide

Yealink

Yealink MeetingSpace VC880 user guide

DMC cardo PACKTALK SKI manual

DMC

DMC cardo PACKTALK SKI manual

Busch-Jaeger Busch-WelcomeTouch 83220-SM Series manual

Busch-Jaeger

Busch-Jaeger Busch-WelcomeTouch 83220-SM Series manual

Cisco TelePresence SX20 reference guide

Cisco

Cisco TelePresence SX20 reference guide

CoachComm X2 operating manual

CoachComm

CoachComm X2 operating manual

Vocera B1000 user guide

Vocera

Vocera B1000 user guide

Avaya CS700 Administration and maintenance

Avaya

Avaya CS700 Administration and maintenance

SystemBase C510ip-s user manual

SystemBase

SystemBase C510ip-s user manual

Yealink MeetingSpace VC880 user guide

Yealink

Yealink MeetingSpace VC880 user guide

Polycom Pano user guide

Polycom

Polycom Pano user guide

N-Com BX4 PLUS User instructions and safety

N-Com

N-Com BX4 PLUS User instructions and safety

Sennheiser SDC 8000 AO Product sheet

Sennheiser

Sennheiser SDC 8000 AO Product sheet

Lucent Technologies PARTNER Advanced Communications System System planner

Lucent Technologies

Lucent Technologies PARTNER Advanced Communications System System planner

CoachComm X-System Getting started guide

CoachComm

CoachComm X-System Getting started guide

LifeSize Icon Series quick start guide

LifeSize

LifeSize Icon Series quick start guide

manuals.online logo
manuals.online logoBrands
  • About & Mission
  • Contact us
  • Privacy Policy
  • Terms and Conditions

Copyright 2025 Manuals.Online. All Rights Reserved.