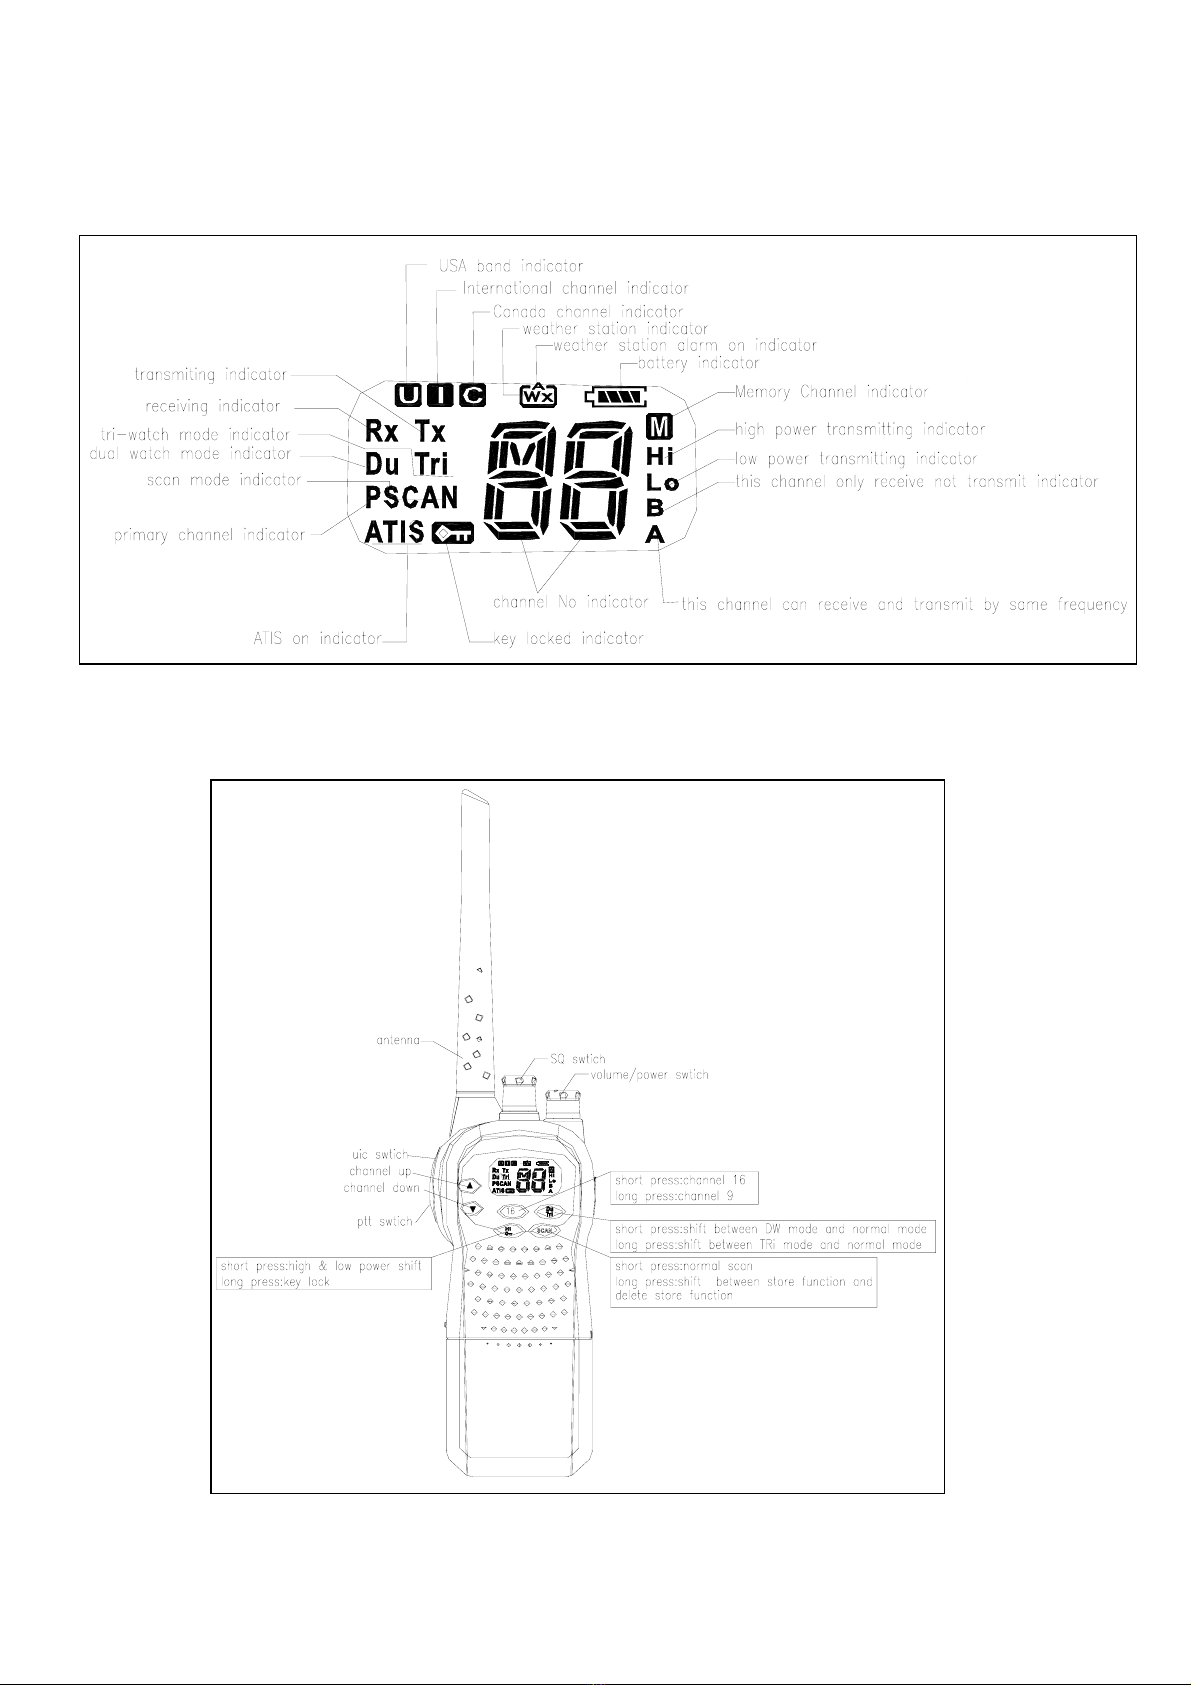
Furuno POCKET 4300 User manual

OWNER’S MANUAL
Pocket4300
INTRODUCTION
Your marine transceiver POCKET 4300 represents the state-of-the-art in high-tech engineering.
Designed for international operation. This allows you to transmit and receive on all international
channels in the VHF marine band, as assigned by the international Union (ITU). This unit is a
quality piece of electronic equipment, skillfully constructed with the finest components. It is
approved with commercial-grade standards to give you clear, reliable communication.
Your transceiver is designed for many years of reliable, trouble-free performance. It is under
control of a microprocessor resulting in enhanced features and performance. The microprocessor
controls not only the marine band tuning but also dual watch, memory channels, and a host of
other useful features.
Your transceiver has the following features:
Channel 16 Switch ---- provides quick access to channel 16, the universal marine frequently used
channel.
PLL (Phase Lock Loop) Controlled Circuitry ---- Provides accurate and stable channel selection.
Squelch Adjustment ---- help eliminate noise between transmissions.
Key Lock ---- lets you lock the keypad in order to prevent the controls from accidental pressing.
High/Low Power Selection ---- lets you save power by selecting a suitable transmitting power for
long or short distances.
Battery Level Indicator ---- shows the battery pack’s condition.
Supplied Battery Charge ---- lets you conveniently recharge your transceiver’s battery pack.
Backlit LCD Display ---- allows you to operate the transceiver in dark environment.
Memory Channels ---- lets you store channels as memory channels.
Du/Tri ---- lets you to select DW/normal mode or Tri/normal mode.
We recommend you record your transceiver’s serial number here. This number is on the
transceiver’s back panel.
Serial Number_______________________
SAFETY INFORMATION
Your hand-held marine VHF radio contains a low power transmitter. When the Push-To-Talk
(PTT) button is pushed it sends out radio frequency (RF) signals.
USING THE RADIO
Page 1 of 8

Page 2 of 8
A. DISPLAY
Your radio comes with a multifunctional display.
B. FUNCTION AND LOCATION OF THE CONTROL

BASIC OPERATION
Before operating your transceiver, you should make the following preparations. You should install
the battery pack on to the main unit and fully charge your 7.2V Ni-MH battery pack or charge it
separately before its being attached onto the radio, then you can use it after making sure to attach
the antenna on your radio.
Turning On/Off Your Transceiver
Rotate VOLUME knob to turn the transceiver on or off with an indicating voice of click. And adjust
the volume to a comfortable level.
Adjusting Squelch
Rotate SQ knob to adjust squelch threshold level.
Squelch is used to eliminate static and background noise and allows for silent operation of the
POCKET 4300 until a transmission is received. If the squelch is too high, only the strongest
transmissions can be heard, and when too low, intermittent static and noise are heard.
Selecting High/Low Power or Lock keypad
Press and release this key to toggle the transmit power between high and low. When the unit is
operating at low power, “Lo” appears on LCD and “Hi” appears on LCD when operating at high
power.
You also can lock your radio keypad to avoid accidental pressing of keys by activating the key lock.
Pressing and holding H/L/LOCK button until key lock icon will appear on LCD if it is enabled. The
function is effective to all other knobs/keys except PTT and H/L/LOCK buttons.
Selecting a Channel
Press the ▲/▼(UP/DOWN) button to scroll through the available channels.
Note: Not all channel numbers are available in INT bands.
Transmitting and Receiving
Press and hold the Push-To-Talk (PTT) key to transmit on the selected channel, then release to
receive. The TX indicator appears while transmitting.
Page 3 of 8

SCANNING FEATURES
The Pocket 4300 is equipped with three types of scan options: All Scan, Saved (Memory) Scan
and Priority Scan. If there are no channels in memory, the default is All Scan. This function
automatically searches for transmissions on the channel set being scanned. If a TX signal is
received, the scan stops on the receiving channel as long as it is present and the SCAN indicator
flashes. If the signal is lost for five seconds, the radio resumes scanning. During the Scan Modes:
Press the Channel ▲/▼(UP/DOWN) button to change the scan direction. UP increments the
channel while DOWN decrements it.
Press and release the SCAN button to terminate the SCAN mode. DW/TRI button do not function
and sound an error beep if pressed.
Note: Scan modes are disabled when the ATIS operation is active.
All Scan
Press and release the SCAN button when no channels are stored in memory to activate the All
Scan function. The SCAN indicator appears on the LCD during All Scan. In All Scan mode, all
channels in the channel set are scanned in sequence, assuming no channels have been stored in
memory. After the last channel number has been scanned, the cycle repeats.
Saved (Memory) Scan
Press and release the SCAN button when there is at least one channel in memory to activate the
Saved Scan function. In Saved Scan Mode, the “ ” and SCAN indicators appear on the LCD. In
Saved Scan mode, only the channels that have been saved in memory are scanned in sequence.
After the last saved channel number has been scanned, the cycle repeats.
Adding Channels to Memory
The Pocket 4300 can store any channel (including Private Channels). The stored channels are the
ones scanned in the Saved (Memory) Scan mode.
To Add Channels to Memory
1. During normal operation mode, use the UP/DOWN key to select the desired channel for
programming.
2. Press and hold the scan key for 3 seconds.
The “ ” icon appears to indicate the current channel has been saved in memory. Any number of
channels can be saved as memory channels.
To Delete Channels from Memory
1. During the normal mode, use the UP/DOWN key to select the channel to be deleted.
2. Press and hold the scan key for 3 seconds.
The selected channel is deleted from memory.
Using the Monitor Modes
The Watch Modes monitor the programmed Priority Channel and other user selected channel(s).
The watch is halted when activity is detected on a monitored channel. The Pocket 4300 is
equipped with 2 types of monitor operations: Dual Watch and Tri Watch.
Note: Monitor modes are disabled when the ATIS operation is active.
Page 4 of 8

Dual Watch
Press and release the DU/TRI button to activate the Dual Watch mode. The “ ” indicator
appears on the LCD. Dual Watch monitors the current working channel and Channel 16 in cycle.
Press and release the DU/TRI button to terminate Dual Watch and return to the previous working
channel.
Press and hold the DU/TRI button to terminate Dual Watch mode and go into Tri Watch mode.
Press and release the 16 button to terminate Dual Watch mode and switch to the Priority channel.
Note: During Dual Watch mode, the SCAN and Channel ▲/▼(UP/DOWN) button are inactive and sounds an
error beep if pressed.
Tri Watch
Press and hold the DU/TRI key for 3 seconds to activate Tri Watch mode. The TRI indicator
appears on the LCD. Tri Watch monitors in cycle Channel 16, the current working channel and the
channel you have set as the Favourite (PLUS) Channel. Tri Watch is demonstrated in the figure to
the left; the sample working channel is CH 72.
Press and release the DU/TRI button to terminate Tri Watch and return to the previous working
channel.
Press and release the 16 button to terminate Tri Watch mode and switch to the Priority Channel.
Note: During Tri Watch Mode, the SCAN, and Channel ▲/▼(UP/DOWN) keys are inactive and sounds an
error beep if pressed.
Resetting the Radio
You can reset many radio settings back to their factory defaults, this will:
• Erase any channels stored in memory
• Return to International channels, if another mode is selected
• Turn OFF the Weather Alert setting, if active
• Return power settings to their original state
To perform the reset:
1. Turn the radio OFF.
2. Press the SCAN button.
3. While continuing to hold this keys, power the radio ON.
The LCD remains blank for 2 seconds, and then the unit switches to channel 16.
Attaching and Charging Your Battery Pack
Before attaching the pack, you should detach the belt clip first, then aligning place the pack on the
unit and secure it using the supplied screw.
The design of the battery pack let you can charge it either when it is attached on the radio or being
detached. You should use the supplied specialized wall charger to charge it (7.2V Ni-MH battery
pack) for 14~15hrs. To charge, plug the charger cable into a standard wall socket and the other
terminal to the charger cradle, place the radio/battery pack mounting on the charger pedestal firmly
to start the charging, accompanied by lighting of the charging indicator LED.
Note: The charging can not stop itself without prevention, even when the battery pack has been fully
charged. Do not forget to take the radio/battery pack out of the charger cradle when it has been fully
charged. Overcharging batteries may result in damage to both the battery pack and radio.
Page 5 of 8

Using the Belt Clip
The supplied belt clip lets you easily attach the transceiver to your belt. To attach the
belt clip, put it onto the back of your transceiver aligning the fitting groove and use a
standard PHILIP screw driver to secure.
Page 6 of 8

Page 7 of 8
TECHNICAL SPECIFICATIONS
Channels……………………….………………………………………All International Channels
Frequency Method……………………………………………………………………….Phase Lock Loop
Frequency Range……………………………………………………………..TX 156.025~157.425 MHz
RX 156.300~162.000MHz
Antenna Impedance…………………………………………………………………………....50 Ohm
Power Supply…………………………………………………………………………..………7.2VDC
Operating Temperature………………………………………………………………….....-20 to +50
Dimensions (HWD)……………..…(With 7.2V Battery Pack) 148mm(H)*60mm(W)*39mm(D)
Weight (with Battery Pack)……………………………………….……(With 7.2V Battery Pack) 421.5g
TRANSMITTER
Power Output……………………………………………….…………0.8 or 5 Watts (Switch Selectable)
Modulation Type…………………………………………………………………………….…………….FM
Hum and Noise Attenuation……………………………………………………………………………34dB
Audio
Distortion..................................................………….………..……………...…...........…...................5%
Spurious
Suppression.................................................………….………………...….....…...........................70dB
RECEIVER
Sensitivity at 12dB
Sinad............................................…….....………………...…………...…....................................0.5µV
S/N Ratio (20dB)....................................…….....………………...………………………………….0.8µV
Squelch Sensitivity....................…….....………………...…………...….......Threshold –12dBµV(EMF)
Adjacent Channel Rejection..........….......................……………..........…..........……..……...….. 70dB
Audio Power Output……………………………….…………………………….…250mW at 10% THD
Spurious Response Attenuation………………………………………….…………………...………70dB
Hum and Noise Attenuation……………………………………………………………………………40dB
Modulation Acceptance Bandwidth…………………………………………………+/- 7.0KHz Minimum
Note: The data are typical, and the practical ones may be varied.

Page 8 of 8
FREQUENCY CHARTS Unit: MHz
INT
TX RX TX RX
1 156.050 160.650
2 156.100 160.700
3 156.150 160.750 60 156.025 160.625
4 156.200 160.800 61 156.075 160.675
5 156.250 160.850 62 156.125 160.725
6 156.300 156.300 63 156.175 160.775
7 156.350 160.950 64 156.225 160.825
8 156.400 156.400 65 156.275 160.875
9 156.450 156.450 66 156.325 160.925
10 156.500 156.500 67 156.375 156.375
11 156.550 156.550 68 156.425 156.425
12 156.600 156.600 69 156.475 156.475
13 156.650 156.650
14 156.700 156.700 71 156.575 156.575
15 156.750 156.750 72 156.625 156.625
16 156.800 156.800 73 156.675 156.675
17 156.850 156.850 74 156.725 156.725
18 156.900 161.500 75 156.775 156.775
19 156.950 161.550 76 156.825 156.825
20 157.000 161.600 77 156.875 156.875
21 157.050 161.650 78 156.925 161.525
22 157.100 161.700 79 156.975 161.575
23 157.150 161.750 80 157.025 161.625
24 157.200 161.800 81 157.075 161.675
25 157.250 161.850 82 157.125 161.725
26 157.300 161.900 83 157.175 161.775
27 157.350 161.950 84 157.225 161.825
28 157.400 162.000 85 157.275 161.875
86 157.325 161.925
87 157.375 157.375
88 157.425 157.426
Table of contents
Other Furuno Marine Radio manuals

Furuno
Furuno FA-100 User manual

Furuno
Furuno FA-100 User manual

Furuno
Furuno FA-40 User manual

Furuno
Furuno FA-150 User manual

Furuno
Furuno FA-150 User manual

Furuno
Furuno FM-3000 User manual

Furuno
Furuno FA-150 User manual

Furuno
Furuno FA-150 User manual

Furuno
Furuno FA-150 User manual

Furuno
Furuno FA-70 User manual

Furuno
Furuno FA-150 User manual

Furuno
Furuno FA-100 Manual

Furuno
Furuno AIS Transponder FA-50 User manual

Furuno
Furuno FA-100 User manual

Furuno
Furuno RC-1800F User manual

Furuno
Furuno FM-2510 Reference guide

Furuno
Furuno FA-170 User manual

Furuno
Furuno P4800 User manual

Furuno
Furuno FA-150 User manual

Furuno
Furuno FM-8900S User manual