Futurecom 8A083X02 R9 User manual

Futurecom Systems Group, ULC
Battery Pack and Charger
User Guide

8A083X02 R9
Battery Pack and Charger User Guide
February 2023 Page 2
Document Revisions
Rev
Date
By
Notes & References
0
Dec. 2004
FC
Preliminary Release
1
Sept. 2007
FC
220V Voltage Added
2
May 2009
FC
Added user tips for prolonged battery life
3
Oct. 2010
FC
Fixed typo on spec sheet (Appendix 1)
4
Nov. 2012
FC
Added New Company Logo
5
July 2015
AJK/SN
New charger operation and indicators
6
Feb. 2019
AJK/SN
New FC template., Added PDR8000 and cable details
7
July 2019
AJK/SN
Added Backup time for TRS with Booster
8
Feb. 2023
KS
Updated Logo
9
June 2023
JP
Updated with Battery Life information
Proprietary Statement
©
2023, Futurecom Systems Group, ULC
Printed in Canada. All Rights Reserved
No part of this document, or any software included with it, may be reproduced and distributed without the prior
written permission of the copyright holder.
Futurecom Systems Group, ULC reserves the right to make changes or improvements to the equipment,
software or specification described in this document at any time and without prior notice. These changes will be
incorporated in the new releases of this document.
This document may contain technical inaccuracies or typographical errors. Futurecom Systems Group, ULC
waves responsibility for any labour, materials or costs incurred by any party as a result of using this document.

8A083X02 R9
Battery Pack and Charger User Guide
February 2023 Page 3
TABLE OF CONTENTS
About this Operator’s Manual .......................................................................................... 4
Notes, Cautions, Warnings, Dangers .............................................................................. 4
Notational Conventions.................................................... Error! Bookmark not defined.
Safety Information............................................................................................................. 5
Battery Pack Overview ..................................................................................................... 8
Principle of Operation...................................................................................................... 8
TRS and Battery Pack Block Diagram............................................................................. 8
Battery Pack Description.................................................................................................. 9
Battery Pack.................................................................................................................... 9
DC Input/Output Connector............................................................................................. 9
Battery Voltage Indicator................................................................................................10
Charging...........................................................................................................................11
Preparing to Charge.......................................................................................................11
Charging ........................................................................................................................12
Use....................................................................................................................................14
Cycle Life..........................................................................................................................15
Storage .............................................................................................................................16
Frequently Asked Questions...........................................................................................17
APPENDIX 1-Battery Pack and Charger Specifications ................................................18
NOTES ..............................................................................................................................19

8A083X02 R9
Battery Pack and Charger User Guide
February 2023 Page 4
About this Operator’s Manual
This Operator’s Manual provides detailed operating procedures for Battery Pack and
Battery Charger products.
This document is not intended to cover the operation details of the Repeater or the Mobile
Radio.
Notes, Cautions, Warnings, Dangers
Throughout this manual, you will see Notes, Cautions, Warnings and Dangers.
Their meaning is as follows:
Note:
A clarifying statement that expands on the text that follows.
IMPORTANT:
An important statement that must be considered and / or implemented in
order to achieve adequate equipment operation.
WARNING:
Describes a potentially hazardous situation, which may lead to equipment
damage, death or injury.
DANGER:
Describes an imminently hazardous situation, which if not avoided, will
result in death or serious injury.

8A083X02 R9
Battery Pack and Charger User Guide
February 2023 Page 5
Safety Information
DANGER!
There are NO user serviceable parts inside the Battery Pack or the Battery
Charger. DO NOT OPEN THE BATTERY PACK OR THE CHARGER AS
LETHAL VOLTAGES ARE PRESENT INSIDE! Only Futurecom Systems
Group can service the Battery Pack and the charger.
WARNING
To ensure that Radio Frequency (RF) energy exposure to bystanders
external to a repeater or mobile radio is lower than the recommended
safety standards, transmit with any repeater or mobile radio only when
bystanders are at least 2 meters away from a properly installed
externally mounted antenna for radios with less than 50 Watts output
power, or 3 meters away for radios with 50 Watts or greater power
output. Refer to the RF Safety Booklet for exact distances.
WARNING
Never use the Battery Pack or attempt to charge the Battery Pack if it is
damaged in any manner. If it is damaged, contact Futurecom Systems
Group.
Only use chargers provided by Futurecom Systems Group for the Battery Pack. Use
of any other charger could damage the Battery Pack or result in fire, electric shock or
electrocution.
DO NOT store or charge the Battery Packs in locations with a warm environment.
Keep the Battery Pack dry.
DO NOT incinerate the Battery Packs.
WARNING
DO NOT enclose the Battery Pack in an airtight casing or environment.
During charging and discharge the Battery Packs must have ventilation.
Airtight environment could cause explosion.

8A083X02 R9
Battery Pack and Charger User Guide
February 2023 Page 6
WARNING
DO NOT operate the Battery Packs in explosive atmospheres, i.e.,
presence of flammable liquids, gases, dust or in an area where the
Battery Pack could be exposed to sparks or any burning material.
Before disposing of the Battery Pack, check with your State/Province Environmental
Protection Agency.
If the Battery Pack should ever become warm when charging or if it should emit a
pungent odour, disconnect the charger from an AC outlet immediately and contact
Futurecom Systems Group.
IMPORTANT
Before each use and before charging the Battery Pack check ventilation
holes provided on the Battery Pack to make sure that holes have not been
blocked or obstructed. Clean or clear any obstruction such as dirt that
may obstruct ventilation.
WARNING
Do not operate charger with damaged AC power cords or DC output
cords or accessories - call manufacturer to have the charger replaced
immediately.
NEVER charge a frozen Battery Pack.
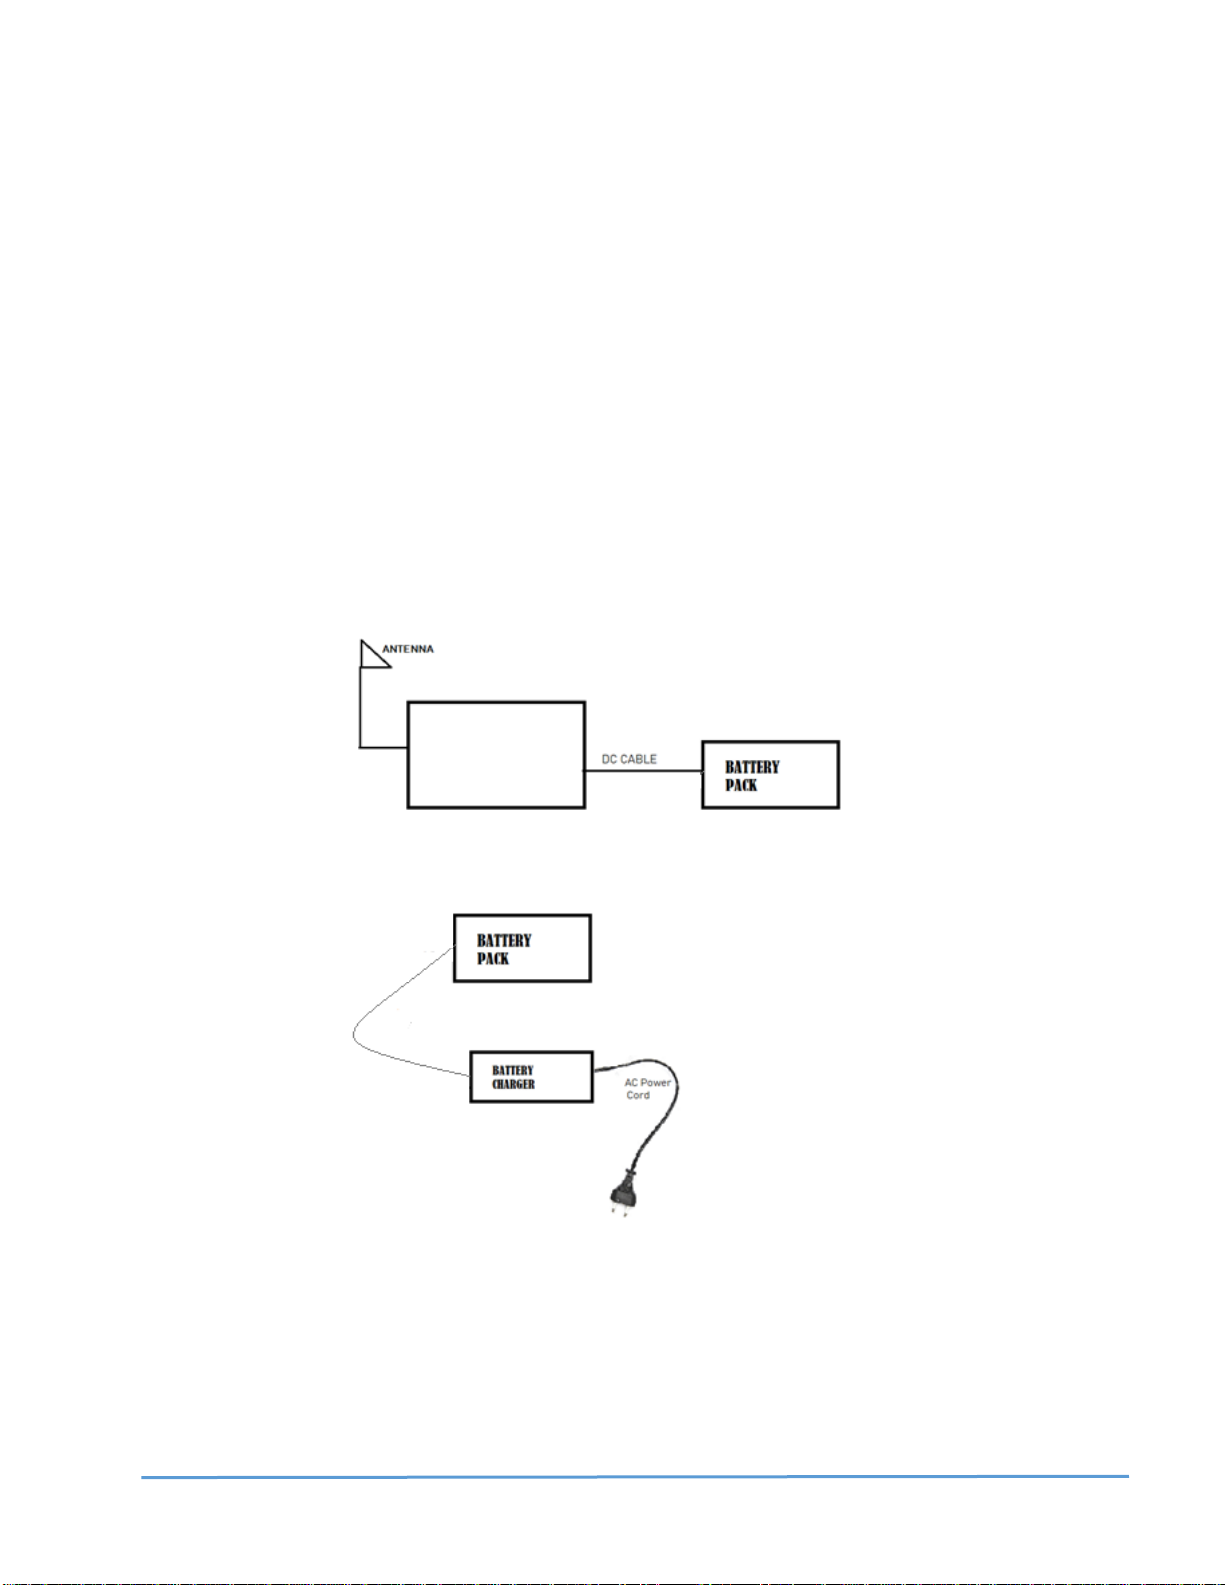
Locate the charger as far away from the Battery Pack as is allowed by the length of
the output cable harness.
NEVER set the charger on a surface constructed from combustible material.
The charger body and power cord are waterproof. However, do not expose the AC
and DC electrical connections at the ends of the power cords to rain or snow.
When handling electric power cords, always pull by the plug rather than by the cord.
This will reduce the risk of damage to both the plug and the cord, and it will minimize
the likelihood of electric shock resulting from that damage.
Make sure that all electric power cords are located so that they cannot be stepped
on, tripped over, or otherwise subjected to damage or stress.
When leaving a battery charger connected to the Battery Pack for extended periods
of time (weeks, months, etc.), periodically check the battery to see if it is unusually

8A083X02 R9
Battery Pack and Charger User Guide
February 2023 Page 7
warm, if it is releasing an excessive amount of gas, or is emitting an unpleasant
odour. If any of these things occur, disconnect the charger from the AC electrical
outlet and contact the manufacturer immediately.
WARNING
NEVER smoke or allow a source of electric spark or open flame in the
vicinity of the battery or charger.

8A083X02 R9
Battery Pack and Charger User Guide
February 2023 Page 8
Battery Pack Overview
Principle of Operation
The Suitcase can contain either a DVRS, a PDR8000, or a Booster Pack. The Suitcase
contains an internal 120V/220V AC to 13.8V DC power supply. NOTE: DVRS comes from
factory with only one of 120V or 220V while the PDR8000 and the Booster Pack are
compatible with both. The Battery Pack is used to supply nominal 13.8V DC power to the
Suitcase where AC supply is not available.
TRS and Battery Pack Block Diagram
Figure 1 shows the Suitcase and Battery Pack block diagram.
The Battery Pack consists of 3 components: the main Battery Pack enclosure, a DC output
cable (7W077X11-01 for DVRS Suitcase, or 7W077X12-01 for PDR8000 Suitcase) and the
Battery Charger (3P077B01-01).
Figure 1: Suitcase and Battery Pack Block Diagram
DVRS SUITCASE NOTE: It is not recommended to connect the battery pack when the DVR-LX
Suitcase is powered from AC. A discharged battery pack can be damaged. Connecting the battery
pack and AC at the same time voids battery pack warranty. This limitation does not apply to the
PDR8000 and Booster Pack.
SUITCASE
OR

8A083X02 R9
Battery Pack and Charger User Guide
February 2023 Page 9
Battery Pack Description
Battery Pack
The main Battery Pack enclosure contains batteries, a battery voltage indicator and a DC
input/output connector. The DC output connector is connected directly to the batteries
without any internal fuses.
The internal batteries are used to supply DC power to the Suitcase where AC supply is not
available.
The AC to DC battery charger is used to charge the internal batteries from a 120V AC
source. NOTE: A step-down transformer and an AC plug adapter (if required) are supplied
for countries with 220V to 240V AC mains.
Figure 2: Battery Pack
DC Input/Output Connector
The “MIL-C-5015” style 2-contact connector is located on the side of the Battery Pack. It
supplies power to the Suitcase. The DC cable (7W077X11-01 or 7W088X11-01) plugs into
this connector. The other end of the DC cable plugs into the Suitcase DC input connector.
The battery charger connects to this connector for charging.

8A083X02 R9
Battery Pack and Charger User Guide
February 2023 Page 10
Figure 3: DC Input/Output Connector
Battery Voltage Indicator
A Battery Voltage Indicator is located on the Battery Pack Cover. See indicator on top right
corner of front of case in Figure 2. The indicator shows the battery voltage:
•RED Flashing Indicator –battery voltage is less than approximately 10.9V.
Do not use the Battery Pack when the Battery Voltage Indicator is
Flashing RED. Recharge the Battery Pack as soon as possible! Using or
leaving the Battery Pack with RED Flashing Battery Voltage Indicator will
severely shorten the battery life and is not covered by the Battery Pack
warranty!
•GREEN Flashing Indicator - battery voltage is greater than 10.9V. This is the
normal operating range of the Battery Pack.

8A083X02 R9
Battery Pack and Charger User Guide
February 2023 Page 11
Charging
Charge the Battery Pack fully before first use!
The Battery Pack must be charged whenever the Battery Voltage Indicator
is Flashing RED!
The Battery Pack must be charged at room temperature (20
C-25
C)!
The battery charger must stay connected to the Battery Pack even after
the battery is fully charged (float charging). This guarantees that the Battery Pack is
fully charged whenever it is needed and that the Battery Voltage Indicator does not
discharge the Battery Pack over a period of time.
Preparing to Charge
WARNING
•Be sure that the area around The Battery Pack and the charger is well
ventilated while the Battery Pack is being charged.
•NEVER charge or store the Battery Pack in a warm environment.
•NEVER charge the Battery Pack if it is damaged in any manner
or if it has been dropped.
•NEVER charge the Battery Pack if it is damp or wet - keep it dry.
•NEVER charge or use the Battery Pack if any terminals located on the DC
charging plug or the Battery Pack DC Connector are damaged in any manner or
are missing.

8A083X02 R9
Battery Pack and Charger User Guide
February 2023 Page 12
Fig. 3 Battery Charger
Charging
•Disconnect the DC output cable from the Battery Pack.
•Plug the DC charger plug into the Battery Pack DC Connector. The DC charger plug
is locked onto the Battery Pack DC Connector by rotating the locking ring clockwise.
•Plug the battery charger AC cord into a 120V AC outlet (or into a 220V to 240V AC
outlet with a step down transformer and an AC plug adapter (if required)).
•A steady AMBER light on the battery charger indicates charging.
•A flashing GREEN light on the battery charger indicates that the Battery Pack is
80% charged.
•A steady GREEN light on the battery charger indicates that the Battery Pack is fully
charged. The battery charger is in float charge mode. It takes approximately 10
hours for a fully discharged Battery Pack to be charged.
•A flashing AMBER light on the battery charger indicates that the charger is
connected to an AC outlet. If the AMBER light continues to flash, the battery voltage
is either too low (less than 3V) or the DC charger plug is not plugged into the Battery
Pack properly. Terminate the charging process immediately if the Battery Pack
voltage is below 3V and contact Futurecom Systems Group! The most likely
cause is either a sulphated battery or a high resistance connection between the
charger and the Battery Pack.

8A083X02 R9
Battery Pack and Charger User Guide
February 2023 Page 13
•Leave the Battery Pack connected to the battery charger even after it has been fully
charged (float charging). Periodically check the Battery Pack during float charging to
see if it is unusually warm, if it is releasing an excessive amount of gas, or if it is
emitting an unpleasant odour. If any of these things occur, disconnect the charger
from the AC electrical outlet and contact Futurecom Systems Group immediately.
•Unplug the AC power cord from an AC outlet ONLY when the Battery Pack is
needed to be used.
•Disconnect the DC charger plug from the Battery Pack DC Connector.
•Place the DC connector cover on the Battery Pack DC Connector.
•The Battery Pack is ready for use.

8A083X02 R9
Battery Pack and Charger User Guide
February 2023 Page 14
Battery Pack Use
The Battery Pack is NOT waterproof.
Make sure that the Battery Pack is not submerged into water!
Discontinue using the Battery Pack whenever the Battery Voltage
Indicator is Flashing RED!
Use the Battery Pack between -15
C and +50
C ambient temperature.
•Remove the DC connector cover from the Battery Pack DC connector.
•Connect the Battery Pack DC output cable to the DC output connector.
•Connect the Battery Pack DC cable to the Suitcase.
•The normal Battery Pack operating range is indicated by the GREEN Flashing
Indicator on the Battery Pack.
•Discontinue using the Battery Pack whenever the Indicator is Flashing RED!
Recharge the Battery Pack as soon as possible.
•Power down the Suitcase and disconnect the Battery Pack DC cable from the
Suitcase.
•Disconnect the Battery Pack DC output cable from the DC output connector.
•Place the DC connector cover on the DC connector.

8A083X02 R9
Battery Pack and Charger User Guide
February 2023 Page 15
Cycle Life
The Battery Pack cycle life is dependent on numerous factors: depth of discharge during
each use, charging habits and ambient temperature. Providing an exact number to the
cycle life versus depth of discharge is impossible given all variables that may apply.
However, in general terms, the following is achieved on a consistent basis: for depth of
discharge 80% or greater - 100-200 cycles, for 50% depth of discharge - 500 cycles, for
30% depth of discharge - up to 1000 cycles.
Table 1: Battery Back Up Time
SUITCASE TYPE
OUTPUT POWER OF SUITCASE
BACK UP TIME
(at 50:50 Tx-Rx Duty Cycle)
DVR-LX with Low Power MSU
700-5W, VHF-6W, 800/UHF-10W
2.5 hours
DVR-LX with Mid Power MSU
700/UHF/VHF-5W, 800-10W
2 hours
PDR8000
20W
7.5 hours
Booster Pack
50W
3.5 hours
Charging Instructions
Option A: For the Longest Cycle Life:
The user MUST recharge the battery pack after every use, even if the green light is still
flashing. The user should leave the battery pack on the charger permanently until needing
to use it.
Option B: If Battery Pack not left on Charger Permanently:
Monthly charging maintenance schedule: The battery pack should be recharged once a
month. Every second month, it should be discharged 20% first and then fully recharged.
IMPORTANT
The user must send the battery pack for refurbishing every 3 years. This
will guarantee that the battery pack will not fail during use.

8A083X02 R9
Battery Pack and Charger User Guide
February 2023 Page 16
Storage
Recommended storage temperature is 25°C (77°F). Do not store the Battery Pack under
direct sunlight or in high temperatures exceeding 60°C (140°F).
The Battery Pack will self-discharge during storage. It should be charged at least once a
month or preferably left float charging.
IMPORTANT
If the Battery Pack has been stored for a long period in a discharged state
(without monthly recharge), it may not be able to regain capacity even if it
is recharged. It is recommended to periodically use the Battery Pack and
recharge it even if in a stored state. Recharge the Battery Pack at least
once a month.

8A083X02 R9
Battery Pack and Charger User Guide
February 2023 Page 17
Frequently Asked Questions
How often should I charge the Battery Pack?
The Battery Pack should be placed on charge after every use regardless of the discharge
status of the Battery Pack.
NOTE:
Failure to charge the Battery Pack after every use, regardless of discharge status, will
shorten the life cycle of the Battery Pack.
How long will it take to charge the Battery Pack?
Recharge time is a function of the depth of discharge. A fully discharged new Battery Pack
is recharged in about 10 hours.
How long will the Battery Pack power the Suitcase?
The Suitcase back up time depends on many variables: Suitcase Tx-Rx duty ratio,
temperature, age of batteries, previous depths of discharge, charging patterns, etc. Refer to
Table 1: Battery Back Up Time.
Can I leave my Battery Pack on charge?
The battery charger is an automatic charger and as long as AC input is provided, it should
be left on charge when not in use. However, always periodically monitor charger and the
Battery Pack. Check the Battery Pack to see if it is unusually warm, if it is releasing an
excessive amount of gas, or is emitting an unpleasant odour. If any of these things occur,
disconnect the charger from the electrical outlet and contact Futurecom Systems Group
immediately.

8A083X02 R9
Battery Pack and Charger User Guide
February 2023 Page 18
APPENDIX 1-Battery Pack and Charger Specifications
General Specifications
Backup Time for Suitcase
DVR-LX w Low Power MSU
DVR-LX w Mid Power MSU
PDR800
Booster Pack
Refer to Table 1: Battery Back Up Time
2.5 hours
2 hours
7.5 hours
3.5 hours
Dimensions Height / Width / Depth
Battery Pack
Battery Charger
245mm (9.65”) / 280mm (11.0”) / 175mm (6.9”)
51mm (2.0”) / 127mm (5.0”) / 124.5mm (4.9”)
Weight
Battery Pack
Battery Charger
13.0kg (28.5lb)
1.8kg (4.0lb)
Battery Charger AC Input Voltage
100V AC –132V AC, 50Hz –60Hz
200V AC –240V AC with Step Down Transformer
Battery Pack DC Output Voltage
Range
10.9V DC –13.8V DC
Output DC Cable
7W077X11-01
7W077X12-01
7W088X11-01
TRS Cable
Motorola DC Power Cable
PDR8000 DC Cable
Charging Temperature
+20°C to +25°C (+68°F to +77°F)
Operating Temperature
-15°C to +50°C (+5°F to +122°F)
Storage Temperature
+25°C (+77°F)
Charger Compliance
Charger DC Plug Compliance
UL 1236 and CSA 22.2
MIL-C-5015
Connectors
Battery Pack DC Output
Charger AC Input
Charger DC Output
CA3102E16-11SB, “MIL-C-5015” Bayonet
NEMA 5-15P Three Prong AC Plug
CA3106E16-11PB, “MIL-C-5015” Bayonet
Battery Pack Output Voltage
Indicator
Flashing RED
Flashing GREEN
< 10.9V DC approx.
> 10.9V DC approx.
Charger Indicator
AMBER
Flashing GREEN
GREEN
Flashing AMBER
Charging
Battery Pack 80% Charged
Battery Pack Charged, Float Charging
Error
Charger Features
Short Circuit Protection
Spark Proof
Charging Time
10 hours approx.
Float Charge
Required

8A083X02 R9
Battery Pack and Charger User Guide
February 2023 Page 19
NOTES
Table of contents