G21 VITALITY Maestro User manual

Manual
Sous Vide G21 Maestro


The benefits of vacuum low temperature cooking
Using vacuum low-temperature cooking, the food does not need to be in direct contact with air
and water, which will reduce the loss of nutrients in the food, infiltration of harmful substances,
using no oil or using very little oil.
The heat is more even, the taste can penetrate into the food evenly, and the color of the food can
be preserved; the energy is saved compared with the oven and the gas stove, and the smoke
pollution of the kitchen can be reduced, different food can be cooked separately by packaging.
You don‘t need aspecial chef, even if you don‘t have any cooking experience, you can cook
healthy and delicious food according to the scientific recipe. You can cook according to the set
temperature and time according to the recipe.
Thanks to precise temperature and time control, it is possible to ensure that food not scorched
or dried out due to overcooking, especially for food cooked at medium and low temperatures.
Preparation for vacuum low temperature cooking
• Vacuum sealing machine - to ensure an air-tight seal, preventing air or liquid going in. You
can use our vacuum sealer with built-in foil holder, foil cutter and dual pump G21 Nefrit or
our vacuum sealer with dual pump G21 Onyx.
• Vacuum sealing bags - To pack foods in and thoroughly sealed, ensuring that no air or liquid
can go inside. Please also ensure that the vacuum sealing bags can bear temperatures up
to 100 °C.
• Cooking water tank or Sous Vide water bath - firstly put the cooking rack into the water
tank, then fill the tank or water bath with enough water to cover the food and control
temperature for cooking. Please ensure that the water tank can bear temperature up to
100 °C.
Do you want to know more about the sous-vide cooking? All the information and useful tips can
be found on www.penta.cz/vse-o-sous-vide.html.
Thank you for your purchase!
Read the manual before using the appliance to avoid damaging it.
Safety
Please always follow these precautions:
• Operate the machine according to the user manual
only, otherwise the machine may be damaged.
• Connect the power supply shown on the rating label only.
• Connect with the safe grounded supply only.
• Cut off the power supply before removing the machine.
• Do not directly touch the liquid to check the temperature, please use temperature display or
thermometer.

• Make sure the water level must be controlled between the lowest water level „MIN“ and the
highest water level „MAX“, to avoid damaging the machine.
• Do not touch hot surfaces during or after working to avoid injury.
• If there is liquid on the upper of the machine (above the MAX water level), please cut off the
power and dry it before use.
• Please place the machine and its cord out of reach of children to avoid danger.
• Children shall not play with the appliance
• Appliances can be used by persons with reduced physical, sensory or mental capabilities
or lack of experience and knowledge if they have been given supervision or instruction
concerning use of the appliance in asafe way and understand the hazards involved
1. TEMP / TIME
Temperature, time adjustment switch button
At standby mode, click the button to go to temperature or time setting.
The first press - the display is flashing, set the desired temperature by pressing ” +” and ” -”.
The second press - the display is flashing, set the desired time by pressing ” +” and ” -”. The
third press - the display stops flashing, the machine is confirming the set temperature and time.
After the display flashes 10 times, if there is no any setting change made, the set temperature
and time is set and confirmed. If you need to reset them, press the button to enter the setting
status.
The set temperature and time will show in 3 seconds intervals alternately when you long press
the button.
2. START/STOP
In standby mode, press the button - machine starts working.
Second Press , the time starts to count down, the display shows the current temperature and
time in turns at about 3s intervals.
Third Press , the machine will stop working, back to standby mode.
Product Function

3.
Adjustment button: Click the button to select the content (temperature or time) to be
adjusted, then use the „+“ and „-“ buttons to adjust to the desired temperature or time.
The temperature unit switch: Press the ”+”, ” -” buttons at the same time to switch and select the
unit of temperature. There are Celsius and Fahrenheit as options.
4. Display
Before the time counts down, the display always shows the current temperature. After
countdown begins, the display shows the current temperature and the remaining work time in
turns at about 3s intervals.
Reset to default:
Under the ready working mode, long press the and ” +” buttons. The display shows the setting
temperature 60°, then release the bu ttons. The display will flash 10 times, then it will return to
base settings.
Product Structure
1
2
3
4
5
6
1. Touch control panel
2. Body
3. Indicator
4. Fixing hand
5. Housing
6. Bottom Cover
Indicator:
• Red light flashes, reaching the preset temperature.
• Orange light is on, reached the preset temperature but not the preset time.
• Green light flashes, reached the desired temperature and time, cooking countdown begins.
• Green light is on, the cooking countdown is completed.

Operating Instructions
1. Choose the suitable container, fix the machine in the container.
2. Put the food in vacuum package into the container.
3. Add water into the container. (Attention: Please make sure the water between Min line and
Max line after add the water into the container)
4. Connect the power.
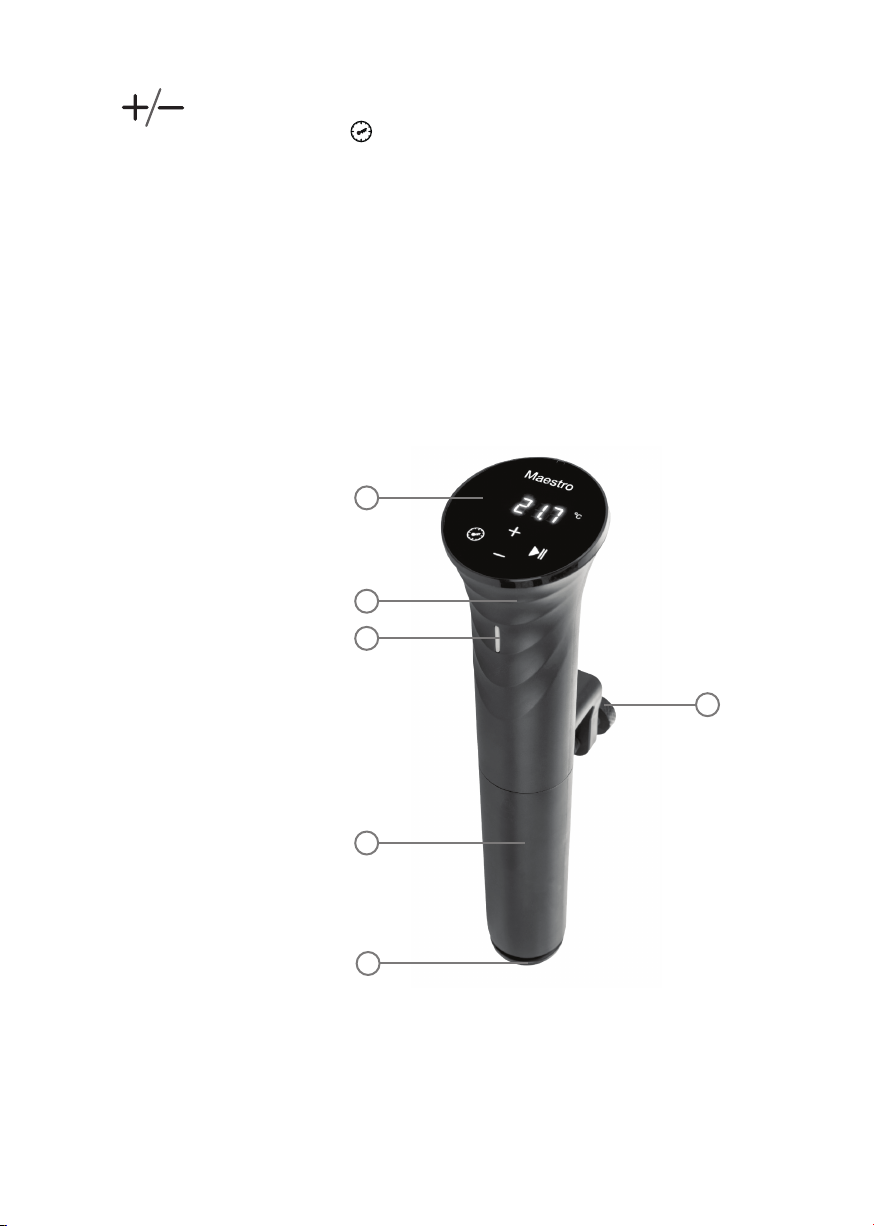
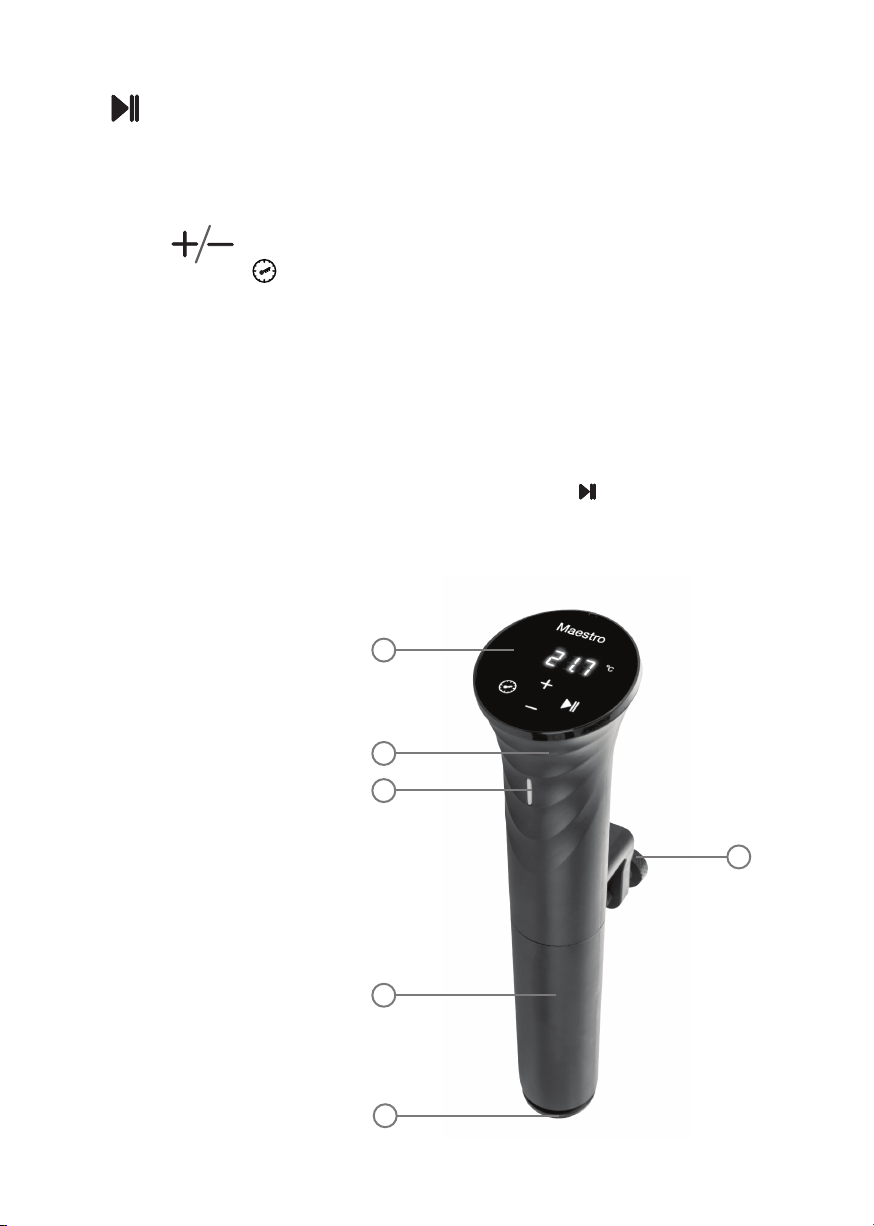
5. Press “+” and “-” simultaneously to select the unit of temperature, the default unit is °C.
6. Click to select the temperature or time to be adjusted, and set the target value with the
“+” and “-” keys.
7. After finishing the setting, click to start working.
8. When the temperature reach to the set temperature, the machine will beep, then press
button, it will count down.
9. After the cooking is finished, the machine will beep. Click to end the machine work.
• Note: If there is no operation, the machine will emit acontinuous beep after 20S, while the
water temperature will remain at the preset temperature.
10. Take foods out, then the food is ready for afterward process.
11. After using the machine, cut off the power supply. Store the machine at the place out of the
children’scontact.
WiFi
Press and hold the and buttons at the same time for 3 to 5 seconds until the WiFi icon
starts flashing.
Choose “Add appliance” in the G21 SmartHome app, then click on the Sous Vide cooker and
follow the instructions in the app.
Maintenance
To avoid burning, please make sure that the machine is off and cooled down to room
temperature before cleaning.
1. Place the machine vertically after cleaning, do not place it horizontally or upside down.
2. During cleaning, do not damage the components inside the machine. Once the components
are damaged, please the G21 authorized service center to have it checked and repaired.
Do not attempt unauthorized repairs to avoid accidents.
3. Discharge the used water after each use, and fill with fresh water next time. To clean the
heating unit and the probe, disassemble the lower cover (“How to disassemble quickly“).
We recommend to clean the heating unit and the probe when you’ve used the appliance for
20 times or when it has been working for 100 hours in total.
4. Do not put the appliance in cold water when it is hot. Let the machine cool down to room
temperature and then put it into cool water to use. Otherwise it will influence the machine
function and lifetime. On the contrary, please do not put cool down machine into hot water
to use.
How to Disassemble Quickly
• Use the tool to remove screw.
• Pull out the low part housing to clean the inner components.

How to Clean
Food grade vinegar (white vinegar, apple vinegar, etc.)
1. Fix the appliance to the container with clamp.
2. Use the mixed liquid in 75% water and 25% vinegar, then pour it into acontainer till the Max
line of the machine.
3. Turn on the machine, set the working temperature 80 °C and set the time 3 hours (03:00),
then single press the button. When reach the presetting temperature, press to start
the timer.
4. When the timer indicates 00:00, stop the machine and turn off the power, unplug and let the
machine cool.
5. Drain out the water from the container and use the fresh water to clean the device.
Troubleshooting
Technical Parameters:
Rated voltage: 110-120 V~/220-240 V~
Rated frequency: 60HZ/50HZ
Rated power: 900 W/1200 W
Temperature setting range: 5-90 °C
The English version of the manual is an exact translation of the original manufacturer‘sinstructions.
Images used in this manual are for illustrational purposes only and may differ from the actual product.
Display accuracy: 0.1
Size: 77X124X345mm
Weight: 0.8 Kg
Time setting range: 5 min-99 hours 59min
Error code Cause of issue Solution
H20 The water level is lower than
the MIN mark.
Turn off the machine power,
add the right amount of water
to the container.
E02 Contact the authorized G21
service center.
During the use of the machine, if any other problems arise, please ask specialist to check the
machine. Do not attempt unauthorized repairs to avoid accidents.

Vorteile des Kochens bei niedriger Temperatur
Beim Vakuumkochen bei niedriger Temperatur kommen die Lebensmittel nicht direkt mit Luft
und Wasser in Berührung, so dass keine Nährstoffe verloren gehen oder Schadstoffe eindringen
können. Darüber hinaus ermöglicht das Vakuumgaren das Garen mit sehr wenig oder gar
keinem Öl.
Die Wärmeverteilung beim Kochen ist gleichmäßig, der Geschmack dringt gleichmäßig in die
Speisen ein und die Farbe der Speisen bleibt erhalten. Im Vergleich zu Backofen und Gasherd
wird Energie gespart und es entsteht keine Rauchbelastung in der Küche. Beim Sous-vide-Garen
können Sie außerdem verschiedene Lebensmittel vakuumverpacken und so zubereiten.
Für das langsame Vakuumkochen brauchen Sie weder einen besonderen Koch noch besondere
Kochkünste. Sie können selbst gesunde und schmackhafte Speisen nach einem Rezept
zubereiten. Sie können nach der im Rezept angegebenen Temperatur und Zeit kochen.
Dank der präzisen Temperatur- und Zeitsteuerung gibt es kein Anbrennen oder Austrocknen
der Speisen durch Überhitzung, insbesondere bei Speisen, die bei mittleren und niedrigen
Temperaturen gegart werden.
Vorbereitung für das Vakuumgaren bei niedriger Temperatur
• Vakuumschweißgerät - zur Erzeugung eines Vakuums, das das Eindringen von Luft
oder Flüssigkeit verhindert. Verwenden Sie unseren G21 Jade-Vakuumkocher mit
integrierter Folienschale, Cutter und Doppelpumpe oder den G21 Onyx-Vakuumkocher mit
Doppelpumpe.
• Vakuumfolie - zum sorgfältigen Einwickeln und Versiegeln von Lebensmitteln, so dass
keine Luft oder Flüssigkeit eindringen kann. Vergewissern Sie sich, dass die Folie
temperaturbeständig bis zu 100 °C ist.
• SousVide-Behälter/Wasserbad - setzen Sie zunächst den G21-Lebensmitteltrenner in den
Behälter/das Wasserbad ein, füllen Sie dann den Behälter/das Wasserbad mit ausreichend
Wasser und überprüfen Sie die Temperatur während des Garens. Achten Sie auch darauf,
dass der Behälter/das Wasserbad bis zu 100 °C temperaturbeständig ist.
• Möchten Sie mehr über das Sous-Vide-Garen erfahren?
Alle Informationen und nützliche Tipps zum Sous-Vide-Garen und Vakuumieren finden Sie
unter www.penta.cz/vse-o-sous-vide.html.
Danke für den Kauf unseres Produktes!
Bitte lesen Sie sich diese Anleitung sorgfältig durch, bevor Sie das Gerät verwenden. Sie verhindern
so eine Beschädigung des Geräts.
Sicherheit
Beachten Sie stets die folgend en Vorsichtsmaßnahmen:
• Betreiben Sie das Gerät nur in Übereinstimmung mit dieser Betriebsanleitung, da sonst
Schäden am Gerät entstehen können.

• Schließen Sie das Gerät nur an eine Stromversorgung an, die mit dem Typenschild
übereinstimmt.
• Schließen Sie das Gerät nur an eine sicher geerdete Steckdose an.
• Ziehen Sie nach dem Ausschalten des Geräts den Stecker aus der Steckdose.
• Prüfen Sie die Temperatur mit einem Temperaturmesser oder Thermometer. Berühren Sie
niemals das Wasserbad.
• Achten Sie darauf, dass der Wasserstand zwischen der niedrigsten „MIN“-Stufe und der
höchsten „MAX“-Stufe am Gerät liegt, um Schäden am Gerät zu vermeiden.
• Berühren Sie keine heißen Oberflächen während oder direkt nach dem Kochen, um
Verletzungen zu vermeiden.
• Wenn sich Wasser auf der Oberseite des Geräts befindet (oberhalb der MAX-Markierung),
schalten Sie es aus und trocknen Sie es ab, bevor Sie es wieder benutzen.
• Stellen Sie das Gerät und das Netzkabel außerhalb der Reichweite von Kindern auf, um
Verletzungen zu vermeiden.
• Kinder dürfen nicht mit dem Gerät spielen.
• Die Geräte können von Personen mit eingeschränkten körperlichen, sensorischen oder
geistigen Fähigkeiten oder mangelnder Erfahrung und Kenntnis verwendet werden, sofern
sie von einem verantwortlichen Erwachsenen beaufsichtigt werden oder in die sichere
Verwendung des Geräts eingewiesen wurden und die möglichen Risiken verstehen.
1. die Einstellung der Temperatur/Zeit
Im Standby-Modus klicken Sie auf die Schaltfläche , um die gewünschte Temperatur und
Zeit einzustellen. Zuerst drücken - die Anzeige blinkt, mit den Tasten „+“ und „-“ die gewünschte
Temperatur einstellen.
Zweites Drücken - die Anzeige blinkt, mit „+“ und „-“ die gewünschte Zeit einstellen.
Drittes Drücken, die Anzeige hört auf zu blinken, das Gerät bestätigt die eingestellte Temperatur
und Zeit.
Nach 10-maligem Blinken der Anzeige werden die eingestellte Zeit und Temperatur bestätigt,
wenn keine Änderung der Einstellung vorgenommen wird. Wenn Sie sie ändern müssen, klicken
Sie erneut auf die Schaltfläche und geben Sie die geänderte Einstellung ein.
Halten Sie die Taste gedrückt , um die Einstellungen anzuzeigen - die Anzeige wechselt
zwischen der eingestellten Temperatur und der Uhrzeit.
Funktionen

2. Start/Stop-Taste
Drücken Sie im Standby-Modus die Taste - das Gerät beginnt zu arbeiten.
Zweites Drücken - der Countdown beginnt, das Display zeigt abwechselnd im Abstand von
3 Sekunden die aktuelle Temperatur und die Uhrzeit an.
Drittes Drücken - das Gerät hört auf zu arbeiten und kehrt in den Standby-Modus zurück.
Beschreibung des Geräts
1
2
3
4
5
6
3. Tasten
Drücken Sie die Taste , um die Temperatur- oder Zeitänderung auszuwählen, und verwenden
Sie die Tasten + und -, um die gewünschte Änderung einzustellen.
Drücken Sie die Tasten + und - gleichzeitig, um die Temperatureinheit zu wählen - es stehen
Grad Celsius und Fahrenheit zur Verfügung.
4. Anzeige
Vor dem Start des Countdowns zeigt das Display immer die aktuelle Temperatur an.
Nach dem Start des Countdowns zeigt das Display im 3-Sekunden - Takt abwechselnd die
aktuelle Temperatur und die Uhrzeit an.
5. Grundeinstellungen wiederherstellen
Wenn das Gerät betriebsbereit ist, drücken Sie lange auf die Tasten und +. Auf dem Display
wird die eingestellte Temperatur von 60° angezeigt, dann lassen Sie die Tasten los. Die Anzeige
blinkt 10 Mal und kehrt dann zur Grundeinstellung zurück.
1. Das Bedienfeld berühren
2. Gerätekörper
3. Die Anzeigeleuchte
4. Klammer zur Befestigung
5. Abdeckung
6. Untere Abdeckung

Betriebsanleitung
1. Wählen Sie ein geeignetes Kochgefäß und befestigen Sie das Gerät mit dem Clip daran.
2. Geben Sie die zu garenden Lebensmittel in den Behälter.
3. Gießen Sie Wasser in den Behälter (der Wasserstand muss zwischen der MIN- und der
MAX-Marke liegen).
4. Stecken Sie den Stecker des Geräts in eine Steckdose.
5. Drücken Sie gleichzeitig die Tasten + und -, um die Temperatureinheiten auszuwählen - die
Werkseinstellung ist Grad Celsius.
6. Drücken Sie die Taste ,+ und -, um die gewünschte Temperatur und Zeit einzustellen.
7. Wenn die Einstellungen abgeschlossen sind, drücken Sie die Taste, um den Garvorgang zu
starten.
8. Wenn das Gerät das Wasserbad auf die gewünschte Temperatur aufgeheizt hat, ertönt ein
Signalton. Dann drücken Sie die Taste - der Countdown beginnt und das Gerät startet den
Garvorgang.
9. Nach Ablauf der eingestellten Garzeit piept das Gerät erneut. Drücken Sie die Taste ,
um den Vorgang zu beenden.
• Hinweis: Wenn das Gerät nicht in Betrieb ist, piept es 20 Sekunden lang - die
Wassertemperatur bleibt auf dem voreingestellten Wert.
10. Die Speisen sind bereit zum Servieren/zur weiteren Zubereitung.
11. Ziehen Sie nach Beendigung des Garvorgangs den Netzstecker aus der Steckdose.
Außerhalb der Reichweite von Kindern aufbewahren.
WiFi
Halten Sie am Sous Vide Kocher die Tasten und 3-5 Sekunden lang gedrückt, bis das
Wifi-Symbol blinkt.
Wählen Sie in der G21 SmartHome App Gerät hinzufügen, wählen Sie Sous Vide Kocher und
folgen Sie den Anweisungen in der App.
Wartung
Um Verbrennungen zu vermeiden, stellen Sie sicher, dass das Gerät vor der Reinigung
ausgeschaltet und auf Raumtemperatur abgekühlt ist.
1. Stellen Sie das Gerät nach der Reinigung aufrecht, nicht waagerecht.
2. Gehen Sie bei der Reinigung vorsichtig vor, um die inneren Teile des Geräts nicht zu
beschädigen. Wenden Sie sich im Schadensfall an Ihren Lieferanten, versuchen Sie niemals,
das Gerät selbst zu reparieren.
3. Um das Wärmerohr und die Sonde zu reinigen, nehmen Sie die untere Abdeckung des
Geräts ab (siehe „Schnelles Zerlegen“). Wir empfehlen, das Rohr und den Fühler nach
100 Stunden Kochzeit/nach 20 Kochvorgängen zu reinigen.
Die Anzeigeleuchte
• Rotes Licht blinkt - das Gerät hat noch nicht die gewünschte Temperatur erreicht.
• Das orangefarbene Licht leuchtet - das Gerät hat die gewünschte Temperatur, aber nicht die
Zeit erreicht.
• Grünes Licht blinkt - das Gerät hat die gewünschte Temperatur und Zeit erreicht, der
Countdown wird gestartet.
• Das grüne Licht leuchtet - der Countdown ist abgeschlossen.

4. Wenn das Gerät heiß ist, legen Sie es nicht in kaltes Wasser. Warten Sie, bis das Gerät auf
Raumtemperatur abgekühlt ist, bevor Sie es zum Gebrauch ins Wasser legen. Umgekehrt
gilt auch: Stellen Sie ein gekühltes Gerät nicht in heißes Wasser. Die Nichtbeachtung dieser
Hinweise kann die Funktion des Gerätes und seine Lebensdauer beeinträchtigen.
So entfernen Sie schnell die untere Abdeckung
• Lösen Sie die Schraube.
• Entfernen Sie die untere Abdeckung und reinigen Sie die internen Komponenten des Geräts.
Reinigung
Sie benötigen Essig in jeder Form.
1. Das Gerät mit dem Befestigungsclip am Behälter befestigen.
2. Bereiten Sie eine Lösung aus Wasser und Essig vor - 3 Teile Wasser, 1 Teil Essig. Gießen
Sie die Lösung in den Behälter - der Füllstand der Lösung muss die MAX-Markierung auf
dem Gerät berühren.
3. Schalten Sie das Gerät ein und stellen Sie es für 3 Stunden auf 80 °C. Drücken Sie die Taste
, um den Heizvorgang zu starten. Sobald das Gerät aufgeheizt ist, drücken Sie die Taste
erneut, um den Garvorgang zu starten.
4. Schalten Sie das Gerät nach Beendigung des Garvorgangs aus, ziehen Sie den Stecker aus
der Steckdose und lassen Sie es abkühlen.
5. Gießen Sie das Wasser aus dem Behälter und spülen Sie das Gerät mit sauberem Wasser
aus.
Fehlersuche
Fehler Mögliche Ursache Lösung
H20 Der Wasserstand im Behälter
ist niedriger als die MIN-
Markierung am Gerät.
Schalten Sie das Gerät aus, füllen
Sie die erforderliche Wassermenge
nach und wiederholen Sie den
Kochvorgang. Contact the
authorized G21 service center.
E02 Wenden Sie sich an
eine autorisierte G21-
Kundendienststelle.
Die deutsche Version der Anleitung ist eine genaue Übersetzung der Anleitung des Herstellers.
Die in diesem Handbuch verwendeten Bilder dienen nur zur Illustration und können nicht genau
das Produkt entsprechen.
Technische Parameter
Spannung: 110-120 V~/220-240 V~
Frequenz: 60 Hz/50 Hz
Leistung: 900 W/1200 W
Temperatur-Einstellbereich: 5-90 °C
Zeiteinstellungsbereich:
5 min-99 Stunden 59 min
Größe: 77x124x345mm
Gewicht: 0,8 kg
Wenn Sie bei der Verwendung des Geräts andere Probleme feststellen, bitten Sie Ihren
Lieferanten, das Gerät zu überprüfen. Versuchen Sie nicht, das Gerät selbst zu reparieren.

Děkujeme za nákup našeho výrobku!
Před použitím přístroje vás prosíme opečlivé přečtení tohoto návodu. Vyhnete se tak poškození
přístroje.
Výhody vaření při nízké teplotě
Při vakuovém nízkoteplotním vaření není jídlo vpřímém kontaktu se vzduchem avodou, takže
nedochází ke ztrátě živin vpotravinách nebo infiltraci škodlivých látek. Vakuové vaření navíc
umožňuje vaření svelmi malým množstvím oleje nebo kompletně bez něj.
Distribuce tepla při vaření je rovnoměrná, chuť rovnoměrně proniká do jídla abarva jídla
zůstává zachována. Ve srovnání stroubou aplynovým sporákem se šetří energie anedochází
ke kouřovému znečištění kuchyně. Sous-vide vaření také umožňuje vařit různé potraviny díky
vakuovému balení každé znich.
Kpomalému vakuovému vaření nepotřebujete zvláštního kuchaře ani speciální kuchařské
dovednosti. Připravit zdravé achutné jídlo podle receptu zvládnete isami. Vařit můžete podle
nastavené teploty ačasu na základě daného receptu.
Díky přesné regulaci teploty ačasu nedochází ke spálení ani vysušení potravin vdůsledku
přehřátí, zejména upotravin vařených při středních anízkých teplotách.
Příprava pro vakuové vaření při nízké teplotě
• Vakuová svářečka – kzajištění vakua, zabraňujícího vniknutí vzduchu nebo kapaliny.
Využijte naši vakuovačku se zabudovaným zásobníkem na fólii, řezačkou aduální pumpou
G21 Nefrit nebo vakuovačku sduální pumpou G21 Onyx.
• Vakuovací folie - pro zabalení adůkladné utěsnění potravin tak, aby dovnitř nemohl
proniknout žádný vzduch nebo kapalina. Ujistěte se, že folie je odolná teplotám až do
100 °C.
• Kontejner pro SousVide/vodní lázeň - nejdříve do kontejneru/vodní lázně vložte stojan G21
pro rozdělení potravin, poté kontejner/vodní lázeň naplňte dostatečným množstvím vody
akontrolujte teplotu při vaření. Také se ujistěte, že kontejner/nádrž na vodní lázeň je odolná
teplotám až do 100 °C.
Chcete osous-vide vaření vědět víc? Všechny informace iužitečné tipy ksous-vide vaření
avakuování naleznete na www.penta.cz/vse-o-sous-vide.html.
Bezpečnost
Vždy dodržujte tato opatření:
• Provozujte zařízení pouze vsouladu stímto návodem kpoužití,
jinak by mohlo dojít kpoškození zařízení.
• Zařízení připojujte pouze ktakovému zdroji, který se shoduje
stypovým štítkem.
• Zařízení připojujte pouze do bezpečně uzemněné zásuvky.

• Po vypnutí zařízení jej odpojte ze zásuvky.
• Pro zjištění teploty používejte ukazatel teploty nebo teploměr. Nikdy do vodní lázně
nesahejte.
• Dbejte na to, aby hladina vody byla udržována mezi nejnižší hladinou „MIN“ anejvyšší
hladinou „MAX“ na zařízení, aby nedošlo kjeho poškození.
• Nedotýkejte se horkých povrchů během nebo přímo po vaření, aby nedošlo ke zranění.
• Pokud je na horní části zařízení voda (nad značkou MAX), vypněte aosušte jej před dalším
použitím.
• Zařízení anapájecí kabel umístěte mimo dosah dětí, aby nedošlo kúrazu.
• Děti si spřístrojem nesmí hrát.
• Spotřebiče mohou používat osoby se sníženými fyzickými, smyslovými nebo duševními
schopnostmi nebo snedostatkem zkušeností aznalostí, pokud jsou pod dohledem
zodpovědné adospělé osoby nebo pokud byly poučeny obezpečném používání spotřebiče
arozumějí možným rizikům.
Nastavení teploty/času
Vpohotovostním režimu kliknutím na tlačítko nastavte požadovanou teplotu ačas. První
stisknutí – displej začne blikat, nastavte požadovanou teplotu stisknutím tlačítek „+“ a„-“.
Druhé stisknutí - displej bliká, nastavte požadovaný čas stisknutím „+“ a„-“.
Třetí stisknutí, displej přestane blikat, zařízení potvrzuje nastavenou teplotu ačas.
Poté, co displej 10krát zabliká, nebude-li provedena žádná změna nastavení, jsou nastavený
čas ateplota potvrzeny. Pokud je potřebujete změnit, klikněte znovu na tlačítko azadejte
změnu nastavení.
Stisknutím apodržením tlačítka lze nastavení zobrazit – displej střídavě zobrazuje
nastavenou teplotu ačas.
Funkce

Tlačítko Start/Stop
Vstandby režimu stiskněte tlačítko – zařízení začne pracovat.
Druhé stisknutí – spustí se odpočet, displej zobrazuje aktuální teplotu ačas střídavě v
3 vteřinových intervalech.
Třetí stisknutí – zařízení přestane pracovat avrátí se do standby režimu.
Tlačítka
Tlačítko pro nastavení: Stiskněte tlačítko pro zvolení změny teploty nebo času a
tlačítky + a– nastavte požadovanou změnu.
Přepnutí jednotek teploty: Stiskněte tlačítka + a– najednou avyberte jednotku teploty –
kdispozici jsou stupně Celsia aFahrenheity.
Displej
Před spuštěním odpočtu displej vždy ukazuje aktuální teplotu.
Po zahájení odpočtu displej střídavě ukazuje aktuální teplotu ačas střídavě v3 vteřinových
intervalech.
Obnova základního nastavení
Vmomentě, kdy je zařízení připraveno pracovat, dlouze stiskněte tlačítka a+. Displej zobrazí
nastavenou teplotu 60°, poté uvolněte tlačítka. Displej 10krát zabliká avrátí se do základního
nastavení.
Popis zařízení
1
2
3
4
5
6
1. Dotykový ovládací panel
2. Tělo zařízení
3. Světelný indikátor
4. Upevňovací klipsa
5. Kryt
6. Spodní kryt

Světelný indikátor
• Červené světlo bliká – zařízení ještě nedosáhlo požadované teploty.
• Oranžové světlo svítí – zařízení dosáhlo požadované teploty, ale ne času.
• Zelené světlo bliká – zařízení dosáhlo požadované teploty ičasu, spouští se odpočet.
• Zelené světlo svítí – odpočet byl dokončen.
Operační instrukce
1. Zvolte vhodnou nádobu pro vaření azařízení kní připevněte pomocí klipsy.
2. Vložte do nádoby zavakuované potraviny.
3. Nalijte do nádoby vodu (hladina vody musí být mezi ryskou MIN aMAX).
4. Zapojte zařízení do zásuvky.
5. Stiskněte tlačítka + a– najednou pro zvolení jednotek teploty – továrně jsou nastaveny
stupně Celsia.
6. Stiskněte tlačítko pro nastavení požadované teploty ačasu pomocí tlačítek + a-.
7. Po dokončení nastavení stiskněte tlačítko pro zahájení vaření.
8. Když zařízení nahřeje vodní lázeň na požadovanou teplotu, zapípá. Poté stiskněte
tlačítko – spustí se odpočet azařízení spustí proces vaření.
9. Po uplynutí nastavené doby vaření zařízení znovu zapípá. Stiskněte tlačítko pro ukončení
procesu.
• Poznámka: Pokud zařízení nepracuje, dlouze zapípá po dobu 20 vteřin – teplota vody
zůstává na přednastavené hodnotě.
10. Potraviny jsou připraveny kpodávání/další úpravě.
11. Po skončení procesu vaření zařízení odpojte ze zásuvky. Uchovávejte jej mimo dosah dětí.
WiFi
Na Sous Vide vařiči stiskněte apřidržte tlačítka a po dobu 3–5 vteřin, dokud se ikona
wifi nerozbliká.
Vaplikaci G21 SmartHome vyberte „Přidat zařízení“, zvolte Sous Vide vařič apostupujte dle
instrukcí vaplikaci.
Údržba
Abyste předešli popálení, ujistěte se, že je stroj před čištěním vypnutý avychladlý na pokojovou
teplotu.
1. Po vyčištění postavte zařízení do svislé polohy, nepokládejte jej vodorovně.
2. Dbejte opatrnosti při čištění, abyste předešli poškození vnitřních částí zařízení. Pokud
kpoškození dojde, obraťte se na autorizovaný servis G21, nikdy se nepokoušejte zařízení
opravit sami.
3. Pro vyčištění tepelné trubice asondy demontujte spodní kryt zařízení (viz „Jak rychle
demontovat“). Doporučujeme trubici asondu čistit vždy po 100 hodinách vaření/po
20 procesech vaření.
4. Pokud je zařízení horké, nevkládejte jej do studené vody. Počkejte, dokud zařízení
nevychladne na pokojovou teplotu aaž poté jej vložte do vody kpoužití. To platí ipro
opačný případ – nevkládejte vychladlé zařízení do horké vody. Nedodržení těchto pokynů
může ovlivnit funkci zařízení ajeho životnost.
Jak rychle demontovat spodní kryt
• Odšroubujte šroub.
• Sundejte spodní kryt avyčistěte vnitřní komponenty zařízení.

Česká verze návodu je přesným překladem originálního návodu výrobce.
Fotografie použité vmanuálu jsou pouze ilustrační anemusí se přesně shodovat svýrobkem.
Čištění
Budete potřebovat ocet jakéhokoli druhu.
1. Připevněte zařízení knádobě pomocí upevňovací klipsy.
2. Připravte si roztok zvody aoctu – 3 díly vody, 1 díl octu. Roztok nalijte do nádoby – hladina
roztoku se musí dotýkat značky MAX na zařízení.
3. Zapněte zařízení anastavte jej na 80 °C po dobu 3 hodin. Stiskněte tlačítko pro zahájení
procesu nahřívání. Jakmile se zařízení nahřeje, znovu stiskněte tlačítko pro zahájení
vaření.
4. Jakmile je proces vaření dokončen, vypněte zařízení, odpojte jej ze zásuvky anechte jej
vychladnout.
5. Vylejte vodu znádoby aopláchněte zařízení čistou vodou.
Řešení problémů
Technické parametry:
Napětí: 110-120 V~/220-240 V~
Frekvence: 60 Hz/50 Hz
Výkon: 900 W/1200 W
Rozsah nastavení teploty: 5-90 °C
Chyba Možná příčina Řešení
H20 Hladina vody vnádobě je nižší
než značka MIN na přístroji.
Vypněte zařízení, dolijte
potřebné množství vody
aopakujte proces vaření.
E02 Obraťte se na autorizovaný
servis G21.
Rozsah nastavení času:
5 min-99 hodin 59 min
Velikost: 77x124x345mm
Hmotnost: 0,8 Kg
Pokud se během používání zařízení vyskytnou jakékoli jiné problémy, požádejte dodavatele
okontrolu zařízení. Nepokoušejte se zařízení opravovat sami.

Výhody varenia pri nízkej teplote
Pri vákuovom nízkoteplotnom varení nie je jedlo vpriamom kontakte so vzduchom avodou,
takže nedochádza kstrate živín vpotravinách alebo infiltrácii škodlivých látok. Vákuové varenie
navyše umožňuje varenie sveľmi malým množstvom oleja alebo kompletne bez neho.
Distribúcia tepla pri varení je rovnomerná, chuť rovnomerne preniká do jedla afarba jedla
zostáva zachovaná. Vporovnaní srúrou aplynovým sporákom sa šetrí energia anedochádza
kdymovému znečisteniu kuchyne. Sous-vide varenie tiež umožňuje variť rôzne potraviny vďaka
vákuovému baleniu každej znich.
Kpomalému vákuovému vareniu nepotrebujete osobitného kuchára ani špeciálne kuchárske
zručnosti. Pripraviť zdravé achutné jedlo podľa receptu zvládnete aj sami. Variť môžete podľa
nastavenej teploty ačasu na základe daného receptu.
Vďaka presnej regulácii teploty ačasu nedochádza kspáleniu ani vysušeniu potravín vdôsledku
prehriatia, najmä pri potravinách varených pri stredných anízkych teplotách.
Príprava pre vákuové varenie pri nízkej teplote
• Vákuová zváračka – na zabezpečenie vákua, zabraňujúceho vniknutiu vzduchu alebo
kvapaliny. Využite našu vákuovačku so zabudovaným zásobníkom na fóliu, rezačkou
aduálnou pumpou G21 Nefrit alebo vákuovačku sduálnou pumpou G21 Onyx.
• Vákuovacia fólia – pre zabalenie adôkladné utesnenie potravín tak, aby dovnútra nemohol
preniknúť žiaden vzduch alebo kvapalina. Uistite sa, že fólia je odolná teplotám až do
100 °C.
• Kontajner pre SousVide/ vodný kúpeľ – najskôr do kontajnera/vodného kúpeľa vložte stojan
G21 pre rozdelenie potravín, potom kontajner/vodný kúpeľ naplňte dostatočným množstvom
vody akontrolujte teplotu pri varení. Tiež sa uistite, že kontajner/nádrž na vodný kúpeľ je
odolná teplotám až do 100 °C.
Chcete osous-vide varení vedieť viac? Všetky informácie aj užitočné tipy ksous-vide vareniu
avákuovaniu nájdete na www.epenta.sk/vsetko-o-sous-vide.html.
Ďakujeme za nákup nášho výrobku!
Pred použitím prístroja vás prosíme opozorné prečítanie tohto návodu. Vyhnete sa tak poškodeniu
prístroja.
Bezpečnosť
Vždy dodržujte tieto opatrenia:
• Prevádzkujte zariadenie len v súlade s týmto návodom na
použitie, inak by mohlo dôjsť kpoškodeniu zariadenia.
• Zariadenie pripájajte len k takému zdroju, ktorý sa zhoduje
stypovým štítkom.
• Zariadenie pripájajte iba do bezpečne uzemnenej zásuvky.
• Po vypnutí zariadenia ho odpojte zo zásuvky.
• Pre zistenie teploty používajte ukazovateľ teploty alebo teplomer. Nikdy do vodného kúpeľa
nesiahajte.

• Dbajte na to, aby hladina vody bola udržiavaná medzi najnižšou hladinou „MIN“ anajvyššou
hladinou „MAX“ na zariadení, aby nedošlo kjeho poškodeniu.
• Nedotýkajte sa horúcich povrchov počas, alebo priamo po varení, aby nedošlo kzraneniu.
• Ak je na hornej časti zariadenia voda (nad značkou MAX), vypnite aosušte ho pred ďalším
použitím.
• Zariadenie anapájací kábel umiestnite mimo dosahu detí, aby nedošlo kúrazu.
• Deti sa sprístrojom nesmú hrať.
• Spotrebiče môžu používať osoby so zníženými fyzickými, zmyslovými alebo duševnými
schopnosťami alebo snedostatkom skúseností aznalostí, pokiaľ sú pod dohľadom
zodpovednej adospelej osoby alebo ak boli poučené obezpečnom používaní spotrebiča
arozumejú možným rizikám.
1. Nastavenie teploty/času
Vpohotovostnom režime kliknutím na tlačidlo nastavte požadovanú teplotu ačas. Prvé
stlačenie – displej začne blikať, nastavte požadovanú teplotu stlačením tlačidiel „+“ a„-“.
Druhé stlačenie – displej bliká, nastavte požadovaný čas stlačením „+“ a„-“.
Tretie stlačenie, displej prestane blikať, zariadenie potvrdzuje nastavenú teplotu ačas.
Potom, čo displej 10-krát zabliká, ak nebude vykonaná žiadna zmena nastavenia, sú nastavený
čas ateplota potvrdené. Ak ich potrebujete zmeniť, kliknite znovu na tlačidlo azadajte zmenu
nastavenia.
Stlačením apodržaním tlačidla možno nastavenia zobraziť – displej striedavo zobrazuje
nastavenú teplotu ačas.
2. Tlačidlo Štart/Stop
Vstandby režime stlačte tlačidlo – zariadenie začne pracovať.
Druhé stlačenie – spustí sa odpočet, displej zobrazuje aktuálnu teplotu ačas striedavo
v3-sekundových intervaloch.
Tretie stlačenie – zariadenie prestane pracovať avráti sa do standby režimu.
Funkcie

3. Tlačidlá
Tlačidlo pre nastavenie: Stlačte tlačidlo pre zvolenie zmeny teploty alebo času atlačidlami
+ a– nastavte požadovanú zmenu.
Prepnutie jednotiek teploty: Stlačte tlačidlá + a– naraz avyberte jednotku teploty – kdispozícii
sú stupne Celzia aFahrenheita.
4. Displej
Pred spustením odpočtu displej vždy ukazuje aktuálnu teplotu.
Po začatí odpočtu displej striedavo ukazuje aktuálnu teplotu ačas striedavo v3-sekundových
intervaloch.
5. Obnova základného nastavenia
Vmomente, kedy je zariadenie pripravené pracovať, dlho stlačte tlačidlá a+. Displej zobrazí
nastavenú teplotu 60°, potom uvoľnite tlačidlá. Displej 10-krát zabliká avráti sa do základného
nastavenia.
Popis zariadenia
1
2
3
4
5
6
1. Dotykový ovládací panel
2. Telo zariadenia
3. Svetelný indikátor
4. Upevňovacia klipsa
5. Kryt
6. Spodný kryt
Svetelný indikátor
• Červené svetlo bliká – zariadenie ešte nedosiahlo požadovanej teploty.
• Oranžové svetlo svieti – zariadenie dosiahlo požadovanej teploty, ale nie času.
• Zelené svetlo bliká – zariadenie dosiahlo požadovanej teploty ičasu, spúšťa sa odpočet.
• Zelené svetlo svieti– odpočet bol dokončený.
Table of contents
Languages:
Other G21 Kitchen Appliance manuals
Popular Kitchen Appliance manuals by other brands

Kasanova
Kasanova AEO000002NOC instruction manual

ARIETE
ARIETE 44 manual

Avantco Equipment
Avantco Equipment HDS100 user manual

Russell Hobbs
Russell Hobbs RHGWC4B-LCK instruction manual

STX International
STX International Dehydra 1200-XLS instruction manual

Brentwood
Brentwood GA-401S Operating and safety instructions