Galanz XQG60-A708E User manual

Service manual of 6.0kg front loading washing machine
Please carefully read this manual before service, judge fault in order to work on the Repairs.
Suitable Model number:
Models
XQG60-A708E

1
CONTENTS
1.Safety notices---------------------------------------------------------------------------------------2
2.Parts name -------------------------------------------------------------------------------------------3
3.installation -----------------------------------------------------------------------------------------4
4.Elecrical Diagram------------------------------------------------------------------------------------6
5.Error indication & analysis-------------------------------------------------------------------- 7
6.Dismentle Guide--------------------------------------------------------------------------------------9
This manual is applicable to the production of Galanz automatic washing machine series, only for guiding
maintenance, not as maintenance based on other brand or OEM product.
For subsequent development and improvement, maybe some of washing machine parameters have been

2
adjusted, specific to the washing machine practical parameters or product instruction
1.Safety Notices
In order to avoid harm or injure user and other’s life and property, the follow instructions about safety should be
seriously obeyed:
Ignore the content. When wrong to use, use the following mark to classify and express the possible harm or
damage degree.
warning Please note the content of warning signs, if violate, it may occur serious injury or death
Warning
●possible electric shocks
1.Disassembly, reparation or modification cannot be carried out by people other than professional
maintenance staffs.
2.Must be pulled out power plug after using or when it is maintaining or cleaning.
3.If the supply cord damaged, it must be replaced by professional staffs .
4.Do not use washing machine if machine is damaged, faulted, parts are loosed, lost or damaged.
5.Please use alone the 220V,above 10Apower plug, which must be connected to a three-core socket.
Do not use wiring board to power on.
6.Socket must be with an earth wire and is grounded properly and reliably.。
7.Do not touch the power plug with wet hands.
8
.
Keep the supply cord tidy. Do not wipe dust by wet cloth.
Warning
●Possible Explosions
1.Do not put combustible / volatile material or the
clothes with the above material into the appliance or
nearby.
2.Do not mix chemicals, or produce toxic and
threaten life.
3.Do not use appliance when leakage of gas.
Warning
●Fire accidents or electric shock may occur 1. 1. Do
not install the appliance close to fire sources or heat
sources.
2. Do not install the appliance in the open air, in gas
places below 0℃ or with wet air.
3. Do not use the appliance on the carpet. The places
installed the appliance must be flat and fastness.
4. Do use low foaming detergent.
5. Do not use water shooting at the appliance when
cleaning it.
Warning
●Possible for high temperature cause burns or
damage.
1. When wash in the high temperature, the glass door
will be hot, please do not contact machine door
especially children.
2. Water is hot after high temperature washing
drainage. Do not nearby.
3. During high temperature washing, must drain the
hot water before coercively open the door.
Warning
●Possible personal injury
1. Please abandon the removed package in time, do
not let children contact or swallow.
2. Do not let children contact or near the machine.

3
Attention
●list as below may cause damage\deformation\collision.
⒉
Remove all the water in the washer to avoid freezing. Do not climb or leave heavy things on the
washer.
⒉Two persons are needed to move the washer. Bolts must be installed in advance before moving.
⒉The water should below 95℃when washing with clean water.
⒋Make sure that all the things (coin\clip\hook) are taken out
⒌Do not wash water-proof clothes such as raincoat\down jacket\shower curtain\sleeping bag
⒍Washer is for clothes that can be washed. Any question, please refer to the washing instruction on the
clothes.
XQG60-A708E
◆energy-efficient washing
The function is applicable for a small amount of clothes. Less water and electricity will be consumed.
◆Iron-free
To prevent wrinkle, no drain after final rinse, press start button to continue the next drain and spin procedure.
◆Rinsing+
Increase rinse one more time
◆child lock
Child lock will prevent the child changing the washing procedure by pressing any button (power button is excluded)
◆degerming
More energy will be consumed to do washing or degerming for the clothes or interior of the machine. The function
is not recommended.
◆foam check
The defoaming procedure will start automatically if too much foam happens. No-foam or little-foam washing
powder is recommended.
2.Parts name:

4
3.installation
3.1、Remove all outer package, including the foam base, check if the machine is intact.Water drops may appear
on the packing plastic bag and the glass of the observation window occasionally, they are condensation resulted
from water testing before the product leaves the factory. It is normal.
3.2、Install according to the following order
Remove the transit bolts
●Remove the transit bolts
with the spanner
supplied
●Keep the transit bolts
for future transportation
Transit bolts
Install the appliance on
asolid and lebel floor
surface
Install the appliance on a solid
and level floor surface. Do not
locate the machine on
cushions or more than 2 º
ground.
●Adjust adjustment feet,
make machine smooth.
3.2.1、installation
●Inlet hose connection
●Make sure rubble sealing washer inside the joint of valve.
●Connect the inlet hose closely, prevent leaking.

5
3.2.2、Inspection operation
①Plugged in plug, connect inlet hose ②press power supple ③press
“start/pause”
④confirm inflow water ⑤confirm automatic corotation and reverse
⑥Close power, open power again, choose dewatering, then press”start/pause”.
⑦confirm drain away water and dewatering ⑨Close power
Facia

6
1. Program knob 2. temperature 3. start/pause 4.Power
4.Electrical diagrams
circuit diagram

7
5.Error indication & analysis

8
5.1 error indication.
No. Error Code Checking/Reason Settlement
1flooding
water error
●●◎
(E1)
◆Is thewater tap opening
or water floe too slow?
◆ Does the sensor
pressure air leakage?
◆ Is the inlet valve
blocked by something?
◆PCB error。
1、Check the water tap close or
open and the water flow
2.Check the sensor pressure
3.Clean the inlet valve
4.Change PCB
2Door Error ●◎●
(E2)
●Is the door closed well?
●Is the door pressed by the
clothes?
●wire terminal not connect well
or wiring error
●Door lock error
1、check if the door closed well.
2、Re-put the clothes well.
3. Reconnecting the wire.
4.Change the door lock.
3Draining
error
●◎◎
(E3)
◆water pump filter is blocked
by something.
◆Dose draining pipe block?
1、clean the pump filter
2、dredge the draining pipe
4Water sensor
error
◎●●
(E4)
◆Is the sensor pressure
wire loose?
◆ Does the inlet
valvealways inflow?
1.check the wire terminal
substanceor not or change the wire
2. change the sensor pressure
5Motor Error ◎●◎
(E5)
◆Is the motor wire terminal
loose?
◆Is motor broken?
◆PCB error
1.check the wire terminal substance
or not
2.change motor
3.change PCB
6Washing
heating error
◎◎●
(E6)
◆Is the heater connection
lost the power?
◆Is the heater temperature
sensor lost the power?
◆Heater error
1. check the wire terminal loose or not
2. Connecting the wire well.
3. change a new heater.
7Heating
temperature
sensor
◎◎◎
(E7)
◆ Does heating
temperature sensor
connect well
◆heating temperature
sensor error
1. Connect the wire well.
2.change the heating temperature
sensor

9
Attention:1、●—indicate the light is off;◎—indicate the light is flicking
2、when the error occurs,all LED light are flickering except indicator light on the control panel. Those indicator
lights can judge what kind of error by washing ,rinsing and drycleaning
5.2 Self-Examine Mode
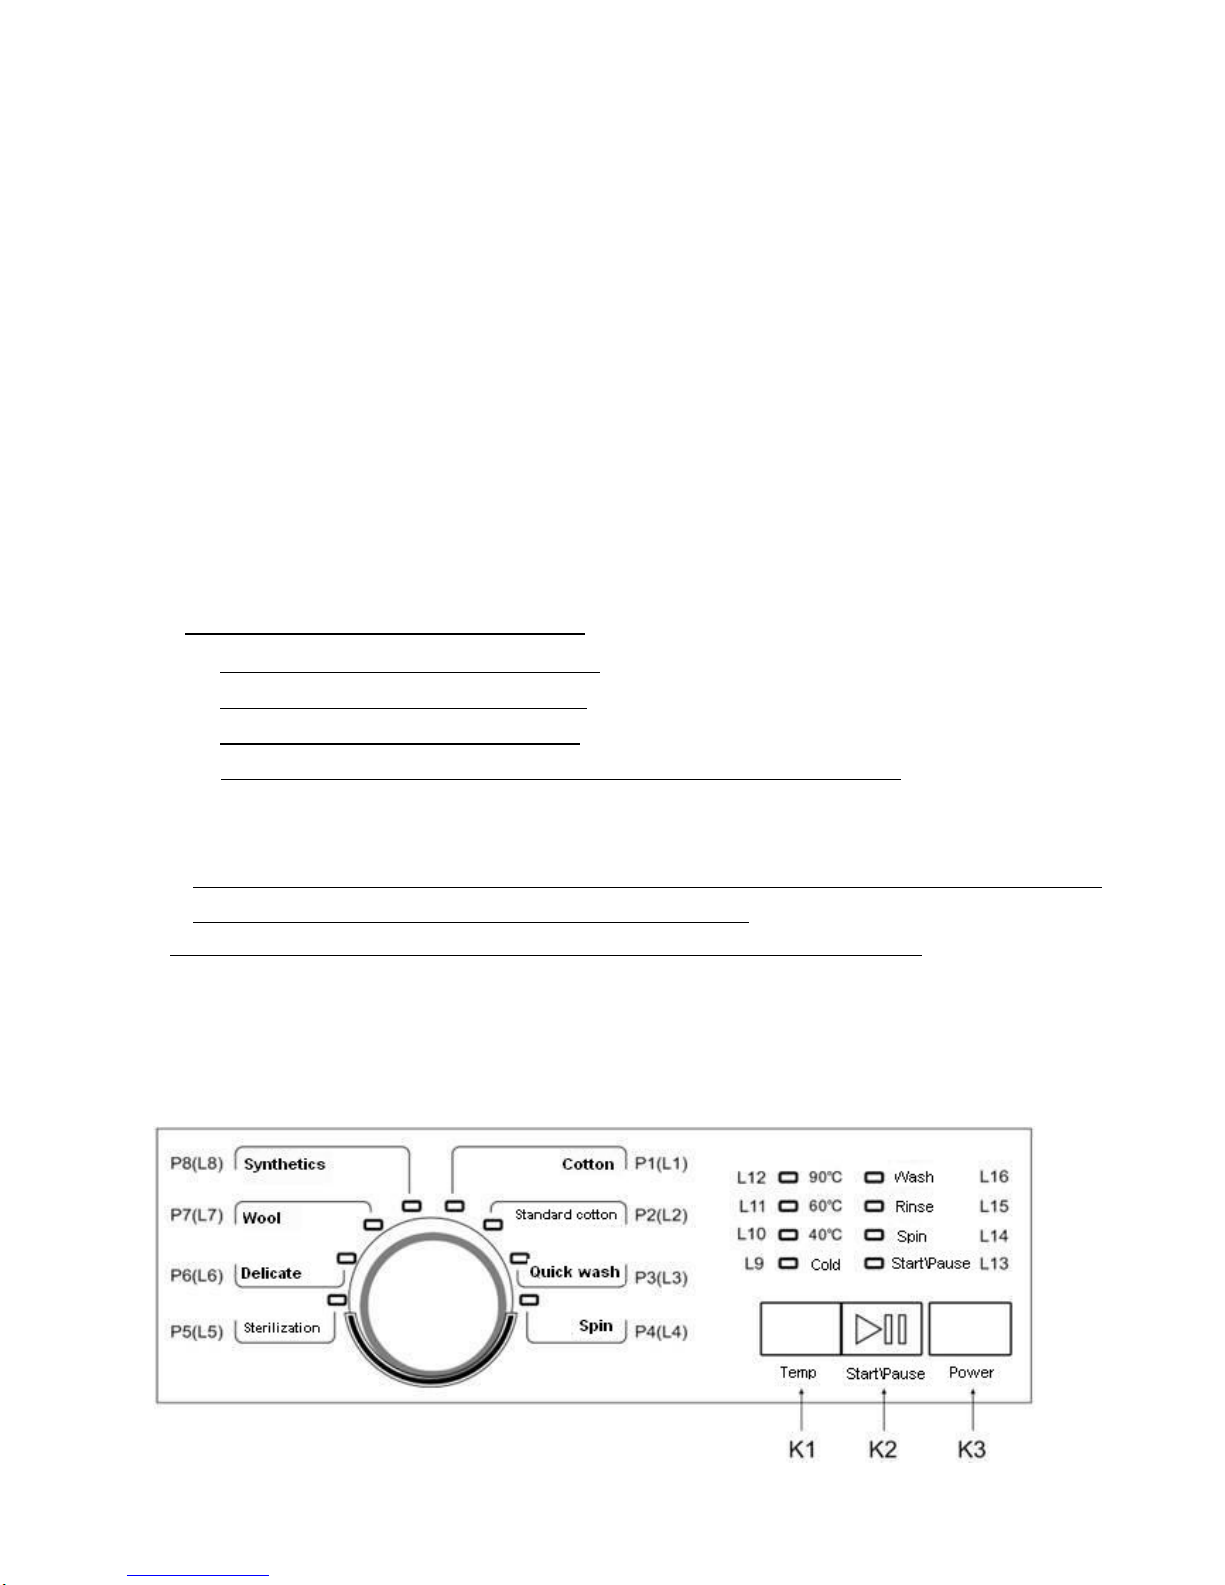
Press【K1】 + 【K2】button simutaneously,after electricity ,the buzzzer will beep three times which
demonstrate the machinehas entered into the special option mode。The interface displays:the
indicator light of program option knob displays the position of current program knob,while”start\
pause”indicator light flickering at the frequency of 1Hz
Turn the progrm knob at the position of P7,press button[start\pause],the progrm enters into factory
mode to measure.All LED indicator lights flicker 3 second , then the machine starts to conduct the
following detection automaticly:
Prewashing valve detection:inflow 5 second,delay 1second;
1) Main washing detection:inflow 5 second,delay 1second
2) Soften valve detection:inflow 5 second,delay 1second
3) Heater valve detection: inflow 5 second,delay 1second
4) Heating detection:judge water level above the heating water level or not.If not,keep on addind
water to heating water level,then start to heat 5 s
5) Motor rotation direction test; the rotation rate :50 rpm,reversal time:5s
6)Outer cylinder leakage test;to judge if the water level lie in the 1 washing water,if not ,replenish to
1 washing water rotation rate (250rpm),posititive rotation 20s
7)Row of dewatering test :firstly ,drain water to the 0 water level of empty tube 10s
◆During the measurement,check the error warning,if happens in present process,the machine will
alarm at once and stop executive program
◆turn off the power and exit the mode

10
Attention:during the detection, for example: the failure occurs in the process of measurement, the
machine will not conduct the following programs unless the problem has been solved and proceed the
detection function again, it can finish all the detection function.
During the detection,press button “start\pause” or button “power” to stop or end detection program, it
won’t work to press other buttons.
6.Dismantle guide
6.1.1 Attention: Please ensure to pull the plug or switch off the machine before dismantle and repair
Control panel
1
①Please remove the two bolt in the back of the top
cover
②Pull back the top cover and take it out
2
①Take off the wiring harness in the lamp panel
②Follow and plus the arrow signal to take out the
cap( picture 1)
③Remove two bolts from the inlet box( picture 2)
④Pull up the control panel
(1) (2)
3
①Remove the 6 bolts in control panel
②Take off the lamp panel from the top of the control
panel
Distribution box
1
①Remove the two bolts from top cover component and
take of the top cover
②Follow the arrow side to take off the distribution box
(picture 1)。
③Remove the two bolt from inlet box(picture 2)。
2①Remove the inlet sink and one bolt on the right
(picture 3) picture3

11
3①Remove the inlet hose and clip
4①Remove the inlet hose(picture 4) picture4
Inlet valve
1
①Take of the inlet valve connection
②Remove two bolts from the back of the inlet valve
③Remove the hose clip and hose
DOWN FRAME
1
①Using corns or screwdriver to open the bottom
dam-board(picture 5), remove the one bolt
②Using the screwdriver to open the dam-borad(picture
6)。
5 6
DOOR
1
①open the door completely
②loose the dorr seal spring (picture7)。
③Remove two bolts from the door hinge, please beware
to hold the screw nut.(picture 8)
7 8
DOOR SEAL PARTS
1
①remove the ourter box door seal ring spring (picture7)
②Take off the top cover
③Open the below dam-board cover and remove one
bolts inside and dam-board. Photo 9 &10) 9 10
2
①Take off the washing powder distribution box (picture
1)
②remove the control panel (attention:follow the
instruction of removing control panel methods)
③Remove all the upside and down side bolts from the
front cover (picture 11& 12) and remove front cover
11 12
3
①Remove outer tub seal ring spring
②Ensure the weep hole from seal ring is backward with
reset. (picture13)
13

12
Pulley, motor and absorber
1
①Remove the back cover
②Loosen the big screw nut from the pulley and take out
the belt
③Remove the pulley
2
①Take off the motor connection plug wire
②Remove two bolts from motor holder, and take out
the motor bush.(picture 14)
③Follow the arrow to take off the motor (picture15)
④Ensure the bush is in the motor holder while reset the
motor
14 15
3
①Remove the fixed bolt from absorber.
②Take out the absorber
③Ensure tighten the fixed bolt while reset the absorber
to avoid the noise from spin
Clear draining pump filer
1
⒉Turn filer left and take off the water pump
filer(picture 16)
②Clear the stuff from water pump filer(photo 17)
③Put back the filer in to right position after clear
⒉Please well set the dam-board after well set the
filer 16 17
Water pump
①Remove the control panel, dam-board and front cover
②Remove two bolts from water pump
③Remove water pump wires
④Hole the water pump pull up
⑤Remove all the hose from water pump
Remove the pump (remark: photo 8 shows the well
set water pump)
18

13
Heater
⒉ Loosen the M6 bolt from heater. please do not
compete loosen the bolt.(picture19)
②Pull out the heater
Attention
Ensure the heater has put into the clip
19
Switch component and door lock
①Remove the front cover real ring spring (photo 7)
⒉ Remove the 2 bolt from the fixed door lock (photo
20)
③Take off the door lock from the wiring harness
connector
20
Drying Thermostat ( model with drying features)
①Open top cover, control panel board, bottom
dam-board and front cover
②Remove eight bolt from the top bracing sheet and
take off the front top bracing sheet (photo 21)
③Remove the bolt from the outer box.(photo 22)
④Then take off the drying thermostat
21
22
Drying motor(model with drying features)
②Remove the top cover
②Take out the drying motor plug wire
Remove the fixed bolt from the drying motor (photo 23) 23
Drying heating pipe(model with drying features)
②Remove top cover
②Take off the plug wire from drying motor and drying
heating pipe
③Remove the fixed bolt from drying motor and drying
heating pipe. (picture 4)
24
6.1.2 Inlet box AS

14
6.1.3 Inside door AS
6.1.4Outside door AS

15
6.1.5 Control panel AS
6.1.6 Drum AS

16
6.1.7 Drying AS(Attention:this picture only for the washer combine with dryer machine)

17
6.1.8 Top Cover AS

18
6.2 components exploded view

19
10.2.1、Drum AS
Other manuals for XQG60-A708E
2
Table of contents
Other Galanz Washer manuals

Galanz
Galanz XQG60-U108E User manual

Galanz
Galanz XQB80-G1E User manual

Galanz
Galanz WMUK004W Operator's manual

Galanz
Galanz XQG60-A708E User manual

Galanz
Galanz XQG100-T514VE User manual

Galanz
Galanz WMUK001W Operator's manual

Galanz
Galanz GLFW22WEA5A User manual

Galanz
Galanz XQG80-Q812DE User manual

Galanz
Galanz XQG60-A708E User manual

Galanz
Galanz XQG90-T514VE User manual