54
ASSEMBLY INSTRUCTIONS
Hardware Used
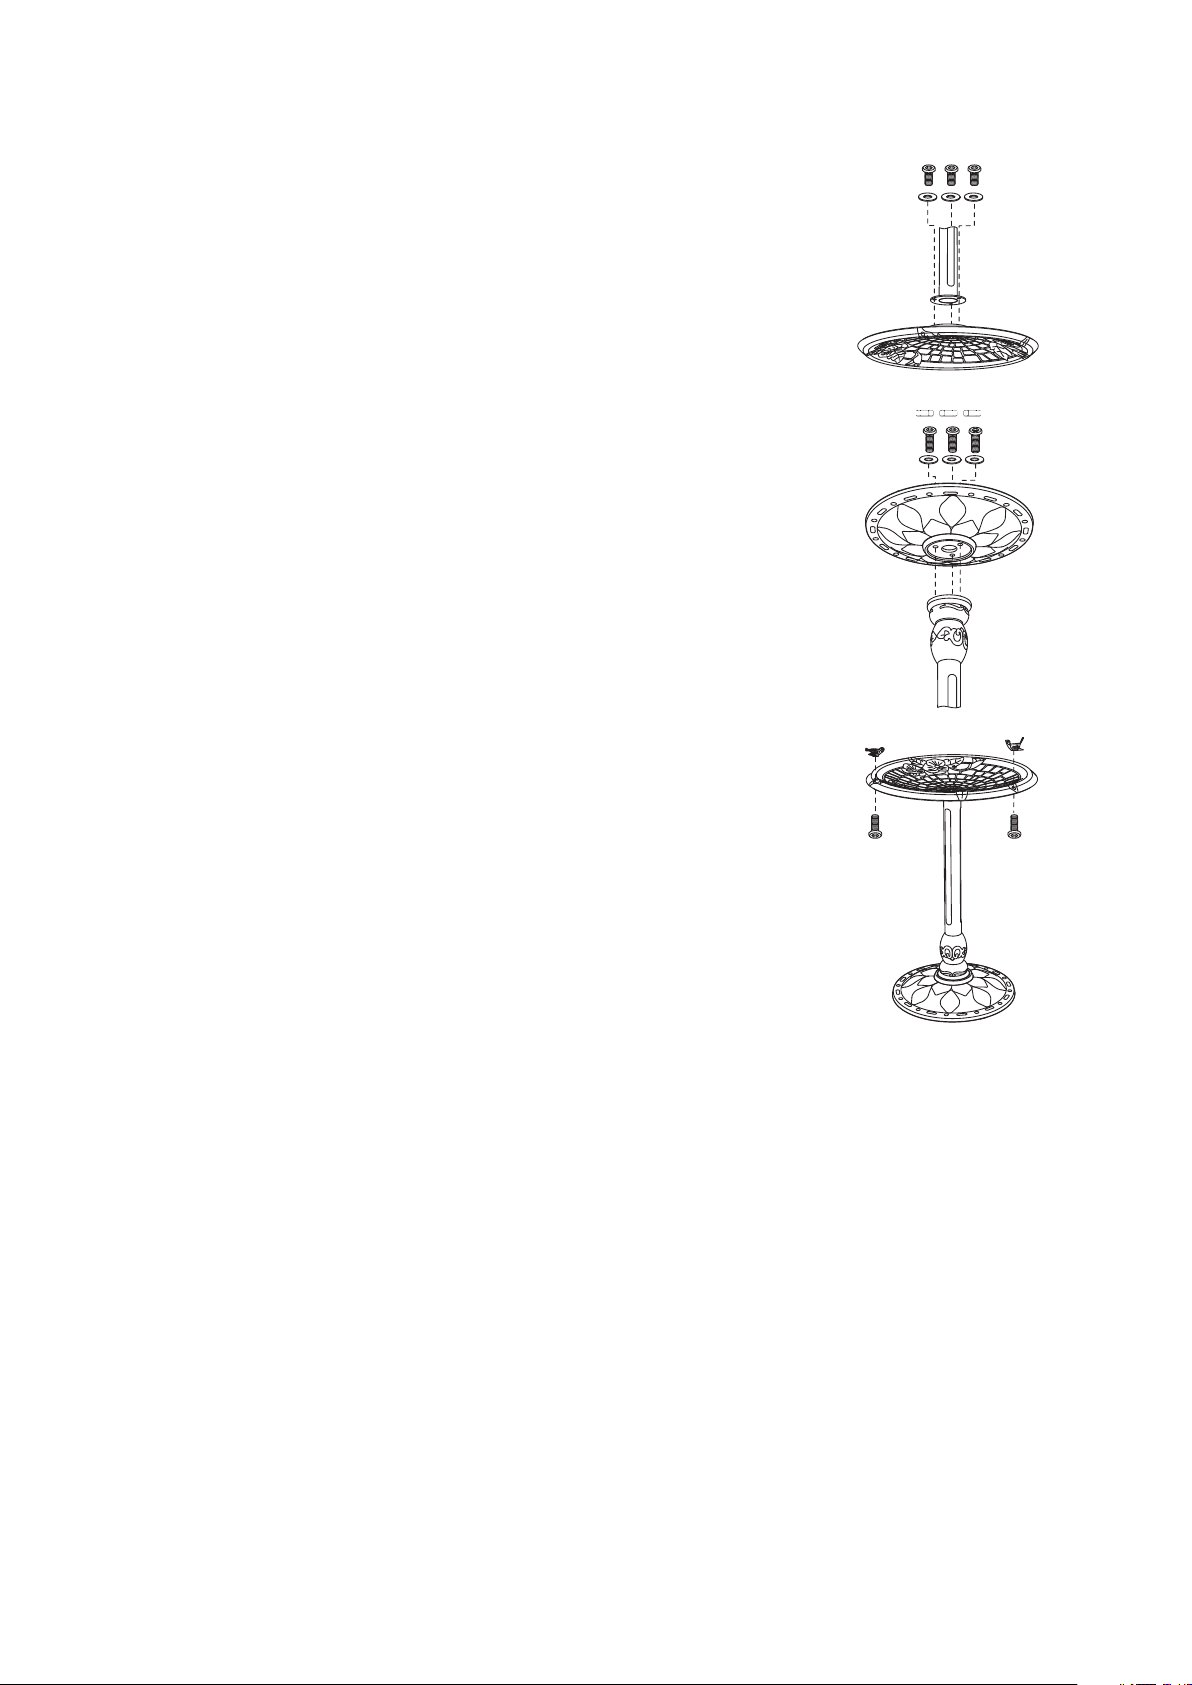
1. Turn the small birdbath bowl (A) upside down on a soft
surface. Connect the stem (B) to the small birdbath
bowl (A) with 2 bolts (AA) and washers (CC). Do not
overtighten.
Safety cap nuts (GG) should be installed after
tightening.
1
M6 x 15 Bolt x 2
AA
x 2
M6 Washer
CC
AA
CC
B
A
Hardware Used
2. Connect the large birdbath bowl (C) to the stem (B) with
1 bolt (BB), rubber gasket (FF) and washer (CC). Do not
overtighten.
Safety cap nuts (GG) should be installed after tightening.
2
M6 x 18 Bolt x 1
BB
x 1
M6 Washer
CC
FF 20 mm Rubber Gasket
FF
BB
CC
B
A
x 1
C
GG M6 Safety Cap Nut x 2
GG M6 Safety Cap Nut x 1
GG
GG
ASSEMBLY INSTRUCTIONS
Hardware Used
3. Unfold and connect the base (F) to large birdbath bowl
(C) with 2 butterfly bolts (DD). Do not overtighten. 3
M6 x 11
Butterfly Bolt x 2
DD
DD
C
F
Hardware Used
4. Connect the bird 1 (D) to the small birdbath bowl (A)
with 1 bolt (EE). Do not overtighten. 4
M8 x 12 bolt x 1
EE
Lowes.com/allenandroth
Hardware Used
5. Connect the bird 2 (E) to the large birdbath bowl (C) with
1 bolt (EE). Do not overtighten. 5
M8 x 12 bolt x 1
EE
EE
A
EE
D
E
C
Lowes.com/allenandroth
54
ASSEMBLY INSTRUCTIONS
Hardware Used
1. Turn the small birdbath bowl (A) upside down on a soft
surface. Connect the stem (B) to the small birdbath
bowl (A) with 2 bolts (AA) and washers (CC). Do not
overtighten.
Safety cap nuts (GG) should be installed after
tightening.
1
M6 x 15 Bolt x 2
AA
x 2
M6 Washer
CC
AA
CC
B
A
Hardware Used
2. Connect the large birdbath bowl (C) to the stem (B) with
1 bolt (BB), rubber gasket (FF) and washer (CC). Do not
overtighten.
Safety cap nuts (GG) should be installed after tightening.
2
M6 x 18 Bolt x 1
BB
x 1
M6 Washer
CC
FF 20 mm Rubber Gasket
FF
BB
CC
B
A
x 1
C
GG M6 Safety Cap Nut x 2
GG M6 Safety Cap Nut x 1
GG
GG
ASSEMBLY INSTRUCTIONS
Hardware Used
3. Unfold and connect the base (F) to large birdbath bowl
(C) with 2 butterfly bolts (DD). Do not overtighten. 3
M6 x 11
Butterfly Bolt x 2
DD
DD
C
F
Hardware Used
4. Connect the bird 1 (D) to the small birdbath bowl (A)
with 1 bolt (EE). Do not overtighten. 4
M8 x 12 bolt x 1
EE
Lowes.com/allenandroth
Hardware Used
5. Connect the bird 2 (E) to the large birdbath bowl (C) with
1 bolt (EE). Do not overtighten. 5
M8 x 12 bolt x 1
EE
EE
A
EE
D
E
C
Lowes.com/allenandroth
Step 1
Turn the Birdbath Bowl (A) upside down on a soft surface.
Attach the Center Post (B) to the Birdbath Bowl (A) by using
three hex head bolts (AA) and three small washers (DD).
Step 2
With the birdbath upside down, attach the base (C) onto the center post (B)
using three slotted set screws (BB), three large washers(EE),
and three nuts (FF).
Step 3
Turn the whole birdbath right side up. Screw the Bird (D) on
the Birdbath Bowl (A) using one screw (CC).
Special Notes
This bird bath is made with an old world, traditional hand-crafted look. Because
of the nature of cast iron or aluminum, you may nd roughness on the surface of the
design. Slight pinholes are also present in the metal casting that is customary to
hand-crafted original iron work. These irregularities enhance the individuality of the
piece. They should not be considered defects.
Care and Maintenance
1. Should the nish get scratched down to metal surface, cover the scratched area with
enamel paint as soon as possible to keep the best condition.
2. Cleaning- Use mild soap and water. Do not use harsh abrasive material, cleaners, or
bleach products. Rinse with clean water and dry thoroughly with rags or direct sunlight.
3. Periodically check and tighten all bolts.
DD
Designed by Innova Hearth & Home
ASSEMBLY INSTRUCTIONS
Step 1
Turn the Birdbath Bowl (A) upside down on a soft surface.
Attach the Center Post (B) to the Birdbath Bowl (A) by using
three 5/16" Short Screws (AA) and three 5/16" washers (DD),
Tighten with Allen Wench (EE).
Step 2
With the birdbath upside down, Attach the Base (C) onto the
Center Post (B) using three 5/16" Long Screws (BB) and three
5/16" Washers (DD). Tighten with Allen Wench (EE).
Step 3
Turn the whole birdbath right side up. Screw the Bird (D) and
Bird (E) on the Birdbath Bowl (A) using two 1/4" Screws (CC).
Tighten with Allen Wrench(EE). The birdbath is now ready for
use.
A
AA
DD
AA
DD
BB
DD
BB
DD
B
B
C
E
D
CC
CC
C
B
A
CARE AND MAINTENANCE
1)
2)
3)
4)
This high quality casting birdbath is made with an old world, traditional hand-crafted
look. Because of the nature of cast iron or aluminum, you may find roughness on the
surfaces and the design. Likewise, slight pinholes will be present in the metal casting
that is customary to hand crafted original iron works. The irregularities enhance the
individuality of this birdbath and are not to be considered defects.
The powder coated cast iron and aluminum frame can be treated with a good quality
outdoor clear coat for paint to enhance and protect the finish. Should the powder
coated finish get scratched down to the metal surface, it is necessary to cover the
scratched area with an enamel paint as soon as possible to prevent rust corrosion.
Cleaning – Use mild soap and water. Do not use harsh abrasive material, cleansers or
bleach products. Rinse with clean water and dry thoroughly with rags or direct sunlight.
Periodically checking and tightening fasteners is highly recommended.
2
CUSTOMER SERVICE
Ph: 1-877-556-0886, 9:00am-4 pm PST. E-mail: :00 ihhca@innovaproducts.com
Visit us at www.innovaproducts.net
FF FF
EE EE
D


