REPRODUCCIÓNDE MENSAJES
El indicador de mensajes (en la tecla PLAY/STOP) destella cuando hay mensajes en
el contestador. Si hay varios mensajes, la luz destellarátantas veces como haya
mensajes grabados; luego haráuna pausa y comenzaránuevamente a destellar.
•Para reproducir los mensajes: oprima y suelte PLAY/STOP.
•Para detener la reproducción: oprima y suelte nuevamente PLAY/STOP.
•Para recomenzar a escuchar un mensaje que se está reproduciendo:
oprima y suelte REVIEW (revisión).
•Para volver al comienzo del mensaje anterior: oprima y suelte repetidas
veces REVIEW hasta que llegue al mensaje que desea escuchar.
•Para saltar al comienzo del próximo mensaje: oprima y suelte SKIP (saltar).
•Para avanzar rápidamente: para barrer los mensajes hacia delante, mantenga
oprimida la tecla SKIP.
•Para borrar un mensaje mientras está reproduciendo: oprima y suelte la
tecla ERASE (borrado). El contestador emitiráun sonido agudo para confirmar
que el mensaje se ha borrado.
BORRADO DE MENSAJES
Cuando el aparato no estéreproduciendo ni grabando mensajes, mantenga
oprimida la tecla ERASE hasta que escuche un sonido agudo. Es posible recuperar
los mensajes borrados con este procedimiento, oprimiendo la tecla PLAY/STOP–
pero sólo si el contestador no ha grabado nuevos mensajes después de que usted
haya borrado los otros.
MEMORIA LLENA
Cuando la memoria estállena el indicador de mensajes destella rápidamente y el
aparato responde después del décimo toque de timbre. Cuando llame a su aparato
desde otro teléfono teclee los tres dígitos del código de seguridad, después de que
escuche el sonido agudo . Es necesario borrar algunos mensajes para que se
puedan grabar los nuevos. Es posible borrar mensajes a distancia, oprimiendo el
0, mientras se reproduce el mensaje.
ENCENDIDO YAPAGADO
Al preparar su aparato, éste se enciende automáticamente y se ilumina PLAY/STOP.
Para apagarlo, oprima la tecla ON/OFF. Cuando el contestador estáapagado, contesta
en el décimo toque de timbre, pero no transmite ni graba ningún mensaje.
AVISO
Para dejar un mensaje mantenga oprimida la tecla MEMO (aviso). Deje su mensaje después
de escuchar el sonido agudo y suelte la tecla memo, cuando haya terminado de hablar.
SELECCIÓNDE LLAMADAS (AUTODESCONEXIÓN)
Dado que su contestador se detiene automáticamente, cuando se levanta el
auricular de otro teléfono en la misma línea, es posible seleccionar las llamadas
escuchando a la persona que deja el mensaje y luego, después de saber quién
llama, levantar el auricular para contestar.
Desde cualquier teléfono con tonos puede tener acceso al contestador, oprimiendo
los tres dígitos del código de seguridad una vez que haya escuchado el mensaje
del contestador (el código de fabrica es 123, pero usted puede cambiarlo). Sepa
que las funciones remotas no se activan con un teléfono con sistema rotatorio o
con botones, pero que funcionen por impulsos. Corte la tarjeta de acceso remoto
para llevar en la billetera que contienen las instrucciones que debe seguir cuando
escucha los mensajes desde otro teléfono.
Para tener acceso al contestador:
1. Disque el número de teléfono del contestador.
2. Luego que escuche el sonido agudo que sigue al mensaje grabado, teclee los
tres dígitos de su código de seguridad. Es posible editar el mensaje grabado
oprimiendo cualquier número mientras se reproduce dicho mensaje.
Observación: para desactivar el acceso a distancia, programe el código de seguridad 000.
Observación: el aparato responde en el décimo toque de timbre, cuando estáapagado o
si la memoria estállena. Para tener acceso al contestador, teclee los tres dígitos del código
de seguridad después de que escuche el sonido agudo. Si la memoria estállena, escuche
los mensajes y borre algunos para dejar espacio para los nuevos. Si el contestador está
apagado, oprima 6 para encenderlo.
ANTES DE COMENZAR
2-9866
Modelo 2-9866
20801800 (Rév. 0, E/S)
97-10
Impresso en China
P.O. Box 1976, Indianapolis, IN 46206
© 1997 Thomson Consumer Electronics, Inc.
Trademark(s) ®Registered
Marca(s) Registrada(s)
Creamos cosas buenas para la vida.
Contestador Digital
Guía del Usuario
Puerta del compartimiento
de la pila
1
2
3
CUIDADO GENERAL DEL PRODUCTO
Para mantener su teléfono funcionando bien y con buena apariencia, observe las
siguientes pautas:
•Evite poner el teléfono cerca de calentadores (calefactores) de ambiente y dispositivos que
generen interferencia eléctrica ejemplo, motores o lámparas fluorescentes).
•No lo exponga a la luz solar directa o a la humedad.
•No deje caer la extensión móvil y no maltrate el teléfono.
•Limpie el teléfono con un trapo suave
•Nunca use un agente de limpieza fuerte ni un polvo abrasivo, ya que esto dañaráel acabado.
•Retenga el empaque original en caso de que necesite embarcar el teléfono en el futuro.
ERASE
REVIEW SKIP
PLAY/ STOP
BATTERYLOW
ANNOUNCE MEMO ON/OFF TIME/SET
MINUTE
CODE
HOUR
DAY SHIFT
C
ÓMO
OBTENER
SERVICIOS
DE
MANTENIMIENTO
La FCC requiere que este producto sea sometido a servicios de mantenimiento solamente por el fabricante o por sus
agentes de servicio autorizados. De acuerdo con los requerimientos de la FCC, los cambios o las modificaciones que no
hayan sido expresamente aprobadas por Thomson Consumer Electronics podrían anular la autoridad que tiene el usuario
de operar este producto. Para recibir instrucciones sobre cómo obtener servicios de mantenimiento, por favor consulte la
garantía incluida en esta Guía, o llame a Información para el Usuario, 1-800-448-0329.
Adjunte su recibo al folleto, para futura referencia, o anote la fecha en la que se compróo recibióeste producto como
regalo. Esta información serávaliosa si se llegase a requerir durante el período de garantía.
Fecha de compra ____________________________ Nombre de la tienda ___________________________________________
INFORMACIÓNDE LA RREGISTRACIÓNDE LA FCC
Su equipo telefónico de la GE ha sido registrado con la Comisión Federal de Comunicaciones (FCC) y estáen acuerdo con las
Partes 15 y 68 de las Regulaciones y Reglas de la FCC.
1 Notificacióna la Compañía Telefónica Local
Al fondo de este equipo Ud. hallaráun rótulo indicando, entre otra información, el número de la Registración con la FCC y
el Número del Equivalente Timbre (REN) para este equipo. Ud. deberá, a petición, proveer esta información a su compañía
telefónica.
El REN es útil para determinar el número total de artefactos que Ud. puede conectar a su línea telefónica, todavía
asegurando que todos estos artefactos sonarán cuando se llame su número telefónico. En la mayoría de las áreas (pero no
en todas), el total de los números REN de todos los artefactos conectados a una línea no debe exceder 5. Para estar seguro
del número total de artefactos que Ud. pueda conectar a su línea (determinado por el REN), Ud. deberáponerse en
contacto con su compañía telefónica local.
NOTAS:
•No se puede usar este equipo con un teléfono de previo pago proveído por la compañía telefónica.
•Las líneas compartidas son sujetas a las tarifas del estado, y por eso, es posible que Ud. no pueda usar su propio equipo
telefónico si Ud. estuviera compartiendo la misma línea telefónica con otros abonados.
•Se debe notificar la compañía telefónica cuando se desconecte permanentemente su teléfono de la línea.
2 Derechosde la Compañía Telefónica
Si su equipo causase algún problema en su línea que pudiera dañar la red telefónica, la compañía telefónica siempre que
sea posible le avisaráde la posible interrupción temporal de su servicio. En caso que la compañía no pudiera avisarle de
antemano y hubiera necesidad de tomar tal acción, la compañía telefónica podráinterrumpir su servicio inmediatemente.
En caso de tal interrupción telefónica temporal la compañía debe : (1) darle aviso al momento de tal interrupción temporal
de servico, (2) concederle a Ud. la oportunidad de corregir la situación, (3) informarle a Ud. de sus derechos de presentar
una questa a la Comisión de acuerdo con los procedimientos dictados en la Subparte E de la Parte 68 de las Regulaciones
y Reglas de la FCC.
La compañía telefónica puede hacer los cambios en sus instalaciones de comunicación, en equipos, en sus
funcionamientos o procedimientos que digne necesarios para el manejo de sus negocios y que no sean incompatibles con
las Reglas y Regulaciones de l a FCC. Si estos cambios pudieran alterar el uso o el funcionamiento de su equipo telefónico,
la compañía telefónica deberádarle aviso adecuado en escrito para que Ud. goce de un servico ininterrumpido.
INFORMACIÓNDE INTERFERENCIAS
Este artefacto cumple con la Parte 15 de las Reglas de la FCC. Su funcionamiento es sujeto a las dos condiciones siguientes: (l)
Este artefacto no puede causar interferencia dañosa, y (2) Este artefacto debe aceptar cualquier interferencia recibida,
incluyendo interferencia que puede causar un funcionamiento no deseado.
Este equipo ha sido probado y cumple con los límites para un artefacto digital de la Clase B, de conformidad con la Parte 15 de
las Reglas de la FCC. Estos límites han sido diseñados para proporcionar una protección razonable contra una interferencia
dañosa que pueda existir en una instalación doméstica.
Este equipo genera, usa y puede radiar la energía de frecuencia de una radio y, si no fuera instalado y usado de acuerdo con las
instrucciones, puede causar interferencia dañosa a las transmisiones radiales. Sin embargo, no hay garantía que la interferencia
no ocurriráen una instalación en particular.
Si este equipo causa en efecto una interferencia dañosa a la recepción de la radio o de la televisión, lo cual puede ser
determinado apagando y prendiendo el equipo, le animamos a Ud. de tratar de corregir la interferencia por medio de una (o
más) de las sugerencias siguientes:
•Cambie la posición o la ubicación de la antena (quiere decir la antena de la radio o de la televisión que está
recibiendo la interferencia).
•Cambie la posición o cambie la ubicación y aumente la distancia entre el equipo de telecomunicaciones y la
antena receptora de la radio o de la televisión que estárecibiendo la interferencia.
•Conecte el equipo de telecomunicaciones a una toma en un circuito diferente del circuito al cual la antena
receptora estéconectada.
•Consulte al comerciante o a un técnico de radio/televisión experto para ayuda.
Si estas medidas no eliminan la interferencia, favor de consultar a su distribuidor o a un técnico de radio/televi
sión experto por otras sugerencias. También, la Comisión Federal de Comunicaciones (FCC) ha preparado un folleto muy útil,
“How To Identify and Resolve Radio/TV Interference Problems”(“Como Identificar y Resolver Problemas de Interferenciade
Radio/Televisión”). Este folleto se puede obtener del U.S. Goverment Printing Office,Washington, D.C. 20402. Favor de
especificar el número 004-000-00345-4 cuando haga su pedido.
COMPATIBILIDAD CON AUDÍFONOS
Se juzga que este teléfono es compatible con audífonos, en base a las normas de la FCC.
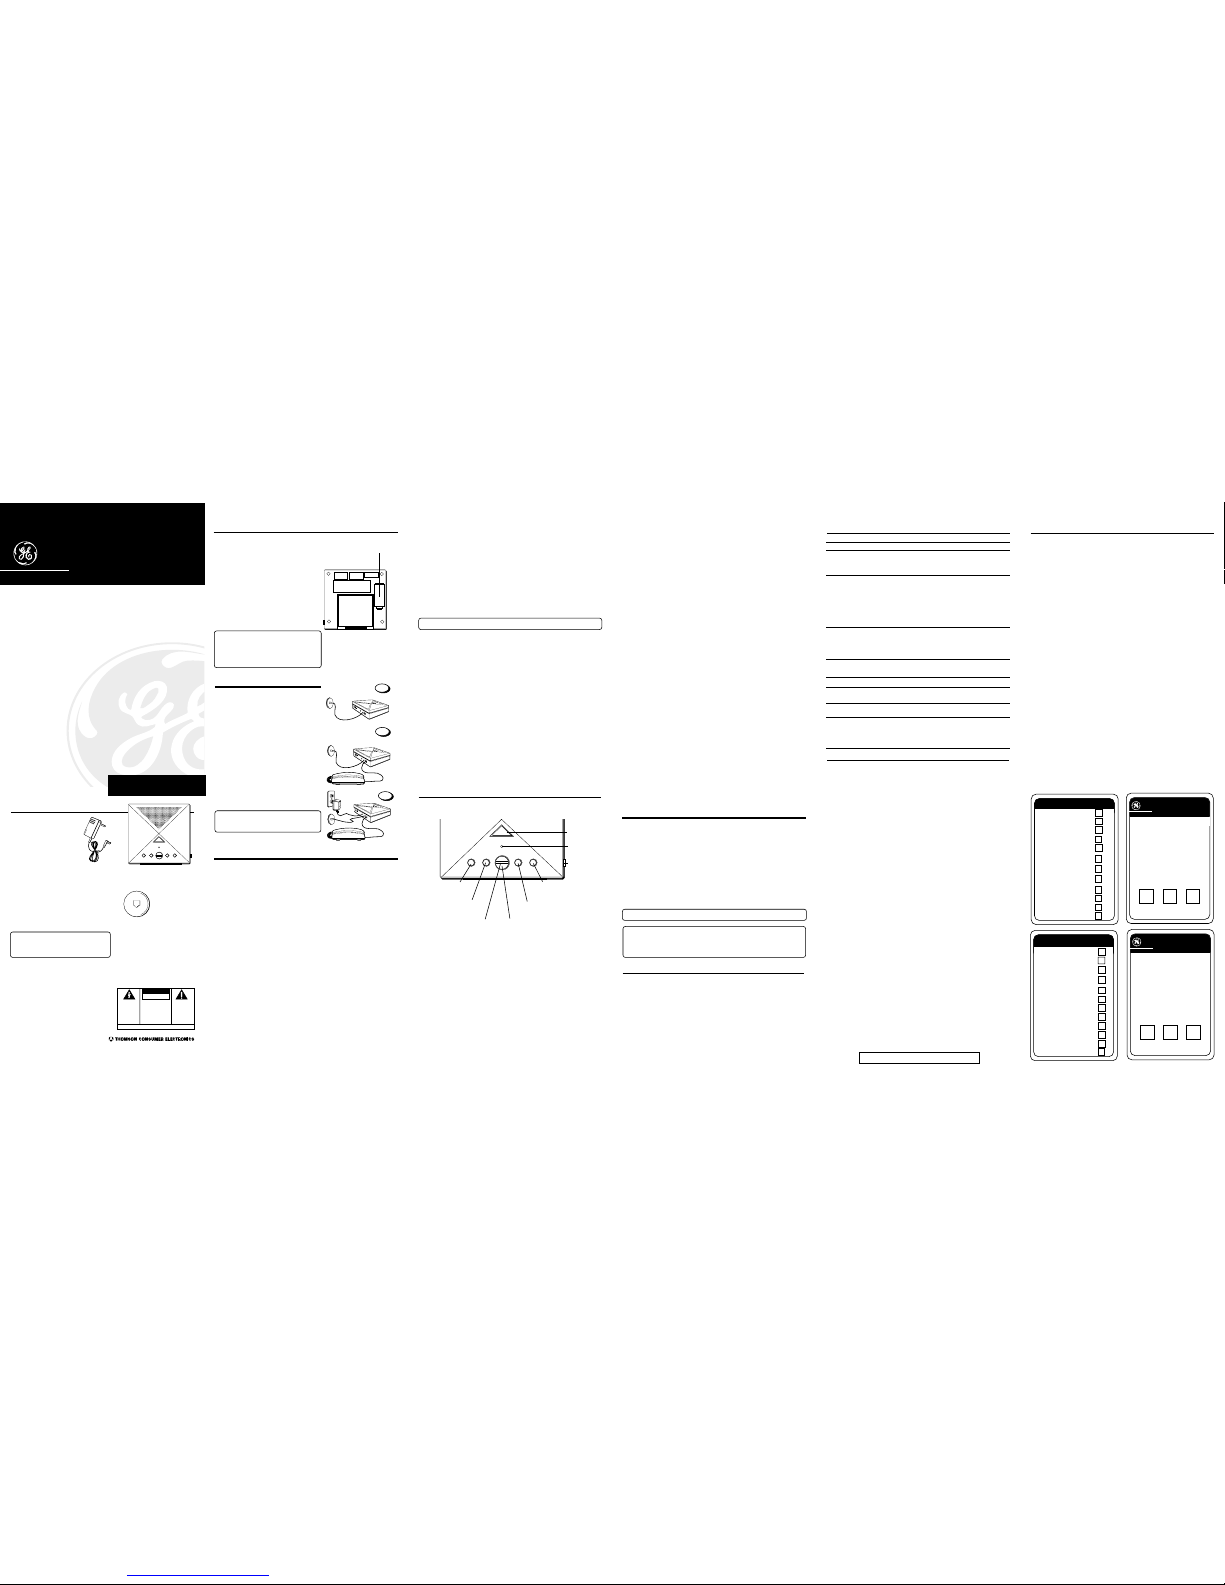
VERIFICACIÓN
DE LOS COMPONENTES
Asegúrese de la caja contiene
los siguientes componentes:
Adaptador de CA
REQUISITOS DE CONEXIÓN
Para conectar el aparato se necesita un jack
modular RJ11, que es el más corriente y se
asemeja al ilustrado en ésta página. Si no tiene
este tipo de jack, llame a su compañía telefónica
local para informarse de como puede instalarlo.
Observación: las ilustraciones que
aparecen en este manual del usuario
sirven de modelo únicamente. Es posible
que su aparato sea ligeramente diferente.
Contestador
PILA DE RESERVA
En el caso de un corte de corriente, la pila de 9
voltios (no incluida) permite al contestador
mantener los mensajes en la memoria. Para
instalar la pila:
1. Abra la puerta del compartimiento de pilas,
en la parte de abajo del contestador, con un
desatornillador.
2. Conecte una pila cargada de 9 voltios e
instálela dentro del compartimiento.
3. Vuelva a colocar la tapa del compartimiento
de pilas y atornille el tornillo.
Observación: cuando la pila deba cambiarse
o si usted no ha instalado una pila en el
contestador, el indicador BATTERY LOW
(pila descargada) destellará. Cuando cambia
la pila, desconecte el cable telefónico antes
de instalarla.
INSTALACIÓN
1. Enchufe el cable de conexión a la línea
telefónica en el jack modular de la pared.
2. Conecte el cable de conexión a la línea de
su teléfono en la entrada que dice FROM
TELEPHONE (del teléfono) en la parte
posterior del contestador (no es necesario
conectar su teléfono para que el
contestador grabe los mensajes.)
3. Enchufe el extremo pequeño del adaptador
de corriente en el jack que dice POWER 9V
AC, en la parte posterior del contestador.
Conecte el otro extremo en una toma de
corriente alterna.
4. Espere a que la señal del contestador le
diga que el aparato se ha calentado
(aproximadamente unos 40 segundos)
antes de proceder con la programación.
Observación: utilice únicamente el
adaptador Thomson 5-2418 que viene con
el aparato. El uso de otros adaptadores
puede dañar el contestador.
PREPARACIÓN
GRABACIÓNDEL MENSAJE DEL CONTESTADOR
Antes de usar el contestador, deberágrabar el mensaje para las personas que
llamen (el mensaje que se escucha cuando el contestador responde la llamada). Si
no graba este mensaje, los que llamen escucharan el mensaje de fabrica que dice:
“Sírvase dejar un mensaje después de la señal.”
Al grabar el mensaje del contestador, manténgase a unos 15 cm (6 pulgadas) del
aparato, y elimine, en lo posible, todos los ruidos de fondo.
1. Prepare el mensaje
Ejemplo de mensaje: “Habla (su nombre). No puedo responder al teléfono en este
momento; por favor, deje su nombre, su número, y un breve mensaje después de la señal. Le
contestarélo antes posible. Muchas gracias.”
2. Mantenga oprimida la tecla ANNOUNCE (mensaje del contestador). Grave su
mensaje después de la señal.
3. Suelte la tecla cuando haya terminado el mensaje.
Para verificar el mensaje, oprima y suelte rápidamente la tecla ANNOUNCE.
Para volver al mensaje de fábrica, después que haya grabado un mensaje personal,
oprima la tecla ANNOUNCE y suéltela cuando escuche la señal.
PROGRAMACIÓNDE LA HORA
Mantenga oprimida la tecla TIME/SET y luego:
•para programar la fecha: mantenga oprimida DAY (día) hasta que el
contestador anuncia el día correcto.
•para programar la hora: mantenga oprimida HOUR (hora) hasta que el
contestador anuncie la hora correcta.
•para programar los minutos: oprima MINUTE (minutos) hasta que el
contestador anuncia el minuto correcto. (Cuando usted mantiene oprimida
MINUTE, los incrementos son de 5 minutos; cuando oprime y suelta MINUTE,
los incrementos son de 1 minuto).
Para verificar la programación de la hora/día, oprima y suelte la tecla TIME/SET (el
contestador anuncia el día, la hora, y los minutos).
Observación: la hora de fábrica es 01H00, lunes, hasta que se programe el nuevo horario.
PROGRAMACIÓNDEL CÓDIGO DE SEGURIDAD
Para poder recoger sus mensajes desde otro lugar (denominado acceso remoto)
deberáteclear un código de seguridad de tres dígitos. El código de fábrica es 123,
pero usted puede cambiarlo.
•Para cambiar el código: mantenga oprimida la tecla TIME/SET mientras oprime
y mantiene oprimida la tecla CODE (código). Suelte TIME/SET después que
haya escuchado el código que quiere utilizar.
•Para verificar el código: mantenga oprimida la tecla TIME/SET, mientras
oprime y suelta la tecla CODE.
Observación: para desactivar el acceso a distancia, programe el código de seguridad 000.
SELECCIÓNDEL TOQUE DE TIMBRE
El conmutador RING SELECT (selector de toques de timbre) se encuentra en la
parte posterior del aparato. Programe su contestador digital para que responda
después del segundo o el cuarto toque de timbre, o elija TS (sistema de ahorro de
cargos). Este sistema le permite llamar desde otro teléfono para controlar sus
mensajes. Si la máquina no responde después del segundo toque de timbre, usted
puede colgar y evitar tener que pagar los cargos.
DURACIÓNDE LOS MENSAJES ENTRANTES
Utilice el selector que estáen la parte posterior del aparato para limitar la duración
del mensaje a 1 MIN (1 minuto) o 2 MIN (dos minutos). Seleccione MAX (máximo),
si desea dar a las personas que llaman la duración máxima para dejar un mensaje.
Esta duración varía según el espacio de memoria digital que haya sido utilizado
para su mensaje personal y otros mensajes que se guardan en dicha memoria.
FUNCIONAMIENTO DEL CONTESTADOR
INDICADOR DE MENSAJES
La luz que va en la tecla PLAY/STOP (reproducción/parada) es el indicador
de mensajes. Le permite saber cuando tiene nuevo mensajes y si su
contestador está encendido o apagado.
Luz del indicador encendido: el contestador estáencendido pero no hay
mensajes.
Indicador destellante: el número de destellos indica el número de mensajes.
Indicador apagado: el contestador estáapagado pero puede que todavía haya
mensajes.
Indicador de mensajes destella rápidamente: el mensaje del contestador no
funciona, la memoria estállena, la hora no ha sido programada, se ha cortado la
corriente y no se instalóuna pila de 9 voltios como reserva. El número de la FCC estáubicado en el fondo de la base
El numero REN esta ubicado en el fondo de la base
GARANTÍALIMITADA
Su garantía cubre:
•Todo defecto de materiales o mano de obra
Vigencia de la garantía:
•Un año a partir de la fecha de compra
(El período de la garantía para los aparatos de alquiler comienza el primer día de alquiler 0 45 días a
partir de la fecha de envío a la empresa de alquiler, cualquiera sea la fecha que cae primero.)
Responsabilidad de la compañía:
•Brindarle un aparato nuevo o, si lo consideramos necesario, un aparato reacondicionado.
•El aparato que se entrega en este caso estarácubierto hasta que termine la garantía del aparato
original.
Reclamo por garantía:
•Embalar el aparato como corresponde, incluyendo los cables y otros accesorios que se suministraron
con el producto. Recomendamos utilizar la caja y el material de embalaje que vinieron de fábrica.
•Colocar en el paquete una prueba de compra que contenga la fecha, como la factura. Además,
escribir en letra de imprenta el nombre y la dirección del remitente y la descripción de la falla. Enviar
el paquete por un servicio de mensajería corriente, como UPS u otro similar a la dirección siguiente:
Thomson Consumer Electronics, Inc.
Product Exchange Center
32 Spur Drive
El Paso, Texas 79906
•Pagar todos los cargos que le cobre el Centro de Canjes por los servicios no cubiertos por la garantía.
•Asegure su envío contra pérdidas o daños, ya que en esos casos Thomson no aceptar ningúna
responsabilidad.
•Se le enviaráun aparato nuevo o reacondicionado con porte pagado.
Aspectos no cubiertos por la garantía:
•Instrucción a los clientes. (Su Manual de Instrucciones le brinda información sobre el funcionamiento
del aparato y de los controles. Para más detalles, póngase en contacto con su representante).
•Instalación y ajustes de configuración
•Pilas
•Daños debidos al abuso o descuido.
•Productos que han sido modificados o incorporados en otros productos.
•Productos adquiridos o reparados fuera de los EE.UU.
•Casos fortuitos, como daños por descargas eléctricas, etc.
Registro del producto:
•Sírvase completar y enviar la tarjeta de registro del producto, que viene con su aparato. El registro
facilitaráel contacto, si fuera necesario. El retorno de la tarjeta no se requiere para la aplicación de la
garantía.
Leyes estatales que se aplican a la garantía:
•Esta garantía cubre sus derechos legales específicos, pero es posible que usted tenga otros derechos
si cambia de estado.
En caso de comprar el producto fuera de los Estados Unidos:
•Esta garantía no se aplica. Solicite a su distribuidor información sobre la garantía.
GUÍADE DETERMINACIÓNDE FALLAS
Problema Explicación/solución
El aparato no responde o
responde al 10 ºtoque de
timbre
•Asegúrese de que estáencendido
•La memoria estállena, borre algunos
mensajes)
•Verifique las conexiones de los cables
eléctricos y de teléfono.
Los mensajes que se graban
quedan incompletos •Se levantóotro auricular en la misma línea.
•Se extendiómás de la duración permitida
(véase la parte posterior y ponga la duración
al máximo (MAX).
•La memoria estállena
•Accidentalmente oprimióPLAY/STOP
durante la reproducción.
No responde a las
instrucciones a distancia •Deberáusar un teléfono por tonos.
•El código de seguridad tecleado no es correcto
•Colgóel teléfono. Si no hace nada durante un
período de tiempo, el aparato cuelga
automáticamente.
No funciona •Desconecte el cable de alimentación, en la
parte posterior del aparato y enchúfelo
nuevamente.
Imposible escuchar
los mensajes •Suba el control del volumen, en el costado
del aparato.
Indicador de pilas descargadas
estádestellando
No puede recomenzar el
mensaje.
•Instale una pila alcalina nueva de 9 voltios.
Indicador de mensajes
destella rápidamente •La memoria estállena. Borre los mensajes.
•No se ha puesto la hora ni la fecha.
•Se cortóla corriente y no hay una pila de 9
voltios de reserva. Ponga la hora y la fecha
CONTROL DE VOLUMEN
Utilice el control de volumen, situado al costado del aparato, para subir o bajar el
volumen al nivel deseado.
ADVERTENCIA:
PARA
PREVENIR EL RIESGO DE UNFUEGO O DE
UNA SACUDIDAELECTRICA, NO EXPONGA
ESTEAPARATOA LA LLUVIA OA LAHUMEDAD.
VEAADVERTENCIA EN LA PARTE POSTERIOR/BASE DELPRODUCTO.
ATTENTION:
RIESGO DE SACUDIDA
ELÉCTRICANO ABRA
EL RELÁMPAGO Y LA
PUNTA DE FLECHA
DENTRO DEL TRIÁN-
GULO ES UNA SEÑAL
DE ADVERTENCIA,
ALERTÁNDOLE A
UD. DE QUE HAY
"VOLTAJE PELI-
GROSO" DENTRO
DEL PRODUCTO.
CUIDADO: PARA REDUCIR
EL RIESGO DE UNA SACU-
DIDA ELÉCTRICA, NO
QUITE LA CUBIERTA
(O PARTE POSTERIOR) NO
USE PARTES DE REPUES-
TO DENTRO. CONSULTE A
ALGUNA PERSONA CALIFI-
CADA DEL SERVICIO DE
REPARACIONES.
EL SIGNO DE EX-
CLAMACIÓN DENTRO
DEL TRIÁNGULO ES
UNA SEÑAL DE
ADVERTENCIA,
ALTERTÁNDOLE A
UD. DE QUE EL
PRODUCTO, TRAE
INCLUCIDO, IN
STRUCTIONES MUY
IMPORTANTES.
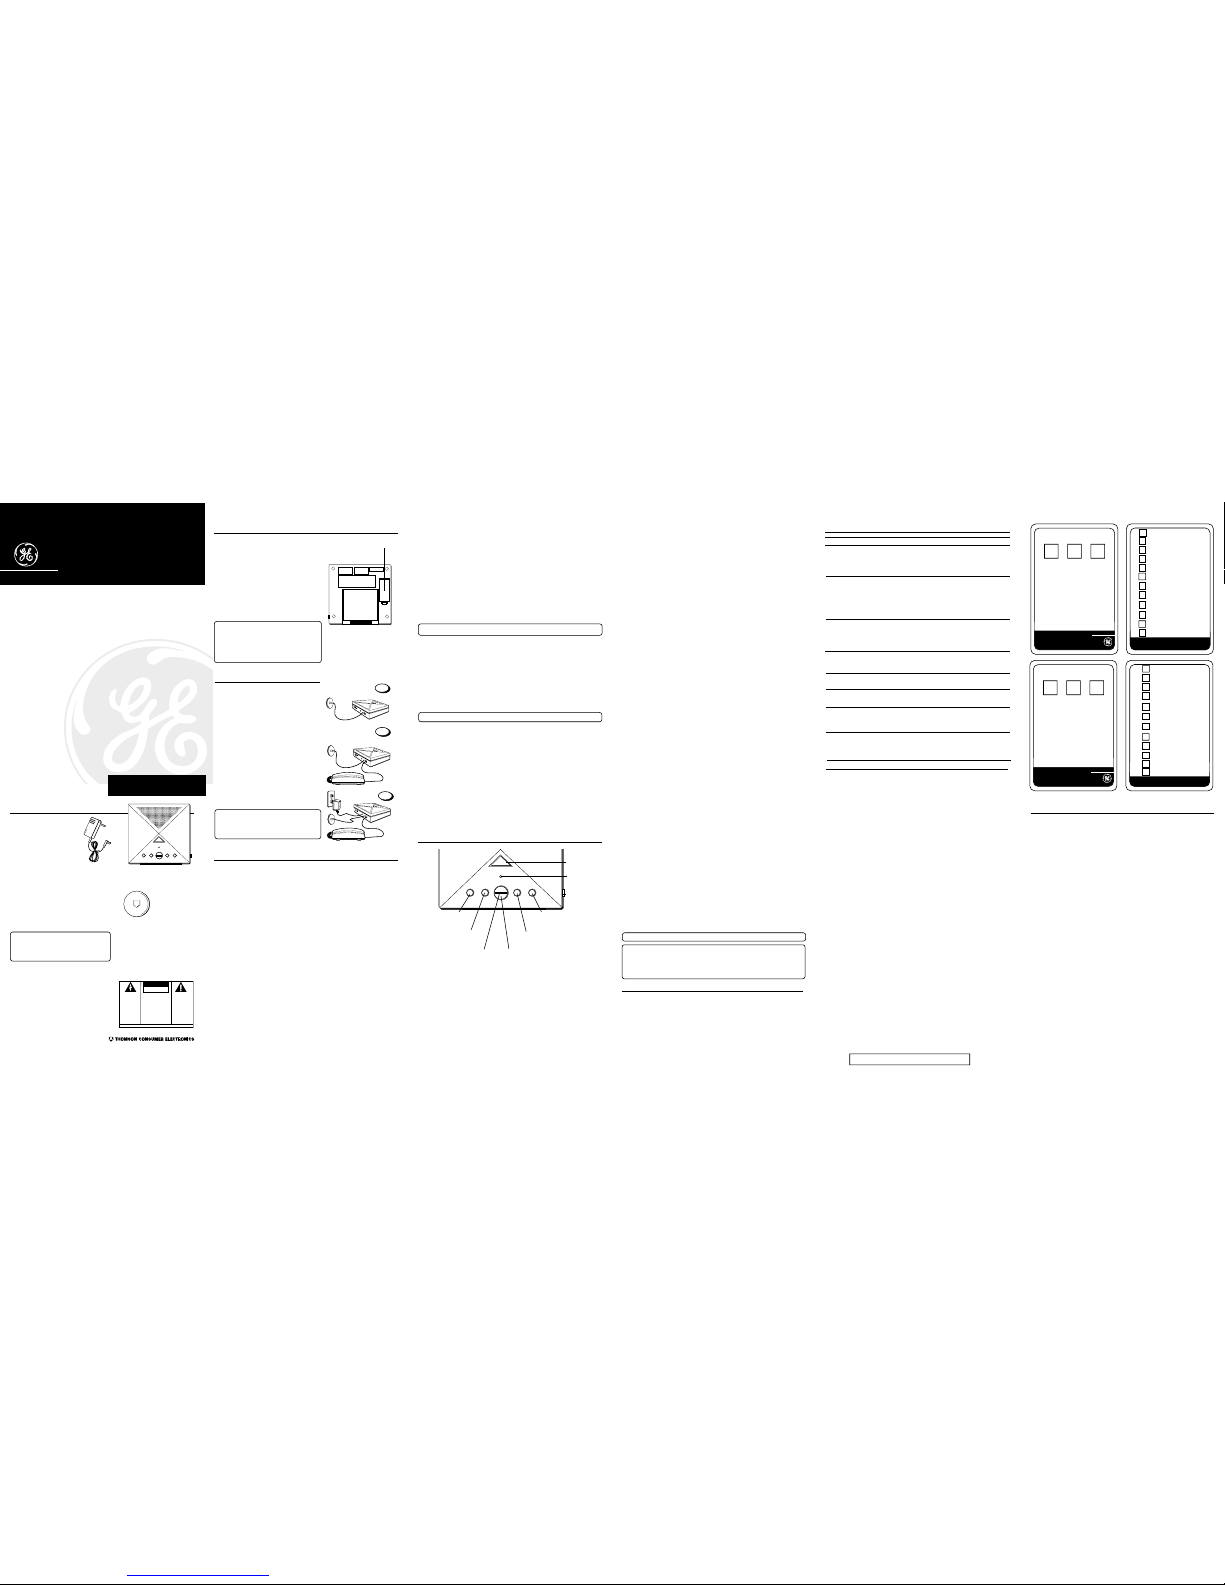
Corte estas tarjetas para acceso a distancia y asípodrátenerlas consigo cuando llame a su número desde otro teléfono.
Write 3-digit security code in boxes.
Digital
Answerer 2-9866
1. Dial phone number of the
answerer.
2. Press any key to bypass
your outgoing announce-
ment.
3. Enter 3-digit security code
after the beep.
4. Enter touch-tone command.
5. Hang up.
To: Press:
Stop playback
Repeat current message
Play previous message
Skip to next message
Erase message
Record announcement
Play announcement
Leave a memo
Turn off answerer
Turn on answerer
3
8
7
9
0
8
2
5
6
(during message playback)
(during message playback)
Play messages
1
(during message playback)
(during message playback)
(during message playback)
4
Move through voice
menu faster
(press 7 again when finished)
(press 8 again when finished)
7
1. Disque el número de teléfono
del contestador.
2. Oprima cualquier tecla para
evitar de escuchar el mensaje
grabado.
3. Teclee los 3 dígitos de su código
de seguridad después de
escuchar el sonido agudo.
4. Oprima una tecla para elegir la
instrucción.
5. Cuelgue.
Contestador
digital
Escriba los 3 dígitos de su código de
seguridad en los recuadros.
2-9866
Para: Oprima:
Detener la reproducción
Repetir el mensaje en curso
Reproducir el mensaje anterior
Saltar al mensaje siguiente
Borrar mensajes
Grabar su mensaje
Reproducir su mensaje
Dejar un aviso
Apagar el contestador
Encender el contestador
3
8
7
9
0
8
2
7
5
6
(durante la reproducción)
(durante la reproducción)
Reproducir el mensaje
1
(durante la reproducción)
(durante la reproducción)
(durante la reproducción)
4
Desplazarse por el menú
rápidamente
Tecla para el mensaje de
contestador y para
programación de fecha
Indicador luminoso
de pila descargada
Tecla de examen de
los anuncios y
programación de hora
ERASE
REVIEW SKIP
PLAY / STOP
BATTERYLOW
ANNOUNCE MEMO ON/OFF TIME/SET
MINUTE
CODE
HOUR
DAY SHIFT
Tecla de borrado
Tecla de encendido y apagado
/Salto y programación de minutos
Reproducción/Parada y
programación de código
Tecla de programación de día,
hora, minutos y códigos
Control de
volumen
Indicador
de mensajes
•Deberáreproducir el mensaje durante un
mínimo de 5 segundos, antes de oprimir la
tecla REVIEW.