GE JGP979 User manual

wvvvv.GEAppliances.com
Safety Instructions ..... 2-5
Operating Instructions
Controls .............. 8, 9
Cookware .............. 9
Electric Ignition ......... 8
Feaun_es ................ 6
Grill Module ......... 10-13
Other Accessories ..... 7, ]4
Surfl_ce Burner
Modules ........... 6, S-I 0
Ventilation System ..... 6, 9
Care and Cleaning
Conuol l<a_obs and
Conuol Panel Seal ...... 15
Grease Jar ............. 15
Griddle Accessotw ....... 17
Grill Burner. ........... 16
Grill Coxer. ............ 16
Grill Grates ............ 16
Ig_iters ................ 17
Porcelain Burner Basin . . 17
Porcelain Cooktop ...... 15
Sealed Burner Modules .. 17
Stainless Smel Surfi_ces ...15
Vent Grille and Filter .... 16
Installation Instructions
Ductwork ........... 22-25
Electrical
Connection ......... 21,26
Gas Connection ...... 21,22
Installing the
Cooktop ............ 21-26
Preparation ......... 19, 20
Safety' Instructions ....... ] 8
Troubleshooting
Tips ............... 27, 28
Consumer Support
Consumer Support ...... 32
Product Registration . .29, 30
_'anantv ............... 31
Write the model and serial
numbers here:
Model #
Serial #
Find these nmnbers on a label
trader the cooktop, on the side
of the vent chamber:
8111P461-60 164D4290P328
J(;P979
49-80172-3 05-04JR

IMPORTANTSAFETYINFORMATION.
READALLINSTRUCTIONSBEFOREUSING.
AWARNING!
For your safe_, the information in this manual must be followed to minimize the risk of fire or
explosion, electric shock, or to prevent property damage, personal injury, or loss of life.
WARNING:If the information in this manual
is not followed exactly, a fire or explosion may
result causing property damage, personal injury
or death.
-- Do not store or use gasoline or other flammable
vapors and liquids in the vicinity of this or any
other appliance.
-WHATTODOIF YOUSMELLGAS
Do not try to light any appliance.
Do not touch any electrical switch; do not use
any phone in your building.
Immediately call your gas supplier from a
neighbor's phone. Follow the gas supplier's
instructions.
If you cannot reach your gas supplier, call the
fire department.
Installation and service must be performed by
aqualified installer, service agency or the gas
supplier.
2

GEAppliances.com
IMPORTANTSAFETYNOtiCE
The California Safe Drinking Water and ToxicEnforcement Act requires the Governor of California to
publish alist of substances known to the state to cause cancer, birth defects or other reproductive
harm, and requires businesses to warn customers of potential exposure to such substances.
Gasappliances can cause minor exposure to four of these substances, namely benzene, carbon
monoxide, formaldehyde and soot, caused primarily by the incomplete combustion of natural gas.
Properly adjusted burners, indicated by a bluish rather than a yellow flame, will minimize incomplete
combustion. Exposure to these substances can be minimized by venting with an open window or
using a ventilation fan or hood.
SAFETYPRECAUtiONS
Have the installer show you the location of the cooktop gas shutoff valve and how to shut #off
ff necessary.
Have your cooktop installed and properly
grounded by a qualified installei, in accordance
with tile Installation ]nstrtlcfions. Any
a@lsunent and service should be perfimned
only by qualified gas cooktop installels or
selwice technicians.
IMPORTANT This product is for use with
natural gas tufty. It is NOT convertible for
use with LP gas.
Do not attelnpt to repair or replace anv
part of your cooktop unless it is specifically
recolmnelMed in this inalmal. M1 other service
should be refl_rred to a qualNed techlfician.
Ixmate tile cooktop out of kitchen traffic path
and ()tit of drafty locati(ms to prevent poor
burner perfimnai_ce.
Plug yore" cooktop into a 120-volt grounded
outlet onlvi Do not I'eII/OVe tile I'Otlnd
grounding prong fl'om tile plug. If in
doubt about tile groui_ding of tile holne
electlical systeln, it is your pelsonal
responsibili b' and obligation to have an
ungrounded outlet replaced with a properly
grounded, three-prong outlet in accordance
with tile National Electrical Code. Do not use
an extension cord with this appliance.
i,et tile burner grates and other surfi_ces cool
befin'e touching them or leaving them where
children can reach them.
Be sure all packaging materials are removed
fl'oln tile cooktop befin'e operating it to prevent
fire or smoke damage should the packaging
material iglfite.
Be sm'e yore" cooktop is correctly a(!iusted by a
qualNed selMce techlfician or installei:
Do not leave children ahme or unattelMed
where a cooktop is hot or in operation. They
could be seriously burned.
Do not allow anvone to climb, stand or hang on
tile cooktop.
CAUTION:Items of interest to children
should not be stored in cabinets above a
cooktop-----{'hildreI_ clin_bing on tile cooktop
to reach itelns could be seriously ii_jured.
Mwavs kee I) wooden and plastic utensils
and canned t0od a sale distance away fl'onl vour
cooktop.
Mwavs kee I) combustible wall coverings,
cmtains or drapes a sate distance fl'om
yotu" cooktop.
Never wear loose-fitting or hanging garments
while using the appliance. Be careflfl when
reaching fin" items stored in cabinets over the
cooktop. Iqalmnable inatefial could be iglfited
if brought in contact with flallle or hot StlYl';ices
and I/lag ca/Ise severe blli'ns.
Teach children not to play with tile COlm-ols or
any other part of tile cooktop.
For your safety, never use your appliance
for warming or heating tile room.
3

IMPORTANTSAFETYINFORMATION.
READALLINSTRUCTIONSBEFOREUSING.
SAFETYPRECAUTIONS
Mwavs keep dish towels, dishcloths, pot
holde_ and other linens a safe distance
from your cooktop.
Do not store flammable materials near
a cooktop.
Do not store or use combustfl)le matei_Jals,
gasoline or other flan/inable \;qxn_ aim liquids
in tile vicinity of this or any other appliance.
Do not let cooking grease or other flamlnable
IllateYJals _lcc/lI//tllate on oi" neai" tile cooktop.
Do not operate tile burner without all burner
parts in place.
Do not place hot cookware on the glass
cooktop. This could cause glass to break.
Do not clean tile cooktop with flammable or
volatile cleaning fluids.
Do not clean the cooktop when the appliance
is in tlse.
Avoid scratching tile cooktop with shaq)
instruments, or with rings and otherjeweh T.
Never use tile cooktop as a cutting board.
WARNING:roredu etheriskoffire,
electrical shock, or injury to persons, observe the
following:
A. Use this unit only in tile manner intended
by tile i//anttfilcttli'ei: If vail have qtlestions,
contnct tile i//an/ll;icttlYeY,
B. gefi)re servicing or cleaning tile refit, switch
power off at service panel.
C. \,_]/en cutting or drilling into wall or ceiling do
not damage electrical wiring and other hidden
utilities.
D. Ducted rims must alwaxs be vented to
tile ot/tdooi_.
E. To reduce tile risk of fire use only metal
ductwork.
WARNING:Toreducetheriskofaoooktop
grease fire:
A. Keep tim, filte_ and grease-laden surliices
clean.
B°
C.
Do not use water on grease fires. Never pick up
a flaming pan. Tm'n tile controls off. Smother
a flaming pan on a sm'fi_ce burner by covering
the pan completely with a well-fitting lid, D.
cookie sheet or fiat tray: Use a multipuq)ose
dry chemical or fi)am-t,/pe fire extinguisher. E.
Haming grease outside a pan can be put ()/it
by covering it with baking soda m; if awfilable,
b)' using a multipuq)ose (hy chemical or
fi)aln-t},,pe fire extinguishei:
Mways turn vent ON when cooking at
high heat.
Use high settings on cooktop only when
necessary. Heat oil slowly on low to medium
setting.
Don't leave the cooktop tmattended when
cooking.
Mwax:s use cookware and utensils appropriate
for tile Q'pe and amount of food being
prepared,
CAUTION:Forgeneralventilatinguse
only. Do not use to exhaust hazardous or explosive
materials and vapors.
COOKMEATANDPOULTRYTHOROUGHLY...
Cook meat and poultry thoroughly--meat to at least an INTERNAL temperature of 160°Fand poultry to
at least an INTERNAL temperature of 180°?Cooking to these temperatures usually protects against
foodbome illness.
4

GEAppliances.com
WARNING!
SURFACEBURNERS
Use proper pan size--avoid pans that are unstable or easily tipped. Select cookware having flat
bottoms large enough to cover burner grates. Toavoid spillovers, make sure cookware is large
enough to contain the food properly. This will both save cleaning time and prevent hazardous
accumulations of food, since heavy spattering or spillovers left on cooktop can ignite. Use pans
with handles that can be easily grasped and remain cool
Mwavs use tile UTE position when igniting tile
top burnei_ and Inake sure tile burneis have
ignited.
Never leave tile Slm'ilce burne_ unattended at
high flame settings. Boilo\'e_s cause slnoking
and greasy spillove_ that may catch on fire.
Use only (hy pot holders--moist or damp pot
holders on hot s/mfilces may result in b/m_s fl'om
steam. Do not let pot holders colne near open
flames when lit_ng cookware. Do not use a towel
or other bulky cloth in place of a pot holder:
Such cloths can catch fire on a hot bume_:
\._l/en using glass cookware, make sure it is
designed for cooktop cooking.
To minimize tile possibili_' of bm'ns, ignition
of flammable materials and spillage, mrn
cookware handles toward
the side or center of the cooktop without
extending over a@lcent burneis.
Mwavs turn tile suFlilce burner controls off
before removing cookware.
Carefidly watch toods being flied at a high
flame setting.
Mwavs heat tilt slowly and watch as it heats.
Do not leave any items on tile cooktop. Tile hot
air fl'om tile vent may ignite flammable items
and will increase pressure in closed containers,
which may Catlse them to btlrst.
If a combination of oils or tilts will be used in
fl'ying, stir together befin'e heating or as lilts
melt slowly.
Do not use a wok on tile cooking surlace
if the wok has a ro/md metal ring that is placed
over tile burner grate to support tile wok. This
ring acts as a heat trap, which may damage the
b/m_er grate and burner head. Mso, it may
cause tile burner to work improperl> This may
cause a carbon monoxide level above that
allowed by current standards, resulting in a
health hazard.
Foods fin" flTing shouM be as d_y as possible.
Frost on frozen foods or moisture on fl'esh
foods can cause hot tilt to bubble up and over
the sides ot the pan.
Use tile least possible amount of lilt for eflecti\'e
shallow or deep-tilt fl'ying. Filling the pan too
flfll of lilt can cause spillove_s when tood is
added.
Use a deep tilt them/ometer whenever
possible to prevent overheating lilt beyond
tile smoking point.
Never t_w to move a pan of hot tilt, especially a
deep tilt flwet: Wait until the tilt is cool.
When flaming toods, turn the tim off. The tim,
if operating, may spread tile flames.
Do not leave plastic items on the cooktop---
tile}' may melt if left too close to tile vent.
Keep all plastics away fl'oln tile SUll'ilce burnei_.
If you smell gas, mrn off the gas to the cooktop
and call a qualified service technician. Never
use an open flame to locate a leak.
To avoid tile possibili_' of a bm'n, always be
certain that tile controls for all burne_ are at
tile off position and all grates are cool before
attempting to remove them.
Never clean the cooktop sm'filce when it is hot.
SoIlle cleanei_ produce noxiotls ][ilIl/es and wet
cloths could cause steam burns if used on a hot
S tlI'J[iIce.
Never leavejms or cans of flit drippings on or
ne}lI" yl)/li" cooktop.
Do not use ahuninuln foil under burner grates.
Misuse could result in a fire hazard or damage
to tile cooktop.
Do not cover or block tile area around the
cooktop knobs. This area must be kept clear fin"
proper ventilation and burner pe_l'imnance.
Clean only parts listed in this Owner's Manual.
READANDFOLLOWTHISSAFETYINFORMATIONCAREFULLY.
SAVETHESEINSTRUCTIONS 5
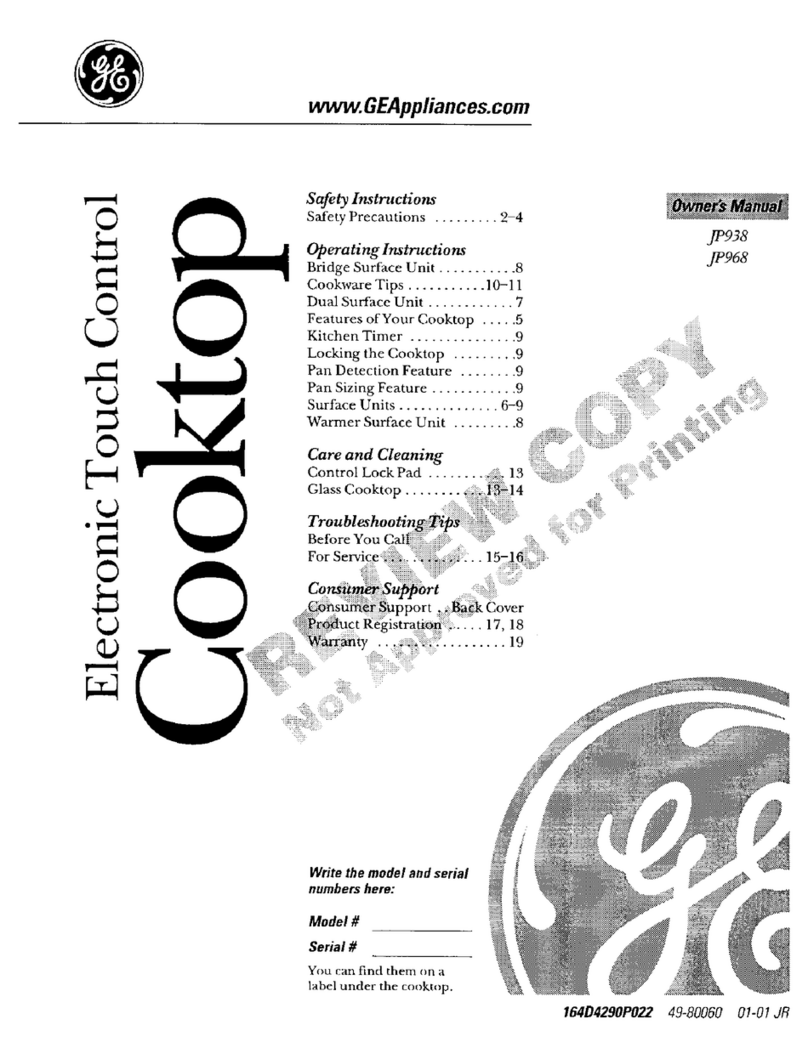
Featuresofyourcooktop.
Throughout this manual, features and appearance may vary from your model.
0
Feature Index
O Grill Module
O Vent (fan operates automatically when grill is in use)
Vent Filters (located below the vent grille)
Cast-Iron Burner Grates
Surface Burners
O Surface Burner Controls
Vent Control

Cooktopaccessories. GEAppliances.com
Throughout this manual, features and appearance may vary from your model.
................................................................Grill Model JXGG79
Consists of two black grill grates
and a grill buinen
Sealed Burner Module
Models JXGB79B (black) and JXGB79W (white)
The grill assembly can be removed
and a sealed burner module
installed.
NOTE: Optional surface burner module
(JXGB79) can replace the grill burner.
Burners supplied with cooktop and
optional module air shutters have
been adjusted for compatibility on
both sides.
Griddle Model JXGL89
Can be used only Mth tile grill
module. Self-draining griddle
makes many favorim foods easier
m fix. Family-sized surface lets you
cook several pancakes, hamburgers
or grilled sandwiches at tile same
time.
Grill CoverModel JXGC89
Attractixe grill coxer protects the
grill when not in use. Textured steel
with molded handles.

Usingthegas surfaceburners.
Throughout this manual, features and appearance may vary from your model
Electric Ignition
Your surlace burners are lit by electric
ignition, eliminating tile need fl)r
standing pilots with constantly burning
[]_lI//es,
/11case era power outage, you can light
tile S(II'J[_ICe b/li'nei's on VO/lI" cooktop
with a match. Hold a lit match to tile
bm'ne_; then turn tile control knob to
tile high position. Use extreme caution
when lighting the burners this way.
Surthce burners in use when an
electrical power fifilure occm_ will
C()Iltilltle to operate noFillallv.
IN CASEOFAPOWERFAILURE,THE
VENTILATIONSYSTEMWILLNOTOPERATE.
Push the control knob down and
turn it to the LITEposition.
How to Light a Gas Surface Burner
Push tile control knol) down and mrn it
to tile LITEposition.
_m will hear a little clicking noise--the
sound of tile electric spark igniting the
b/IFneI:
_dter tile bm'ner ignites, mrn tile knob to
a(!itlst tile flame size.
To mrn a burner off; turn tile knob
clockwise, as tin" as it will go, to tile OFF
position.
If tile flame is too low at tile setting, tile
\:five can be a(!iusmd. Refer to Flames too
high or too low at the LOWsetting in tile
Troubleshooting tips secdon.
How to Select Flame Size
Forsafehandling of cookware, neverlet the
flamesextendup thesides of the cookware.
_htch tile flame, not tile knob, as you
reduce heat. Tile flame size on a gas
burner should match tile cookware um
are using.
Any flame laxger tl/an tile bottom of tile
cookware is wasted and only serves to
heat tile handle.
Before Lighting a Gas Burner
Make sm'e all grates on tile cooktop
are in place before using any bm'ne_:
Only surtace burners mav be used
on the right side,
8
After Lighting a Gas Burner
Do not operate tile bm'ner fin" an
extended period of time without
cookware on tile grate. Tile finish
on tile gram may chip without
cookware to absorb tile heat.
Check to be sure tile burner vou turn
on is one _;lIlt Veil want to rise.
Be sure tile burnex_ and grates are
cool before you place yore" hand,
a pot holder, cleaning cloths or
other materials on tl/em.
When using tile surtace burners, if
you find that the LO setting is too hot
fin" delicate foods, you can a(!iust tile
knob below tile tO setting.
Do not allow large pans to extend
over tile control knobs. Heat trapped
between large pans and control
knobs could cause possible damage
to tile control knobs.

Usingyourcooktop. CEAppliancescorn
Use aflat-bottomed wok.
Wok This Way
Werecommendthat youusea fiat-bottomed
wok,availableat yourlocal retail store.
Only a flat-bottomed wok should be used.
Do not use a flatq)ottomed wok with a
wok holden
Do not rise a flat-bottollled wok Oil }1
support ring. Placing tile ring over tile
bm'ner or grate may cause tile bm'ner to
work improperl> resulting in carbon
monoxide levels above allowable cmTent
standards. This could be dangerous to
veto" health.
Cookware
Uselargediametercookwareon rear
burners.
Aluminum: Medium-weight cookware is
recommended because it heats quickly
and evenly. Most foods brown evenly in
an alumimm_ skillet. Use saucei)ans with
tight fitting lids when cooking with
IIlinilIltllIl alilO/ints of _;_teI:
Enamelware: Under some conditions,
tile enai//el of SOllle cookwaYe Ill}IV
melt. Follow cookware mamdactm'er's
recommendations fin" cooking methods.
Glass: There are two t)pes _ffglass
cookware: those fin" oven rise only
and those fin" cooktop cooking
(saucepans, coffee and teapots).
Glass conducts heat very slowly.
Cast Iron: If heated slowly, n/ost
skillets will give satisfi_ctox_' results.
Heatproof Glass-Ceramic: Can be used
fin" either sm'fl_ce or oven cooking.
It conducts heat very slowly and cools
very slowly. Check cookware
mantlfi_ctm'er's directions to be sm'e it
can be used on [I gas cooktop.
Stainless Steel: This metal alone has
poor heating properties and is usually
combined with coppe_; ahmfinum
or other metals fin" improved heat
distribution. Combination metal skillets
usually work safisfi_ctorilv if they are used
with medimn heat as the manufi_cturer
i'ecolillilends.
Usingthe downdraftventsystem.
ON ,.,.; OFF
How to Operatethe Downdraft VentSystem
The built-in vent system helps remove
cooking vapors, odors and smoke from
foods prepared on the cooktop.
To tm'n on tile vent tim, use tile vent
control switch on the control panel.
• Press down on the left side of the
switch to turn tile tim on.
• Press down on the right side of the
switch to turn tile tim off.
NOTE: Even if the switch is in the
eff pesition, the fan wifl operate
automatically when the grifl burner
is in use.
Continuous use of tile vent system
while cooking helps kee I) the kitchen
comfln'table and less hmnid, reducing
cooking odors and soiling moisture
that nommllv creates a frequent need
fin" cleaning.
Tile appearance of tile burner flames
may be affected when the vent tim is
operating.
IN CASE OFA POWERFAILURE,THE
VENTILATIONSYSTEM WILLNOT OPERATE.
9

Surfaceburnerandgrill modules.
Throughout this manual, features and appearance may vary from your model
Sealed Burner Module
ToInstall the Sealed Burner Module:
1. Make sure that all control knobs are
set to OFF.
2. Clean tile cooktop basin to remove
any grease accumulation. See tile Care
and Cleaning the Cooktop secdon.
3. _'ith tile back of tile bm'ner module
tilted up and tile mixer tube openings
and ignitor rods fl_cing tile orifices
and tem/inal receptacle, insert tile
module in tile cooktop basin.
4. Slide tile bm'ner module fin'ward tmfil
tile tubes and ignitm_ start to engage.
5. I,ower tile back _d tile module into
place and careliflly slide it fin'ward
tmtil tile mixer robes and ignitor rods
are fidly engaged.
ToRemove the Sealed Burner Module:
l,
2.
Make sm'e that all control knobs are
set to Off'and that the cooktop is cool.
i,ifi up tile edge of tile bm'ner module
tmtil tile bottom of tile module clea_
tile edge of tile basin.
IMPORTANT'. 0o not lift the module too
high while it is still connected--you could
damage the ignitor rods and mixer tubes.
3. Hold tile module by tile sides and pull
it away fl'om tile temfinal receptacle
and orifices, i,ifi it out of tile basin
when it is completely mq)lugged.
4. Do not store or stack modules where
they could fifll or be damaged.
NOTE:The optional sealed bm'ner
moduleJXGB79 can replace tile grill
burner assembl_:
Grill Module
Thegrill consists of two black grill grates and the grill burner. Only install the grill on the left
side of your cooktop.
ToInstall the Grill Module:
l,
2.
3,
Make sm'e that all control knobs are
set to OFF.
Position tile grill bm'ner Mth tile
mixer robes and ignitor rod ti_cing tile
orifices and temfinal _eceptacle.
Slide tile grill burner fin'ward until tile
tubes and ignitols are engaged; then
lower the 1)urner tmtil it rests on the
motmting pins.
4. Careflflly place tile grill grates on tile
cooktop.
NOTE:Beforeusingthegrill for thefirst time,
heatthegrill burnerto removethe protective
shippingcoating.Heat thegrill bumer on HI
for 10minutesand usethe ventsystemto
removeanyadditionalsmokeduringcooling.
10
ToRemove the Grill Module:
1. Make sm'e that all control knobs are
set to OFFand all grill conli)onents are
cool.
2,
3.
Rem_we tile grill grates.
I,ifl tile grill bm'ner up slightly and
pull it away from tile temdnal
receptacle and orifices, i,ifl it out of
the basin when it is completely
tmplugged.
4. Do not stoFe or stnck ii/o(hlles wheI'e
they could tifll or be damaged.
NOTE:The optional sealed burner
module.]XGB79 can replace tile grill
burner assembl_:

Grilling. GEAppliances.com
Using the Grill
• The vent fm_ will operate
automatically when the grill
burner is in use.
• gefi)re using the grill fl)r the first
time, wash grill grates in hot soapy
water. Rinse and dry.
• Precondition grates by brushing with
vegetable oil or spraying with a non-
stick coating such as Pare ®.Do this
every time betm'e w)u grill.
•D)r easier clean-ui), spray grates and
bm'ner basin with a non-stick coating.
• Use nmmaetallic spatulas or utensils
to prevent damaaghlg the non-stick
grill grate finish.
• Preheat the grill on high fin" 5 to 10
minutes. Preheating improves the
flavor and appearance of meats and
quickly sears the meat to help retain
the juices.
• F_xcessive amounts of fat should be
trimmed from meats. Some tat is
necessary to produce the smoke
needed for that smoked "outdoor"
flavor. However; excessive tat can
create cleaning and flare-up
problems.
• Allowing excessive amotmts of grease
or drippings to constantly flame w_ids
the warranty on the grill grates.
Excessive flare-ups indicate that
either the grill interior needs to be
cleaned, excessive alnounts of tilt are
in the meat or that the meat was not
properly trimmed.
• Grease drii)pings will occasionally
ignite to produce hamfless puffs of
flame fin" a second or two. This is a
normal part of the cooking process.
• Never leave the grill unattended
dm'ing operation.
IMPORTANT"
•Donot usealuminum foil inside the
grill area.
•Donot use charcoal or wood chips in
the grill area.
•Donot aflow burner basin to become
overloaded with grease. Cleanafter
each use.
•Donot cover grates completely with
meat.Leaveair space between each
steak, etc., to allow proper ventilation
as well as to prevent flare-ups.
Should a Sustained Rare-Up Occur:
l. Use the vent control to tm'n the
t_lll on.
2. hmnediatelv turn the grill control
knobs to the 0FFposition.
3. Remove the meat ti'om the grill.
11

Grilling.
Grilling Tips
" _]tl/ your grill, any food you've
considered "at its best" when
prepared outdoors can now be
prepared indoors with less fllss and
great flavor.
• Tile tOllowing suggestions are good
_ules to tollow and will increase yore"
enjoyment of tile equipment. Be sm'e
to tollow directions in this guide fin.
using the grill.
" Suggested cooking times and control
settings are approximate due to
wlriations in meats. Experience will
quickly indicate cooking times as well
as which settings work best.
'_For best results, buy tol>grade meat.
Meat that is at least 3/4-inch thick
will grill better than thinner cuts.
" For tile attractive "branded" look on
steaks, be sm'e tile grill is preheated.
Allow one side of tile meat to cook to
tile desired doneness, or/mtil the
juices appear on tile top surtace,
befin'e turning. Turn steaks and
hambm_ge_ just once. Moving tile
tood aro/ind Catlses loss of juices.
* When basting meats or applying
sauces to foods, remember that
excessive alnounts wind 11I) inside
yore _grill and do not improve tile
tood flavor. Apply sauces during tile
last 15 to 20 minutes of cooking time
mfless the recipe specifies otherwise.
Suga>based marinade (tOt example,
barbecue sauce) will caramelize
on grill grates and will create a
cleaning chore.
,i There are many meat marinades which
will hel I) tenderize less expensive cuts
of meat tot cooking on the grill.
" Certain flmds, such as poultry and
non-oily fish, may need some extra
tat. Brush with oil or melted butter
occasionally while grilling.
" Use tongs with long handles or
spatulas tot tm'ning meats. Do not
use fin'ks because these pierce the
meat, allowing juices to be lost.
" To hel I) retain meat juices, salt atter
turning meat or after cooking is
completed.
" Score the tat on the edges of steaks
but do not cut into tile meat to
prevent cmqing while cooking.
12

Grillingguide. GEAppliances.com
Preheat the grill on high for 5 to 10minutes for best flavor.
Control Setting Cooking Time ProcedureType
Meat
Steak(1/2"-3/4")
Rare HI
Medium HI
Well HI
Steak(1"-1W')
Rare HI
Medium HI
Well HI
Hamburgers(3-4 oz.) Medium
Porkchops Medium
Fullycookedsmokedporkchops Medium
Hamslices Medium
Porkribs Medium
6to 10minutes Turnafter 3 to 5 minutes.f
10to 16minutes Turnafter 5to 8 minutes.
21to 24minutes Turnafter 6 to 12minutes.
14to 24minutes
18to 30minutes
24to 34minutes
20to 25minutes
20to 30minutes
lOto 15minutes
15to 20minutes
50to 65minutes
Fullycookedsausages
Hotdogs,brats HI 7to 12minutes
Polish HI 13to 16minutes
Freshsausages
Links Medium 15to 25minutes
Patties(3"diameter) Medium 15to 20minutes
Italiansausage Medium 25to 30minutes
Lambchops Medium 20to 30minutes
Turnafter 7 to 12minutes.f
Turnafter 9 to 15minutes.
Turnafter 12to 17minutes.
Turnafter halfthetime.
Turnoccasionally.
Turnafter halfthetime.
Turnoccasionally.Brush
with barbecuesauceduring
thelast 15minutes.
Turnoccasionally.
Turnoccasionally.
Turnoccasionally.
Turnafter halfthetime.
Piercecasingwith a fork.
Turnonce.
Turnoccasionally.Brushwith
glaze,ifdesired.
Poultry
Chicken
Pieces:bone-in Medium 35to 50minutes Turnoccasionally.
Bonelessbreasts Medium 25to 35minutes Turnoccasionally.
Wings Medium 25to 35minutes Turnoccasionally.
Cornishhen(halved) Medium 35to 45minutes Turnoccasionally.
Fish
Small,whole(1")
Steaks(1")
Fillets--with skinon(1/2")
Medium 15to 20minutes Brushwith butter.Turnafter
halfthetime.
Medium 20to 25minutes Brushwith butter.Turnafter
halfthetime.
Medium 10to 15minutes Startskinsidedown.Brush
with butter.Turnafter half
thetime.
Shrimp(skewered) Medium 10to 20minutes Turnand brushwith butter
or marinadefrequently.
Bread
Garlicbread Medium 4to 6 minutes Turnafter halfthetime.
Hotdogor hamburgerbuns Medium 1to 2 minutes Turnafter halfthetime.
f TheU.S.DepartmentofAgriculturesays"Rarebeefispopular,butyoushouldknowthatcookingit toonly140°Fmeanssome
foodpoisoningorganismsmaysurvive."(Source:SafeFoodBook.YourKitchenGuide.USDARev.June1985.)
13

Otheraccessories.
Grill Cover
The textured steel grill cover makes an
attractive cover for the grill section of the
cooktop when it is not in use.
To use the grill cover:
Remove the cover belore heating tile
grill. Since a heated grill cover would
not appear hot, this could cause
accidental burns should it be touched.
Heating the grill cover could also
damage tile finish.
Do not place the grill cover over a
heated grill. I,et the grill cool befln'e
putting tile cover in place.
Use the cover over the grill grates onl>
Do not place the cover over the griddle
or sm'tace bm'ner grates.
IMPORTANT"Although the finish is very
durable, care should be taken toavoid
setting utensils or other items on the
surface that could cause scratches.
DONOT set extremely hot containers on
the surface, including handles, since these
could mar or discolor the cover.It is an
attractive cover and proper care will keep
it that way<
Griddle Accessory
Using the griddle:
1. Before tile first use, wash your new
griddle in hot soapy water, rinse and
dry. Then "condition" the surface bv
wiping on a thin coating of cooking
oil or shortening. Remove excess oil
or shortening by wiping again with
another paper towel.
2. Insert grill burner. DO NOT use grill
grates.
3. Place griddle over grill burner so
that tile drain holes are in fl'ont.
This will permit excess grease to be
collected in the grease container.
4. Preheat tile griddle 5 to 10 minutes
at tile specified setting as noted in
tile Griddle Guide.
5. Use non-metallic spatulas or utensils
while cooking to prevent damaging
the finish.
Griddle Guide
NOTE: These are suggested guides for control settings and times. Factors such as low gas pressm'e may altect tile
times and control settings which provide tile best results. Preheat 5 to 10 minutes at specified setting.
Approximate Cooking Approximate Cooking
FoodItem TimeFirstSide TimeSecondSide
3-4 minutesBacon
Buns
Eggs
Fishsticks(frozen)
Hamslice
Hamburgers
Hotdogs
Frenchtoast
Grilledcheesesandwiches
Pancakes
Sausagepatties
Control
Setting
Medium
HI
Medium
Medium
Medium
Medium
HI
HI
HI
HI
Medium
4-5minutes
2-3 minutes
2-3 minutes
7-8 minutes
6-7 minutes
5-7 minutes
5 minutes
2-4minutes
2-3 minutes
1-2 minutes
6-8 minutes
1 minute
5-7 minutes
5-6 minutes
4-6 minutes
5 minutes
2-3 minutes
2-3 minutes
1-2 minutes
4-5 minutes
14

Careand cleaningofthe cooktop. CEA,,lia,ces.com
Before Cleaning
Befl)re cleaning any part of your
cooktop, be sure all controls are off'
and DISCONNECT ELECTRICALPOWER
TO THE COOKTOPat the tuse box or
circuit breaker panel, or pull the
cooktop power plug, located beneath
the cooktop and inside the cabinets.
Do not operate the cooktop without all
parts in place.
ControlKnobsand ControlPanel Seal
After grilling there may be soot on the
knobs and control panel seal. This soot
can be renloved by scrubbing with a
plastic scrubber and mild dishwashing
detergent. The control knobs may
be removed ti)r cleaning.
Toremove a knoh, pull it straight up.
X4'ash the knobs in soap and water but
do not soak. Avoid getting water down
into the knob stem holes.
X_]i)e with a sponge, damp cloth or
paper towel. Do not scrub with steel
wool pads or abrasive cleansers.
To replace a knob, match the fiat part
of the knob opening with the fiat side
of the shaft.
IGrease Jar
A grease jar is located below the grill
basin pan under the countertop. Check
periodically to prevent spillovers.
Unscrew and remove.
If the jar is broken, replace with any
heat tempered jar, such as a canning
jar, which has a standard screw neck.
Porcelain Cooktop
The porcelain enamel finish is stm'dv
but breakable if misused. This finish is
acid-resistant. However, anv addic fl)ods
spilled (such as fluitjuices, tomato or
vinegar) should not be permitted to
remain on the finish.
If acids spill on the cooktop while it is
hot, use a dry paper towel to wipe it
up right away. X_'hen the sm'tace has
cooled, wash with soap and water or
cleansing powders. Rinse well.
For other spills, such as fat spattering&
wash with soap and water or cleansing
powders after the surtace has cooled.
Rinse well. Polish with a dry cloth.
Stainless Steel Surfaces
Donotusea steel wool pad;it will scratch
thesurface.
To clean the stainless steel surti_ce, use
warm sudsy water, a stainless steel
cleaner such as Kleen tCdng _,or an all-
pml)ose liquid or spray cleaner. Mways
wash in the direction ot the grain. Rinse
thoroughly with a sponge or cloth and
clean water: D_T with a soil clean cloth.
After cleaning, use a stainless steel
polish, such as Stainless Steel Magic <`:,
Revere Col)per and Stainless Steel
Cleaner '_or Wenol All Pml)ose Metal
Polish _.Follow the product instructions
tot cleaning the stainless steel sm'tace.
15

Careand cleaningofthe cooktop.
GnflBumer
The grill burner should be cleaned after
each use. It can be cleaned with a non-
abrasive I)ad or in the dishwasher.
Rinse and (liT thoroughly beflire using
again. For heavv soil, the l)tli'ilei"
should be cleaned first with a soai)y
steel wool i)ad, rinsed and dried. Then
it can be cleaned in a sell=cleaning
()veil t()I" two ho/llN,
NOTE:Check to be sure all burner i)(/rts
are (/i)en. To open clogged i)orts, insert
a twist tie directl) into each port.
Gnfl G_s
The grates should be cleaned after
each use. They can be cleaned with
detergent and a l)lastic scrubbei; such
as Tuff}:, or washed in the dishwasher
if burned on residue is fii_t ren/oved.
For hea\ T soil, grates can be si/aked
in hot, soai)y water inixed with
household ai/lll/onia.
Do not use metal brushes or abrasive
scouring pads or other scrubbers intended
to clean outdoor grills. These will remove
the finish as well as scratch the grates.
Do not clean in a self-cleaning oven or
use oven cleaners on the grates.
Grill Cover
The grill cover nlav be easily cleaned
with a danl I) ch)th and n/ild detergent
or liquid household cleanser. Rinse and
dry thoroughly.
DONOTclean ina dishwasher.
16
Vent Grille and Filter
Vent Grille: The vent grille lifts off easily.
_]I)e clean or wash in the sink with
Inild hI/usehold detergents.
NOTE: On n/odels with a white vent
grille, stubborn stains n/ay be renloved
by soaking the grille in a 50/50 inix of
bleach and water overnight. After
cleaning, rinse the grille thor(mghly
and dry it befl)re rel)lacing.
Filter: Turn off the tan beflire
renloving. Turn the filter retainer
clip to renlove the filtei; The filter
is a i)ernlanent type and should be
cleaned when soiled. (:lean in the
sink with warnl water and liquid
dishwashing detergent.
IMPORTANT" Do not ()i)erate the tan
without the filter. The filter should
always be l)laced at an angle. _s you
tace the front of the cooktoI), the top
of the filter should rest against the
left side of the vent oi)ening and the
bottom of the filter should rest against
the right side (ff the ventilation
chanlber at the bottoin. If the filter
is flat against the fhn wall, xentilation
effectixeness is reduced.
Ventilation Chamber: This area, which
houses the filtei; should be cleaned
in tile event of spills or whenever it
becomes coated with a fihn (ff grease.
The ventilation chanlber inay be
cleaned with a i)ai)er towel, dan/I)
cloth or sponge and a n/ild h(msehold
detergent or cleanser.
/
When replacflTg the filter, make
sure it rests, at an angle, on the
supports in the vent openflTg.
Latchit h7place.

GEAppliance_com
Igniters
It is important to kee I) igniter port
openings on burne_ clear and free oI
obstructions to avoid ignition failure
and possible gas buildup. If the port
openings are bh)cked, use a twist tie to
remove food particles.
Griddle Accessory
DO NOT immerse a hot griddle in
cold water.
Once the griddle has cooled, wash
with soap or detergent in hot water
in the sink. Be sm'e to remove all
food residue before cooking on
the griddle again.
Remove stubborn spots with a plastic
scouring pad. For best results, use only
those cleaning products which are
recommended fin" use when cleaning
non-stick surtaces. Do not use steel
wool or COalSe SCO/lring pads.
DO NOT wash in a dishwasher.
Sealed BurnerModules
Cooktop surface:
To l)revent the cooktop from
discoloring or staining:
• Clean the cooktop after each use.
• Wipe up acidic or suga_ T spills
as soon as the cooktop has cooled,
because these spills may discolor
the porcelain.
Sealed Burners:
The sealed burners of your cooktop are
secured to the cooktop module and are
not designed to be removed. Since the
burners are sealed into the module,
boilovers or spills will not seep
underneath the cooktop. However, the
burner heads should be cleaned after
each use.
Burner Grates:
The grates must be properly positioned
before cooking. Improper installation
of the grates may result in chil)ping of
the cooktop.
Do not operate burners without a pan on
the grate. The grate's porcelain finish may
chip without a pan to absorb the heat
from the burner flame.
Although the burner grates are
durable, thev will gradually lose their
shine and/or discolor, due to the high
temperatures of the gas flame.
Porcelain Burner Basin
This area is located under the grill and
sm'tace bm'ners and should be cleaned
after each use of the grill,
To remove light soil, clean with soapy
water or with a cleaner such as 409%
For easier cleanup, soak i)aper towels
in a household cleanse_; lay in the
burner basin and soak for at least a
half horn" or hmger.
To reillove i//oderate soil, SClllb
with Comet '_,Bon Ami '_,a soft
scrub cleanser or plastic sc_ ubber.
To remove Sttlbborn soil, spray with an
oven cleaner. I,et soak overnight. X_]l)e
clean. Rinse and dry.
17

Installation
Instructions Gas Downdraft Cooktop
Iff youhave questions,call 800.GE.CARES(800.432.2737)or visitour W_bsite at: GEAppliances.com
In the Commonwealth of Massachusetts:
" This product must be installed bv a licensed phunber
or gas fitter.
• When using ball-type gas shut-offvalves, they shall be
the T-handle type.
• A flexible gas connectm; when used, must not exceed
3 teet.
BEFORE YOU BEGIN
IMPORTANT NOTE: This product is for use with
natural gas only. It is NOT convertible for use with
LP gas.
Read these instructions completely and carefully.
•IMPORTANT -Savethese
instructions ti)r h)cal inspector's use.
•IMPORTANT -Observeall
governing codes and ordinances.
• Note to Installer -Be sure to leave these
instructions with tile Consumer.
• Note to Consumer - IZeep these insnuctions
ti)r fllture reierence.
° Proper installation is tile responsibility of
the installer.
0 Product fifihu'e due to improper installation is not
covered trader tile _,Varrantv.
FOR YOUR SAFETY
If You Smell Gas:
1. Open windows.
2. Don't touch any electrical switches.
3. Extinguish any open flame.
4. hnmediately call your gas supplier.
Do not store or use gasoline or other flmnmable vapors
mid liquids in the vicinity of this or rely other appliance.
WARNING -Before beginning tile
installation, switch power off' at the service panel
and lock the service disconnecting means to prevent
power fl'om being switched on accidentall> When
tile service disconnecting means cannot be h)cked,
secm'elv tasten a prominent warning device, such as
a tag, to the service panel. 8
IMPORTANT SAFETY
INSTRUCTIONS
Tile cooktop has been design-certified by CSA
International. _s with any appliance using gas and
generating heat, there are certain sale_' precautions
wm should fi)llow. You'll find these precautions in the
"ImportantSMotg Instuctions section in the fi'ont ot this
Owner's Manual. Read them carefldlv.
° Be sm'e yore" cooktop is installed properl) b) a qualified
installer or service technician,
° The cooktoi) m ust be electricall) gromMed in accordance
with local codes, or in their absence, with the National
Electrical Code ANSI/NFE__ No. 70 - latest Edition.
0 Installation of this cooktop Inust confimn with local
codes, or in the absence of local codes, with the National
Fuel Gas Code ANSI Z_223.. 1- latest Edition.
° lmi)roper installation, a(!iusm_ent, alteration, setMce
or maintenance can cause ii_jtuy or propert), damage.
Refer to this manual. For assistance or additional
infi)mmtion, consult a qualified installe_; service agency,
manufi_cmrer (dealer) or tile gas suI)plie_:
° Disconnect electrical sui)i)ly beli)re servicing.
° Never reuse old flexible connecto_. Tile use of old
flexible connectors can cause gas leaks and personal
ii_jm T. Mways use NEW flexible connectoi3 when
installing a gas appliance.
° Make sure the wall coverings amtmd the cooktop can
withstand heat generated by the cooktop up to 200°E
° Avoid placing cabinets above the cooktop.
° If cabinets are placed above the cooktop, allow a
minimum clearance ot 30" between tile cooking
surIi_ce and tile bottom of protected cabinets.
0If a 30" clearance between cooking sm_i_ce and overhead
combustible material or metal cabinets cannot be
maintained, protect tile trade,side of tile cabinets above
tile cooktop with not less than 1/4" instflafing millboard
or g_psum board at least 3/16" thick covered with 28
gauge sheet steel or 0.020" thick coppe_:
• (]learance between the cooking sm_i_ce and i)rotected
t/
cabinets MUST NE'YER BE LESS THAN 24. Tile
vertical distance from tile plane of tile cooking stu_ilce
to tile bottom of a(!iacent overhead cabinets extending
closer than 2" to tile plane of tile cooktop sides must not
be less than 18{t

Installation Instructions
PARTS LIST
• Gas cooktop base unit
• I,iterature pack
• 1 Surtace burner assembly
• 2 Surtace burner grates
• ] Vent filter
• ] Vent grille
• 1 Grease jar
TOOLS AND PARTS NEEDED
• i,arge flat-blade screwdriver
• Saw
• Carpenter's square
• Pipe wrench
• 7/16" open end wrench
• Gas line shut ot1 wdve
• Pipe joint sealant for use with gas connections
For flexible cmmection where local
codes permit:
• Flexible metal tubing (same 3/4" or 1/2" I.D. as
gas supply line)
• Flare union adapter for connection to supply lille
(3/4" NPT x 3/4" I.D. or 1/2" NPT x 1/2" I.D.)
• Flare union adapter for connection to regulator
(1/2" NPT x 3/4" I.D. or 1/2" I.D.)
For rigid connection:
• Pipe fittings as required
IMPORTANT
Motor Clearance--Provide 2" rain. (5.1 cm) cabinet
clearance to n/otor t0r cooling pllI])OSe.
NOTE: Where possible, 6" (l 5.2 cm) is
recommended tot motor/blower service.
Side Clearance--Grills installed near a side wall
should allow a minimum clearance of 8" (20.3 cm).
YO/l II/tISt allow I'oon/ eIl()tlgl/ t() rei/love _lild ei/lpty
grease container(s).
CAUTION: _hrrantv is void on equipment installed
other than as recommended bv GE. Recommended
wall caps and transitions inust be used fl)r proper
operation and installation.
PREPARING FOR INSTALLATION
JGP979
Tie down bolt
on each end
*Blower can be
swiveled 90=
Grease Container
Pressure Regulator
Wiring Box Cover
2.38 cm 1
Minimum I
Clearance I
28%"± V_d' 201%d'± Vld'
±.16 cm
79/16 zz
19.21 cm
1%" Min.
4.76 cm
Select appropriate
duct cutout. (See
ducting installation
instructions.) 3%6" 8.41cm
--T l'
5.08 cm_ P- 14,,_ 117/8,,+I
Minimum 35.56 cm
Clearance 30.16 cm
Appliance
Pressure
Regulator
Grease
Container
* Blower may be rotated for horizontal or vertical direction by loosening
nuts around blower inlet. Accessible inside ventilation chamber.
19

Installation Instructions
MINIMUM SPACING REQUIREMENT
When installing a double bay downdrafl cooktop in
c()mbination with another downdrafl cooktop
maintain the minimmn spacing between units as
shown below. Installing them too close will affect
cooking i)erforn/ance.
1 8 ff
F __46.70m__4
43/8 r_
11.1cm
[] INSTALLING CABINETS OVER
YOUR COOKTOP
30" min
(76.2 cm)
8" min to wall
(63.5 cm)
(91.4 cm)
8" min to wall
(20.3 cm)
Avoid placing cabinets above the cooktop trait,
if possible, in order to reduce the hazards caused
by reaching over heated sm'ihce traits,
If the cabinets are installed above the cooktop,
allow a minimmn 30" (769 cm) clearance
between the cooking surface and the bottom of
the cabinet.
A non-combustible material Inust be installed on
the m_der side of the cabinet. Use a flame retardant
millboard at least 1/4" (6.3 ram) thick, or g)'psmn
board at least 3/16" (4.7 ram) thick, covered with
28 gauge sheet steel or 0.020" (.5 ram) thick
COl)per. The maxim mn depth of cabinets above
the cooktop is 13" (33 cm).
EXCEPTION: Installation of a listed microwave
oven or cooking appliance over the cooktop shall
conform to the installation instructions packed
with that appliance.
Working areas a(!iacent to the cooktop should have
an 18" (45.7 cm) minimum clearance between the
cotmtermp and the bottom of the cabinet. If the
clearance is less than 18" (4.'5.7 cm), the adjacent
cabinets should be at least 8" (20.3 cm) fl'om the
side of the cooktop.
2O
Table of contents
Other GE Cooktop manuals