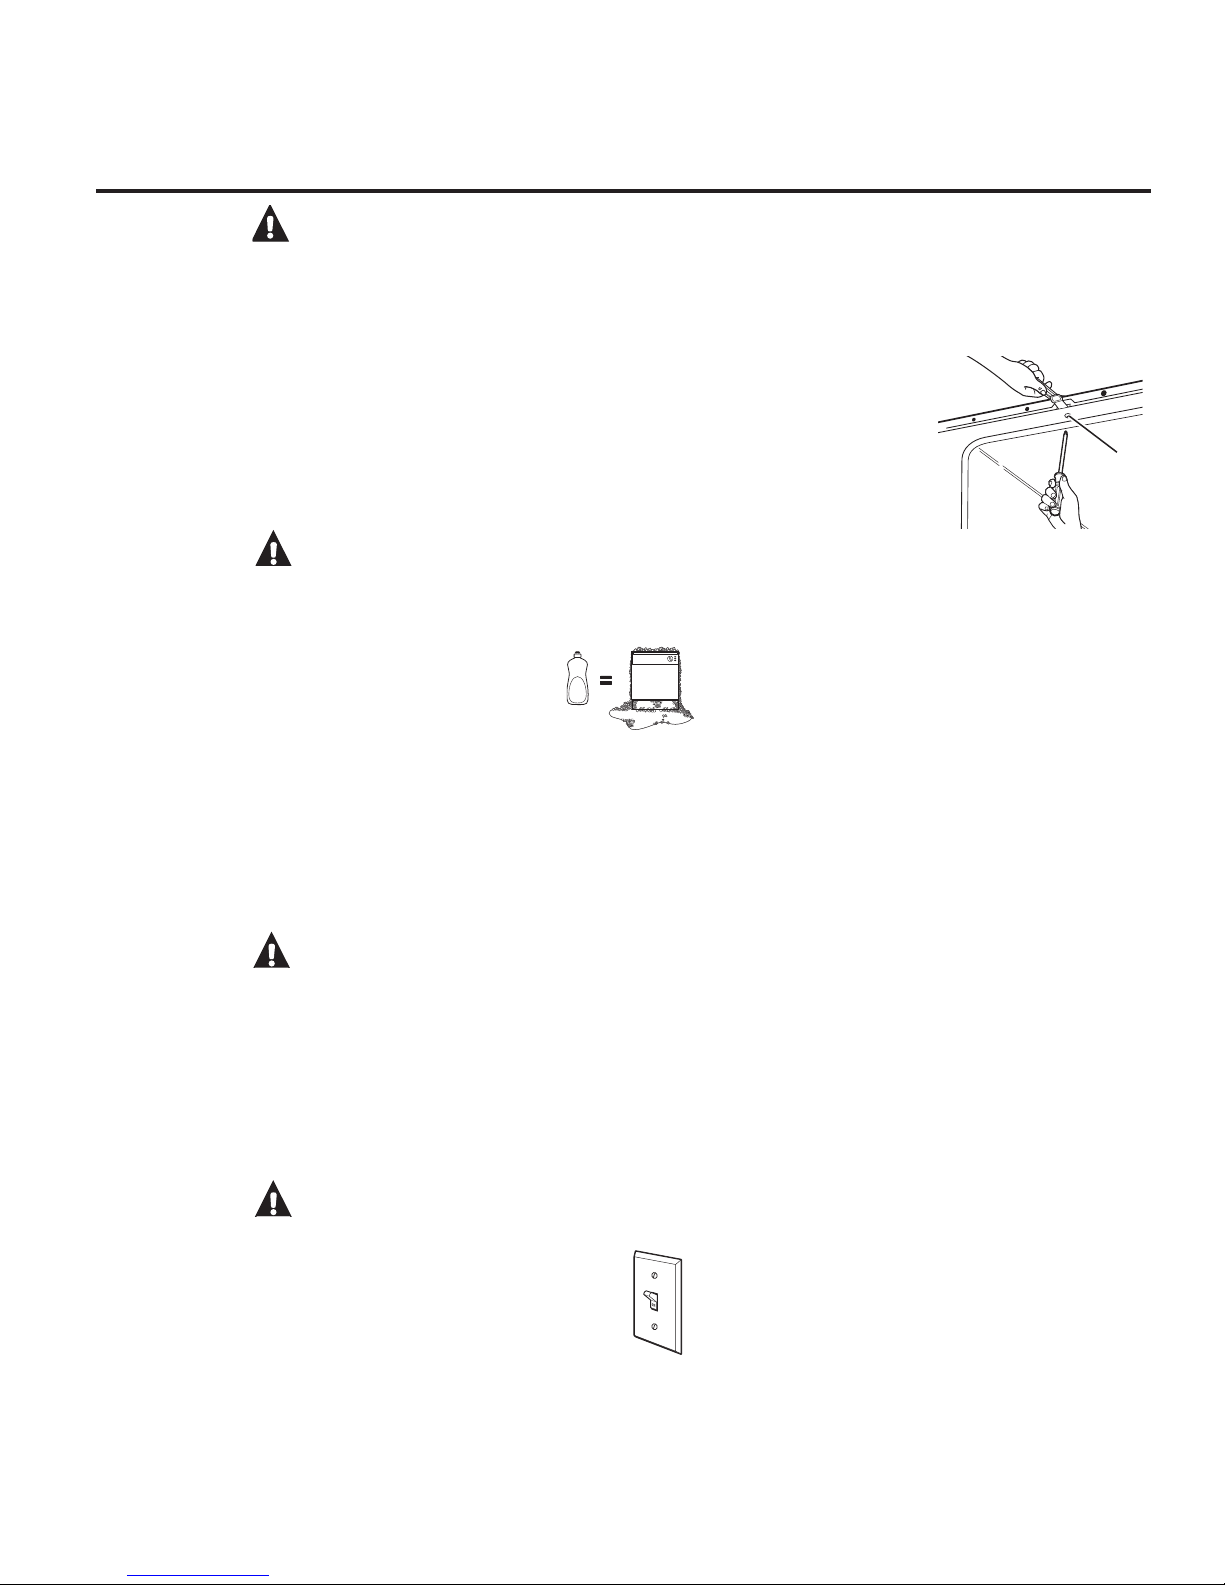
GE Monogram ZBD1850 User manual

Owner’s
Manual
Dishwasher
ZBD1850
ZBD1870
monogram.com

2
Consumer Information
Dishwasher
Your new Monogram dishwasher makes an eloquent statement of style, convenience and kitchen
planning flexibility. Whether you chose it for its purity of design, practical features or assiduous
DWWHQWLRQWRGHWDLO³RUIRUDOORIWKHVHUHDVRQV³\RX·OOILQGWKDW\RXU0RQRJUDPGLVKZDVKHU·VVXSHULRU
blend of form and function will delight you for years to come.
The information on the following pages will help you operate and maintain your dishwasher properly.
If you have any other questions, visit our Website at: monogram.com
Introduction
Contents
Appliance Registration.....................................3, 22, 23
Care and Cleaning................................................. 16–18
Consumer Services................................................... 3, 23
Model and Serial Number Location..........................3
Operating Instructions......................................... 10–15
Control Panel and Operation.......................10-13
Water Temperature................................................. 12
Rinse Agent ................................................................. 12
Detergents................................................................... 13
Dishwasher Racks.............................................14, 15
Problem Solver......................................................... 19–21
Safety Instructions....................................................... 4-9
Warranty ............................................................................ 23

3
Consumer Information
Dishwasher
Before
using
your
dishwasher
Read this manual carefully. It is intended to help
you operate and maintain your new dishwasher
properly.
Keep it handy for answers to your questions.
,I\RXGRQ·WXQGHUVWDQGVRPHWKLQJRUQHHGPRUH
help, there is a list of toll-free consumer service
numbers included on the Consumer Services
page in the back section of this manual.
OR
Visit our Website at: monogram.com
Write
down the
model &
serial
numbers
You can locate your model and serial numbers
on the tub wall just inside the door.
Before sending in the card, please write these
numbers here:
Model Number
Serial Number
Use these numbers in any correspondence or
service calls concerning your dishwasher.
If you
received a
damaged
dishwasher
Immediately contact the dealer (or builder) that
sold you the dishwasher.
Save time
& money
Before you request service, check the Problem
Solver in the back of this manual.
It lists causes of minor operating problems that
you can correct yourself.
If you
need
service
To obtain service, see the Consumer Services
page in the back of this manual.
:H·UHSURXGRIRXUVHUYLFHDQGZDQW\RXWREH
pleased. If for some reason you are not happy
with the service you receive, here are steps to
follow for further help.
FIRST, contact the people who serviced your
appliance. Explain why you are not pleased.
In most cases, this will solve the problem.
NEXT, if you are still not pleased, contact us on
RXUZHEVLWHZULWHDOOWKHGHWDLOV³LQFOXGLQJ\RXU
SKRQHQXPEHU³RUZULWHWR
Manager, Customer Relations
GE Appliances
Appliance Park
Louisville, KY 40225

IMPORTANT SAFETY INFORMATION
5($'$//,16758&7,216%()25(86,1*³
SAVE THESE INSTRUCTIONS
WARNING!
For your safety, the information in this manual must be followed to minimize the risk of fire,
explosion, electric shock, and to prevent property damage, personal injury, or death.
WATER HEATER SAFETY
PROPER INSTALLATION AND MAINTENANCE
This dishwasher must be properly installed and located in accordance with the Installation Instructions
before it is used. If you did not receive an Installation Instructions sheet with your dishwasher, you can
receive one by visiting our Website at GEAppliances.com. In Canada, visit www.GEAppliances.ca.
Connect the dishwasher/appliance to a grounded
metal,permanent wiring system;or run anequipment-
grounding conductor with the circuit conductors and
connect to the equipment-grounding terminal or lead
of the appliance.
Improper connection of the equipment-grounding
conductor can result in a risk of electric shock. Check
with a qualified electrician or service representative
if you are in doubt whether the appliance is properly
grounded.
Dispose of discarded appliances and shipping
or packing material properly.
Do not attempt to repair or replace any part
of your dishwasher unless it is specifically
recommended in this manual. All other servicing
should be referred to a qualified technician.
To minimize the possibility of electric shock,
disconnect this appliance from the power supply
before attempting any maintenance.
NOTE: Turning the dishwasher off does not disconnect
the appliance from the power supply. We recommend
having a qualified technician service your appliance.
WARNING!
Under certain conditions, hydrogen gas may be produced in a water heater that has not been used for two or
more weeks. HYDROGEN GAS IS EXPLOSIVE.
If the hot water has not been used for two or more weeks, prevent the possibility of damage or injury by turning
on all hot water faucets and allowing them to run for several minutes. Do this before using any electrical appliance
connected to the hot water system. This simple procedure will allow any built-up hydrogen gas to escape. Since
the gas is flammable, do not smoke, use an open flame, or use the appliance during this process.
Use this appliance only for its intended purpose
DVGHVFULEHGLQWKLV2ZQHU·V0DQXDO
Do not operate your dishwasher unless all enclosure
panels are properly in place.
Do not store or use combustible materials including
gasoline or other flammable liquids or vapors in the
vicinity of this or any other appliance.
Do not abuse, sit on, hang from, or stand on the door
or dish rack of the dishwasher.
Do not tamper with controls.
Do not wash plastic items unless marked dishwasher
safe or the equivalent. For plastic items not so marked,
FKHFNWKHPDQXIDFWXUHU·VUHFRPPHQGDWLRQV
WARNING! When using your dishwasher, follow basic precautions,
including the following:
WARNING!
4

Door
latch
receiver
Hold nut at top of dishwasher
while removing screw
IMPORTANT SAFETY INFORMATION
5($'$//,16758&7,216%()25(86,1*³
SAVE THESE INSTRUCTIONS
During or after wash cycle, contents may be hot to
the touch. Use care before handling.
Using a detergent that is not
specifically designed for dishwashers
will cause the dishwasher to fill with
suds.
Non-Dishware Items: Do not wash items such as
electronic air cleaner filters, furnace filters and
paint brushes in your dishwasher. Damage to the
dishwasher and discoloration or staining of the
dishwasher may result.
Close supervision is necessary if this appliance is
used by or near children. Do not allow children to
play around the dishwasher when closing the door,
closing the upper rack, or while vertically adjusting
the upper rack due to the possibility of small fingers
being pinched.
Load light-weight, plastic items so they do not
become dislodged and drop to the bottom of the
GLVKZDVKHU³WKH\PLJKWFRPHLQWRFRQWDFWZLWKWKH
heating element and be damaged.
Locate sharp items so that they are not likely to
damage the door seal.
Load sharp knives with the handles up to reduce the
risk of cut-type injuries.
Do not touch the heating element during or
immediately after use.
CAUTION: To prevent minor injury and property damage
CAUTION: ELECTRICAL REQUIREMENTS
This appliance must be supplied with 120V, 60 Hz, and
connected to an individual, properly grounded branch
circuit protected by a 15 or 20 amp circuit breaker or
time-delay fuse.
If the electric supply provided does not meet the
above specifications, it is recommended that a
licensed electrician install an approved electrical
connection.
Your dishwasher circuit should not be used for
any other appliance while the dishwasher is in
operation as the dishwasher requires the full
capacity of the circuit.
,I WKH ZDOO UHFHSWDFOH \RX SOXJ WKH GLVKZDVKHU·V
power cord into is controlled by a switch, turn on
the switch.
READ AND FOLLOW THIS SAFETY INFORMATION CAREFULLY.
SAVE THESE INSTRUCTIONS
If your dishwasher is connected to a wall
switch, ensure that the switch is on prior to
use.
If you choose to turn the wall switch off
between wash cycles, allow 5-10 seconds
after turning the switch on before touching
Start to allow the control to initialize.
Use only powder, Cascade®Platinum Pacs, liquid
detergents or rinse agents recommended for use
in a dishwasher and keep them out of the reach
of children. Cascade®Platinum Pacs Automatic
Dishwashing Detergent, and Cascade®Complete
Rinse Aid rinse agents are recommended for use in
all GE dishwashers.
NOTICE
Junked or abandoned dishwashers are dangerous…even if they will sit for “just a
few days.” If you are getting rid of your dishwasher, please follow the instructions
below to help prevent accidents.
Do not allow children to play with, on, or inside this or any discarded appliance.
Take off the door of the washing compartment or remove the latch by
removing the screw from the latch receiver inside the tub (as shown).
WARNING! RISK OF CHILD ENTRAPMENT
Do not allow children to play with, on, or inside this appliance at any time.
PROPER DISPOSAL OF THE DISHWASHER
5

CONSIGNES DE SÉCURITÉ IMPORTANTES
VEUILLEZ LIRE TOUTES LES CONSIGNES AVANT D’UTILISER
/·$33$5(,/³&216(59(=&(6',5(&7,9(6
AVERTISSEMENT!
Pour votre sécurité, veuillez suivre les directives données dans le présent manuel afin de
réduire au minimum les risques d’incendie, d’explosion et de chocs électriques et prévenir tout
dommage et blessure grave ou mortelle.
SÉCURITÉ DU CHAUFFE-EAU
INSTALLATION ET ENTRETIEN
&HODYHYDLVVHOOHGRLWrWUHFRUUHFWHPHQWLQVWDOOpHQFRQIRUPLWpDYHFOHVGLUHFWLYHVG·LQVWDOODWLRQIRXUQLHV
DYDQWG·rWUHXWLOLVp6LYRXVQ·DYH]SDVUHoXOHVGLUHFWLYHVG·LQVWDOODWLRQDYHFYRWUHDSSDUHLOYRXVSRXYH]
YRXVOHVSURFXUHUHQYLVLWDQWQRWUHVLWH:HEjO·DGUHVVHwww.electromenagersge.ca.
Cet appareil doit être relié à un système
de câblage électrique permanent en métal, mis
à la terre. Sinon, un fil de mise à la terre pour
appareillage doit être installé et raccordé à la borne
RXDXILOGHPLVHjODWHUUHGHO·DSSDUHLO
Un raccordement incorrect du fil de mise à la terre
SHXWSUpVHQWHUXQULVTXHG·pOHFWURFXWLRQ&RQVXOWH]
XQpOHFWULFLHQRXXQWHFKQLFLHQTXDOLILpVLYRXVQ·rWHV
SDVFHUWDLQTXHO·DSSDUHLOHVWFRUUHFWHPHQWPLVjOD
terre.
9HXLOOH]YRXVGpEDUUDVVHUGHODIDoRQDSSURSULpH
de vos vieux électroménagers et des matériaux
G·HPEDOODJHRXG·H[SpGLWLRQ
Ne tentez pas de réparer ou de remplacer une pièce
quelconque de votre lave-vaisselle, à moins que cela
ne soit spécifiquement recommandé dans le présent
manuel. Confiez toutes les autres réparations à un
technicien qualifié.
3RXUUpGXLUHDXPLQLPXPOHVULVTXHVG·pOHFWURFXWLRQ
GpEUDQFKH]O·DSSDUHLOGHVDVRXUFHG·DOLPHQWDWLRQ
DYDQWG·HQHIIHFWXHUO·HQWUHWLHQ
REMARQUE : /HIDLWG·DUUrWHUOHODYHYDLVVHOOH
QHFRXSHO·DOLPHQWDWLRQpOHFWULTXHGHO·DSSDUHLO1RXV
vous recommandons de confier la réparation
de votre électroménager à un technicien qualifié.
AVERTISSEMENT!
'DQVFHUWDLQHVFRQGLWLRQVLOSHXWVHIRUPHUGHO·K\GURJqQHGDQVXQFKDXIIHHDXTXLQ·DSDVpWpXWLOLVpSHQGDQW
deux semaines ou plus. L’HYDROGÈNE EST UN GAZ EXPLOSIF.
6LYRXVQ·DYH]SDVXWLOLVpYRWUHFKDXIIHHDXSHQGDQWGHX[VHPDLQHVRXSOXVRXYUH]WRXVOHVURELQHWVG·HDX
FKDXGHHWODLVVH]FRXOHUO·HDXSHQGDQWSOXVLHXUVPLQXWHVDILQGHUpGXLUHOHVULVTXHVGHGRPPDJHVPDWpULHOVRX
GHEOHVVXUHV3UHQH]FHWWHSUpFDXWLRQDYDQWPrPHG·XWLOLVHUXQpOHFWURPpQDJHUUDFFRUGpDXFKDXIIHHDXSRXU
pOLPLQHUO·K\GURJqQHTXLSRXUUDLWV·\rWUHDFFXPXOpp3XLVTX·LOV·DJLWG·XQJD]LQIODPPDEOHQHIXPH]SDVRX
Q·XWLOLVH]SDVXQHIODPPHQXHRXXQpOHFWURPpQDJHUDXFRXUVGHFHSURFHVVXV
1·XWLOLVH]FHWDSSDUHLOTXHSRXUO·XVDJHSRXUOHTXHO
LODpWpFRQoXFRPPHH[SOLTXpGDQVOHSUpVHQW
manuel.
Ne faite pas fonctionner le lave-vaisselle si tous
OHVSDQQHDX[GHODFDUURVVHULHQ·RQWSDVpWp
correctement réinstallés.
Ne rangez ni n'utilisez des matières combustibles, y
compris de l'essence ou d'autres liquides ou vapeurs
inflammables, à proximité de cet appareil ou de tout autre.
Abstenez-vous de vous asseoir, de vous accrocher ou
de vous tenir sur la porte ou le panier du lave-vaisselle,
RXG·HQIDLUHXQHPSORLDEXVLIGHWRXWHDXWUHPDQLqUH
Ne modifiez pas le fonctionnement des commandes.
1HODYH]SDVOHVDUWLFOHVHQSODVWLTXHjPRLQVTX·LOV
ne portent la mention « Lavable au lave-vaisselle »
RXO·pTXLYDOHQW6LFHUWDLQVDUWLFOHVHQSODVWLTXH
ne portent pas cette mention, reportez-vous aux
recommandations du fabricant.
AVERTISSEMENT! Lors du fonctionnement de votre lave-vaisselle, prenez les
précautions de base, notamment les suivantes :
AVERTISSEMENT!
APPROPRIÉS
6

CONSIGNES DE SÉCURITÉ IMPORTANTES
VEUILLEZ LIRE TOUTES LES CONSIGNES AVANT D’UTILISER
/·$33$5(,/³&216(59(=&(6',5(&7,9(6
Pendant ou après le cycle de lavage, le contenu
peut s'avérer très chaud au toucher. Manipulez-le
avec soin.
/·XWLOLVDWLRQG·XQGpWHUJHQWQRQ
FRQoXSRXUOHVODYHYDLVVHOOHVSHXW
provoquer la formation de mousse.
Articles autres que la vaisselle : ne lavez pas
dans le lave-vaisselle des articles comme des
ILOWUHVGHSXULILFDWHXUG·DLUGHVILOWUHVGHV\VWqPHV
de chauffage ou des pinceaux. Vous pourriez
endommager le lave-vaisselle et provoquer une
GpFRORUDWLRQRXGHVWDFKHVGDQVO·DSSDUHLO
Une surveillance attentive est nécessaire lorsque
cet appareil est utilisé par ou près des enfants.
Ne laissez pas les enfants jouer à proximité du lave-
vaisselle lorsque vous la fermeture de la porte, la
fermeture de la crémaillère supérieure, ou tout réglage
HQKDXWHXUGXSDQLHUVXSpULHXUDILQG·pYLWHUTXHOHXUV
petits doigts se coincent.
Placez les articles légers en plastique de manière
TX·LOVQHVHGpSODFHQWSDVRXQHWRPEHQWSDVDXIRQG
GHO·DSSDUHLO³LOVSRXUUDLHQWHQWUHUHQFRQWDFWDYHF
O·pOpPHQWFKDXIIDQWFHTXLSRXUUDLWOHVHQGRPPDJHU
3ODFH]OHVDUWLFOHVFRXSDQWVGHPDQLqUHjFHTX·LOV
Q·HQGRPPDJHQWSDVOHMRLQWG·pWDQFKpLWpGHODSRUWH
Placez dans le panie r à couverts les couteaux
tranchants le manche vers le haut afin de réduire
les risques de coupures.
1HWRXFKH]SDVjO·pOpPHQWFKDXIIDQWSHQGDQWRX
LPPpGLDWHPHQWDSUqVOHIRQFWLRQQHPHQWGHO·DSSDUHLO
ATTENTION : Pour éviter les blessures mineures ou les dommages matériels
ATTENTION : EXIGENCES ÉLECTRIQUES
Cet appareil électroménager doit être alimenté par
du courant de 120V, 60 Hz, et branchéà un circuit de
dérivation bien mis à la terre, protégé par un fusible à
retardement ou un disjoncteur de 15 ou 20 ampéres.
6LO·DOLPHQWDWLRQpOHFWULTXHIRXUQLHQHUHPSOLW
pas les caractéristiques ci-dessus, nous
vousrecommandons de faire installer par un
électricien qualifié une bonne prise.
Le circuit de votre lave-vaisselle ne doit être
utilisépar aucun autre appareil électroménager
quandle lave-vaisselle fonctionne, car le lave-
vaissellenécessite toute la capacité du circuit.
Si la prise murale dans laquelle vous branchez
OHFRUGRQG·DOLPHQWDWLRQGHYRWUHODYHYDLVVHOOH
est contrôlé par un interrupteur, mettez
cetinterrupteur en position ON (marche).
VEUILLEZ LIRE ET SUIVRE À LA LETTRE CES CONSIGNES DE SÉCURITÉ.
CONSERVEZ CES DIRECTIVES
NOTICE
Si votre lave-vaisselle est branché sur un circuit relié à
XQLQWHUUXSWHXUPXUDODVVXUH]YRXVG·DFWLRQQHUFHOXL
FLDYDQWG·XWLOLVHUYRWUHDSSDUHLO
6LYRXVIHUPH]O·LQWHUUXSWHXUPXUDOHQWUHOHV
cycles de lavage, attendez de 5 à 10 secondes
DSUqVDYRLUUDPHQpO·LQWHUUXSWHXUjPDUFKH
DYDQWG·DSSX\HUVXUODWRXFKHStart (Marche)
pour permettre aux commandes de se réinitialiser.
1·XWLOLVH]TXHOHVGpWHUJHQWVHWDJHQWVGHULQoDJH
liquides, en poudre ou en tablette ou les
Cascade®
Platinum Pacs
recommandés pour les lave-vaisselle et
gardez-les hors de la portée des enfants. Les détergents
pour lave-vaisselle
Cascade®Platinum Pacs
et les
DJHQWVGHULQoDJH
Cascade®Complete Rinse Aid
sont recommandé avec les lave-vaisselle GE.
AVERTISSEMENT! RISQUE DE SUFFOCATION POUR
UN ENFANT COINCÉ À L’INT RIEUR DE L’APPAREIL
1HODLVVH]MDPDLVOHVHQIDQWVMRXHUDYHFVXURXjO·LQWpULHXUGHO·DSSDUHLO
ÉLIMINATION APPROPRIÉE DU LAVE-VAISSELLE
Les lave-vaisselle jetés ou abandonnés sont dangereux… même si vous ne les
laissez là que pour quelques jours. Si vous voulez jeter votre lave-vaisselle, veuillez
suivre les directives ci-dessous pour éviter les accidents.
1HODLVVH]SDVOHVHQIDQWVMRXHUDYHFVXUOHODYHYDLVVHOOHRXjO·LQWpULHXUGH
celui-ci ou de tout autre électroménager mis aux rebuts.
Enlevez la porte du compartiment de lavage ou enlevez le verrou en ôtant le
YLVGXORTXHWjO·LQWpULHXUGHODFXYHFRPPHLOOXVWUp
Porte
loquet
verrou
,PPRELOLVH]O·pFURXVXUOH
dessus du lave-vaisselle
pendant le retrait de la vis.
7

INFORMACIÓN IMPORTANTE DE SEGURIDAD
/($72'$6/$6,16758&&,21(6$17(6'(86$5³
GUARDE ESTAS INSTRUCCIONES
¡ADVERTENCIA!
Para su seguridad, siga las instrucciones de este manual a fin de minimizar riesgos de incendio,
explosión, descargas eléctricas, y para evitar daños en su propiedad, lesiones personales o la
muerte.
SEGURIDAD DEL CALENTADOR DE
AGUA
INSTALACIÓN Y MANTENIMIENTO
Esta lavadora se deberá instalar y ubicar de acuerdo con las Instrucciones de Instalación antes de ser
usada. Si no recibió una ficha de Instrucciones de Instalación con su lavavajillas, podrá acceder a una
visitando nuestro sitio web en GEAppliances.com.
Conecte el lavavajillas/ electrodoméstico a un
sistema de cableado de metal permanente con
conexión a tierra o se debe tender un conducto
para la conexión a tierra del equipo con los
conductores del circuito y conectado al terminal de
tierra del equipo o al conductor de suministro del
electrodoméstico.
Una conexión inapropiada del conductor de
conexión a tierra del equipo puede provocar riesgos
de descargas eléctricas. Consulte a un electricista
calificado o personal del servicio técnico si tiene
dudas de que el electrodoméstico se encuentre
conectado a tierra apropiadamente.
Deshágase de forma correcta de electrodomésticos
y materiales de envío o embalajes descargados.
No intente reparar o reemplazar ninguna parte
de la cocina, a menos que se lo recomiende
específicamente en este manual. Cualquier otra
reparación deberá ser realizada por un técnico
calificado.
A fin de minimizar la posibilidad de descargas
eléctricas, desconecte este electrodoméstico del
suministro de corriente antes de intentar cualquier
mantenimiento.
NOTA: Apagar el lavavajillas no desconecta el
electrodoméstico del suministro de corriente.
Le recomendamos que el servicio técnico de su
electrodoméstico sea realizado por un técnico
calificado.
¡ADVERTENCIA!
Bajo ciertas condiciones, se podrá producir gas de hidrógeno en un calentador de agua que no fue usado por
dos semanas o más. EL GAS DE HIDRÓGENO ES UN EXPLOSIVO.
Si el agua caliente no se usó durante dos semanas o más, evite la posibilidad de daño o lesión abriendo todos
los grifos de agua caliente y permitiendo que el agua corra durante varios minutos. Haga esto antes de usar
cualquier artefacto eléctrico que esté conectado al sistema de agua caliente. Este procedimiento simple
permitirá el escape de cualquier gas de hidrógeno acumulado. Debido a que el gas es inflamable, no fume, no
use una llama abierta ni use el electrodoméstico durante este proceso.
Use este electrodoméstico sólo para su propósito
original, como se describe en el Manual del Propietario.
No use su lavavajillas a menos que todos los paneles
de cercamiento estén correctamente en sus lugares.
No guarde ni use materiales combustibles, incluyendo
gasolina u otros líquidos o vapores inflamables cerca
de éste o de otros electrodomésticos.
No abuse, no se siente, no se sostenga ni se pare
sobre la puerta o la bandeja del plato del lavavajillas.
No manipule indebidamente los controles.
No lave productos de plástico, a menos que
contengan una marca de seguridad en lavavajillas
o su equivalente. Cuando se trate de productos de
plástico que no estén marcados de esta manera,
consulte las recomendaciones del fabricante.
Al usar su lavavajillas, siga las precauciones básicas,
incluyendo lo siguiente:
ADECUADOS
¡ADVERTENCIA!
¡ADVERTENCIA!
8

Puerta
traba
dentro
Al retirar el tornillo, sostenga
la tuerca en la parte superior
del lavavajillas.
PRECAUCIÓN: A fin de evitar lesiones menores y daños sobre la propiedad
INFORMACIÓN IMPORTANTE DE SEGURIDAD
/($72'$6/$6,16758&&,21(6$17(6'(86$5³
GUARDE ESTAS INSTRUCCIONES
Durante o después del ciclo de lavado, es posible
que los contenidos estén calientes al tacto. Tenga
cuidado antes de tomar los mismos.
El uso de un detergente que no esté
diseñado específicamente para
lavavajillas hará que este último se
llene de agua con jabón.
Productos que no sean utensilios: no lave artículos
tales como filtros electrónicos de limpieza
con aire, filtros de horno y brochas de pintura
en su lavavajillas. Se podrán producir daños,
descoloración o manchas sobre el lavavajillas.
Se deberá estar especialmente atento si el
electrodoméstico es usado por niños o se encuentra
cerca de los mismos. No permita que los niños
jueguen alrededor del lavavajillas cerrar la puerta,
cerrar la bandeja superior, o mientras verticalmente
ajustando la rejilla superior debido a la posibilidad
de que sus dedos pequeños sean presionados.
Cargue artículos de plástico livianos, de modo
que no sean desplazados ni caigan al fondo del
lavavajillas – es posible que entren en contacto con
el calentador y sean dañados.
Ubique artículos puntiagudos de modo que no
haya posibilidades de daños sobre el sellador de la
puertal.
Cargue los cuchillos puntiagudos con los mangos
hacia arriba, a fin de reducir el riesgo de lesiones
por cortes.
No toque el elemento de calefacción durante o
inmediatamente después del uso.
PRECAUCIÓN: REQUISITOS ELÉCTRICOS
Este electrodoméstico deberá ser provisto con 120V,
60 Hz, y estar conectado a un circuito individual
correctamente conectado a tierra, protegido por un
disyuntor o fusible de retardo de 15 o 20 amp.
Si el suministro de corriente provisto no cumple
con las especificaciones anteriores, se recomien-
da que un electricista matriculado instale un
conexiones eléctricas aprobado.
Su circuito del lavavajillas no debería ser usado
para ningún otro electrodoméstico mientras el la-
vavajillas está funcionando, ya que éste requiere
toda la capacidad del circuito.
Si el receptáculo de pared en el cual enchufa el
cable de corriente del lavavajillas es controlado
por un interruptor, encienda este último.
GUARDE ESTAS INSTRUCCIONES
Si el lavavajillas está conectado a un
tomacorriente de pared, asegúrese de que
el interruptor esté encendido antes del uso.
Si decide apagar el interruptor entre ciclos
de lavado, espere entre 5 y 10 segundos
luego de encender el interruptor antes de
presionar Start (Iniciar) para permitir que el
control se inicie.
Use sólo polvo, Cascade® Platinum Pacs, detergentes
líquidos o agentes de enjuague recomendados para
uso con un lavavajillas y mantenga los mismos
fuera del alcance de los niños. El Detergente para
Lavavajillas Automáticos Cascade® Platinum
Pacs, y los agentes de enjuagues Cascade®
Complete Rinse Aid se recomiendan para su uso
en todos los lavavajillas de GE.
AVISO
Los lavavajillas tirados o abandonados son peligrosos…incluso aunque se
conserven por “sólo unos pocos días”. Si se deshará de su lavavajilla, siga las
siguientes instrucciones a fin de evitar accidentes.
No permita que los niños jueguen con, en, o dentro de éste o cualquier
electrodoméstico que haya descartado.
Retire la puerta del compartimiento de lavado o quite la traba, retirando lo
tornillo del receptor de la traba dentro de la tina (como se muestra).
¡ADVERTENCIA! RIESGO DE QUE UN NIÑO QUEDE
ATRAPADO
No permita que los niños jueguen con, en, o dentro de éste o cualquier electrodoméstico que haya descartado.
FORMA ADECUADA DE DESCARTAR EL LAVAVAJILLAS
LEA Y SIGA ESTA INFORMACIÓN DE SEGURIDAD
CUIDADOSAMENTE.
9

Dishwasher
Control Panel
ON
OFF
DELAY
HOURS
CYCLE
SELECT
1 - 24 HR.
LOW RINSE AID
HEAVY NORMAL
LIGHT GLASSES AIR-DRY SPEED RINSE
CLEAN
ON/OFF With door open, press ON/OFF button to turn the unit ON to begin operation and OFF at the end
of a wash cycle. The ON/OFF light is displayed when the dishwasher is ON.
WASH CYCLE Press CYCLE SELECT button to choose wash cycle. The light under the cycle name will display to
SELECTIONS indicate which cycle has been selected.
NOTE: All cycle times and water usage information contained in this section are approximate
values. Actual results will depend on several factors including, but not limited to, inlet water
temperature and household water pressure.
HEAVY 6.2 gallons, 125 minutes
This cycle is meant for heavily soiled dishes or cookware with dried-on or baked-on soils. This
cycle may not remove burned-on foods. Everyday dishes are
safe to be used in this cycle. This cycle also includes heated dry.
NORMAL 4.6 gallons, 90 minutes
This cycle is meant for loads of everyday dishes, glasses and cookware with medium soils that
have not been pre-rinsed. This cycle also includes heated dry.
LIGHT 4.4 gallons, 85 minutes
This cycle is meant for loads of everyday dishes, glasses and cookware with light soils that have
been pre-rinsed. This cycle also includes heated dry.
GLASSES 3.5 gallons, 65 minutes
This cycle is meant for lightly soiled glassware. This cycle has less heating during the wash and
rinse to protect your glassware. This cycle also has a lower temperature heated dry.
AIR-DRY 3.5 gallons, 50 minutes
This cycle is meant for loads of everyday dishes, glasses and cookware with light soils that have
been pre-rinsed and should air dry naturally. This cycle does not include heated dry.
SPEED 5.3 gallons, 80 minutes
This cycle is meant for loads of everyday dishes, glasses and cookware with medium soils that
have not been pre-rinsed. This cycle features reduced wash times to allow for faster cycle
completion. This cycle also has a reduced time heated dry.
RINSE 1 gallon, 10 minutes
For rinsing partial loads that will be washed later. Do not use detergent with this cycle. This cycle
does not include heated dry.
1
2
1
23
5
10
5

Dishwasher
Control Panel
DELAY HOUR This option allows you to delay the start of a wash cycle for up to 24 hours.
SELECTION With the door open, turn the dishwasher ON by pressing the ON/OFF button; then press DELAY
HOURS button to choose the number of hours you want to delay the start of the wash cycle. The
hours will show in the display window.
NOTE: To cancel the DELAY HOURS option before the start of the cycle, repeatedly press the
DELAY HOURS button until the display is blank or reads “00.”
STARTING After selecting the wash cycle (Step 2) and delay hours (Step 3), if desired, close the door of the
A CYCLE dishwasher to start the cycle or begin the DELAY HOURS countdown. When the cycle starts, the
drain begins and approximately 60 seconds later the water fill begins.
STATUS
INDICATORS
LOW RINSE
AID The red light will display when the rinse aid dispenser needs to be refilled with liquid rinse aid. Use
of
Cascade® Complete Rinse Aid
removes spots and prevents new film buildup on your
dishes, glassware, flatware, cookware and plastics. See page 12 for instructions on refilling the
rinse aid dispenser.
CLEAN The green light will display and a beep will sound to alert you that the wash cycle is complete.
3
4
5
11

Using the Dishwasher
Dishwasher
Check
the Water
Temperature
The entering water should be at least 120°F
and
not more than 150°F for effective cleaning
and to prevent dish damage. Check the water
temperature with a candy or meat thermometer.
Turn on the hot water faucet nearest the
dishwasher, place the thermometer in a glass and
let the water run continuously into the glass until
the temperature stops rising.
Use a
Rinse
Agent
A rinse agent improves dry performance, reduces
spots and prevents new film buildup
on your dishes, glasses, flatware, cookware
and plastic. Cascade® Complete Rinse Aid
is recommended rinse agents for Monogram
Dishwashers.
Filling the Dispenser
The rinse agent dispenser holds 3.5 oz. of rinse
agent. Under normal conditions, this will last
approximately one month. Try to keep it full,
but do not overfill.
1. Make sure the dishwasher door is fully open.
2. Turn the dispenser cap to the left and
lift it out.
3. Add rinse agent until the indicator window
looks full.
4. Clean up any spilled rinse agent with a
damp cloth.
5. Replace the dispenser cap.
Rinse Aid Setting
The amount of rinse agent released into the final
wash can be adjusted. The factory setting is at the
midpoint. If there are rings of calcium (hard water)
spots on dishes, try a higher setting. If you observe
foam in the final rinse, try a lower setting.
To adjust the setting, remove the dispenser
knob; then turn the adjuster counterclockwise to
increase the amount of rinse agent or clockwise
to reduce the amount of rinse agent dispensed.
M
i
n
M
a
x
Indicator
Dispenser cap
Adjustable setting
Dish
Preparation
Prior to
Loading
•No pre-rinsing of normal food soil is required if using
Heavy, Normal or Speed wash cycles.
•Scrape off hard soils, bones, toothpicks, skins and seeds.
•Remove large quantities of any remaining food.
•Remove leafy vegetables, meat, trimmings and
excessive amounts of grease or oil.
12

Use only detergent specifically made for use
in dishwashers. Cascade®Platinum Pacs are
recommended. Powders, liquids and gels may
also be used but may not work as effectively.
.HHS\RXUGHWHUJHQWIUHVKDQGGU\'RQ·WSXW
GHWHUJHQWLQWRWKHGLVSHQVHUXQWLO\RX·UHUHDG\WR
wash dishes.
The amount of detergent to use depends on
whether your water is hard or soft. With hard
water, you need extra detergent. With soft water,
you need less detergent.
Protect your dishes and dishwasher by contacting
your water department and asking how hard your
water is. Twelve or more grains is extremely hard
water. A water softener is recommended. Without
it, lime can build up in the water valve, which could
stick while open and cause flooding. Too much
detergent with soft water can cause a permanent
cloudiness of glassware, called etching.
Use the information in the table below as a
guideline to determine the amount of automatic
dishwasher detergent to place in the dispenser.
When using automatic dishwasher detergent
tablets, simply place one tablet in the dispenser
and close the cover.
Do not use hand dish detergent.
NOTE: Using a detergent that is not specifically
designed for dishwashers will cause the
dishwasher to fill with suds. During operation,
these suds will spill out of the dishwasher
vents, covering the kitchen floor and making
the floor wet.
Because so many detergent containers look alike,
store the dishwasher detergent in a separate
space from all other cleaners. Show anyone who
may use the dishwasher the correct detergent
and where it is stored.
While there will be no lasting damage to the
dishwasher, your dishes will not get clean using
a dishwashing detergent that is not formulated
to work with dishwashers.
Detergents
Button
To open the wash cover, press the button and the cover will flip back.
Using the Dishwasher
Dishwasher
Detergent Cups to Fill
15 cup
25 cup
15 and 25 cups
15, 25 cups and
the open cup
Number
of Grains
Less than 4
4 to 8
8 to 12
Greater than 12
Open
cup
For heavily-soiled loads, use the Heavy cycle and add a little
extra detergent.
Forget
to add
a dish?
A forgotten dish can be added any time before the
main wash.
1. Unlatch the door to interrupt the cycle. Pull door handle
to release the door.
2. Do not open the door until the water/spray action
stops. Steam may rise out of the dishwasher.
3. Add forgotten dishes.
4. Close the door and push it in to re-latch.
13

Upper Rack
The upper rack is for glasses, cups and saucers.
This is also a secure place for dishwasher-safe
plastics. A cup shelf may be placed in the up
or down position to add flexibility. The upper
rack is good for all kinds of odd-shaped utensils.
Saucepans, mixing bowls and other items should
be placed face down.
Secure larger dishwasher-safe plastics over two
tines when possible.
Make sure small plastic items are secure so they
can’t fall onto the heater.
Be sure that items do not protrude through the
bottom of the rack and block rotation of the
middle spray arm. This could result in poor wash
performance for items in the upper rack.
For best dishwashing results, follow these
loading guidelines. Features and appearance
of racks and silverware baskets may vary from
your model.
Lower Rack
When loading the lower rack, do not load large
platters or trays in the front left corner. They may
prevent detergent from circulating during the wash
cycle.
The lower rack is best used for plates, saucers
and cookware. Large items should go along the
sides. Load platters, pots and bowls along the
sides, in corners or in the back. The soiled side
of items should face the center of the rack.
Be careful not to let a portion of any item, such as
a pot or dish handle, extend through the bottom
rack. This could block the wash arm and cause
poor washing results.
Loading the Racks
Dishwasher
The Wine Glass Holder secures wine glasses
for best washability. You may also remove the
silverware basket to allow for all glasses loading
of the lower rack.
Wine Glass
Holder
14

Silverware
Basket
The silverware basket may be used without
the topper for quick loading. With the topper,
flatware is better positioned for the dishwasher to
thoroughly wash and dry all pieces by preventing
nesting.
Without the Topper
Put the flatware in the removable basket with
fork and knife handles up to protect your hands.
Place spoons in the basket with handles down.
0L[NQLYHVIRUNVDQGVSRRQVVRWKH\GRQ·WQHVW
together. Distribute evenly. Small plastic items,
such as measuring spoons and lids from small
containers, should go in the bottom of the
silverware basket with silverware on top.
With the Topper
Place small plastic items, such as measuring
spoons and lids from small containers, in the
bottom of the basket and snap the topper in
place. Insert spoons and forks, handles first,
through the holes in the topper. Place knives,
blades first, through the holes in the topper.
Loading the Racks
Dishwasher
15

Care and Cleaning
Dishwasher
Exterior
Cleaning the Door Panel
Before cleaning the front panel, make sure you
know what type of panel you have. Refer to the
last two letters of your model number. You can
locate your model number on the left-hand tub
wall just inside the door. If your model number
ends with SS, then you have a Stainless Steel door
panel.
Follow the instructions below for cleaning the door
panel for your specific model.
Stainless Steel Door Panel (model numbers
ending in SS)
The stainless steel panels can be cleaned with
Stainless Steel Magic or a similar product using
a clean, soft cloth. Do not use appliance wax,
polish, bleach or products containing chlorine on
Stainless Steel doors.
You can order Stainless Steel Magic #WX10X29
through GE Parts by calling 800.626.2002.
Cleaning the Control Panel
To clean the control panel, use a lightly dampened
cloth; then dry thoroughly. Do not use sharp
objects, scouring pads or harsh cleaners on the
control panel.
16

Care and Cleaning
Dishwasher
Spray Arms
and Filters
The dishwasher will flush away all normal food
soils. However, objects (fruit pits, bones, etc.)
may collect in openings and should be removed
occasionally to avoid clogging the drain system.
CAUTION:Personal injury hazard.
Before cleaning the interior, wait at least 20
minutes after a cycle for the heating element
to cool down. Failure to do so could result in
burn injuries.
Cleaning the Spray Arms
Because hard water chemicals will clog the spray
arm jets and bearings, it is necessary to clean the
spray arms regularly. To remove the spray arm,
twist the retaining nut 90 degrees and pull the
spray arm off the shaft.
Wash the arms in soapy, warm water and use a
soft brush to clean the jets. Replace them after
rinsing thoroughly.
Cleaning the Filters
For best performance and results, the filter
assembly must be cleaned regularly. The filter
efficiently removes food particles from the wash
water, allowing water to be recirculated during
the cycle. For this reason, it is a good idea to
remove the large food particles trapped in the
filter frequently by rinsing the main filter and
cup under running water. To remove the filter
assembly, pull up on the cup handle. The entire
filter assembly should be cleaned at least once
a month. To clean the main filter and fine filter,
use a cleaning brush. Then, reassemble the filter
parts as shown in the illustration and reinsert the
entire assembly in the dishwasher, positioning it
in place and pressing downward. The dishwasher
must never be used without the filters. Improper
replacement of the filter may reduce the
performance level of the appliance and may
damage dishes and utensils.
Retaining
nut
Washer
Retaining nut
Upper rack
Main filter
Fine filter
Cup
17

Care and Cleaning
Dishwasher
Protect
Against
Freezing
If your dishwasher is left in an unheated place
during the winter, ask a service technician to:
1. Cut off electrical power to the dishwasher.
Remove fuses or trip circuit breaker.
2. Turn off the water supply and disconnect the
water inlet line from the water valve.
3. Drain water from the water inlet line and water
valve. (Use a pan to catch the water.)
4. Reconnect the water inlet line to the water
valve.
Does Your
Dishwasher
Have an Air
Gap?
An air gap protects your dishwasher against water
backing up into it if a drain clogs. The air gap is not
a part of the dishwasher. It is not covered by your
warranty. Not all plumbing codes require air gaps,
so you may not have one.
The air gap is easy to clean.
1. Turn off the dishwasher and lift off the chrome
cover.
2. Remove the plastic cap and clean with
a toothpick.
Stainless
Steel
,QWHULRU³
Tub and
Inner Door
The stainless steel used to make the dishwasher
tub and inner door provides the highest
reliability available in a Monogram dishwasher.
If the dishwasher tub or inner door should be
scratched or dented during normal use,
they will not rust or corrode. These surface
blemishes will not affect their function
or durability.
Check the air gap any time your dishwasher
LVQ·WGUDLQLQJZHOO
Two types of
air gaps
18

PROBLEM POSSIBLE CAUSE WHAT TO DO
Noise Some of the sounds you •Detergent cup opening.
will hear are normal •The motor starting during the drying period.
•Water draining out of the tub immediately
after you start the dishwasher.
Utensils are not secure •Make sure everything is secured in
in the rack or something dishwasher.
small has dropped into
the rack
Motor hums •Dishwasher has not been used on a regular
basis. If you do not use your dishwasher
often, set it to fill and pump out once every
week. This will help keep the seal moist.
•Dishwasher control was not advanced properly
to the start of the desired cycle. Advance the
control to the start of the desired cycle.
Detergent left in Dishes are blocking the •Reposition the dishes.
dispenser cups detergent cups
Water standing in the Drain is clogged •If you have an air gap, clean it.
bottom of the tub •Check to see if your kitchen sink is draining
well. If not, you may need a plumber.
•If the dishwasher drains into a disposer, run
disposer clear.
This is normal •A small amount of clean water around the
outlet of the tub bottom at the back of the
tub keeps the water seal lubricated.
Suds in the tub Correct detergent •Use only automatic dishwasher detergents
ZDVQ·WXVHG WRDYRLGVXGVLQJCascade®dishwashing
detergents have been approved for use
in all Monogram dishwashers.
•To remove suds from the tub, open the
dishwasher and let suds evaporate.
Rinse agent was spilled •Always wipe up rinse agent spills
immediately.
Stained dishwasher Detergent with colorant •Some detergents contain colorant (pigment
parts was used or dyes) that will discolor the tub interior with
extended use. Check the detergent cup for signs
of any discoloration. If cup is discolored, change
to detergent without any colorant. Cascade®
dishwashing detergents have been approved
for use in all Monogram dishwashers.
Some tomato-based foods •Use of the RINSE ONLY cycle after adding
can stain the dish to the load can decrease the level
of staining.
Before You Call For Service
Dishwasher
Questions?
Use this
problem
solver
19

Questions?
Use this
problem
solver
PROBLEM POSSIBLE CAUSE WHAT TO DO
Dishes and flatware Low inlet water •Make sure inlet water temperature is correct
not clean temperature (see page 12).
Water pressure is •Turn on a faucet. Is water coming out more
temporarily low slowly than usual? If so, wait until pressure is
normal before using your dishwasher.
Air gap is clogged • Clean the air gap.
Improper rack loading •Make sure large dishware does not block the
detergent dispenser or the wash arms.
No air gap or high •Verify that you have an air gap or a high drain
drain loop loop. Refer to the Installation Instructions.
Filter needs cleaning •The filter assembly must be cleaned regularly
to allow the filter to efficiently remove food
particles from the wash water. See Cleaning
the Filter section on page 17.
Spots and filming on •Use Cascade® Complete Rinse Aid to
glasses and flatware remove spots and prevent new film
buildup.
•
Make sure water temperature is at least 120°F.
•
Load dishwasher as shown in the Loading the
Dishwasher Racks section.
•
Make sure detergent is fresh.
•
If water is extremely hard, a water softener may
be required.
Cloudiness on glassware Combination of soft water •This is called etching and is permanent.
and too much detergent To prevent this from happening, use less
detergent if you have soft water. Wash
glassware in the shortest cycle that will
get it clean.
Water temperature •Lower the water heater temperature.
entering the dishwasher
exceeds 150°F
Black or gray marks Aluminum utensils have •Remove marks with a mild, abrasive
on dishes rubbed against dishes cleaner.
Yellow or brown film Tea or coffee stains •Remove the stain by hand, using a solution
on inside surfaces of 1/2 cup bleach and 3 cups warm water.
WARNING:Before cleaning
interior, wait at least 20 minutes after a cycle
for the heating element to cool down. Failure
to do so can result in burns.
An overall yellow or brown •A special filter in the water supply line
film can be caused by iron is the only way to correct this problem.
deposits in water Contact a water softener company.
Extremely hard water
Low inlet water temperature
Overloading the dishwasher
Improper loading
Old or damp powder
detergent
Rinse agent dispenser empty
Too little detergent
Before You Call For Service
Dishwasher
20
Other manuals for Monogram ZBD1850
2
This manual suits for next models
1
Table of contents
Other GE Dishwasher manuals