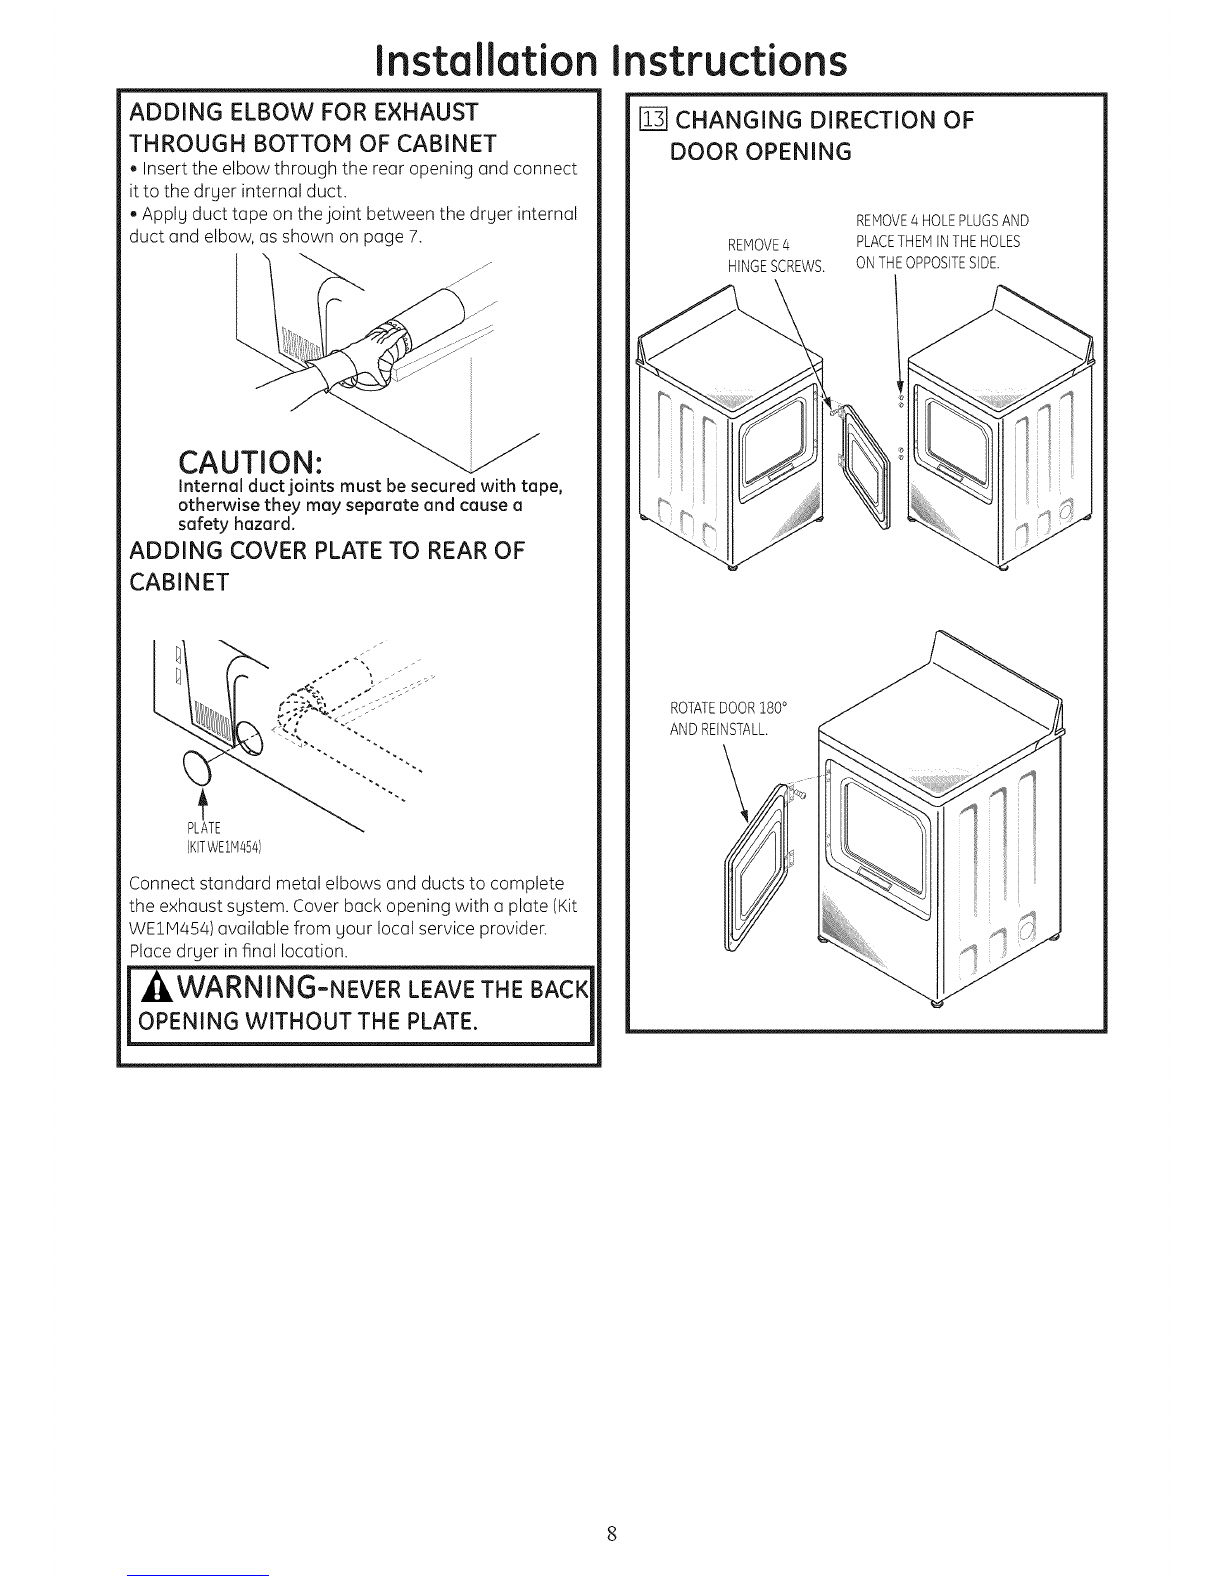
Installation
Instructions Gas Drger
Questions on installation? Call: 1-800-GECARES (US)
or Visit ou r Web site at: www.GEAppliances.com (US)
BEFOREYOU BEGIN
Read these instructions completely and
carefully.
•IMPORTANT- Save these instructions for
local inspector's use.
•IMPORTANT- Observe all governing codes
and ordinances.
• Note to Installer - Besureto leavethese
instructionswith thecustomer.
• Note to Customer - Keep these instructions
with gour Use and Care Book for future
reference.
• Before the old drger is removed from service or
discarded, remove the drger door.
• Inspect the drger exhaust outlet and straighten
the outlet walls if theg are bent.
•Service information and the wiring diagram
are located in the control console.
• Do notallow children on or in the appliance.
Close supervisionof children is necessarg when
the applianceis used near children.
• Install the drgerwhere the temperatureis
aboveSO°Ffor satisfactorg operationof the
drger controlsgstem.
WARNING RBKOFFIRE
To reducethe riskof severeinjurgor death,followall installation instructions.
Clothesdrger installationmust beperformedbg aqualified installer.
Installthe clothesdrger according tothese instructionsand in accordancewith local
codes.Inthe absenceof localcodes,installationmust comptgwith NationalFuelGas
Code,ANSIZ225.1/NFPA54or the CanadianNaturalGasandPropaneInstallationCode,
CSAB149.1.
ColifomioSafeDrinkingWaterond ToxicEnforcementAct.
Thisact requiresthe governorof Californiato publisha listof substancesknownto the
state to causecancer,birth defectsor other reproductiveharm and requiresbusinesses
to warncustomersof potential exposureto suchsubstances.Gasappliancescan
cause minorexposureto four of these substances,namelg benzene,carbon monoxide,
formaldehgdeand soot, causedprimaritg bgthe incompletecombustion of natural gas
or LPfuels.Properlgadjusted drgerswilt minimizeincomplete combustion.Exposure
to thesesubstancescan be minimizedfurther bg properlgventingthe drger to the
outdoors.
Thisdrger mustbeexhaustedto the outdoors.
Useonlg 4"rigid metalducting for exhaustingthe clothesdrger to the outdoors.
DONOTinstall a clothesdrger with flexibleplasticducting materials.Ifflexible metal
(semi-rigidor foit-tgpe)duct isinstalled,it must be ULlistedand installedinaccordance
with the instructions found in "ConnectingTheDrgerTo HouseVent"on page6 ofthis
manual.Flexibleventing materialsare knownto collapse,beeasilgcrushed,andtrap
lint.Theseconditionswiltobstructdrger airflow andincreasethe riskoffire.
Donot installor storethisappliance in anglocationwhereit could beexposedto water
and or weather.
Drgersinstalled in residentialgaragesmust beelevated 18"(46cm)abovethe floor.
Savetheseinstructions.(Installers:Besureto leavetheseinstructionswith the
customer).
in the state of Massachusetts,installation must be performed bya qualifiedor
licensedcontractor, plumber, or gasfitter qualified or licensedby the state.
TOOLSYOU
WILLNEED
(x2)
IO"ADJUSTABLEWRENCHES _.
8"PIPEWRENCH LEVEL
SLIPJOINTPLIERS FLATBLADESCREWDRIVER
MATERIALSYOUWILLNEED
4"DIA.METALDUCT I====_
(RECOMMENDED)
4"DIAMMETALELBOW
4"DIA.FLEXIBLEMETAL(SEMI-RIGID)
ULLISTEDTRANSITIONDUCT
(IFNEEDED)
KITWXO8X10077(INCLUDES2ELBOWS) 4"DUCTCLAMPS
4"SPRINGCLAMPS
4"DIA.FLEXIBLEMETAL(FOILTYPE) _(x2)
ULLISTEDTRANSITIONDUCT
(IFNEEDED.)
PIPE
EXHAUSTHOOD COMPOUND
DUCTTAPE
FLEXIBLEGASLINECONNECTOR
SOAPSOLUTION
FORLEAKDETECTION
SAFETYGLASSES
GLOVES
Step 1
Step 2
Step 3
Verifg Your Gas Installation (seesection 2).
Prepare the Area and Exhaust for Installation of
New Drger (seesection 1).
Check and Insure the Existing External Exhaust
is Clean (seesection 1)and Meets Attached
Installation Specifications (seesection 6).
Step 4 Remove the Foam Shipping Pads(seesection 1).
Step 5 Move the Drger to the Desired Location.
Step 6 LevelYour Drger (seesection 8).
Step 7 Connect the Gas Supplg (seesection 3) and check
for leaks (seesection 4).
Step 8 Connect the External Exhaust (seesection 7).
Step 9 Connect the Power Supplg (seesection 5).
Step 10 Check the Operation of the Power Supplg, Gas
Connections, and Venting.
Step 11 Place the Owners Manual and the Installation
Instructions in a Location Where Theg Will Be
Noticed Bg the Owner.
For Alcove or Closet Installation see section 9.
For Bathroom or Bedroom Installation see section 10.
For Mobile or Manufactured Home see section 11.
234Dll13PO02 31-16225-1 07/08/10 GE