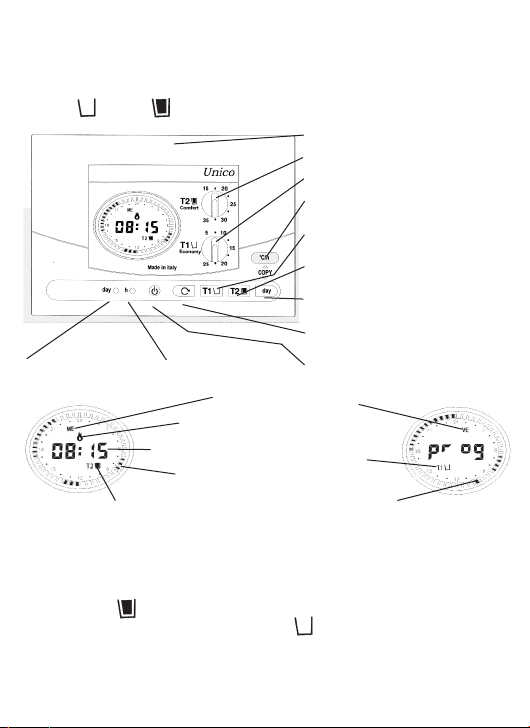
Geca Tecno Control Unico Installation manual

CRONO ERMOS A O A DUE EMPERA URE
cHronotHermostat WitH tWo temPeratures
IS RUZIONI PER L’USO E L’INS ALLAZIONE
Programming instructions and installation guide
Unico
Unico 2009_Unico 2009 27/11/09 14:08 Pagina 1

Unico
l'insostituibile/the unreplaceable
DESCRIZIONE GENERALE
Unico è il cronotermostato elettronico giornaliero e settimanale che
permette di programmare la temperatura della casa, ad intervalli di
mezz'ora, per tutta la giornata e per tutti i giorni della settimana.
Con Unico è infatti possibile decidere quando avere in casa una
temperatura accogliente (T2 ) che chiameremo “Comfort”, e
quando risparmiare sulle spese di riscaldamento impostando la
temperatura “Economy” (T1 ).
Unico visualizza in ogni istante il programma giornaliero delle tem-
perature impostato, I’accensione del carico collegato, I’ora attuale o
la temperatura ambiente.
Unico, conformemente al D.P.R.412 (legge 10), evita gli sprechi di
energia azionando l'impianto di riscaldamento o condizionamento
solo quando serve.
GENERAL DESCRIPTION
The Unico daily and weekly electronic chronothermostat allows you
to program the temperature in your house for each half an hour of
the day and each day of the week.
In fact with Unico you can decide when to have in your house a wel-
come temperature (T2 ) called “comfort”, and when to save on
heating costs setting up an “economy” temperature (T1 ).
You can see on Unico the temperature daily programme, the igni-
tion of the connected load, the present hour or room temperature.
Unico avoids the waste of energy operating the heating and condi-
tioning system only when it is necessary.
Unico 2009_Unico 2009 27/11/09 14:08 Pagina 2

COLLEGAMENTO ELETTRICO
POWER CONNECTION
Nel caso di collegamento a forti carichi induttivi (pompe o mo-
tori), si consiglia di collegare un filtro RC in parallelo al carico.
In case of connection with strong inductive loads (pumps or mo-
tors), it is advisable to connect an RC filter parallel to the load.
INSTALLAZIONE
Unico può essere installato direttamente su scatola da incasso 3
moduli (installazione a semincasso) oppure su parete. In entrambi i
casi l'altezza consigliata è di 1,5m dal pavimento, in luogo asciutto,
esente da correnti d'aria e lontano da fonti di calore.
INSTALLATION
Unico can be directly installed on a 3 module recess box (semi-re-
cessed installation) or on the wall. In either cases, it is advisable to
position it at a height of 1,5 meters from the wall, in a dry place,
away from draughts and heat sources.
Collegamento con bruciatore,
caldaia murale, impianto di
condizionamento, valvola di
zona con ritorno a molla:
Connection to burner, wall-
mounted boiler, air-conditioning
system, spring-return zone
valve:
Collegamento con valvola di
zona:
Connection to zone valve :
Fig. 1
FN
CNC
Unico
FN
NA
no CNC
Unico
APRE
oPen
CHIUDE/close
NA
no
Unico 2009_Unico 2009 27/11/09 14:08 Pagina 3

INSTALLAZIONE A SEMINCASSO
Dopo aver effettuato il collegamento elettrico come da Fig.1 fissare
il cronotermostato senza la base direttamente sulla scatola da in-
casso 3 moduli utilizzando le viti (tipo A) in
dotazione. (Fig.2a)
ATTENZIONE:EVITARE UN SERRAGGIO
TROPPO FORTE, POTREBBE DEFOR-
MARE IL FRONTALE.
SEMI-RECESSED INSTALLATION
After connecting the wiring as illustrated in
Fig.1, fit the chronothermostat without its base directly on to the 3-
module recess box, using the A type screws supplied. (Fig.2a)
WARNING : AVOID OVERTIGHTENING, AS THIS COULD CAUSE
DEFORMATION OF THE FRONT IECES.
BB
AB C
VITI E TASSELLI IN DOTAZIONE
SCREW AND LUGS SU LIED
Fig.2b
Fig.2a AA
ANTINA / FRAME
Unico 2009_Unico 2009 27/11/09 14:08 Pagina 4

INSTALLAZIONE A PARETE (Fig.2 )
Dopo aver fissato la base alla parete mediante tasselli e viti (tipo C)
in dotazione, collegare elettricamente il cronotermostato come da
Fig 1 e fissarlo alla base con le viti (tipo B).
WALL INSTALLATION (Fig.2b)
After having fixed the base to the wall using (C type) plugs and
screws , connect the chronothermostat to the wiring, as illustrated in
Fig. 1, and fix it to the base using B type screws.
ALIMENTAZIONE
Unico va alimentato con due comuni batterie Alcaline stilo da 1,5V
che ne garantiscono il funzionamento per almeno due anni. Per l'in-
serimento delle batterie sfilare verso l’alto l’antina e posizionare le
batterie facendo attenzione alla polarità indicata all'interno del vano.
(Fig. 2a).
Unico è dotato di due soglie di scarica delle batterie. Superata la pri-
ma soglia compare il simbolo " ~ " sul display mentre l'apparec-
chio continua a funzionare regolarmente.
Al raggiungimento della seconda Unico blocca completamente le
sue funzioni di termoregolazione mentre il display visualizza solo l'o-
ra, il giorno ed il simbolo di batteria scarica " " lampeggianti.
Durante la sostituzione delle pile i dati rimangono memorizzati per 3
minuti in assenza di alimentazione.
Attenzione: Una volta sostituite le pile, attendere per una decina di secondi che
scompaia il simbolo “ “ ” se ciò non avviene spegnere e successivamente riac-
cendere il cronotermostato premendo 2 volte il tasto on/off ( ''6 " ).
POWER SUPPLY
Unico is supplied by two ordinary alkaline 1,5 Volt batteries which
can guarantee at least 2 year operation. To place the batteries, re-
move up the frame and place the batteries please pay attention to
the correct polarity of the batteries (Fig.2a).
Unico is provided with two battery run-down thresholds.
When the first threshold is overcome, the symbol “ ” will appear
while the appliance will carry on working as usual. When the second
threshold is reached, Unico completely stops its thermoregulation
Unico 2009_Unico 2009 27/11/09 14:08 Pagina 5

functions while the display will only show the time , the day and the
battery run-down symbol “ ” flashing. During the battery chang-
ing operation, data will be kept stored for 3 minutes with the power
off.
Warning: after replacement of batteries wait for 10 seconds that symbol “ ” dis-
appears. If this not happen switch off and then light the chronothermostat pressing
twice the key on/off ( “ ” ).
FUNZIONAMENTO E PROGRAMMAZIONE
INIZIALIZZAZIONE
Appena alimentato Unico effettua un ciclo di controllo accendendo
tutti i segmenti del display ed attivando il carico per pochi secondi.
Nel caso questa accensione del carico voglia essere evitata ali-
mentare il cronotermostato prima di effettuare i collegamenti elettrici.
•
Tasto a scomparsa per la
regolazione dell’ora corrente
•
Tasto a scomparsa per la
regolazione del giorno corrente
• Giorno corrente
• Indicazione del
comando carico
• Ora corrente o
temperatura ambiente
• Segmento intermittente
corrispondente all ora attuale
• Temperatura impostata attuale
Funzionamento normale
Giorno in
programmazione •
Temperatura
programmata nell’orario
corrispondente al
segmento intermittente •
Segmento intermittente
selezionato nella programmazione •
• Vano portabatterie
• Manopola per impostazione T2 (comfort)
• Manopola per impostazione T1 (economy)
• Tasto per la visualizzazione alternata del-
l’orario o della temperatura ambiente
• Tasto per l’assegnazione di T1 al settore
selezionato durante la programmazione
• Tasto per l’assegnazione di T2 a settore
selezionato durante la programmazione
• Tasto per lo scorrimento dei giorni durante
la programmazione
• Tasto per lo scorrimento dell’orario durante
la programmazione
• Tasto On/Off (acceso/spento)
Programmazione
Unico 2009_Unico 2009 27/11/09 14:08 Pagina 6

DISPLAY
Unico è dotato di un display grafico su cui è visualizzato il program-
ma giornaliero delle temperature. La corona ovale esterna, infatti, è
divisa in 48 settori, ognuno corrispondente a mezz'ora.
Per individuare l'intervallo di tempo corrispondente ad ogni settore
facilitando la lettura del programma sono inseriti, ogni due segmen-
ti, I'ora corrispondente o un punto di riferimento ad essa. Il seg-
mento che fà riferimento all'ora attuale è facilmente riconoscibile
perchè lampeggiante.
Ogni settore può essere pieno (scuro) o vuoto (chiaro), indicando che
la temperatura programmata nel periodo corrispondente è, rispettiva-
mente, T2 (temperatura Comfort) o T1 (temperatura Economy)
.
Al centro del display possono essere visualizzati alternativamente,
premendo il tasto “°C/h”, I’ora attuale o la temperatura ambiente.
Sopra esso due lettere indicano il giorno della settimana (“LU” per
Lunedì, “MA” per Martedi ecc.).
In basso, invece, è visualizzato il simbolo “T1 U “ oppure “T2 ”
che indica la temperatura attualmente impostata.
OPERATION AND PROGRAMMING
STARTING
As soon as it is supplied with current,
Unico
carries out a test cycle by
lighting all the segments on the display and activating the load for a few
seconds. In the case where this load ignition would to be avoided, sup-
ply the chronothermostat before to proceed with power connection.
DISPLAY
Unico
is supplied by graphic display which shows daily temperatures
program. The oval external crown is divided in 48 segments, and each
of them corresponds to a half an hour. To locate the time interval cor-
responding to each segment for a easy program reading, there are in-
serted, every two sectors, the corresponding hour or a reference point
of it. The sector relevant to the actual hour is lighting. Each sector can
be full (dark) or empty (bright), indicating that the programmed tem-
perature in its correspondent period is, respectively, T2 (Comfort tem-
Unico 2009_Unico 2009 27/11/09 14:08 Pagina 7

perature) or T1 (economy temperature). On the display centre can be
visualized, alternately, pressing the key “°C/h” the present hour or the
room temperature. On this key two letters indicate the week day (“ LU”
for Monday, “MA” for Tuesday, and so on). Lower it is showed the sym-
bol “T1 ” or “T2 ” which indicates the programmed temperature.
PROGRAMMAZIONE
Appena alimentato, I’orologio parte dall’ora 00.00 di Lunedì, mentre
la corona di segmenti rappresenta un programma standard di utiliz-
zo in cui “T2 W ” è la temperatura comfort, da mantenere nelle ore
in cui c'è più bisogno di caldo; “T1 ” è invece la temperatura
economy, più bassa di T2, per i periodi della giornata in cui normal-
mente si è assenti oppure a dormire.
Abbassando l’antina si accede a tutti i comandi necessari alla pro-
Present day
Loader
command indication
Time or room temperature
Flashing segment
correspondent to present time
Present temperature programmed
Normal operation Programming
Programming day
Programmed
temperature in time
correspondent
to the flashing segment
Flashing segment selected
into programming
• Space batteries
• nob to set T2 (comfort)
• nob to set T1 (economy)
• ey to see time and room temperature
• ey to assign T1 to selected segment dur-
ing programming
• ey to assign T2 to selected segment dur-
ing programming
• ey to slide the days during programming
• ey to slide the time during programming
• ey On/Off
•
Hideaway key for
time setting
•
Hideaway key for
day setting
Unico 2009_Unico 2009 27/11/09 14:08 Pagina 8

grammazione del cronotermostato, è quindi possibile personaliz-
zare il programma secondo le proprie esigenze.
ATTENZIONE: Le operazioni di programmazione descritte in segui-
to devono essere eseguite in "modalità di programmazione" indica-
ta sul display con la scritta “prog”: er entrare in questa modalità e
sufficiente premere una volta il tasto scorrimento ( ), per uscirne
e salvare automaticamente le modifiche effettuate è sufficiente non
premere alcun tasto per 20 secondi circa.
Se durante le operazioni si mantiene inattivo il cronotermostato per
un intervallo di tempo sufficiente a far scomparire la scntta “prog”
prima di continuare con la programmazione sarà necessario pre-
mere una volta il tasto scorrimento ( ).
Premendo il tasto scorrimento ( ) è possibile scorrere il pro-
gramma giornaliero e, una volta posizionato il cursore lampeggiante
sul settore desiderato si può impostare la temperatura desiderata
premendo il tasto “T1 U “ oppure “T2 ~”. In questo modo è così
pos
sibile impostare gli intervalli di tempo in cui si desidera la tem-
per
atura comfort (T2 ~) e quelli con temperatura economy (T1 U)
nell'arco della giornata di Lunedì.
Ultimato il programma del Lunedì si possono programmare i restanti
giorni in due diversi modi:
- Copiando il programma appena definito nel giorno successivo at-
traverso la funzione “COPY” (tasti “°C/h” e “DAY” premuti contem-
poraneamente);
- Spostandosi nel giorno successivo premendo il tasto “DAY”; in
questo caso verrà mostrato il programma presente in memoria o, se
non c’è, verrà visualizzato il programma standard.
In entrambi i casi è sempre possibile effettuare ulteriori cambiamenti uti-
lizzando come descritto in precedenza i tasti “ ”, “T1 U ” e “T2 1~ ”.
IMPOSTAZIONE Dl T1 E T2
T1 (temperatura Economy) e T2 (temperatura Comfort) sono facil-
mente impostabili per mezzo delle due manopole poste sul frontale
dell’apparecchio; per una regolazione più accurata procedere nel
seguente modo:
Unico 2009_Unico 2009 27/11/09 14:08 Pagina 9

- Accertarsi di non essere in modalità programmazione, in caso con-
trario attendere fino a che scompare la scritta “prog”;
- Premere il tasto “T1 U “ o “T2 ~ ” corrispondente alla temperatu-
ra da impostare, sul display lampeggierà il segmento corrispon
dente
T1 o T2 e sarà indicata la temperatura attualmente impostata;
- Regolare la temperatura tramite la manopola corrispondente (T1 o
T2) controllando sul display il valore che assume. Dopo 5 secondi di
inattività il cronotermostato torna alle condizioni normali.
IMPOSTAZIONE DELL'ORA E GIORNO
Premendo, mediante uno strumento appuntito, i due tasti a scom-
parsa “h” e “day” si impostano rispettivamente l’ora ed il giorno attuali.
TASTO ON/OFF
Il tasto ON/OFF “ ” disabilita le funzioni di termoregolazione di Uni-
co mantenendo in memoria il programma impostato. Premere ulte-
riormente il tasto per tornare al funzionamento normale.
FUNZIONE RESET
Premendo contemporaneamente i tasti “ ”, “T1 U”, “T2 ”
e “DAY”, si cancellano tutti i programmi presenti in memoria e si at-
tiva la procedura di inizializzazione descritta precedentemente.
Questa funzione, chiamata RESET, può servire nel caso ci fosse la
necessità di annullare il programma inserito, oppure nel caso il
cronotermostato si comporti in modo anomalo.
PROGRAMMING
When Unico is supplied, the timer starts from h. 00.00 of Monday
(LU, see table 1), while the segments crown represents a using
standard program in which “T2 ” is the comfort temperature , to
be kept when it is colder ; “T1 ” is the economy temperature, low-
er than T2, when you are not at home or when you are sleeping.
Lowing the shutter you can see all the necessary keys to program
the chronothermostat in according to your personal needs.
WARNING: The program operations described as follow must be
Unico 2009_Unico 2009 27/11/09 14:08 Pagina 10

carried out in “programming modalities”, indicated on the display
with “prog”. To enter in this modalities press the sliding key ( ),
to exit and save automatically the changes do not press any key for
20 seconds.
If during the operations you keep inactive the chronothermostat until
when the notice “prog” is disappeared, before to proceed with pro-
gramming it will be necessary to press one again the sliding key ( ).
ressing the sliding key ( ) you can slide the daily program and,
when the lighting messenger is positioned on the desired segment
you can program the temperature pressing key “T1 ” or “T2 ”.
In this way it is possible to program the intervals time where you
wish comfort temperature (T2 ) and those with economy tem-
perature (T1 ) in the day of Monday. After programming the first
day, you can program all the other in two different ways:
-Copy the day just programmed into the following one using the
“COPY” function (°C/h and DAY keys together);
-Move into the day after pressing DAY key ; in this case it will be
showed the program in memory or , if there is not , it will be showed
the standard program.
In each case it is always possible to make other changes using as
decribed above the keys “ ”, “ T1 ” and “ T2 ”.
SETTING OF T1 AND T2
T1 (economy temperature) and T2 (comfort temperature) are easy
to program by means of the two knobs on the front of the
chronother-
mostat; for a better regulation proceed in the following way :
- Be sure to not be in programming modality , on the contrary wait
until “prog” is cancelled;
- ress the key T1 or T2 correspondent to the temperature to be pro-
grammed, and the sector corresponding T1 or T2 will lighting on the
display, and there will be indicated the programmed temperature;
- Regulate the temperature by the relevant knob (T1 or T2) control-
ling the value on the display.
After 5 seconds of inactivity the chronothermostat will come back to
the normal conditions.
Unico 2009_Unico 2009 27/11/09 14:08 Pagina 11

PROGRAMMING OF HOUR AND DAY
With the help of a pointed instrument you can set the hour and the
day (see table 1) by pressing the two “h” and “day” hideaway keys.
KEY ON/OFF
The key ON/OFF “ “ deactivate thermoregulation functions keep-
ing anyway in memory and activating the starting procedure de-
scribed above. ress once again the key to come back to the nor-
mal function.
RESET FUNCTION
ressing at the same time the keys “ ”, “T1 ”, “T2 ” and
“DAY” will be cancelled all the programs in memory and will be ac-
tivated the starting procedure described above.
This function is called RESET and it can be used when it is neces-
sary to cancel the recorded program , or when the chronothermostat
is bad functioning.
TABLE 1: Segments indicating the day
LU Monday
MA Tuesday
ME Wednesday
GI Thursday
E Friday
SA Saturday
DO Sunday
Unico 2009_Unico 2009 27/11/09 14:08 Pagina 12

CARATTERISTICHE TECNICHE
Alimentazione: 2 pile stilo alcaline da 1,5V
Autonomia pile: superiore a 2 anni.
Controllo automatico della scarica delle pile con 2 soglie d'intervento.
Sostituzione delle pile senza perdita di dati.
Campo di regolazione:
T1 (temp. economy): 5°C - 25°C;
T2
(temp. comfort): 15°C - 35°C con step di 0,5°C
.
Differenziale termico: +0,25°C.
Possibilità di impostare per tutta la settimana, ad intervalli di mez-
z'ora, la temperatura desiderata (T1 o T2).
Portata contatti: 230Vac, 5A carico resistivo.
Installazione: a parete oppure a semincasso diretta
mente su scatola 503.
Colori disponibili: bianco o grigio antracite.
Dimensioni: 119x82x26,6 mm se installato a parete,
119x82x18,7 mm se installato a semincasso su 503.
Peso: 173 gr pile incluse.
TECHNICAL DATA
Supply: 2 alkaline 1,5 Volt batteries
Battery autonomy: over 2 years
Automatic check of battery run-down with 2 intervention thresholds.
Battery change without loss of data
Setting range : T1 (economy temp.) : 5° - 25° C;
T2 (comfort temp.): 15° C. - 35° C. with step of 0,5° C
.
Thermal differential: ± 0,25°C.
Any temperature within the setting range can be programmed for
each half an hour ( T1 and T 2).
Contact capacity : 230 Vac, 5A resistance load.
Installation:
wall-mounting or semi-recess directly on 503 box.
Colours available: white or anthracite grey
Dimensions: 119x82x26,6 mm if wall-mounted ,
119x82x18,7 mm if semi-recessed on 503 box.
Weight : 173 g batteries included.
Unico 2009_Unico 2009 27/11/09 14:08 Pagina 13

CONDIZIONI GENERALI Dl GARANZIA
IL PRESENTE CERTIFICATO E' L'UNICO DOCUMENTO CHE DA' DIRITTO
ALLA RIPARAZIONE DEL CRONOTERMOSTATO IN GARANZIA
- Il cronotermostato Unico è GARANTITO per un periodo di 24 mesi
dalla data di acquisto.
- Non sono coperti da GARANZIA eventuali danni derivati da
manomissioni, uso ed installazione errati o impropri.
- La GARANZIA è valida solo se debitamente compilata.
- In caso di difetti coperti da GARANZIA, il produttore riparerà o
sostituirà il prodotto gratuitamente.
PRESTAZIONI FUORI GARANZIA:
Trascorsi i termini o la durata della GARANZIA le eventuali
riparazioni verranno addebitate in funzione alle parti sostituite e al
costo della manodopera.
GENERAL CONDITIONS OF WARRANTY
THE PRESENT CERTIFICATE IS THE ONLY DOCUMENT TO HAVE THE RIGHT OF
REPARATION OF THE CHRONOTHERMOSTAT
- The device is warranted for 24 month from purchase date.
- Any damages caused by tampering and incorrect use or
installation will be not covered by warranty.
- The warranty is valid only if is full compiled.
- In case of defects covered by warranty, the producer will repair or
replace the free product.
PERFORMANCES OUT OF WARRANTY:
When warranty’s terms are spent, the eventual reparations will
debited in according to the replaced parts and to the hand costs.
Unico 2009_Unico 2009 27/11/09 14:08 Pagina 14

CERTIFICATO DI GARANZIA
DA COMPILARE E SPEDIRE IN CASO DI GUASTO
APPARECCHIO
oUnico color bianco (art. 350) oUnico color grigio antracite (art. 351)
Numero di serie (s.n.)
RIVENDITORE
Timbro: Data di acquisto:
//
UTILIZZATORE
Cognome e nome
Via n°
C.A.P. Città
Telefono
WARRANTY CERTIFICATE
TO COMPILE AND SEND IN CASE OF DAMAGE
DEVICE
oUnico color white (art. 350) oUnico color gray (art. 351)
Serial number (s.n.)
DEALER
Stamp: Date of purchase:
/ /
USER
Surname and name
Address n°
City
Telephone
Unico 2009_Unico 2009 27/11/09 14:08 Pagina 15

GECA Srl via E.Fermi n°98 25064 Gussago (BS) ITALY
Tel. +39 030 3730218 Fax +39 030 3730228
E-mail: [email protected] - http://www.gecasrl.it
TECNOCONTROL Srl via Miglioli n°47 20090 Segrate (MI) I ALY
el. +39 02 26922890 Fax +39 02 2133734
E-mail: [email protected] - http://www.tecnocontrol.it
La ditta costruttrice si riserva il diritto di apportare qualsiasi modifica, estetica o funzionale, senza preavvi-
so alcuno ed in qualsiasi momento.
The manufactory reserves the right to make any aesthetic or functional modification to the without prior
notice at any time
dis.1034002b cod.2.710.0881 MADE IN ITALY
Unico 2009_Unico 2009 27/11/09 14:08 Pagina 16
Table of contents
Other Geca Thermostat manuals
Popular Thermostat manuals by other brands

Pro 1 IAQ
Pro 1 IAQ T755S installation manual

Gocontrol
Gocontrol GC-TBZ48 Installation & operation guide

Pro 1 IAQ
Pro 1 IAQ T955 installation manual

Pro 1 IAQ
Pro 1 IAQ T701 operating manual

Termoventiler
Termoventiler LADDOMAT 11-30 Manual and installation instructions

Kieback&Peter
Kieback&Peter TQF10 Technical data