34
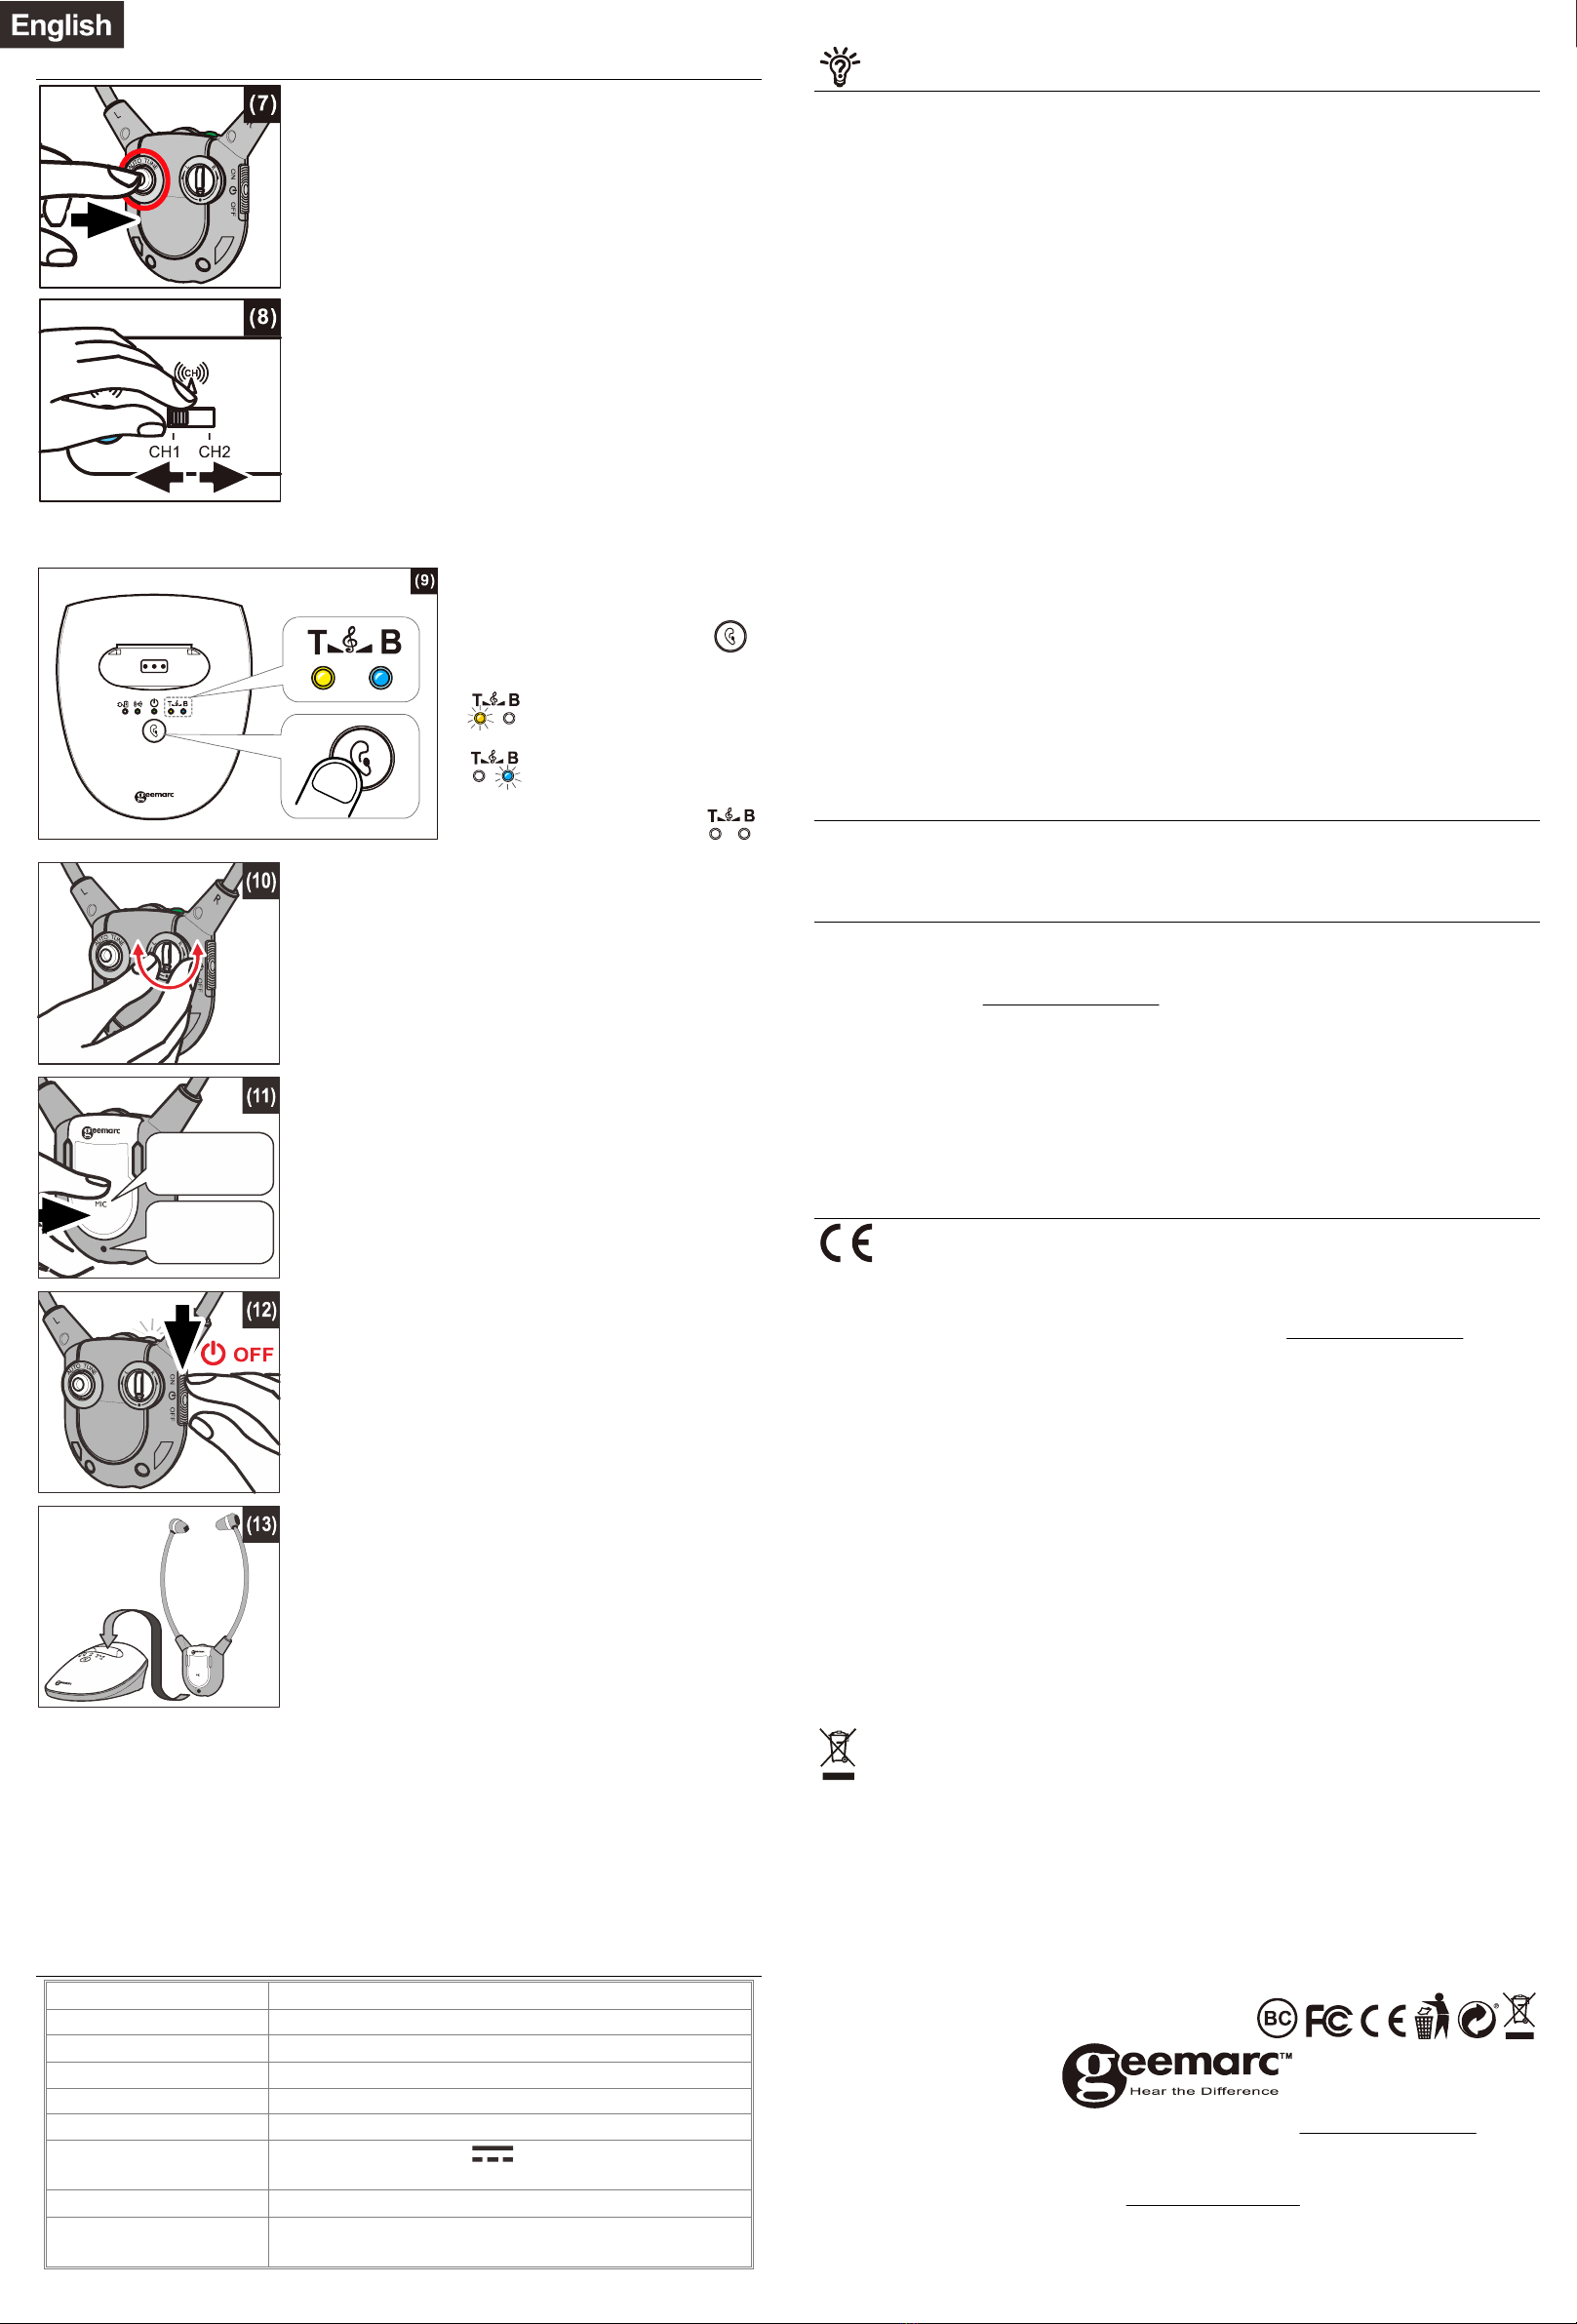
Improving Sound bySwitching Channels
The CL7350cantransmit on either oftwobuilt-in
frequencychannels. Youcan select thechannelthat
will produce better audioquality.
1. Ifthe audio sound is distorted or unclear,pressthe
Auto Tune Button on the TVReceiver (see figure (7)),
to match the frequencyofChannel 1or Channel 2
set at the backofTransmitter. Allowafew seconds
forthe audio to resume.
2. Ifthis does not help, switch the channel selector on
the rear ofthe Charging Cradle (see figure(8)) and
see ifthe audio qualityhas improved.
3. Press the AutoTune button againto improvethe
qualitystillfurther.
NOTE: The Transmitter willturn offautomaticallyafter
about5minutes ifthere isno audio signalfromthe
audio source (TVset, etc.), or the signal fromthe
audiosource is too weakfor proper reception.
However,ifthe audiosignalreturns to an acceptable
level, the transmission will automaticallyrestart.
Controlling the Tone (Bass & Treble)
You can adjust the tone ofthe audioyou are listening to and enhance your listening
pleasure byamplifyingeither the
Treble or theBass intheHeadset
Receiver.
Press the Tone ClarityButton
to switch cyclicallybetween:
1.Enhanced treble (yellowLEDglows
),
2.Enhancedbass(blueLED glows
), or
3.Flat tone (bass and trebleequally
enhanced,no LEDsglowing ).
Adjusting the Sound Balance(left-right)
You can adjust the soundto suit your hearing ineach ear.
With the Receiver on, rotate the Sound Balance button (see
figure (10)) to adjust the sound you will notice that the sound
seemsto “drift”fromone side to the other.Playwiththis
button until you find your most pleasant sound balance.
Using the Mic Button and Microphone for
Conversation
You can switch fromListeningmode to Conversation mode
without havingto take off theReceiver.
To talk or listen tosomeone:
1. PresstheMic button(seefigure (11)). This will shut offthe
Audio Source and theReceiver will becomean amplifier
byactivating the Microphone.
2. Toresumelistening toyouraudiodevice,presstheMic
button again. The microphonewill be shut offandthe
audiowill resume.
Charging the Battery
1. The signalLEDIndicatoron the HeadsetReceiver will
blinkslowlywhen the batterylevel islow.At thisstage
there are about 20 minutesofoperating timebefore the
Headset will switchoff. Recharge thebattery.
2. Switch OFF the On/Off Switch on the Headset (see figure
(12)). The green LED on the Headset should turn off.
3. Place the Headphone on the Charging Cradle (see figure
(13)), make surethecharge contact touchesthecharge
pinson the Charging Cradle.
4. The Charging process starts automatically.
•The LED Indicatorglows redduringcharging.
•It will glowin green after the batteryis fullycharged.
WARNING:
The batterymustnotbeexposed toexcessiveheat such
as sunshine, fireetc.
Do not attempt toreplacetheoriginalrechargeable
battery.
When theheadphonesarenot in use, move theswitch
tothe OFFposition toavoid damagingthe batteries.
The batterymust alwaysbe fullychargedbefore firstuse.An initial3hourschargeis
required toguaranteeanacceptable servicelifefor therechargeablebattery.Always
ensure that theReceiver is switched to OFFposition whilethe batteryis charging.
Excessive soundpressure fromearphones and headphones can cause hearingloss.
IMPORTANT:
This unit should be operatedwith built-inrechargeable batteryonly.When replacing
thebatteryorwhendisposing oftheunit,alwayscomplywithapplicablelawsrelating
to thedisposalofbattery.Pleaseplacethem inaproperdisposalcontainer to ensure
that theyareeliminatedsafelyandinanenvironmentallyfriendlyway.
TECHNICAL SPECIFICATIONS
Batteryoperating Time: Up to 6 Hours
Range : Up to 25meters (open area)
Frequencyresponse : 30 Hz 10K Hz
Signal-to-noise ratio : >65 dB
Distortion : <2%
Headset weight : 50 grams
Operating voltage : Charging Cradle: 8V 0.4A
: Headset: 3.7V, 380mAh LithiumPolymer Battery
Transmission mode : UHF Stereo
Carrier frequency : 863MHz(CL7350 OPTI VDE&UK version)
: 900MHz(CL7350 OPTI US version)
TROUBLESHOOTING
No Sound
•Ensure the power supplyis properlyplugged into the electricitysocket and that its
cable is properlyconnected to the DC IN connector onthe Charge Cradle.
•Ensure that the Headset Power ON/OFF switch is switched ON.
•Checkthe stateoftheBatterycharging intheHeadset place it intheCharge
Cradle and recharge the batteryuntil the BatteryCharge LED turns green.
•Ensure thattheTVset,Hi-Fi system or audiocomponent is switched ONand set
to a channel that broadcasts an audio signal.
•Ensure that the volumeon the connected audiocomponent is turned upto at least
halfits full volume.
•The connectedaudio/videoequipment maynot beinplaybackmode. Start
playbackon bythe equipment.
•Use the Volume Control on the Headset to turn up the volume.
•Checkwhether theHeadset volumelevelis settoolow.Adjust the volumeto a
suitable level.
•Ifthe sound is notclear anddistorted, change the frequencyChannelselection on
the backoftheChargeCradle,andthen press the AutoTune Buttononthe
HeadsetReceiver for betterreception.
Distortion
•The batteryinsideHeadset mayneed charging. Recharge thebattery.
•The Headsetmaybe too farawayfromthe transmitter inside the ChargeCradle.
Bring themcloser together.
•The audio signal input level fromthe audio source is too low. Increase the volume
at the audio source.
•Ifthe sound is not clear and distorted, changethe frequencyChannelonthe back
ofthe ChargeCradle,andthenpress theAutoTune Button on the Headset for
better reception.
.
Cleaning & Maintenance
Note: DO NOT use alcohol, chemical or spirit based cleaning agents.
Wipe Base and Headset clean witha damp cloth.
GUARANTEE
From the moment yourGeemarc productispurchased,Geemarc guarantee itfor the
periodoftwo years. Duringthis time, all repairs or replacements(at our discretion)
are free ofcharge. Should youexperience aproblemthen contact our help line or
visit our website at www.geemarc.com.
The guarantee does not cover accidents, negligence orbreakages to anyparts. The
product must not be tampered with or taken apart byanyonewho is not an authorized
Geemarc representative.
The Geemarc guarantee in no waylimitsyour legal rights.
IMPORTANT: YOUR RECEIPTIS PARTOF YOUR GUARANTEE AND MUSTBE
RETAINEDAND PRODUCED INTHE EVENTOF AWARRANTYCLAIM.
Please note: The guarantee applies to the United Kingdom only.
DECLARATIONS
CE Directives
Geemarc TelecomSAherebydeclaresthatthis productisin compliancewith
theessentialrequirementsandother relevant provisions ofthe Radio Equipment
Directive2014/53/UE.
The CE declarationof conformity may be consulted at www.geemarc.com
FCC NOTICE
This device complies with part 15oftheFCC Rules.Operationis subject tothe
following two conditions:
1. This device maynot cause harmful interference, and
2.This devicemust acceptanyinterferencereceived,includinginterference that may
causeundesired operation.
FCC CAUTION
Anychanges or modifications not expresslyapprovedbythe partyresponsible for
compliance could void the user’sauthorityto operate thisequipment. This device and
itsantenna(s)mustnot be co-located oroperating in conjunction with anyother
antenna or transmitter.
Electricalconnection: The apparatus is designedtooperatefrom a230V 50Hz
supplyonly.(Classifiedas hazardousvoltageaccordingtoEN60950standard).The
apparatusdoesnotincorporate an integral poweron/offswitch.Toswitchoffthe
apparatus,disconnectthepoweradaptor.
When installing the apparatus, ensure that themains power socket is readilyaccessible.
Recycling Directives
The WEEE (Waste Electrical andElectronic Equipment) has beenput in
place for the product
s at the end oftheir useful life arerecycledin the best way.
When this product is finished with, please do not put itin your domestic waste bin.
Please use one ofthe followingdisposal options:
- Remove the batteries anddeposit themin an appropriateWEEE skip.
Deposit the product in an appropriate WEEE skip.
-Or,hand the oldproduct to theretailer.Ifyoupurchase anewone, theyshould
accept it.
Thus ifyou respect these instructions youensure human health andenvironmental
protection.
For product support andhelp visit our website at www.geemarc.com
Contact Geemarc UK:
5B SwallowCourt, Swallowfields, Welwyn Garden City,Hertfordshire, AL7 1SB,UK
E-mail : help@geemar.com
telephone 01707 387602 orfax 01707 832529
QUGCL7350 OPTI_En_A3_V1.5
Button


