SETTING UP
1 - CONNECTING TELEPHONE
The plug at the end of the lead should be connected to the
telephone socket.
Voltages present on the telecommunication network are classified
TNV-3 (Telecommunication Network Voltage) according to the
EN60950 standard.
2 - RINGER SETTING
A switch located on the right of the base allows to switch OFF, LO
or HI the ringer.
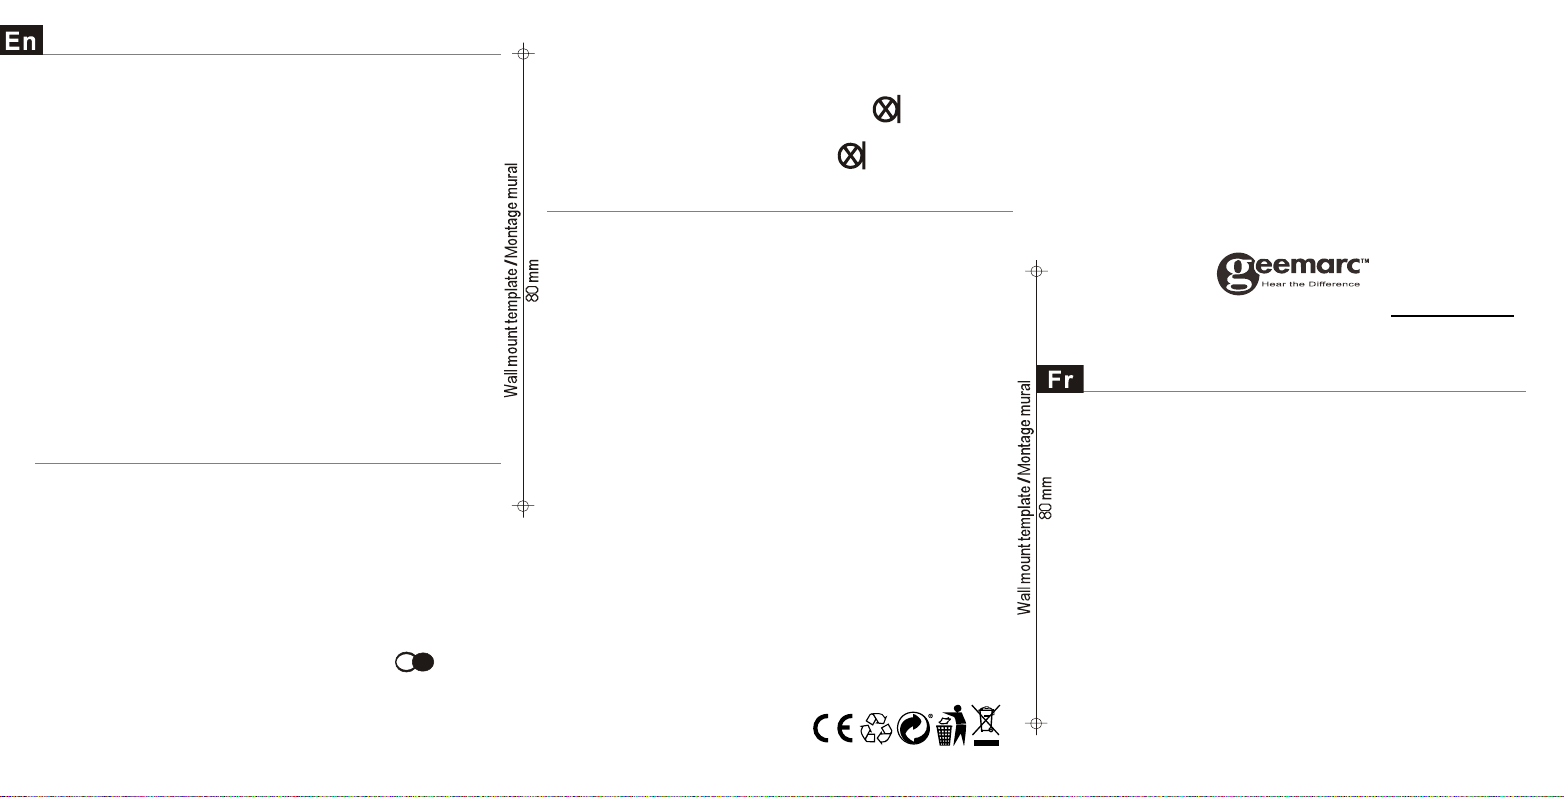
3 - WALL MOUNTING
To wall-mount your telephone, slide out the clip turn around and
slide back into the wall mounting position (located in the base unit,
just below the ear piece).This will ensure that the handset stays
firmly in position. Make 2 holes in the wall 80mm apart, insert the
wall plugs and the wall mounting screws. The screws should
protrude from wall by 10 mm. Place the phone onto the screw-
heads and slide down to secure.
USING THE TELEPHONE
1 - ANSWERING INCOMING CALLS
When an incoming call is received, the telephone will ring. To
answer the call lift the handset and speak.
2 - MAKING A CALL
Lift the handset, await the dial tone and dial required number. Lift
the handset, await the dial tone and dial required number. On
completion of the call, carefully replace the handset in the cradle.
3 - LAST NUMBER REDIAL
Lift the handset, await the dial tone and press the (Redial)
button. The previously dialed number will be AUTOMATICALLY
RE-DIALLED.
4 - R, * & # BUTTONS:
These are used with the new services provided on digital
exchanges. For details please contact your network operator.
5 - MUTE BUTTON
If you wish to speak privately to someone else in the room (without
your caller overhearing) press and hold the (Mute) button.
Your caller may still be heard during the MUTE operation. To
resume normal conversation , release the (Mute) button.
GUARANTEE
From the moment your Geemarc product is purchased, Geemarc
guarantee it for the period of two years. During this time, all repairs
or replacements (at our discretion) are free of charge. Should you
experience a problem then contact our helpline or visit our website
at www.geemarc.com. The guarantee does not cover accidents,
negligence or breakages to any parts. The product must not be
tampered with or taken apart by anyone who is not an authorised
Geemarc representative. The Geemarc guarantee in no way limits
your legal rights.
IMPORTANT: YOUR RECEIPT IS PART OF YOUR
GUARANTEE AND MUST BE RETAINED AND PRODUCED IN
THE EVENT OF A WARRANTY CLAIM
Please note: The guarantee applies to the United Kingdom only.
DECLARATION: Geemarc Telecom SA here by declares that this
product is in compliance with the essential requirements and other
relevant provisions of the Radio and Telecommunications
Terminal Equipment Directive 2014/53/UE and in particular article
3 section 1a, 1b and section 2. The telephone does not operate if
the line current is lower than 18 mA.
The declaration of conformity may be consulted at
www.geemarc.com
Telephone connection: Voltages present on the
telecommunication network are classified TNV-3
(Telecommunication Network Voltage) according to the EN60950
standard.
RECYCLING DIRECTIVES
The WEEE (Waste Electrical and Electronic Equipment) has been
put in place for the products in end of life are recycled in the best
way.
When this product is out of order, please do not put it in your
domestic waste bin. Please use one of the following disposal
options:
- Remove the batteries and deposit them in an appropriate WEEE
skip. Deposit the product in a appropriate WEEE skip.
- Or hand the old product to the retailer. If you purchase a new
one, they should accept it .
Thus if you respect these instructions you ensure human health
and environmental protection.
For product support and help visit our website at ww.geemarc.com
telephone 01707 387602 or fax 01707 832529
INSTALLATION
1 - RACCORDEMENTS
Branchez le conjoncteur téléphonique dans la prise téléphonique
murale.
Les tensions présentes sur ce réseau sont classées TRT-3
(Tension de Réseau de Télécommunication) au sens de la norme
EN60950.
2 - SONNERIE
Un commutateur situé à droite de la base permet de régler la
sonnerie.
HI: sonnerie forte. LO: sonnerie faible. OFF: sonnerie désactivée..
3 - POSITION MURALE
Pour maintenir votre combiné en position verticale, retirez l’ergot
situé sur la base (en dessous du bouton de raccroché), le tourner
et le réinsérer. Percez 2 trous verticaux distants de 80 mm dans
votre mur pour y insérer 2 chevilles avec leurs vis. Vous pouvez
vous aider du gabarit de perçage. Laissez dépasser les vis de
10mm environ.
Faites glisser ensuite votre téléphone dans les têtes de vis.
123


