Gemas SPIRON-D User manual

GEMAŞ Genel Mühendislik Mekanik San.veTic.A.Ş.
İTOB Organize Sanayi Bölgesi 10001 Sok.No:28 Menderes/İZMİR TURKEY
22
EN GEMAŞ SPIRON-D/M Installation and Instruction Manual V3.1
“Thank you for your trust in Gemas products.”
The instructions for use should be read carefully before assembly, and the assembly
should be done by experienced technicians. Assembled in violation of the assembly
instructions; Damages and malfunctions that may occur in products with electrical and
water connections are out of warranty.
GEMAŞ SPIRON HEATER is a device designed and manufactured only for use in pools. Using the
heater, you bought for other purposes can be dangerous both for the device and for the place and
people using it.
Serious injuries or even death may occur as a result of electric shock. Therefore,
seek help from experienced technicians.
Connect the ground connection to a proper grounding line. Take electrical power
from a line with leakage current protection.
In terms of life safety and product; the heater should be mounted out of the
reach of children.

GEMAŞ Genel Mühendislik Mekanik San.veTic.A.Ş.
İTOB Organize Sanayi Bölgesi 10001 Sok.No:28 Menderes/İZMİR TURKEY
33
EN GEMAŞ SPIRON-D/M Installation and Instruction Manual V3.1
1. MODEL AND FEATURES
Electric heater is available in 6 KW, 9 KW, 12 KW, 15KW and 18 KW power types. The label on
the product shows the power of the electric heater.
1.1. GEMAŞ SPIRON-D Features
1 -Front Cover Screws
2 -Flow Tube / Heating Tank
3 -Heater Resistance Status Lamp
4 -Water Flow Direction Indicator
5 -Digital Thermostat Directional Button
6 -Digital Thermostat Direction Button
7 -Digital Thermostat Display Screen
8 -Button to Switch to Digital Thermostat
Setting Mode
9 -Digital Thermostat Approval Button
10 -Open / Close Light Switch
11 -Flow Switch
1.2. GEMAŞ SPIRON-M Features
1 -Front Cover Screws
2 -Flow Tube / Heating Tank
3 -Heater Resistance Status Lamp
4 -Water Flow Direction Indicator
5 -Thermostat Setting Switch
6 -Open / Close Light Switch
7 - Flow Switch

GEMAŞ Genel Mühendislik Mekanik San.veTic.A.Ş.
İTOB Organize Sanayi Bölgesi 10001 Sok.No:28 Menderes/İZMİR TURKEY
44
EN GEMAŞ SPIRON-D/M Installation and Instruction Manual V3.1
2.INSTALLATION
2.1. Plumbing Installation
• Piping should be done before the electrical installation. The electric heater should be placed in the
pipe to the pool in a horizontal position and after the filter. In this way, it is ensured that it is
constantly filled with water.
• Do not put a slide valve between the heater and the pool. When it is necessary to put a valve,
use a check-valve.
• For the flow switch to operate, the heater must be positioned and installed in the correct
direction. Otherwise, the product may malfunction.
• Chlorination, acidity regulation, etc. to prevent corrosion. should be done after the heater in the
direction of the water flow.

GEMAŞ Genel Mühendislik Mekanik San.veTic.A.Ş.
İTOB Organize Sanayi Bölgesi 10001 Sok.No:28 Menderes/İZMİR TURKEY
55
EN GEMAŞ SPIRON-D/M Installation and Instruction Manual V3.1
2.2. Water Values
The heater should not be used in seawater and corrosive waters with concentrated
chemical content.
Incoloy models should be used in chlorinator and saltwater pools.
In order for the electric heater to operate efficiently and with a long life, the
properties of the pool water will operate must be as follows:
Chlorine Rate
Maximum 3 mg / l
Sodium Chloride (Salt) Ratio
150 mg / l maximum
PH value
7.2 - 7.8 pH
Alkalinity
60 - 120 mg / l
Calcium Hardness
200 - 1000 mg / l
Maximum Temperature
45 ° C
Maximum Pressure
10 Bar Without Pressure Switch
Minimum Flow
85 l / min
2.3. Electrical Installation
The electrical installation must be done by a licensed electrician.
Electrical and mechanical measures have been taken to protect life and
property safety in the SPIRON heater. In order for the electrical precautions
to function, the leakage relay and grounding warnings must be taken into
consideration.
Use a residual current relay that is CE certified and is sure to operate. Make sure that the relay
you will use only controls the heater. Do not share it with other devices. Test the Leakage
Current Relay strictly every year.
The manufacturer/seller company cannot be held responsible for any problems that
may arise from the failure of the Leakage Current Relay or its subsequent failure or
cancellation.
Grounding: Make sure grounding in your facility is well done. Always connect the grounding
line of the installation to the terminal on the device. If necessary, test the ground line. You
should also see the voltage value you see between phase and neutral between phase/ground.
The neutral to ground voltage value should be at most 2 VAC.
L1-N: 220V L1-PE: 220V N-PE: Maximum 2V
The manufacturer/seller company cannot be held responsible for any problems that
may arise from the failure of connecting the ground wire and poor grounding.
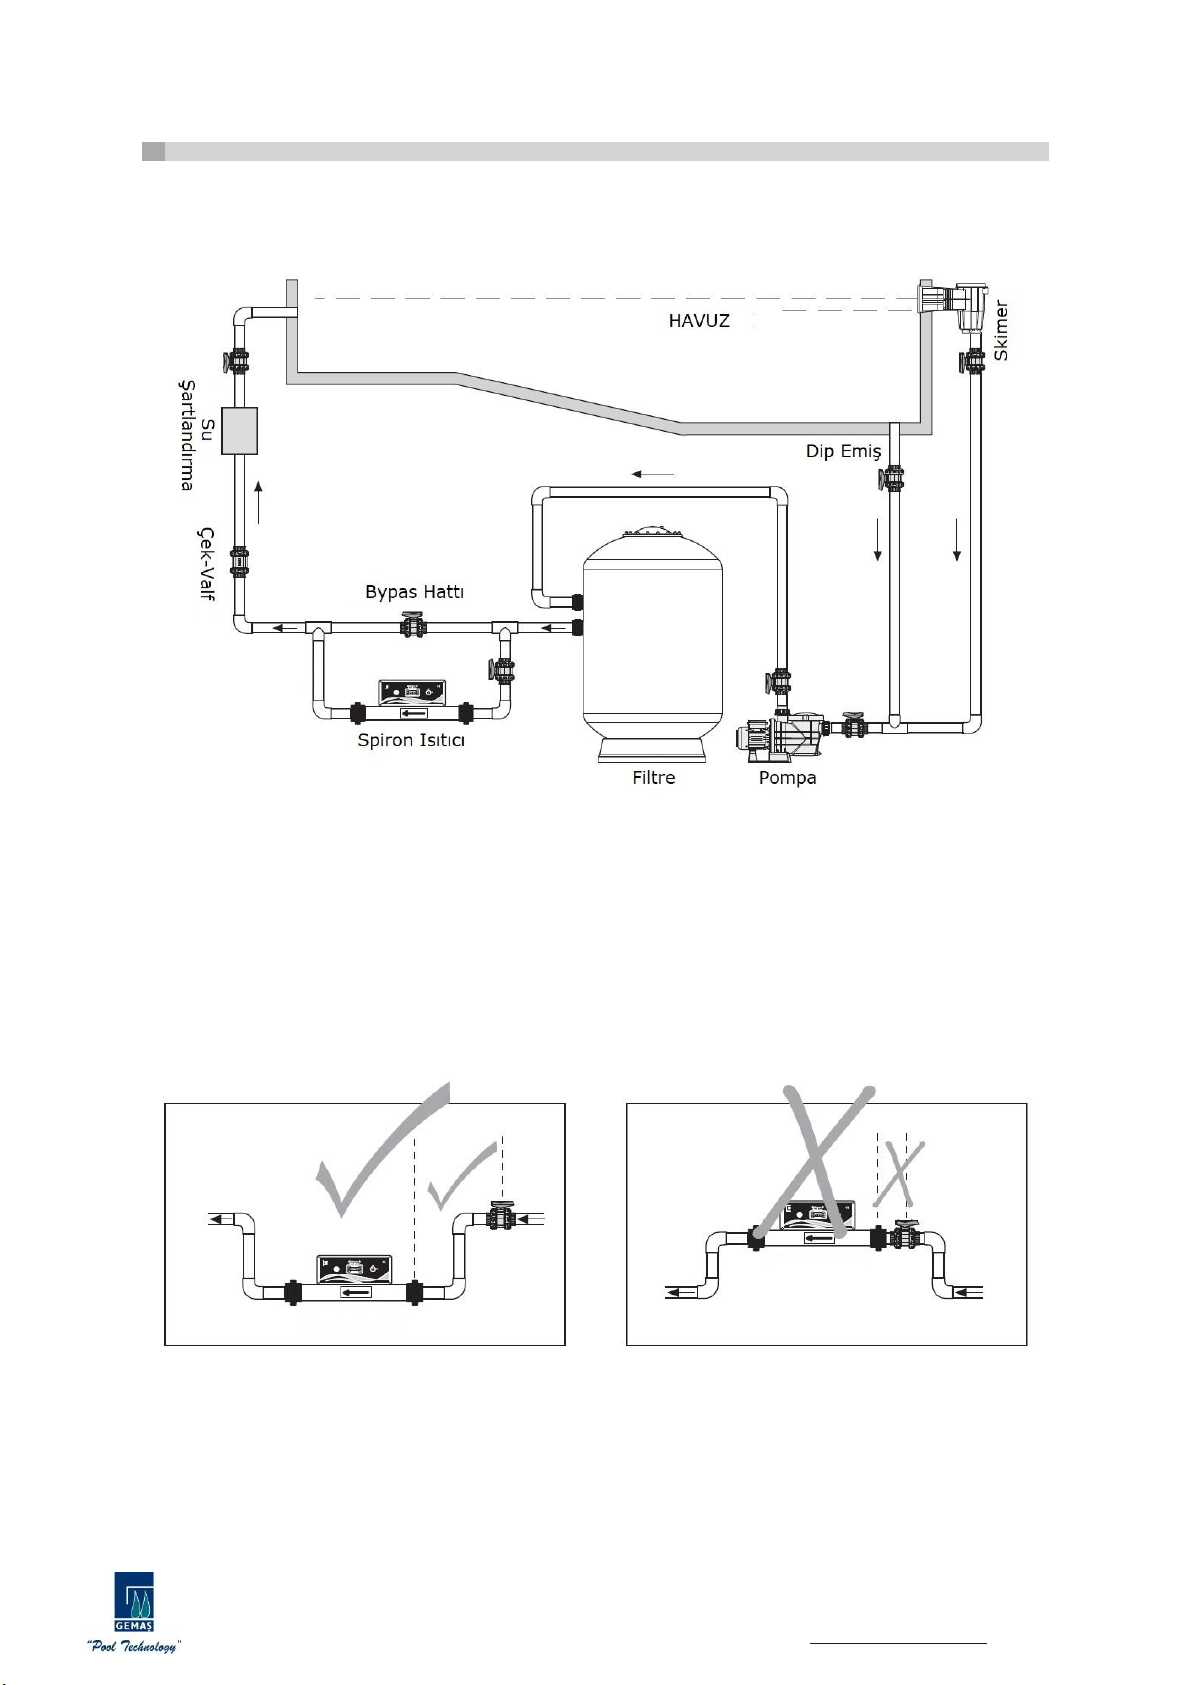
The heater should be installed in such a way that it cannot be activated when the circulation
pump is not running / there is not enough flow. For this, the power line to the contactor must
be passed over the motor protection of the pump.
In the table below, the current values to be drawn from the mains according to the power of
the heater are shown. To control the heater, you need to select the contactor and the power
input cable you will connect, considering these values.
3 Phase
Power Output
400V Star/230V Delta
Amp
6 –KW
400/230
9/15
9 –KW
400/230
13/23
12 –KW
400/230
18/31
15 –KW
400/230
22/38
18 –KW
400/230
26/46

GEMAŞ Genel Mühendislik Mekanik San.veTic.A.Ş.
İTOB Organize Sanayi Bölgesi 10001 Sok.No:28 Menderes/İZMİR TURKEY
66
EN GEMAŞ SPIRON-D/M Installation and Instruction Manual V3.1
3. SECURITY
If the heater is mounted on a flammable material, a piece such as a gypsum
board that will interfere with heat exchange should be placed between the
heater and the flammable material. The plate should protrude at least 10cm
around the heater body. The heater should not be placed in a flammable
material, it should not be covered with a flammable material or placed near it.
The heater should be turned off during backwashing and when cleaning the filter.
The heater must be dried before it is exposed to temperatures below zero. In
climates where the temperature drops below zero, the heater should be installed so
that it can be discharged. Otherwise, the heater and other equipment may be
damaged in the expansion that will occur due to the freezing of the water in the
heater.
4.USAGE
4.1. GEMAŞ SPIRON-D Usage
a. Start the pool water circulation pump.
b. Make sure water circulation is normal before operating the heater.
c. Turn the on / off light switch to the on position.
d. To control the flow switch, make sure that the power of the contactor is cut off when you stop
the flow of water passing through the heater using a slide valve.
e. Press settings button (SET) on the digital thermostat and see (S) mark on the screen.
f. Change the value on the digital thermostat display screen with the direction buttons to bring it to
the desired value.
g. By pressing the confirm button on the digital thermostat, the disarm value of the thermostat is
set.

GEMAŞ Genel Mühendislik Mekanik San.veTic.A.Ş.
İTOB Organize Sanayi Bölgesi 10001 Sok.No:28 Menderes/İZMİR TURKEY
77
EN GEMAŞ SPIRON-D/M Installation and Instruction Manual V3.1
4.2.GEMAŞ SPIRON-M Usage
a. Start the pool water circulation pump.
b. Make sure water circulation is normal before operating the heater.
c. Turn the On / Off light switch to the on position.
d. To control the flow switch, make sure that the power of the contactor is cut
off when you stop the flow of water passing through the heater using a slide
valve.
e. By turning the thermostat adjustment switch clockwise or counterclockwise,
the temperature setting that the resistance must stop is made.
5. FAULTS
If the heater is not running
•Check the fuses.
• Make sure that the arrow on the flow tube points in the flow direction of the water.
• Set the thermostat to a higher degree.

GEMAŞ Genel Mühendislik Mekanik San.veTic.A.Ş.
İTOB Organize Sanayi Bölgesi 10001 Sok.No:28 Menderes/İZMİR TURKEY
88
TR GEMAŞ SPIRON-D/M Kurulum Ve Kullanım Talimatı V3.1
“Gemaş Genel Mühendislik ürünlerine duyduğunuz güven için teşekkür ederiz.”
Kullanma talimatı montaj yapılmadan önce dikkatli bir şekilde okunmalı ve montaj
işlemi tecrübeli teknisyenler tarafından yapılmalıdır. Montaj talimatına aykırı şekilde
montajlanan; elektrik ve su bağlantıları yapılan ürünlerde oluşabilecek hasar ve
arızalar garanti kapsamı dışındadır.
GEMAŞ SPIRON ISITICI sadece havuzlarda kullanılmak için tasarlanmış ve üretilmiş bir
cihazdır. Satın aldığınız ısıtıcıyı başka amaçlar için kullanmak gerek cihaz için, gerekse kullanılan
mahal ve kullanan kişiler için tehlike arz edebilir.
Elektrik çarpması sonucu ciddi yaralanmalar hatta ölümler meydana gelebilir. Bu
yüzden tecrübeli teknisyenlerden yardım isteyiniz.
Topraklama bağlantısını düzgün bir topraklama hattına bağlayınız. Elektrik
enerjisini kaçak akım koruması bulunan bir hattan alınız.
Can güvenliği ve ürün açısından; ısıtıcı çocukların ulaşamayacağı yerlere montajı
yapılmalıdır.

GEMAŞ Genel Mühendislik Mekanik San.veTic.A.Ş.
İTOB Organize Sanayi Bölgesi 10001 Sok.No:28 Menderes/İZMİR TURKEY
99
TR GEMAŞ SPIRON-D/M Kurulum Ve Kullanım Talimatı V3.1
1.MODEL VE ÖZELLİKLER
Elektrikli ısıtıcının, 6 KW, 9 KW, 12 KW, 15KW ve 18 KW güçlerinde tipleri mevcuttur. Ürünün
üzerinde bulunan etikette elektrikli ısıtıcının gücü gösterilmektedir.
1.1.GEMAŞ SPIRON-D Özellikler
1 –Ön Kapak Vidaları
2 –Akış Tüpü/Isıtma Tankı
3 –Isıtıcı Rezistansı Durum Lambası
4 –Su Akış Yönü Göstergesi
5 –Dijital Termostat Yön Butonu
6 –Dijital Termostat Yön Butonu
7 –Dijital Termostat Gösterge Ekranı
8 –Dijital Termostat Ayar Moduna Geçiş Butonu
9 –Dijital Termostat Onay Butonu
10 –Aç/Kapat Işıklı Anahtar
11 –Akış Anahtarı
1.2. GEMAŞ SPIRON-M Özellikler
1 –Ön Kapak Vidaları
2 –Akış Tüpü/Isıtma Tankı
3 –Isıtıcı Rezistansı Durum Lambası
4 –Su Akış Yönü Göstergesi
5 –Termostat Ayar Anahtarı
6 –Aç/Kapat Işıklı Anahtar
7 –Akış Anahtarı

GEMAŞ Genel Mühendislik Mekanik San.veTic.A.Ş.
İTOB Organize Sanayi Bölgesi 10001 Sok.No:28 Menderes/İZMİR TURKEY
1010
TR GEMAŞ SPIRON-D/M Kurulum Ve Kullanım Talimatı V3.1
2.KURULUM
2.1.Su Tesisatı Kurulumu
Boru tesisatı elektrik tesisatından daha önce yapılmalıdır. Elektrikli ısıtıcı, havuza giden boruya
yatay pozisyonda ve filtreden sonra yerleştirilmelidir. Bu sayede sürekli su dolu olması
sağlanmış olur.
Isıtıcı ve havuz arasına sürgülü vana koymayınız. Vana koymanın gerekli olduğu durumlarda
çek-valf kullanınız.
Akış şalterinin çalışması için ısıtıcının doğru yönde pozisyonlandırılması ve montajının yapılması
gerekir. Aksi halde üründe arıza meydana gelebilir.
Korozyonu önlemek için klorlama, asidite düzenlemesi vb. suyun akış yönünde ısıtıcıdan sonra
yapılmalıdır.

GEMAŞ Genel Mühendislik Mekanik San.veTic.A.Ş.
İTOB Organize Sanayi Bölgesi 10001 Sok.No:28 Menderes/İZMİR TURKEY
1111
TR GEMAŞ SPIRON-D/M Kurulum Ve Kullanım Talimatı V3.1
2.2.Su Değerleri
Isıtıcı deniz suyu ve konsantre kimyasal içerikli korozif sularda kullanılmamalıdır.
Klorinatör ve tuzlu su kullanılan havuzlarda İncoloylu modelleri kullanılmalıdır.
Elektrikli ısıtıcının verimli ve uzun ömürlü çalışması için havuz suyu özelliklerinin aşağıdaki gibi
olması gerekir:
Klor Oranı
Maksimum 3 mg/l
Sodyum Klorür(Tuz) Oranı
Maksimum 150 mg/l
pH Değeri
7.2 –7.8 pH
Alkalinite
60 –120 mg/l
Kalsiyum Sertliği
200 –1000 mg/l
Maksimum Sıcaklık
45°C
Maksimum Basınç
Basınç Anahtarı Olmadan 10 Bar
Minimum Akış
85 l/min
2.3.Elektrik Tesisatı Kurulumu
Elektrik tesisatı lisanslı bir elektrikçi tarafından yapılmalıdır.
SPİRON ısıtıcıda can ve mal güvenliğini korumaya yönelik olarak elektriksel
ve mekanik önlemler alınmıştır. Elektriksel önlemlerin işlevini yerine
getirebilmesi için mutlaka kaçak akım rölesi ve topraklama ile ilgili uyarıların
dikkate alınması gerekmektedir.
CE belgeli ve çalıştığından emin olduğunuz bir kaçak akım rölesi kullanın. Kullanacağınız rölenin
sadece ısıtıcıyı kontrol ettiğinden emin olun. Diğer cihazlarla ortak kullanmayın. Kesinlikle her
yıl Kaçak Akım Rölesini test edin.
Kaçak Akım Rölesinin takılmamasından ya da sonradan arızalanmasından veya iptal
edilmesinden kaynaklanabilecek her türlü sorunlardan üretici/satıcı firma sorumlu
tutulamaz.
Topraklama: Tesisinizdeki topraklamanın iyi yapılmış olduğundan emin olun. Tesisatın
topraklama hattını mutlaka cihaz üzerindeki klemense bağlayın. Gerekirse topraklama hattını
test edin. Faz ile nötr arasında gördüğünüz voltaj değerini faz/toprak arasında da görmeniz
gerekmektedir. Nötr ve toprak arası voltaj değeri en çok 2 VAC olmalıdır.
L1-N: 220V L1-PE: 220V N-PE: Maksimum 2V
Topraklama kablosunun bağlanmamasından, topraklamanın zayıf olmasından
kaynaklanabilecek her türlü sorunlardan üretici/satıcı firma sorumlu
tutulamaz.
Isıtıcı, sirkülasyon pompası çalışmadığında/yeterli akış olmadığında devreye giremeyecek
şekilde kurulmalıdır. Bunun için kontaktöre giden güç hattı pompanın motor koruması
üzerinden geçirilmelidir.
Aşağıda verilen tabloda ısıtıcının gücüne göre şebekeden çekeceği akım değerleri gösterilmiştir.
Isıtıcıyı kontrol etmek için bağlayacağınız kontaktörü ve enerji girişi kablosunu bu değerleri göz
önünde bulundurarak seçmeniz gerekmektedir.
3 Phase
Power Output
400V Star/230V Delta
Amp
6 –KW
400/230
9/15
9 –KW
400/230
13/23
12 –KW
400/230
18/31
15 –KW
400/230
22/38
18 –KW
400/230
26/46

GEMAŞ Genel Mühendislik Mekanik San.veTic.A.Ş.
İTOB Organize Sanayi Bölgesi 10001 Sok.No:28 Menderes/İZMİR TURKEY
1212
TR GEMAŞ SPIRON-D/M Kurulum Ve Kullanım Talimatı V3.1
3.GÜVENLİK
Isıtıcı yanıcı bir malzeme üzerine monte edilmiş ise, ısıtıcı ile yanıcı madde
arasına alçı levha benzeri ısı alışverişini kesecek bir parça yerleştirilmelidir.
Levha, ısıtıcı gövdesinin etrafına en az 10cm çıkıntı yapmalıdır. Isıtıcı yanıcı
bir materyal içine konmamalı, yanıcı materyal ile örtülmemeli, ya da yakınına
yerleştirilmemelidir.
Ters yıkama esnasında ve filtre temizlenirken ısıtıcı kapatılmalıdır.
Isıtıcı sıfırın altındaki derecelere maruz kalmadan önce kurutulmalıdır. Sıcaklığın
sıfırın altına düştüğü iklimlerde ısıtıcı boşaltılabilecek şekilde kurulmuş olmalıdır.
Aksi durumda ısıtıcı içindeki suyun donması nedeniyle oluşacak genleşmede ısıtıcı ve
diğer ekipmanlar zarar görebilir.
4.KULLANIM
4.1.GEMAŞ SPIRON-D Kullanımı
a. Havuz suyu sirkülasyon pompasını çalıştırınız.
b. Isıtıcıyı çalıştırmadan önce su dolaşımının normal olduğundan emin olunuz.
c. Aç / Kapat ışıklı anahtarını açık konuma getiriniz.
d. Akış şalterini kontrol etmek için, sürgülü vana kullanarak ısıtıcıdan geçen su akışını kestiğinizde
kontaktörün gücünün de kesildiğinden emin olunuz.
e. Dijital termostat ayar moduna geçiş butonuna (SET) basıp ekranda (S) işaretinin çıktığını
görünüz.
f. Dijital termostat gösterge ekranındaki değeri yön butonlarıyla değiştirerek istenilen değere
getiriniz.
g. Dijital termostat onaylama butonuna basarak termostadın ısıtıcıyı devreden çıkarma değeri
ayarlanmış olur.

GEMAŞ Genel Mühendislik Mekanik San.veTic.A.Ş.
İTOB Organize Sanayi Bölgesi 10001 Sok.No:28 Menderes/İZMİR TURKEY
1313
TR GEMAŞ SPIRON-D/M Kurulum Ve Kullanım Talimatı V3.1
4.2.GEMAŞ SPIRON-M Kullanımı
a. Havuz suyu sirkülasyon pompasını çalıştırınız.
b. Isıtıcıyı çalıştırmadan önce su dolaşımının normal olduğundan emin olunuz.
c. Aç / Kapat ışıklı anahtarını açık konuma getiriniz.
d. Akış şalterini kontrol etmek için, sürgülü vana kullanarak ısıtıcıdan geçen su
akışını kestiğinizde kontaktörün gücünün de kesildiğinden emin olunuz.
e. Termostat ayar anahtarı saat yönü veya tersi yönde çevrilerek rezistansın
durması gereken sıcaklık ayarı yapılır.
5.ARIZALAR
Eğer Isıtıcı Çalışmıyorsa
Sigortaları kontrol edin.
Akış tüpü üzerindeki okun suyun akış istikametini gösterdiğinden emin olun.
Termostatı daha yüksek bir dereceye ayarlayın.
This manual suits for next models
1
Table of contents
Languages: