Geneva XXL User manual

GENEVA
MODEL XXL
Manual – English..................................................................................................................................................01
说明书-简体中文..................................................................................................................................................17
说明书-繁体中文..................................................................................................................................................33
매뉴얼-한국어.....................................................................................................................................................49
Инструкция-русский.......................................................................................................................................65
取扱説明書-日本語............................................................................................................................................81


1
WARNING
TO PREVENT FIRE OR SHOCK HAZARDS. DO NOT EXPOSE THIS APPLI-
ANCE TO RAIN OR MOISTURE.
To reduce the risk of electric shock, do not remove the cover ( or back ), no
user serviceable parts inside.
IMPORTANT SAFETY INSTRUCTIONS
1. Read these instructions.
2. Keep these instructions.
3. Heed all warnings.
4. Follow all instructions.
5. Do not use this device near water.
6. Only clean with a dry cloth.
7. Do not block any vents. Install in accordance with the
manufacturer’s instructions.
8. Do not install near any heat sources such as radiators, heaters, stoves,
or other devices ( including amplifiers ) that produce heat.
9. Do not defeat the safety purpose of the polarized or grounding-type
plug. A polarized plug has two blades with one wider than the other. A
grounding type plug has two blades and a third grounding prong. The
wide blade or the third prong is provided for your safety. If the provided
plug does not fit into your outlet, consult an electrician for replacement
of the obsolete outlet.
10. Protect the power cord from being walked on or pinched particularly at
the plugs, convenience receptacles, and the point where they exit from
the device.
11. Only use attachments/accessories specified by the manufacturer.
12. Use only with the cart, stand, tripod, bracket, or table specified
by the manufacturer, or sold with the device. When a cart is
used, use caution when moving the cart/device combination to
avoid injury from tip-over.
13. Unplug this device during lightning storms or during long periods of
disuse.
14. Refer all servicing to qualified service personnel. Servicing is required
when the device has been damaged in any way, such as power-supply
cord or plug damages, liquid has been spilled or objects have fallen into
the device, the device has been exposed to rain or moisture, does not
operate normally, or has been dropped.
WARNINGS
Batteries in the remote control: Keep the remote control battery away
from children. It may cause a fire or chemical burn if mishandled. Do not re-
charge, disassemble, heat above 212ºF ( 100ºC ), Replace only with a battery
of the correct type and model number ( CR2032 lithium coin cell battery, 3 V ).
The remote control supplied with this product contains a coin/button cell
battery. If the coin/button cell battery is swallowed, it can cause severe
internal burns in just 2 hours and can lead to death.
Keep new and used batteries away from children. If the battery compart-
ment does not close securely, stop using the product and keep it away from
children.
If you think batteries might have been swallowed or placed inside any part of
the body, seek immediate medical attention.
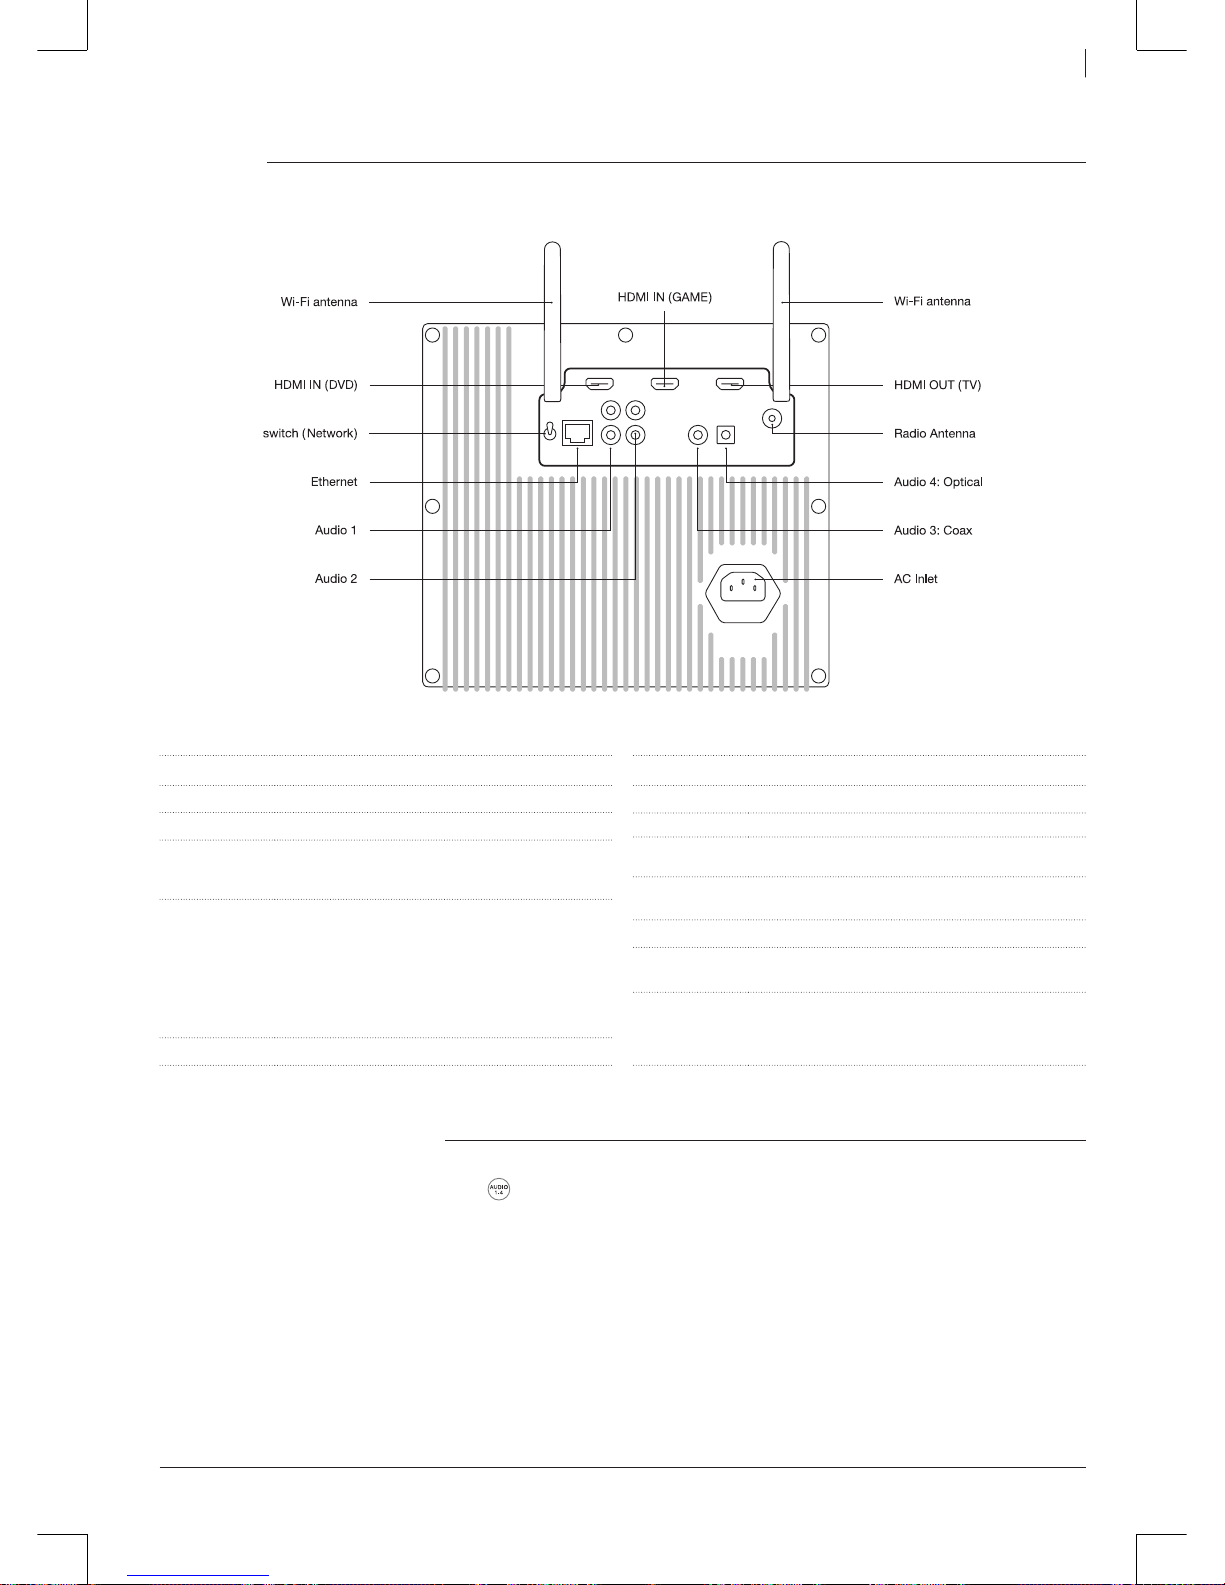
Ventilation: Do not block any ventilation openings on the back of the device.
For example, do not place the Geneva Sound System very close to a wall or
in front of a curtain that may reduce the heat sink efficiency.
Sitting or leaning on Geneva Sound System: Do not lean against the
Geneva Sound System and do not sit on it under any circumstances.
Avoid hearing damage: Playing very loud music for an extended period of
time can result in permanent hearing loss.
Label location: The product labels and safety related markings are located
on the rear panel.
Outside Antenna: If an outside antenna or cable system is connected to
this product, be sure the antenna or cable system is grounded so as to
provide some protection against voltage surges and built-up static charges.
Article 810 of the National Electric Code, ANSI/NFP No. 70 information,
Section 54 of the Canadian Electrical Code, with regard to proper grounding
of the mast and supporting structure, grounding of the lead-in wire to an
antenna discharge unit, size of grounding conductors, location of antenna/
discharge unit, connection to grounding electrodes, and requirements for
the grounding electrode.
Note to CATV system installer: This reminder is provided to call the CATV
system installer’s attention to Article 820-40 of the NEC ( of USA) that pro-
vides guidelines for proper grounding. In particular, it specifies that the cable
ground shall be connected to the grounding system of the building, as close
to the point of cable entry as is practical.
Operating temperatures: The recommended operating temperature
range for the Geneva Sound System is 41 to 95 degrees Fahrenheit ( 5 to 35
degrees Celsius ).
Protective earthing terminal. The apparatus should be connected to a
mains socket outlet with a protective earthing connection.
CONFORMITY
FCC Regulations
Warning: Changes or modifications to this unit not expressly approved
by the party responsible for compliance could void the user’s authority to
operate the equipment.
NOTE: This equipment has been tested and found to comply with the limits
for a Class B digital device, pursuant to Part 15 of the FCC Rules. These
limits are designed to provide reasonable protection against harmful inter-
ference in a residential installation. This equipment generates, uses and can
radiate radio frequency energy and, if not installed and used in accordance
with the instructions, may cause harmful interference to radio communica-
tions. However, there is no guarantee that interference will not occur in a
particular installation.
If this equipment does cause harmful interference to radio or television
reception, which can be determined by turning the equipment off and on,
the user is encouraged to try to correct the interference by one or more of
the following measures:
• Reorient or relocate the receiving antenna.
• Increase the separation distance between the equipment and the
receiver.
• Connect the equipment to an outlet on a circuit different from that to
which the receiver is connected.
• Consult the dealer or an experienced radio/TV technician for help.
Modifications not expressly approved by the manufacturer could void the
user’s authority to operate the equipment under FCC rules.
FCC ID: ZXX-MODELXXL
ZXX: Guarantee Code, assigned by the FCC.
Canada
This device complies with Industry Canada licence-exempt RSS standard(s).
Operation is subject to the following two conditions: (1) this device may not
cause interference, and ( 2 ) this device must accept any interference, includ-
ing interference that may cause undesired operation of the device.
Industrie Canada ( IC ): Nr. 10107A-MODELXXL
CE Conformity
G-Lab GmbH declares that this device is in compliance with the essential
requirements and other relevant provisions of Directive 1999/5/EC. The
declaration of conformity may be consulted on request by contacting G-Lab
GmbH, Zurich, Switzerland or on http://genevalab.com.
Recycling
This product can be recycled. Products bearing this symbol must
NOT be thrown away with normal household waste. At the end
of it’s life, take the product to a collection point designated for
recycling of electrical and electronic devices. Find out more about
return and collection points through your local authority.
The European Waste Electrical and Electronic Equipment ( WEEE ) Di-
rective was implemented to dramatically reduce the amount of waste going
to landfills, thereby reducing the environmental impact on the planet and
on human health. Please act responsibly by recycling used products. If this
product is still usable, consider giving it away or selling it.
Used batteries: Please dispose of used batteries properly, following the
local regulations. Do not place batteries in fire.
LICENSING INFORMATION
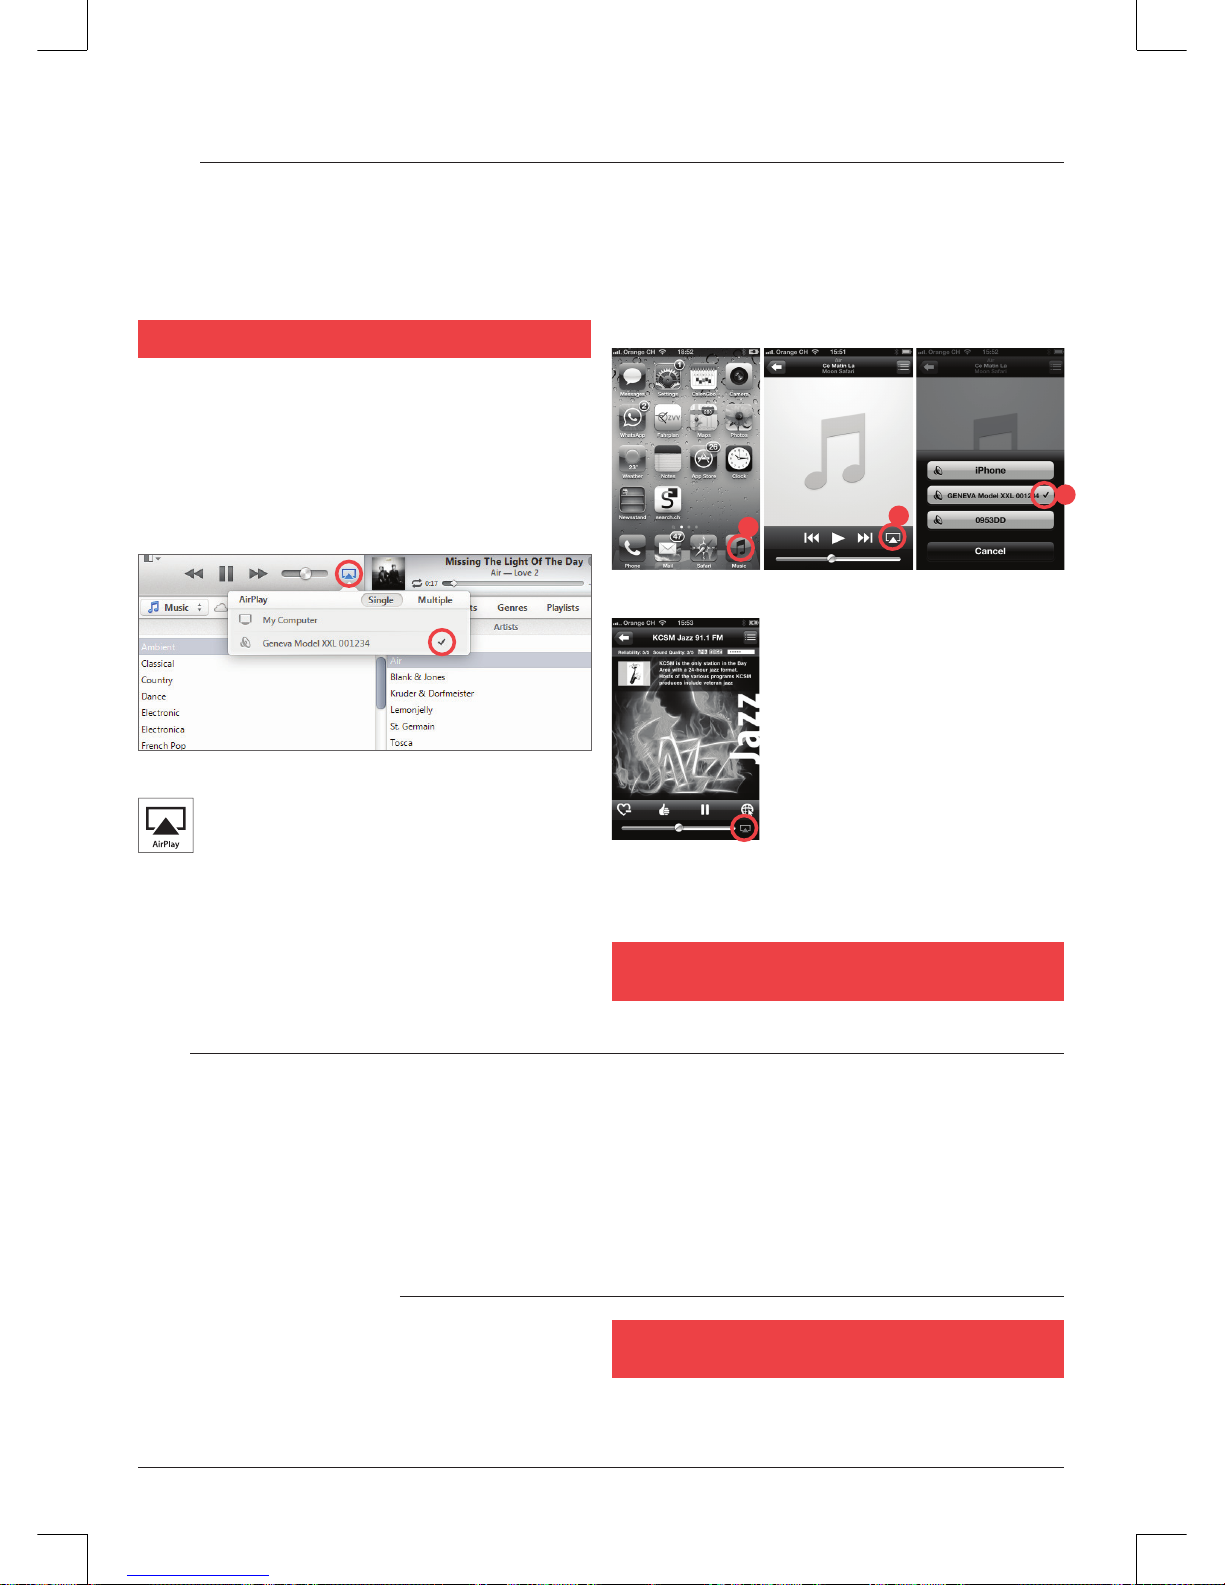
Apple, AirPlay, iPad, iPhone, iPod touch, iTunes and Mac are trademarks of
Apple Inc., registered in the U.S. and other countries.
The Bluetooth®word mark and logos are registered Trademarks owned by
Bluetooth SIG, Inc.
© 2013 G-Lab GmbH. All rights reserved.
The Wi-Fi CERTIFIED Logo is a certification mark of the Wi-Fi Alliance.
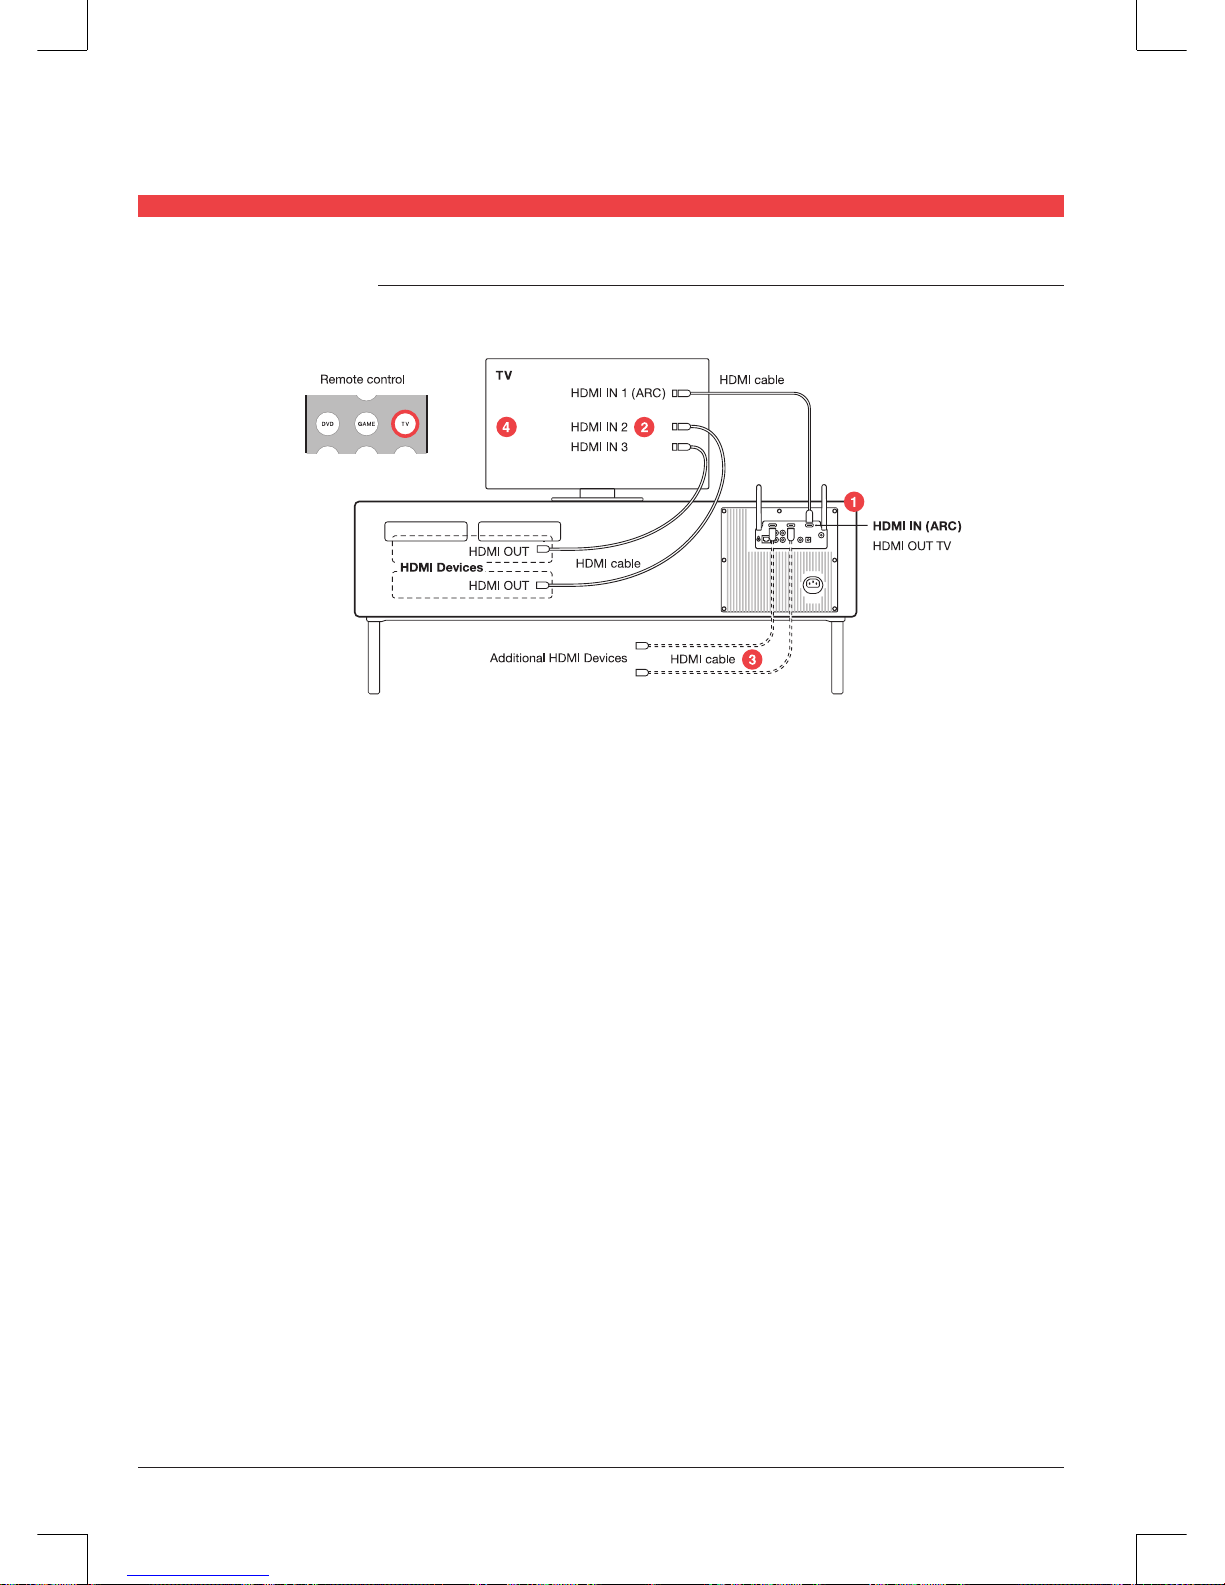
HDMI, the HDMI logo and High-Definition Multimedia Interface are trade-
marks or registered trademarks of HDMI Licensing, LLC.
Under the copyright laws, this manual may not be copied, in whole or in
part, without the written consent of G-Lab GmbH
Geneva®is a registered trademark of G-Lab GmbH.
MANUAL VERSION
Geneva Sound System Model XXL, User Manual, Version v1.1.
English

CONTENTS
GETTING STARTED....................................................................................................................... 3
About the Model XXL ...................................................................................................................... 3
Getting started ................................................................................................................................ 3
USING THE MODEL XXL......................................................................................................... 4 – 7
Remote and display controls........................................................................................................... 4
FM radio .......................................................................................................................................... 4
DAB / DAB+ radio............................................................................................................................. 4
TV, DVD & Game consoles.............................................................................................................. 5
Bluetooth......................................................................................................................................... 5
AirPlay ............................................................................................................................................. 6
DLNA ............................................................................................................................................... 6
Automatic software updates ........................................................................................................... 6
Back panel....................................................................................................................................... 7
Analog and digital audio inputs....................................................................................................... 7
TV SETUP ................................................................................................................................ 8 – 10
TV setup ( TV with HDMI ARC ) ........................................................................................................ 8
Alternative TV setup 1 ..................................................................................................................... 9
Alternative TV setup 2 ................................................................................................................... 10
NETWORK SETUP ................................................................................................................ 11 – 13
Overview........................................................................................................................................ 11
Ethernet setup ............................................................................................................................... 11
Wi-Fi setup with WPS.................................................................................................................... 12
Wi-Fi setup with Model XXL as a temporary Wi-Fi access point .................................................. 13
TROUBLESHOOTING AND FAQ.......................................................................................... 14 – 15
SUPPORT ..................................................................................................................................... 15

3
GETTING STARTED
ABOUT THE MODEL XXL
The Model XXL has the following built-in functions:
• FM radio
• DAB/DAB+ radio (works only in countries with DAB service)
• Bluetooth
• AirPlay®
• DLNA
You can connect your TV, DVD and Game console using the
following connectors:
• 2 HDMI inputs, 1 HDMI output
• Support for HDMI ARC
• 2 analog audio inputs (RCA connectors)
• 2 digital audio inputs (coaxial, optical)
GETTING STARTED
Connect the external radio antenna ( for FM and DAB/DAB+ )
The Model XXL has an enclosed wire antenna. On the back panel,
screw the wire antenna into the antenna connector (1 ).
Connect power to Model XXL
On the back panel, connect the power cable to the AC power
connector ( 2 ) and then to a wall outlet.
Prepare the remote control
Remove the battery protector from the remote control battery
compartment.
TV, DVD and game console
• Place the TV on top of the Model XXL.
• The right side compartment has space for the DVD player, game
console, Blu-ray player, set-top box and other video devices.
• Connect all power cords to an AC power strip.
IR extender
If you place a DVD player, game console or set top box into the right
side compartment of the Model XXL, use the two IR extenders that are
located inside the compartment. The IR extenders amplify the signal
of the infrared ( IR ) remote control so that the components behind the
closed front grid can still be controlled. Make sure the IR extenders
are placed in front of the components’ IR receiver windows. Use the
attached adhesive tape on the bottom side of the IR extender.
Turn the Model XXL on
Press the power button on the remote control , or press the power
button above the display.
English

4
FM RADIO
The button on the remote control toggles between FM and DAB radio.
Select a station manually
Select an FM station using the and buttons.
Find a station automatically
Hold down or for one second and the FM radio will search for
the next station automatically.
Switch between mono and stereo
Hold the button for one second to toggle between mono and stereo
mode. Once the mode is changed, all the stations are always in the
same mode until the mode is changed again manually.
Using FM presets: select a stored station
In FM mode, press the FM preset buttons ( P, R, E, S, E or T ) to select
a previously stored radio station. There are six presets for FM, and six
presets for DAB. The FM presets work only in FM mode.
Store the current station in a preset
Hold one of the preset buttons for one second, until the display shows
a confirmation.
DAB RADIO
The button on the remote control toggles between FM and DAB radio.
DAB is not available in all countries:
DAB/DAB+ ( sometimes referred to as Digital Radio ) is only available in
certain countries ( UK, Germany, Switzerland, Norway, Hong Kong, and
others ). The Model XXL is compatible with DAB and DAB+.
Select a station
Press or on the remote control to change radio stations.
DAB Presets
The six DAB presets work in exactly the same way as the FM presets.
The DAB presets work only when DAB has been selected.
How to use “Scan”
1. Press the button on the remote control to select DAB.
2. Hold the button on the remote control until the display shows
“Scan”.
3. Once all available stations have been found, you can browse the list
of radio stations using the and buttons.
Using DAB for the rst time ( “Scan” function )
Initially the Model XXL has no DAB stations stored. Press the “Scan”
function to find the available stations in your region. The stations are
stored automatically. Use the “Scan” function again after moving the
Model XXL to a new location with different radio stations, or when you
move the Model XXL to a room with a different radio reception.
USING THE MODEL XXL
REMOTE
Remote control
DISPLAY CONTROLS
Open the front grill to access the following controls:
Power On / Off
Reset to factory default settings ( hold 10 sec.)
Volume control
Change between different audio sources:
FM, DAB, AirPlay, Bluetooth, etc,
Wi-Fi Setup button Select one of the three Wi-Fi network setups
Power On / Off
Volume control
Bass control
Treble control
Bluetooth
FM / DAB
AirPlay / DLNA
Audio 1: analog audio input
Audio 2: analog audio input
Audio 3: digital audio input ( coax )
Audio 4: digital audio input ( optical)
HDMI input ( DVD connector )
HDMI input ( GAME connector )
HDMI ARC input ( TV connector )
FM: change frequency
FM: auto-search ( hold 1 sec.)
DAB: change stations
DAB: scan ( hold 1 sec.)
AirPlay: change tracks
Mute,
FM: mono / stereo ( hold 1 sec.)
AirPlay: Play / Pause
6 FM presets &
6 DAB presets.

5
TV, DVD AND GAME CONSOLE
TV
The HDMI output can also be an input for audio, if your TV supports
HDMI ARC. Press TV on the remote control to hear audio from the TV.
DVD and GAME
Press the DVD and GAME buttons to select the connected HDMI inputs
1 and 2 respectively. The video of the two HDMI inputs is forwarded to
the HDMI output, and the audio is played on Model XXL.
Using the TV remote control with HDMI CEC
If your TV supports CEC, and the Model XXL is connected via HDMI to
your TV you have the following possibilities:
• Use your TV remote control for selecting the HDMI source of the
Model XXL and change the volume of the Model XXL.
Possibly you'll need to enable CEC on your TV first. CEC is also called
Anynet+ ( Samsung ), Bravia synch/link ( Sony ), Kuro Link ( Pioneer ), CE/
Regza Link ( Toshiba ), Viera Link ( Panasonic ), EasyLink ( Philips ).
Note: Turning the Model XXL on and off via HDMI CEC ( using the TV
remote control ) is not supported.
BLUETOOTH
Mobile phones, tablets, and computers with Bluetooth can connect to
the Model XXL and play music wirelessly. The mobile phone, tablet, or
computer must support Bluetooth A2DP.
Initial Setup ( “pairing” ) with iPhone
1. Touch the button until the display shows “Blue”. Wait for 20
seconds until the display shows a blinking “P”.
2. Select “Settings” on your iPhone. Select “General / Bluetooth”. Turn
on Bluetooth. New Bluetooth devices are found automatically.
3. After a few seconds “GENEVA XXL ( Not Paired )” will appear.
4. Select “GENEVA XXL”. The phone is now connecting ( “pairing” ) to
the Model XXL.
5. You can now play music on an iPhone/iPad/iPod touch and listen to
it on the Model XXL.
Playing Music
Most smartphones connect automatically to the Model XXL after the
initial setup ( “pairing” ).
Touch the button on the remote control. When the Model XXL
connects the display shows “C” for a few seconds.
When playing music on a mobile phone, the Model XXL will connect
automatically after a few seconds.
Status information on the display
“S”: Searching for previously paired devices.
“C”: Successfully connected.
“P”: Pairing. If the Model XXL does not make a successful connection
within 20 seconds, it will go into pairing mode for 2 minutes.
“– ”: There is no active connection.
Pairing guide for other devices and mobile phones
Go to www.genevalab.com and select “Support.”
Bluetooth settings on iPhone Playing music
English

6
AirPlay
The AirPlay button on the remote control toggles between AirPlay and DLNA.
What is AirPlay?
AirPlay lets you wirelessly stream anything on your iPhone, iPad, iPod
touch, Mac®OS X or Windows computer to the Model XXL and other
AirPlay speakers. Once a user starts playing music on iTunes or an iOS
device the Model XXL switches automatically to AirPlay.
Before you can use the AirPlay function you need to connect the
Model XXL to your network. See chapter “Network Setup”.
Playing music with iTunes from a computer ( Mac or Windows )
1. Turn the Model XXL on.
2. Wait until the Model XXL connects to the network. “AirPlay” stops
blinking on the display.
3. Open iTunes on your Mac©or Windows computer.
4. Click on the AirPlay icon and select “Geneva Model XXL”.
All music playing on iTunes is now streamed to the Model XXL over
the network.
AirPlay compatibility
AirPlay works with iPhone, iPad, and iPod touch with iOS 4.3.3 or later,
Mac with OS X Mountain Lion, and Mac and PC with iTunes 10.2.2 or later.
Playing music from an iPhone, iPad or iPod touch
1. Select the “Music” app.
2. Select the AirPlay icon.
3. Select “Geneva Model XXL”.
Any music that is played is now streamed to the Model XXL over
the network.
Internet radio, Spotiy, etc.
Synchronize the volume of the Model XXL and iTunes
To synchronize the volume control of iTunes and Model XXL, open
Preferences, open “Devices” and enable “Allow iTunes audio control
from remote devices”.
!SUDDEN MUSIC WARNING: !
Turning the volume control on iTunes or an iPhone to its maximum,
will change the volume of Model XXL to volume 100.
DLNA
The AirPlay button on the remote control toggles between AirPlay and DLNA.
What is DLNA?
DLNA is a standard for streaming audio to a DLNA-enabled speaker in
a home network. DLNA also supports video streaming, but this is not
supported with the Model XXL.
Playing music from a Windows computer
We recommend you use iTunes ( using AirPlay ) when streaming music
from your computer ( Mac OS X or Windows ).
Playing music from Android and Windows smartphones
1. Start the built-in music app in Android and Windows smartphones.
2. Browse the network for DLNA-compatible devices and select the
Model XXL.
3. Music will automatically play on the Model XXL.
AUTOMATIC SOFTWARE UPDATES
The Model XXL periodically checks for software updates via the Internet.
The Model XXL software will be updated automatically as new versions
become available. The automatic software update is triggered every
four weeks when the Model XXL is turned off.
If a software update is automatically started, the display shows
“Software update”.
During the software update do not remove the AC cord from the
Model XXL. Doing so can leave the Model XXL without software and
the complex manual software update procedure to be.
The manual software update procedure is described in the “Support”
section of the website genevalab.com.
You can also listen to Music from other iPhone
apps, such as Internet Radio, Spotify, etc.
In most iPhone apps, the AirPlay icon will
automatically appear if you are connected to
an AirPlay speaker. The following example
shows the AirPlay icon in the Internet Radio app
“vTuner”.
12
3

7
ANALOG AND DIGITAL AUDIO INPUTS
There are four inputs on the back panel for external audio sources
such as TV, CD players and MP3 players. Press the button until the
desired input is shown on the display.
CONNECTOR DETAILS
HDMI IN ( DVD ): HDMI input
HDMI IN (GAME): HDMI input
HDMI OUT /
HDMI ARC ( TV )
This connector has two functions:
1. HDMI output ( from one of the two HDMI inputs )
2. Audio input from TV with a HDMI ARC connector.
Switch
“Network”
Select between Wi-Fi and Ethernet.
“Wi-Fi only”: only Wi-Fi is used, Ethernet is ignored.
“Ethernet only”: only Ethernet is used, Wi-Fi is
turned off.
Ethernet and Wi-Fi do NOT work at the same time.
After ipping the switch, the Model XXL restarts its
networking subsystem. This process can take up to
30 seconds.
Ethernet Ethernet input ( 10 / 100BASE-T )
CONNECTOR DETAILS
Audio 1 Analog audio input ( stereo ), RCA connectors
Audio 2 Analog audio input ( stereo ), RCA connectors
Audio 3 Digital audio input ( stereo ), coaxial / SPDIF,
RCA connector
Audio 4 Digital audio input ( stereo ), optical,
TOSLINK connector
AC power input 100 - 240 VAC, 50/60 Hz
Radio antenna Input for external FM / DAB antenna.
F-Type connector.
Wi-Fi antennas Two external Wi-Fi antennas. For best
reception orient the two antennas as shown in
the figure above.
BACK PANEL
English

8
TV SETUP
There are two different ways to connect your TV to the Model XXL. Depending on your TV’s capabilities, you can use the TV setup below or one of
the alternative TV setups on the next pages.
If your TV does have an HDMI ARC connector go to the chapter“Alternative TV setup 1” or “Alternative TV setup 2”
TV SETUP ( TV WITH HDMI ARC )
To set it up
1. Connect the HDMI ARC connector on the TV to the HDMI IN (ARC )
connector on the Model XXL.
2. Connect your HDMI devices ( DVD player, Blu-ray player, game
console, cable TV, satellite ) to the HDMI inputs of your TV.
3. If your TV does not have enough HDMI inputs, connect additional
HDMI devices to the DVD and GAME inputs on the
Model XXL.
4. Enable CEC* in the setup menu on your TV.
Possibly you also need to select “External Speakers” on your TV
setup menu.
*CEC is also called Anynet+ ( Samsung ), Bravia synch/link
( Sony ), Kuro Link ( Pioneer ), CE/Regza Link ( Toshiba ), Viera Link
( Panasonic ), EasyLink ( Philips ).
How to use it
If your TV supports CEC, then you can use your TV remote control
instead of the Model XXL remote control for most operations:
• Model XXL remote control: turn the Model XXL on and off.
• TV remote control: turn the TV and all connected HDMI devices
on and off.
• TV remote control: change the volume of Model XXL.
• TV remote control: select the HDMI source ( HDMI sources
connected to your TV and DVD/GAME HDMI inputs connected to
Model XXL ).
Note: Turning the Model XXL on and off with the TV remote control is
not supported.

9
ALTERNATIVE TV SETUP 1: TV WITHOUT HDMI
When to use this setup
Your TV has analog and/or digital audio outputs and no HDMI ARC connector.
How to use it
• Model XXL remote control: use to select the desired audio input with .
• Model XXL remote control: use to change volume.
A. TV with digital audio output ( optical / TOSLINK )
To set it up
1. Connect a fiber optic cable from the TV ( small square connector
with a red light inside ) to the Model XXL ( connector “Audio 4” ).
2. Select “External Speakers” on the TV setup menu.
B. TV with digital audio output ( coax/SPDIF )
To set it up
1. Connect an audio cable from the TV (single, yellow RCA connector )
to the Model XXL ( connector “Audio 4” ). The audio cable has single
RCA connectors on both sides.
2. Select “External Speakers” on the TV setup menu.
C. TV with analog audio output
If the TV has both analog and digital audio outputs, then the digital
audio is recommended, because it provides the best audio quality.
To set it up
1. Connect an audio cable from the TV (dual red & white RCA
connectors or 3.5mm connector ) to the Model XXL ( connector
“Audio 1” ). The audio cable has either a 3.5 mm and dual-RCA
connectors or dual-RCA connectors on both sides.
2. Select “External Speakers” on the TV setup menu.
Connecting a DVD player, game console and other devices
How to set it up
Connect the DVD player, game console, set top box, satellite receiver
and other devices to your TV with an HDMI or other type of cable ( DVI,
analog video ).
How to use it
Use the TV remote control to select the input source ( DVD player, game
console, etc. ).
English

10
ALTERNATIVE TV SETUP 2: TV WITHOUT HDMI ARC
When to use this conguration
The TV does not have an HDMI ARC connector and you want to use the Model XXL remote control to select the video source with the DVD and
GAME buttons. If your TV supports CEC, this setup allows you to control the volume of the Model XXL and change the HDMI input sources using
the TV's remote control.
Limitation: All video sources must be connected to the Model XXL, a video source connected directly to the TV will have no audio output on the
Model XXL.
To set it up
1. Connect a DVD player or Blu-ray player with an HDMI cable to the
“DVD” HDMI connector on the Model XXL.
2. Connect a game console, set top box or satellite receiver to the
“GAME” HDMI connector on the Model XXL with an HDMI cable.
3. Connect the Model XXL ( “TV” HDMI connector ) to the TV ( “HDMI
IN” connector ) with an HDMI cable.
4. In the TV setup menu of the TV, turn off the TV speakers by
selecting “external speakers”.
How to use it
Press the or buttons on the Model XXL remote control to select
the HDMI inputs.
How to use it ( with CEC )
• TV remote control: use to select HDMI sources on Model XXL.
• TV remote control: use to change volume of Model XXL.

11
NETWORK SETUP
OVERVIEW
Playing music wirelessly with AirPlay or DLNA requires the Model XXL to be connected to a local network via Ethernet or Wi-Fi. The following
pages describe different methods on how to configure the Model XXL so it can access the network.
The Model XXL supports both wired ( Ethernet ) and wireless ( Wi-Fi ) network connection.
SETUP METHOD WHEN TO USE THIS METHOD
ETHERNET SETUP An Ethernet cable is available for the Model XXL.
WI-FI SETUP WITH WPS The Wi-Fi access point (wireless router) has a WPS push button for easy network setup.
WI-FI SETUP WITH MODEL XXL
AS A TEMPORARY
WI-FI ACCESS POINT
Wi-Fi access points (wireless router) has no WPS push button,
this method works with all Wi-Fi access points.
Additional setup methods such as static IP addresses and Auto-IP are described in the Support secton on genevalab.com.
How to check the network status of the Model XXL
1. Press the button on the remote control.
2. Hold the button on the remote control for a few seconds.
3. Press the button to view the following: software version, IP address, IP type ( DHCP/static ), network connection status and
Wi-Fi network name.
Troubleshooting
See Network section in the chapter “Troubleshooting”.
ETHERNET SETUP
Instructions
1. Connect the Ethernet cable between the router and the back panel
on the Model XXL.
2. Set the “Network” switch on the back panel to “Ethernet”. The Wi-Fi
function is now disabled.
3. Turn the Model XXL on.
4. Press on the remote control. Wait until the display
shows “Connected”.
Now you are ready to play music via AirPlay or DNLA.
English

12
WI-FI SETUP WITH WPS
What is WPS?
WPS ( Wi-Fi protected setup ) is a simple way to connect a new device to a Wi-Fi network. WPS is a common feature on newer Wi-Fi access points
( wireless routers ). Press the “Wi-Fi Setup” button on the Model XXL and the “WPS” button on the Wi-Fi access point within about a minute, the
Model XXL will automatically connect to the Wi-Fi network.
Instructions
1. Set the “Network” switch on the back panel to “Wi-Fi-only”.
2. Turn on the Model XXL.
3. Press “AirPlay” on the remote control.
4. Lower the front grid.
5. Press the “Wi-Fi Setup” button below the display. The display will
show “WPS”. Pressing the power button above the display cancels
this setup process.
6. On the Wi-Fi access point ( wireless router) press the WPS button.
The light on the button starts to blink. If nothing happens you may
have to hold the button down for a few seconds, the Model XXL and
the Wi-Fi access point are now starting to connect to each other.
7. Wait until the Model XXL display shows “Connected to XXX” -
where XXX is the name of the connected Wi-Fi network.
Now you are ready to play music via AirPlay or DLNA.

13
WI-FI SETUP WITH MODEL XXL AS A TEMPORARY WI-FI ACCESS POINT
Instructions
1. Set the “Network” switch on the back panel to “Wi-Fi-only”.
2. Turn the Model XXL on.
3. Push “AirPlay” on remote control, then wait 30 seconds.
4. Lower the front grid.
5. Press the “Wi-Fi Setup” button below the display two times; the
display will show “WIFI AP”. ( Pressing the power button above the
display cancels this setup process. )
6. Connect to the Wi-Fi network, depending on your device and
operating system:
7. Open an Internet browser ( Safari, Windows Explorer, Chrome,
Firefox, etc. ).
8. Enter http://192.168.1.1 to access the Network Setup webpage for
the Model XXL.
9. Select your Wi-Fi network ( SSID ).
10. Enter the password, if needed.
11. Press “Apply”. The webpage now is no longer accessible.
12. Wait until the Model XXL display shows “Connected to XXX” –
where XXX is the name of the connected Wi-Fi network.
13. Now you are ready to play music via AirPlay or DLNA.
English
iPhone, iPad or iPod®touch
6.1. Open “Settings”, and then open “Wi-Fi”.
6.2. Make sure Wi-Fi is on.
6.3. Select the network “GENEVA_XXL…”. This temporary Wi-Fi
network created by the Model XXL does not require a password.
6.4. Click “Join”
Android
6.1. Open “Settings”, and then go to “Wireless & networks”, “Wi-Fi”.
6.2. Make sure Wi-Fi is on.
6.3. Select the network “GENEVA_XXL…”. This temporary Wi-Fi
network created by the Model XXL does not require a password.
Windows 7
6.1. Go to the control panel, and select “Networking”.
6.2. Select “Manage wireless networks”.
6.3. Select the network “GENEVA_XXL…”. This temporary Wi-Fi
network created by the Model XXL does not require a password.
6.4. Click “OK”.
Windows 8
6.1. Go to the control panel, and select “Networking and Internet”.
6.2. Select “Connect to a network”.
6.3. Select the network “GENEVA_XXL…”. This temporary Wi-Fi
network created by the Model XXL does not require a password.
6.4. Click “Connect”.
Mac OS 10.5 or higher
6.1. Go to System Preferences, then “Network”.
6.2. On the left select Wi-Fi. Make sure Wi-Fi is enabled.
6.3. Select the network “GENEVA_XXL…” in the menu “Network
Name”. This temporary Wi-Fi network created by the Model XXL
does not require a password.
6.4. Click “Apply”
9
8
10
11

14
TROUBLESHOOTING
If you cannot find an answer in this section, go to genevalab.com and select “Support” for more information.
GENERAL
How do I clean the speaker cabinet?
Unplug the Model XXL from the wall outlet before cleaning. Clean
only with a dry cloth. To avoid scratching the surface, we recommend
that you use the cleaning cloth included in the accessory bag. Do not
use cleaning alcohol or other solvent uids to clean the surface of the
cabinet as this can both damage the lacquer and also cause electrical
failures and fire if it enters the electronic chassis!
Why does the Model XXL turn itself off?
The Energy Saving Function will turn the Model XXL automatically off
after 15 minutes if there is no active Bluetooth connection or if there are
no signals from the Audio 1 – 4 inputs.
How to change the battery in the remote control?
1. Push the small lever in the direction of the arrow with your finger or
a small screwdriver.
2. While holding the small lever, slide out the battery compartment.
3. Replace the battery ( 3V lithium cell, 3V CR2032 ). Verify that the
battery is inserted with the correct polarity ( + side is facing down ).
12
3
Why does the display show a blinking “DAB”?
There are no stations stored. Start a scan by holding the key.
BLUETOOTH
How to reset the Bluetooth
Up to eight paired Bluetooth devices can be stored. To clear the
memory, perform the following steps:
1. Turn on the Model XXL and select Bluetooth with the remote
control.
2. Within 5 seconds of entering Bluetooth mode, hold down the
button on the remote control until “Reset Bluetooth” appears.
3. Pair your mobile phone again ( check the Bluetooth Pairing Guide ).
During Pairing, my smartphone requests a PIN – what is the PIN?
If the phone asks for a PIN, enter “0000” ( four zeros ).
AIRPLAY
Do I need an Internet connection for AirPlay?
An Internet connection is NOT needed to listen to music from via
AirPlay or DLNA.
I don’t see the Model XXL in the AirPlay icon of iTunes
The AirPlay icon in iTunes does not show up
The AirPlay icon in iTunes or iPhone shows up only if an AirPlay
speaker has been found in your local Ethernet or Wi-Fi network. Make
sure the Model XXL is connected successfully to your network; look for
the message on the display “Connected successfully to XXX”, where
XXX is the name of your network.
The Model XXL does not show up anymore in AirPlay on
iTunes or iPhone
Make sure you are connected to the network. If Model XXL still does
not show up, perform a factory default reset, and perform a network
setup again.
TV SETUP
Which HDMI devices are supported?
The Model XXL incorporates an HDMI 2-input, 1-output HDMI
transceiver with support for:
• All HDTV formats up to 1080p 12-bit deep color
• All mandatory 3D TV formats
• Audio Return Channel (ARC)
• CEC support
• PCM audio. Compressed audio (AC-3, DTS) is not supported.
How to disable CEC on the Model XXL
Holding the button for 5 seconds in DVD or GAME mode disables /
enables the CEC functionality.
The HDMI devices act unpredictably
If there are CEC incompatibility issues between the attached HDMI
devices and the Model XXL, one simple solution is to disable the CEC
functionality of on the Model XXL.
The TV changes the input sources automatically without user
interaction
Never connect both the SPDIF/Optical output and HDMI connector
of the TV to the Model XXL at the same time. The TV might switch
automatically between sources and it will not be possible to select an
input HDMI channel correctly.
The audio and the video are not synchronized when I watch a
DVD movie
• Adjust the audio delay in the setup menu of the DVD player or the TV.
• Change the TV setup so the audio is coming from the TV via the
HDMI ARC ( standard TV setup ) or via an audio output ( alternative
TV setup 1 ).
What is HDMI ARC?
ARC means “Audio Return Channel”. The HDMI ARC connector on the
TV is a bidirectional connector with two functions:
1. Normal HDMI input.
2. TV audio output. The HDMI ARC connector sends the audio from
the TV to the Model XXL ( select the Model XXL remote control
button “TV” ).
Why is not possible to turn the Model XXL on and off with the TV
remote control ( using CEC )?
The Model XXL meets strict environmental regulations applicable in
the EU, USA and Canada. These regulations require the Model XXL to
respect low power consumption in standby mode below 0.5 Watt .

15
TROUBLESHOOTING
NETWORK SETUP
How to check the network status of the Model XXL
1. Press the button on the remote control.
2. Hold the button on the remote control for 5 seconds.
3. Press the button to view the following: software version, IP
address, IP type ( DHCP/static ), network connection status and
Wi-Fi network name.
How to use the Wi-Fi setup button below the display
Three different Wi-Fi setup methods can be selected by repeatedly
pressing the button. After a setup method has been selected, the setup
process will start automatically after 5 seconds.
Cancel: Pressing the power button above the display cancels the
setup process.
Ethernet setup troubleshooting
• Repeat the procedure.
• Check that the “Network” switch on the back panel is set to
“Ethernet-only”.
• Check the cable connections, unplug and plug in the
Ethernet cable.
• Check that the green and yellow lights next to the Ethernet
connector of the Model XXL are ashing. If there are no lights, the
Ethernet cable is not connected to the network.
• Make sure DHCP (dynamic IP address) is enabled on the router.
DHCP is a protocol for assigning IP addresses in a local network.
DHCP is the most common configuration on modems, routers or
Wi-Fi access points.
Wi-Fi setup with WPS troubleshooting
• Repeat the procedure.
• Check that the “Network” switch on the back panel is set to “Wi-
Fi-only”. Ethernet and Wi-Fi do NOT work at the same time on the
Model XXL. After ipping the switch, the Model XXL restarts its
networking subsystem. This process can take up to 30 seconds.
• Note that the Model XXL supports only the WPS “push button”
method. The WPS “PIN” method is not supported.
• Upgrade the software on your Wireless Access point.
• Try a different network setup method.
Wi-Fi setup with the Model XXL as a temporary Wi-Fi
access Point troubleshooting
In this setup the Model XXL becomes a temporary Wi-Fi access point
without a password. Connect to the Model XXL and use an internet
browser to access the “Network Setup” webpage for the Model XXL.
Enter the Wi-Fi network name ( SSID ) and password on the webpage.
• Repeat the procedure.
• Check that the “Network” switch on the back panel is set to “Wi-Fi-
only”. Ethernet and Wi-Fi do NOT work at the same time on Model
XXL. After ipping the switch, the Model XXL restarts its networking
subsystem. This process can take up to 30 seconds.
• Check that Wi-Fi is enabled on your computer or smartphone.
• Check that you entered the correct IP address in the Internet
browser: http://192.168.1.1
• If the display shows a blinking “AIRPLAY” without a success
message, it means the Model XXL was not able to connect to the
Wi-Fi network: possibly a wrong password was entered. Repeat
the procedure.
• Try a different network setup method.
Reset the network settings to factory defaults
1. Turn on the Model XXL and wait at least 30 seconds.
2. Hold the power button above the display for 10 seconds:
all Network settings will be reseted.
SUPPORT
Service and repair
If the product is damaged and needs repairs, please contact your
dealer. Visit www.genevalab.com to find a dealer in your area.
Warranty
See the specific terms for your country at www.genevalab.com.
English


17
警告
为了避免引发火灾或触电,请勿让本产品淋雨或受潮。
为了减少触电风险,切勿取下盖子(或后盖),因为其内含用户不可维修
的零件。
重要安全提示
1. 务必阅读这些操作说明。
2. 妥善保管这些操作说明。
3. 留意所有的警告。
4. 遵守全部的操作说明。
5. 切勿在靠近水的地方使用该产品。
6. 仅用干布进行清洁。
7. 切勿遮挡任何通风口。根据厂商的说明进行安装。
8. 切勿在任何热源附近安装,如散热片、 加热器、炉子、或其
它的发热设备 (包括功放)。
9. 切勿使极性插头或接地插头的安全作用失效。极性插头有两个
扁形插脚,其中一个插脚比另一个插脚宽。接地插头有两个扁
形插脚和一个接地插脚。宽的或接地的那个插脚为你提供用电
安全保护。如果配备的插头与您使用的插座不相配,可咨询电
工了解老插座的更换方法。
10.保护好电源线,防止被踩到或夹到,特别是插头、插座位置、
以及电源线在本产品上的引出位置。
11.只使用厂家指定规格的零配件。
12.只使用厂家指定规格的或者随本产品配送的推车、置物
台、三脚架、托架、或桌子。当使用推车运送本产品
时,注意避免因侧翻而砸伤。
13.遇雷电天气或长期不用时,应拔掉本产品的电源插头。
14.应由合格的维修人员进行维修。当本产品因电源线或插头受
损、液体溅到或异物进入、受到雨淋或受潮、运行异常、跌落
而损坏时,应进行维修。
警告
遥控器电池:勿让小孩接触遥控器电池。如果误处理,可能会引起
火灾或化学性灼伤。切勿充电、拆卸、及在212ºF(100ºC)以上的
温度中加热。只能使用正确品牌型号的电池更换(CR2032锂钮扣电
池,3V)。
切勿吞食电池,会造成化学性灼伤
本产品的遥控器内置一颗纽扣电池。如果吞食了纽扣电池,2小时之
内会引起严重的内部器官灼伤,而且有可能会导致死亡。
勿让小孩接触新电池和旧电池。如果电池盒没有盖好,请勿使用本产
品,并将其放在小孩够不着的位置。
如果您觉得可能吞食了电池或者电池位于身体某一内部器官中,请立
即就医。
通风:切勿堵塞本产品背面的通风口。例如:勿将Geneva音响设备放
置在近墙处或可能降低散热效率的帘布前方。
坐在或靠着Geneva音响设备:勿靠着Geneva音响设备,且在任何情况
都勿坐在本产品上面。
避免损伤听力:长时间将音乐声音开得非常大可能会永久损伤听力。
标签位置:本产品的标签及安全相关标志位于后面板上。
室外天线:若连接室外天线或有线系统到产品时,应将天线或有线
系统接地,以防止电压浪涌及静电荷累积。美国国家电气规程第810
条、ANSI/NFP70号资料、加拿大电气规程第54节,对天线杆及其支撑
结构的正确接地、引入线到天线放电装置的接地、接地导体的尺寸、
天线/放电装置的位置、接地电极的连接、以及接地电极的要求进行
了规定
CATV系统安装人员注意事项:此注意事项提醒CATV系统安装人员须注
意美国国家电气规程第820-40条中有关正确接地的指导。而且其特别
规定了电缆屏蔽接地应连接到建筑物的接地系统,靠近电缆进入屋内
的位置。
使用环境温度:建议在41-95℉(5-35℃)的环境温度范围内使用该款
产品。
保护接地。须将本产品连接到带有保护接地的电源插座。
符合性
FCC法规
警告:未经合规性责任方明确认可而对本产品进行改造或改动,会使
用户失去操作本产品的权利。
注意:经测试,本产品符合FCC法规第15章中有关B类数字设备的限
制。这些限制用于在住宅安装环境中提供合理的防有害干扰保护。本
产品产生、使用并可能辐射射频能量,如果不遵循这些操作说明进行
安装和使用,可能会对无线电通讯造成有害干扰。然而,无法保障在
特定安装环境中不会产生干扰。
如果本产品对无线电或电视接收造成了有害干扰(这种干扰可通过开
启和关闭本产品进行测定。),鼓励用户采用以下一种或多种措施自
行消除干扰:
• 重定向或移动接收天线。
• 加大本产品与接收器之间的间隔距离。
• 将本产品与接收器连接到不同的电源插座上。
• 咨询零售商或有经验的无线电/电视技术人员,寻求帮助。
根据FCC法规,未经厂商明确认可而对本产品进行改动,会使用户失
去操作本产品的权利。
FCC编号:ZXX-MODELXXL
ZXX:受让人代码,由FCC指定。
加拿大
本产品符合加拿大工业部免许可RSS标准。操作时易发生下面两种情
况:(1)本产品可能不会产生干扰,而且(2)本产品必须接收任何干
扰,包括可能对本产品造成非期望操作的干扰。
加拿大工业部(IC):编号10107A-MODELXXL
CE符合性声明
G-Lab公司声明:这款产品符合1999/5/EC指令的核心要求和其它相关
条款。有关该符合性声明的内容,可以访问其网站http://geneval-
ab.com,或者向瑞士苏黎世G-Lab公司咨询。
设备回收
本产品可回收重复利用。禁止将带此标记的产品与通常的生
活垃圾扔在一起。当本产品无法继续使用时,将其送至专门
的电子、电气设备回收点,您可以通过本地官方机构了解更
多关于回收点的信息。
执行欧洲报废电子电器设备(WEEE)指令,显着减少运送到垃圾填埋场
的垃圾数量,从而降低对星球与人类健康的环境影响。请负责回收废
旧产品。如果本产品仍然能用,可考虑送给其他人或卖掉。
废旧电池:请按当地法规正确处理废旧电池。切勿将电池扔入火中。
许可资料
Apple、AirPlay、iPad、iPhone、iPod touch、iTunes 以及 Mac为苹果公司
在美国及其它国家的注册商标。
Bluetooth®字标与标志是Bluetooth SIG, Inc持有的注册商标。
© 2013 G-Lab GmbH.版权所有。
Wi-Fi认证的商标为Wi-Fi联盟的证明标志。
HDMI、HDMI标志及高清多媒体界面为HDMI Licensing LLC的商标或注册商标。
根据版权保护法,未经G-Lab GmbH书面同意,不得全部或部分复印本说明书中
的内容。
Geneva®是G-Lab GmbH的注册商标。
手册版本
Geneva音响设备Model XXL使用手册,版本号:v1.1。
简体中文
小心触电,请勿打开
注意

目录
开始使用 ........................................................................................................................................ 19
关于Model XXL ............................................................................................................................... 19
开始使用 ........................................................................................................................................ 19
使用MODEL XXL ....................................................................................................................... 20 – 23
.......................................................................................................................... 20
FM收音机 ........................................................................................................................................ 20
DAB / DAB+......................................................................................................................... 20
电视、DVD 以及游戏机................................................................................................................... 21
蓝牙 ............................................................................................................................................... 21
AirPlay ........................................................................................................................................... 22
DLNA ............................................................................................................................................. 22
软件自动更新................................................................................................................................. 22
后面板............................................................................................................................................ 23
模拟与数字音频输入 ...................................................................................................................... 23
电视设置 ................................................................................................................................. 24 – 26
电视设置(有HDMI ARC的电视机)................................................................................................. 24
替代电视设置1 ............................................................................................................................... 25
替代电视设置2 ............................................................................................................................... 26
网络设置 ................................................................................................................................. 27 – 29
概要 ............................................................................................................................................... 27
ETHERNET设置................................................................................................................................. 27
带WPS的WI-FI设置.......................................................................................................................... 28
带MODEL XXL临时WI-FI接入点的WI-FI设置 .................................................................................... 29
故障排除与常见问题 ............................................................................................................... 30 – 31
技术支持 ........................................................................................................................................ 31
Other manuals for XXL
2
Table of contents
Languages:
Other Geneva Radio manuals