Tire de la lengüeta protectora para activar el control remoto
Abrepuertas de producción actual
1. Oprima el botón de programación y manténgalo oprimido hasta
que el LED redondo se vuelva
azul, luego suéltelo.
2. El LED redondo se apagará y el
LED largo comenzará a pestañar
en violeta.
3. Oprima el botón deseado en el
control remoto una vez cada dos
segundos hasta que la puerta
funcione.
PROGRAM
SET +
PROGRAM
SET +
NOTA: El MODO DE APRENDIZAJE del abrepuertas se desactivará en 30
segundos.
PROGRAM
SET +
PROGRAM
SET +
PROGRAMACIÓN DE UN ABREPUERTAS RESIDENCIAL
PRODUCCIÓN DEL ABREPUERTAS DESDE 2011 AL PRESENTE
PRGM
SET
TIPO 1 TIPO 2 TIPO 3
Existen 4 tipos de almohadillas de botones de programación. El tipo 1
se ilustra en estos pasos. Todos los botones realizan la misma función y
la programación es la misma para todos los tipos indicados arriba.
Ponga el abrepuertas en el modo de programación:
TIPO 1-2-3-4
+PRGM
SET
+
–
PRGM
SET
+
–
PRGM
SET
+
–
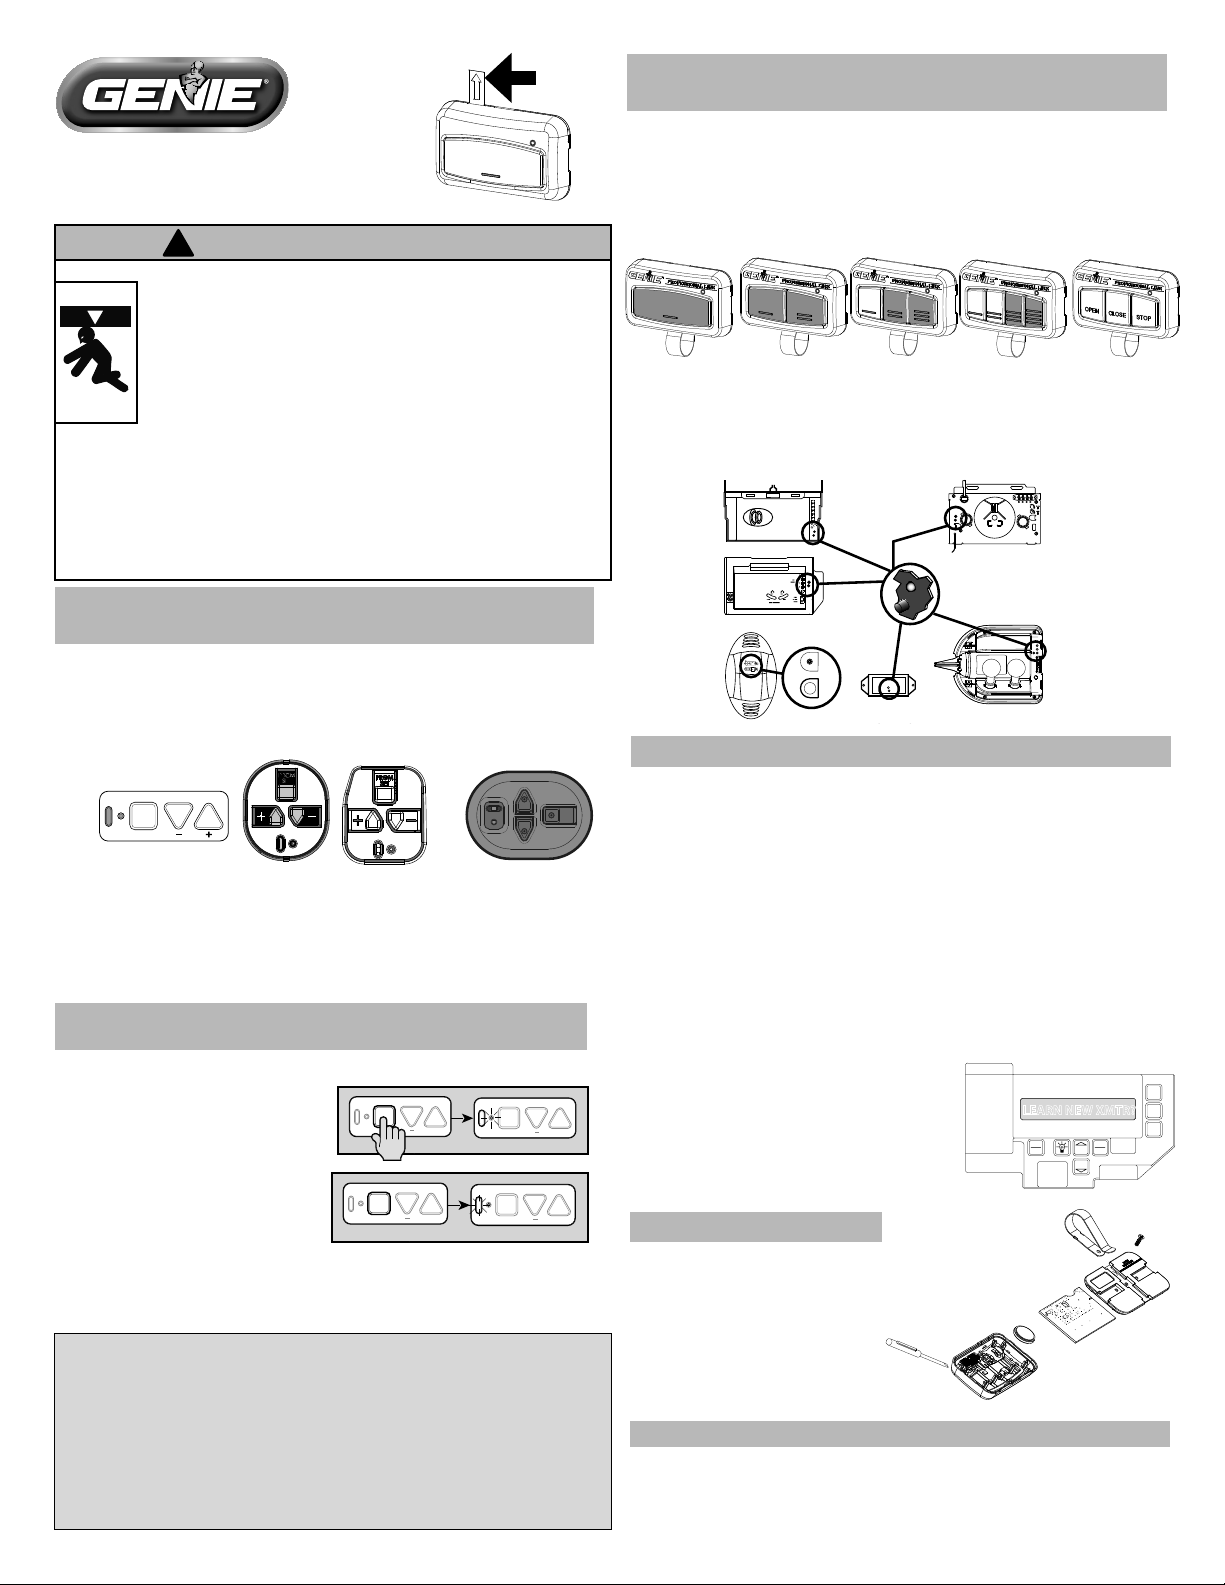
TIPO 4
Abrepuertas fabricados entre 1995 y 2011 y todos los
receptores externos. (TIPO CÓDIGO DE APRENDIZAJE).
Ponga el abrepuertas en el modo de programación:
1. Oprima el botón del CÓDIGO DE APRENDIZAJE hasta que el LED ROJO
comience a pestañar y luego suéltelo.
2. Oprima el botón deseado en el control remoto una vez cada dos
segundos hasta que la puerta funcione.
1995-2011
FRONT FRONT
INSIDE LIGHT LENS
BOTTOM
BACK
CODE
LEARN
SET
SET
OPEN
FORCE
CLOSECODE
LEARN LIMITMANUAL
EXTERNAL
RECEIVERS
PROGRAMACIÓN DEL ABREPUERTAS RESIDENCIAL
PRODUCCIÓN DE ABREPUERTAS DEL 2011 Y ANTERIORES
1. Si el abrepuertas está en el modo de MARCHA, oprima la tecla “CAL/
RUN”para ingresar al modo de calibración.
2. Oprima“SCROLL”(hacia arriba o hacia abajo) hasta que la pantalla
indique “LEARN NEW XMTR?” Fig.1
•Esta pregunta, junto con la indicación“HIT SET FOR YES”se desplazará
continuamente por la ventana de visualización.
•Si se oprime “SCROLL” o“CAL/RUN”se cancelará la operación.
3. Oprima “SET/CLEAR”.
•La visualización indicará“PUSH XMTR BUTTON TWO TIMES TO LEARN
XMTR.”
4. Escoja cualquier botón del transmisor y oprímalo dos veces.
•Se asignará un número al azar al transmisor y la visualización indicará
“XMTR __ LEARNED.”Ese transmisor se ha ingresado y estará listo para
hacer funcionar la puerta.
•Rotule el transmisor con el número
asignado.
5. Oprima“SCROLL”(hacia arriba o hacia
abajo) para pasar a otro elemento del
menú, o“CAL/RUN”para salir del modo de
CALIBRACIÓN.
OPEN
CLOSE
STOP
CAL
RUN SCROLL
SCROLL
SET
CLEAR
LEARN NEW XMTR?
Fig. 1
PROGRAMACIÓN DEL ABREPUERTAS COMERCIAL
Para información sobre la patente: :
www.geniecompany.com/patents ©2020, The Genie Company
CÓMO CAMBIAR LA PILA:
1. Retire el clip de la visera.
2. Retire el pequeño tornillo cruciforme
al dorso.
3. Abra la caja con una moneda pequeña
o un destornillador.
4. Retire la tarjeta de circuitos.
5. Cambie la pila con una pila tipo botón
CR2032.
AYUDA CON LA PROGRAMACIÓN:
Si el abrepuertas no se activa después de llevar a cabo los pasos
ilustrados, repítalos o contáctese con Atención al Cliente, por diálogo en
línea (www.geniecompany.com) o por teléfono al 1-800-354-3643 para
obtener ayuda con la programación.
¡ADVERTENCIA!
LA PUERTA EN MOVIMIENTO PUEDE OCASIONAR LESIONES GRAVES O
LA MUERTE.
•NO instale el transmisor (teclado) a menos que el dispositivo de
seguridad del operador de la puerta funcione como es requerido por
el manual del operador de la puerta.
•La Consola de Pared debe ser montada a la vista de la puerta, por lo
menos 5 pies arriba del piso y alejada de las partes en movimiento de
la puerta.
•Evite que las personas se acerquen mientras la puerta está en movimiento.
•NO permita que los niños jueguen con el transmisor o el operador de la puerta.
•Si la función inversa de seguridad no funciona correctamente:
•Cierre la puerta y después desconecte el abridor utilizando la manija de liberación
manual.
•NO utilice el transmisor o el operador de la puerta.
•Consulte los Manuales del Propietario de la Puerta y del Abridor de la Puerta antes
de intentar cualquier reparación.
Declaración FCC Parte 15.21:
Los cambios o modicaciones que no estén aprobados expresamente por la parte
responsable del cumplimiento podrían anular la autoridad del usuario para operar el
equipo.
Declaración FCC / IC:
Este dispositivo cumple con las normas de la Parte 15 de FCC y las normas de exención
de licencia de RSS de Industry Canada. La operación está sujeta a las dos condiciones
siguientes: (1) este dispositivo no podrá ocasionar interferencias dañinas, y (2) este
dispositivo tiene que aceptar cualquier interferencia que sea recibida, incluyendo las
interferencias que podrán ocasionar la operación indeseada del dispositivo.
FRENTE
DORSO
DEBAJO RECEPTORES
EXTERNOS CRISTAL DE LUZ INTERIOR
FRENTE
NOTA: Los botones con Código de Aprendizaje generalmente están
ubicados debajo de las cubiertas de los cristales en los modelos anteriores.
NOTA: ¿Abrepuertas fabricado entre noviembre 1995 y 1997? Compatible
con botones sombreados.
Ejemplo de
control remoto


