Genvex ECO 190 CS/CL User manual

INSTALLATION
MANUAL
ECO 190 CS/CL – ECO 190 TS/TL
Mechanical ventilation with passive heat
recovery
A

2
TABLE OF CONTENT
Installation ECO 190 CS/CL................................................................................................................................................3
Duct connection............................................................................................................................................................5
Duct system ...................................................................................................................................................................5
Condensate drain .........................................................................................................................................................6
Insulation of ducts in cold loft spaces..................................................................................................................6
Insulation of ducts in heated spaces.....................................................................................................................7
Reheating of the supply air.......................................................................................................................................7
Electrical Installation .................................................................................................................................................8
Inspection and initial adjustment of appliance.................................................................................................8
Optimum initial adjustment of plant.....................................................................................................................9
Maintenance of ventilation unit..............................................................................................................................9
Trouble shooting....................................................................................................................................................................10
Options for ECO 190 ventilation unit............................................................................................................................11
Spare parts..............................................................................................................................................................................12
Electrical diagram – OPT251............................................................................................................................................13
Electrical diagram – OPT260............................................................................................................................................15
EC – Declaration of conformity .......................................................................................................................................18
Disassembly instructions ..................................................................................................................................................19

INSTALLATION
IMPORTANT:
When installing ECO 190 follow these instructions:
1) Turn off the electricity before opening the unit
2) Install an air tight water trap on a non-freezing location
to compensate for the fan pressure.
3) The height of the water trap must be at least 50 mm.
4) Make sure that the drain flows downwards all the way
from the unit.
5) Pour 1 liter water into the drip tray of the unit to verify
that it is drained properly. Before each heating season
make sure that the drain is filled with water.
6) If freezing of the water trap occurs, it is necessary to
install a thermostat and electrical heater to prevent
freezing when the temperature drops below +2 °C.
7) Air flow adjustments must be made on both supply and
exhaust air sides before use of the machine. It is
important supply and exhaust air volumes are balanced.
8) It is recommended to keep the ducts closed until the unit
is started and the system is adjusted.
Above instructions must be followed. If the condensate
drain is not made according to this instruction, Genvex can
not be made responsible for any additional damages, which
have nothing to do with the Genvex unit.
ECO 190 CS/CL is intended for mounting on the ceiling
with special brackets, which is delivered together with
the ventilation unit (see photos).
Important: ECO 190 can only be installed horizontally.
1. Position the ceiling brackets according to the size of the
ventilation unit and mount with a total of 6 screws
capable of taking the entire weight of the unit.
2. Slide the ventilation unit with the preinstalled flanges
onto the ceiling brackets.
3. Finish the installation by installing a screw in the fixation
hole to ensure that the ventilation unit cannot move
out of the ceiling bracket.
ECO 190 is intended for mounting flat on a plain vibration-
free surface. Standard configuration is "right", which means
that supply and extract air from the house living room areas
are connected to the right side of the ventilation unit (note:
controller facing towards you). Stickers on the ventilation
unit indicate how to connect the ductwork.
PLEASE BE AWARE that project specific models can be
configured left - if so the stickers will indicate how to
connect ductwork.
1.
3.
On a "right" configured model the condensate drain and
syphon is connected to the left side of the ventilation unit
(i.e. on the fresh air and discharge side of the unit). The
condesate drain on the right hand side will be plugged and
is not in use.
Space necessary for installation recommended is machine
size including brackets + 20 cm all around the unit.
100 cm free space is recommended in front of PCB to be
able to connect sensors and for service.
A minimum of 160 cm below the machine is recommended
for filter extract.
Please consider space required for siphon/condensate
drain when planning the installation of ECO 190.
2.
Information on how to configure a "right" unit to a
"left" unit on site can be aquired by contacting your
Genvex sales representative.
3

ECO 190 CS/CL
Dimensions diagram (in mm)
ECO 190 TS/TL
Dimensions diagram (in mm)
1. Fresh air
2. Exhaust air
3. Extract air
4. Supply air
Weight: 25 kg (31 kg
with bottom cover plate)
1. Fresh air
2. Exhaust air
3. Extract air
4. Supply air
Weight: 25 kg (31 kg
with bottom cover plate)
4 13 2
Note that general service of heatexchanger, fans etc. is only possible by removing the bottom plate of the ventilation
unit and thus ductwork needs to be disconnected to be able to lift the unit and remove the bottom plate.
Note that the units shown above are configured as "right" models.
673
1202
1271
241
3
4
1211
1271
267
678
1211
1271
267
678
1
2
4

Duct connection
All duct connections display a yellow sticker indicating the
type of ventilation duct to be connected.
Connect the supply air
Du ct system from the unit to the supply outlet in the living
room
Connect the extract air
Duct system from wet rooms to the unit.
Connect the fresh air
Duct system from fresh air roof cowls/external grills from
the ground collector to the unit.
Connect the exhaust air:
Duct system from unit to the escaping roof cowls/external
grills.
Duct system
It is recommended that the duct system is executed in
spiral ducting connected with rubber ring seal fittings in
order to provide a leak-free and durable duct system.
To achieve a satisfactory low sound level from the unit,
attenuators must always be fitted to the supply and extract
duct system between the unit and the first supply and
extract fittings.
It is recommended that air speeds in the ducts are
dimensioned at sufficiently low level to prevent noise from
the ductwork.
When positioning fresh air and extract roof cowls/grills,
make sure the two air flows do not short circuit, causing
escaping air to be drawn in again.
It is recommended that the fresh air intake is placed on the
north or east side of the house to provide optimum comfort
with minimum influence by heating of the sun.
Recommended minimum horizontal distance between air
intake and exhaust: 3 meters.
Recommended minimum vertical distance between air
intake and exhaust: 1 meter.
To connect standard galvanized steel ducts to the ECO190
ventilation unit - start by installing 4 no. male connectors in
the Ø125 mm. openings in the unit (double sealing lips).
Now the unit is ready for connecting ductwork directly on
to the male connector.
It is recommended to install galvanized brackets to secure
the male connector to the galvanized housing by using steel
cutting screws.
3 m
1 m
3 m
5

Condensate drain
The units produce up to 6 litres of condensate per day. It is
therefore important that the condensate drain is correctly
executed and that the unit has a slight slope towards the
floor gully/drain.
The condensate drain pipe must be air tight for example by
bending a copper pipe as an siphon or using a standard
siphon as illustrated..
Use an armed water hose between the drain connecting
piece on the unit and the siphon and tightend it in both ends
with a collar band.
From the siphon and to floor gully/drainage point a
necessary slope at 1% is required.. The condensate drain
must be fitted with a water trap as there is negative
pressure in the chamber in which the condensate tray is
mounted.
If the unit is installed in a cold loft space, the condensate
drain pipe must be insulated to prevent freezing of the
condensate in the pipe. However, it is recommended that
the siphon is installed in a heated space below to ensure
that the water in it does not freeze.
If installation problems make it impossible to secure the
condensate drain pipe from freezing by insulation, it will be
necessary to mount a thermostat-controlled heating tape
around the condensate drain pipe.
During operation there will be an under pressure in the unit
it will therefor be neccesary to make sure that the siphon
contains a minimum of 50 mm watercolumn.
Insulation of ducts in cold loft spaces
In order to exploit the unit’s high heat recovery potential
(efficiency), it is necessary to insulate the ducts correctly.
Supply and extract ducts
To minimise heat losses from the duct system in cold loft
spaces, the supply and extract ducts must be insulated with
a minimum of 100 mm insulation. If insulation form
alternative A is used, it is recommended that it is executed
with two layers of 50 mm Lamella mats with paper or foil
externally and with staggered joints between the two
layers. If the ducts are laid on the rafter foot, alternative B
may be used. The insulation must always be tightly packed
round the ducts.
Fresh air and escaping ducts in cold spaces
It is recommended that fresh air and escaping ducts
are insulated with a minimum of 50 mm insulation. The
fresh air duct is insulated to prevent warm air in the loft in
summer from heating up the fresh air. Take care to seal the
termination where the escaping duct is led through the roof
or through the gable end, in order to avoid condensation
damage.
Duct insulation, alt. A
Duct insulation, alt. B
Faulty duct insulation
6

Insulation of ducts in heated spaces
Supply and extract ducts
In warm loft spaces the supply and extract channels must
be insulated with 50 mm insulation.
Supply and extract ducts led through heated spaces in
dwellings do not require insulation.
Fresh air and exhaust ducts
In warm loft spaces and heated rooms in dwellings the
fresh air and escaping ducts must be insulated with
minimum 50 mm insulation. In addition the insulation must
be covered externally with plastic film or aluminium foil in
order to avoid condensate in the insulation.
Reheating of the supply air
As the countercurrent heat exchanger cannot recuperate al
the heat from the extract air to the supply air, the supply air
will be 1°-5° C colder than the room temperature. If this is
not tolerable it is possible to mount a water or electric
reheater, that heats the air up to the room temperature.
Water reheater
As the counter current heat exchanger cannot extract all
the heat from the extract air and supply it to the supply air,
the supply air will be about 1-4°C colder than the room
temperature in the dwelling for the whole winter season. If
this lower supply temperature is insupportable during cold
periods, a water-based or electrical reheating surface can
be mounted for reheating the supply air up to room
temperature.
Water-based reheating surface
To protect the water-based reheating surface from frost
burst, a frost protection thermostat must be fitted to the
unit and the surface insulated. The frost protection
thermostat sensor is mounted behind the fins of the water-
based reheating surface. The sensor for controlling the
motor valve is mounted in the supply air channels approx.
500 mm downstream of the water-based reheating surface
in order not to be affected by the radiant heat from the
heating element. The water supply to the water-based
reheating surface must be executed by an authorised
plumbing and heating engineer.
Electrical reheating surface
The sensor for controlling the electrical heating surface is
mounted in the supply air channel approx. 500 mm
downstream of the electrical reheating surface in order not
to be affected by the radiant heat from the heating
element.
Electrical preheater
At outdoor temperatures below 0 °C it is recommended to
install an electrical preheater to prevent the counterflow
heatexchanger from ice building. The sensor for controlling
the electrical preheater needs to be installed in the fresh
air duct 500 mm. upstream of the electrical preheater.
Note – when using the modulating preheater, the existing
fresh air temperature sensor in the ventilation unit can be
used to control the preheater (no extra temperature sensor
is required).
Heating coil – power/flow/temp graph
7

Electrical installation
The electrical connection must be carried out by an
authorised electrical installer. See the electrical diagrams
at page 14-18.
The cable between the unit and the control panel is a 4-
conductor 0.25 mm2cable with a maximum length of 50 m.
when using the Optima 250/251 design panel.
When connecting the Optima 100 design or Opus panel to
OPT260 the conductor needs to be 8 wire x 0.25 mm2 with
a maximum length of 10 m.
Inspection and initial adjustment of appliance
To achieve optimum operation of the unit it must be initially
adjusted with air measuring equipment.
To start up the unit before adjustment, do as follows:
Before starting up the unit:
1: Check that the Genvex unit is correctly mounted and
that all ducts are insulated as required.
2: Check that hatches can be opened so that service and
maintenance on the unit can be carried out.
3: Check that filters are clean (may be dirty from
installation work).
4: Check that the condensate drain is correctly mounted
with water trap and is protected from freezing..
5: Set all supply valves such that the valve closest to the
unit is opened three turns from closed position, while
the furthest is open eight turns from closed position.
Open the intermediate valves by 4-7 turns depending on
how far they are from the unit.
6: If a reheating surface has been mounted on the unit, set
the supply temperature to 0-3°C below the room
temperature in the dwelling.
The unit can now be started up and be allowed to run until
initial adjustment with air measurement equipment has
taken place.
8

G4 = Standardlter
(CoarselterclassG4)
F5= Finelter(FinelterclassF5)
F7= Pollenlter(FinelterclassF7)
9
Maintenance of ventilation unit
Filters
When the filter timer reaches the set value for filter
change, “Alarm!” will show in the screen saver and ”Chg.
filter” will flash. This means that it is time to clean/change
the filters.
Switch the unit off on the switch on the control panel
or the switch on the electrical panel. Open the front
doors and remove the filters. When the filters have been
cleaned/replaced, close the front doors and reset the
filter alarm by holding down the button below the filter
symbol, until ”Alarm!”, “Chg. Filter” and the exclamation
mark disappears in the filter symbol. The unit reverts to
normal operation.
If the wish is another time interval this can be adjusted in
the user menu.
Do not vacuum or clean at high air pressure. It will
damage the filter!
Condensate drain
When changing the filter in August/September, before
outside temperatures fall to 5°C, check the condensate
drain for blockage by dirt and check that there is water in
the water trap.
Countercurrent heat exchanger
Inspect the countercurrent heat exchanger. If it is dirty,
remove it and wash in warm soapy water and then rinse,
possibly in the bathroom using the shower head.
Careful handling of the heat exchanger plates is
required. They have sharp edges and must not be
damaged.
Fans
Check the two fan wheels for dirt. If they are dirty they may
be cleaned with a brush, bottle washer etc.
Supply and extract valves
Clean the valves by wiping with a dry cloth. Make sure the
valve does not rotate, causing a change in the air volume.
Important: When reinstalling the front plate to the
ventilationunit please make sure not to use electrical tools
fortightning the bolts as this could possibly result in
damage to the threaded connections.
Gently tighten alle the front plate bolts untill the front
plate is securely fixed to the ventilation unit cabinet.
Optimum initial adjustment of plant
Air measuring equipment is used.
Before starting initial adjustment, check that the 6 points
in the inspection and initial adjustment section have been
carried out. Then start up the unit:
Set the initial basic ventilation value, which is speed 2. To
reduce energy consumption as much as possible, first
adjust the main air volumes to the desired air volume by
changing the voltage outlet on the transformer.
Then adjust the supply and extract valves with air
measuring equipment (Remember when performing initial
adjustment of the valves to lock them and to turn the guide
plate in the supply valves so the air blows in the right
direction).
Then check the main air volumes again and fine-adjust the
main air volumes by using the fresh air and extract air
valves (remember to lock the position of the valves after
initial adjustment).

10
Cold supply air
Possible error
• Clogged heat changer
• Faulty extract air fan
• Clogged extract air filter
• Electrical reheater is disconnected at the over heating
thermostat (only units with electrical reheater installed)
• Air in the heating pipes, faulty thermostat / motorvalve,
incorrect setting of control panel.
Within the guarantee period (0-2 years)
The installer from whom you have bought the system.
After the guarantee period (2 years ->)
The installer from whom you have bought the system or the
Genvex service department (+45 7353 2765).
Before calling, please write down the data from the
inscription
plate (silver plate on the unit).
Alarms
Filter timer
The control has a filter timer to guarantee that the filter is
changed and that optimal operation is established. When
the timer reaches the set value, “Chg. filter” will flash in the
display until the filters have been changed.
When the filters have been changed, the button for the
filter symbol must be held down until ”Alarm!”, “Chg. Filter”
and the exclamation mark disappears and the unit reverts
to normal operation.
Com error
This error appears when there is no communication
between the display and control. Check that the wiring is
correct on terminals 21 to 24.
Frost protection error
This error message will be displayed if a water reheater is
fitted to the system and the temperature of the water
reheater is too low, causing a danger of frost burst. The
control will stop the system and open the motoroperated
valve to keep the heater warm.
21 Signal
22 Signal
23 10 Volt
24 0 Volt
Safety thermostat in electrical heater
(optional equipment)
If an error occurs on an electrical heater, the safety
thermostat will disconnect.
The heater is equipped with a fire thermostat that
automaticallycuts off the power supply, if the temperature
exceeds 80 °C. If the temperature decreases, the heater
automatically re-engages.
As an additional security there is a built-in thermal cut-out,
which disengages if the temperature exceeds 110 °C.
Reengaging must be done manually.
Does not apply to PTC electrical heaters.
The system is not running
Unit stopped
Possible error
• Fuse in main board has blown, no power to unit.
• One of the fuses on the circuit board of the unit isblown.
• Loose wire, no power to unit.
• Loose wire between unit and control panel.
• Faulty or incorrectly set week program.
• Filter timer has switched the system off.
• Condensed water is leaking from the unit
• Possible error:
• Condensation outlet blocked by dirt.
• The condensation outlet is not adequately protected
• against freezing at low outdoor temperatures.
Air faults
No supply air
Possible error
• Faulty supply air fan
• Clogged supply air fi lter
• Clogged fresh air grill due to dirt and leaves during the
• fall and snow and ice during the winter.
• Fuse on the circuit board is blown.
• The unit is in defrost mode (supply air fan stops)
• Incorrect value set in User menu item 2.
No extract air
Possible error
• Faulty extract air fan
• Clogged extract air fi lter.
• Fuse on the circuit board is blown
TROUBLESHOOTING

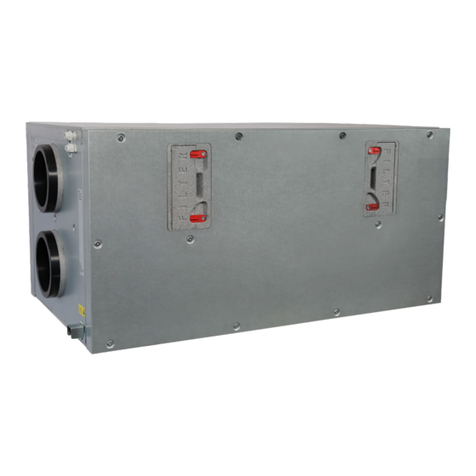
Bottom galvanized steel plate for ECO190C - for a smooth
finish of the ECO 190C bottom (available also in white RAL
9016).
Condensate safety float switch - to be wired to "external
start/stop" on main PCB for automatic shut down of
ventilation unit if condensate drain is blocked.
11
OPTIONS FOR ECO 190 VENTILATION UNIT
(available upon request from Genvex)

SPARE PARTS
1
2
2
4
3
5
6
6
7
12
Item Description
1. 042478 Optima 251 controller
2. 069300 CS fan complete/069323 CL fan complete
3. 069344 Heat exchanger, aluminium/069345 Heat exchanger, PET
4. 069372 Filter F7
5. 069370 Filter F4
6. 069349 Sealing
7. 069382 Baseplate EPS complete
#

L1 = Potential free input for optional:
Humidistat, Extractor hood ,CO2
L2 = Optima Display
L3 = Sensors T1,T3,T4,T7
L4 = Humidity sensor P1
L6 = Sensors T8,T9
L8 = External stop
L10 = Modulating Pre / Reheating
L11 = 0-10V Motorvalve Reheating
0-10V Belimo LM230ASR bypass
L17 = 0-10V extract air fan and
0-10V supply air fan
H1 = Mains connection 230 VAC
H2 = (R2) Electric Reheater 230VAC
H3 = (R3) Electric Preheater 230VAC
H2,H3 = Max. load total 1800W
H6 = (R10) Motorvalve Reheating,
Belimo LM230ASR 230VAC
H7 = (R10) Fan, extract air 230VAC
H8 = (R12) Saia-UCK ON/OFF Bypass 2x230VAC
H9 = (R10) Fan, supply air 230VAC
H14 = (R6) Belimo CM230-F-R ON/OFF Bypass 230VAC
H16 = (R8) Belimo CM230-F-R ON/OFF Bypass 230VAC
H17 = (R9) AUX relay 230VAC
A = LED Flash - Power on
B = LED Flash - Communication to Optima Display
Q = Fuse
1
1
1
1 1
1
1
1
1
1
1
1
1
1
1
1
1
1
1
2
2 2
2
2
2
2
2
2
2
2
2
2
2
2
2
2
2
2
3
33
3
3
3
3
3
4
4
4
4
4
4
4
5
5
5
6
6
6
7
7
7
8
8
8
L1 L2
L3
L6
L8
L11
H2 H3
H7H6
H8 H9
H17H16
ES960C
PEPE
L17
A B
Q1= 1.6A
Q2= 2.5A
H1
L4
Q3= 0.5A
Q4= 0.5A
Q1= H8,H16,H17
Q2= H6,H7,H9
Q3= L1-L17
Q4= L1-L17
H14
L10
1
1
1
1 1
1
1
1
1
1
1
1
1
1
1
1
1
1
1
2
2 2
2
2
2
2
2
2
2
2
2
2
2
2
2
2
2
2
3
33
3
3
3
3
3
4
4
4
4
4
4
4
5
5
5
6
6
6
7
7
7
8
8
8
13
ELECTRICAL DIAGRAM – OPT251

14
-
-
+
+
M1
M2
N
N
N
L
L
0-10V
0-10V
0-10V
0-10V
L
L
L
L
N
N
N
N
N
L
+5V
0V
Signal
0V
+10V
-
-
+
+
N
L
+12V
+12V
0V
0V
Optima Design Mains connection
1x230VAC, L-N-PE
Max: 13A
H2 and H3
Max.load total
1800W
Aux. relay R9
1x230V 50Hz
ONLY control current
Sensor Frost
Sensor, extract air
Sensor, exhaust air
Sensor, fresh air
Sensor, supply air
Sensor Option
External stop
EC fan
Extract air
Blue
Yellow
EC fan
Supply air
Blue
Yellow
EC fan
Extract air
Saia-UCK
ON/OFF
Bypass
Brown
Brown
Blue
Blue
Yellow/green
Yellow/green
Belimo
LM230ASR
Bypass
Humidity sensor
White
Red/Brown
Blue/Green
EC fan
Supply air
Red - Brown
Blue - Green
Yellow - White
Belimo
CM230-F-R
ON/OFF
Bypass
Electric Reheater
Electric Preheater
Black
Black
White
White
Control signal
Motorvalve
Reheating
Power supply
Motorvalve
Reheating
Modulating
Reheating
Modulating
Preheating
Potential free input
for optional:
Humidistat,
Extractor hood ,
CO2
White
Brown
Blue
Belimo
LM230ASR
Bypass
12 12
H1
12 12
H2
12 12
H3
12 12
H6
12 12
H7
123 123
H8
12 12
H9
12 12
H16
12 12
H17
L
12 12
L1
1234 1234
L2
12345678 12345678
L3
1234 1234
L4
12345678 12345678
L6
12 12
L8
1234 1234
L11
1234 1234
L17
M1
M1
M2
M2
M3
M3
M5
N
P1
PE
PE
PE
T1
T3
T4
T7
T8
T9
21
22
23
24
21
22
23
24
M4
M4
12345678 12345678
L10
12 12
H14
M6

1 11
1
1
1
12
2
2
2
2
22
2
3
3
3
3
4
4
4
4
5
L1 L2
L3
L6
L8
L11
H2 H3
H7H6
H8 H9
H17H16
ES960CC
PE
PE
L17
A B
Q1= 1,6A
Q2= 2,5A
H1
L4
Q3= 0,5A
Q4= 0,5A
Q1= H8,H14,H16,H17
Q2= H6,H7,H9
Q3= L1-L17
Q4= L1-L17
H14
L10
L16
L13
L5
L7
C D
L15
L14
SD
1
1
1
1
1
1
1
1
1
1
1
1
1
1
1
1
1
1
1
1
1
1
2
2
2
2
2
2
2
2
2
2
2
2
2
2
2
2
2
2
2
2
2
3
3
3
33
3
3
3
3
3
3
3
3
4
4
4
4
4
4
4
4
4
4
4
4
5
5
5
5
5 6
6
6
6
7
7
7
7
8
8
8
8
L1 = Potential free input for optional:
Humidistat, Extractor hood ,CO2
L3 = Sensors T1,T3,T4,T7
L4 = Humidity sensor P1
L5 = Room sensor T2 (optional)
L6 = Option 1 & 2, Sensors T8,T9
L7 = Option 1
L8 = Externalstop
L10 = Modulating Pre / Reheating & Option 2
L11 = 0-10V Motorvalve Reheating
0-10V Belimo LM230ASR bypass
L13 = Option 1
L14 = Data logger socket
L15 = Programming socket
L16 = Modbus
L17 = 0-10V extract air fan and
0-10V supply air fan
H1 = Mains connection 230 VAC
H2 = (R2) Electric Reheater 230VAC
H3 = (R3) Electric Preheater 230VAC
H2, H3 = Max. load total 1800W
H6 = (R10) Motorvalve Reheating,
Belimo LM230ASR 230VAC
H7 = (R10) Fan, extract air 230VAC
H8 = (R12) Saia-UCK ON/OFF Bypass 2x230VAC
H9 = (R10) Fan, supply air 230VAC
H14 = (R6) Belimo CM230-F-R ON/OFF Bypass 230VAC
H16 = (R8) Belimo CM230-F-R ON/OFF Bypass 230VAC
H17 = (R9) AUX relay 230VAC
A = LED Flash - Power on
B = LED Flash - Startup
D = LED Flash - Loadsthe program from sd card
Q = Fuse
15
ELECTRICAL DIAGRAM – OPT260

12
H1
12
H2
12
H3
12
H6
12
H7
123
H8
12
H9
12
H16
12
H17
L
12
L1
12345678
L3
1234
L4
1345678
L6
12
L8
1234
L11
1234
L17
M1
M1
M2
M2
M3
M3
M5
N
P1
PE
PE
PE
T1
T3
T4
T7
T8
T9
M4
M4
12345678
L10
12
H14
M6
12345678
L7
1234
L13
12
L5
T2
-
-
+
+
M1
M2
N
N
N
L
L
0-10V
0-10V
0-10V
0-10V
L
L
L
L
N
N
N
N
N
L
+5V
0V
Signal
-
-
+
+
N
L
+12V
+12V
0V
0V
Option 1
Option 2
Option 1
Option 1
Option 2
Mains connection
1x230VAC, L-N-PE
Max: 13A
H2 and H3
Max.loadtotal
1800W
Aux. relay R9
1x230V 50Hz
ONLY control current
Sensor Frost
Sensor, extract air
Sensor, exhaust air
Sensor, fresh air
Sensor, supply air
Sensor (Optional)
for aux relay R9
External stop
EC fan
Extract air
Blue
Yellow
EC fan
Supply air
Blue
Yellow
EC fan
Extract air
Saia-UCK
ON/OFF
Bypass
Brown
Brown
Blue
Blue
Yellow/green
Yellow/green
Belimo
LM230ASR
Bypass
Humidity sensor
White
Red/Brown
Blue/Green
EC fan
Supply air
Red - Brown
Blue - Green
Yellow - White
Belimo
CM230-F-R
ON/OFF
Bypass
Electric Reheater
Electric Preheater
Black
Black
White
White
Control signal
Motorvalve
Reheating
Power supply
Motorvalve
Reheating
Modulating
Reheating
Modulating
Preheating
Potential free input
for optional:
Humidistat,
Extractor hood ,
CO2
W hite
Brown
Blue
Belimo
LM230ASR
Bypass
Room Sensor
(Optional)
2
16

12345678 12345678
L6
12345678 12345678
L10
1234 1234
L13
21
22
23
24
C1
C2
C3
C4
21
22
23
24
C1
C2
C3
C4
OPT 100 DISPLAY
12345678 12345678
L7
12345678 12345678
L6
Option 1
Option 2
+12V
+12V
0V
0V
+2V
0V
0V
+2V
+2V
+2V
+2V
+3V
+3V
+3V
+3V
0V
Connection for OPT 100 / OPUS control panel
Connection for boost button and filter reset button
Boost button
Filter reset button
Filter alarm 12V lightbulb
Boost 12V lightbulb
LED Speed 1
LED Speed 2
LED Speed 3
LED Speed 4
GND
LED Reheat / Filter alarm
Reheat / Filter reset button
Speed button
17

18
CE
I
ECO 190 es; CL; TS; TL Ventilation Passiv
ECO 190 es CL; TS; TL Ventilation Passive
ECO 190 es; CL; TS; TL Ventilation Passive
I I
DS/EN
DECLARATION OF CONFORMITY

Remove fans
Remove condensate drain switch
Remove bypass actuator
Remove heat exchanger
19
DISASSEMBLY INSTRUCTIONS

KVM-Genvex A/S •Sverigesvej 6 •DK-6100 Haderslev •Tel.: +45 73 53 27 00 •salg@genvex.dk •genvex.dk
THE AIR WE BREATHE
08:101-1604
Genvex –The original Danish Ventilation System
Genvex is a genuine Danish original. We invented the ventilation system
more than 40 years ago, and we are still ahead of the pack when it comes
to development and production of the strongest and most durable
ventilation system.
Our unit is working in thousands of homes providing fresh clean air – free
of pollen, dust and harmful particles. This helps to strengthen the health
of the house and to make the indoor environment healthy and
comfortable for lots of families. At the same time, our system is an
important element when it comes to saving energy in homes and in
society as a whole – in fact you can recover up to 95% of the heat energy
with a Genvex system.
All
Genvex
systems are
rated with
energy label
A
The original Genvex units are
assembled by skilled and
experienced technicians and
have a lifetime that in many cases is
measured in decades. The units are
approved by all applicable
standards and are easy to operate
and service. Last – but not least all
Genvex systems are developed with
focus on compact dimensions and
ease of installation and can be
integrated discreetly in all types of
homes.
We are part of the NIBE Group
– a family of companies that
specialize in supplying hot water,
heating and home comfort to
homeowners worldwide.
Please visit www.genvex.dk to see a list of our distributors
This manual suits for next models
1
Table of contents
Other Genvex Fan manuals

Genvex
Genvex OPTIMA 270 User manual

Genvex
Genvex GE ENERGY 3 User manual

Genvex
Genvex ECO 275 User manual

Genvex
Genvex ECO 300 User manual

Genvex
Genvex ECO 375 TS User manual

Genvex
Genvex ECO 360 R User manual

Genvex
Genvex ECO 190 XL User manual

Genvex
Genvex ECO 375 User manual

Genvex
Genvex ECO 400 XL User manual