Geoscan Pioneer User manual


Content:
1 Return to Pioneer webpage 1
1.1 Pioneer assembly ........................................ 2
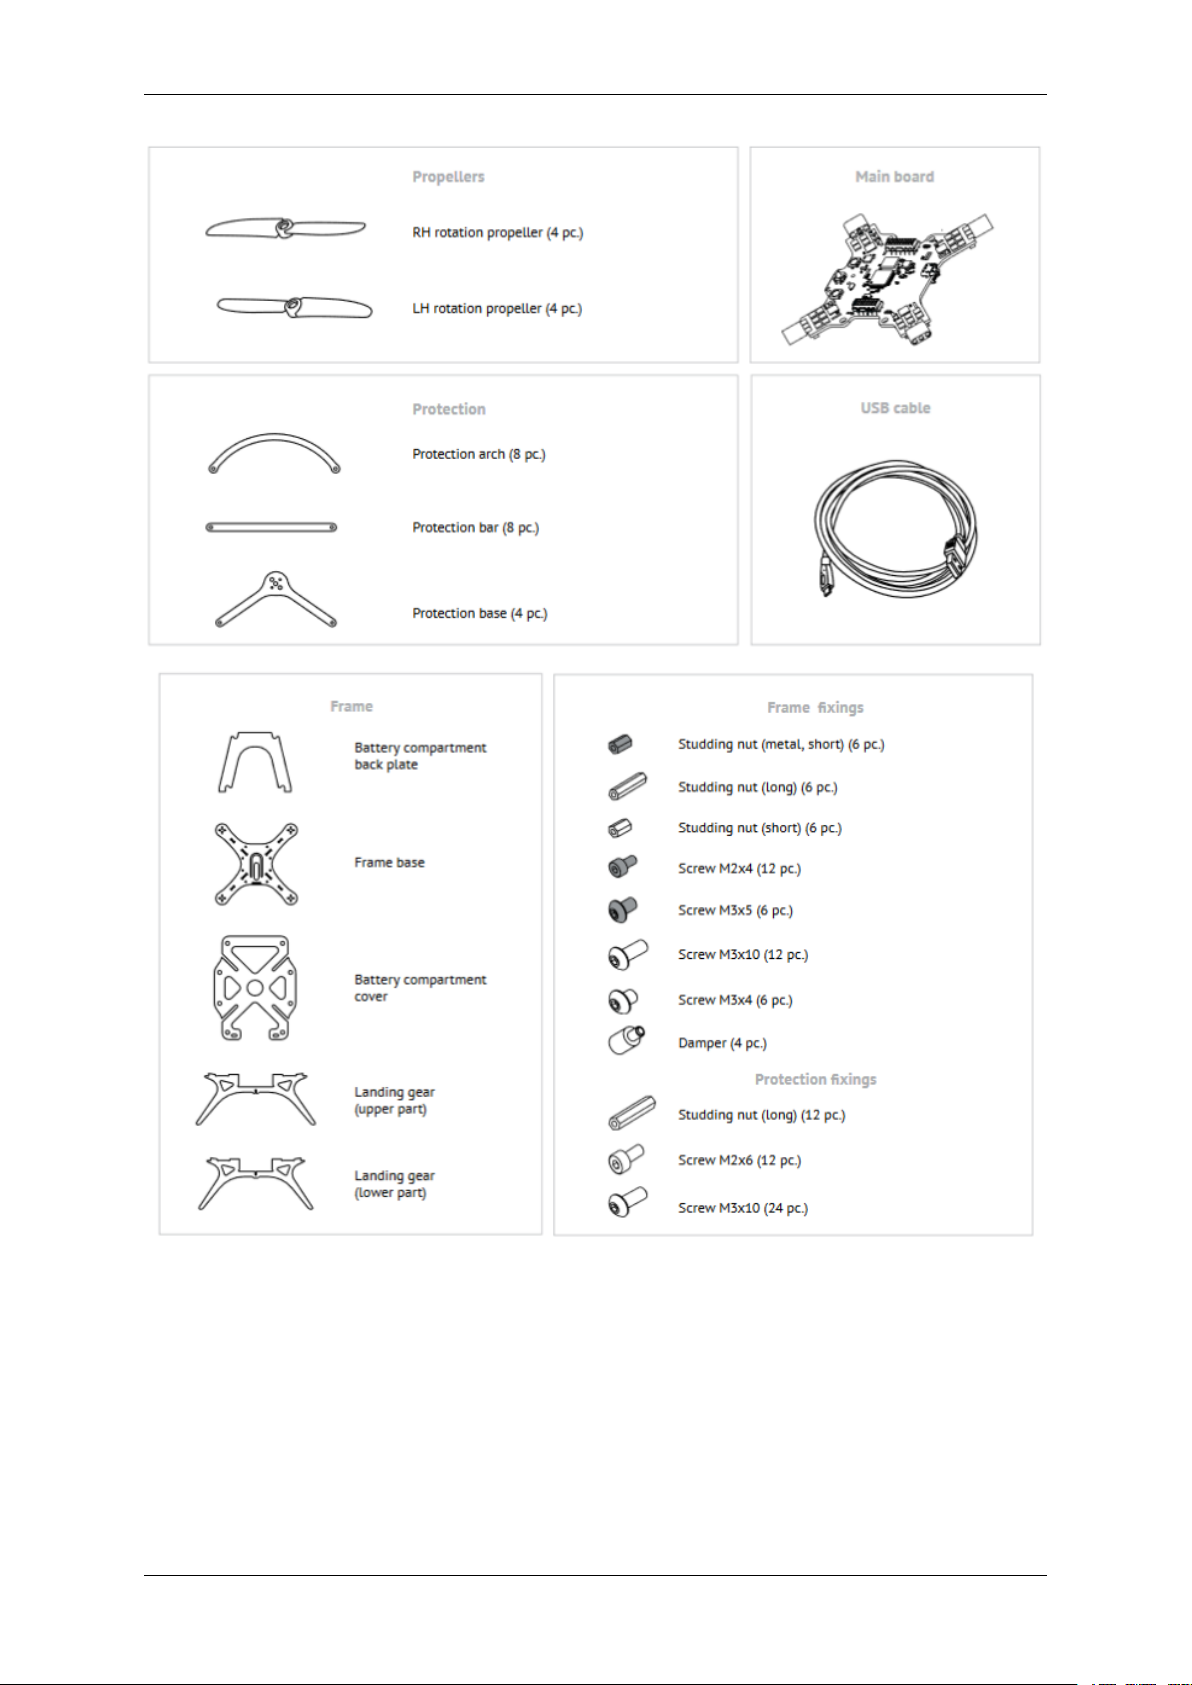
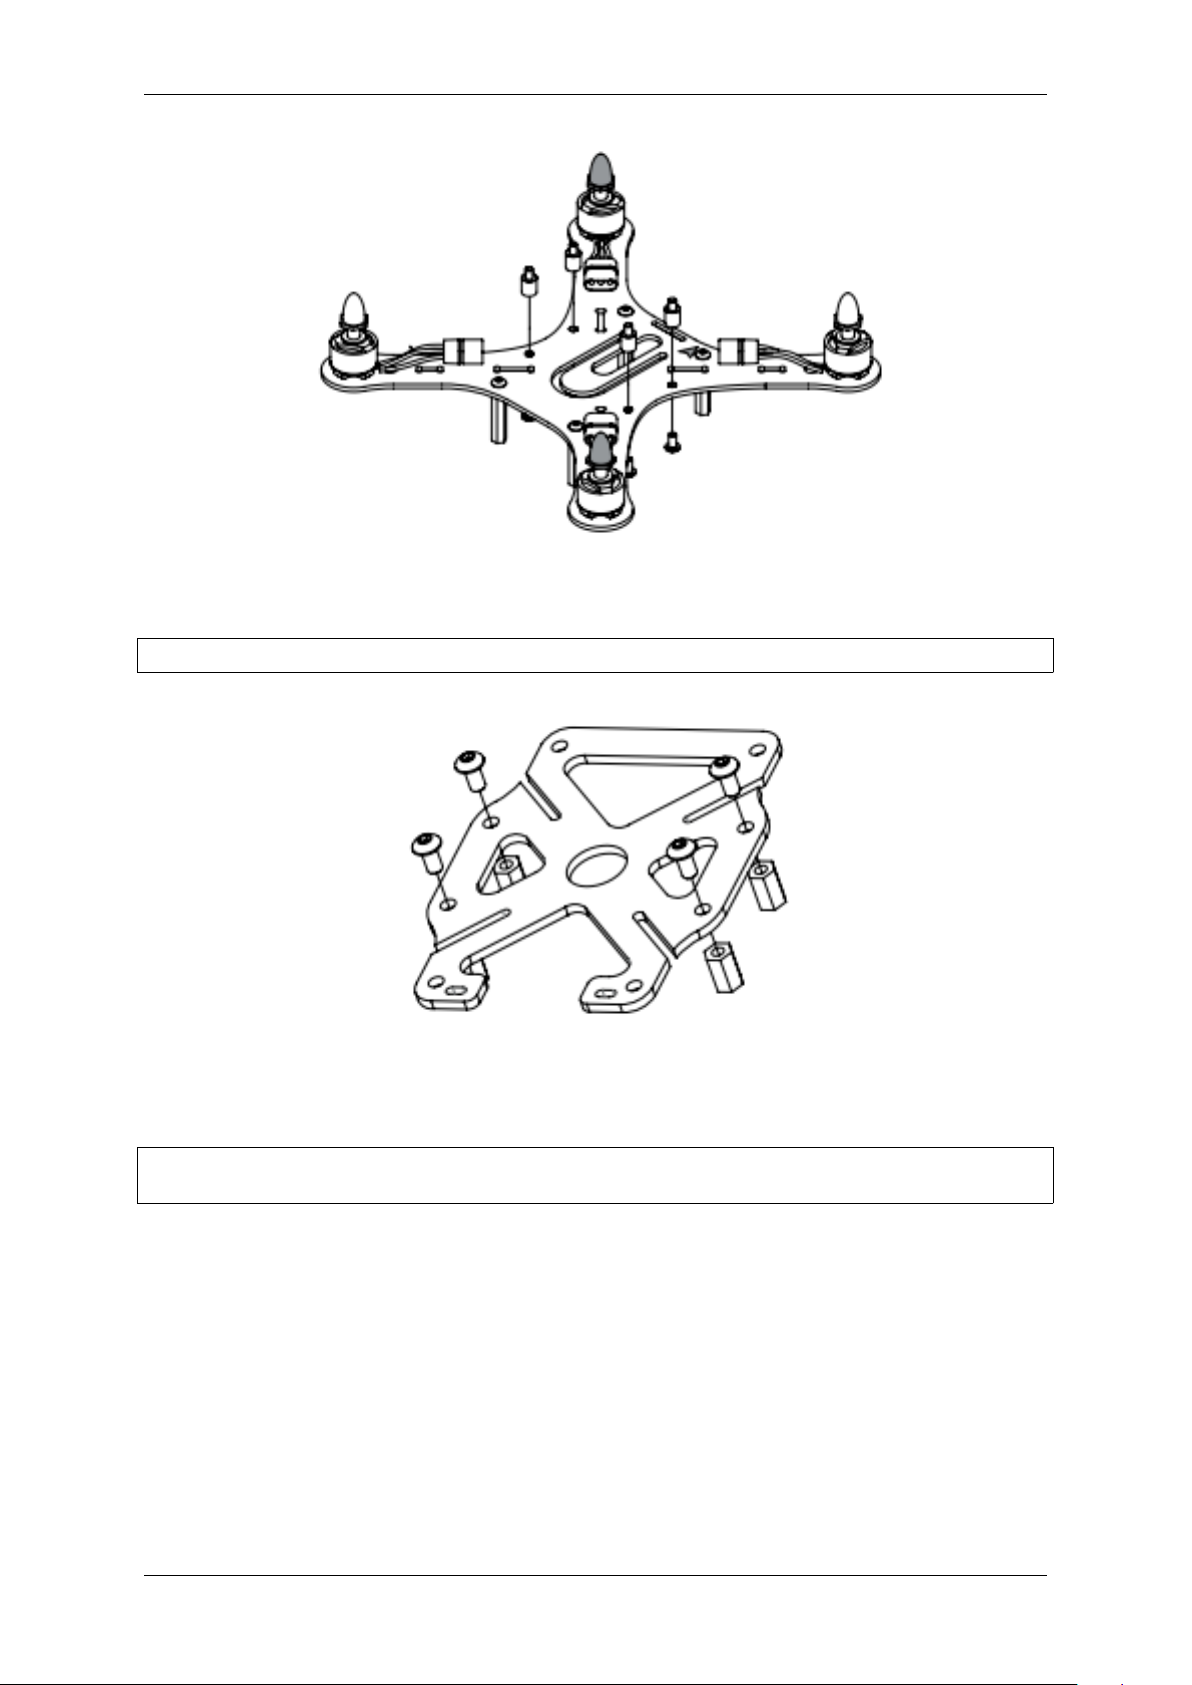
1.1.1 Frame assembly .................................... 4
1.1.2 Protection assembly .................................. 8
1.1.3 First switch-on ..................................... 10
1.2 Settings .............................................. 12
1.2.1 Firmware update .................................... 12
1.2.2 RC transmitter setting ................................. 12
1.2.3 Receiver connection .................................. 13
1.2.4 Autopilot parameters setting ............................. 14
1.2.5 Autopilot logs ...................................... 15
1.3 Flight ............................................... 17
1.3.1 Simulator ........................................ 18
1.3.2 LiPo battery ....................................... 20
1.3.3 Flight safety ....................................... 21
1.3.4 RC transmitter ..................................... 21
1.3.5 Controls ......................................... 23
1.3.6 Flight preparation - first start ............................. 24
1.4 Extension modules ....................................... 25
1.4.1 Extension modules board ............................... 26
1.4.2 Cargo module ...................................... 28
1.4.3 GPS/GLONASS module ................................ 30
1.4.4 OpenMV camera .................................... 33
1.4.5 Optical flow module .................................. 36
1.4.6 LED module ...................................... 39
1.4.7 GoPro camera gimbal ................................. 42
1.4.8 Photo and video camera ................................ 43
1.4.9 FPV kit ......................................... 43
1.4.10 Onboard indoor navigation module ......................... 44
1.5 Programming .......................................... 45
1.5.1 Visual programming TRIK .............................. 45
1.5.2 Pioneer Station ..................................... 49
1.5.3 Lua programming language .............................. 54
1.6 Geoscan Locus indoor navigation system ........................... 62
1.6.1 Flyzone setting ..................................... 63
1.6.2 Indoor flight ...................................... 65
1.6.3 Navigation system firmware update ......................... 65
1.7 FAQ ................................................ 66
1.8 Changelog ............................................ 66
1.8.1 20/06/2019 ....................................... 66
i

CHAPTER 1
Return to Pioneer webpage
Geoscan Pioneer is a multifunctional educational complex. It was developed for schools, robotics labs
and for individual use.
Use Pioneer to:
• study the robotics and avionics basics
• get to know the principles of quadcopter constuction
1

• master your flying skills
• tailor the drone to suit your needs and tasks
• program the drone
Important: Pioneer’s functional abilities can be extended by adding and programming extension mod-
ules.
Table 1: Technical specs
Parameter Value
Class quadcopter
Flight time up to 17 minutes
Airspeed up to 65 km/h
Weight 230 g
Max takeoff weight 230 g
Dimensions 290 x 290 x 120 mm
Motors Brushless 1306 3100KV
Battery LiPo 2S 1300 mAh 9.62 Wh
Max flight distance 500 m
Max wind speed up to 5 m/s
Operation temperature From 0 to +40 °C
1.1 Pioneer assembly
Important: The stock Pioneer kit contains all necessary parts and tools to assemble and launch it.
2 Chapter 1. Return to Pioneer webpage

1.1. Pioneer assembly 3

Parts: frame base, clockwise motor -2, counterclockwise motor -2, M2x4 screw -8.
The motors with silver caps should be installed according to white marks on the frame. Place and secure
each motor with 4 screws.
Step 2
Parts: unit assembled at step 1, studding nut (long) -4, m3x10 screw -4.
Install the stands on the botoom side of the frame and secure them with M3x10 screws like shown in the
picture.
Step 3
Parts: unit assembled at step 2, dampers -4, M3x4 screws -4.
1.1. Pioneer assembly 5

Mount 4 dampers on the board and secure them with M3x4 screws as shown on the picture.
Step 4
Parts: battery compartment cover, 8mm stubbing nut -4� M3x5 asrews -4.
Using M3x5 screws thighten the stands on the battery bay cover like shown on the picture. These stands
will be required for mounting extra modules.
Step 5
Parts: unit assembled at step 3, landing gear (upper and lower), battery compartment back␣
,→plate.
6 Chapter 1. Return to Pioneer webpage

Insert the LiPo bay backplate and landing gear in their slots at the bottom of the frame.
Step 6
Parts: unit assembled at step 4, unit assembled at step 5, M3x10 srews.
Using M3x10 screws, connect the assembled frame and lipo bay cover together (steps 4 and 5)
Step 7
Parts: unit assembled at step 6, studding nut(metal, short) -4, main board.
1.1. Pioneer assembly 7

Using dampers, mount the board on the frame so that white arrows on top of them point in same direc-
tion. Plug in motors connectors applying no extra force.
Once finished with the frame, proceed to the protection assembly
1.1.2 Protection assembly
Step 8
Parts: unit assembled at step 7, protection base -4, M2x6 screw -8.
Place protection mounts and secure them using M2x6 screws like shown on the picture
Step 9
Parts: unit assembled at step 8, protection arch -8, protection bar -8, M3x10 screw -8,␣
,→studding nut (long) -8. (continues on next page)
8 Chapter 1. Return to Pioneer webpage

(continued from previous page)
Secure the protection arcs, bulkhead and stands using M3x10 screws like shown in the picture.
Step 10
Parts: unit assembled at step 9, protection arch -8, protection bar -8, M3x10 screw -10.
Connect the stands and protection arcs using M3x10 screws.
Step 11
Parts: unit assembled at step 10,5030 prop -2,5030R prop -2.
1.1. Pioneer assembly 9

Note: black caps have right thread! The markers on props and board should match. Take off the caps,
mount the props and twist them back tight.
Step 12
Parts: unit assembled at step 11, receiver (packed with RC transmitter).
Install the receiver on the landing gear using elastic ring. Connect the PPm cable to the board under
mUSB port.
For further instructions, proceed to First switch-on
1.1.3 First switch-on
To turn Pioneer on, place the LiPo battery in the bay and plug in its connector to the board.
10 Chapter 1. Return to Pioneer webpage

Important:
• When connected, the quadcopter makes a beeping sound and blinks with its leds to show the re-
maining charge level. Red lights - LiPo discharged, green - fully charged.
• White led blinking fast - autopilot loading.
• Blue led blinking slowly - the quadcopter is ready to fly.
• Blue led blinking fast - the script is initialised
• White led blinking fast - error
• When the battery voltage drops down - quadcopter begins to beep every 5 seconds.
Attention:
Pioneer is able to switch off its motors in case of:
• pitch or roll angle more than 90°;
• strike or fall.
1.1. Pioneer assembly 11

1.2 Settings
Pioneers firmware can be upgraded. This section has necessary info on update process.
If your RC transmitter or receiver were changed, proceed to RC connection
You can set up the transnitter in case of malfunction.
Autopilot parameters instruction will help you set parameters correctly.
1.2.1 Firmware update
For Pioneer to perform correctly, it is recommended to upload the last version of firmware. You need to
have Pioneer station installed on your PC. If you don’t have it, click download Pioneer Station and run
the acquired .exe file.
Note: If program doesn’t run, try to download 32bit version, unpack the archive and open run.bat file.
Turn on firmware update mode on Pioneer. Press “Start” button on it and connect the USB cable while
holding the button pressed. All LEDs on the board should switch on.
Run Pioneer Station and click the quadcopter icon in the top left corner of the window. Select “firmware
update” and follow the appearing instructions.
Note: If quadcopter is not shown in the window, try rebooting your PC and re-connect Pioneer. If this
didn’t help, download and install port driver, then reload Pioneer Station and re-connect the drone.
It is recommended to select “inbuilt” source of firmware. That guarantees you install the latest version.
Wait for the firmware update to finish, this can take a few minutes. Click OK button afterwards to switch
Pioneer in standard connection mode.
If any problem occurs during Pioneer update or usage, feel free to contact our helpdesk via sup-
1.2.2 RC transmitter setting
To set up the controller, follow these steps:
1. Plug in the batteries in the battery compartment on the back of controller. To turn it on, press and
hold two power buttons.
12 Chapter 1. Return to Pioneer webpage

2. The default screen image looks like this:
“warning! Place all switches in their up position” means you have to check all flipswitches and place left
stick to its lower position.
3. Use touchscreen to navigate the menu and press settings icon.
4. “Function” tab contains settings of the RC transmitter. “System” tab is used to change the model’s
properties.
Adjust the following settings in “system” tab:
1. REVERSE →Ch2 и Ch4 –Rev
2. AUX. CHANNELS →Channel 5 → →select SWx switch type→press SwA and select SwC in
the opened menu.
3. AUX. CHANNELS →Channel 6 → → select switch type SWx→press SwA and select SwD.
4. AUX. CHANNELS →Channel 7 → → select switch type SWx→press SwA and select SwB.
Select the SYSTEM tab:
5. OUTPUT MODE →Output →PPM
6. STICKS MODE →M2 (Mode 2)
For further setting proceed to Receiver connection
1.2.3 Receiver connection
To control the drone with RC transmitter, a binding operation is required. Follow this manual to perform
it.
Attention: Controlling several drones using one RC transmitter might cause crashes. Do not bind
more than one receiver to one controller.
1.2. Settings 13

1. Turn the RC transmitter on
2. Use touchscreen to navigate the settings menu.
3. Select Rx Bind in “System” tab. “Binding to Rx..” should appear on the screen.
4. Press and hold “BIND” button on the receiver.
5. While holding the button, plug in the battery to turn quadcopter on.
6. Leave the Rx bind mode on the controller. The drone should beep once after this. A light on the
receiver should not blink.
If the drone doesn’t react on controller signals, try to re-bind its receiver once again. If this doesn’t solve
Important: Binding procedure works for FlySky-A8S receiver.
1.2.4 Autopilot parameters setting
Autopilot parameters can be set precisely using Pioneer Station. Follow the manual to connect Pioneer
to your PC. Switch to “autopilot parameters setting” tab.
To perform a setting, Pioneer should be connected to PC and its current parameters should be displayed
in right part of Pioneer station window.
Switch to “autopilot parameters” tab. Left column represents parameters, their current values are dis-
played in the second column. To change any of them, click to the right of selected parameter and type the
new value in, then press Enter. Don’t forget to save the changes by clicking save changes to autopilot
LPS,GPS and OPT buttons are situated in the top part of the window. Each is responsible for loading
a standard set of parameters for indoor positioning system, GPS and optical flow mode respectively.
Note: If you want to return to factory preset, click return to default button above the table and wait
until Pioneer reboots.
14 Chapter 1. Return to Pioneer webpage

Parameters setting for motors change
Changing stock motors on Pioneer to more powerful (or any other at all) may result in different electrical
specs. This, in turn, will lead to pre-flight checks fail, and Pioneer will not be able to take off. Adjust the
following parameters to reset pre-flight checks:
•Copter_motorCheckTime - duration (in seconds) of motors rpm check before takeoff. Set to
zero to turn it off.
•Copter_startRpmMax - Max rpm for pre-flight check pass.
•Copter_startRpmMin - Min rpm for pre-flight check pass.
•Copter_startRpmSigma - Max allowed inconsistency between motors rpm speeds.
There is another check, run for the first 5 seconds after takeoff command:
•Copter_stallRpm - max rpm after which sync fail is declared and motors stop. For custom mo-
tors, use its max possible rpm value (calculated as motor’s kv multiplied by battery voltage)
You may also need to customize PID parameters for different engines. If done incorrectly, this may result
in noticable vibrations and oscillations during flight.
To customize PIDs, adjust the following parameters:
•Copter_xyRate_ki - controller’s integral component. Lower it If the controls are sluggish. In-
crease it if low-frequency oscillations are present.
•Copter_xyRate_kp - controller’s proportional component. Lower it if the drone wobbles when
hovering. Increase it if the controls feel sluggish.
Note: To evaluate necessary rpm values, look through rpm data chart in motor-x autopilot logs
channel after manual-controlled flight. See Autopilot logs section.
1.2.5 Autopilot logs
From the moment of motors start, Pioneer’s autopilot begins to log flight parameters in multiple chan-
nels and saves them in downloadable file. Log writing stops when motors are turned off. In case they
are started again, previous log is erased to start a new one.
Log download
To download the log file, connect Pioneer to the PC via USB and run Pioneer Station. Setup the connec-
tion and open Logs - Download logs from AP by PlazLink menu tab.
1.2. Settings 15

After that, select saving folder and file name. Log download will start automatically. Pioneer will reboot
when it’s finished.
Note: Older firmware versions do not support log download by Plazlink protocol. In that case, select
Logs - Download logs from AP by Payloader menu tab. Follow the wizard instructions (press and
hold “Start” button on Pioneer board and connect it to the computer). After that select folder and start
log download.
Log preview
To open log file, select Logs - Open AP log menu tab.
You can inspect autopilot log data in the opened tab.
16 Chapter 1. Return to Pioneer webpage
Other manuals for Pioneer
1
Table of contents
Other Geoscan Drone manuals