EAVISION EA-30X User manual

EA-30X Agricultural Spraying Drone
User Manual v1.5
2022.7
3WWDZ-30B
Intelligent Quadrotor Agricultural Spraying Drone
Suzhou EAVISION Robotic Technologies Co., Ltd.

To Users
Thank you for choosing EA-30X, the agricultural spraying drone developed and manufactured by EAVISION.
To operate the product correctly and avoid damage or serious injury, please read and follow all the
instructions in the user manual, and carry out maintenance in a timely and meticulous manner.
Navigate to a Topic
View a complete list of topics in the table of contents. Click on a topic to navigate
to that section.

Contents
Disclaimers .........................................................................................................................................................1
Safety Notice ......................................................................................................................................................1
Rules for the use of pesticides ................................................................................................................... 1
Operation ................................................................................................................................................... 2
List of Items ........................................................................................................................................................3
Product Overview .............................................................................................................................................. 4
Product description ....................................................................................................................................4
Feature highlights ...................................................................................................................................... 4
Drone ................................................................................................................................................................. 6
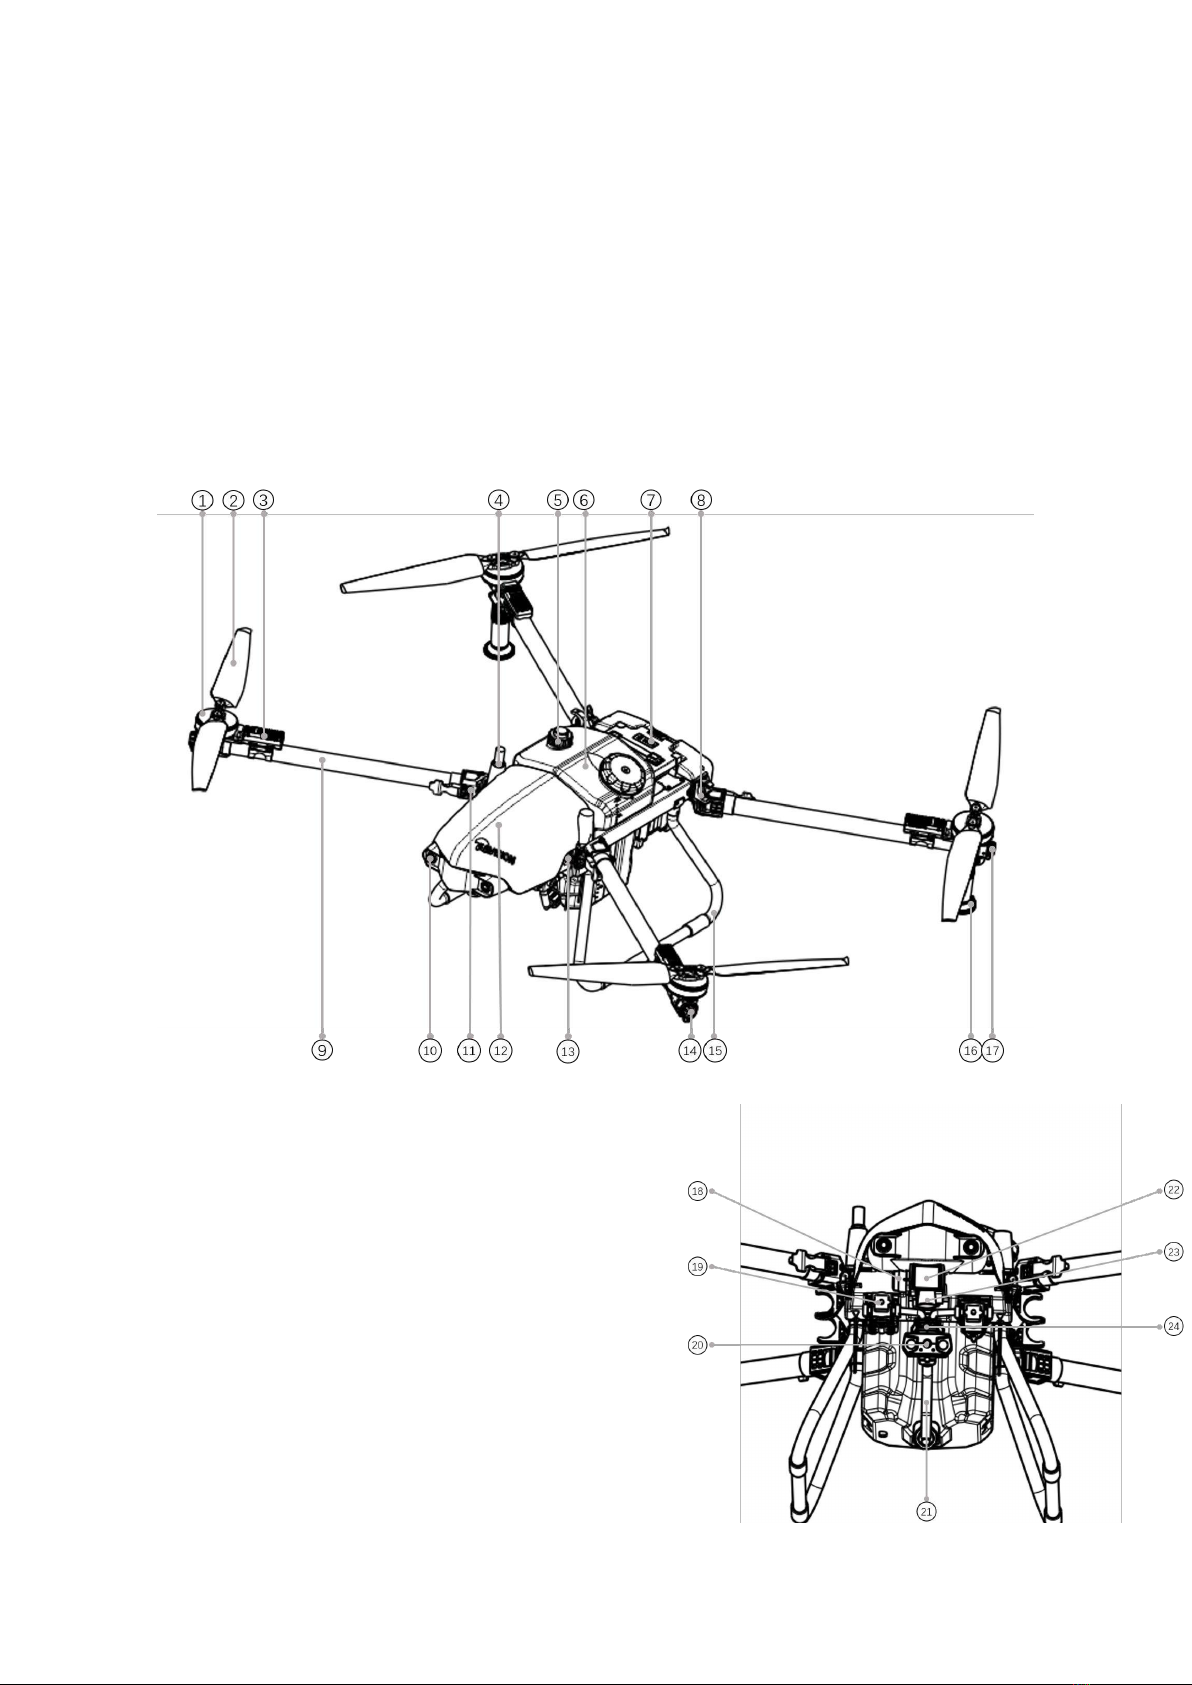
Drone overview ..........................................................................................................................................6
Drone components .................................................................................................................................... 6
Preparing the drone ...................................................................................................................................7
Remote Controller ..............................................................................................................................................7
Remote controller overview ...................................................................................................................... 7
Remote controller components .................................................................................................................8
Remote controller operation ..................................................................................................................... 9
Remote controller LEDs ........................................................................................................................... 11
Precautions for use .................................................................................................................................. 11
Smart Battery ................................................................................................................................................... 12
Smart battery overview ........................................................................................................................... 12
Smart battery components ......................................................................................................................12
Battery function ....................................................................................................................................... 12
Battery use ............................................................................................................................................... 13
Battery storage & transport .....................................................................................................................15
Battery disposal ....................................................................................................................................... 16
Precautions for use .................................................................................................................................. 16
Smart Charger .................................................................................................................................................. 17
Smart charger overview ...........................................................................................................................17
Smart charger components ..................................................................................................................... 17
Charge controller ..................................................................................................................................... 18
Charger use .............................................................................................................................................. 19
Firmware upgrade ....................................................................................................................................20
Storage and maintenance ........................................................................................................................ 21
Precautions for use .................................................................................................................................. 21
Mapping Device ............................................................................................................................................... 22
Mapping device overview ........................................................................................................................22

Mapping device components .................................................................................................................. 22
Mapping device operation .......................................................................................................................22
Firmware upgrade ....................................................................................................................................24
Precautions for use .................................................................................................................................. 24
Mobile Base Station ......................................................................................................................................... 24
Mobile base station overview ..................................................................................................................24
Mobile base station components ............................................................................................................ 25
Base station operation .............................................................................................................................25
Firmware upgrade ....................................................................................................................................27
Precautions for use .................................................................................................................................. 27
App Introduction ..............................................................................................................................................27
Survey ...................................................................................................................................................... 27
Smart AG .................................................................................................................................................. 28
Flight ................................................................................................................................................................ 28
Basic operation ........................................................................................................................................ 28
Drone operation .......................................................................................................................................29
Maintenance .................................................................................................................................................... 33
Troubleshooting ............................................................................................................................................... 34
List of dangers and hazards ..............................................................................................................................37
Warranty Service ..............................................................................................................................................37
Table 2 List of Wearing Parts ....................................................................................................................40
Nozzle Warranty Special Instructions .............................................................................................................. 41
Warranty Certificate .........................................................................................................................................41
Specifications................................................................................................................................................... 42

1
Disclaimers
By using this product, you hereby acknowledge that you have read this declaimer and the user manual
carefully and that you understand and agree to abide by the terms and conditions herein.
This product is not intended for use by persons under the age of 18. Adults should keep the drone out of
reach of children and DOT NOT operate this drone in the presence of children. UAV operation license
issued by EAVISION is required for users to operate the drone.
In no event will EAVISION be liable to you for any indirect, incidental, special, consequential or punitive
damages (including damages for loss of profits, goodwill, or any other intangible loss) arising out of or
relating to your access to or use of, or your inability to access or use, the product, product accessories, or
any materials, flight environment data, and whether or not EAVISION has been informed of the possibility
of damage.
This product is a multirotor flying platform intended for agricultural applications only. When you use our
mobile apps or our products or other software, you will provide EAVISION with data regarding the use and
operation of the product, and operations record, and agree that the latter can legally collect, store, and
use the data and record. EAVISION bears no responsibility for loss of data that results from your inability
to use the product.
The excellent performance of this product relies on the original parts of EAVISION. Do not use accessories
that are not from EAVISION.
Unmanned aerial vehicle (UAV) operators should abide by the regulations from self-regulatory
organizations such as the International Civil Aviation Organization, the Federal Aviation Administration,
and their local aviation authorities. Once you use this product, it is deemed that you have read the
relevant regulations and documents, and EAVISION is not responsible for any relevant legal
responsibilities arising from the use of this product in violation of laws and regulations.
This statement has important implications for the safe use of this product and your legal rights. Suzhou
EAVISION Robotic Technologies Co., Ltd. reserves the right to update this disclaimer. Thank you again for
choosing EAVISION.
Safety Notice
Rules for the use of pesticides
Avoid the use of powder pesticides as much as possible as they may reduce the service life of the
nozzle. Be sure to clean the nozzle carefully each time after spraying powder in case of nozzle blockage
and damage.

2
Pesticides are toxic and needed to be handled in strict accordance with their specifications.
Residue on the equipment caused by splashes or spills when pouring and mixing the pesticide can
irritate your skin. Make sure to clean the equipment after mixing.
Use clean water to mix the pesticide and filter the mixed liquid before pouring into the spray tank to
avoid blocking the strainer. Clear any blockage before using the equipment.
Make sure to stay in an upwind area when spraying pesticide to avoid bodily harm.
Wear protective clothing to prevent direct body contact with the pesticide. Rinse your hands and skin
after handling pesticides. Clean the drone and remote controller after applying the pesticide.
Effective use of pesticides depends on pesticide density, spray rate, spray distance, drone speed, wind
speed, wind direction, temperature, and humidity. Consider all factors when using pesticides, but DO
NOT compromise the safety of people, animals, or the environment in doing so.
DO NOT contaminate rivers and sources of drinking water.
Operation
Make sure that your operations do not violate any applicable laws or regulations, and that you have
obtained all appropriate prior authorizations. Consult the relevant government agency or authority
before flight to ensure you comply with all relevant laws and regulations.
Make sure that the battery is firmly inserted into the drone and the arms are unfolded and arm locks
are firmly tightened. Avoid flying over or near crowds or hazardous materials.
Do not fly under the influence of alcohol or drugs or in poor physical or mental condition.
Do not operate the drone alone outside the training area without sufficient training. Seek help from
experienced users before and during flight.
Stay away from the rotating propellers. And avoid any obstruction, interference or assault from
humans, animals or objects during flight.
Avoid flying near strong electromagnetic sources such as high voltage towers, large power equipment,
radio and television transmission towers, and mobile phone base stations. EVASION assumes no
liability for damage or injury incurred from operation in such areas.
Make sure you comply with all relevant laws and regulations before flight. Factory settings for the
drone: 20m of max altitude, 7m/s of max speed, and 1000m of max distance.

3
List of Items
Check that all of the following items are included in the package. If there is any missing item, please
contact your dealer promptly.
EA-30X drone×1 Base stationx1 Smart Batteries×2
(Including spray tank and propeller holders)
Remote Controller×1 Smart Charger×1 Mapping Device×1
(Including power adapter and power cord) (In the tool box)
Tool box contains mapping device x 1, mapping device extension rod x 1, tapered head x 1, Type-C
adapter x 1, Type-C data cable x 1, screwdriver set x 1

4
Product Overview
Product description
The new generation of the EA-30X is a professional agricultural drone for hilly and mountainous terrains
and can be operated day and night. (Note: Some requirements must be met for the drone to operate at
night. Please refer to the operation manual)
The drone comes equipped with the new-generation binocular vision system (EAVision 4.0) with 120° of
FOV, providing pixel level accuracy. Incorporated with technologies such as millimeter wave radar and
LIDAR, users are able to plan the field and operate flight, no need to map in advance. The optimized rotor
blades and electronic speed control algorithms allow drone to avoid obstacles in a timely manner. EA-30X
is capable of high-speed and continuous precise obstacle avoidance even at slopes below 90°, making it
efficient on all terrains.
The flight system is equipped with the EAVISION Night Lighting System (EANLS), with the brightness of
700LUX within 5 meters. It can accurately sense all-terrain obstacles at night, ensuring operational safety
all day long.
The next- generation CCMS-L20000 mist nozzle produces droplets to penetrate crops with size ranging
from 10 to 100 microns. Its spray rate reaches 10L/min thanks to the integrated spraying system. The new
spot spraying system allows users to plan fields and locate, achieving precise and sufficient treatment of
crops.
The global offline mode has been upgraded again, with a single base station covering an area of 333
hectares, which can easily cope with no network operation scenarios.
The EA-30X features a quadrilateral folding structure design for quick folding and easy storage with the
folding size of only 0.5 cubic meters. And the smart battery makes it convenient to charge the drone since
it is fully charged in 11 minutes and 2 batteries and 1 charger are provided. The image transmission
distance reaches 1.5km with the help of the integrated FPV remote controller which controls boundary
points adding and plot flight.
Feature highlights
The updated binocular vision system (EAVision 4.0) with 120° of FOV effectively senses the
environment and helps to circumvent obstacles day and night.
The optimized rotor blades and electronic speed control algorithms allow drone to avoid obstacles in
less than 0.2s.
The next- generation CCMS-L20000 mist nozzle produces droplets to penetrate crops with size
ranging from 10 to 100 microns.
The spray rate reaches 10L/min thanks to the integrated spraying system, and the tolerance is within

5
5% with ultrasonic flow meter.
The image transmission distance reaches 1.5km with the help of the integrated FPV remote controller
which controls boundary points adding and plot flight.
The smart battery can be fully charged in 11 minutes, and 2 batteries and 1 charger are provided for
easy use.
The drone can fly as low as 0.7m from the canopy, shortening the droplet settling distance,
significantly reducing evaporation and drift, enhancing the penetration of the liquid, and ensuring the
effectiveness of agricultural protection for all types of crops.
The flight system is equipped with the EAVISION Night Lighting System (EANLS), with the brightness of
700LUX within 5 meters. It can accurately sense all-terrain obstacles at night, ensuring operational
safety all day long.
In the case of RTK disconnection, the drone will maintain the original accuracy for 4 minutes, and wait
for the signal to recover without stopping operation. Even if the signal cannot be recovered in time, it
can complete the task and return to the take-off and landing point.
The global offline mode has been upgraded again, with a single base station covering 333 hectares,
which can easily cope with agricultural operations in areas without network.
The new spot spraying system allows users to plan fields and locate, achieving precise and sufficient
treatment of crops.
It allows the user to select multiple take-off and landing spots, the Smart AG app performs intelligent
route planning and take-off and landing spot recommendations based on the plot and the location of
the take-off and landing spot, providing flight route planning with the best operating efficiency, and
route replanning for route resuming to reduce flight time and improve efficiency by more than 30%.

6
Drone
Drone overview
The drone uses an industrial flight controller to provide multiple operation modes for various applications.
The drone adopts binocular vision, millimeter-wave radar and lidar fusion, and no need to map in advance.
Facing complex terrain with slopes below 90°, it can achieve high-speed, accurate and continuous
obstacle avoidance. In addition, the drone also proves functions of intelligent route planning for multiple
take-off and landing spots, intelligent spot spraying, points adding, etc.
Drone components
1. Motor 13. Backup Power Switch
2. Propeller 14. Front Navigation Light
3. Electronic Speed Control 15. Landing Gear
4. RTK Antenna 16. Nozzle
5. Liquid Level Gauge 17. Rear Navigation Light
6. Spray Tank 18. Lidar
7. Smart Battery 19. Water Pump
8. Arm Storage Clamp 20. FPV Camera
9. Frame Arm 21. Hoses
10. Binocular Lens 22. Millimeter wave radar
11. Arm Locks 23. Ultrasonic Radar
12. Cover 24. Ultrasonic flowmeter

7
Preparing the drone
1. Unfold the M3 and M4 arms followed by M1 and
M2 and fasten the four arm locks. Avoid pinching
fingers.
2. Fold the M1 and M2 arms followed by the M3 and
M4 and make sure that the arms are inserted into
the storage clamps on both sides of the drone.
Avoid pinching fingers.
3. Unfold the propeller blades.
Remote Controller
Remote controller overview
The EAVISION remote controller adopts the advanced high-definition image transmission technology, and
can automatically select the frequency band with the lowest interference. Equipped with an
omnidirectional antenna, the image transmission and control distance can reach 1.2 to 1.8 kilometers. Its
powerful computing performance reduces video transmission display delay to 180ms with Qualcomm
eight-core CPU.
The remote controller uses a 5.5 inch 1920*1080 high-definition display with a maximum screen
brightness of 1000cd/㎡, nearly twice that of a common smartphone, and is still clearly visible in direct
sunlight.

8
Remote controller components
1. Antenna (Relays drone control and image transmission signal)
2. Status LED
3. Power button
4. Battery level LED
5. Right joystick (controls UAV movement)
6. Spray switch (in manual operation mode, switch to start or stop spraying)
7. Touch screen (Tap to select. Android-based device to run Smart AG Pro App)
8. Left joystick (controls UAV movement)
9. 3-Stage switch (auto mode/manual mode)
1
9
8
7
6
5
4
3
2

9
Remote controller top interface Remote controller bottom interface
Remote controller operation
Turning on and off
1. When the remote controller is powered off, press the power button to check the battery level of the
internal battery. Recharge before use if the battery level is low.
2. When the remote controller is powered off, press the power button to lighten the battery level LED,
then press and hold to power on the remote controller. Wait till all LEDs to light up in sequence.
3. When the remote controller is powered on, press and hold the power button for about 2 seconds
until the shutdown button pops up. Tap it to turn off the remote controller.
Screenshot: when the remote controller is powered on, press and hold the power button for about 2
seconds until the screenshot button pops up. Tap it to screenshot.
Standby: when the remote controller is turned on, press the power button to switch to the
energy-saving mode.
It takes about 90 seconds to power on the remote controller for the first time. And it takes about 30
to 35 seconds to change battery during operation (with backup battery).
Charging
Charge the battery with the AC power adapter when the remote controller is powered off.
1. Use Type-C fast charging cable to connect the remote controller and adaptor.
2. The Status LED turns solid red when charging.
3. The Status LED turns solid green when fully charged.
The remote controller cannot be charged with the 5V adaptor, please use the original charger.
Make sure the remote controller is powered off when charging, otherwise, it will be overheating.

10
Operating the drone
You can set the joystick under System Settings of Siyi Remote Controller.
This section explains how to control the orientation of the drone through the remote controller. Control
can be set to Mode 1 (American standard), Mode 2 (Japanese standard), or Mode 3 (Chinese standard).
Below refers to Mode 1 (American standard).
Linking the Remote Controller
1. Enter the System menu in Siyi Remote Controller app, go to System Settings, and tap Start Linking.
2. The Status LED on the remote controller blinks red, indicating that the linking is in progress.
3. Press the linking button in the receiver for 2 seconds until the status LED blinks red.
4. Wait for 5 to 10 seconds for linking, and the status LEDs of the remote controller and receiver will turn
solid green.
Operation Control
Flight mode switch: push the dial in the upper left corner of the remote controller to the top for auto
flight, and to the bottom for manual flight.
Spray button: in manual operation mode, push the dial to the left to stop spraying and the opposite
direction to start spraying.
FPV: turn on SIYI FPV on the remote controller to display the FPV view.
Ameri
Mode 1

11
Remote controller LEDs
The status LED indicates different meanings with three colors of light flashing and different flashing
frequencies.
Status LED
Description
Red light flashing quickly
Linking
Alternating red-green-yellow flashing slowly
Picture transmission starting up
Alternating red-green-red-green-red flashing
Unexpected shutdown of Android system
Red light flashing slowly
Firmware mismatch
Red light flashing three times
Image transmission initialization failed
Red light flashing four times
Joysticks need to be calibrated
Yellow light flashing slowly
The remote controller power supply voltage is abnormal
Yellow light flashing twice
Remote controller Bluetooth not connected
Solid red light
No transmission with the receiver
Alternating yellow-red flashing
Alternating yellow-red-red flashing
Alternating yellow-red-red-red flashing
Remote controller temperature first-level alarm
Remote controller temperature second-level alarm
Remote controller temperature third-level alarm
Alternating green-red flashing
Alternating green-red-red flashing
Alternating green-red-red-red flashing
Receiver temperature first-level alarm
Receiver temperature second-level alarm
Receiver temperature third-level alarm
Flashing green light
The faster the flashing frequency, the worse the signal
strength
Precautions for use
1. Do not use the remote controller to control the drone near crowds, obstacles, strong electromagnetic
source, or other areas that are likely to cause unnecessary economic losses or even personal injury.
2. When operating, do not cover the remote controller antenna or block signal transmission in other
ways.
3. During operation, keep a visual line of sight between the mid-section of the remote controller antenna
and the drone, and the shade of green plants will seriously affect the remote controller signal distance.
4. The top of the remote controller antenna is the part with the weakest signal transmission. When
operating, avoid pointing it to your drone.
5. Do not cut off the power of the remote controller when the drone motor is still running.
6. Always check the battery level of the remote controller before operation.

12
Smart Battery
Smart battery overview
EA-30X intelligent flight battery adopts a new high-energy density battery cell and an advanced battery
management system to provide sufficient power for the drone. Metal casing and silicone protective cover
effectively protect the battery. The battery capacity is 29000mAh and the nominal voltage is 51.8V.
Smart battery components
1. Power Button 4. Silicone Protective Cover
2. LED Indicator 5. Clamp
From left to right are power LED1, LED2, LED3, LED4, fault light 6. Power Interface
3. Handle
Battery function
JM2-29000mAh Smart Flight Battery has the following functions:
1. Battery level display: press the battery power button to check the current battery level.
2. Intelligent transmission: the battery information, such as voltage, battery level can be obtained in real
time through the intelligent charging app to ensure that the drone can work properly.
3. Abnormal use record: the management system can record information such as high and low
temperature charging and discharging, charging overcurrent, discharging overcurrent, long-time
high-power storage, etc.
4. Charging warning prompt: if an error occurs during charging, restart the battery and charger. If the
problem is not solved, restart the battery according to the App display and try again.

13
5. Automatic balancing function: under certain conditions, the battery will automatically turn on the
balancing function to ensure the dynamic balance of the cells in the battery.
6. Automatic discharging function: the battery has a self-discharge function, and it will automatically
discharge 40% of the power when left in a fully charged state for more than ten days.
7. Automatic adjustment of current and segmental protection function: when charging with an official
charger, the charging current can be intelligently adjusted according to the current cell temperature.
Also, the battery protects itself based on its temperature.
8. Thermal balance management function: the battery has a thermal balance management function,
which controls the temperature difference between the cells within the error range and makes them
equal.
Battery use
Turning on and off
1. In sleep mode or shutdown mode, press and hold the power button (T > 3 seconds) until all LEDs flash,
then press the power button to turn on the battery.
1) The battery will be kept off if there is no operation during LEDs flashing.
2) The battery will be kept off if either operation is performed.
2. In the power-on mode, press and hold the power button (T > 3 seconds) until all LEDs flash, then press
the power button to turn off the battery.
1) The battery will be kept on if there is no operation during LEDs flashing.
2) The battery will be kept on if either operation is performed.
When the battery is correctly inserted into the drone, press and hold the power button until all LEDs
flash, then press the power button to turn on the battery. After flight, press and hold the power button
until all LEDs flash, then press the power button to turn off the battery, and then disconnect the battery
from the drone.
Make sure the battery is fully charged before each flight.
If the drone enters the low battery alarm mode, land and stop flying as soon as possible, and replace
the battery
In a low temperature environment, it is recommended to preheat the battery to above 5°C before
flight, preferably to 20°C.
Checking battery level
1. In sleep mode or shutdown mode, press the power button (0.1 second < T < 1 second), the LED will
display the power for 5 seconds. The battery LEDs are shown in the table below.

14
LED1 (Green)
LED2 (Green)
LED3 (Green)
LED4 (Green)
LED5 (Red)
Current Battery
Level
On
On
On
On
Off
90%--100%
On
On
On
Flash quickly
Off
80%--90%
On
On
On
Off
Off
70%--80%
On
On
Flash quickly
Off
Off
60%--70%
On
On
Off
Off
Off
50%--60%
On
Flash quickly
Off
Off
Off
40%--50%
On
Off
Off
Off
Off
20%--40%
Flash quickly
Off
Off
Off
Off
0%--20%
The flashing frequency is 2Hz, on for 0.25 seconds and off for 0.25 seconds.
2. When charging battery, the battery level indication is shown in the table below.
LED1 (Green)
LED2 (Green)
LED3 (Green)
LED4 (Green)
LED5 (Red)
Current Battery
Level
On
On
On
On
Off
99%--100%
On
On
On
Flash slowly
Off
90%--98%
On
On
On
Flash quickly
Off
80%--90%
On
On
Flash slowly
Off
Off
70%--80%
On
On
Flash quickly
Off
Off
60%--70%
On
Flash slowly
Off
Off
Off
50%--60%
On
Flash quickly
Off
Off
Off
40%--50%
Flash slowly
Off
Off
Off
Off
20%--40%
Flash quickly
Off
Off
Off
Off
0%--20%
1. The fast-flashing frequency is 2Hz, on for 0.25 seconds and off for 0.25 seconds. And the slow-flashing
frequency is 0.5Hz, on for 1.2 seconds and off for 0.8 seconds.

15
2. When charging battery, the LED will flash to indicate the charging status. After charging, please
disconnect the battery from the charging device.
Warning prompt
The battery status LED can display information about battery protection triggered by abnormal charging.
After troubleshooting, please press the battery switch to cancel the LED protection prompt, and re-plug in
the charging device to resume charging. If the charging temperature is abnormal, wait for it to return to
normal, and the battery will automatically resume charging without re-plugging in the charging device.
LED1
LED2
LED3
LED4
LED5
(Fault Indicator)
Description
Off
Off
Flash
quickly
Off
Flash quickly
Charging overcurrent / Discharging
overcurrent
Off
Off
Flash
quickly
Flash
quickly
Flash quickly
Short circuit protection
Flash
quickly
Off
Off
Flash
quickly
Flash quickly
Charging at low temperatures /
Discharging at low temperatures
Flash
quickly
Off
Off
Off
Flash quickly
Charging at high temperatures /
Charging at high temperatures
Flash
quickly
Flash
quickly
Flash
quickly
Flash
quickly
Off
Battery upgrading
Off
Off
Off
Off
Flash quickly
Incompatible charger / Charger
abnormality
Battery storage & transport
1. After each flight, disconnect the drone from the battery, check the battery power interface and clean
up the debris.
2. Make sure the battery is powered off and disconnected from the drone or other device before
transportation.
3. Keep batteries out of the reach of children. If a child accidentally swallows a part, seek immediate
medical attention.
4. Do not place batteries near heat sources, in direct sunlight or in a car on a hot day.
5. Store the batteries in a dry environment. Do not place the battery in water or in a place where water
may leak.
6. Do not store or transport batteries together with metal objects (such as glasses, watches, metal

16
necklaces, hairpins, etc.), inflammable or explosive materials.
7. Put the battery on flat ground to avoid damage to the battery from sharp objects.
8. Do not store the battery for a long time after being completely discharged in case of over-discharging.
9. For long-term storage, please disconnect the battery from the drone.
Battery disposal
Soak the battery in water for over 24 hours to ensure that the battery has been completely
discharged before putting in the designated battery recycling bin. Batteries are hazardous chemicals
and should not be put in other trash bins. For details, please follow local laws and regulations on
battery recycling and disposal.
If the battery cannot be completely discharged due to the failure of the power switch, contact a
professional battery recycling company for further processing instead of putting the battery directly
into the battery recycling bin.
Precautions for use
1. Do not use the battery near a heat source, such as in direct sunlight or in a car on a hot day
2. Keep the battery away from any liquid. Do not immerse the battery in water or get it wet. Never use
the battery in the rain or in a wet environment. When the interior of the battery meets water, a
decomposition reaction may occur, causing the battery to spontaneously ignite or even explode.
3. Batteries with bulging, leaking or damaged packaging are strictly prohibited. If the above situation
occurs, please contact local dealer for further processing.
4. Keep the battery off before mounting or removing the battery from the drone. Do not remove or
insert the battery while the battery is turned on, otherwise the power connector may be damaged.
5. The battery should be used between -5°C and 65°C. High temperature may cause the battery to catch
fire or even explode. If the temperature is too low, the battery performance will be seriously
degraded and cannot be used. Use the battery when it returns to normal temperature.
6. Do not use the battery in a strong electromagnetic environment. Otherwise, the battery protection
board may be abnormal, resulting in serious failure of the drone.
7. Do not disassemble or puncture the battery with sharp objects in any way, otherwise it will cause the
battery to catch fire or even explode.
8. Stay away from the battery leakage as it’s highly corrosive. If the internal liquid splashes on human
skin or eyes, please rinse it off with clean water and seek medical attention immediately.
9. Do not use the battery again after it is dropped from the drone or hit by external force.
10. If the battery accidentally falls into the water during flight or under other circumstances, please
remove the battery immediately and place it in a safe open area, and keep away from the battery
until it is completely dry. Dried batteries should not be used again and should be disposed of properly
according to the disposal methods in the user manual.
This manual suits for next models
1
Table of contents
Other EAVISION Drone manuals