Germid BV-096B-2K User manual

BV-096B-2K
Serial No.: 2020BV0962K0521
USER MANUAL
Changes or modifications not expressly approved by the party responsible for compliance could void the user's authority to
operate the equipment.
This equipment has been tested and found to comply with the limits for a Class B digital device, pursuant to Part 15 of the FCC
Rules. These limits are designed to provide reasonable protection against harmful interference in a residential installation. This
equipment generates uses and can radiate radio frequency energy and, if not installed and used in accordance with the
instructions, may cause harmful interference to radio communications. However, there is no guarantee that interference will not
occur in a particular installation. If this equipment does cause harmful interference to radio or television reception, which can be
determined by turning the equipment off and on, the user is encouraged to try to correct the interference by one or more of the
following measures:
-- Reorient or relocate the receiving antenna.
-- Increase the separation between the equipment and receiver.
-- Connect the equipment into an outlet on a circuit different from that to which the receiver is connected.
-- Consult the dealer or an experienced radio/TV technician for help
This device complies with part 15 of the FCC rules. Operation is subject to the following two conditions (1)this device may not
cause harmful interference, and (2) this device must accept any interference received, including interference that may cause
undesired operation.
This equipment complies with FCC radiation exposure limits set forth for an uncontrolled environment. This equipment should be
installed and operated with minimum distance 20cm between the radiator & your body.
FCC STATEMENT
9.66 Inch 2K HD Steaming Media Mirror Monitor
With Built-in Dash Camera

1 2
Package contains following items, please confirm.
Note: The “time-lapse”function
of the dash cam can be used
only when the hard line
is selected.
1. Steaming media dash cam 2. Dash cam power wire (cigarette lighter version)
2-1. Dash cam hard line (optional) 3. Rear camera 4. Rear camera power line
5. User manual 6. Bandage
1
2
34 5 6
1. It is strictly forbidden for the driver to operate this product while driving! All the consequences caused by the driver's illegal operation
while driving are irrelevant to the company!
2. The company does not assume any responsibility for the consequences of the installation, dismantle and disassembly of the device
by the non-legally authorized qualification engineer!
3. Do not install or repair your product by yourself. Installation or repair of this product by personnel who aren’t been trained in field of
electronic equipment and automotive accessories can cause danger and may expose you to electric shock or other hazards. Do not
operate this product while driving.
4. It is forbidden to use the power cable and rear camera extension cable other than the factory standard. Do not bend or squeeze the
power cable and rear camera extension cable with heavy objects to avoid accidents such as short circuit and even fire.
5. Watching videos and related operations while driving is prohibited by some national laws. For the safety of you and others, do not
watch videos and related operations while driving.
6. Do not expose the main unit of this product to liquids, as this may result in electric shock and damage to the product system.
7. All the functions of this product (and optional accessories camera, etc.) are only used as an aid when driving the vehicle. It does not
mean that you can be distracted, careless or lose judgment when driving, and the safety accident caused by this is none of our
company’s business.
8. The pictures used in this manual are only for reference. Misunderstandings if occurs, that’s no concern of our company.
9. If this product does not work properly, please consult the Manufacturing Customer Service Department.
Statement
1. If the functions of G-sensor, parking monitoring, etc. are turned on, the recorder may have a prompt that the SD card storage of
this recorder is full. If open G-sensor, parking monitoring, etc. functions, the recorder will generate a lock file, the lock file will not be
automatically covered by the system, you need to manually delete, please manually format the memory periodically.
2. Please use genuine Class 10 U1 high speed memory card.
Extra Tips
PACKING LIST
2-1

3 4
9.66 inch full dispaly screen
1080P rear recording
2K front recording
Wi-Fi connect
HD night version
Backup camera display
parking monitor
Car on auto record
Waterproof rear camera
Loop recording
Time-lapse recording (optional)
G-sensor
PRODUCT INTRODUCTION
PRODUCT SPECIFICATION
Front camera: IMX335, 5 million Pixel
recording angle: front 1300, rear 1400
Storage: 8~64GB, CLASS10 U1, SD card
G-sensor: Support
Microphone: Built-in
BATTERY: 800 mAh
Front lens resolution: 2560*1440 or 1920*1080
Rear lens resolution: 1920*1080
Backup camera display: support
Wi-Fi: support
Parking monitor: support
Video compression: H.264 / H.264
Video format: MP4
Working current: 2A
Operating Voltage: DC5V
Operating temperature: -20 0C~+70 0C
Power supply: USB 5V 2A
1 2 3 46
7
5
1: TF memory card slot
2: Rear camera interface
3: USB power interface
4: System reset button
5: Front HD lens
6: speaker
EQUIPMENT INSTRUCTIONS
Display screen: 9.66 inch, 1280*320
PRODUCT FEATURES
7: Power button (short press to turn on / off the screen, long press to turn on / off the mirror)

5 6
1
1: The red light flashing indicates the device is recording. When the recording is stopped, the red light disappears.
2: Recording resolution display of front lens
3: Recording time
4: Date and time display
5: Wi-Fi status display
6: The rear camera connected or not
7: Recording sound or not
14: Drag up and down on the 1/3 of left screen to adjust the display area
15: Swipe from left to right to enter the video playback interface
16: In the 1/3 of middle screen, slide from top to bottom to enter the setting interface
17: Swipe from right to left to switch the front and back display screen
( this function is only available when the rear camera is connected)
18: Drag up and down at the 1/3 of right screen to adjust the screen brightness
(this function is only available if "Backlight Adjustment" is set to "Manual")
RECORDING INTERFACE
2 3 4 5 76 8
9 10 11 12 13
14
16 1715
18
8: Battery status display
9: Video sound on / off
10: Switch to photo mode (only available when you stop recording)
11: Start / stop recording
12: Enter the setting interface
13: Lock the current recording video

Enter the setting interface
VIDEO PLAYBACK INTERFACE
7 8
HOW TO WIRE
Switch to the recording interface Take pictures
Back File type selection
File selection
Delete Play / Pause
To connect with
car cigar lighter
Rear camera
Connect with reversing lights
(If do not connect with this line, the
mirror screen will not switch to the
rear view when reversing)
CAMERA INTERFACE

In the main interface, short press the button to enter the system menu setting interface.
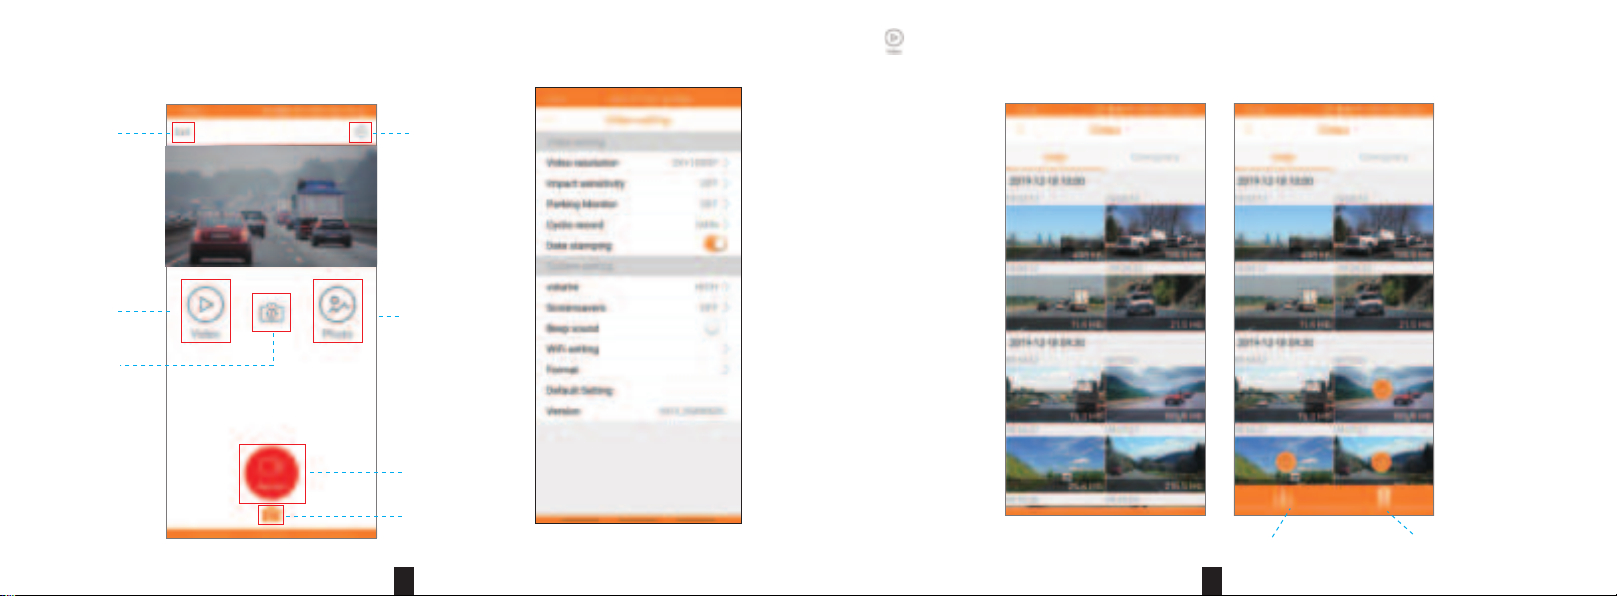
Resolution: 2K + 1080P or 1080P + 1080P .
Loop Record: 1 minute / 3 minutes / 5 minutes.
Time-lapse: "Off" "1S" "2S" "3S".
When “OFF” is selected, the device will shut down automatically when the ACC is disconnected.
Select “1S”, “2S”, and “3S”: When ACC is disconnected, the device will automatically enter the time-lapse monitoring state
and record as “1S frame”, “2S frame”, and “3S frame”.
After the ACC is powered, the device exits the time-lapse monitoring and starts normal recording. (This function can only be
used when the wire is hard line , and this function cannot be used when power by cigarette lighter)
MENU SETTING
9 10
Resolution 1080P+1080P
Back
Backlight
adjustment Video Encode Frequency USB Mode Key Voice Speaker Boot Sound Stream Language
Resolution Loop Record Time-Lapse Record Audio G-Sensor Parking Guard License Screen Saver
Record Audio: On / off can be set; when set to "Off", there will be no sound in recording video.
G-Sensor: Off / High / Medium / Low can be set; when gravity sensor is turned on, the machine is subjected to collision during
normal recording. When the collision acceleration value reaches the value set by G-Sensor (trigger sensitivity can be set as
required), then the system will Lock the currently recorded video, and the locked video will not be covered by the loop system.
Parking Monitor: Off / High / Medium / Low can be set; when the dash cam is off, if it detects vibration of the car (trigger
sensitivity can be set as required), then the recorder will automatically start recording for 20 seconds and then shut down.
License: You can set your license plate number and then display it on the recording interface and the recorded video.
Screen Saver: Off / 1 minute / 3 minutes.
Backlight adjustment: Manual / Auto can be set; when set to manual, it can be adjusted up and down on the 1/3 part of right
screen to adjust screen brightness.
Video Encode: H.264 / H.265 can be set.
Frequency: 50Hz / 60Hz.
USB Mode: Connect the device to the PC with a USB wire and directly read the data in the machine's SD card.
Key Sound: On / off can be set.
Speaker: Off / low / medium / high.
Boot sound: On / off can be set.
Stream: On / off can be set. Stream mode means the mirror screen display the rear camera as default while you restart the vehile
everytime . If switch off the stream mode . The mirror will display the front view camera instead once it power on .
Language: 8 languages optional.

Time setting: time / date / time format / date format can be set.
Format: If the files in the SD card are not important, user can clear all the files in the SD card with one click.
Default: After multiple custom settings, users can use this option to restore the recorder to the original factory setting.
Wi-Fi App: Scan the QR code to download the APP, and realize the wireless connection between the mobile phone and the device
through Wi-Fi.
Version: Check the device version number.
Backlight
adjustment Video Encode
Date/ Time Format Default Wi-Fi App Version
Frequency USB Mode Key Voice Speaker Boot Sound Stream Language
Resolution 1080P+1080P
WI-FI CONNECTION
Built-in Wi-Fi module, this machine can be connected to
mobile phone through Android or IOS APP, please follow the
instructions below.
3. Click the icon to connect the phone and dash cam.
1. Search "RoadCam" in the App store (Apple) or App Store
(Android), or scan the QR code below to quickly install the APP.
2. Turn on the Wi-Fi of the mobile phone, and connect the
Wi-Fi ID (the default name is himc_apxxxxxxxxxx _ *), enter
the initial password: 12345678.
11 12
Click here

4. After connecting successfully, on the bottom right corner of the dash cam will display "Please operate in the App!" Users can
view the video being recorded or make other settings on the mobile phone.
Recording interface Setting interface
13 14
5. Click to enter the recorded video interface, you can perform individual, batch deletion, or download to the local on the
recorded video.
Setting
Record
Photo
Image files
Disconnect
Recorded files
Switch
DeleteDownload
Table of contents
Other Germid Automobile Accessories manuals
Popular Automobile Accessories manuals by other brands

Prorack
Prorack K549 Fitting Instructions for Basic Carrier

TAUBENREUTHER
TAUBENREUTHER 16-5910 manual

v.link
v.link VL3-UCON5-F manual

Over Armour Offroad
Over Armour Offroad KU-RTVXG850-SDK01 Instructions for Installation and Care

DICE
DICE FMRDS USB PRO installation guide

ADS
ADS idatastart RSA-AUD2 install guide