Gesswein POWER HAND 2X Z-6X User manual

Instruction Manual
for
Recipro Handpiece
Model: Z-6X
#510-2160
®

2 3
Introduction
Gesswein Power Hand 2X Recipro handpieces are manufactured to the highest stan-
dards available to provide many years of trouble-free service. Complete with Powerful
30V DC aircooled motors and sealed bearings. Backed by a limited warranty that covers
wear parts for 90 days and overall balance of parts for six months.
This DC electrically driven Recipro handpiece is designed to be used with Gesswein
Power Hand 2X Single, Standard, Dual, Jewelers’ Micromotor, Power Carver II and
Bright-Cutting Controllers. These controllers convert the Alternating Current (AC) power
supply to a variable Direct Current (DC) by means of an I.C. “transistorized” automatically
controlled circuit.
2
1. Accessories
Included Accessories
A. One Pin Tool
B. One Allen Wrench
C. One Bottle Spindle Oil
D. One Assortment of Tool Holders, Bamboo Laps, PSA Chips and Felt Pads
Optional Accessories
A. Handpiece Extension Cord (#510-1120): adds 6', or almost 2m, to the 1.7m hand-
piece cord
B. Handpiece Cradle Rest (#510-1130): provides safe holding place for handpiece when
not in use
C. Variable-Speed Foot Rheostat (#510-3100)
D. On/Off Foot Switch (#510-3105)
145mm (53⁄4")
130mm
(51⁄8")
40mm (11⁄2")
Fig. 1
Specifications
Speed Range (RPM)
Dual or Single Controller* 0-70
Standard Controller 15-70
Input Voltage 3-30V
Length of Stroke 0-6.0mm
Max. Shaft Output (W/sec.)
Dual Controller 50
Standard Controller 32.5
Single Controller 33.8
Max. Stoppage Torque (ft.-lbs./N-m**)
Dual Controller 0.056/0.076
Standard Controller 0.048/0.065
Single Controller 0.053/0.072
Net Wt. (without power cord) 24 oz.
*Or Standard Controller with variable-speed foot rheostat
**Foot-pounds/Newton-meters

4 5
2. Parts Nomenclature
1. Spindle
2. Tool-Securing Screw
3. Lubrication Hole
4. Floating Head-Securing Knob
5. Body
6. Cover
7. Cover Screw
8. Grip
9. Strain Relief
10. Electric Cord with 3-Pin Plug
11. Eccentric Collar
12. Eccentric Shaft
13. Hex Socket Set Screw
14. Eccentricity Indicator
15. Crank Shaft
16. Crank Shaft Set Screw
17. Ball Joint
18. Pulley
19. Drive Belt
Fig. 2
3. General Use
Tool Holder
The Recipro handpiece Spindle is designed to
accept tools with shank diameters from 1.5 to
4.0mm. To insert the desired polishing tool into
the spindle aperture, turn the Tool-Securing Screw
counterclockwise either by hand or with the tool
pin provided (see fig. 3). Once the tool has been
inserted, be sure to tighten securely by rotating the
Tool-Securing Screw back in the clockwise direction.
Stroke Adjustment
Remove the Recipro handpiece Cover by unfasten-
ing the Cover Screw located at the rear. The Hex
Socket Screw is located on the side of the Eccentric
Shaft. Loosen this set screw with the provided Allen
Wrench (see fig. 4). Stroke lengths are graduated
in millimeters (1.0mm = 0.4") and indicated by red
numbers on the Eccentric Collar. Hold the Recipro
in one hand with stroke adjustment numbers facing
you, and press your thumb against the Eccentric
Shaft. With your free hand, turn the Eccentric Collar
until the selected stroke length lines up with the red
Eccentricity Indicator. Now tighten the set screw
and replace the handpiece cover.
Floating Head
The Recipro handpiece has been designed to allow
the efficient polishing of both curved and flat sur-
faces. Better control can be maintained on a curved
work surface if the tool can float so it is always in
contact with the surface. When the Recipro hand-
piece is in its floating head position, the selected tool
will revolve around its axis 360° in both directions
while reciprocating. The normal fixed head position
is used for flat surfaces and holds the tool parallel to
the surface being polished.
To use the Floating Head feature, turn the Floating
Head-Securing Screw counterclockwise (see fig. 5).
In this position the head will rotate freely around its
axis while polishing. To return to the position of fixed
reciprocation, turn the securing screw clockwise.
Fig. 3
Fig. 4
Loosen
Tighten
Tool
Floating Head-
Securing Knob
Fig. 5

6 7
4. Operating Procedure
With your Recipro handpiece adjusted for stroke and with a selected tool fitted, connect the
Gesswein Power Hand Controller to an electrical supply and the Recipro to Controller.
Set the slide Rheostat on the controller to “Low” or the “0” position. Put the Controller Main
Switch to the “ON” position, which lights up a pilot light that indicates your Recipro is ready
to use.
To increase the speed of the Recipro handpiece, move the Slide Rheostat toward “High”
or “10” and the desired reciprocating frequency and begin working. When the work is com-
pleted, put the Main Switch to “OFF.”
To operate your Recipro by using the optional Variable-Speed Foot Rheostat or optional On/
Off Foot Switch, please refer to the Power Hand Controller Instruction Manual for proper con-
nection. The handpiece will not reciprocate until the foot rheostat/switch is depressed. The
rheostat provides infinitely variable speed control; the switch only turns handpiece on and off
(operates at speed selected on control unit).
5. Precautions
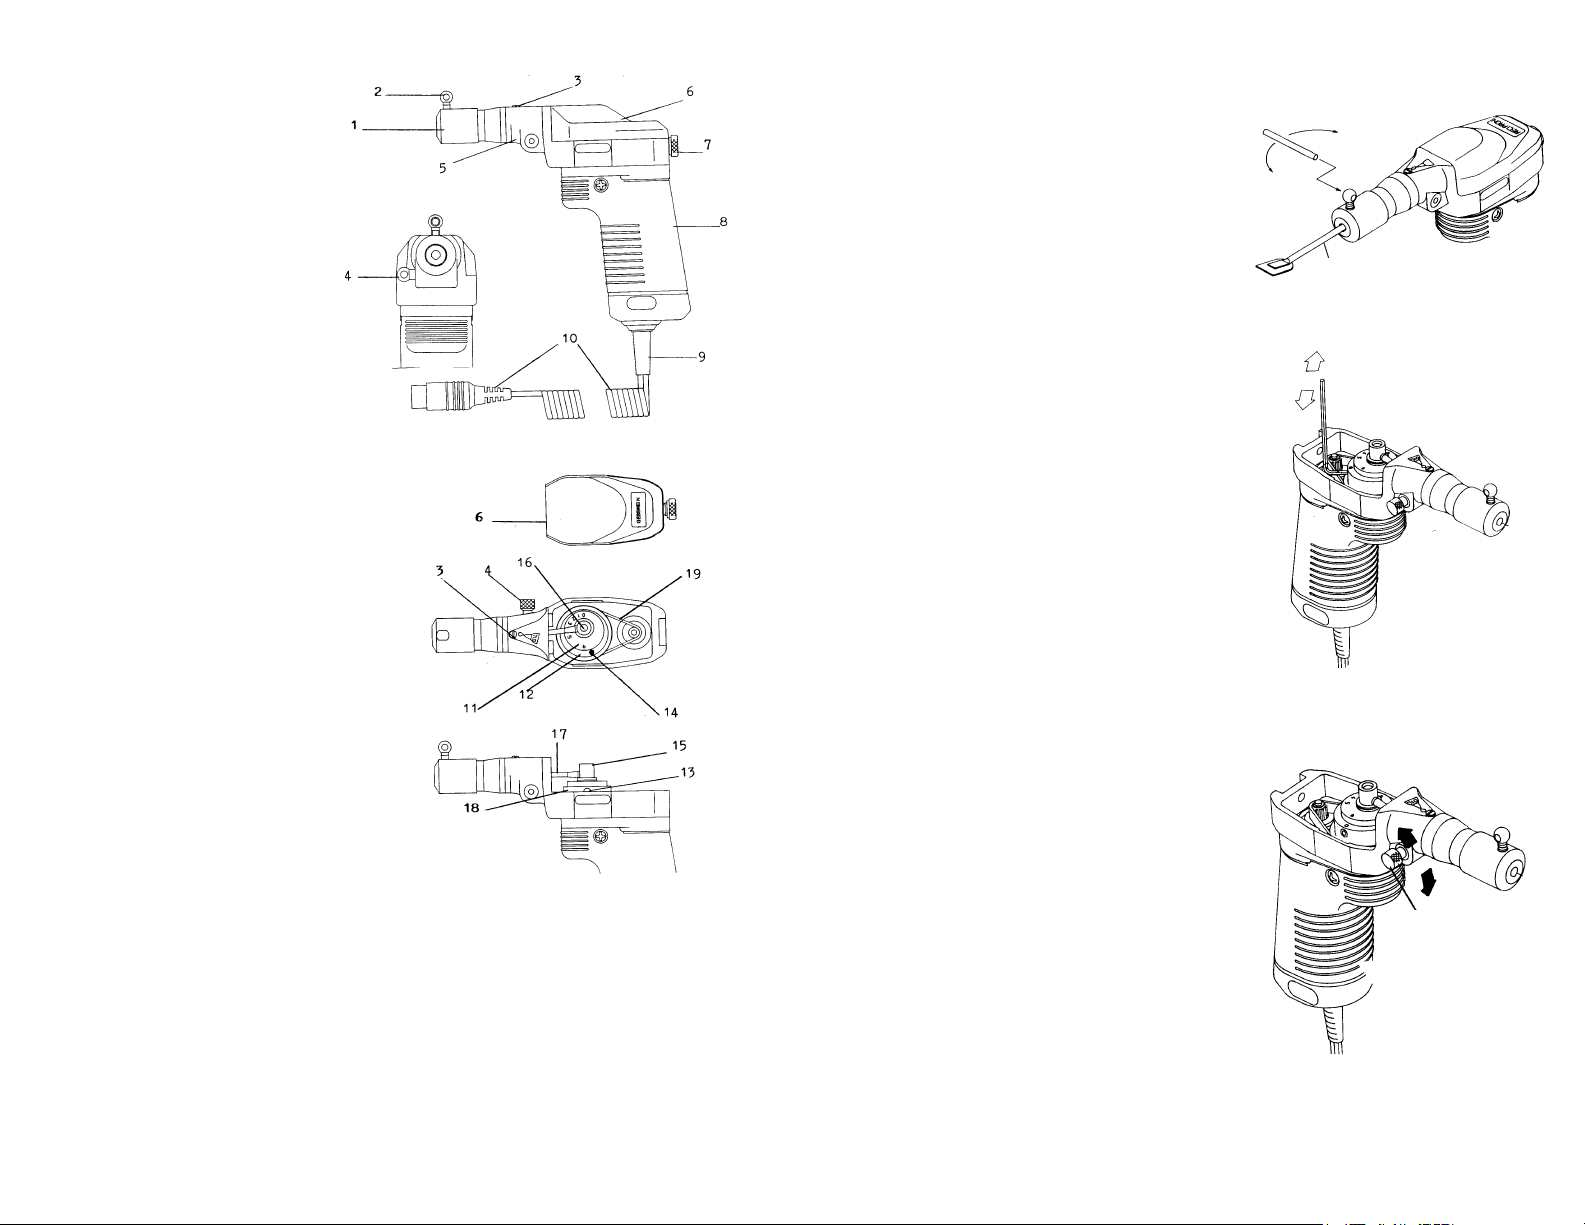
A. For your personal safety, do not operate the Recipro handpiece with the cover removed.
Operation without the cover secured with the cover screw can cause foreign objects to
fall into the high-speed moving cam parts, causing bodily injury and handpiece damage.
B. Before operating your Recipro, be sure the desired tool is properly secured in the spindle
aperture.
C. Do not attempt to change tools or use the floating head feature while the handpiece is
operating.
D. During use, avoid pushing too hard on the work tool or exceeding torque capacity of the
Recipro motor.
E. After stoning operations with lubricants, prevent oil-abrasive slurry from entering the
handpiece by holding the Recipro with spindle pointed down.
F. When the Recipro is used against vertical walls of a workpiece, a hammering effect may
be felt in the handpiece and work tool. Although the Recipro has a spring-loaded cush-
ion to prevent damage caused by hammering or the restriction of stroke movements,
prolonged use of this nature can cause damage to the spindle, ball joint, metal bearings
and work tool.
G. Applications in which a sharp work tool strikes the surface of a workpiece should be
avoided.
H. Whenever possible, avoid using the Recipro in high humidity.
I. Always disconnect the Recipro from the Controller by the plug, not the cord.
J. Under normal circumstances, the Recipro handpiece will not overheat. If your Recipro
does overheat, please contact the Gesswein Repair Department.
6. Maintenance
Lubrication
It is necessary to lubricate the Recipro head assembly parts engaged in reciprocating
action. Lubrication should be scheduled for this portion of your Recipro once for each
eight hours of use.
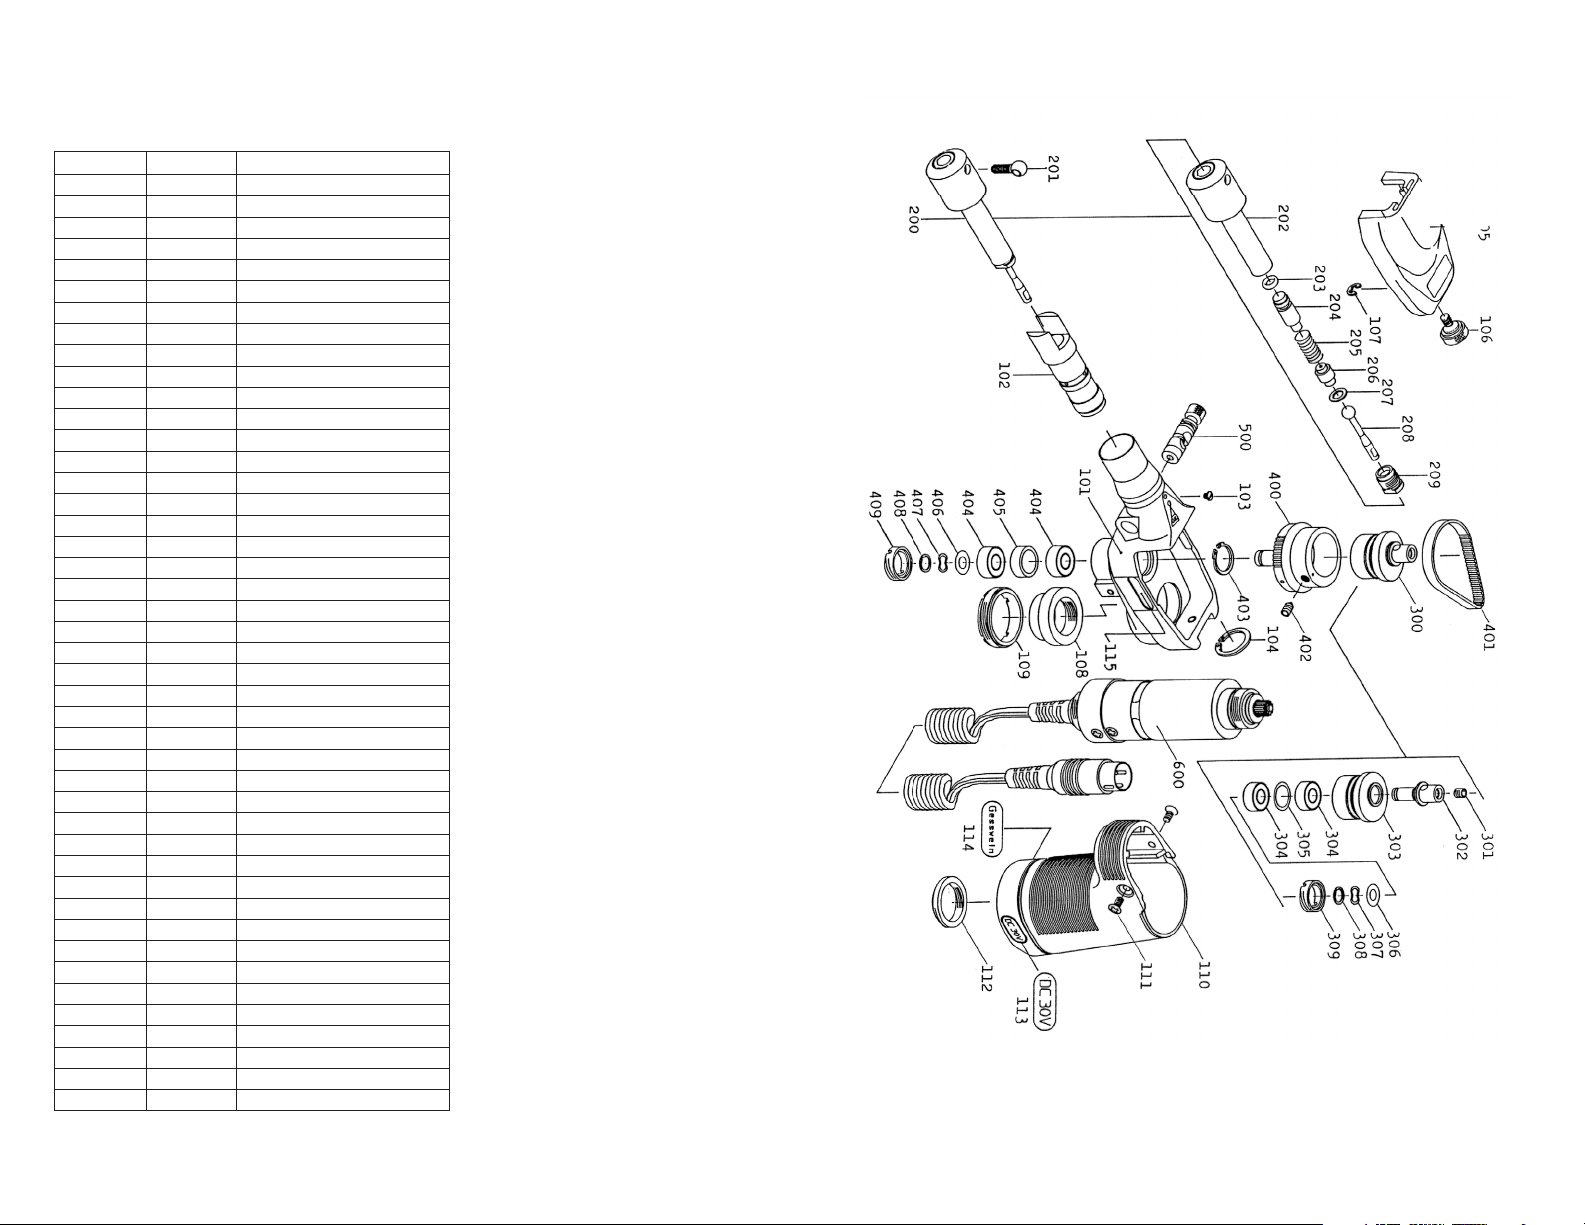
The Recipro must periodically receive two small drops of oil. Lubrication is done through the
Lubrication Hole after removal of the small screw (part #103 – see p. 8-9 for parts drawing)
located in the top-front of the handpiece body. Two drops of light machine oil like the Spindle
Oil provided with the Recipro is sufficient to keep the spindle assembly working smoothly.
Cleaning
With prolonged use of the Recipro handpiece, oil, abrasives and dust from the workplace
atmosphere are likely to accumulate around and in the spindle aperture and under the
body cover. This accumulation could cause malfunction and damage to moving compo-
nents if not removed.
To remove the dirt from under the body cover, use a dry brush or a detergent-moistened
cloth. Periodically clean the spindle aperture with a cotton swab. Do not use paint thinner
or alcohol as a cleaner.
When the external surfaces of your handpiece become dirty, wipe with a cloth slightly
saturated with neutral cleaning liquid. Again, do not use a volatile liquid such as paint
thinner or alcohol.

8 9
Z-6X Parts List
When ordering spare parts, always specify part# (or item# if applicable) and description.
Part# Item# Description
Z-6X-101 8960108 Body
Z-6X-102 8960109 Spindle Metal
Z-6X-103 8960110 Lubricant Hole Screw
Z-6X-104 8960111 Clip Ring
8960112 Spacer
Z-6X-105 8960113 Body Cover
Z-6X-106 8960114 Cover Set Screw
Z-6X-107 8960115 E-Ring
Z-6X-108 8960116 Tesion Collar
Z-6X-109 8960117 Tension Collar Set Screw
Z-6X-110 8960118 Handgrip
Z-6X-111 8960119 Oval Head Screw
Z-6X-112 8960120 Handgrip Set Screw
Z-6X-200 8960124 Spindle Complete
Z-6X-201 8960125 Tool-Securing Screw
Z-6X-202 8960126 Spindle
Z-6X-203 8960127 Rubber O-Ring
Z-6X-204 8960128 Damper
Z-6X-205 8960129 Coil Spring
Z-6X-206 8960130 Joint Base
Z-6X-207 8960131 Spacer
Z-6X-208 8960132 Ball Joint
Z-6X-209 8960133 Ball Joint Receiver
Z-6X-300 8960134 Eccentric Collar Complete
Z-6X-301 8960135 Hex Socket Set Screw
Z-6X-302 8960136 Crank Shaft
Z-6X-303 8960137 Eccentric Collar
Z-6X-304 5103078 Ball Bearing
Z-6X-305 8960139 Metal Spacer
Z-6X-306 8960060 Stainless Spacer
Z-6X-307 8960141 Wave Washer
Z-6X-308 8960142 C-Ring
Z-6X-309 8960143 Screw Ring A
Z-6X-400 8960144 Eccentric Shaft Complete
Z-6X-401 8960182 Drive Belt
Z-6X-402 8960146 Hex Socket Set Ring
Z-6X-403 8960147 C-Ring
Z-6X-404 5103082 Ball Bearing
Z-6X-405 8960149 Bearing Spacer
Z-6X-406 8960150 Stainless Spacer
Z-6X-407 8960151 Wave washer
Z-6X-408 8960152 C-Ring
Z-6X-409 8960153 Screw Ring B
Z-6X-500 8960154 Spindle Lock Complete

10 11
Parts List, continued
When ordering spare parts, always specify part# (or item# if applicable) and description.
Part# Item# Description
Z-6X-600 8960155 Motor Complete
Z-6X-601 8960156 E-Type Clip Ring
Z-6X-602 8960157 Pulley
Z-6X-603 8960158 Motor Case
Z-6X-604 8960159 Countersunk Head Screw
Z-6X-605 8960160 O-Type Rubber Ring
Z-6X-606 8960161 Metal Spacer
8960162 Wave Washer
8960163 Metal Spacer
Z-6X-610 8960164 Armature Complete
Z-6X-612 8960165 Fiber Spacer
Z-6X-611 8960166 C-Type Clip Ring
8960167 Wave Washer
Z-6X-613 8960008 Metal Spacer
Z-6X-614 5103094 Ball Bearing
Z-6X-615 8960168 Armature
Z-6X-616 5103073 Ball Bearing
Z-6X-621 8960012 O-Type Rubber Ring
Z-6X-622 8960013 Teflon Spacer
Z-6X-623 8960014 Rear Lid
Z-6X-624 8960017 Pan Head Screw
Z-6X-625 5101063 Carbon Brush
Z-6X-262 8960138 Brush Side Lid
Z-6X-267 8960148 Terminal
Z-6X-628 8960169 (–) Terminal Insulation Tube
Z-6X-629 8960170 (+) Terminal Insulation Tube
Z-6X-630 8960171 Motor Cap
Z-6X-631 8960159 Countersunk Head Screw
Z-6X-632 5100165 Cord Brush
Z-6X-633 8960174 Motor Cord with Plug
8960175 Motor Cord with Plug
Complete
Z-6X-003 8960176 Allen Wrench
Z-6X-004 8960177 Spindle Oil

Safety Recommendations
— Prolonged –use of vibrating or reciprocating tools may result
in vibration-induced circulation problems in the hands. Always follow safe operating procedures.
Using hand protection (i.e., insulated gloves) and taking frequent breaks can help minimize but
not guarantee against injury. Operating these types of tools in cold weather or with a tight grip will
reduce the period of operation before risking potential injury. Individuals with a tendency to suffer
from poor circulation, frequently cold fingers or itchy hands should closely monitor the condition
of their hands. If symptoms appear, seek medical advice immediately.
Component Selection:
•PH3 controller
•Six motors (three high torque,
two standard, and one high speed)
•A selection of 8 heads
•Two reciprocating profilers
•One side-to-side profiler
•Belt Sander
Controllers and handpieces combine to create the most versatile finishing system in the
industry, offering rotary, profiling and belt sanding action.
201 Hancock Ave. Bridgeport, CT 06605, USA
orders 800.243.4466 |203.366.5400 |fax 203.366.3953
#8901105 / 0418
This manual suits for next models
1
Table of contents
Other Gesswein Power Tools manuals

Gesswein
Gesswein UTR Series User manual

Gesswein
Gesswein Z-CNX User manual

Gesswein
Gesswein Powerhand 2X User manual

Gesswein
Gesswein POWER HAND 3 PH3 55X User manual

Gesswein
Gesswein ULTRAMAX DF POWER UF-0103 User manual

Gesswein
Gesswein Z-ANX User manual

Gesswein
Gesswein POWER HAND 2X Z-2X User manual

Gesswein
Gesswein PH3 15X User manual
Popular Power Tools manuals by other brands

Black & Decker
Black & Decker KX2200 instruction manual

Felisatti
Felisatti RF67/2200 Operating/safety instructions

Powermatic
Powermatic PM2815FS Operating instructions and parts manual

Hitachi
Hitachi RH 650V instruction manual

Rothenberger
Rothenberger ROMAX 3000 Instructions for use

Metabo
Metabo MT 400 Quick Original instructions