GET GK-GETBC-0001 User manual

1
IT
EN
ES
FR
V.1
PT
DE
GUIDE
GUIDA
GUÍA
GUIDE
GUIA
HANDBUCH
BATTERY
CHARGER
AUTOMATIC LITHIUM-PB BATTERY
CHARGER AND MANTAINER
12 Volt
1 Amp
START
BATTERY CHARGER
WET
GEL
AGM
Pb
LiFePo4
Lithium
REVERSE FAULT POWER CHARGING FULL
12 Volt
1 Amp
START
BATTERY CHARGER
WET
GEL
AGM
Pb
LiFePo4
Lithium
REVERSE FAULT POWER CHARGING FULL

2

3
A. INSTRUCTIONS FOR PROPER USE
Before using GET Battery Charger, please read all instructions and
warnings carefully. Failure to do so may lead to incorrect operation or
device malfunctions, resulting in damage to the product or personal injury.
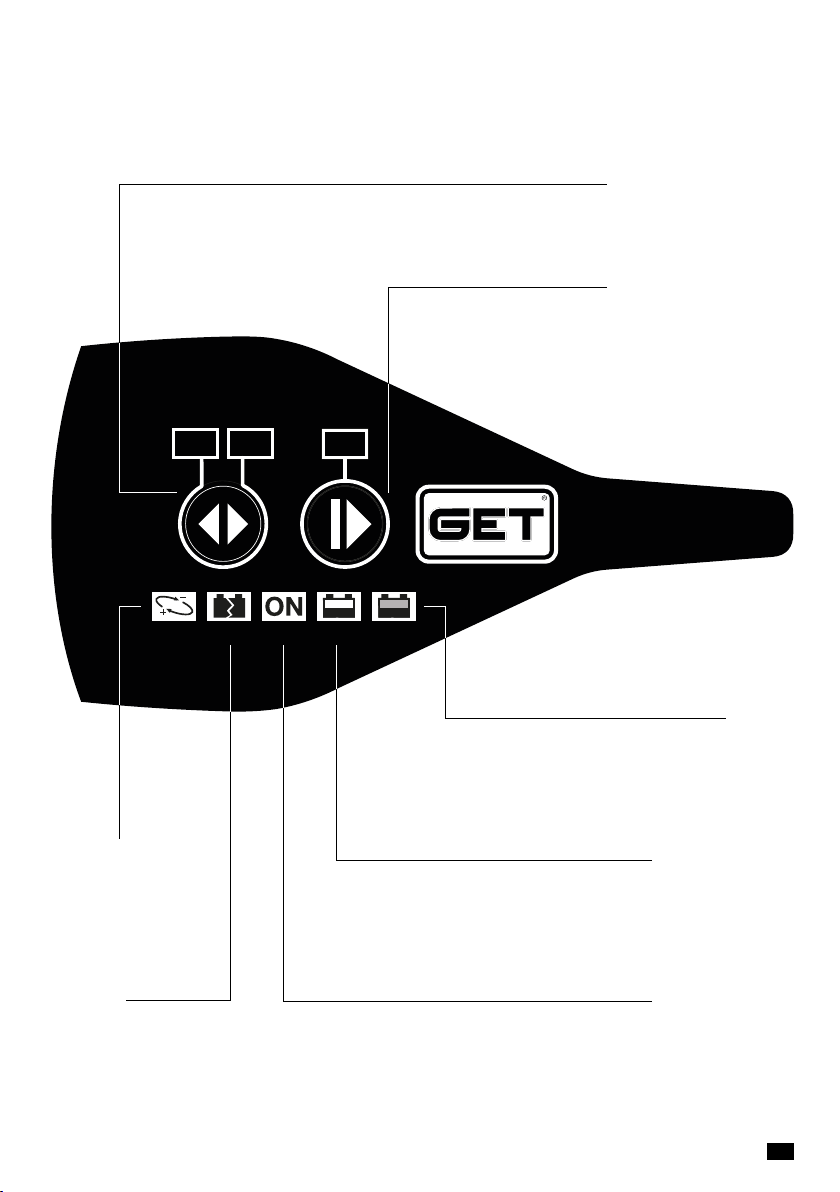
1. The battery charger is designed to charge lead acid batteries and lithium-
ion batteries with LiFePO4 technology. Do not use it for any other purposes.
Do not charge disposable batteries. Do not charge frozen batteries.
2. Children should be supervised to ensure that they do not play with the
appliance. This appliance can be used by children aged from 8 years and
above and persons with reduced physical, sensory or mental capabilities
or lack of experience and knowledge if they have been given supervision or
instruction concerning use of the appliance in a safe way and understand the
hazards involved. Children shall not play with the appliance. Cleaning and user
maintenance shall not be made by children without supervision.
3. This charger is not intended for use by persons (including children) with
reduced physical, sensory or mental capabilities, or lack of experience and
knowledge, unless they have been given supervision or instruction concerning
the use of the charger by a person responsible for their safety. Children should
be supervised to ensure they do not play with the charger
4. Always wear protective goggles and keep your face away from the battery
while connecting and disconnecting it.
5. Explosive gas could be given off while the battery is charging; therefore,
prevent the formation of sparks or flames, and do not smoke.
6. Charge the battery in well-aired and dry places. Do not expose to rain or
snow.
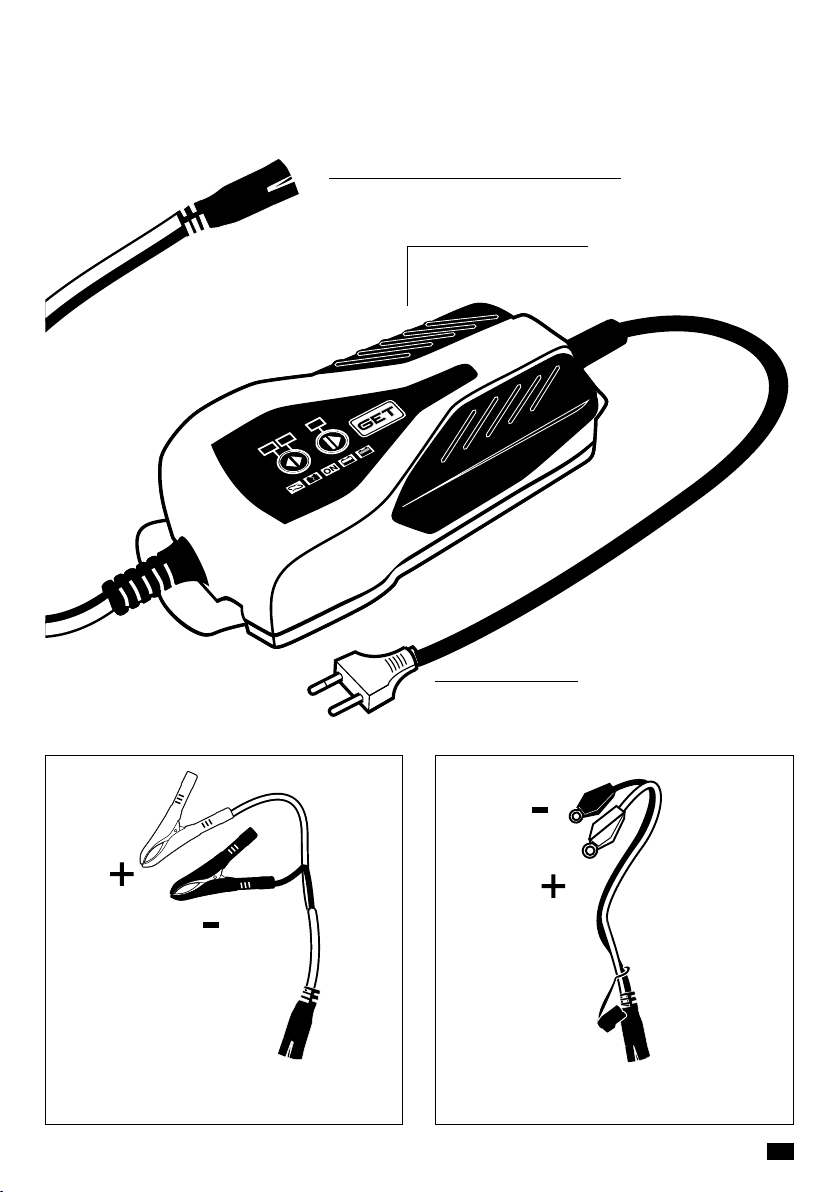
7. Make sure the battery charger is disconnected from the mains before
connecting, or disconnecting, the charge leads to/from the battery.
8. Never put the battery charger on top of the battery while charging it.
9. The fluid in the batteries is corrosive. In case of accidental contact between
the acid and the skin or eyes, rinse with water immediately and seek medical
advice.
10. Improper use of the battery charger or tampering with the built-in
electronic circuit will invalidate your warranty.
11. If the power supply lead of the appliance is damaged, it must be replaced
by authorized technicians, because its replacement requires the use of special
tools.
12. The appliance must be repaired or serviced by trained personnel only.
13. Read the instruction manual carefully before using the battery charger.
EN

4
B. PRODUCT LAYOUT - Components
12 Volt
1 Amp
START
BATTERY CHARGER
WET
GEL
AGM
Pb
LiFePo4
Lithium
REVERSE FAULT POWER CHARGING FULL
12 Volt
1 Amp
START
BATTERY CHARGER
WET
GEL
AGM
Pb
LiFePo4
Lithium
REVERSE FAULT POWER CHARGING FULL
QUICK
CONNECTOR
BATTERY CHARGER
POWER OUTLET
CLAMPS EYELET TERMINALS
EN

5
12 Volt
1 Amp
START
BATTERY CHARGER
WET
GEL
AGM
Pb
LiFePo4
Lithium
REVERSE F A U LT POWER CHARGING FULL
BATTERY TYPE
SELECTOR KEY
CHARGE
START KEY
REVERSE
Polarity
inversion
FAULT
Error warning ON POWER
Battery Charger powered on
CHARGING
Battery under charge
FULL
Charge completed
B. PRODUCT LAYOUT - Keys and pilot lights
EN

6
BATTERY CHARGER MAIN FUNCTIONS:
• Electronic battery charger for all types of batteries:
it recharges any type of battery for vehicles on the market, both lead
(Pb) and lithium ion (LiFePO4) batteries.
• Charge maintainer:
allows long-term maintenance recharges, thanks to the use of eyelet
cables, which can be installed directly on the motorbike.
• Maximum safety:
the device was designed to guarantee:
- Full protection against sparks
- Protection from short-circuit
- Voltage offset
- Protection from overheating
- Protection against polarity inversion
- Protection against external agents (IP65)
The battery charger is made of insulating material and protects from
overheating or short circuits.
• Charge cycles optimisation:
the multiple construction technologies of batteries currently on the
market, need different charging curves to provide correct and complete
charges. GET Battery Charger extends batteries life by recognising the
correct charge cycle to apply to each battery.
• Charge resuming after power outage:
GET Battery Charger memorises the work cycle in case of interruptions
on the 230V power network in order to resume it automatically when the
power comes back on. This function is fundamental in case the battery
charger executes charging cycles without the operator; for example, during
very long charging cycles (maintenance charges) or overnight cycles.
EN

7
C. INSTALLATION AND OPERATION
ATTENTION
-Before starting the charge cycle, ensure that the power supply cable is
disconnected from the power outlet.
-Identify the pole corresponding to the vehicle ground, which is usually
connected to the negative terminal.
-Ensure that battery charger positive and negative output conductors are
properly in contact with the corresponding poles on the battery.
CONNECTION TO THE BATTERY
Continue taking into account the cases described below:
A. Connection to a battery with a negative pole connected to the vehicle ground
1. Connect the red clamp of the battery charger to the positive pole (+) of the battery.
2. Connect the black clamp of the battery charger to the vehicle ground, away from
the battery and from the fuel duct.
B. Connection to a battery with a positive pole connected to the vehicle ground
1.Connecttheblackclampofthebatterychargertothenegativepole(-)ofthebattery.
2. Connect the red clamp of the battery charger to the vehicle ground, away from the
battery and from the fuel duct.
C. Connection to the battery by means of the eyelet terminals
1. Connect the black eyelet to the negative pole (-) of the battery.
2. Connect the red eyelet to the positive pole (+) of the battery.
3. Make sure that the two eyelets are correctly fastened to the poles of the battery
ensuring an optimal electrical contact.
4. At the end of the charge, disconnect the cable from the battery charger by means
of quick connector and ensure to fasten it in a protected point, away from the fuel
duct (do not use metal ties or other material that could damage the output cable).
ATTENTION
The rapid connector of the conductors with eyelet terminals is fitted with
an insulating watertight protection cap; always insert it on the quick
connector at the end of the charge.
D. Connection to batteries not connected to a vehicle
1. Connect the red clamp of the battery charger to the positive pole (+) of the battery.
2. Connect the black clamp of the battery charger to the negative pole (-) of the battery.
EN

8
START OF THE CHARGE
1
Once the battery output conductor cables are connected,
connect the device power cable to the power outlet,
ensuring that the voltage corresponds to the nominal one
of the battery charger
2
Pb Lithium
With the battery charger in “stand-by” mode (LED ON
illuminated), select the type of battery to charge by means of
the key “Type of Battery Selector”.
Configurable charge parameters
Pb
Charge for 12V batteries from 2Ah to 40Ah
Maintenance for 12V batteries from 2Ah to 100Ah
Recommended for Pb batteries: WET – GEL – AGM
Lithium
Charge for 12V batteries from 2Ah to 40Ah
Maintenance for 12V batteries from 2Ah to 100Ah
Recommended for LiFePO4 lithium batteries.
ATTENTION: do not charge other types of lithium batteries
3
START
Press the key START to start the charge.
Charge messages:
CHARGING
Battery status analysis
CHARGING Battery under charge
FULL
Thebatteryis100% loadedandfromnowonthebatterycharger
will go into the maintenance phase and the battery efficiency
status will be constantly monitored, ensuring at the same time
that the battery is always kept at an optimal charge level.
EN

9
END OF THE CHARGE
1
Disconnect the device power cable from the
power outlet
2
Disconnect the output conductor with the black
clamp from the vehicle ground or from the negative
terminal (-) of the battery.
3
Disconnect the output conductor with the red
clamp from the positive terminal (+) of the battery.
ATTENTION
When the battery charger is not used, it must be stored in a dry area to
prevent humidity. For cleaning the external body of the battery charger,
disconnect the device and use a soft cloth.
EN

10
D. ERROR MESSAGES
In case of faults, the battery charger displays the following messages:
SIGNAL CAUSE REMEDY
REVERSE
Polarity inversion: the
output conductors
clamps are not properly
connected to the
battery.
Place correctly the clamps and
resume the battery charge (see
paragraph “C”).
FA U LT
Battery with too high
voltage (attempt
to charge a 24 Volt
battery).
Check the battery voltage. GET
Battery Charger can only be used
with batteries with a 12 Volt
maximum voltage.
Battery with excessive
capacity.
Check the battery capacity. GET
Battery Charger can only be used
to charge batteries with a capacity
between 2 and 40 Ah.
The battery cannot
maintain a good charge
level.
The battery might be defective.
Check the status with a specialised
technician.
Very low charged
battery.
Press again the button to restart
the charge and try to recover the
battery.
Disconnected cables or
short circuited.
Place correctly the clamps and
resume the battery charge (see
paragraph “C”).
Battery completely
short circuited.
The battery might be defective.
Check the status with a specialised
technician.
EN

11
E. DISPOSAL
Pursuant to art. 26 of Legislative Decree no. 49 of 14 March 2014,
“Implementation of Directive 2012/19/EU on waste electrical and
electronic equipment (WEEE)”.
The crossed-out wheelie bin symbol displayed on a product or its packaging
indicates that when the equipment reaches the end of its life cycle it must be
disposed of separately from other waste for purposes of treatment and recycling.
Once such products reach the end of their life cycle, users may dispose of them
free of charge at special municipal centres for the collection of waste electrical
and electronic equipment, or return them to the distributor under one of the
following arrangements:
- very small products, i.e. equipment with no external dimension exceeding 25
cm, may be returned with no obligation to buy to distributors whose sales areas
dedicated to electrical and electronic equipment exceed 400 m2. Distributors
with smaller sales areas are not obliged to participate in this scheme.
- products of dimensions greater than 25 cm may be returned to distributors
under a “one for one” arrangement, i.e. the distributor is only obliged to
receive the product in return for the purchase of a new, equivalent product,
with one new product being purchased for every waste product returned.
The separate collection and subsequent processing of products for purposes of
recycling, treatmentand environmentallysound disposal helpsavoidpotentially
harmful effects on the environment and human health, and facilitates the
reuse/recycling of the materials contained in the products.
Users abusively disposing of products are subject to the penalties
applicable under the respective legislation.
EN

12
F. SYMBOLS AND CERTIFICATIONS
Athena hereby declares that product GK-GETBC-0001 meets the
essential requirements of the EMC Directive (2014/30/EU), LVD
Directive (2014/35/EU) and the RoHS Directive (2011/65/EU). The full
text of the Declaration is available at https://shop.athena.eu/node/49.
G. WARRANTY
Athena S.p.A. warrants to the consumer that the product is free of defects
in material and workmanship for 24 (twenty-four) months from the date of
purchase, which must be certified by a document valid for fiscal purposes.
The warranty can only be exercised by the original consumer of the product
purchasedfromanauthoriseddealerorthroughtheAthenaS.p.A.saleschannel.
During the warranty period, the product – if the relevant defect has been
ascertained following an internal assessment – will be repaired or replaced
without any additional cost for workmanship and materials.
The warranty shall not apply in the following cases:
• Normal wear and tear of the product;
• Improper use of the product;
• Improper installation;
• Damages arising from repairs or alterations by unauthorised personnel;
•Damagesarising frommisuse,accidentsandfailuretoobservetheprecautionsrequired;
• Inadequate maintenance.
Athena S.p.A. shall not be held liable for any damages, losses, expenses and
direct or indirect costs arising from the product or ascribable to the latter.
In case of repairs or replacement, the product will be covered by warranty until
the expiry of the original warranty. The product’s repair or replacement may
involve the use of equivalent parts in place of the original parts.
Theremovedpartsorreplaced productswillbecome theproperty ofAthenaS.p.A.
This warranty issued by Athena S.p.A. does not in any way affect the rights and
remedies expressly envisaged and recognised to the consumer pursuant to the
national or regional laws in force concerning the sale of consumer goods, nor
does it limit the consumer’s rights towards the dealer arising from the sales
contract. This warranty is exclusively valid in the countries in which the product
was marketed and sold by Athena S.p.A. or by an authorised dealer.
EN

13
A. AVVERTENZE PER UN CORRETTO UTILIZZO
Prima di utilizzare GET Battery Charger, leggere attentamente tutte le
istruzioni e le avvertenze. La mancata lettura e/o osservanza delle istruzioni
e delle avvertenze può causare un uso non corretto del dispositivo o un suo
malfunzionamento, con conseguenti danni al prodotto e lesioni alla persona.
1. Il caricabatterie è destinato alla ricarica di batterie al piombo acido e batterie
agli ioni di litio LiFePO4. Non utilizzare per altri scopi. Non caricare batterie di
tipo non ricaricabili. Non caricare batterie congelate.
2. I bambini devono essere vigilati per assicurarsi che non giochino con il
dispositivo. Questo dispositivo non può essere utilizzato da soggetti con ridotte
capacità fisiche, sensoriali o mentali o con scarsa esperienza e conoscenza,
purchésianovigilatiodebitamenteistruitieabbianocompresoipericoliconnessi
conl’uso dell’apparecchiatura. Ibambininon devono giocare con il dispositivo.La
pulizia e la manutenzione non devono essere eseguite da bambini non vigilati.
3. Il presente caricabatterie può essere usato da bambini di età superiore agli
8 anni e da soggetti con capacità ridotta a livello fisico, sensoriale o mentale,
o prive dell’esperienza e conoscenza adeguata solo dietro supervisione o
istruzioni relative all’uso del caricabatterie da parte di un responsabile della loro
sicurezza. I bambini devono essere controllati per assicurarsi che non giochino
con il caricabatterie.
4.Indossare sempre occhialiprotettivi eallontanare ilviso dallabatteria durante
le operazioni di collegamento e scollegamento.
5. Durante la ricarica della batteria può verificarsi l’emissione di gas esplosivi,
evitare dunque la formazione di scintille o fiamme e non fumare.
6.Effettuare la carica inambientiadeguatamente areatied asciutti:non esporre
a pioggia o neve.
7. Accertarsi che il caricabatterie sia disinserito dalla rete prima di collegare, o
scollegare, i cavi di carica alla batteria.
8. Durante la ricarica non posizionare mai il caricabatterie sopra la batteria.
9. Il liquido all’interno delle batterie è corrosivo, qualora vi fosse un contatto
accidentale dell’acido con la pelle o con gli occhi sciacquare immediatamente
con acqua e consultare un medico.
10. L’ uso improprio del caricabatterie, o la manomissione del circuito elettronico
interno all’apparecchio, ne fanno decadere la garanzia.
11. In caso di danneggiamento, il cavo di alimentazione dell’apparecchio deve
essere sostituito da tecnici autorizzati, poiché l’intervento richiede l’utilizzo di
utensili speciali.
12. Interventi di riparazione o manutenzione dell’apparecchio devono essere
effettuati solo da personale qualificato.
13. Utilizzare il caricabatterie solo dopo aver letto attentamente il manuale
d’istruzioni.
IT

14
B. LAYOUT DEL PRODOTTO - Componenti
IT
12 Volt
1 Amp
START
BATTERY CHARGER
WET
GEL
AGM
Pb
LiFePo4
Lithium
REVERSE FAULT POWER CHARGING FULL
12 Volt
1 Amp
START
BATTERY CHARGER
WET
GEL
AGM
Pb
LiFePo4
Lithium
REVERSE FAULT POWER CHARGING FULL
CONNETTORE
RAPIDO
CARICABATTERIE
PRESA DI
ALIMENTAZIONE
PINZE TERMINALI AD OCCHIELLO

15 IT
12 Volt
1 Amp
START
BATTERY CHARGER
WET
GEL
AGM
Pb
LiFePo4
Lithium
REVERSE F A U LT POWER CHARGING FULL
TASTO SELETTORE
DEL TIPO DI BATTERIA
TASTO DI AVVIO
DELLA CARICA
REVERSE
Inversione
polarità
FAULT
Segnalazione
di errore
ON POWER
Caricabatterie alimentato
CHARGING
Batteria in ricarica
FULL
Carica completata
B. LAYOUT DEL PRODOTTO - Tasti e spie luminose

16
FUNZIONI PRINCIPALI DI BATTERY CHARGER:
• Caricabatterie elettronico per tutti i tipi di batteria:
consente di ricaricare ogni tipo di batteria per veicoli presente sul
mercato, sia al piombo (Pb) che agli ioni di litio (LiFePO4).
• Mantenitore di carica:
permette di effettuare cariche di mantenimento di lunga durata, grazie anche
all’utilizzo dei cablaggi con gli occhielli, installabili direttamente sulla moto.
• Massima sicurezza:
il dispositivo è progettato per garantire:
- Protezione completa contro le scintille
- Protezione di cortocircuito
- Compensazione di tensione
- Protezione di surriscaldamento
- Protezione contro l’inversione di polarità
- Protezione contro gli agenti esterni (IP65)
Il caricabatterie è in materiale isolante e protegge da surriscaldamento
o cortocircuiti.
• Ottimizzazione dei cicli di carica:
le molteplici tecnologie costruttive delle batterie attualmente in
commercio necessitano di differenti curve di carica per avere delle
ricariche corrette e complete. GET Battery Charger allunga la vita delle
batterie riconoscendo il giusto ciclo di carica da applicare su ognuna.
• Ripresa del caricamento in seguito a interruzione della linea di rete:
GET Battery Charger memorizza il ciclo di lavoro in caso di interruzioni sulla
linea di rete a 230V in modo da poterlo riprendere automaticamente al
ritorno dell’alimentazione. Questa funzione è fondamentale nei casi in cui
il caricabatterie esegua cicli di carica in assenza di operatore; ad esempio
durante cicli di lavoro molto lunghi (cariche di mantenimento) o cicli notturni.
IT

17
C. INSTALLAZIONE E MESSA IN OPERA
ATTENZIONE
-Verificare prima di avviare la carica che il cavo di alimentazione sia
disinserito dalla presa di rete.
-Individuare il polo corrispondente alla massa del veicolo, in genere
collegata al morsetto negativo.
-Assicurarsi che i conduttori di uscita positivoe negativo del caricabatterie
abbiano un contatto adeguato con i loro rispettivi poli sulla batteria.
CONNESSIONE ALLA BATTERIA
Procedere considerando i casi di seguito descritti:
A. Connessione a una batteria con polo negativo collegato alla massa del veicolo
1. Collegare la pinza rossa del caricabatterie al polo positivo (+) della batteria.
2. Collegare la pinza nera del caricabatterie alla massa del veicolo, lontano dalla
batteria e dal condotto del carburante.
B. Connessione a una batteria con polo positivo collegato alla massa del veicolo
1. Collegare la pinza nera del caricabatterie al polo negativo (-) della batteria.
2. Collegare la pinza rossa del caricabatterie alla massa del veicolo, lontano dalla
batteria e dal condotto del carburante.
C. Connessione alla batteria tramite i terminali ad occhiello
1. Collegare l’occhiello nero al polo negativo (-) della batteria.
2. Collegare l’occhiello rosso al polo positivo (+) della batteria.
3. Assicurarsi che i due occhielli siano fissati correttamente ai poli della batteria
garantendo un contatto elettrico ottimale.
4. Al termine della carica scollegare dal caricabatterie il cavo attraverso il connettore
rapidoedassicurarsidifissarloinunpuntoprotetto,lontanodalcondottodelcarburante
(non utilizzare fascette in metallo o altro materiale che possa rovinare il cavo di uscita).
ATTENZIONE
Il connettore rapido dei conduttori con terminali ad occhiello è dotato di
cappuccio isolante di protezione a tenuta stagna; inserirlo sempre sul
connettore rapido terminata la carica.
D. Connessione a batterie non collegate ad un veicolo
1. Collegare la pinza rossa del caricabatterie al polo positivo (+) della batteria.
2. Collegare la pinza nera del caricabatterie al polo negativo (-) della batteria.
IT

18
AVVIO DELLA CARICA
1
Una volta connessi i cavi dei conduttori di uscita alla
batteria, collegare il cavo di alimentazione dell’apparecchio
alla presadirete,assicurandosi chelatensionecorrisponda
a quella nominale del caricabatterie
2
Pb Lithium
Con il caricabatterie in modalità “stand-by” (LED ON acceso),
selezionare il tipo di batteria da caricare mediante il tasto
“Selettore Del Tipo Di Batteria”.
Parametri di carica impostabili
Pb
Carica per batterie a 12V da 2Ah a 40Ah
Mantenimento per batterie a 12V da 2Ah a 100Ah
Indicato per carica di batterie Pb: WET – GEL – AGM
Lithium
Carica per batterie a 12V da 2Ah a 40Ah
Mantenimento per batterie a 12V da 2Ah a 100Ah
Indicato per carica di batterie litio LiFePO4
ATTENZIONE: non caricare altre tipologie di batterie al litio
3
START
Premere il tasto START per avviare la carica.
Segnalazioni di carica:
CHARGING
Analisi stato batteria
CHARGING Batteria in fase di carica
FULL
Labatteriaècaricaal100%,daquestomomentoilcaricabatterie
entrerà nella fase di mantenimento e terrà costantemente
monitorato lo stato di efficienza della batteria, provvedendo a
mantenerla sempre ad un livello ottimale di carica.
IT

19
FINE DELLA CARICA
1
Scollegare il cavo di alimentazione dell’apparecchio
dalla presa di rete
2
Scollegare il conduttore di uscita con pinza nera
dalla massa del veicolo o dal morsetto negativo (-)
della batteria.
3
Scollegare il conduttore di uscita con pinza rossa
dal morsetto positivo (+) della batteria.
ATTENZIONE
Quando non è in uso il caricabatterie deve essere mantenuto in una
zona asciutta per evitare l’umidità. Per la pulizia del corpo esterno del
caricabatterie, scollegare l’apparecchio e utilizzare un panno morbido.
IT

20
D. SEGNALAZIONE DI ERRORI
In caso di anomalia il caricabatterie potrà segnalare le seguenti indicazioni:
SEGNALE CAUSA RIMEDIO
REVERSE
Inversione di polarità:
le pinze dei conduttori
di uscita sono collegati
impropriamente alla
batteria.
Posizionare correttamente le pinze
e riprendere la carica della batteria
(vedere il paragrafo “C”).
FA U LT
Batteria con tensione
troppo alta (si sta
tentando di caricare
una batteria da 24 Volt).
Verificare la tensione della batteria.
GET Battery Charger è utilizzabile
solo con batterie con tensione
massima di 12 Volt.
Batteria di capacità
eccessiva.
Verificare la capacità della batteria.
GET Battery Charger è utilizzabile
solo per carica di batterie con
capacità da 2 a 40 Ah.
La batteria non è in
grado di mantenere un
buon livello di carica.
La batteria può essere difettosa.
Verificarne lo stato con un tecnico
specializzato.
Batteria molto scarica. Premere nuovamente il pulsante
per fare ripartire la carica e tentare
di recuperare la batteria.
Cavi scollegati o in
cortocircuito.
Posizionare correttamente le pinze
e riprendere la carica della batteria
(vedere il paragrafo “C”).
Batteria
completamente in
cortocircuito.
La batteria può essere difettosa.
Verificarne lo stato con un tecnico
specializzato.
IT
Table of contents
Languages:
Popular Batteries Charger manuals by other brands

Sony
Sony AC-VQ850D Operating Instructions / Manual de instrucciones / Mode... operating instructions

Worx
Worx WA3869 manual

SP
SP WC102P instruction manual

Universal Electronics
Universal Electronics 3-Stage Switch Mode SLA Charger 12BC4000T-1 Specification sheet

DS18
DS18 INFINITE PWSI200A owner's manual

Battery Extender
Battery Extender SP1-CA owner's manual