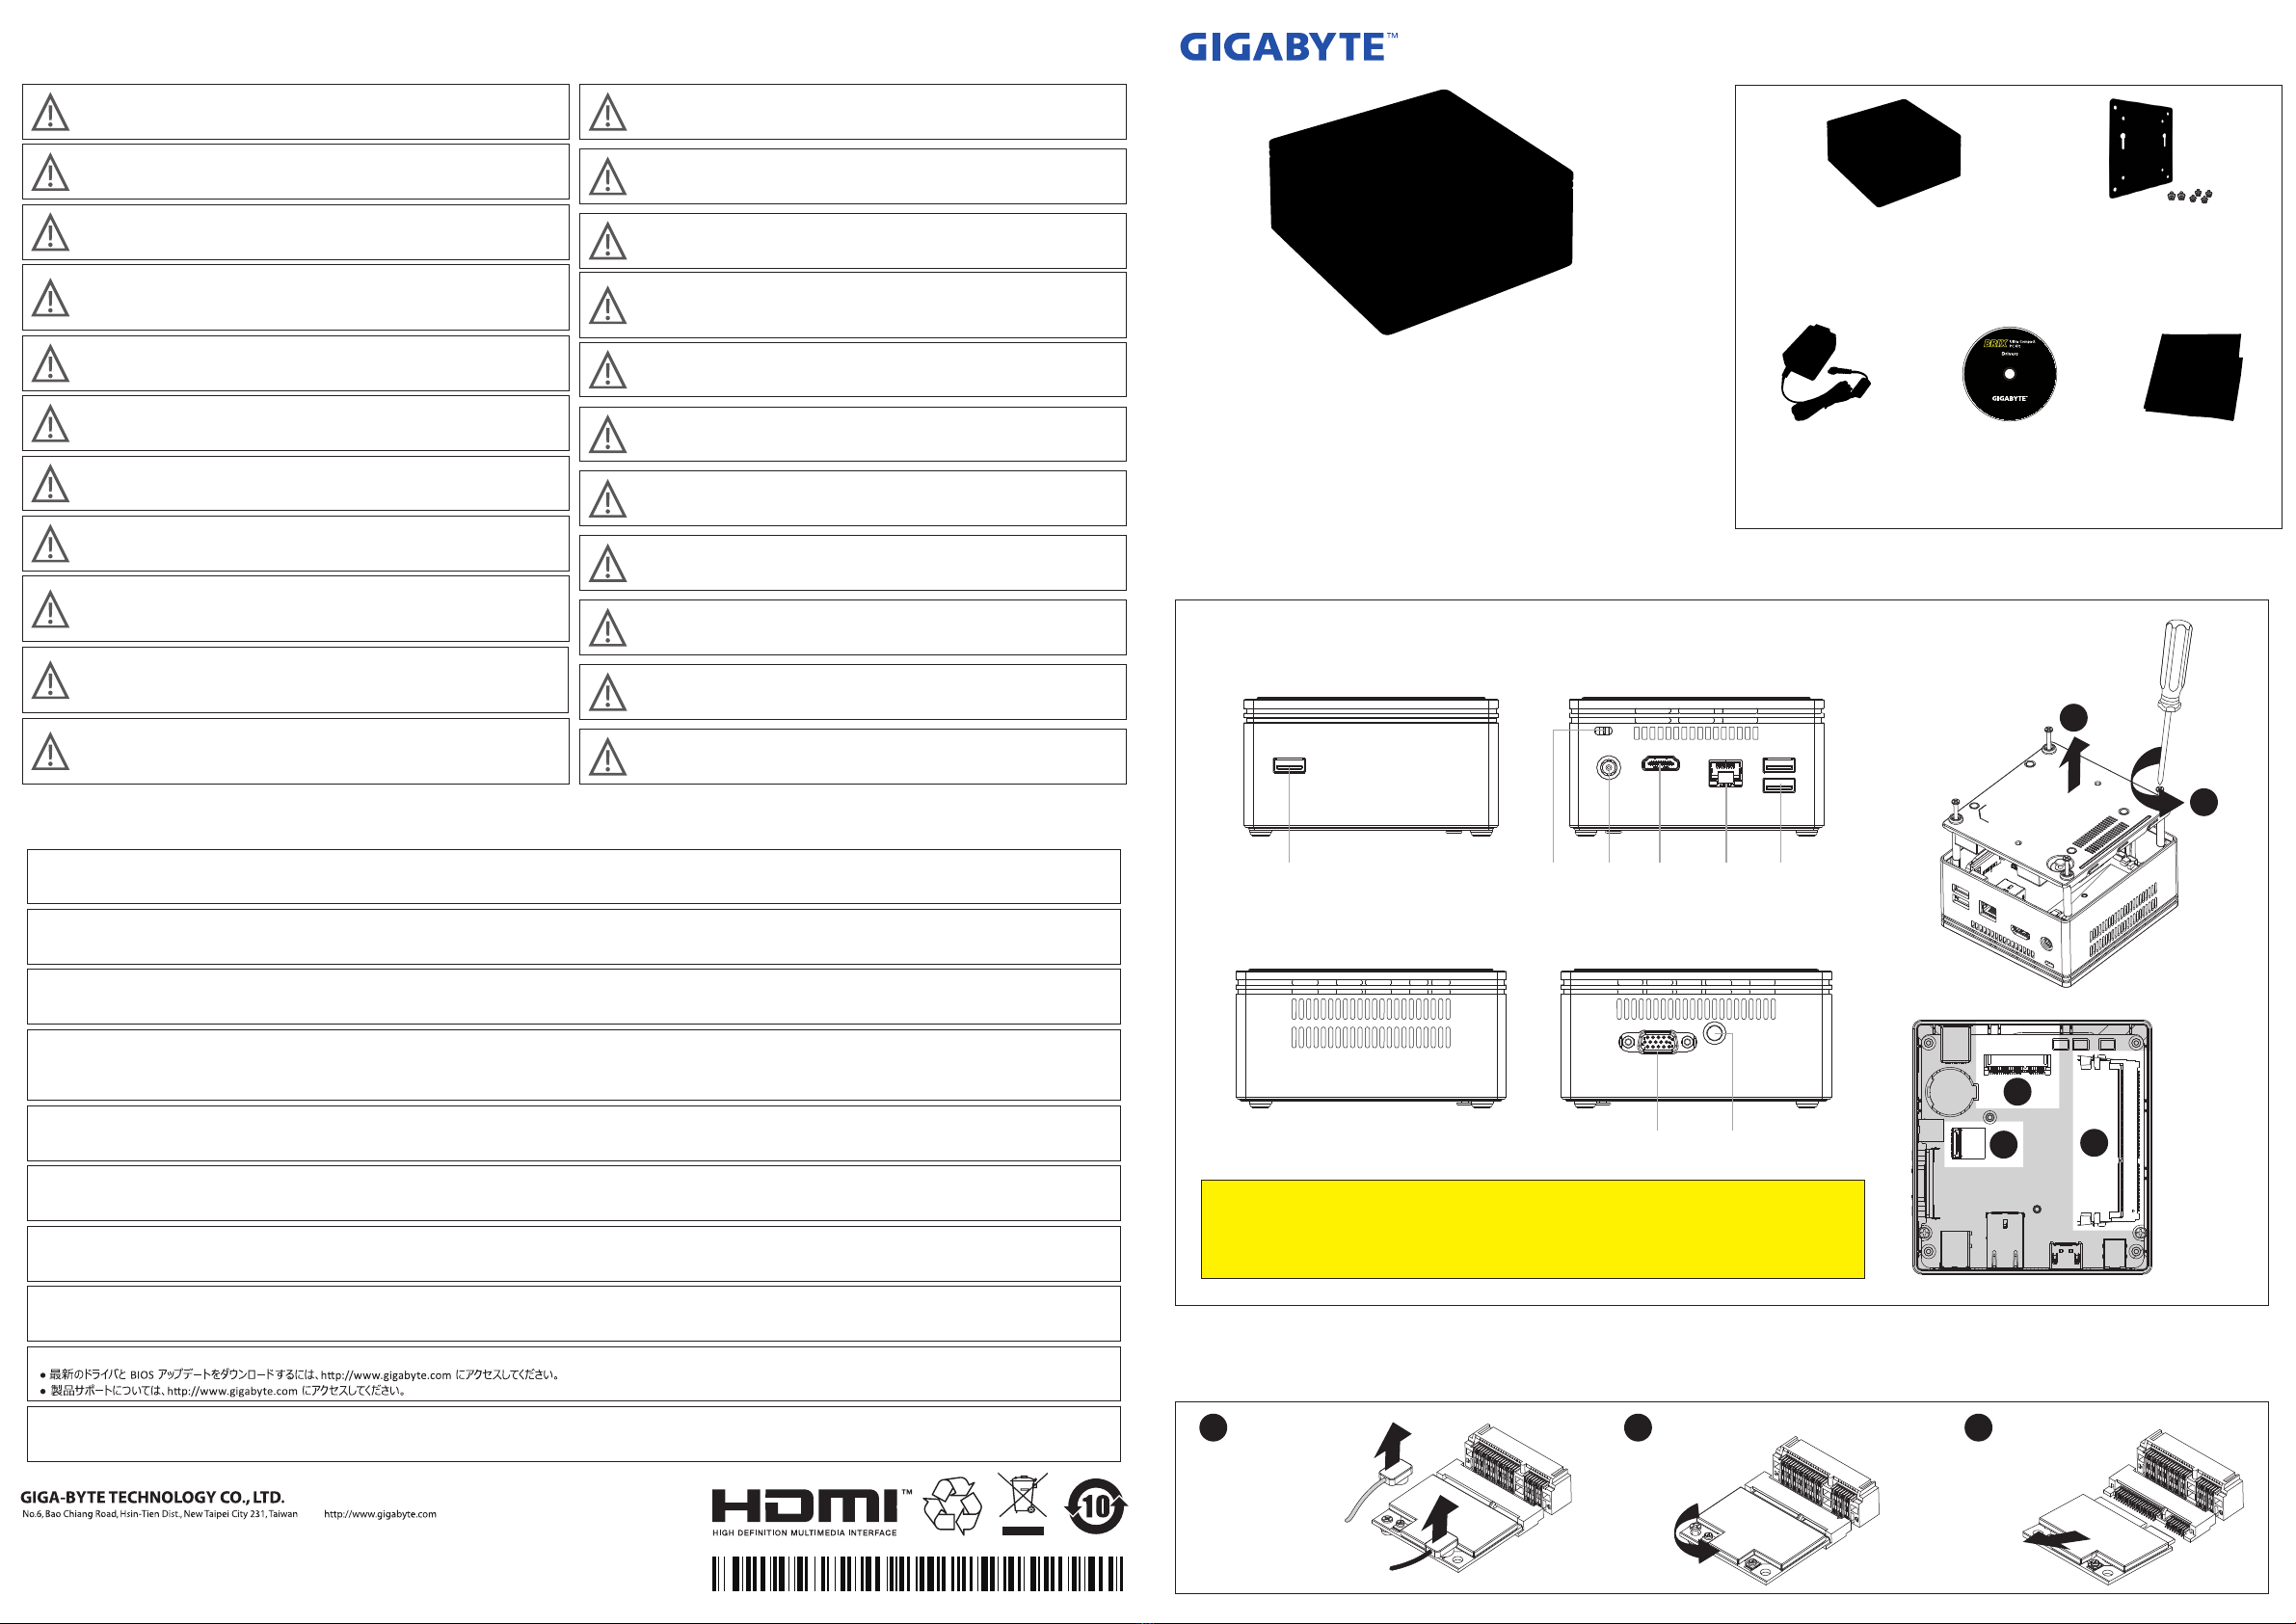
manuals.online logo
Brands
  1. Home
  2. •
  3. Brands
  4. •
  5. Gigabyte
  6. •
  7. Desktop
  8. •
  9. Gigabyte BRIX BXBT-1900 User manual

Gigabyte BRIX BXBT-1900 User manual

Package Contents
Lieferumfang / Contenu de l'emballage / Комплект поставки / Przewodnik użytkownika
Paket İçeriği
Geng familiar with your unit
Kennenlernen Ihres Geräts / Découvrez votre unité / Первое знакомство с устройством / Prezentacja zestawu / Cihazınızı daha iyi tanıyın
1 x VESA Mount Bracket & 6 x Screws
- 1 x VESA-Halterung & 6 x Schrauben
- 1 x support VESA et ses 6 vis
- 1 крепление VESA и 6 винтов
- 1 zestaw montażowy VESA i 6 śrub mocujących
- 1 x VESA Montaj Desteği & 6 x Vida
GB-BXBT x 1
- NOT Include any of the following: 2.5” HDD, SO-DIMM memory
- Folgende Arkel sind NICHT enthalten: 2,5 "HDD, SO-DIMM-Speicher
- Composants non inclus: Disque Dur 2.5", Mémoire SO-DIMM
- Следующие позиции не включенеы в комплект поставки:
2,5-дюйм накопитель, SO-DIMM модули ОЗУ
- Zestaw nie zawiera: 2.5" HDD, pamieci SO-DIMM
- Şunlar dahil değildir : 2.5” HDD, SO-DIMM haza
Quick Start Guide
- Schnellstartanleitung
- Guide de démarrage rapide
- Руководство по быстрой сборке
- Instrukcja użytkownika
- Hızlı Başlangıç Kılavuzu
Driver CD x 1
- Treiber-CD x 1
- CD de drivers x 1
- Диск с драйверами
- Płyta CD ze sterownikami
- Sürücü CD x 1
BRIX Ultrakompakt-PC-Set / Kit PC ultra compact BRIX
Ультракомпактный ПК BRIX / BRIX - Kompaktowy zestaw PC
BRIX Ultra Compact PC Ki
Quick Start Guide
Schnellstartanleitung / Guide de démarrage rapide / Руководство по быстрой сборке
Przewodnik użytkownika / Hızlı Başlangıç Kılavuzu
BRIX Ultra Compact PC Kit
Safety and Regulatory Informaon
Informaonen zur Sicherheit und zu gesetzlichen Vorschrien / Informaons sur la sécurité et les réglementaons / Безопасность и нормативная информация
Informacje dotyczące bezpiecznego użytkowania / Güvenlik ve Düzenleme Bilgisi
Wall-mount adapter x 1
- Adapter fuer Wandhalterung x 1
- Support mural inclus x 1
- Приспособление для крепления
устройства на стене x 1
- Adapter do montażu na ścianie x 1
- Duvar bağlan apara x 1
A. Wireless Module: How to Safely Remove the Module
Wireless-Modul: Das sichere enernen des Moduls / Module sans fil : Comment rerer le module en toute sécurité / Модуль беспроводной связи: Как безопасно удалить модуль
Moduł bezprzewodowy: Jak bezpieczne usunąć moduł. / Kablosuz Modülü : Modülü Nasıl Güvenli Kaldırabilirim
1
Disconnect the two
antenna by manually
liing off the clips
that hold them in
place
2
Remove the screw in
the le corner
3
Carefully pull the
wireless module
from the slot
Support
Unterstützung / Assistance / Техническая поддержка / Wsparcie / Destek
Risk of explosion if the baery is replaced with an incorrect type. Baeries should
be recycled where possible. Disposal of used Baeries must be in accordance with
local environmental regulaons.
Failure to use the included Model GB-BXBT Power Adapter may violate regulatory
compliance and may expose the user to safety hazards.
Es besteht Explosionsgefahr, wenn die Baerie durch einen falschen Typ ersetzt
wird. Baerien müssen recycelt werden, sofern möglich. Gebrauchte Baerien
müssen gemäß den örtlichen Umweltschutzvorschrien entsorgt werden.
Die Nichtbenutzung des mitgelieferten Netzteils Modell GB-BXBT könnte eine
Einhaltung gesetzlicher Vorschrien nicht mehr gewährleisten und für den
Benutzer zu einem Sicherheitsrisiko werden.
Risque d’explosion si la baerie n’est pas du bon type. Les piles doivent être
recyclées quand cela est possible. Le rejet des baeries usagées doit être effectué
en foncon des réglementaons locales.
Un manquement à l'ulisaon de l'adaptateur d'alimentaon du GB-BXBT peut être
en infracon avec des réglementaons et vous exposer à des dangers.
Характеристики батареи отличные от оригинальных могут привести к
разрушению корпуса элемента (микровзрыву). Использованные батареи
должны быть утилизированы в соответствии с рекомендациями местных
регулирующих органов.
Применение стороннего блока питания отличного от устройства из комплекта
поставки модели GB-BXBT может повлечь за собой нарушение нормативных
требований и правил техники безопасности.
Istnieje ryzyko wybuchu, w razie zastosowania nieodpowiedniego typu baterii.
Zużyte baterie mogą być odpadami niebezpiecznymi. Zużyte baterie powinny być
zatem segregowane i utylizowane w miejscach do tego przeznaczonych.
Użycie innego zasilacza niż dostosowany do modelu GB-BXBT może spowodować
uszkodzenie sprzętu a także być niebezpieczne dla zdrowia.
Yanlış şekilde pil takıldığında patlama tehlikesi bulunmaktadır. Piller mümkün
olduğunda geri dönüştürülmelidir. Kullanılmış piller yerel çevresel düzenlemelere
uygun olarak ak işleme tesislerine gidecek şekilde almalıdır.
Güvenlik Uyarısı: GB-BXBT Güç Adaptörünün kullanılmaması kullanıcıya ve cihaza
zarar verebilir.
배터리를 잘못된 타입으로 교체하면 폭발 위험이 있습니다. 가능한한 배터리를
재활용하십시오. 수명이 다한 배터리는 현지의 환경 규정에 따라 폐기해야
합니다.
間違ったバッテリーへの交換は、破裂など事故の原因になります。可能であればバッテリー
はなるべくリサイクルしてください。使用済みバッテリーは地域の環境規制に従い処理してく
ださい。
제공된GB-BXBT전원 어댑터를 사용하지 않은 것은 관련 규정을 어긴 것이며
이로인해 안전상의 위험에 노출될 수있습니다.
GB-BXBTに付属の電源アダプターと電源ケーブルは専用品となります。他の機器で使用しない
で下さい、安全上の問題や各種規制違反になる場合がございます。
若未使用隨附的GB-BXBT型號電源變壓器,可能會違反規範合規性,並讓使用者
暴露在危險中。
若以不正確類型的電池進行更換,可能會有爆炸的危險。應儘可能回收電。應依
照當地環保法規棄置使用過的電池。
此产品符合中国能效标识规范─微型计算器效能等级:1级 ,属 于 B类 产 品 类 型 。典
型能耗值:131kWh
若不使用随货附赠的GB-BXBT型号电源适配器,可能不符合规格,并给用户的人
身安全带来危险。
根据中华人民共和国国家标准GB 28380-2012(微型计算器能效限定值及能效等级
)规范要求,此机型仅适用于产品类型:B类,系统总内存配置容量必须大于2GB(
含2GB)。
更换电池时,若使用的类型不正确,可能存在爆炸危险。废旧电池必须依照当地
环境法规进行废弃处置。
● For a list of tested memory, 2.5” HDD, wireless adapters and OS supported, go to: hp://www.gigabyte.com
● To download the latest drivers and BIOS updates, go to: hp://www.gigabyte.com
● For product support, go to: hp://www.gigabyte.com
● Pour une liste de types de mémoire, disques 2.5” HDD, adaptateurs sans fil et systèmes d'exploitaon testés, veuillez vous rendre sur : hp://www.gigabyte.com
● A télécharger la dernier version du mis à jour le bios et les pilots, voici: hp://www.gigabyte.com
● Pour l'assistance produit, veuillez vous rendre sur : hp://www.gigabyte.com
● Eine Liste mit geprüem Arbeitsspeicher, 2.5” HDD, drahtlosen Adaptern und unterstützten Betriebssystemen finden Sie unter: hp://www.gigabyte.com
● Für den Download aktuellster Treiber und BIOS-Updates gehen Sie zu: hp://www.gigabyte.com
● Unterstützung zu Produkten finden Sie unter: hp://www.gigabyte.com
● Подробная информация о протестированных модулях ОЗУ, 2.5” HDD и модулях беспроводной связи под управлением совместимой ОС размещена по адресу:
hp://www.gigabyte.com
● Для загрузки актуальных драйверов и обновлений версий BIOSвоспользуйтесь ссылкой: hp://www.gigabyte.com
● Информация о технической поддержке продукта размещена по адресу: hp://www.gigabyte.com
● Test edilen haza listesi için, 2.5” HDD, kablosuz adaptörler ve desteklenen OS için, ilgili adrese gidiniz: hp://www.gigabyte.com
● En son sürücüleri ve BIOS güncellemelerini indirmek için, ilgili adrese gidiniz: hp://www.gigabyte.com
● Ürün desteği için, ilgili adrese gidiniz: hp://www.gigabyte.com
● Listę komaptybilnych komponentów (pamięć, 2.5” HDD, karty rozszerzeń) oraz systemów operacyjnych można znaleźć pod adresem internetowym: hp://gigabyte.com
● Najnowsze wersje sterowników oraz BIOSu można pobrać ze strony:hp://www.gigabyte.com
● Aby uzyskać wsparcie dotyczące produktów proszę wejść na stronę internetową: hp://www.gigabyte.com
● 如 需 已 測 試 記 憶 體、2.5" SATA HDD、無線介面卡和支援的作業系統清單,請前往hp://www.gigabyte.com
● 若要下載最新驅動程式和BIOS更 新,請 前 往:hp://www.gigabyte.com
● 如 需 產 品 支 援 資 訊,請 前 往:hp://www.gigabyte.com
● サ ポ ー ト さ れ た テ ス ト 済 み の メ モ リ、2.5"SATA HDD、ワ イヤ レス アダ プ ター、OSのリストについては、次のサイトで確認できます: hp://www.gigabyte.com
● 테스트한 메모리,무선어댑터 지원 관련 목록은 hp://www.gigabyte.com 을 참조 하십시오
● 최신 드라이버 및BIOS의 업데이트는 홈페이지 hp://www.gigabyte.com 에서 다운로드하십시오.
● 제품 지원에 대한 상세한 내용은 홈페이지 hp://www.gigabyte.com 를 참조하십시오.
● 如 需 已 测 试 内 存、2.5" SATA HDD、无线适配卡和支持的操作系统列表,请前往:hp://www.gigabyte.com
● 若要下载最新驱动程序和BIOS更 新,请 前 往:hp://www.gigabyte.com
● 如 需 产 品 支 持 信 息,请 前 往:hp://www.gigabyte.com
2
1
【Front】 【Rear】
【Right】 【Le】
USB 2.0USB 3.0 RJ-45HDMIDC-In
Headphone/
Microphone
VGA
D-Sub
Kensington
lock slot
B
A
C
For Windows 7 OS only:
Intel Trusted Execuon Engine Interface (Intel TXEI) Driver uses KMDF (WDF) 1.11, which is built-in on Windows 8
and Windows 8.1. However, Windows 7 doesn’t have it. Please install Kernel-Mode Driver Framework (KMDF)
version 1.1. Otherwise, yellow bang appears on Intel TXEI device upon installaon. Please follow instrucons in
KB2685811 link : hp://support.microso.com/kb/2685811/en-us. Or install hot fix from Driver CD.
©2013 GIGABYTE Technology Co., Ltd. All rights reserved. The marks menoned herein are
trademarks or registered trademarks of GIGABYTE Technology Co., Ltd. or its affiliates. All other
product names menoned herein are trademarks or registered trademarks or their respecve owners.
The terms HDMI and HDMI High-Definion Mulmedia Interface, and the HDMI Logo are trademarks
or registered trademarks of HDMI Licensing LLC in the United States and other countries.
25ME0-XM3100-Q0R
产 地 :中 国 Made in China
Mul-BIOS Allows you to choose BIOS mode according to the OS of your choice
mulples Bios / Mul-BIOS / Мульти-BIOS / mul-BIOS / Çoklu-BIOS
System Supported
- Win 7 - Win 8.x
Note: You have to select the OS mode in the BIOS before installing any OS on your BRIX.
Press or “Del” during device
start up to enter BIOS
1
Select “Windows 7” or
“Windows 8.x” from “OS
selecon” on menu bar
2
B. Memory Installaon DDR3 Low Voltage (1.35v)
Arbeitsspeicher Installaon DDR3 Low Voltage (1,35 V) / Installaon de la mémoire DDR3 Low Voltage (1.35v) / Установка модулей ОЗУ DDR3 Low Voltage (1,35 В)
Instalacja pamięci DDR3 nisko napięciowych (1.35V) / Bellek Yerleşrilmesi DDR3 Düşük Voltaj (1.35v)
Note: The GIGABYTE BRIX
requires DDR3L SO-DIMM
system memory. This is low
voltage DDR3 memory that
offers great performance
at a lower 1.35v.
Push down unl the
modules click into
place
2
Carefully insert
SO-DIMM memory
modules
1
USB Power On Funcon Allows device power on via USB. Useful when mounted behind a display or TV
USB Power On Funkon / Démarrage via USB supporté / Функция USB Power On / Opcja USB Power On / USB Güç Açık Fonksiyonu
System Requirements
- Win 7 - Win 8.x (Install ulity required)
Note: ‘USB Power On’ funconality in Windows 8 and above requires an addional Windows patch. This is provided on GIGABYTE
official website labeled ‘USB Power-On Patch’. Your GIGABYTE BRIX can be powered on via a connected USB device such as a
keyboard or mouse, offering greater convenience when mounted behind a display or monitor.
Press “Del” during device start
up to enter BIOS
1
Select “Chipset” from the
menu
2
Manually configure “Erp”
sengs to “Disabled”
3
Press F4 to Save and Exit
4
1
VESA Bracket
VESA-Halterung / Support VESA / Крепление VESA / Standard montażowy VESA / VESA Desteği
Aach the screws
provided on
underside of the
BRIX
Aach the VESA
mounng plate to
the rear of a
compable display
using the screws
provided
2
The BRIX can now
be mounted by
sliding the device
into place
3
Warranty Term
Garanebedingung / Informaons de garane / Гарантийные обязательства / Warunku gwarancji / Garan Şartları
Deutsch
Das System ist durch eine dreijährige Garanezeit abgedeckt.
Der AC-Adapter (inkl. Netzkabel) und das DLP-Projektor-Modul sind durch eine einjährige
Garanezeit abgedeckt.
Das Chassi, die Treiber-CD, das VESA-Montagekit (inkl. Schrauben) und die Produktverpackung sind
nicht in der Garane inbegriffen.
GIGABYTE übernimmt keine Haung für verlorene oder beschädigte Daten und Sowares. GIGABYTE
empfiehlt Kunden nachdrücklich, die Erstellung einer vollständigen Datensicherung und eines
Recovery-Plans.
Weitere Bedingungen, unterliegen den regionalen Garanebedingungen, in denen das Produkt
gekau wurde.
●
●
●
●
●
Français
Le système est couvert d’une garane de trois ans.
Le bloc d’alimentaon (câble compris) et le module de projecon DLP sont couverts d’une garane
d’un an.
Le châssis, le CD de drivers, le kit de montage VESA (vis comprises), ainsi que l’emballage ne sont pas
inclus dans la garane.
GIGABYTE n’assume aucune responsabilité en cas de perte ou dommage infligés aux données,
logiciels, et autre contenu stockés ou préservés sur le produit. GIGABYTE recommande à l’ulisateur
d’effectuer une sauvegarde régulière complète de ses données, ainsi que de prévoir un plan de
restauraon.
Tout autre terme et condion est sujet aux termes et condions de la garane locale où le produit a
été acheté.
●
●
●
●
●
English
The system is covered by a three year warranty period.
The AC Adapter (inc. power cord ) and DLP projector module are covered by a one year warranty.
The chassis, driver CD , VESA mounng kit (including. screws ), product package are not included in
the warranty.
GIGABYTE will not assume responsibility for any lost or damaged data, soware or other materials
stored or preserved on the product. GIGABYTE strongly recommends that customers to maintain a
complete data backup, and recovery plan.
Other terms and condions shall be subject to regional warranty terms and condions where the
product is bought.
●
●
●
●
●
Русский
Гарантийные обязательства на изделие действительны в течение трех лет.
Гарантийные обязательства на блок питания (включая сетевой кабель) и модуль
DLP-проектора действительны в течение 1 года.
Гарантийные обязательства не распространяются на корпус, а также компакт-диск и
VESA-крепление (вместе с винтами) из комплекта поставки изделия.
Компания GIGABYTE не несет ответственность за потерю или повреждение данных,
целостность ПО и иной информации, хранящейся на накопителях изделия. Компания
GIGABYTE настоятельно рекомендует пользователям проводить резервное копирование
данных на регулярной основе и заранее продумать план восстановления системы после
сбоев.
Иные условия подлежат согласованию с учетом положения о гарантийных обязательствах,
действующего в том регионе, где было приобретено изделие.
●
●
●
●
●
Polski
System objęty jest trzyletnim okresem gwarancji.
Zasilacz sieciowy (przewód zasilający Inc) i moduł projektora DLP są objęte roczną gwarancją.
Obudowa, płyta CD ze sterownikami, zestaw montażowy VESA (w tym śruby), opakowanie produktu
nie są objęte gwarancją
GIGABYTE nie ponosi odpowiedzialności za utratę lub uszkodzenie danych, oprogramowania lub
innych materiałów przechowywanych na dysku produktu. GIGABYTE zaleca klientom utworzenie
kopii zapasowej danych.
Pozostałe warunki podlegają regionalnych warunków gwarancji, w którym produkt jest kupowany.
●
●
●
●
●
Türkçe
Sistem üç yıllık garan süresi kapsamındadır.
AC Adaptörü (anl. güç kablosu) ve DLP projektör modülü bir yıllık garan kapsamındadır.
Gövde, sürücü CD'si, VESA montaj ki (vidalar dahil) ve ürün pake garan kapsamında değildir.
GIGABYTE, üründe depolanan ya da saklanan verilerin, yazılımların veya diğer malzemelerin
kaybolmasında ya da hasar görmesinde sorumluluk kabul etmez. GIGABYTE, müşterilerin eksiksiz bir
veri yedekleme ve kurtarma planı oluşturmasını kesinlikle önerir.
Diğer hüküm ve koşullar, ürünün san alındığı yerdeki bölgesel garan hükümleri ve koşullarına tabi
olacakr.
●
●
●
●
●
繁體中文
BRIX(台式機電腦)主機保固3年(不含外殼)。
變壓器(含電源線) 及DLP投影機模組保固1年。
產品外殼、CD 光 碟、固 定 鐵 架 (含螺絲)、產品包裝,恕不在保固範圍內。
產品內的資料可能因維修或重新格式化而遺失,技嘉科技並無提供客戶資料救援與保管之服務。強
烈建議您應定時備份資料或為採取資料免於損壞之措施。
其他保固條款請見產品購買地區之個別條款。如產品於台灣購買請見技嘉台灣共同保固條款:
hp://service.gigabyte.tw/Home/Content/
●
●
●
●
●
简体中文
BRIX(台式计算机)主机保修3年(不含机壳)。
电源适配器(含电源线) 及DLP投影机模组保修1年。
主机机壳、CD 光 盘 、固 定 铁 架 (含螺丝)、产品包装,恕不在保修范围内。
产品内的数据可能因维修或重新格式化而遗失,技嘉科技并不提供客户数据支持与保管的服务。强
烈建议您应定时备份数据或为恢复数据免于损坏的措施。
其他保修条款请见产品购买地区的个别条款。如产品于台湾购买请见技嘉台湾共同保修条款:
hp://service.gigabyte.tw/Home/Content/
●
●
●
●
●
日本語
システムの 保 証 期 間 は 3年 間 で す。
ACア ダ プ タ ー( 電 源 コ ー ド )とDLPプ ロジェクターモジュール は 、1年 間 の 保 証 が 適 用 さ れ ま す。
筐 体 、ド ラ イ バ ー CD、VESAマウントキット(ネジを含む)、製品パッケージは保証に含まれません。
GIGABYTEは製品に保存されたデータ、ソフトウェア、その他資料に関するあらゆる紛失や破損につ
いて責任を負いません。
その他の条件については、製品が購入された地域の保証条件に従います。
【重要】付属のACアダプターならびに電源ケーブルは汎用コネクタを備えていますが本製品専用で
す。他の電気機器へは絶対に接続しないでください。
●
●
●
●
●
한국어
시스템에 대한 무상 보증 서비스 기간은 3년입니다.
AC 어뎁터(전원 코드 포함)와DLP 프로젝터 모듈에 대한 무상 보증 서비스 기간은 3년입니다.
섀시, CD 드라이버, VESA 조립 키트(나사 포함), 제품 패키지는 무상 보증 서비스에 포함되지
않습니다.
GIGABYTE는소프트웨어 또는 기타 제품에 저장되거나 보존된 데이터의 파손 또는 손실에 대해
책임을 지지 않습니다. GIGABYTE는고객 여러분께서 데이터 백업 및복구에 대해 관리할 것을
권장합니다.
기타 사용 약관은 제품을 구입한 현지의 사용 약관에 따릅니다.
●
●
●
●
●
C. SATA 3Gbps HDD: How to install 2.5” HDD
SATA 6 Gbps: Wie die 2.5 "HDD richg installieren / Disque dur SATA 6Gbps : Comment installer le disque dur 2.5"
SATA 6 Гбит/c: Порядок инсталляции 2,5-дюйм накопителя HDD / SATA 6Gbps: jak zainstalować HDD 2.5' / SATA 6Gbps: 2.5” HDD 'yi nasıl yerleşrebilirim
1Unscrew and remove the boom panel,
disconnecng the SATA cable.
5Connect the SATA cable to the
motherboard and reinstall the
boom panel.
2Flip the boom panel and unscrew the four
screws holding the HDD cage in place.
4Screw the HDD cage in place
in the boom panel.
3Install the HDD in the cage using the screws
provided and connect the SATA cable to the HDD.

This manual suits for next models

1

Other Gigabyte Desktop manuals

Gigabyte BRIX User manual

Gigabyte

Gigabyte BRIX User manual

Gigabyte BRIX GB-BXBT-1900 User manual

Gigabyte

Gigabyte BRIX GB-BXBT-1900 User manual

Gigabyte GB-BEi7-1260 User manual

Gigabyte

Gigabyte GB-BEi7-1260 User manual

Gigabyte GB-KMA User manual

Gigabyte

Gigabyte GB-KMA User manual

Gigabyte BRIX User manual

Gigabyte

Gigabyte BRIX User manual

Gigabyte GZ-FW1CA-AJS User manual

Gigabyte

Gigabyte GZ-FW1CA-AJS User manual

Gigabyte GB-AEGT User manual

Gigabyte

Gigabyte GB-AEGT User manual

Gigabyte G-MAX FB User manual

Gigabyte

Gigabyte G-MAX FB User manual

Gigabyte BRIX S User manual

Gigabyte

Gigabyte BRIX S User manual

Gigabyte BRIX Extreme User manual

Gigabyte

Gigabyte BRIX Extreme User manual

Gigabyte BRIX User manual

Gigabyte

Gigabyte BRIX User manual

Gigabyte G-MAX XA3CB User manual

Gigabyte

Gigabyte G-MAX XA3CB User manual

Gigabyte GS-A21S-RH User manual

Gigabyte

Gigabyte GS-A21S-RH User manual

Gigabyte GR-EZI04H User manual

Gigabyte

Gigabyte GR-EZI04H User manual

Gigabyte BRIX User manual

Gigabyte

Gigabyte BRIX User manual

Gigabyte G-MAX FB User manual

Gigabyte

Gigabyte G-MAX FB User manual

Gigabyte BRIX User manual

Gigabyte

Gigabyte BRIX User manual

Gigabyte W771-Z00 User manual

Gigabyte

Gigabyte W771-Z00 User manual

Gigabyte GB-AEDNK User manual

Gigabyte

Gigabyte GB-AEDNK User manual

Gigabyte BRIX S User manual

Gigabyte

Gigabyte BRIX S User manual

Gigabyte H971 User manual

Gigabyte

Gigabyte H971 User manual

Gigabyte BRIX User manual

Gigabyte

Gigabyte BRIX User manual

Gigabyte GB-BMCE-4500C User manual

Gigabyte

Gigabyte GB-BMCE-4500C User manual

Gigabyte G-MAX TA3 User manual

Gigabyte

Gigabyte G-MAX TA3 User manual

Popular Desktop manuals by other brands

Acer ALTOS 1100E Series user guide

Acer

Acer ALTOS 1100E Series user guide

Moxa Technologies MC-1100 Series Quick installation guide

Moxa Technologies

Moxa Technologies MC-1100 Series Quick installation guide

Dell OptiPlex 3040M Series owner's manual

Dell

Dell OptiPlex 3040M Series owner's manual

Sony VGN-FZ21J user guide

Sony

Sony VGN-FZ21J user guide

HP Workstation xw8000 Hardware installation guide

HP

HP Workstation xw8000 Hardware installation guide

Lenovo 7360D6U - THINKCENTRE M58 7360 Hardware Maintenance Manual

Lenovo

Lenovo 7360D6U - THINKCENTRE M58 7360 Hardware Maintenance Manual

MiTAC Pluto E220 Quick installation guide

MiTAC

MiTAC Pluto E220 Quick installation guide

Lenovo ThinkCentre Edge 71 user guide

Lenovo

Lenovo ThinkCentre Edge 71 user guide

Kogan ERGOLUX ELRIPLGDKBA user guide

Kogan

Kogan ERGOLUX ELRIPLGDKBA user guide

HP Compaq dc7900 Business PC Quickspecs

HP

HP Compaq dc7900 Business PC Quickspecs

Lenovo ThinkCentre Edge 5068 Hardware Maintenance Manual

Lenovo

Lenovo ThinkCentre Edge 5068 Hardware Maintenance Manual

HP 8100 - Elite Convertible Minitower PC Technical reference guide

HP

HP 8100 - Elite Convertible Minitower PC Technical reference guide

HP Pavilion v700 - Desktop PC Technical specifications

HP

HP Pavilion v700 - Desktop PC Technical specifications

Lenovo ThinkStation S30 user guide

Lenovo

Lenovo ThinkStation S30 user guide

HP SignagePlayer mp8200 Hardware reference guide

HP

HP SignagePlayer mp8200 Hardware reference guide

NEC POWERMATE - VERSION 2007 manual

NEC

NEC POWERMATE - VERSION 2007 manual

Zotac ZBOX series user manual

Zotac

Zotac ZBOX series user manual

Compaq Presario 6500 - Desktop PC manual

Compaq

Compaq Presario 6500 - Desktop PC manual

manuals.online logo
manuals.online logoBrands
  • About & Mission
  • Contact us
  • Privacy Policy
  • Terms and Conditions

Copyright 2025 Manuals.Online. All Rights Reserved.