©2013 GIGABYTE Technology Co., Ltd. All rights reserved. The marks menoned herein are trademarks or registered trademarks of GIGABYTE Technology Co., Ltd. or its affiliates. All
other product names menoned herein are trademarks or registered trademarks or their respecve owners. 产 地 :中 国 Made in China 25ME0-IRIS00-Q0R
BRIX ProUltra Compact PC Kit
BRIX Pro Ultrakompakt-PC-Set / Kit PC ultra compact BRIX Pro
Ультракомпактный ПК BRIX Pro / BRIX Pro - Kompaktowy zestaw PC
BRIX Pro Ultra Compact PC Ki
Quick Start Guide
Schnellstartanleitung / Guide de démarrage rapide / Руководство по быстрой сборке
Przewodnik użytkownika / Hızlı Başlangıç Kılavuzu
Package Contents
Lieferumfang / Contenu de l'emballage / Комплект поставки / Przewodnik użytkownika
Paket İçeriği
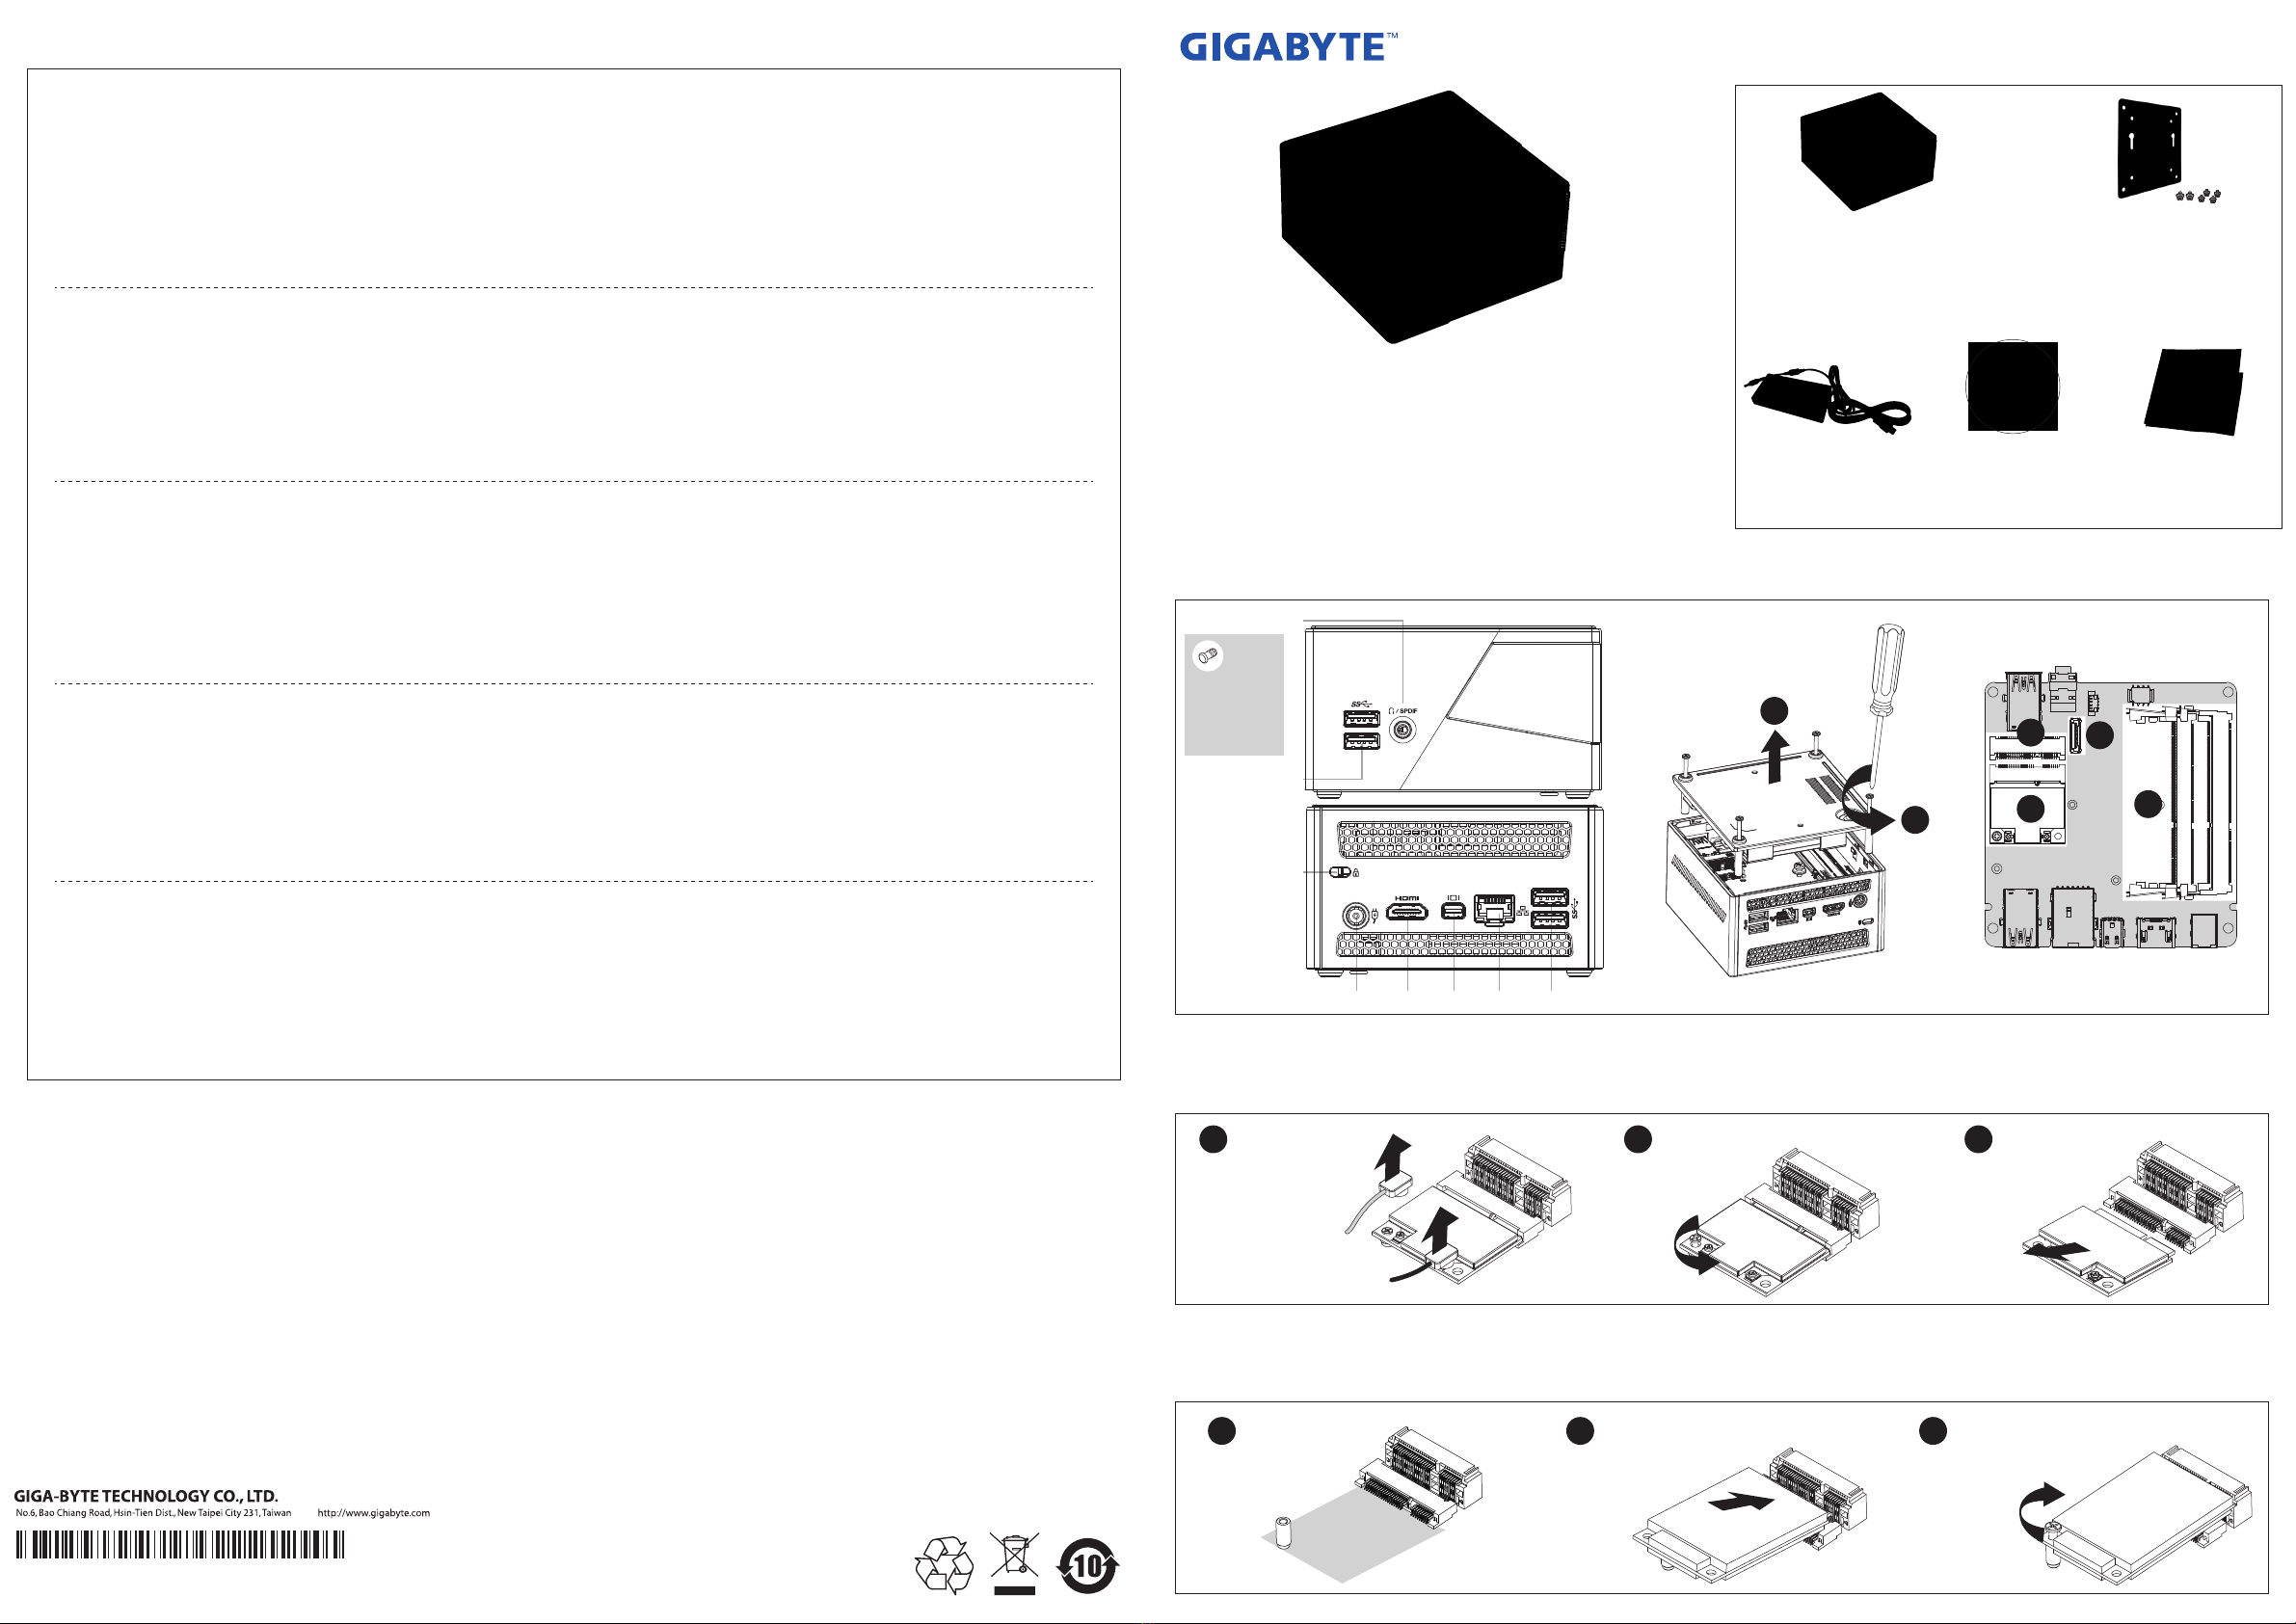
Geng familiar with your unit
Kennenlernen Ihres Geräts / Découvrez votre unité / Первое знакомство с устройством / Prezentacja zestawu / Cihazınızı daha iyi tanıyın
A1. Wireless Module: How to Safely Remove the Module
Wireless-Modul: Das sichere enernen des Moduls / Module sans fil : Comment rerer le module en toute sécurité / Модуль беспроводной связи: Как безопасно удалить модуль
Moduł bezprzewodowy: Jak bezpieczne usunąć moduł. / Kablosuz Modülü : Modülü Nasıl Güvenli Kaldırabilirim
A2. mSATA SSD: How to install the (oponal) mSATA SSD
mSATA SSD: Wie die (oponal) mSATA SSD richg installieren / SSD mSATA : Comment installer le SSD mSATA (En opon) / mSATA SSD: Порядок инсталляции модуля mSATA SSD (опция)
mSATA SSD: jak zainstalować (opcjonalny) mSATA SSD. / mSATA SSD: mSATA SSD (opsiyonel)'yi nasıl yerleşrebilirim
1 x VESA Mount Bracket & 6 x Screws
- 1 x VESA-Halterung & 6 x Schrauben
- 1 x support VESA et ses 6 vis
- 1 крепление VESA и 6 винтов
- 1 zestaw montażowy VESA i 6 śrub mocujących
- 1 x VESA Montaj Desteği & 6 x Vida
GB-BXi x 1
- NOT Include any of the following: mSATA, 2.5” HDD, SO-DIMM memory
- Nicht im Auslieferungsumfang enthalten: mSATA, 2,5 "HDD, SO-DIMM
Speicher
- Composants non inclus : mSATA, Disque Dur 2.5", Mémoire SO-DIMM
- Следующие позиции не включенеы в комплект поставки:
mSATA-модуль, 2,5-дюйм накопитель, SO-DIMM модули ОЗУ
- Zestaw nie zawiera: dysku mSATA 2.5" oraz pamieci SO-DIMM
- Şunlar dahil değildir : mSATA, 2.5” HDD, SO-DIMM haza
Adapter & Power Cord x 1
- Netzteil & Netzleitung x 1
- Adaptateur et cordon d'alimentaon x 1
- Адаптер и кабель питания
- Zasilacz oraz przewód zasilający
- Adaptör ve Güç Kablosu x 1
Quick Start Guide
- Schnellstartanleitung
- Guide de démarrage rapide
- Руководство по быстрой сборке
- Instrukcja użytkownika
- Hızlı Başlangıç Kılavuzu
Driver CD x 1
- Treiber-CD x 1
- CD de drivers x 1
- Диск с драйверами
- Płyta CD ze sterownikami
- Sürücü CD x 1
German
Das System wird durch eine dreijährige Garanezeit abgedeckt.
Der AC Adapter (inkl. Netzkabel) wird durch eine einjährige Garane abgedeckt.
Das Chassi, Treiber-CD, VESA-Montagekit (inkl. Schrauben), Produkt-Kartonage sind nicht in der
Garane enthalten.
GIGABYTE wird keine Verantwortung für verlorene oder beschädigte Daten und Soware
übernehemen. GIGABYTE empfiehlt dringend, dass Kunden eine vollständige Datensicherung
erstellen und eine Einrichtung eines Recovery-Plan erstellen.
Andere Bedingungen gelten regionalen bezüglich der Garanen Bedingungen, wo das Produkt
gekau wurde.
●
●
●
●
●
French
Le système est couvert par une garane de trois ans.
L'adaptateur secteur (cordon d'alimentaon compris) est couvert par une garane d'un an.
Le châssis, le CD de pilotes, le kit de montage VESA (vis comprises) et l'emballage du produit ne sont
pas compris dans la garane.
GIGABYTE n'assume aucune responsabilité pour la perte ou l'endommagement de données, logiciels
ou autres matériaux stockés ou préservés sur le produit. GIGABYTE recommande fortement à ses
clients de conserver une sauvegarde intégrale des données et d'avoir un plan de récupéraon.
Les autres condions générales sont sujees aux condions générales de la région d'achat du
produit.
●
●
●
●
●
English
The system is covered by a three year warranty period.
The AC Adapter (inc. power cord ) is covered by a one year warranty.
The chassis, driver CD , VESA mounng kit (including. screws ), product package are not included in
the warranty.
GIGABYTE will not assume responsibility for any lost or damaged data, soware or other materials
stored or preserved on the product. GIGABYTE strongly recommends that customers to maintain a
complete data backup, and recovery plan.
Other terms and condions shall be subject to regional warranty terms and condions where the
product is bought.
●
●
●
●
●
Russian
Гарантийные обязательства на изделие действительны в течение трех лет.
Гарантийные обязательства на блок питания (включая сетевой кабель) действительны в
течение одного года.
Гарантийные обязательства не распространяются на корпус, а также компакт-диск и
VESA-крепление (вместе с винтами) из комплекта поставки изделия.
Компания GIGABYTE не несет ответственность за потерю или повреждение данных,
целостность ПО и иной информации, хранящейся на накопителях изделия. Компания
GIGABYTE настоятельно рекомендует пользователям проводить резервное копирование
данных на регулярной основе и заранее продумать план восстановления системы после
сбоев.
Иные условия подлежат согласованию с учетом положения о гарантийных обязательствах,
действующих в том регионе, где было приобретено изделие.
●
●
●
●
●
Polish
System objęty jest trzyletnim okresem gwarancji.
Zasilacz (oraz kabel zasilający) jest objęty roczną gwarancją.
Obudowa, płyta CD ze sterownikami, zestaw montażowy VESA (w tym śruby), opakowanie produktu
nie są objęte gwarancją.
GIGABYTE nie ponosi odpowiedzialności za utratę lub uszkodzenie danych, oprogramowania lub
innych materiałów przechowywanych na dysku produktu. GIGABYTE zaleca klientom utworzenie
kopii zapasowej danych.
Pozostałe warunki podlegają regionalnych warunków gwarancji, w którym produkt jest kupowany.
●
●
●
●
●
Tukish
Sistem üç yıllık garan süresi kapsamındadır.
AC Adaptörü (güç kablosu dahil) bir yıllık garan kapsamındadır.
Gövde, sürücü CD'si, VESA montaj ki (vidalar dahil) ve ürün pake garan kapsamında değildir.
GIGABYTE, üründe depolanan ya da saklanan verilerin, yazılımların veya diğer malzemelerin
kaybolmasında ya da hasar görmesinde sorumluluk kabul etmez. GIGABYTE, müşterilerin eksiksiz bir
veri yedekleme ve kurtarma planı oluşturmasını kesinlikle önerir.
Diğer hüküm ve koşullar, ürünün san alındığı yerdeki bölgesel garan hükümleri ve koşullarına tabi
olacakr.
●
●
●
●
●
Tradional Chinese
BRIX(台式機電腦)主機保固3年(不含外殼)。
變壓器(含電源線) 保固1年。
產品外殼、CD 光 碟、固 定 鐵 架 (含螺絲)、產品包裝,恕不在保固範圍內。
產品內的資料可能因維修或重新格式化而遺失,技嘉科技並無提供客戶資料救援與保管之服務。強
烈建議您應定時備份資料或為採取資料免於損壞之措施。
其他保固條款請見產品購買地區之個別條款。如產品於台灣購買請見技嘉台灣共同保固條款:
hp://service.gigabyte.tw/Home/Content/
●
●
●
●
●
Simplified Chinese
BRIX(台式计算机)主机保修3年(不含机壳)。
电源适配器(含电源线) 保修1年。
主机机壳、CD 光 盘 、固 定 铁 架 (含螺丝)、产品包装,恕不在保修范围内。
产品内的数据可能因维修或重新格式化而遗失,技嘉科技并不提供客户数据支持与保管的服务。强
烈建议您应定时备份数据或为恢复数据免于损坏的措施。
其他保修条款请见产品购买地区的个别条款。如产品于台湾购买请见技嘉台湾共同保修条款:
hp://service.gigabyte.tw/Home/Content/
●
●
●
●
●
●
●
●
●
●
Korean
시스템은 3년동안 보증됩니다.
AC 어댑터(전원 코드 포함)는1년동안 보증됩니다.
섀시, 드라이버 CD, VESA 장착 키트(나사 포함), 제품 패키지는 보증에 포함되지 않습니다.
GIGABYTE는소프트웨어 또는 기타 제품에 저장되거나 보관된 데이터 파손 또는 손실에 대해 책임을
지지 않습니다. GIGABYTE는전체 데이터 백업 및복구 계획에 대해 고객이 관리할 것을 권장합니다.
기타 사용약관은 제품을 구입한 지역의 사용약관에 따릅니다.
Japanese
システムの 保 証 期 間 は 3年 間 で す。
ACア ダ プ タ ー( 電 源 コ ー ド を 含 む )の 保 証 期 間 は 1年 間 で す。
筐 体 、ド ラ イ バ ー CD、VESAマウントキット(ネジを含む)、製品パッケージは保証に含まれません。
GIGABYTEは製品に保存されたデータ、ソフトウェア、その他資料に関するあらゆる紛失や破損につ
いて責任を負いません。GIGABYTEはお客様が完全なデータバックアップを持ち、リカバリー計画を
持 つことを 強 く推 奨 しま す。
その他の条件については、製品が購入された地域の保証条件に従います。
●
●
●
●
●
Warranty Term
Garanebedingung / Informaons de garane / Гарантийные обязательства / Warunku gwarancji / Garan Şartları
2
Carefully insert the
mSATA SSD into the
slot
3
The mSATA SSD is secured in
place with a small screw in
the le corner
1
The upper slot is
designed for mSATA
installaon
1
Disconnect the two
Antenna by manually
liing off the clips
that hold them in
place
2
Remove the screw in
the le corner
3
Carefully pull the
wireless module
from the slot
SPDIF/ Headphone
USB 3.0
HDMI MiniDP RJ-45 USB 3.0
DC-In
Kensington
lock slot
Rubber seal
included in
package for
headphone use.
2
1A1
A2
C
B


