Gigaset A730 User manual

1
The base at a glance
Gigaset A730
The base at a glance
1Display in idle status
Indicates that the telephone is powered on.
2End/Back key
3Control key (¢page 14)
4Menu / OK key
5 Phonebook
6INT key
- Making internal calls (¢page 16)
- Registering handsets (¢page 24)
7Mute key (¢page 16)
Mute the microphon
8Call list (¢page 19)
9Redial key (¢page 18)
10 Recall key
- Consultation call (flash)
- Insert a dialling pause (press and hold)
11 Speaker key (LED)
Switch between earpiece and speaker mode
12 Star key
Ringtone on/off (press and hold);
with an open connection: switch between
pulse and tone dialling (press briefly);
text input: open table of special characters
13 Priority key (¢page 33)
Memory key (press and hold) 14
Hash key
Keypad lock on/off (press and hold in
idle status);
12 14
13
11
1
2
3
5
6
7
8
9
10
4

2
The base at a glance
Base display symbols
The following symbols are displayed dependent on the settings and the operating status of
your telephone:
Index number
Call log (¢page 19)
Keypad locked (¢page 14)
Ringtone switched off (¢page 20)
Mute on (¢page 16)
Directory opened (¢page 18)
Talk (hook off)
Current date and time (¢page 20)
æZhô˝Ë#88
12345678901234
<DATE 08.17 TIME 09:20 >

3
The handset at a glance
1Display in idle status
2Battery charge status (¢page 4)
3Display keys (¢page 21)
4End call key, On/Off key
End call, cancel function, go back one menu
level (press briefly), back to idle status (press
and hold), activate/deactivate handset (press
and hold in idle status)
5Hash key
Keypad lock on/off (press and hold in
idle status)
6Recall key
–Consultation call (flash)
– Insert a dialling pause (press and hold)
7Microphone
8Message key (¢page 30)
Access to call list
9Star key
Ringtone on/off (press and hold);
with an open connection: switch between dial
pulsing/tone dialling (press briefly)
10 Priority key (¢page 26)
Memory key (press and hold)
11 Talk key
Flashes: incoming call;
Accept a call (press briefly);
12 Control key (¢page 21)
uinitiate an internal call;
vmute the microphone during a call;
topen audio settings;
sopen the directory;
13 Signal strength symbol of the connection to
the base
You can register up to four handsets to the
Gigaset A730 (¢page 24).
ÐU
07/15
10/14
REDIAL EMENU
§§2§§
§§3§§
§§4§§
§§5§§
§§6§§
§§1§§
§12§
§11§
§§7§§
§§8§§
§§9§§
§13§
§10§

4
The handset at a glance
Handset display symbols
The following symbols are displayed dependent on the settings and the operating status of
your telephone:
Display in idle status
Ringtone switched off
Microphone mute
Reviewing phonebook
Signal strength
Alarm activated
Keypad locked
Reviewing call log
Battery charging state
ÐZhô¼˝ËU
07/15
10/14
Current date Current time
REDIAL EMENU
Up /Down indication
1
Internal number of the handset
uReception signal between the base and handset:
ÐSteady on: connected with base; blinking: connection lost.
If the handset goes out of range a warning tone will be heard.
uBattery charge status:
–=eVU(empty to full)
–=low warning tone: batteries almost empty
–eVUduring charging, the symbol is outlined red
while the charging state changes periodically
For more information about your telephone, visit www.gigaset.com/gigasetA730.
Have fun using your new phone!
ÐU
07/15
10/14
REDIAL EMENU

5
Contents
Contents
Gigaset A730 . . . . . . . . . . . . . . . . . . . . . . . . . . . . . . . . . . . . . . . . . . . . . . . . . . .1
The base at a glance . . . . . . . . . . . . . . . . . . . . . . . . . . . . . . . . . . . . . . . . . . . . . . . . . . . . . . . . . 1
Base display symbols . . . . . . . . . . . . . . . . . . . . . . . . . . . . . . . . . . . . . . . . . . . . . . . . . . . . . . . . . . . . . . . . . . . . . . 2
The handset at a glance . . . . . . . . . . . . . . . . . . . . . . . . . . . . . . . . . . . . . . . . . . . . . . . . . . . . . . 3
Handset display symbols . . . . . . . . . . . . . . . . . . . . . . . . . . . . . . . . . . . . . . . . . . . . . . . . . . . . . . . . . . . . . . . . . . 4
Safety precautions . . . . . . . . . . . . . . . . . . . . . . . . . . . . . . . . . . . . . . . . . . . . . . . . . . . . . . . . . . . 8
First steps . . . . . . . . . . . . . . . . . . . . . . . . . . . . . . . . . . . . . . . . . . . . . . . . . . . . . . . . . . . . . . . . . . 10
Checking the pack contents . . . . . . . . . . . . . . . . . . . . . . . . . . . . . . . . . . . . . . . . . . . . . . . . . . . . . . . . . . . . . . 10
Setting up the base and handset charging cradle . . . . . . . . . . . . . . . . . . . . . . . . . . . . . . . . . . . . . . . . . 10
Setting up the handset for use . . . . . . . . . . . . . . . . . . . . . . . . . . . . . . . . . . . . . . . . . . . . . . . . . . . . . . . . . . . 12
Setting the date and time . . . . . . . . . . . . . . . . . . . . . . . . . . . . . . . . . . . . . . . . . . . . . . . . . . . . . . . . . . . . . . . . 13
The Gigaset A730 base . . . . . . . . . . . . . . . . . . . . . . . . . . . . . . . . . . . . . . . . 14
Using the base . . . . . . . . . . . . . . . . . . . . . . . . . . . . . . . . . . . . . . . . . . . . . . . . . . . . . . . . . . . . . . 14
Control key . . . . . . . . . . . . . . . . . . . . . . . . . . . . . . . . . . . . . . . . . . . . . . . . . . . . . . . . . . . . . . . . . . . . . . . . . . . . . . 14
Keys on the keypad . . . . . . . . . . . . . . . . . . . . . . . . . . . . . . . . . . . . . . . . . . . . . . . . . . . . . . . . . . . . . . . . . . . . . . 14
Activating/deactivating the keypad lock . . . . . . . . . . . . . . . . . . . . . . . . . . . . . . . . . . . . . . . . . . . . . . . . . . 14
Reverting to idle status . . . . . . . . . . . . . . . . . . . . . . . . . . . . . . . . . . . . . . . . . . . . . . . . . . . . . . . . . . . . . . . . . . . 14
Making calls . . . . . . . . . . . . . . . . . . . . . . . . . . . . . . . . . . . . . . . . . . . . . . . . . . . . . . . . . . . . . . . . 15
Making an external call . . . . . . . . . . . . . . . . . . . . . . . . . . . . . . . . . . . . . . . . . . . . . . . . . . . . . . . . . . . . . . . . . . . 15
Ending a call . . . . . . . . . . . . . . . . . . . . . . . . . . . . . . . . . . . . . . . . . . . . . . . . . . . . . . . . . . . . . . . . . . . . . . . . . . . . . 15
Accepting a call . . . . . . . . . . . . . . . . . . . . . . . . . . . . . . . . . . . . . . . . . . . . . . . . . . . . . . . . . . . . . . . . . . . . . . . . . . 15
Calling Line Identification (CLI) . . . . . . . . . . . . . . . . . . . . . . . . . . . . . . . . . . . . . . . . . . . . . . . . . . . . . . . . . . . 15
Speaker mode . . . . . . . . . . . . . . . . . . . . . . . . . . . . . . . . . . . . . . . . . . . . . . . . . . . . . . . . . . . . . . . . . . . . . . . . . . . 15
Adjusting the earpiece/speaker volume during a call . . . . . . . . . . . . . . . . . . . . . . . . . . . . . . . . . . . . . . 16
Switching to mute . . . . . . . . . . . . . . . . . . . . . . . . . . . . . . . . . . . . . . . . . . . . . . . . . . . . . . . . . . . . . . . . . . . . . . . 16
Making internal calls . . . . . . . . . . . . . . . . . . . . . . . . . . . . . . . . . . . . . . . . . . . . . . . . . . . . . . . . 16
Transferring a call . . . . . . . . . . . . . . . . . . . . . . . . . . . . . . . . . . . . . . . . . . . . . . . . . . . . . . . . . . . . . . . . . . . . . . . . 16
Internal consultation/conference calls . . . . . . . . . . . . . . . . . . . . . . . . . . . . . . . . . . . . . . . . . . . . . . . . . . . . 17
Accepting/rejecting call waiting . . . . . . . . . . . . . . . . . . . . . . . . . . . . . . . . . . . . . . . . . . . . . . . . . . . . . . . . . . 17
Using the directory and lists . . . . . . . . . . . . . . . . . . . . . . . . . . . . . . . . . . . . . . . . . . . . . . . . . 18
Directory . . . . . . . . . . . . . . . . . . . . . . . . . . . . . . . . . . . . . . . . . . . . . . . . . . . . . . . . . . . . . . . . . . . . . . . . . . . . . . . . 18
Redial list . . . . . . . . . . . . . . . . . . . . . . . . . . . . . . . . . . . . . . . . . . . . . . . . . . . . . . . . . . . . . . . . . . . . . . . . . . . . . . . . 18
Call list . . . . . . . . . . . . . . . . . . . . . . . . . . . . . . . . . . . . . . . . . . . . . . . . . . . . . . . . . . . . . . . . . . . . . . . . . . . . . . . . . . 19
Base settings . . . . . . . . . . . . . . . . . . . . . . . . . . . . . . . . . . . . . . . . . . . . . . . . . . . . . . . . . . . . . . . 20
Setting the date and time . . . . . . . . . . . . . . . . . . . . . . . . . . . . . . . . . . . . . . . . . . . . . . . . . . . . . . . . . . . . . . . . 20
Setting the earpiece and speaker volume . . . . . . . . . . . . . . . . . . . . . . . . . . . . . . . . . . . . . . . . . . . . . . . . . 20
Setting the ringer . . . . . . . . . . . . . . . . . . . . . . . . . . . . . . . . . . . . . . . . . . . . . . . . . . . . . . . . . . . . . . . . . . . . . . . . 20
System settings . . . . . . . . . . . . . . . . . . . . . . . . . . . . . . . . . . . . . . . . . . . . . . . . . . . . . . . . . . . . . . . . . . . . . . . . . . 20

6
Contents
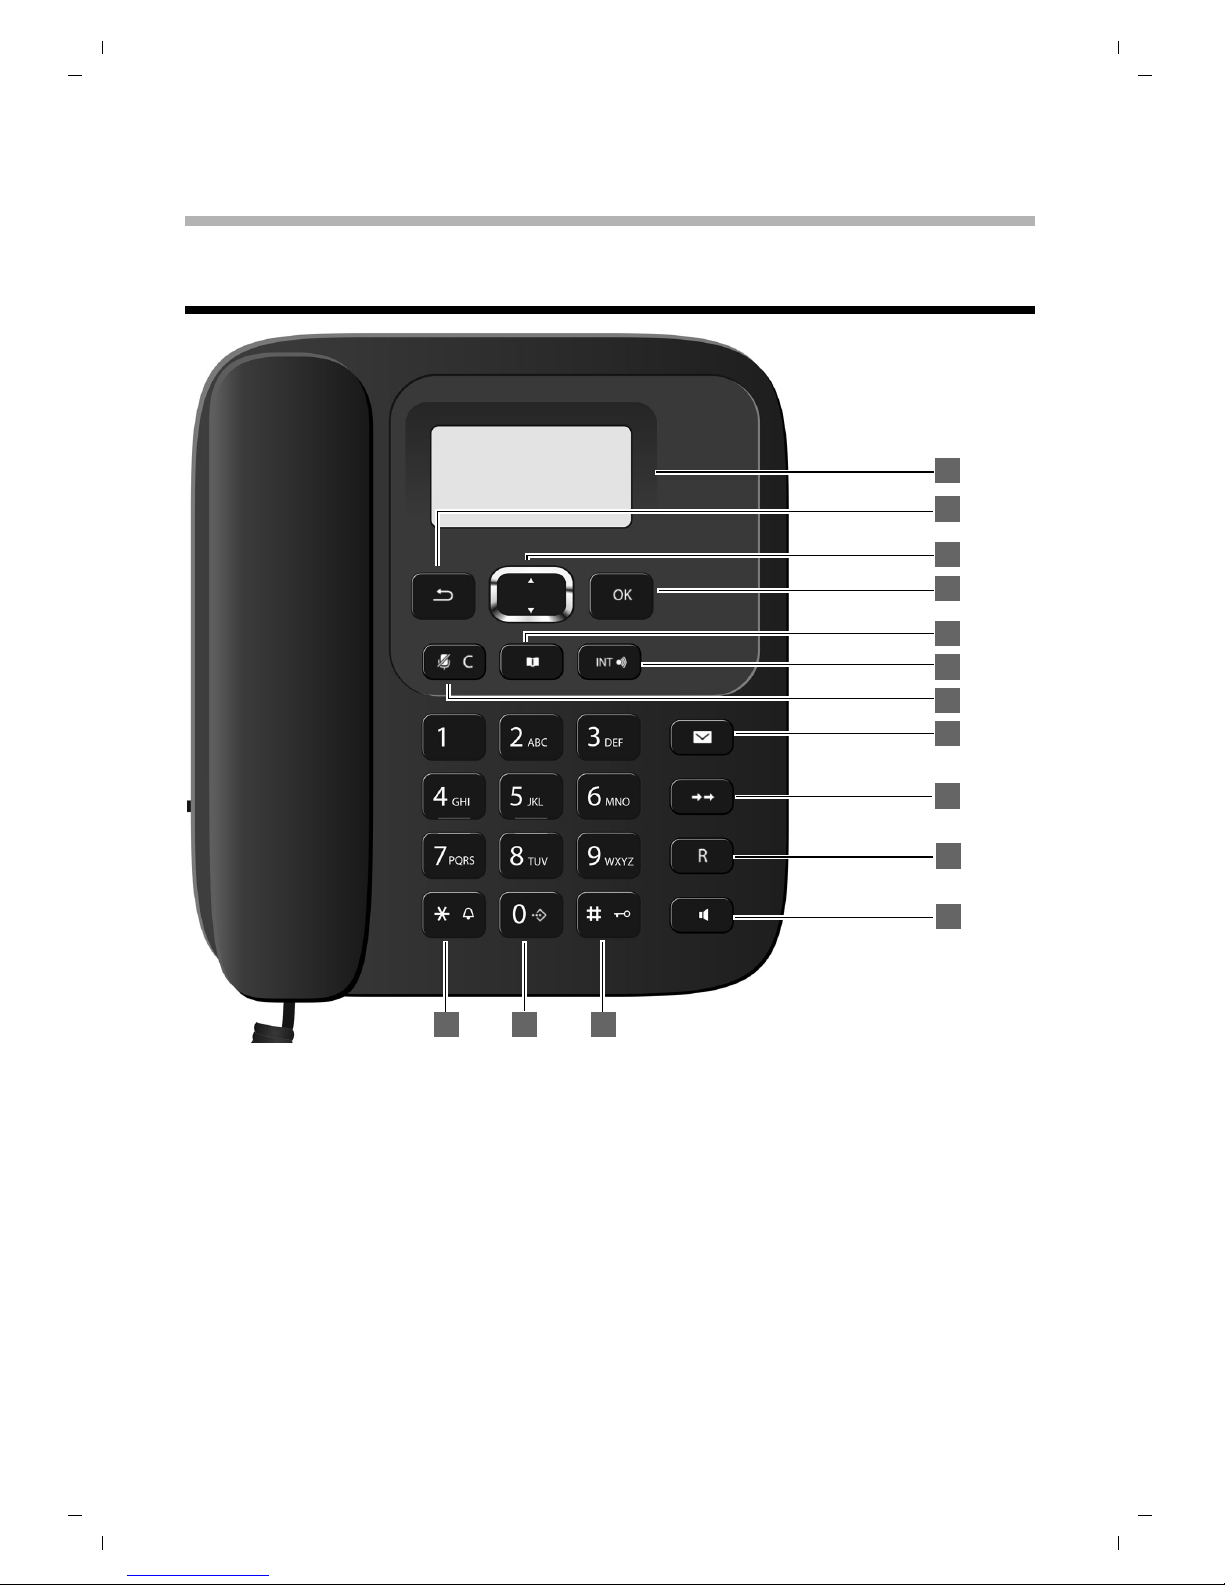
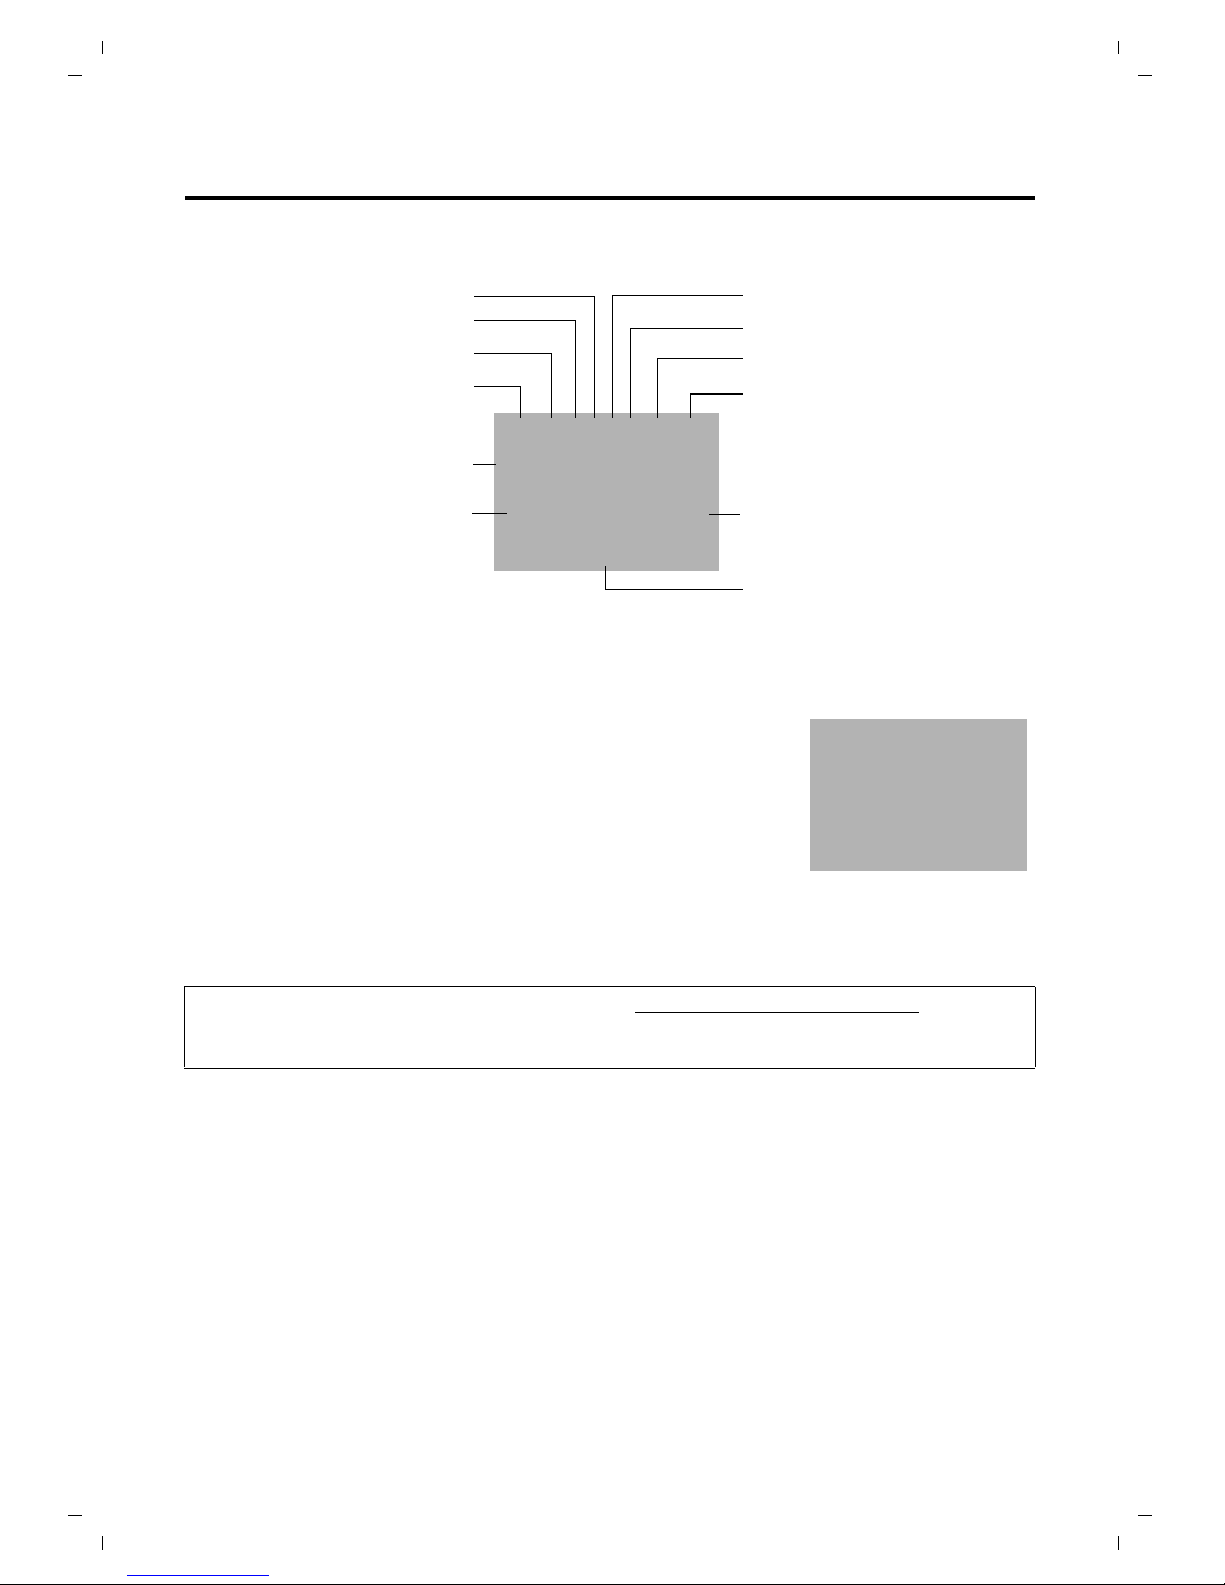
The Gigaset A530H handset . . . . . . . . . . . . . . . . . . . . . . . . . . . . . . . . . . . 21
Using the handset . . . . . . . . . . . . . . . . . . . . . . . . . . . . . . . . . . . . . . . . . . . . . . . . . . . . . . . . . . 21
Control key . . . . . . . . . . . . . . . . . . . . . . . . . . . . . . . . . . . . . . . . . . . . . . . . . . . . . . . . . . . . . . . . . . . . . . . . . . . . . . 21
Display keys . . . . . . . . . . . . . . . . . . . . . . . . . . . . . . . . . . . . . . . . . . . . . . . . . . . . . . . . . . . . . . . . . . . . . . . . . . . . . 21
Keys on the keypad . . . . . . . . . . . . . . . . . . . . . . . . . . . . . . . . . . . . . . . . . . . . . . . . . . . . . . . . . . . . . . . . . . . . . . 21
Correcting incorrect entries . . . . . . . . . . . . . . . . . . . . . . . . . . . . . . . . . . . . . . . . . . . . . . . . . . . . . . . . . . . . . . 22
Activating/deactivating the keypad lock . . . . . . . . . . . . . . . . . . . . . . . . . . . . . . . . . . . . . . . . . . . . . . . . . . 22
Activating/deactivating the handset . . . . . . . . . . . . . . . . . . . . . . . . . . . . . . . . . . . . . . . . . . . . . . . . . . . . . . 22
Menu guidance . . . . . . . . . . . . . . . . . . . . . . . . . . . . . . . . . . . . . . . . . . . . . . . . . . . . . . . . . . . . . . . . . . . . . . . . . . 22
Handset menu overview . . . . . . . . . . . . . . . . . . . . . . . . . . . . . . . . . . . . . . . . . . . . . . . . . . . . . . . . . . . . . . . . . 23
Registering handsets . . . . . . . . . . . . . . . . . . . . . . . . . . . . . . . . . . . . . . . . . . . . . . . . . . . . . . . . . . . . . . . . . . . . . 24
De-registering handsets . . . . . . . . . . . . . . . . . . . . . . . . . . . . . . . . . . . . . . . . . . . . . . . . . . . . . . . . . . . . . . . . . . 24
Locating handsets (paging) . . . . . . . . . . . . . . . . . . . . . . . . . . . . . . . . . . . . . . . . . . . . . . . . . . . . . . . . . . . . . . 24
Making calls . . . . . . . . . . . . . . . . . . . . . . . . . . . . . . . . . . . . . . . . . . . . . . . . . . . . . . . . . . . . . . . . 25
Making an external call . . . . . . . . . . . . . . . . . . . . . . . . . . . . . . . . . . . . . . . . . . . . . . . . . . . . . . . . . . . . . . . . . . . 25
Ending a call . . . . . . . . . . . . . . . . . . . . . . . . . . . . . . . . . . . . . . . . . . . . . . . . . . . . . . . . . . . . . . . . . . . . . . . . . . . . . 25
Accepting a call . . . . . . . . . . . . . . . . . . . . . . . . . . . . . . . . . . . . . . . . . . . . . . . . . . . . . . . . . . . . . . . . . . . . . . . . . . 25
Calling Line Identification (CLI) . . . . . . . . . . . . . . . . . . . . . . . . . . . . . . . . . . . . . . . . . . . . . . . . . . . . . . . . . . . 25
Speaker mode . . . . . . . . . . . . . . . . . . . . . . . . . . . . . . . . . . . . . . . . . . . . . . . . . . . . . . . . . . . . . . . . . . . . . . . . . . . 25
Adjusting the earpiece/speaker volume during a call . . . . . . . . . . . . . . . . . . . . . . . . . . . . . . . . . . . . . . 26
Switching to mute . . . . . . . . . . . . . . . . . . . . . . . . . . . . . . . . . . . . . . . . . . . . . . . . . . . . . . . . . . . . . . . . . . . . . . . 26
Battery status control during a call . . . . . . . . . . . . . . . . . . . . . . . . . . . . . . . . . . . . . . . . . . . . . . . . . . . . . . . . 26
Call by call dialling . . . . . . . . . . . . . . . . . . . . . . . . . . . . . . . . . . . . . . . . . . . . . . . . . . . . . . . . . . . . . . . . . . . . . . . .26
Making internal calls . . . . . . . . . . . . . . . . . . . . . . . . . . . . . . . . . . . . . . . . . . . . . . . . . . . . . . . . 27
Transferring a call . . . . . . . . . . . . . . . . . . . . . . . . . . . . . . . . . . . . . . . . . . . . . . . . . . . . . . . . . . . . . . . . . . . . . . . . 27
Internal consultation/conference calls . . . . . . . . . . . . . . . . . . . . . . . . . . . . . . . . . . . . . . . . . . . . . . . . . . . . 27
Using the directory and lists . . . . . . . . . . . . . . . . . . . . . . . . . . . . . . . . . . . . . . . . . . . . . . . . . 28
Directory . . . . . . . . . . . . . . . . . . . . . . . . . . . . . . . . . . . . . . . . . . . . . . . . . . . . . . . . . . . . . . . . . . . . . . . . . . . . . . . . 28
Redial list . . . . . . . . . . . . . . . . . . . . . . . . . . . . . . . . . . . . . . . . . . . . . . . . . . . . . . . . . . . . . . . . . . . . . . . . . . . . . . . . 29
Call list . . . . . . . . . . . . . . . . . . . . . . . . . . . . . . . . . . . . . . . . . . . . . . . . . . . . . . . . . . . . . . . . . . . . . . . . . . . . . . . . . . 30
Handset settings . . . . . . . . . . . . . . . . . . . . . . . . . . . . . . . . . . . . . . . . . . . . . . . . . . . . . . . . . . . . 30
Setting the date and time . . . . . . . . . . . . . . . . . . . . . . . . . . . . . . . . . . . . . . . . . . . . . . . . . . . . . . . . . . . . . . . . 30
Setting the alarm clock . . . . . . . . . . . . . . . . . . . . . . . . . . . . . . . . . . . . . . . . . . . . . . . . . . . . . . . . . . . . . . . . . . . 30
Audio settings . . . . . . . . . . . . . . . . . . . . . . . . . . . . . . . . . . . . . . . . . . . . . . . . . . . . . . . . . . . . . . . . . . . . . . . . . . . 31
Activating/deactivating auto answer . . . . . . . . . . . . . . . . . . . . . . . . . . . . . . . . . . . . . . . . . . . . . . . . . . . . . 32
Storing number . . . . . . . . . . . . . . . . . . . . . . . . . . . . . . . . . . . . . . . . . . . . . . . . . . . . . . . . . . . . . . . .. . . . . . . 32
System settings . . . . . . . . . . . . . . . . . . . . . . . . . . . . . . . . . . . . . . . . . . . . . . . . . . . . . . . . . . . . . . . . . . . . . . . . . . 32
Connecting the telephone to the PABX . . . . . . . . . . . . . . . . . . . . . . . . . 33
Changing the dialling mode . . . . . . . . . . . . . . . . . . . . . . . . . . . . . . . . . . . . . . . . . . . . . . . . . . . . . . . . . . . . . . 33
Setting recall . . . . . . . . . . . . . . . . . . . . . . . . . . . . . . . . . . . . . . . . . . . . . . . . . . . . . . . . . . . . . . . . . . . . . . . . . . . . 33
Setting an automatic prefix . . . . . . . . . . . . . . . . . . . . . . . . . . . . . . . . . . . . . . . . . . . . . . . . . . . . . . . . . . . . . . 33
Temporarily switching to tone dialling (DTMF) . . . . . . . . . . . . . . . . . . . . . . . . . . . . . . . . . . . . . . . . . . . . 33

7
Contents
Customer Service & Assistance . . . . . . . . . . . . . . . . . . . . . . . . . . . . . . . . . 34
Questions and answers . . . . . . . . . . . . . . . . . . . . . . . . . . . . . . . . . . . . . . . . . . . . . . . . . . . . . 34
Appendix . . . . . . . . . . . . . . . . . . . . . . . . . . . . . . . . . . . . . . . . . . . . . . . . . . . . . 35
Care . . . . . . . . . . . . . . . . . . . . . . . . . . . . . . . . . . . . . . . . . . . . . . . . . . . . . . . . . . . . . . . . . . . . . . . . 35
Contact with liquid . . . . . . . . . . . . . . . . . . . . . . . . . . . . . . . . . . . . . . . . . . . . . . . . . . . . . . . . . . . . . . . . . . . . . . 35
Specifications . . . . . . . . . . . . . . . . . . . . . . . . . . . . . . . . . . . . . . . . . . . . . . . . . . . . . . . . . . . . . . . . . . . . . . . . . . . . 35
Writing and editing text (handset) . . . . . . . . . . . . . . . . . . . . . . . . . . . . . . . . . . . . . . . . . . . . . . . . . . . . . . . . 36
Index . . . . . . . . . . . . . . . . . . . . . . . . . . . . . . . . . . . . . . . . . . . . . . . . . . . . . . . . . . . . . . . . . . . . . . 37

8
Safety precautions
Safety precautions
uRead the safety precautions and the user guide before use.
uExplain their content and the potential hazards associated with using the device
to your children.
Use only the power adapter indicated on the device.
Use only rechargeable batteries that correspond to the specification (see "Technical data").
Never use a conventional (non-rechargeable) battery or other battery types as this could
result in significant health risks and personal injury. Rechargeable batteries, which are notice-
ably damaged, must be replaced.
Using your telephone may affect nearby medical equipment. Be aware of the technical con-
ditions in your particular environment, e.g., doctor's surgery.
If you use a medical device (e.g., a pacemaker), please contact the device manufacturer. They
will be able to advise you regarding the susceptibility of the device to external sources of high
frequency energy (for the Technical data of your Gigaset product see "Technical data").
Do not hold the rear of the handset to your ear when it is ringing or when speaker mode is
activated. Otherwise you risk serious and permanent damage to your hearing.
Your Gigaset is compatible with the majority of digital hearing aids on the market. However,
perfect function with all hearing aids cannot be guaranteed.
The phone may cause interference in analogue hearing aids (humming or whistling) or cause
them to overload. If you require assistance, please contact the hearing aid supplier.
The devices are not splashproof. For this reason do not install them in a damp environment
such as bathrooms or shower rooms.
Do not use the devices in environments with a potential explosion hazard (e.g., paint shops).
If you give your Gigaset to a third party, make sure you also give them the user guide.
Remove faulty devices from use or have them repaired by our Service team, as these could
interfere with other wireless services.
Do not use the device if the display is cracked or broken. Broken glass or plastic can cause
injury to hands and face. Send the device to our Service department to be repaired.
To prevent loss of hearing, avoid listening at high volume over long periods of time.

9
Safety precautions
Disposal
Batteries should not be disposed of in general household waste. Observe the local waste dis-
posal regulations, details of which can be obtained from your local authority.
All electrical and electronic equipment must be disposed of separately from general house-
hold waste using the sites designated by local authorities.
The appropriate disposal and separate collection of used equipment serve to prevent poten-
tial harm to the environment and to health. They are a precondition for the re-use and recy-
cling of used electrical and electronic equipment.
For further information on disposing of your used equipment, please contact your local
authority or your refuse collection service.
uThe device cannot be used in the event of a power failure. It is also not possible
to transmit emergency calls.
uEmergency numbers cannot be dialled if the keypad/display lock is activated!

10
First steps
First steps
Checking the pack contents
Setting up the base and handset charging cradle
The base and charging cradle are designed for use in enclosed dry rooms with a temperature
range of +5°C to +45°C.
¤Install the base on a level, non-slip surface in a central location in your house or flat.
The phone's feet do not usually leave any marks on surfaces. However, due to the multitude of
different varnishes and polishes used on today's furnishings, the occurrence of marks on the
surfaces cannot be completely ruled out.
¤The display is protected by a plastic film. Please remove the protective film!
Please note:
uNever expose the telephone to the influence of heat sources, direct sunlight or other electri-
cal devices.
uProtect your Gigaset from moisture, dust, corrosive liquids and vapours.
uone Gigaset A730 desktop
uone Gigaset A530H handset
uone charger for Gigaset A530H
utwo batteries
uone battery cover
uone receiver
uone receiver cable
uone phone cable
uone mains adapter
uthis user guide
Please note
Make sure you observe the range of the base for the handset connection.
This is up to 300 m in unobstructed outdoor areas and up to 50 m inside buildings.

11
First steps
Connecting the base
Connecting the handset charging cradle
Please note
The mains adapter must always be connected, as the phone will not operate without a
mains connection.
¤Only use the mains adapter and phone cord supplied. Pin connections on telephone
cables can vary (pin connections ¢page 36).
1
1
¤Connect the receiver to the
telephone using the coiled cable
supplied 1.
¤Connect the telephone jack 2.
¤Connect the mains adapter 3.
¤Insert the cable of the mains
adapter into the cable ducts 4.
1
2
1
4
1
3
1¤Plug the mains adapter
into the plug socket 1.

12
First steps
Setting up the handset for use
The display is protected by a plastic film. Please remove the protective film!
Inserting the batteries and closing the battery cover
Warning
Only use the rechargeable batteries (¢page 35) recommended by Gigaset Communica-
tions GmbH, i.e. never use conventional (non-rechargeable) batteries, as this could result in
significant health risks and personal injury. For example, the outer casing of the batteries
could be damaged or the batteries could explode. The phone could also malfunction or be
damaged as a result of using batteries that are not of the recommended type.
¤Slide the battery cover from bottom up
onto the casing until it clicks into place.
Opening the battery cover
If you need to open the battery cover,
for instance to replace the batteries:
¤Press the ribbing at the top of the
battery cover and slide it down-
ward.
¤Insert the batteries the right way round.
The polarity is indicated in/on the battery
compartment.

13
First steps
Placing the handset in the charging cradle
Place the handset in the charging cradle with its display facing forward.
The supplied handset is registered with the base at the factory. You do not need to register it. If
you wish to use your handset with a different base or use further handsets with your base, you
will have to register them manually, ¢page 24.
To charge the batteries, leave the handset in the charging cradle.
Initial charging and discharging of the batteries
The correct charge level can only be displayed if the batteries are first fully charged and dis-
charged.
Setting the date and time
Set the date and time so that the correct date and time can be assigned to incoming calls, and
so that the alarm can be used. You can set the date and time on any registered handset
(¢page 30).
Your telephone is now ready to use!
Please note
Only place the handset in the charging cradle that is intended for it.
Please note
uAfter the first battery charge and discharge you may replace your handset in the charg-
ing cradle after every call.
uAlways repeat the charging and discharging procedure if you remove the batteries from
the handset and re-insert them.
uThe batteries may warm up during charging. This is not dangerous.
uAfter a while, the charge capacity of the batteries will decrease for technical reasons.
¤Place the handset in the charging cradle for 10
hours.
¤Then remove the handset
from the charging cradle
and do not replace it until
the batteries are fully dis-
charged.
10 h

14
Using the base
The Gigaset A730 base
Using the base
Control key
Below, the side of the con-
trol key you need to press in
the respective operating
situation is marked by an
arrow, sfor "press bot-
tom on the control key" or tfor "press at
the top of the control key".
The control key has a number of different
functions:
When the base is in idle status
tIncrease the ringer volume.
sDecrease the ringer volume.
In lists
t/ sScroll up/down line by line.
During a call
t/ sAdjust the loudspeaker volume
for earpiece and speaker mode.
Keys on the keypad
*/ Q/ #etc.
Press the matching key on the
keypad.
~Enter digits or letters.
Activating/deactivating the
keypad lock
The keypad lock prevents any inadvertent
use of the phone.
#Press and hold the hash key in
idle status to activate or deacti-
vate the keypad lock. You will
hear the confirmation tone.
If the keypad lock is activated, the ˝symbol
is displayed and a warning tone will be emit-
ted when you press a key.
The keypad lock deactivates automatically
when you receive a call. It is reactivated
when the call is ended.
Reverting to idle status
You can revert to idle status from anywhere
in the menu as follows:
¤ Press the back key
Or:
¤Do not press any key: after 2 minutes the
display will automatically revert to idle
status.
Or:
¤Briefly lift the corded handset.
Please note
When the keypad lock is active, you can
call emergency numbers only by using
the receiver at the base.

15
Making calls
Making calls
You make a call using the phone's receiver or
the speaker.
Making an external call
External calls are calls using the public tele-
phone network.
~PEnter the number and lift the
receiver.
Or:
P~Lift the receiver and then enter
the number.
The number is limited to 24 digits.
You are shown the duration of the call while
the call is in progress.
Instead of using the receiver:
mPress the speaker key to make a
call via the speaker. The LED
lights up permanently.
You can also switch at any time during the
call. Throughout the whole of this section,
the P(or Q) symbol can always represent.
If the line is in use by a handset LINE IN USE
is displayed.
Ending a call
QPut down the receiver, or press
the speaker key mif the call
was made handsfree.
Accepting a call
The base indicates an incoming call in three
ways: by ringing, by a display on the screen
and by the flashing talk LED.
You can accept the call by:
¤Lifting the receiver P.
¤Pressing the speaker key mto make the
call handsfree.
To deactivate the ringtone, press long the
*key. You can accept the call as long as it
is displayed on the screen.
Calling Line Identification
(CLI)
Calling Line Identification is a telephony ser-
vice that transmits caller identification infor-
mation (name or number). When you receive
acall, the caller's number is displayed on the
screen according to the following rules:
Number is transmitted
If the number is transmitted it is displayed.
If the number exceeds 24 digits, only the first
24 digits are displayed.
Number is not transmitted
The base rings but nothing is displayed.
Speaker mode
Instead of putting the receiver to your ear
you can make a call using the speaker. This
allows other people to participate in the call.
Please note
Dialling with the directory (¢page 18),
call list (¢page 19) redial list
(¢page 18)saves you from repeatedly
keying in phone numbers.
Please note
The name of the caller is only displayed
on the handset (¢page 15).

16
Making internal calls
Activating/deactivating speaker
mode
Activating while dialling
~mEnter the number and press the
speaker key.
When the speaker mode is activated, the m
key lights up.
¤You should inform your caller before you
use the speaker function so that they
know someone else is listening.
Switching between earpiece and
speaker mode
mPress the speaker key.
During a call activate or deactivate speaker
mode.
If you wish to place the receiver in the base
during a call:
¤Press and hold the speaker key mwhile
placing the receiver in the base.
For instructions on how to adjust the loud-
speaker volume, ¢page 20.
Adjusting the earpiece/
speaker volume during a call
To adjust the earpiece or speaker volume
during a call:
qUse the control key to adjust the
volume in five levels.
Switching to mute
You can deactivate the microphone in the
receiver of the base during an external call.
Press the key to mute the micro-
phone. The display shows the
mute symbol h. Press the key
again to reactivate the micro-
phone.
Making internal calls
Internal calls between the base and the
handset or to other handsets registered on
the same base are free.
An internal call is indicated by the paging
tone, which is different from the incoming
tone.
Calling all handsets
Initiate the internal call.
PLift the receiver or press the
speaker key m.
All handsets are called. The connection will
be established with the first answering
handset. All other handsets cannot
participate.
Ending a call
QReplace the receiver or press the
speaker key m.
Transferring a call
You can transfer an external call to any
handset.
During an external call:
Press the key to page all
registered handsets.
The external participant is put
on hold.
Either:
mPress the key or replace the
receiver to transfer the call to
the first answering handset.
If no handset answers within 30 sec. the call
is transferred back to the base.
Or:
Wait until an internal participant answers. If
necessary, announce the external call.
QReplace the receiver.
The external call is transferred to the hand-
set.

17
Making internal calls
If no internal participant answers or the line
is busy, press the kkey again to return to
the external call.
Internal consultation/
conference calls
When you are conducting an external call,
you can call an internal participant at the
same time for consultation or hold a
conference call between all 3 participants.
You are conducting an external call:
Press the key to page all
registered handsets.
The external participant is put on hold.
The connection will be established with the
first answering handset for consultation.
Either:
Press the key.
You are reconnected with the
external participant.
Or:
Press and hold the key.
All 3 participants are connected
with each other.
Ending a conference call
QReplace the receiver.
If an internal participant ends the call, the
other remains connected to the external
participant.
Accepting/rejecting call
waiting
Ifyou receive anexternal call during an
internal call, you will hear the call waiting
tone (short tone). The caller's number will
appear in the display if Calling Line
Identification isenabled.
Accepting the external call
Either:
mPress the speaker key if you are
conducting the internal call via
the receiver.
PLift the receiver if you are
conducting the internal call
via speaker.
The internal call is ended and you are
connected to the external caller.
Or:
Press the key to answer the call
and put the internal participant
on hold.
Press again to toggle between the
exter-nal and the internal participant.
Rejecting the external call
Ignore the call waiting. You remain
connected with the internal participant.
The ringtone can still be heard on other
registered handsets.
Please note
Conferences are only possible
between one external and two internal
participants.

18
Using the directory and lists
Using the directory and
lists
The following options are available to store
information on calls, contacts and numbers:
uDirectory
uRedial list, ¢page 18
uCall list, ¢page 19
Directory
The directory can hold up to 30 entries. A
directory entry contains only one number.
The entries are displayed in chronological
order.
Opening the directory
To open the directory in idle status:
nPress the directory key.
Selecting/viewing a directory
entry
nOpen the directory.
qScroll through the entries
until the required number is
displayed.
Storing a number into the
directory
Press long the directory key.
~
Enter the number.
Use asbackspace. Press the
key to save the entry.
Editing an entry in the phone book
Open the directory.
qSelect an entry.
Press long the directory key.
~
Enter the number. Use
as backspace.
Press the key to save the entry.
Dialling with the directory
n¢sOpen the directory, select the
desired entry.
PLift the receiver or press the
speaker key d.
The number is dialled.
Deleting an entry in the directory
Open the directory.
qScroll through the entries
until the required number is
displayed.
Press the key.
Press the key to confirm.
Deleting the completedirectory
Open the directory.
Press long the key.
Press the key to confirm.
Redial list
The redial list contains the 10 numbers last
dialled on the base (max. 32 digits).
The redial list is arranged in reverse
chronological order, i.e. the last dialled
number is the first number in the list.
Please note
The call list is saved in the base and
shared with all registered handsets.
Changes apply to all handsets.

19
Using the directory and lists
Manual redial
PLift the receiver or press the
speaker key m.
Press the redial key. The number
is dialled.
Or:
Press the redial key.
PLift the receiver or press the
speaker key m. The first
number is dialled.
To dial the second, third, ... stored number,
press twice, three times, etc..
Managing entries in the redial list
Press the redial key briefly.
sSelect an entry.
Deleting an entry
Press the delete key.
Press the OK key to confirm. A
confirmation tone is emitted.
The redial list is displayed.
Tocancel deleting, press the key.
Deleting the redial list
Press and hold the delete key
until “---” is displayed.
Press the OK key to confirm. A
confirmation tone is emitted.
The redial list is displayed.
To cancel deleting, press the key.
Storing a number into the directory
Press long the directory key.
Press the key to save the entry.
Call list
Requirement: Calling Line Identification,
¢page 15.
The telephone stores a maximum of 20 num-
bers in the call list. In idle mode the Ësym-
bol indicates that there are new missed calls
in the call list.
Opening the call list
In idle status:
Press the call list key.
List entry
The calls are displayed in chronological
order.
An entry shows
– Time and date of the call
– Number of caller
Dialling from the call list
PLift the receiver or press the
speaker key dto return the
call selected.
Managing entries in the call list
Press the call list key.
sSelect an entry.
Deleting an entry
Press the delete key.
Press the OK key to confirm. A
confirmation tone is emitted.
The call list is displayed.
To cancel deleting, press the key.
10.15 10:26
07912345678
Ë

20
Base settings
Deleting the call list
Press and hold the delete key
until “---” is displayed.
Press the OK key to confirm. A
confirmation tone is emitted.
The call list is displayed.
To cancel deleting, press the key. When
you quit the call list, all entries are set
to the status "old"; i.e. the Ësymbol is no
longer displayed.
Storing a number into the directory
Press long the directory key.
Press the key to save the entry.
Base settings
Your telephone is preconfigured, but you
can change the settings to suit your
individual requirements.
Setting the date and time
Time and date can only be set via the
handset menu (¢page 30).
Setting the earpiece and
speaker volume
You can set the loudspeaker volume for
handsfree talking and the earpiece volume
to five different levels during a call.
Setting the earpiece volume
qSet the earpiece volume; the
level (L1... L5) is displayed,
during a call with corded
handset.
Setting the speaker volume
qSetthe speaker volume; the
level (L1... L5) is displayed
during a handsfree call.
Setting the ringer
You can set the ringer volume to six different
levels for the base. The ringer melody can
only be changed for handsets.
Setting the ringer volume
In idle status:
qPress the up or down control
key.
L0....L5 The volume level currently set is
shown.
When the ringer volume is set to L0 (off), L0
is displayed and the ôsymbol appears in
the display.
The ringer volume can also be adjusted
during an incoming call, but this setting is
not permanent.
Activating/deactivating the
ringtone
You can deactivate the ringtone on your
handset before you answer a call or when
the handset is in idle status; the ringtone can
be deactivated permanently or just for the
current call. The ringtone cannot be re-acti-
vated while an external call is in progress.
Deactivating the ringtone
permanently
*Press and hold the star key.
The ôsymbol appears in the display.
Reactivating the ringtone
*Press and hold the star key.
System settings
System settings apply to the entire phone
system. They can only be set on a registered
handset (¢page 32).
Table of contents
Other Gigaset Telephone manuals

Gigaset
Gigaset DA310 User manual

Gigaset
Gigaset 5040 User manual

Gigaset
Gigaset AS180 User manual

Gigaset
Gigaset DX600A ISDN User manual

Gigaset
Gigaset M270T User manual

Gigaset
Gigaset C570A User manual

Gigaset
Gigaset Pro series Hybird 120 User manual

Gigaset
Gigaset DA611 User manual

Gigaset
Gigaset DX800 A User manual

Gigaset
Gigaset 5005 Series User manual

Gigaset
Gigaset A150 User manual

Gigaset
Gigaset DA310 User manual

Gigaset
Gigaset S850A User manual

Gigaset
Gigaset E550 User manual

Gigaset
Gigaset Fusion User manual

Gigaset
Gigaset C330 User manual

Gigaset
Gigaset SL450 A User manual

Gigaset
Gigaset DA310 Installation guide

Gigaset
Gigaset Gigaset DA610 User manual

Gigaset
Gigaset E370 User manual