Gigaset SL400h User manual

Gigaset SL400H / IM1 EN (IRL_UK) / A31008-M2152-R101-2-4N19 / Cover_front.fm /
Congratulations
By purchasing a Gigaset, you have chosen a brand that is fully committed
to sustainability. This product’s packaging is eco-friendly!
To learn more, visit www.gigaset.com.

Gigaset SL400H / IM1 EN (IRL_UK) / A31008-M2152-R101-2-4N19 / Cover_front.fm /

1
Gigaset SL400H – your high-quality accessory
Gigaset SL400H / IM1 EN (IRL_UK) / A31008-M2152-R101-2-4N19 / introduction.fm / 01.02.2011
Version 4,1, 21.11.2007
Gigaset SL400H – your high-quality accessory
Congratulations, you are holding the slimmest and smallest Gigaset there has ever been. This
phone sets new standards with its high-quality genuine metal frame and metal keypad, 1.8 " TFT
colour display and incorporated functions. Your Gigaset can do a lot more than just make calls:
Further information on your phone can be found at
www.gigaset.com/gigasetSL400.
After purchasing your Gigaset phone, please register it at
www.gigaset.com/customercare – this will ensure any questions you may have or warranty
services you request are dealt with even faster!
Have fun using your new phone!
Bluetooth® and mini USB
Connect your handset to a PC or headset using a mini USB (¢page 12) or Bluetooth®
(¢page 27).
Directory for up to 500 vCards – calendar and appointments
Save phone numbers and other data to the directory (¢page 18). Enter appointments and
birthdays in the calendar and set reminders (¢page 24).
Large font
Increase readability of call lists and the directory (¢page 30).
Customise
Assign personal caller display pictures (¢page 19), view your personal pictures as a screen-
saver slide show (¢page 30) or change the colour scheme of the display (¢page 30).
Choose from a selection of ringtones specially composed for your SL400 or load your own
(¢page 31).
If you don't (always) want it to ring
Make the most of the silent alert (¢page 32), the time control for calls (¢page 31) or
ensure that all calls with a withheld number are not signalled (¢page 32).
Other practical information
Synchronise the directory of an existing Gigaset handset (¢page 20), use the quick dial
function (¢page 20), adapt your Gigaset to suit your handsfree requirements (¢page 31)
and adjust the brightness of your keypad to suit you (¢page 30).
Environment
Gigaset Green Home — Be environmentally aware when using your phone. Details about our
ECO DECT products can be found at www.gigaset.com/customercare.

2
Brief overview
Gigaset SL400H / IM1 EN (IRL_UK) / A31008-M2152-R101-2-4N19 / overview.fm / 01.02.2011
Version 4,1, 21.11.2007
Brief overview 1Display in idle status
2Battery charge status (¢page 12)
3Display keys (¢page 4)
4Message key (¢page 22)
Access to call and message lists;
Flashes: new message or new call
5End call key, On/Off key
End call, cancel function, go back one menu
level (press briefly), back to idle status (press
and hold), activate/deactivate handset (press
and hold in idle status)
6Hash key
Keypad lock on/off (press and hold in idle sta-
tus);
toggles between upper/lower case and digits
7Mute key (¢page 18)
Mute the microphone
8Mini USB port (¢page 12)
9Microphone
10 Recall key
- Recall
- Insert a dialling pause (press and hold)
11 Star key
Ringtone on/off (press and hold);
with an open connection: switch between
pulse dialling/tone dialling (press briefly);
text input: open table of special characters
12 Key 1
Dial (network) mailbox (press and hold)
13 Talk key
Flashes: incoming call;
Accept a call; open redial list (press briefly);
start dialling (press and hold)
14 Handsfree key (¢page 17)
Switch between earpiece and handsfree
mode;
Accept a call; open redial list (press briefly);
start dialling (press and hold)
15 Control key (¢page 13)
16 Signal strength (¢page 12)
Green: Eco Mode (¢page 24) activated
iV
07:15
INT 1 05 Apr
Calls Calendar
2
3
5
4
6
7
15
13
9
1
14
16
11
12
10
8
Please note
To change the display language,proceed as follows (¢page 29):
v¢O5 Press keys slowly one after the other.
sSelect the correct language and press the right display key.

3
Brief overview
Gigaset SL400H / IM1 EN (IRL_UK) / A31008-M2152-R101-2-4N19 / overview.fm / 01.02.2011
Version 4,1, 21.11.2007
Display symbols
The following symbols are displayed dependent on the settings and the operating status of
your telephone:
Signalling
Establishing a connection
W
Connection established
Connection cannot be
established or connection
interrupted
i»ó˝
¼08:00 07:15
INT 1 05 Apr
Ù¾
02 10 09 08
Calls Calendar
ØåÚ
Internal call (¢page 18)
Ø«Ú
External call (¢page 17)
Signal strength i(¢page 12)
or ECO Mode+ icon ¼(¢page 24)
Bluetooth activated (¢page 27)
or ô/ õ(Bluetooth headset/data device) connected
Ringtone switched off (¢page 32)
or ñalert tone activated (¢page 32)
Keypad lock switched on (¢page 14)
Battery charging (¢page 12)
Battery charge status (¢page 12)
Alarm switched on and wake-up time set (¢page 25)
Current time
Current day and month
Name of the handset
Number of new messages:
uÃon the network mailbox (¢page 22)
u™in the missed calls list (¢page 22)
u¾in the SMS list (dependent on base)
uin the missed alarms list (¢page 23)
V
ØðÚ
Anniversary (¢page 25)
ØìÚ
Alarm (¢page 25)
ØáÚ
Appointment (¢page 25)
z X

4
Display keys
Gigaset SL400H / IM1 EN (IRL_UK) / A31008-M2152-R101-2-4N19 / overview.fm / 01.02.2011
Version 4,1, 21.11.2007
Other display symbols
Display keys
The functions of the display keys change
depending on the particular operating situ-
ation. Example:
Important display keys:
Open call lists.
Open calendar.
Open a menu for further func-
tions.
Confirm selection.
Delete key: delete character by
character/word by word from
right to left.
Go back one menu level or can-
cel operation.
Save entry.
Main menu symbols
Information on using the menus
(¢page 13)
Menu overview (¢page 15)
Information
¶ Û
Query Please wait...
À
Action failed
‰
Action complete
Á
Room monitor activated
(¢page 26)
Ð
‹ Œ °
Snooze mode (¢page 26)
Switch from earpiece to
handsfree mode
(¢page 17)
Switch from handsfree to
earpiece mode
(¢page 17)
Back Save
1Current display key function
2Display keys
1
2
1
2
Calls
Calendar
Options
OK
Û
Back
Save
ÇSelect Services
òBluetooth
ÉAdditional Features
ÊCall Lists
ËSMS (dependent on base)
ÌVoice Mail
áOrganizer
ÂDirectory
ÏSettings
SMS
ÇòÉ
ÊËÌ
á Â Ï
Back OK

5
Contents
Gigaset SL400H / IM1 EN (IRL_UK) / A31008-M2152-R101-2-4N19 / SL400HIVZ.fm / 01.02.2011
Version 4,1, 21.11.2007
Contents
Gigaset SL400H – your high-quality accessory . . . . . . . . . . . . . . . . . . . . . . 1
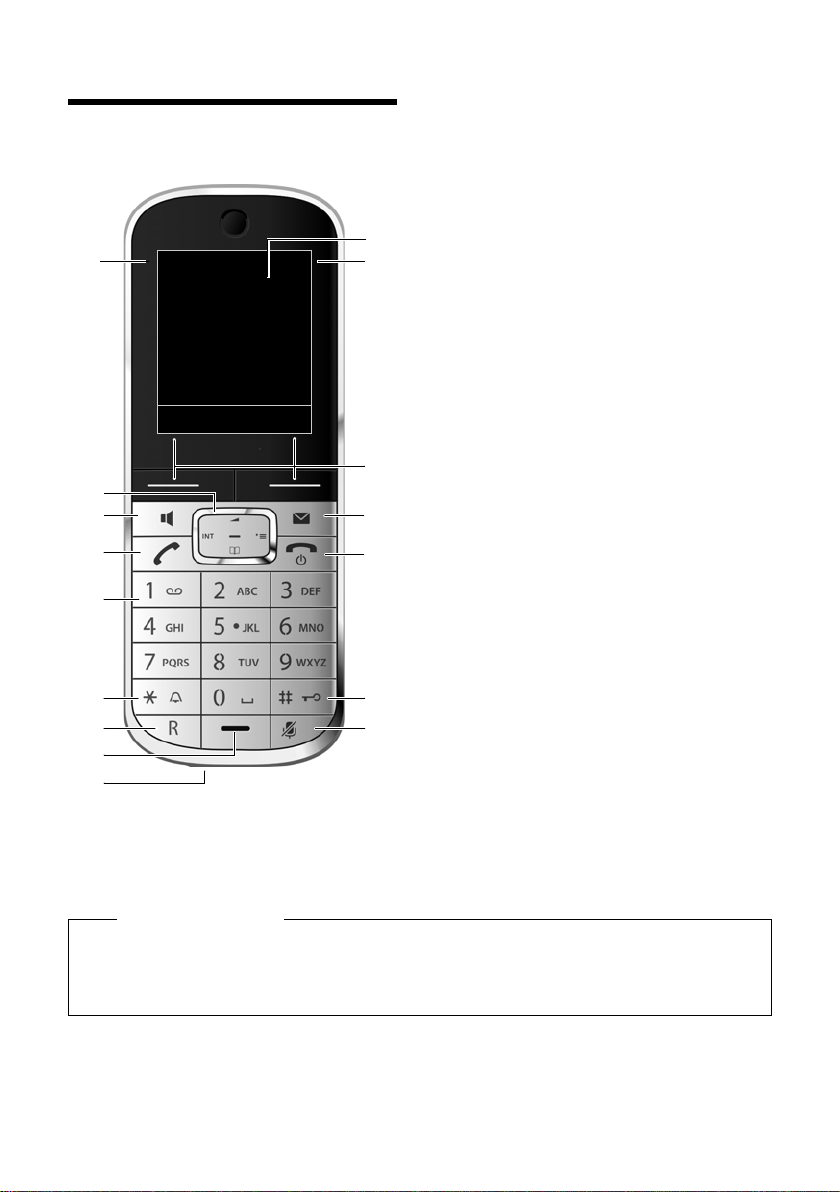
Brief overview . . . . . . . . . . . . . . . . . . . . . . . . . . . . . . . . . . . . . . . . . . . . . . . . . . . . . 2
Display symbols . . . . . . . . . . . . . . . . . . . . . . . . . . . . . . . . . . . . . . . . . . . . . . . . . . . 3
Display keys . . . . . . . . . . . . . . . . . . . . . . . . . . . . . . . . . . . . . . . . . . . . . . . . . . . . . . . 4
Main menu symbols . . . . . . . . . . . . . . . . . . . . . . . . . . . . . . . . . . . . . . . . . . . . . . . 4
Safety precautions . . . . . . . . . . . . . . . . . . . . . . . . . . . . . . . . . . . . . . . . . . . . . . . . . 7
First steps . . . . . . . . . . . . . . . . . . . . . . . . . . . . . . . . . . . . . . . . . . . . . . . . . . . . . . . . . 8
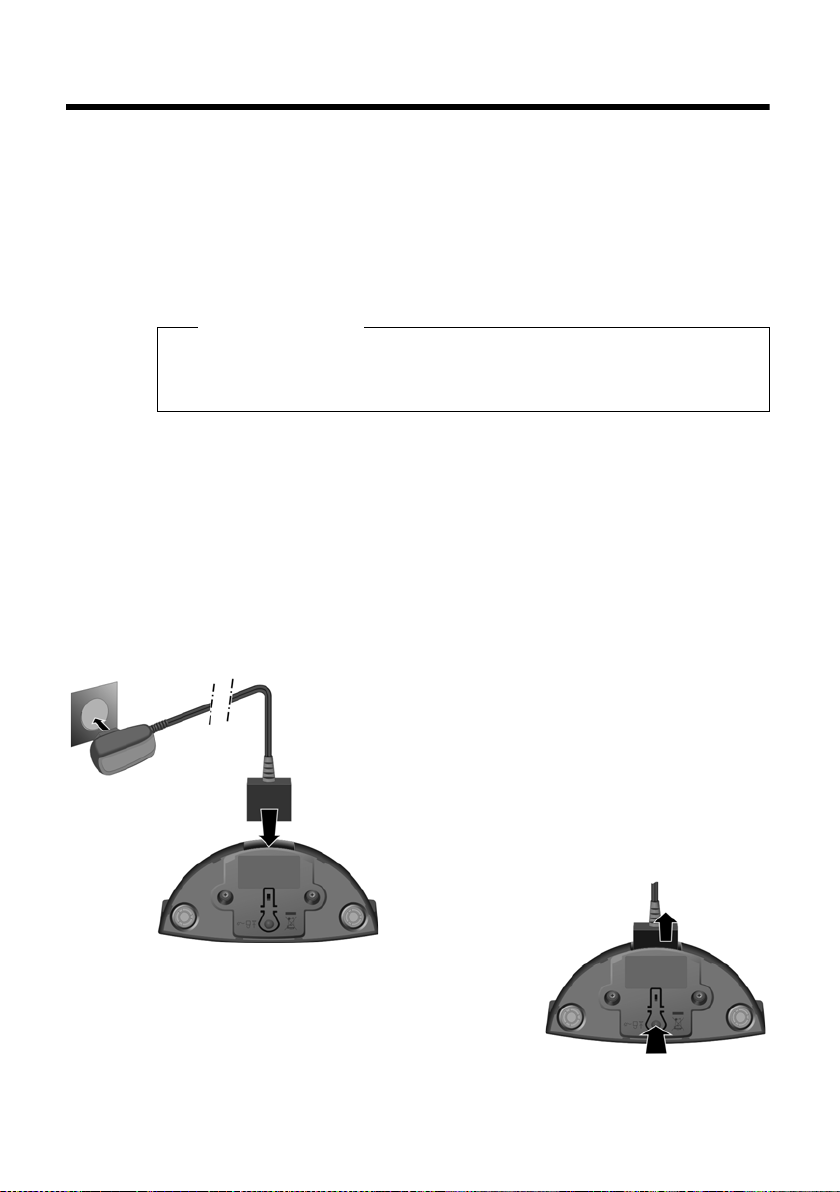
Installing the charger . . . . . . . . . . . . . . . . . . . . . . . . . . . . . . . . . . . . . . . . . . . . . . . . . . . . . . . . . 8
Connecting the charger . . . . . . . . . . . . . . . . . . . . . . . . . . . . . . . . . . . . . . . . . . . . . . . . . . . . . . . 8
Setting up the handset for use . . . . . . . . . . . . . . . . . . . . . . . . . . . . . . . . . . . . . . . . . . . . . . . . 9
Registering the handset . . . . . . . . . . . . . . . . . . . . . . . . . . . . . . . . . . . . . . . . . . . . . . . . . . . . . . 11
Establishing the mini USB connection . . . . . . . . . . . . . . . . . . . . . . . . . . . . . . . . . . . . . . . . 12
Using the phone . . . . . . . . . . . . . . . . . . . . . . . . . . . . . . . . . . . . . . . . . . . . . . . . . . 13
Using the control key . . . . . . . . . . . . . . . . . . . . . . . . . . . . . . . . . . . . . . . . . . . . . . . . . . . . . . . . 13
Using the menus . . . . . . . . . . . . . . . . . . . . . . . . . . . . . . . . . . . . . . . . . . . . . . . . . . . . . . . . . . . . . 13
Activating/deactivating the handset . . . . . . . . . . . . . . . . . . . . . . . . . . . . . . . . . . . . . . . . . . 13
Activating/deactivating keypad lock . . . . . . . . . . . . . . . . . . . . . . . . . . . . . . . . . . . . . . . . . . 14
Menu overview . . . . . . . . . . . . . . . . . . . . . . . . . . . . . . . . . . . . . . . . . . . . . . . . . . . 15
Making calls . . . . . . . . . . . . . . . . . . . . . . . . . . . . . . . . . . . . . . . . . . . . . . . . . . . . . . 17
Making an external call . . . . . . . . . . . . . . . . . . . . . . . . . . . . . . . . . . . . . . . . . . . . . . . . . . . . . . 17
One Touch Call . . . . . . . . . . . . . . . . . . . . . . . . . . . . . . . . . . . . . . . . . . . . . . . . . . . . . . . . . . . . . . . 17
Ending a call . . . . . . . . . . . . . . . . . . . . . . . . . . . . . . . . . . . . . . . . . . . . . . . . . . . . . . . . . . . . . . . . . 17
Accepting a call . . . . . . . . . . . . . . . . . . . . . . . . . . . . . . . . . . . . . . . . . . . . . . . . . . . . . . . . . . . . . . 17
Using handsfree mode . . . . . . . . . . . . . . . . . . . . . . . . . . . . . . . . . . . . . . . . . . . . . . . . . . . . . . . 17
Switching to mute . . . . . . . . . . . . . . . . . . . . . . . . . . . . . . . . . . . . . . . . . . . . . . . . . . . . . . . . . . . 18
Making internal calls . . . . . . . . . . . . . . . . . . . . . . . . . . . . . . . . . . . . . . . . . . . . . . . . . . . . . . . . . 18
Using the directory and lists . . . . . . . . . . . . . . . . . . . . . . . . . . . . . . . . . . . . . . . 18
Directory . . . . . . . . . . . . . . . . . . . . . . . . . . . . . . . . . . . . . . . . . . . . . . . . . . . . . . . . . . . . . . . . . . . . 18
Redial list . . . . . . . . . . . . . . . . . . . . . . . . . . . . . . . . . . . . . . . . . . . . . . . . . . . . . . . . . . . . . . . . . . . . 21
Call lists . . . . . . . . . . . . . . . . . . . . . . . . . . . . . . . . . . . . . . . . . . . . . . . . . . . . . . . . . . . . . . . . . . . . . 21
Message key function . . . . . . . . . . . . . . . . . . . . . . . . . . . . . . . . . . . . . . . . . . . . . . . . . . . . . . . . 22
Missed alarms list . . . . . . . . . . . . . . . . . . . . . . . . . . . . . . . . . . . . . . . . . . . . . . . . . . . . . . . . . . . . 23
Using the network mailbox . . . . . . . . . . . . . . . . . . . . . . . . . . . . . . . . . . . . . . . 23
ECO DECT . . . . . . . . . . . . . . . . . . . . . . . . . . . . . . . . . . . . . . . . . . . . . . . . . . . . . . . . 24
Setting an appointment (calendar) . . . . . . . . . . . . . . . . . . . . . . . . . . . . . . . . 24
Displaying missed appointments, anniversaries . . . . . . . . . . . . . . . . . . . . . . . . . . . . . . . 25
Setting the alarm clock . . . . . . . . . . . . . . . . . . . . . . . . . . . . . . . . . . . . . . . . . . . 25

6
Contents
Gigaset SL400H / IM1 EN (IRL_UK) / A31008-M2152-R101-2-4N19 / SL400HIVZ.fm / 01.02.2011
Version 4,1, 21.11.2007
Using a handset as a room monitor (Babyphone) . . . . . . . . . . . . . . . . . . . 26
Using Bluetooth devices . . . . . . . . . . . . . . . . . . . . . . . . . . . . . . . . . . . . . . . . . . 27
Defining handset settings . . . . . . . . . . . . . . . . . . . . . . . . . . . . . . . . . . . . . . . . . 29
Quick dialling numbers and functions . . . . . . . . . . . . . . . . . . . . . . . . . . . . . . . . . . . . . . . . 29
Changing the display language . . . . . . . . . . . . . . . . . . . . . . . . . . . . . . . . . . . . . . . . . . . . . . 29
Setting the display . . . . . . . . . . . . . . . . . . . . . . . . . . . . . . . . . . . . . . . . . . . . . . . . . . . . . . . . . . . 30
Setting keypad illumination . . . . . . . . . . . . . . . . . . . . . . . . . . . . . . . . . . . . . . . . . . . . . . . . . . 30
Activating/deactivating auto answer . . . . . . . . . . . . . . . . . . . . . . . . . . . . . . . . . . . . . . . . . 30
Changing the handsfree/earpiece volume . . . . . . . . . . . . . . . . . . . . . . . . . . . . . . . . . . . . 31
Setting a handsfree profile . . . . . . . . . . . . . . . . . . . . . . . . . . . . . . . . . . . . . . . . . . . . . . . . . . . 31
Changing ringtones . . . . . . . . . . . . . . . . . . . . . . . . . . . . . . . . . . . . . . . . . . . . . . . . . . . . . . . . . . 31
Using the Resource Directory . . . . . . . . . . . . . . . . . . . . . . . . . . . . . . . . . . . . . . . . . . . . . . . . . 32
Activating/deactivating advisory tones . . . . . . . . . . . . . . . . . . . . . . . . . . . . . . . . . . . . . . . 33
Setting your own area code . . . . . . . . . . . . . . . . . . . . . . . . . . . . . . . . . . . . . . . . . . . . . . . . . . 34
Restoring the handset default settings . . . . . . . . . . . . . . . . . . . . . . . . . . . . . . . . . . . . . . . . 34
Service (Customer Care) . . . . . . . . . . . . . . . . . . . . . . . . . . . . . . . . . . . . . . . . . . . 35
Questions and answers . . . . . . . . . . . . . . . . . . . . . . . . . . . . . . . . . . . . . . . . . . . . . . . . . . . . . . 36
Authorisation . . . . . . . . . . . . . . . . . . . . . . . . . . . . . . . . . . . . . . . . . . . . . . . . . . . . . . . . . . . . . . . . 36
Guarantee Certificate
United Kingdom . . . . . . . . . . . . . . . . . . . . . . . . . . . . . . . . . . . . . . . . . . . . . . . . . . . . . . . . . . . . . 37
Guarantee Certificate
Ireland . . . . . . . . . . . . . . . . . . . . . . . . . . . . . . . . . . . . . . . . . . . . . . . . . . . . . . . . . . . . . . . . . . . . . . 37
Protecting our environment . . . . . . . . . . . . . . . . . . . . . . . . . . . . . . . . . . . . . . . 38
Appendix . . . . . . . . . . . . . . . . . . . . . . . . . . . . . . . . . . . . . . . . . . . . . . . . . . . . . . . . 39
Caring for your telephone . . . . . . . . . . . . . . . . . . . . . . . . . . . . . . . . . . . . . . . . . . . . . . . . . . . . 39
Contact with liquid . . . . . . . . . . . . . . . . . . . . . . . . . . . . . . . . . . . . . . . . . . . . . . . . . . . . . . . . . . 39
Specifications . . . . . . . . . . . . . . . . . . . . . . . . . . . . . . . . . . . . . . . . . . . . . . . . . . . . . . . . . . . . . . . . 39
Writing and editing text . . . . . . . . . . . . . . . . . . . . . . . . . . . . . . . . . . . . . . . . . . . . . . . . . . . . . . 40
Accessing additional functions via the PC interface . . . . . . . . . . . . . . . . . 41
Accessories . . . . . . . . . . . . . . . . . . . . . . . . . . . . . . . . . . . . . . . . . . . . . . . . . . . . . . . 43
Index . . . . . . . . . . . . . . . . . . . . . . . . . . . . . . . . . . . . . . . . . . . . . . . . . . . . . . . . . . . . 44

7
Safety precautions
Gigaset SL400H / IM1 EN (IRL_UK) / A31008-M2152-R101-2-4N19 / security.fm / 01.02.2011
Version 4,1, 21.11.2007
Safety precautions
Warning
Be sure to read this user guide and the safety precautions before using your telephone.
Explain their content and the potential hazards associated with using the telephone to your
children.
Use only the power adapter supplied, as indicated on the underside of the base.
Use only rechargeable batteries that correspond to the specification provided on
page 39, as this could otherwise result in significant health risks and personal injury.
Using your telephone may affect nearby medical equipment. Be aware of the tech-
nical conditions in your particular environment, e.g., doctor's surgery.
If you use a medical device (e.g., a pacemaker), please contact the device manufac-
turer. They will be able to advise you regarding the susceptibility of the device to
external sources of high frequency energy. Please refer to the "Appendix" chapter for
the specifications of this Gigaset product.
Do not hold the rear of the handset to your ear when it is ringing or when handsfree
mode is activated. Otherwise you risk serious and permanent damage to your hear-
ing.
Your Gigaset is compatible with the majority of digital hearing aids on the market.
However, perfect function with all hearing aids cannot be guaranteed.
The handset may cause interference in analogue hearing aids (humming or whis-
tling) or cause them to overload. If you require assistance, please contact the hearing
aid supplier.
Do not install the base or charger in bathrooms or shower rooms. The base and
charger are not splashproof (¢page 39).
Do not use your phone in environments with a potential explosion hazard (e.g., paint
shops).
If you give your Gigaset to a third party, make sure you also give them the user guide.
Remove faulty bases from use or have them repaired by our Service, as they could
interfere with other wireless services.
Please note
uNot all of the functions described in this user guide are available in all countries.
uThe device cannot be used in the event of a power failure. It is also not possible to trans-
mit emergency calls.
$
ƒ

8
First steps
Gigaset SL400H / IM1 EN (IRL_UK) / A31008-M2152-R101-2-4N19 / starting.fm / 01.02.2011
Version 4,1, 21.11.2007
First steps
Checking the package contents: One Gigaset handset, one battery, one battery
cover, one charger, one power adapter for the charger, one belt clip, one user guide.
Installing the charger
The charger is designed for use in dry rooms in a temperature range of +5°C to
+45°C.
¤Install the charger on a level, non-slip surface.
The phone's feet do not usually leave any marks on surfaces. However, due to the
multitude of different varnishes and polishes used on today's furnishings, the
occurrence of marks on the surfaces cannot be completely ruled out.
Please note:
uNever expose the telephone to the influence of heat sources, direct sunlight or
other electrical devices.
uProtect your Gigaset from moisture, dust, corrosive liquids and fumes.
Connecting the charger
Please note
Pay attention to the range of the base.
This is up to 300 m in unobstructed outdoor areas and up to 50 m inside build-
ings. The range is reduced when Eco Mode (¢page 24) is activated.
¤Plug the power adapter into the plug
socket 2.
¤Connect the flat plug from the power
adapter 1.
To disconnect the plug from the charger, press the release
button 3and disconnect the plug 4.
1
2
3
4

9
First steps
Gigaset SL400H / IM1 EN (IRL_UK) / A31008-M2152-R101-2-4N19 / starting.fm / 01.02.2011
Version 4,1, 21.11.2007
Setting up the handset for use
The display is protected by a plastic film.
Please remove the protective film!
Inserting the battery and closing the battery cover
To reopen the battery cover to replace the battery:
¤Remove the belt clip (if
attached).
¤Insert your fingernail into the
notch at the bottom of the
casing and pull the battery
cover upwards.
To change the battery,insert
your fingernail into the notch in
the casing and pull the battery
upwards.
Please note
Use only rechargeable batteries recommended by Gigaset Communications
GmbH (¢page 39), as this could result in significant health risks and personal
injury. For example, the outer casing of the battery could be destroyed or the
battery could explode. The phone could also malfunction or be damaged as a
result of using batteries that are not of the recommended type.
¤First insert battery with the con-
tact surface facing down a.
¤Then press the battery down-
wards buntil it clicks into place.
¤First, align the protrusions
on the side of the battery
cover with the notches on
the inside of the casing.
¤Then press the cover until it
clicks into place.
a
b

10
First steps
Gigaset SL400H / IM1 EN (IRL_UK) / A31008-M2152-R101-2-4N19 / starting.fm / 01.02.2011
Version 4,1, 21.11.2007
Initial charging and discharging of the battery
The correct charge status can only be displayed once the battery is first fully
charged and discharged.
¤Charge the handset in the charger for 3 hours.
¤After charging, remove the handset from the charger and only replace it when
the battery is fully discharged.
Please note
Only place the handset in the designated charger.
3hours
Please note
uAfter the initial battery charge and discharge, you may place your handset in
the base after every call.
uAlways repeat the charging and discharging procedure if you remove the
battery from the handset and reinsert them.
uThe battery may warm up during charging. This is not dangerous.
uAfter a while, the charge capacity of the battery will decrease for technical
reasons.

11
First steps
Gigaset SL400H / IM1 EN (IRL_UK) / A31008-M2152-R101-2-4N19 / starting.fm / 01.02.2011
Version 4,1, 21.11.2007
Registering the handset
Your Gigaset handset can be registered on up to four bases. You must register the
handset on both the handset (1) and the base (2).
Once the registration process has been completed successfully, the handset returns
to idle status. The handset's internal number is shown in the display, e.g., INT 1. If
not, repeat the procedure.
1) On the handset
2) On the base
Within 60 sec. press and hold the registration/paging key on the base
(approx. 3 sec.).
Register
¤Press the key below §Register§ on the
display screen.
A message appears stating that the
handset is searching for a base that is
ready for registration.
Please note
If the handset is already registered to at least one base, start the registration
process as follows:
v¢Ï¢Registration ¢Register Handset
If the handset is already registered to four bases, select the required base.
Please note
For instructions on deregistering the handsets, please consult the base user
guide.

12
First steps
Gigaset SL400H / IM1 EN (IRL_UK) / A31008-M2152-R101-2-4N19 / starting.fm / 01.02.2011
Version 4,1, 21.11.2007
Display in idle status
Once the phone is registered and the time set, the idle status is shown as in this
example.
Displays
uReception between the base and the handset:
– Good to poor: ÐiÑÒ
–Noreception:|
Green: Eco Mode (¢page 24)
uBattery charge status:
–{white: charged over 66%
–{white: charged between 33% and 66%
–ywhite: charged between 10% and 33%
–yred: charged below 10%
–yflashes red: battery almost empty (less than 10-minutes talktime)
–xyxyx{x{ white: battery charging
uINT 1
Internal name of the handset
If Eco Mode+ (¢page 24) is activated, the ¼icon is displayed in the top left cor-
ner of the display.
Your phone is now ready for use!
Establishing the mini USB connection
The mini USB connection is on the
underside of your Gigaset handset.
Connecting the headset with jack connectors
You can connect the headset with a 2.5 mm jack connector using the USB-to-jack
adapter (available from Service).
See the relevant product page at www.gigaset.com for information on recom-
mended headsets.
The headset volume corresponds to the settings for the earpiece volume.
Connecting the USB data cable
You can connect a standard USB data cable with a USB mini-B connector to syn-
chronise your handset with a PC. To use this function, the Gigaset QuickSync soft-
ware must be installed (¢page 41).
i V
07:15
INT 1 04 Apr
Calls Calendar

13
Using the phone
Gigaset SL400H / IM1 EN (IRL_UK) / A31008-M2152-R101-2-4N19 / starting.fm / 01.02.2011
Version 4,1, 21.11.2007
Using the phone
Using the control key
Below, the side of the control key that you must press in the
respective operating situation is marked in black (top, bottom,
right, left, centre), e.g., vfor "press right on the control key" or
wfor "press the centre of the control key".
Functions when pressing the middle of the control key
Depending on the operating situation, the key has different functions.
uIn idle status the key opens the main menu.
uIn submenus, selection and input fields, the key takes on the function of the
display keys §OK§, §Yes§, §Save§, §Select§ or §Change§.
Using the menus
The menu view can be expanded (expert mode •) or simplified. Expert mode is
the active default setting.
Main menu (first menu level)
¤When the handset is in idle status, press the right control key vto open the
main menu.
¤Use the control key pto select the required function and press the display
key §OK§.
Submenus
The functions in the submenus are displayed as lists.
¤Scroll to the function with the control key qand press §OK§.
Reverting to idle status
You can revert to idle status from anywhere in the menu as follows:
¤Press and hold the end call key a.
or:
¤Do not press any key: after 2 minutes the display will automatically revert to idle
status.
Settings that have not been saved by selecting the display keys §OK§, §Yes§ or §Save§ are
lost.
Activating/deactivating the handset
aWith the phone in idle status, press and hold the end call key (confir-
mation tone) to switch off the handset.
Press and hold the end call key again to switch the handset on.

14
Using the phone
Gigaset SL400H / IM1 EN (IRL_UK) / A31008-M2152-R101-2-4N19 / starting.fm / 01.02.2011
Version 4,1, 21.11.2007
Activating/deactivating keypad lock
Keypad lock prevents any inadvertent use of the phone.
#Press and hold the hash key in idle status to activate or deactivate key-
pad lock. You will hear the confirmation tone.
If keypad lock is activated, you will see a message when you press a key.
Keypad lock deactivates automatically when you receive a call. It is reactivated
when the call is finished.
Please note
When keypad lock is active, you cannot even call emergency numbers.

15
Menu overview
Gigaset SL400H / IM1 EN (IRL_UK) / A31008-M2152-R101-2-4N19 / menuetree.fm / 01.02.2011
Version 4,1, 21.11.2007
Menu overview
Setting simplified or expert mode
The menu view can be expanded (expert mode •) or simplified. Expert mode is the active
default setting. Menu options that are only available in expert mode are marked with the
•icon.
To change these settings:
Select v¢Ï¢Menu View ¢Simplified or Complete (expert mode)
¢§Select§ (the active mode is marked with Ø)
Open the main menu: press vwhen the phone is in idle mode.
ÇSelect Services (Menu dependent on base)
òBluetooth
Activation ¢page 27
Search for Headset ¢page 27
Search Data Device ¢page 27
Known Devices ¢page 28
Own Device ¢page 28
ÉAdditional Features
Room Monitor ¢page 26
One Touch Call ¢page 17
•Resource Directory Screensavers ¢page 33
Caller Pictures ¢page 33
Sounds ¢page 33
Capacity ¢page 33
ÊCall Lists
All Calls ¢page 21
Outgoing Calls ¢page 21
Accepted Calls ¢page 21
Missed Calls ¢page 21
ËSMS (Menu dependent on base)
ÌVoice Mail (Menu dependent on base)
áOrganizer
Calendar ¢page 24
Alarm Clock ¢page 25
Missed Alarms ¢page 25

16
Menu overview
Gigaset SL400H / IM1 EN (IRL_UK) / A31008-M2152-R101-2-4N19 / menuetree.fm / 01.02.2011
Version 4,1, 21.11.2007
ÂDirectory ¢page 18
ÏSettings
Date/Time
Audio Settings Handset Volume ¢page 31
Handsfree Profiles ¢page 31
•Advisory Tones ¢page 33
Silent Alert ¢page 32
Ringtones(Handset) ¢page 31
•Music on hold (dependent on base)
Display + Keypad Screensaver ¢page 30
Large Font ¢page 30
Colour Schemes ¢page 30
•Display Backlight ¢page 30
Keypad Illumination ¢page 30
Language ¢page 29
Registration Register Handset ¢page 11
De-reg. Handset (dependent on base)
Select Base ¢page 11
•Telephony Auto Answer ¢page 30
(further submenus dependent on base)
•System Handset Reset ¢page 34
(further submenus dependent on base)
Menu View Simplified ¢page 15
Complete ¢page 15
Eco Mode Eco Mode (dependent on base)
Eco Mode+ (dependent on base)

17
Making calls
Gigaset SL400H / IM1 EN (IRL_UK) / A31008-M2152-R101-2-4N19 / direct_charges.fm / 01.02.2011
Version 4,1, 21.11.2007
Making calls
Making an external call
External calls are calls using the public tele-
phone network.
~c Enter the number and press the
talk key.
or:
c~ Press and hold the talk key c
and then enter the number.
You can cancel the dialling operation with
the end call key a.
One Touch Call
You can set up your phone that by pressing
any key a previously stored number is
dialled. This allows for example children,
who can not enter a number, to call a certain
number.
v¢É¢One Touch Call
¤Change multiple line input:
Activation:
Select On to activate.
Alarm to:
Enter or change number.
¤Press §Save§ to save the settings.
When the function is activated, the idle dis-
play looks as shown below:
By pressing any key the saved number is
dialled. Press the end call key a, to cancel
the dialling operation or to end the call.
Deactivating the One Touch Call
¤In idle status, press the display key §OFF§.
¤Press and hold the hash key #, to
deactivate the One Touch Call.
Ending a call
aPress the end call key.
Accepting a call
The handset indicates an incoming call in
three ways: by ringing/silent alert, by a dis-
play on the screen and by the flashing talk
key c.
Accept the call by:
¤Pressing the talk key c.
¤Pressing the handsfree key d.
¤Pressing the display key §Accept§.
If the handset is in the charger and the Auto
Answer function is activated (¢page 30),
the handset will automatically accept a call
when you lift it out of the cradle.
To deactivate the ringtone/silent alert, press
the §Silence§ display key. You can accept the
call as long as it is displayed on the screen.
Using handsfree mode
You can set various handsfree profiles to
optimally adapt your phone to your environ-
ment.
Activating/deactivating handsfree
mode
Activating while dialling
~d Enter the number and press the
handsfree key.
Switching between earpiece and
handsfree mode
dPress the handsfree key.
If you wish to place the handset in the
charger during a call:
i V
07:15
INT 1 22 Oct
”
OneTouchCall active
0891234567
OFF

18
Using the directory and lists
Gigaset SL400H / IM1 EN (IRL_UK) / A31008-M2152-R101-2-4N19 / direct_charges.fm / 01.02.2011
Version 4,1, 21.11.2007
¤Press and hold handsfree key dwhile
placing the handset in the base/charger
and for a further 2 seconds.
For instructions on adjusting the handsfree
volume (¢page 31).
Switching to mute
You can deactivate your handset's micro-
phone during a call.
hPress key to mute the handset.
The display shows Microphone
is off.
Press the key again to reactivate
the microphone.
Making internal calls
Internal calls to other handsets registered on
the same base are free.
Calling a specific handset
uInitiate internal call.
~Enter the number of the
handset.
or:
sSelect handset.
cPress the talk key.
Calling all handsets ("group call")
uPress and hold.
or:
uInitiate internal call.
*Press the star key.
or
Call All Select
cPress the talk key.
All handsets are called.
Ending a call
aPress the end call key.
Using the directory and
lists
Directory
You can save up to 500 entries in the direc-
tory.
Open the directory in idle status using the
skey.
Length of the entries
3 numbers: each max. 32 digits
First name and
surname: each max. 16 characters
E-mail address: max. 64 characters
Saving a number in the directory
s¢<New Entry>
¤You can enter data in the following fields:
First Name:/Surname:
Enter first names and/or surnames. (For
instructions on entering text and special
characters, please see ¢page 40.)
Phone (Home):/Phone (Office):/Phone
(Mobile):
Enter a number in at least one of the
fields.
E-mail:
Enter the e-mail address.
Anniversary:
Select On or Off.
With setting On:
Enter Annivers. (Date) and Anniversary
(time) and select reminder type: Anniver-
sary (tone) (¢page 20).
Caller Melody (VIP):
Mark a directory entry as a VIP (Very
Important Person) by assigning a specific
ringtone to it. Prerequisite: Calling Line
Identification Presentation (CLIP).
Table of contents
Other Gigaset Telephone manuals

Gigaset
Gigaset E630 A User manual

Gigaset
Gigaset Fusion User manual

Gigaset
Gigaset DA310 Installation guide

Gigaset
Gigaset 5015 User manual

Gigaset
Gigaset Gigaset 5005 User manual

Gigaset
Gigaset A400 User manual

Gigaset
Gigaset DA210 User manual

Gigaset
Gigaset C610ip User manual

Gigaset
Gigaset DA310 User manual

Gigaset
Gigaset E290 User manual

Gigaset
Gigaset E290A User manual

Gigaset
Gigaset E490 User manual

Gigaset
Gigaset DL500a User manual

Gigaset
Gigaset E630A GO User manual

Gigaset
Gigaset DX800 User manual

Gigaset
Gigaset E560HX User manual

Gigaset
Gigaset Euroset 5005 User manual

Gigaset
Gigaset Gigaset DA510 User manual

Gigaset
Gigaset Gigaset 5020 User manual

Gigaset
Gigaset SL450 User manual