Giropes GI620 COMPACT User manual

V. 1
22/06/2023
EN
INDICATOR WITH FUNCTION
AXLE WEIGHING
GI620 COMPACT
USER MANUAL
The manufacturer reserves the right to modify the characteristics of its products without prior notice to introduce technical improvements or comply with
new official regulations.
Pol. Empordà Internacional C/ Molló 3
17469 VILAMALLA - (Girona) SPAIN
T. (34) 972 527 212

ENENUSER MANUAL GI620 COMPACT
2
INDEX
1. INTRODUCTION 3
1.1 DISPLAY LCD 3
1.2 PLATFORM MANAGEMENT 3
1.3 FILE MANAGEMENT 3
1.4 WEIGHT MANAGEMENT 3
1.5 FUNCTIONS 3
1.6 PRINTER 3
1.7 PC MANAGEMENT 3
1.8 TICKET FORMAT 4
1.9 BATTERY POWER 4
2. GENERAL CHARACTERISTICS 4
2.1 DIMENSIONS 5
3. DISPLAY SYMBOLS 6
4. KEYS FUNCTION 8
5. BASIC CONFIGURATIONS 10
5.1 SETUP 10
5.2 PASSWORD 10
5.3 CLOSED CALIBRATION (RESTRICTED METROLOGICAL PARAMETERS) 10
5.4 USER MENU 11
5.5 TECHNICAL MENU 12
6. BASIC FUNCTIONS 14
6.1 ZEROING THE SCALE 14
6.2 ACQUISITION OF TARE (ONLY IN TARE_VERSION) 14
6.3 MANUAL TARE (ONLY IN TARE_VERSION) 14
6.4 TARE FILES IN MEMORY (ONLY IN TARE_VERSION) 14
6.5 CANCELLATION OF THE ACTIVE TARE (ONLY IN TARE_VERSION) 15
6.6 DISABLE THE TARE KEY (ONLY IN TARE_VERSION) 15
6.7 SUBTOTALIZATION 15
6.8 REPRINT THE LAST PRINTED TICKET 15
7. STATIC AXLE WEIGHT: F96 AND F97 15
7.1 WEIGHING WITH AXLE TOTALIZATION MANUAL F96 15
7.2 WEIGHING WITH AXLE TOTALIZATION AUTOMATIC F97 16
8. DYNAMIC AXLE-WEIGHT: F98 17
9. PRINTOUT 18
9.1 TOTALIZATION 18
9.2 PRINTING THE TOTALS 19
10. PERSONALIZED TICKET 19
11. BY10 DATA VISUALIZER 23
11.1 X10 DATA VISUALIZER 23
12. ERROR MESSAGES 24
13. CELL CONNECTOR 25
14. REMOVAL OF ELECTRONIC EQUIPMENT(WEE) 25

3
ENENUSER MANUAL GI620 COMPACT
1. INTRODUCTION
-This version of the device is designed to work with a maximum of 2 channels.
-Place the platforms on a completely flat and level surface. and leave them well aligned.
-The platforms should be mounted with mats for a better leveling and to avoid vibrations. In the case of having the platforms embedded in the
ground, mats will not be necessary.
-With this device its posible to weigh the axles of the vehicle in static mode (with the vehicle stationary) and also in dynamic mode (with the
vehicle moving at low speed). In last case, the passing speed of the vehicle will be recorded and printed.
-Printing of the weights with totalization of the axes. Its posible to print a subtotal of the weighing done so far (for example: print the weight of
the tractor and/or trailer). Up to three subtotals can be obtained for each full weighing.
-Different codes can be associated to the weights. There are four different register of 400 codes each, the plate and 3 more register.
-The USB port (in according version of the device) used for uploading/downloading register and weights (weights can only be downloaded).
1.1 DISPLAY LCD
The Gi620 indicator has an LCD display with 6 digits of 27mm, with 14 segments per digit.
1.2 PLATFORM MANAGEMENT
- It is possible to visualize the sum of the active platforms or see the weight of one at a time.
- Totalize the weight of the axles, achieving the subtotal weight of the truck and the total withtrailer
- Print the displayed weight, and the total weight of a vehicle.1
- During the weighing of a composite vehicle (tractor + trailer), possible to print the subtotal of the trailer and the truck.1
1.3 FILE MANAGEMENT
It is possible to manage 4 files of 400 codes each (Plate and 3 free Register)
This files are used for the management of the codes to associate to the weighings.
1.4 WEIGHT MANAGEMENT
It is possible to store a maximum of 1000 weighings with warning of almost full memory (80%).
1.5 FUNCTIONS
The functions are as follows:
- Zero acquisition
- Tara, Manual Tara, Cancel Tara, actívate or deactivate the Tara key. (only Tare_version)
- Weighing / printing with axle totalization 1
- TOTAL Printing 1
- Printing of totals of weighings (lists) 1
1.6 PRINTER
It is possible to connect a printer by serial RS 232 connection.
1.7 PC MANAGEMENT
- Management and configuration (setup) via PC.
• GiManager
• Upload/download files and weighings via USB (in according Version of the device) in format *.csv (Format of USB-stick must be FAT32)
- Continuous data transmission.
- Connected to PC or repeater via RS232
1If there is a printer connected

ENENUSER MANUAL GI620 COMPACT
4
1.8 TICKET FORMAT
It is possible to modify and select the printed fields related to the Weighing tickets using the GiManager software
1.9 BATTERY POWER
The device has an optional internal battery that allows operation also during a drop in mains power. Batterylife (fully charged) is approx.
360min.
2. GENERAL CHARACTERISTICS
POWER SUPPLY 110-240V AC 50/60Hz, or with optional internal rechargeable
lithium-ion battery.
OPERATING TEMPERATURE -10°C to +40°C
DISPLAY LCD DISPLAY of 6 digits, h 27mm. and 14 segments
SIGNALS Multiple on-screen status indicators
KEYBOARD ALPHANUMERIC WATERPROOF KEYBOARD with 12 keys
and 7 operation keys.
INTEGRATED CALENDAR CLOCK as standard
TARE FUNCTION Subtraction possible according to the capacity. If it has been activated,
it is subtracted to the current value. (out of metrology only)
DISCHARGED BATTERY WARNING Indicated by symbol on the display.
POWER CELLS 5V DC (max. 12 cells of 350 Ohm or 34 cells of 1000 Ohm)
CONNECTION LOAD CELLS 4 cables plus SENSE
OUTPUT COMMUNICATIONS input /output RS232 configurable for connect with PC/PLC or a repeater.
1 USB input/output (in according Version of the device) (csv).
ALIBI/DSD MEMORY (OPTIONAL) for storage with unique identifier of the last 400,000 weighings made.
POWERSUPPLY AND OPTIONAL BATTERY
The GI6xx devices are powered with a mains voltage of 100-240V AC. For the connection with the power supply, safety regulations must be
respected, including the use of a line “free” of interference caused by other electronic devices.
Battery life: Approx. 6 hours with the device connected to 1 single cell and printing tickets continuously.
Battery recharge: connect to the network for approx. 5 hours.
OPTIONAL BATTERY FEATURES
Material: Lithium ion
Power: 2600mAh
Voltage: 7.4V
Do not connect other appliances to the same outlet.
Do not step on or crush the power cord.
TO TURN ON the instrument press the ON/OFF button, you will see that the LED indicator of the power button lights up.

5
ENENUSER MANUAL GI620 COMPACT
2.1 DIMENSIONS
237
237
124
124
200
237237
124
124
200
237
237
124
124
200

ENENUSER MANUAL GI620 COMPACT
6
3. DISPLAY SYMBOLS
The LCD display has various symbols that indicates the operating status of the indicator. The function of each symbol is described below.
NUMBER SYMBOL FUNCTION
1
Is showing the weighing range
2
Indicates that the weight detected is within the range of zero calibration, inclu-
ded in the range –5% FS and +15 FS.
3Indicates that the weight is stable.
4Indicates that the value displayed is a gross weight.
5Indicates that the value displayed is a net weight.
6Not used

7
ENENUSER MANUAL GI620 COMPACT
7Indicates the channel or channels in use.
8Indicates the record or records in use.
9
Indicates that a memorized tare has been activated, previously stored in the
database (F50).
(only in the version with tara)
10 Not used
11 Indicates that connected USB stick has been detected
12 Not used
13
During the visualization of the metric information:
“MAX” shows the capacity of the indicated platform;
“MIN” shows the minimum weighing of the indicated platform;
“e” shows the step of the indicated platform.
14
Indicates unit pounds for version out of metrology lb
15
Indicates that a tare is activated
16
Not used
17
Indicates the unit of weight in use, kilograms.
18 Not used
19
Indicates the battery charge level (when the optional Battery is installed):
-3 brands, full battery.
-2 brands, medium battery.
-1 brand, low battery.
-0 marks, very low battery, imminent shutdown if not plugged in.
-When charging battery the indication flashes
20 Not used

ENENUSER MANUAL GI620 COMPACT
8
4. KEYS FUNCTION
KEYBOARD
GI620 DESCRIPTION OF THE EXECUTABLE FUNCTION
Power key: Turn the indicator on and off
Short press: access to the user menu
Long press: Access to the technical menu
In the edit menus: increase the digit in editable Menu
Short press: performs manual zero if the value displayed is within the margins
of this function
In the edit menus: decrease the digit in editable Menu
Short press: changes the display from gross to net and vice versa if a tare has
been performed
Long press: Input a manual tare.
(only in Tare_version)
In the edit menus: move editable digit to the left
Short press: performs the tare function, subtracting the current weight.
Long press: Deactivate the tare that is active.
(only in Tare_version)
In the edit menus: Move editable digit to the right.
Short press: totalize and print the ticket 2
Long press: reprint the last printed ticket.2
In the edit menus:
Short press: clears the value in editable menu.
Long press: returns to the previous menu.
Short press: Accumulate and print the Axle in static mode.2
Long press: Performs the subtotal of the weights stored so far. Up to 3 subto-
tals can be performed within the same accumulation.
In the edit menus: save the changes made and return to the previous menu.
2 If there is a Printer connected

9
ENENUSER MANUAL GI620 COMPACT
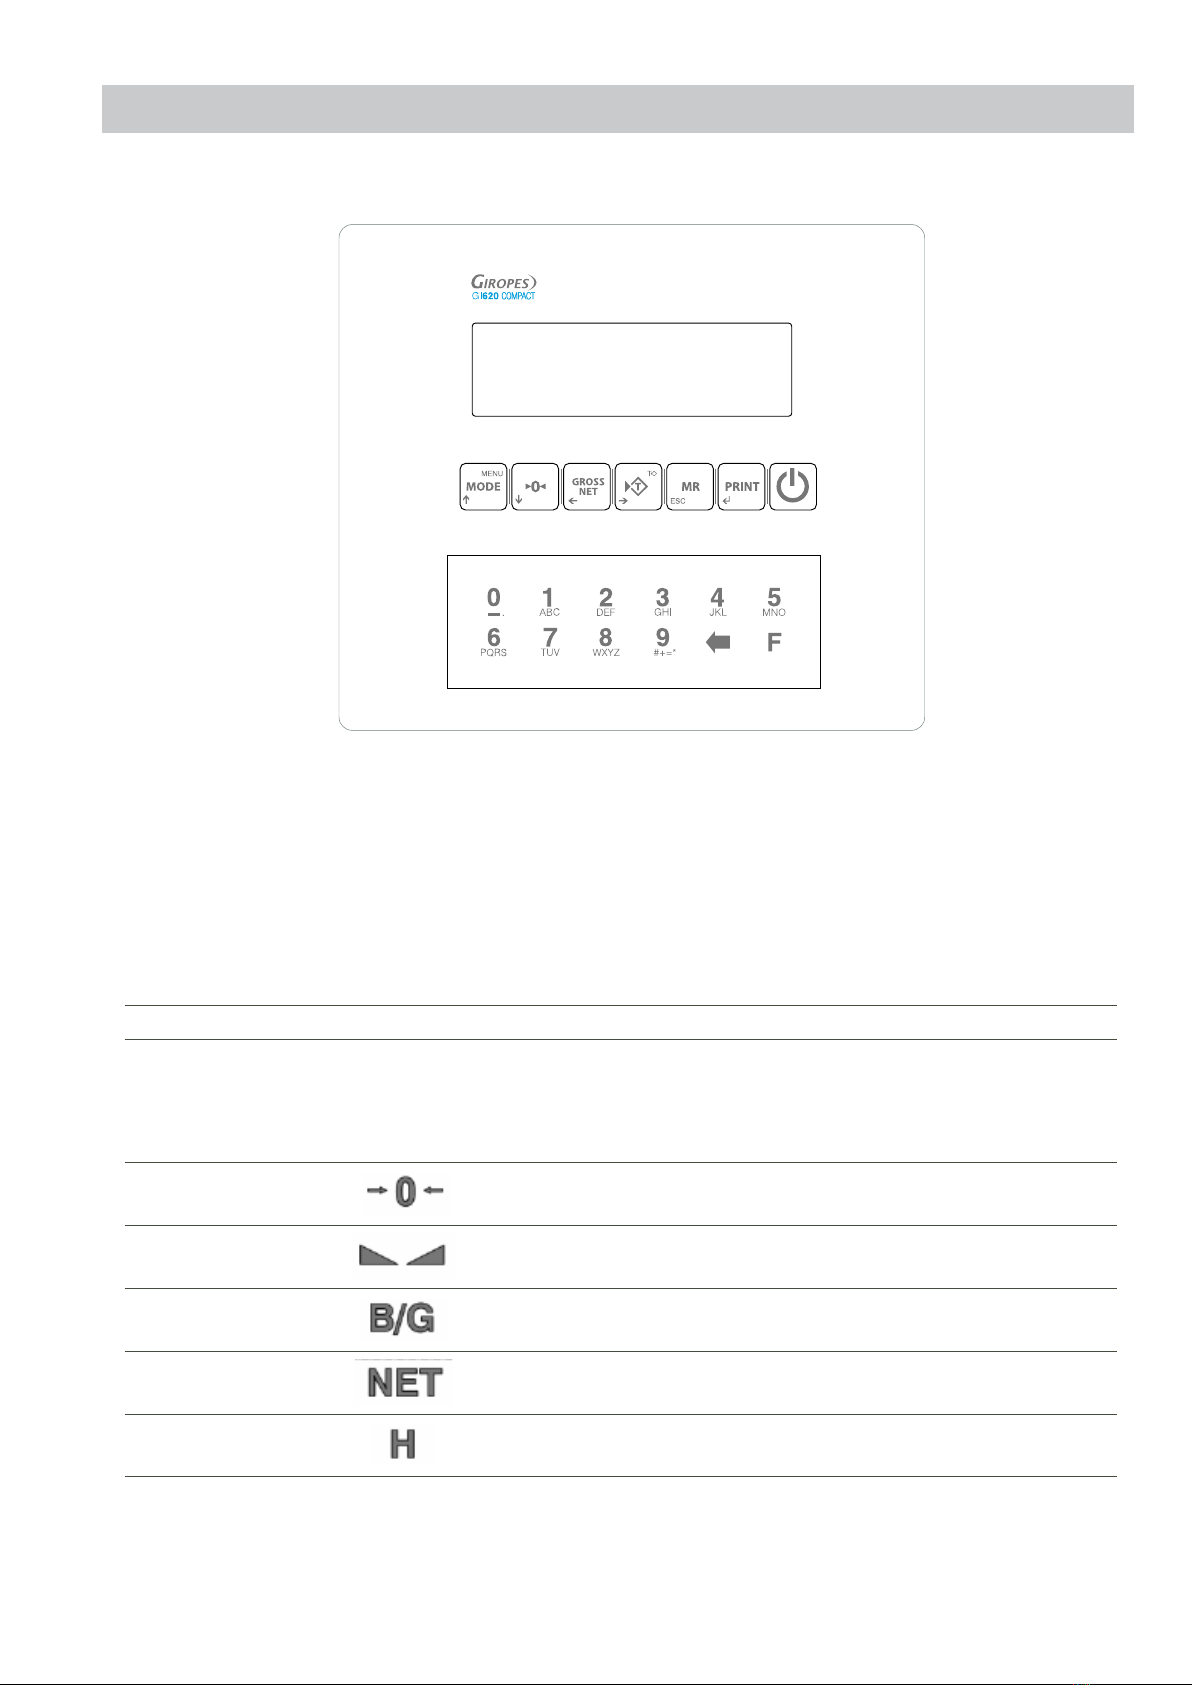
In the edit menus: In the numeric menus, directly enter the digit represented
on the key.
In alphanumeric menus, the letters or symbols described.
Pressing change from letter to number and vice versa.
The left arrow serves to delete one by one the last digit in editing.
The key, pressed from the weighing mode can be combined with two digits to have direct access to different functions or menus of the
device.
In the weight-window, first press the
key followed by the two corresponding numbers in the table, entered one by one.
F10 Access the edit menu of the Plate register
F11 Access the activation menu of the Plate register
F12 Deactivate the currently active Plate register
F20 Access the edit menu of the Register 1
F21 Access the activation menu of the Register 1
F22 Deactivate the currently active Register 1
F30 Access the edit menu of the Register 2
F31 Access the activation menu of the Register 2
F32 Deactivate the currently active Register 2
F40 Access the edit menu of the Register 3
F41 Access the activation menu of the Register 3
F42 Deactivate the currently active Register 3
F50 Access the edit menu of memorized tares (only in Tare_version)
F51 Access the activation menu of memorized tares (only in Tare_version)
F52 Deactivate the currently active memorized tare (only in Tare_version)
F70 Deletes the table of weighings performed
F71 Delete the Totals of the Plate register (TOTREG option) or delete the info of Plate register
completely (ALLREG option)
F72 Delete the Totals of the Register 1 (TOTREG option) or delete the info of Register 1 comple-
tely (ALLREG option)
F73 Delete the Totals of the Register 2 (TOTREG option) or delete the info of Register 2 comple-
tely (ALLREG option)
F74 Delete the Totals of the Register 3 (TOTREG option) or delete the info of Register 3 comple-
tely (ALLREG option)
F75 General delete. Eliminates the weighing table, as well as the Plate register and Register 1, 2
and 3
F76 General delete of programmed tares. Eliminate the table of memorized tares
(only in Tare_version)
F80 Sequential activation of records previously saved in memory. Plate register, Register 1,
Register 2 and Register 3
F81 Sequential introduction of information (free, without previously storage in memory).
Plate register, Register 1, Register 2 and Register 3
F90 In static automatic or dynamic mode, it allows you to configure the number of axles. (In these
two working modes it is mandatory to enter the number of axles in order to operate)
F96 Activates the static manual axle-weighing mode. Channels P1 and/or P2
F97 Activates the static automatic axle-weighing mode. Channels P1 and/or P2
F98 Activates the dynamic axle-weighing mode. Channel P3 (P4 in this case does not act as a
channel but as a connector in the case of working with two platforms in this mode)

ENENUSER MANUAL GI620 COMPACT
10
It is also possible to access functions directly by pressing the number keys on the keyboard.
0Switch to static mode and displays the sum of the active channels. By Default channel 1+2
1Switches to static mode and displays channel 1
2Switches to static mode and displays channel 2
3Switch to dynamic mode and display channel 3 (connectors 3 and 4)
4Switch to dynamic mode and display channel 3 (connectors 3 and 4)
6Sequential activation of registers previously saved in memory: Plate register, Register 1,
Register 2 and Register 3 (Same as F80)
7
Short press: Sequential introduction of information (free, without previously storage in me-
mory). Plate register, Register 1, Register 2 and Register 3 (Same as F81)
Long press: Cancels the actual accumulation and deactivates all active Register
8Direct access to the time editing menu
9Direct access to the time editing menu
5. BASIC CONFIGURATIONS
5.1 SETUP
The indicator has two clearly differentiated menus, the USER and the TECHNICAL menu. Within the configuration menu we find the
Metrological parameter (MET.CNF), which is protected by the CALIBRATION JUMPER or by a password depending on the working mode
(OPEN or CLOSED calibration).
The device can be in OPEN CALIBRATION mode: in this case the user has access to all the parameters of the equipment. The metrological
parameters are protected by the password.
The equipment can be in CLOSED CALIBRATION mode: in this case the user has access to all the parameters of the device except the
metrological parameters.
5.2 PASSWORD
The password by default is 0000
This can be changed whenever desired inside the menu 5ECURI
5.3 CLOSED CALIBRATION (RESTRICTED METROLOGICAL PARAMETERS)
In mode CALCLO, the Metrological parameter (MET:CNF) cannot be accessed.
To access the restricted part of the device in CLOSED CALIBRATION mode, it is necessary, while on the weighing screen, to
remove and put back the calibration jumper. In the GI620 device this is placed on the CPU-board. See the technical manual for
detailed information.

11
ENENUSER MANUAL GI620 COMPACT
5.4 USER MENU
Being in the weighing screen, press the key once, to access to the user menu. Use the arrow keys as well as
to move through, as well to access and exit the menus.
The user menu is detailed below:
5EL PT PLTF 1 - Displays platform 1 if enabled and switches to static mode
PLTF 2 - Displays platform 2 if enabled and switches to static mode
PLTF 3 - Displays platform 3 and switches to dynamic mode.
5UM PT Displays the sum of platforms in static mode, whenever more than one is enabled. If there is only
1 platform enabled, it shows a message indicating that the sum is not possible.
ALIBI
IN id 000000 - ALIBI/DSD ID input
INCOdu 00000 - INTRODUCTION of ALIBI/DSD CODE
Once both values have been entered, and the optional ALIBI/DSD is plugged on the device, the
data stored in the memory corresponding to the code entered is displayed.
BY 10
shows the tenth of the step (high resolution x10). Press to exit high-resolution mode.
In Closed Calibration mode its displayed for approx. 5s. The high resolution function is only
displayed on single channels, never in the sum.
N TICK edition of the ticket number, only if the access is not locked (see technical manual)
LI5T5
TOTAL5
RESET N - printing of the list of totals and don’t erase the memory.3
RESET Y - printing of the list of totals and erase the memory.3
(This process only deletes the totals, to delete the weights, you have to access to the database)
export
downloads the weighing table in .csv format: By COM (capturing the file using RealTerm software)
or by USB (if the USB is connected) with separation of columns by “,” or “;”. With the correct
country separator, Excel opens ell csv in columns.4
IMport Import the editable register (only with USB plugged) 4
DAT.BA5 Fastacces to the database menu (see Settings menu.)
WORK M
5tatic
MANUAL - static working mode, platforms 1 and/or 2.
The storing of the axle-weight is made according to the option selected in
COMMS -> WEI. TRG which can be manual, (pressing PRINT) or stable, (the weight
being stable on the platform for 3s). Totalization is done by pressing MR
AUTO - static working mode, platforms 1 and/or 2.
AX5 00 - introduction of the desired number of axles (from 1 to 10). The storing of
the axle-weight is made based on the option selected in COMMS -> WEI. TRG as in
the previous case.
Totalization is performed automatically once the number of axles previously entered has
been reached.
DYNAMI - accesses dynamic mode settings (connectors 3 and 4)
AX5MAN - allows you to enter the desired number of axles manually by selecting YES
and typing the value in AXS00. We can also put it in NO, in this case the device works
with a timeout.
Totalization is performed automatically once the number of axles previously entered has
been reached.
3 If there is a printer connected
4 In according version of the device

ENENUSER MANUAL GI620 COMPACT
12
TIMOUT-> maximum time that can elapse between axles. After this time the indicator
automatically totalize the axles. (1 – 99)
5tOP-> finish dynamic weighing mode, but continues to display channel 3 data
Note: In the case of automatic static axle-weighing mode and dynamic axle-weighing mode, the introduction of the
number of axles is mandatory in order to work. Is possible to change the number of Axles before each Accumulation, if
desired. Therefore, you can enter the desired number of axles in the user menu of the automatic manual mode, or with
the F90 fastaccess.
1 2 3 4
STATIC DYNAMIC
5.5 TECHNICAL MENU
The device allows you to modify a series of parameters that are in the setup menu without knowing the password.
To access this function, while on the weighing screen, press the key for at least 3 seconds. Use the arrow keys to move, access and
leave the menus. .
COMMS
COM1 - number of bytes / parity / stop bits / baudrate / Protocol / Sending mode.
COM2 - not available
.COM3 - not available
The available protocols are: Giropes, Sipi 2, ALIBI, Sensocar, Printer, Giconf
PRINTER - Adjustment of the printersettings of the COM ports
PRCOM1 - COM1 Settings
MODEL - ASCII / PLUS2
TICKET - Default / Custom
PRCOM2 - not available
MODEL - not available
TICKET - not available
WEI.TRG -Sending mode in which way the Weighings are stored: Manual / Stable / No

13
ENENUSER MANUAL GI620 COMPACT
REG.CNF
DATE - Setting of the system date.
TIME - Setting of the system time.
LANGGE - Setting of the system language (including the printouts): Spanish / English /
French/Portuguese / Italian / German / Basque / Catalan / Galician.
CONFIG
BACKLI - Backlight settings: ON/OFF and default color settings
BLO.TIC - blocks access to the edition of the ticket number (password is required to
access)
Type - Selection of the channel or channels to use in static mode
SINGLE - only uses channel 1 or 2
MULTI - Both channels are used
Batter - Battery type installed: bat 7.4 / bat NO
Dyn.par - Dynamic parameter settings (password required to access)
DIM - platform size in the direction of circulation
TRIGGR - minimum weight from which you start collecting samples
DELTA - internal values
AVG - internal values
DEBUG - to send the point cloud through the COM
EN.CMP - internal values
SPEED - internal values
COEF - internal values
K WEI - internal values
Dat.bas
Database
Tables - Table of the registers in memory
Regist - Edit, activate and deactivate the desired register
Delete - Delete data or register
Tare.pr - Edit, activate and deactivate the pre-Tara register
Buf.inf - Select whether to display or not, and when to display full buffer
information
Rg.name - Modify the name of the registers: Plate / Reg 1 / Reg 2 / Reg 3
Securi Menu for to change the password (by default 0000)
Diagns
Diagnostic
Menu
mV - Displays the signal received by the indicator in mV.
ICOUnT - Displays the signal received by the indicator in internal accounts.
About
Displays and
prints the
various device
information
WEM
VER5IO -Displays the WEM version on the screen
CRC - Displays the CRC value of the weigh module..
LOG EV - Prints the event log5
ERREV - Prints the event log5
UPD EV - Prints the event log5
VER - Displays and prints the different versions into which the firmware is divided to.5
Met.inf- Displays the metrological information of the active channel or the sum of
channels, depending on what is currently active
FABRIC
Reset to fabric settings
USER - Restore the not metrological Settings (z.B. Ticketformat, COM Parameter etc)
WEM - Restore metrological Settings (requires the Password & only in Cal_open)
5 If there is a printer connected

ENENUSER MANUAL GI620 COMPACT
14
6. BASIC FUNCTIONS
The functions described below are those performed during the operation of the device, in normal weighing window.
6.1 ZEROING THE SCALE
The first step is to select the desired channel. To do this, press the key once and the 5EL PTmenu will appear. Select the desired
platform with the arrow keys. Validate with .
Also is possible to press the keys , or the key
to see the sum of channels in static mode. Press to go to dynamic
mode, and display the connected platforms on channels 3 and 4.
Once the device shows the weight value of the desired platform/s, press the key , it assumes the function of zeroing the weight in the
modality described below in reference to current regulations.
- The weight stable (indication of stable weight on);
- Weight value not less than -5% max. with respect to the zero calibration of the scale;
- Weight value not exceeding 15% of Max. with respect to the zero calibration of the scale.
The indication indicates that the function has been performed.
6.2 ACQUISITION OF TARE (ONLY IN TARE_VERSION)
To perform a tare, press . The indication will turn on.
If its necessary to perform another tara, press the key again.
To see the gross weight (container plus contents) press the key .
If press the key again, the net weight will be displayed again.
6.3 MANUAL TARE (ONLY IN TARE_VERSION)
The device allows to insert a manual tare by pressing the key . for two seconds. Introduce the desired Tare-value, by using the
numeric keypad (or the Arrow keys), and press the key to confirm.
6.4 TARE FILES IN MEMORY (ONLY IN TARE_VERSION)
The device allows to insert memorized tares. Access to the settings menu by pressing the key for approx. 2s. In the settings menu
move through, with the arrow keys till dat.bas -> tables -> TARE.PR and press to access.
In this menu there are 3 possible options:
- edit/create a memorized tare
- activate one of the memorized tares previously stored
- deactivate the current active memorized tare
Use the arrow keys to move, access and leave the menus . The numeric keys to modify or
insert the tare value, and the key to validate each menu..
You can also access the Tare.pr menu to edit by pressing F+5+0, activate a memorized tare with F+5+1 or deactivate the current
active memorized tare with F+5+2.

15
ENENUSER MANUAL GI620 COMPACT
6.5 CANCELLATION OF THE ACTIVE TARE (ONLY IN TARE_VERSION)
To deactive the curent tare, press for approx. 2s
6.6 DISABLE THE TARE KEY (ONLY IN TARE_VERSION)
It is possible, for convenience, to disable the function of the tare key. To deactivate the tare key, see the Technical manual.
6.7 SUBTOTALIZATION
At any time within the accumulation, it is possible to make a subtotal of the weights taken so far.
To do this, press the key , for approx. 3s. The device will subtotalize the weights stored so far. Within each totalization a maximum of 3
subtotals can be done.
6.8 REPRINT THE LAST PRINTED TICKET
The device allows to reprint the last printed ticket.6To do this, press the key for approx. 3s
7. STATIC AXLE WEIGHT: F96 AND F97
List of operations to be carried in the different weighing operations.
7.1 WEIGHING WITH AXLE TOTALIZATION MANUAL F96
PRESS F+9+6 TO ACTIVATE MANUAL AXLE-WEIGHT WORKING MODE
1. First the device will ask, to work with both platforms P1 and P2 or only with one of the two Platforms.
2. If necessary, press the key to set the scale back to 0.
3. Position the first axle of the vehicle on the platform(s)
4. When the weight is stable, press the key . The device will store this weight and print the according part of the ticket.6
5. Discharge the platform(s)
6. Position the second axle of the vehicle on the platform(s)
7. When the weight is stable, press the key . The device will store the second weight and print the according part of the ticket. 6
8. Discharge the platform(s)
9. Repeat the operations for the remaining axes.
10. Press the key to finish the accumulation and print the total 6weight of the vehicle, and the total number of axles weighed.
Note: It is also possible to perform the accumulation automatically. For this, access to the Menu Comms -> Wei.trg and
select Stable.
Note: There is the possibility of relating plates and register with the weighing. Before performing point 3 of the procedure described
above, press F80 to sequentially select the previously stored plate and register, or press F81 to sequentially enter the desired
plate and register (without previously stored in memory). If one or more fields in the sequence are not needed, they can be left
empty. In both of the cases, the validation of the field is done by pressing .
There is also the option to activate the plate and/or each register separately. Plate F+1+1,
Register 1 F+2+1, Register 2 F+3+1 and Register 3 F+4+1
If necessary, it is possible to print up to 3 Subtotals. The printing of the subtotal is done by pressing the key , for approx. 3s.
(also described in the point Subtotalization of this manual).
6 If there is a printer connected

ENENUSER MANUAL GI620 COMPACT
16
7.2 WEIGHING WITH AXLE TOTALIZATION AUTOMATIC F97
PRESS F+9+7 TO ACTIVATE THE AUTOMATIC AXLE-WEIGHT WORKING MODE
1. First the device will ask, to work with both platforms P1 and P2 or only with one of the two platforms.
2. Followed by the desired number of axes to weigh. Enter the desired number of axes using the arrow, or numeric keys and confirm
with .
3. If necessary, press the key , to set the scale back to 0.
4. Position the first axle of the vehicle on the platform(s).
5. When the weight is stable, press the key . The device will store this weight and print the according part of the ticket.7
6. Discharge the platform(s).
7. Position the second axle of the vehicle on the platform(s).
8. When the weight is stable, press the key . The device will store the second weight and print the according part of the ticket.7
9. Discharge the platform(s).
10. Repeat the operations for the remaining axes.
11. Once the number of axes entered is reached, the total weight of the vehicle, and the total number of axles weighed will be printed. 7
Note: Is possible to change the number of Axles before each Accumulation, if desired. Therefore, you can enter the desired number
of axles in the user menu of the automatic manual mode, or with the F90 fastaccess.
Note: It is also possible to perform the accumulation automatically. For this, access to the Menu Comms -> Wei.trg and
select Stable.
Note: There is the possibility of relating plates and register with the weighing. Before performing point 4 of the procedure described
above, press F80 to sequentially select the previously stored plate and register, or press F81 to sequentially enter the desired
plate and register (without previously stored in memory). If one or more fields in the sequence are not needed, they can be left
empty. In both of the cases, the validation of the field is done by pressing .
There is also the option to activate the plate and/or each register separately. Plate F+1+1, Register 1 F+2+1, Register 2
F+3+1 and Register 3 F+4+1
If necessary, it is possible to print up to 3 Subtotals. The printing of the subtotal is done by pressing the key , for approx. 3s.
(also described in the point Subtotalization of this manual)
7 If there is a printer connected

17
ENENUSER MANUAL GI620 COMPACT
8. DYNAMIC AXLE-WEIGHT: F98
This operation mode uses a single channel of the GI620 either connecting 1 platform on channel 3 or on channel 4, or with 2
platforms acting together connected on channels 3 and 4. In any case, the active channel remains P3. The channel 4 connector
does not act as a separate channel, it act as another channel 3 connector.
PRESS F+9+8 OR THE NUMBER KEY
TO ACTIVATE THE DYNAMIC WORKING MODE
1. If necessary, press the key to set the scale back to 0.
2. Start the weighing process with a speed that does not exceed 5km/h.
3. By default the indicator is set with a “timeout” of 5s. That means, every time the weight on the platform, during the weighing operation,
is on 0 and stable (there is no axle on theplatform) the 5s counter is started. If this coutner goes down to 0, the device automatically totalizes.
Note: it is also possible, to automatically totalize once the desired number of axes previously entered has been reached. In this case
the timeout is deactivated, and the totalization will be done automatically. In the user menu, move through with the arrow keys till:
work m -> dynami -> axsman -> Yes and enter the desired number of axes, press .
Once the number of axes entered is reached, the ticket will be printed. This includes the weight of each axle, the total weight of the
vehicle, and the total number of axles weighed.
Is possible to change the number of Axles before each Accumulation, if desired. Therefore, you can enter the desired number of axles in the
user menu of the dynamic mode (as explained in point before), or with the F90 fastaccess.
Note: The weight must be bigger than the setting in dyn.par -> Triggr
Note: There is the possibility of relating plates and register with the weighing. Before performing point 2 of the procedure described
above, press F80 to sequentially select the previously stored plate and register, or press F81 to sequentially enter the desired
plate and register (without previously stored in memory). If one or more fields in the sequence are not needed, they can be left
empty. In both of the cases, the validation of the field is done by pressing .
There is also the option to activate the plate and/or each register separately. Plate F+1+1, Register 1 F+2+1, Register 2
F+3+1 and Register 3 F+4+1
If necessary, it is possible to print up to 3 Subtotals. The printing of the subtotal is done by pressing the key , for approx. 3s.
(also described in the point Subtotalization of this manual)
If the option Config -> dyn.par -> Debug is activated, the data taken by the platform is transmitted by the COM of
the device. Either in csv format. or “octave” format. This data contains information on the weighing, date, time, number of axes and
samples, as well as all samples taken with a “-1” indicating the detection of each axis.

ENENUSER MANUAL GI620 COMPACT
18
9. PRINTOUT
9.1 TOTALIZATION
In static mode, during the accumulation, each detected axle is printed, on the contrary in dynamic mode nothing is printed until it is totalized.8
In any case, once the totalization is done, the ticket is closed and a new accumulation can be started.
------------------------------
2022/05/27 13:41:40
Axis
1380kg
2380kg
SUBTOTAL 760kg
3380kg
SUBTOTAL 380kg
4450kg
5450kg
SUBTOTAL 900kg
------------------------------
TOTAL
------------------------------
5 Axes
Net: 2040kg
------------------------------
User signature
Driver’s signature
8 If there is a printer connected

19
ENENUSER MANUAL GI620 COMPACT
9.2 PRINTING THE TOTALS 9
In the weighing window, press the key , once, to access the user menu. Use the arrow keys to move, access and leave the menus
.
The LI5T5 menu includes the Totals-list
Accessing this option, prints the list of stored totalweights. In this menu it is to choose, delete or not delete the memory after printing the list
------------------------------
TOTAL WEIGHTS
------------------------------
Date: 2022/05/27 18:38:23
------------------------------
Number of weighings: 8
Total Gross: 36020kg
Total Tare: 0Kgs
Total Net: 36020kg
------------------------------
10. PERSONALIZED TICKET
Request DA1 / DA2
Description Allows to display the date. Example: 20/02/2020 12:18:00”
Format 0 -> « Label » « Date » « Time »
1 -> « Date » « Time »
2 -> « Label » « Date »
3 -> « Date »
4 -> « Label » « Time »
5 -> « Time »
Example [DA1,1]
Request TIC
Description Ticket number
Format 0 -> « Label » « Ticket »
1 -> « Ticket »
Example [TIC,0]
9 If there is a printer connected

ENENUSER MANUAL GI620 COMPACT
20
Request NAX
Description Display the Number of Axles
Format 0 -> « Label » « Axis number »
1 -> « Axis number »
2 -> « Number of axes» « Label »
3 -> « Label »
Example [NAX,2]
Request ACC
Description Display the accumulated Weigh
Format
0 -> « Label » « Gross weight »
1 -> « Label » « Tare weight »
2 -> « Label » « Net weight »
3 -> « Label » « Gross weight » <CR> « Label »
« Tare weight » <CR> « Label » « Net weight »
4 -> « Gross weight (accumulated) »
5 -> « Tare weight »
6 -> « Net weight »
7 -> « Gross weight » « Tare weight » « Net weight »
8 -> « Label » (Gross weight)
9 -> « Label » (Tare weight)
10-> « Label » (Net weight)
11-> « Gross weight »
Example [ACC,7]
Request SPD
Description Display the calculated Speed
Format
0 -> « Label » « Speed »
1 -> « Label »
2 -> « Speed »
Example [SPD,0]
Request DSx
Description Display the Alibi (DSD) number
Format
0 -> « Label » « DSD number »
1 -> « DSD number »
Example [DS1,0]
Other manuals for GI620 COMPACT
1
Table of contents
Other Giropes Measuring Instrument manuals